This post provides a guide on changing Siri’s voice on iPhones. Users can select different accents and voice options in the Settings app under Siri. The process is straightforward, enhancing user experience by personalizing Siri’s voice to be more relatable and understandable. Compatibility depends on current iOS versions.
RAYMOND OGLESBY @RaymondOglesby2 April 29, 2025 – 3 minutes read time
Overview
Tired of your current Siri voice? Let’s learn how to change it. Apple has recorded actors’ voices and run them through its neural text-to-speech engine in an effort to make Siri sound more natural, so you have more options than ever for how Siri’s voice should sound.
If you have not used Siri before, when you first use the virtual assistant, you will be prompted to choose a voice for it, but if you have, you can change the voice Siri is using manually. So, how do you change Siri’s voice? You can customize Siri’s voice in the Settings app. Let’s find out how.
Why You Will Like This Tip
Customize Siri’s voice to one that you like the best.
Make Siri more understandable by matching the voice to your country’s native accent.
System Requirements
This tip was performed on an iPhone 14 Pro running iOS 18.4.1
Click here to learn how to update your iPhone to the latest iOS version.
Change Siri’s Voice
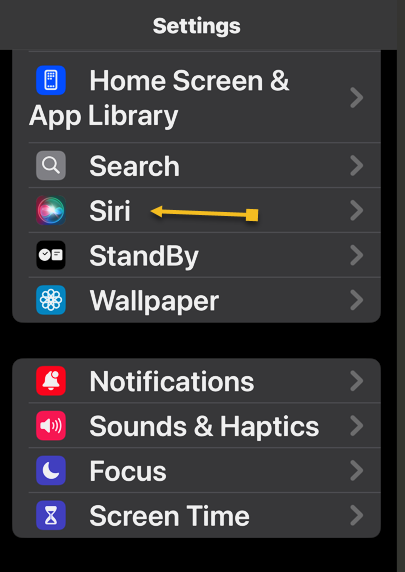
First, open Settings, and tap either Siri or Apple Intelligence & Siri (the menu option will appear differently depending on whether or not you have an Apple Intelligence-enabled device). Refer to the below image:
Selecting the Siri option
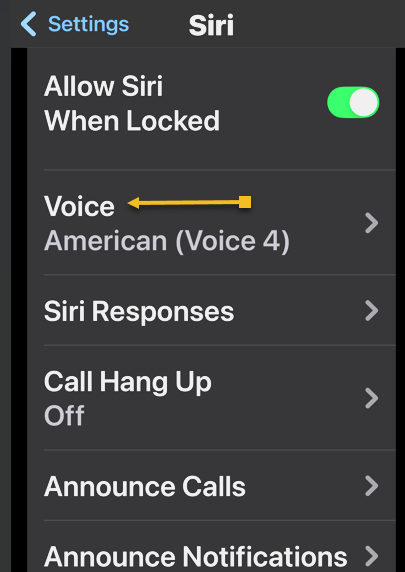
Next, tap Voice. See the image below:
Selecting the Voice option
Now, under Variations, you can choose between American, Australian, British, Indian, Irish, or South African. See the following image:
Selecting a Voice Variation
Next, after you have decided on your Variation, you can select a Voice. Depending on which Variation you chose, you should have between 2-5 different voices. Refer to the image below:
Selecting a Voice
Now, once you have found one you like, it will take some time for your iPhone to completely download the voice, though you do not need to wait in Settings for it to do so. See the image below:
Downloading a Voice
If you change the voice of your Siri on your iPhone, it will change it across your synced devices.
That’s how to change Siri’s voice. It’s that easy!
Disclaimer
Technology is constantly evolving, and smartphone and desktop tech rarely remains static. Therefore, the information in this post is only accurate as of the date it was written. Blog posts that are older than six months may contain instructions that are no longer compatible with your device or operating system. We hope that the content from previous posts continues to function as intended. Thank you for reading TechSavvy.Life, where technology works for you.
Quote For the Day
. “Cars will soon have the Internet on the dashboard. I worry that this will distract me from my texting.”
― Andy Borowitz
X (Twitter) Info
That’s it. Please feel free to share this post! One way to share is via Twitter.
Just click the Tweet icon below. This will launch Twitter where you click its icon to post the Tweet.
vCheckout TechSavvy.Life for blog posts on smartphones, PCs, and Macs! You may email us at contact@techsavvy.life for comments or questions.
We value your feedback! Was this post helpful? Please share your comments with us. If you have a tech question related to your computer or smart device, feel free to reach out. Just send an email to contact@techsavvy.life, and be sure to include the device, app, and version you are using. To assist us further, you can also attach screenshots related to your inquiry.
The author’s Vietnam eBook on the “Battle for Tra Bong Vietnam: Events and Aftermath” can be accessed from a Kindle device or the Kindle App for a desktop or smartphone. The apps are free.
The author’s Vietnam eBook on the Battle for Tra Bong Vietnam: Events and Aftermath
The article provides a comprehensive guide on how to clean your keyboard effectively. It emphasizes that keyboards harbor numerous germs, making cleaning essential for functionality. Key tips include shaking out debris, brushing between keys, using compressed air, and wiping surfaces. For mechanical keyboards, washing removable keycaps is also recommended.
RAYMOND OGLESBY @RaymondOglesby2 April 8, 2025 – 5 minutes read time
Overview
From the classic shakedown to bathing your keycaps, these easy tips will help restore order to the most important peripheral on your desk.
We have to talk about your keyboard. It likely has more germs than a toilet seat, which is gross but can also disrupt your device’s functionality. With spring upon us, now is the perfect time to clean things up. Disconnect or turn off your keyboard, and clear off a work area. Now, let’s explore how to properly clean your keyboard.
Why You Will Like This Tip
A clean keyboard means clean fingers.
Increase of typing speed and accuracy, no sticky keys.
System Requirements
Any device with a physical keyboard.
Turn Your Keyboard Upside Down and Give It a Good Shake
Place the keyboard on a large cloth or clear surface and turn it upside down, giving it a few good shakes. With the keys facing down, tap the back, then hold the board at different angles and pat it firmly but gently across the entire surface to knock free additional loose particles. Expect a cascade of debris. If you’re using a keyboard with removable keycaps (a mechanical keyboard, for instance), carefully pull those off and give the panel another upside-down shake. Refer to the image below:
Shaking your keyboard
Brush Out the Muck
To remove even more from your keyboard, grab a keyboard brush or even just a toothbrush or bottle brush and run it through the spaces between your keys. See the image below:
Brushing your keyboard
Blow Out Dust and Debris
Now to get those particles even a brush can miss. Compressed canned air dislodges dust and dirt with a pressurized blast. Before inserting the straw-like plastic hose and blasting away, though, make sure there are no items nearby that will take on whatever gets knocked out of your keyboard.
You might even want to take this part outside or do it over a bathtub or sink. Just remember that canned air tends to create condensation, so be sure to leave some room between the keyboard and hose to avoid any moisture that could damage inner circuitry.
Prop the keyboard sideways on a steady surface, then, using the duster as directed, aim the straw at an angle along the crevices for a series of short bursts. Give the keyboard another few taps, and repeat the process until you are satisfied. You may be surprised at just how much flies out, even if you do not eat at your desk or have pets who climb across your keyboard at the most inopportune times. Removing the keycaps will make this process all the more effective.
On our humanitarian trips to South America and Southeast Asia, we would always carry 1-2 canisters of compressed air, called Blaster. This item was extremely hard to find. But airport customs, especially in Southeast Asia, would confiscate the canisters. The customs agents thought they were a bomb. See the following image:
Using a compressed air canister
Wipe Everything Down
Take a microfiber cloth and dampen it with the tiniest bit of water and wipe down your entire keyboard. Go over it with a dry part of the same cloth. Make sure the keyboard is completely dry before plugging it back in or powering it on. Refer to the image below:
Wiping your keyboard
Give Your Keycaps a Bath
This tip is not for everyone; only those with a mechanical keyboard and removable keytops should follow these instructions. Start by snapping a quick picture of your fully assembled keyboard to avoid mixing up letters, numbers, and commands later. Then simply soak the keycaps in a container of water with a bit of dish soap. After a few minutes, give the keys a scrub with a small brush or rag and set them out to air dry.
If you have a lot of dirty keycaps, our recommendation is to purchase a new keyboard. See the image below:
Bathing your keycaps
Disclaimer
Technology is constantly evolving, and smartphone and desktop tech rarely remains static. Therefore, the information in this post is only accurate as of the date it was written. Blog posts that are older than six months may contain instructions that are no longer compatible with your device or operating system. We hope that the content from previous posts continues to function as intended. Thank you for reading TechSavvy.Life, where technology works for you.
Quote For the Day
. “Man is a slow, sloppy, and brilliant thinker; computers are fast, accurate, and stupid.”
― John Pfeiffer
X (Twitter) Info
That’s it. Please feel free to share this post! One way to share is via Twitter.
Just click the Tweet icon below. This will launch Twitter where you click its icon to post the Tweet.
Checkout TechSavvy.Life for blog posts on smartphones, PCs, and Macs! You may email us at contact@techsavvy.life for comments or questions.
We value your feedback! Was this post helpful? Please share your comments with us. If you have a tech question related to your computer or smart device, feel free to reach out. Just send an email to contact@techsavvy.life, and be sure to include the device, app, and version you are using. To assist us further, you can also attach screenshots related to your inquiry.
The author’s Vietnam eBook on the “Battle for Tra Bong Vietnam: Events and Aftermath” can be accessed from a Kindle device or the Kindle App for a desktop or smartphone. The apps are free.
The author’s Vietnam eBook on the Battle for Tra Bong Vietnam: Events and Aftermath
Apple has disabled Advanced Data Protection (ADP) for iCloud in the UK due to government demands for law enforcement access. This compromises data security, as backdoor access could be exploited. In contrast, ADP offers end-to-end encryption unavailable to Apple, ensuring only users can access their data. Users outside the UK retain this protection.
Insert dRAYMOND OGLESBY @RaymondOglesby2 April 1, 2025 – 6 minutes read time
Overview
Recently. Apple took the unusual step of turning off its highest level of iCloud encryption, Advanced Data Protection (ADP) for customers in the UK. The British government has reportedly demanded that Apple provide a method for law enforcement to access encrypted data as part of criminal investigations. But that creates a serious security problem, because this type of backdoor access can also be exploited by criminals or untrustworthy governments.
Why You Will like This Tip
Have the best encryption for your Apple devices.
Prevent hackers from accessing and viewing your data.
System Requirements
See below for the Apple software versions. These screenshots were captured using iOS 18.3.2 on iPhone 14 Pro.
Click here to learn how to update your iPhone to the latest iOS version.
United Kingdom vs United States
For people in the UK, ADP can no longer be enabled. If you are currently using ADP, you will need to turn off the feature at a future date.
If you are outside the UK and concerned about who can see your data, ADP adds an extra layer of security by making it unreadable even by Apple. If ADP is disabled, your data could be at risk because it can still be unlocked by Apple, a legal request or a data breach.
Let’s explore how to turn Advanced Data Protection on, and how it differs from the default iCloud encryption methods.
How Does ADP Work
The key difference between ADP and how Apple encrypts data by default is how accessible your information is when stored on Apple’s servers.
In what Apple calls standard data protection, information sent between points, such as files stored on iCloud Drive and iCloud backups of your devices, is encrypted and transmitted securely. If someone intercepts that data between the two points, they will see only gibberish.
That data remains encrypted when it’s stored on Apple’s servers, so you can access it from other devices, for instance. However, Apple can still access the encryption keys to unscramble and read the data; and provide it to law enforcement following a legal request.
By contrast, when you enable Advanced Data Protection for iCloud, the data is end-to-end encrypted, meaning only your trusted devices possess the encryption keys to read it. The information remains encrypted on the servers, and not even Apple can access its contents. (Not all iCloud data can be end-to-end encrypted. Apple breaks out-which types of information, such as iCloud Mail messages, that remain covered by standard data protection even when ADP is turned on.)
The UK’s Investigatory Powers Act, the “Snooperd’s Charter”, makes that inaccessibility illegal, which is why Apple is turning the feature off for UK customers.
Some services are end-to-end encrypted regardless due to the sensitivity of the data, such as passwords, information stored in the Health app and payment information.
Setup Your Account for ADP
Note! Setting up ADP applies to all devices in your Apple account.
To set up ADP on your account, first make sure you have met all the prerequisites for the feature:
Your Apple Account must use two-factor authentication.
You must have a recovery method set up in case you lose access to your account. That can be a 28-character Recovery Key or a person you have designated as a Trusted Contact.
Every device connected with your Apple Account must be able to run at least
iOS 16.2, iPadOS 16.2, MacOS 13.1
WatchOS 9.2
TVOS 16.2
HomePod 16.0
For Windows computers, make sure iCloud for Windows is at version 14.1 or later.
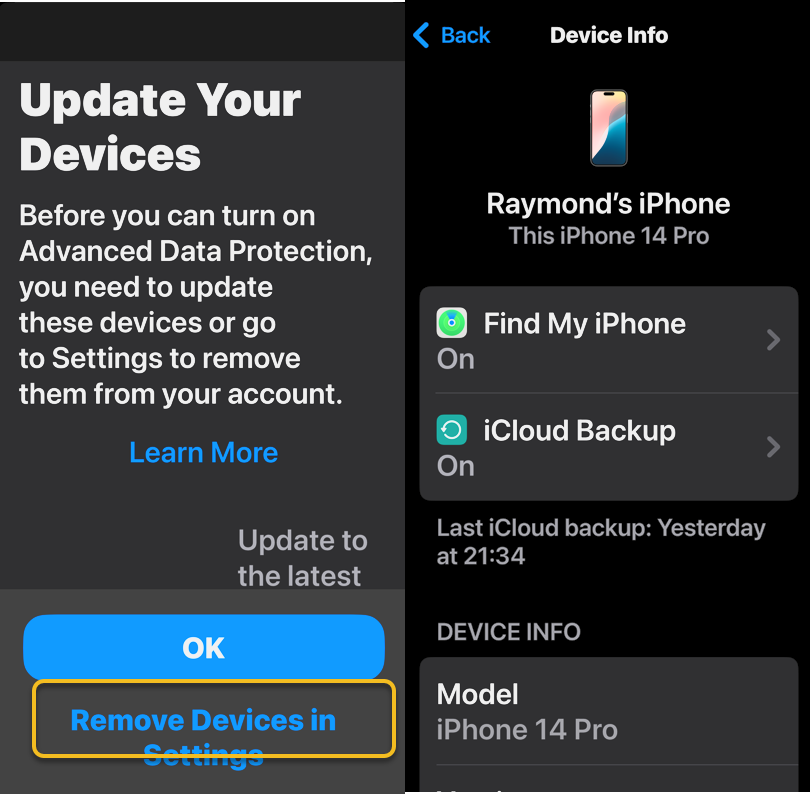
If any of your devices do not qualify, you will be warned during the ADP setup process. If any of those are too old or you no longer have access to them, head to:
Settings > Remove Devices and delete them from your list.
Refer to the below image:
Update your Devices
How to Setup
To turn on ADP on an iPhone, iPad or Mac do the following:
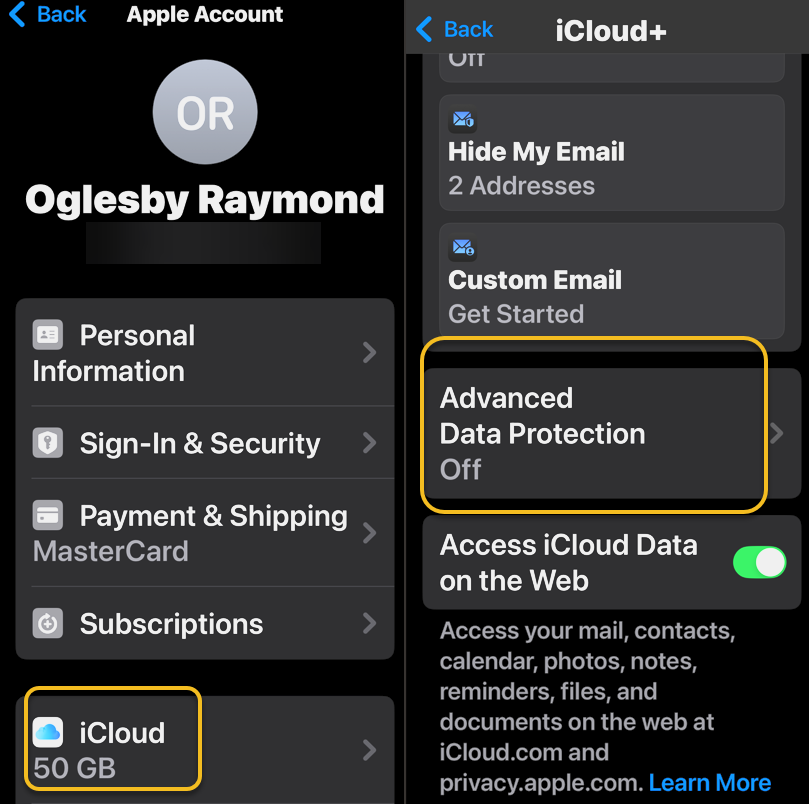
1. Go to Settings > [Your Name] > iCloud. On a Mac, open System Settings > [Your Name] > iCloud.
2. Scroll down to Advanced Data Protection, which likely says Off, and tap that to enable. This will take some time, and the screen will appear to be unresponsive; Just be patient. Later, if you want to disable ADP, repeat the above steps and select the Turn Off button.
See the below image:
Turn on ADP
3, If there are any of the aforementioned impediments to setting up ADP, such as needing to update other devices on your account, you will review them on the next screen.
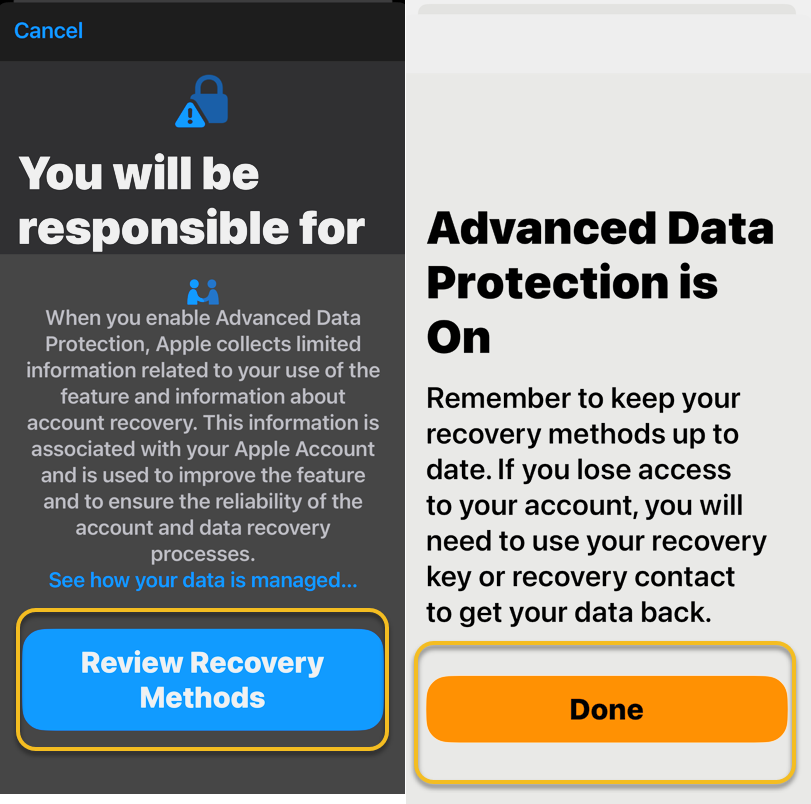
4. In the following screen, tap Review Recovery Options. You need to have a Recovery Key, Recovery Contact or both to ensure that you can get your data if you lose access to your iCloud account.
5. Enter your device’s passcode to finish.
See the following image:
ADP is Enables
Activating ADP on one device means it’s on for all of your devices using the same Apple account, so you only need to set it up once.
Disclaimer
Technology is constantly evolving, and smartphone and desktop tech rarely remains static. Therefore, the information in this post is only accurate as of the date it was written. Blog posts that are older than six months may contain instructions that are no longer compatible with your device or operating system. We hope that the content from previous posts continues to function as intended. Thank you for reading TechSavvy.Life, where technology works for you.
Quote For the Day
. “Imagination is more important than knowledge. For knowledge is limited, whereas imagination embraces the entire world, stimulating progress, giving birth to evolution.”
-Albert Einstein
X (Twitter) info
That’s it. Please feel free to share this post! One way to share is via Twitter.
Just click the Tweet icon below. This will launch Twitter where you click its icon to post the Tweet.
Checkout TechSavvy.Life for blog posts on smartphones, PCs, and Macs! You may email us at contact@techsavvy.life for comments or questions.
We value your feedback! Was this post helpful? Please share your comments with us. If you have a tech question related to your computer or smart device, feel free to reach out. Just send an email to contact@techsavvy.life, and be sure to include the device, app, and version you are using. To assist us further, you can also attach screenshots related to your inquiry.
The author’s Vietnam eBook on the “Battle for Tra Bong Vietnam: Events and Aftermath” can be accessed from a Kindle device or the Kindle App for a desktop or smartphone. The apps are free.
The author’s Vietnam eBook on the Battle for Tra Bong Vietnam: Events and Aftermath
This post highlights a helpful trick for iPhone users to type numbers and symbols without switching keyboards. By holding the 123 button, users can access numbers while continuing to type with the ABC keyboard. It also discusses a fun, less practical feature in iOS 17 that displays the time on-screen.
RAYMOND OGLESBY @RaymondOglesby2 March 25, 2025 – 5 minutes read time
Overview
It would be convenient if Apple added a numbers row to the standard iPhone keyboard, but it has not happened yet. If you want an iPhone keyboard with numbers, here’s an iPhone texting trick. This post shows how to access iOS keyboard symbols and numbers without leaving the standard keyboard.
Why You Will like This Tip
Type numbers quickly and efficiently without having to switch to the number keyboard.
Impress your friends with your iPhone keyboard-shortcut knowledge.
System Requirements
While the steps below work on previous iOS software versions, the screenshots shown were captured using iOS 18.3.2 on iPhone 14 Pro.
Click here to learn how to update your iPhone to the latest iOS version.
Typing Numbers
Have you been wishing for an iPhone keyboard with numbers and symbols? Let’s go over how to access numbers and symbols without leaving the ABC keyboard on your iPhone.
First, open any app where you want to use a keypad with numbers, such as Messages or Notes.
Next, when typing, touch and hold the 123 button to bring up the keypad with numbers. Since the button is on the left side of the screen, it works best to do this with your left hand. You will need to keep holding it while you type the numbers and/or symbols. Refer to the below image:
Entering a new message
Now, while still holding the 123 buttons, type the numbers or symbols you need using the other hand. See the below image:
Holding down the 123 button to display the numbers
Next, release the 123 button, which will automatically switch back to the ABC keys. You can then carry on typing in the standard iPhone keyboard to complete your text. See the following image:
Release the 123 button to return the normal keyboard
That’s how to get numbers on an iPhone keyboard the quickest way! For those who already type with two hands, this will be a breeze. If you typically type with only one hand, this iPhone keyboard shortcut may take a little bit of getting used to, but it’s still faster than having to navigate from the ABC keyboard to the 123 keyboard and back!
BONUS: A Favorite Useless Tip
This tip uses the StandBy feature introduced in iOS 17. It should be enabled by default in iOS 17 and higher, but you will still want to confirm that it’s set up for this tip to work.
This nameless tip will show the time in the middle of your screen upon a certain action.
First, head to:
Settings > StandBy
and make sure StandBy and Always On (if you have that feature) are enabled.
Next, if you want to see notifications, turn on Show Notifications.
Now, tap the Display option, then enable the Night Mode switch if you want the screen to take on a red tint in reaction to low ambient light at night so it does not disturb your sleep. Refer to the below image:
Enabling options
Bext, you simply press and hold down the Time indicator in the status bar (top left). The current time will be displayed in the middle of your screen and stay there until you release the Time indicator. We ask, why? Some Apple engineer had too much time on his hands. See the below image:
Press and hold the Time indicator to display Time in the middle of the screen
Want more useless information? Press and hold the other indicators (signal strength, WiFi and Battery). See the following image:
Display another useless indicators
Disclaimer
Technology is constantly evolving, and smartphone and desktop tech rarely remains static. Therefore, the information in this post is only accurate as of the date it was written. Blog posts that are older than six months may contain instructions that are no longer compatible with your device or operating system. We hope that the content from previous posts continues to function as intended. Thank you for reading TechSavvy.Life, where technology works for you.
Quote For the Day
“Please, no matter how we advance technologically, please don’t abandon the book. There is nothing in our material world more beautiful than the book.”
-Patti Smith
X (Twitter Info)
That’s it. Please feel free to share this post! One way to share is via Twitter.
Just click the Tweet icon below. This will launch Twitter where you click its icon to post the Tweet.
Checkout TechSavvy.Life for blog posts on smartphones, PCs, and Macs! You may email us at contact@techsavvy.life for comments or questions.
We value your feedback! Was this post helpful? Please share your comments with us. If you have a tech question related to your computer or smart device, feel free to reach out. Just send an email to contact@techsavvy.life, and be sure to include the device, app, and version you are using. To assist us further, you can also attach screenshots related to your inquiry.
The author’s Vietnam eBook on the “Battle for Tra Bong Vietnam: Events and Aftermath” can be accessed from a Kindle device or the Kindle App for a desktop or smartphone. The apps are free.
The author’s Vietnam eBook on the Battle for Tra Bong Vietnam: Events and Aftermath
The article emphasizes the importance of a web browser, specifically Google Chrome, in daily online activities. It provides four methods to enhance its performance: updating Chrome, clearing the cache, upgrading security settings, and managing performance settings like using Memory Saver. These steps aim to ensure a smoother browsing experience.
RAYMOND OGLESBY @RaymondOglesby2 March 11, 2025 – 6 minutes read time
Overview
In many ways, your web browser is as important as, if not more so than, your computer’s operating system. Think about it: Nearly everything you do, from writing emails and posting on social media to editing documents and streaming videos, can happen inside a browser. So when Chrome starts feeling sluggish, it can affect your whole online experience, professionally and personally. Do not get bogged down by your browser. Here are four ways to speed it up.
System Requirements
This tip works on devices running Google Chrome. Screenshots are from Windows 11 Pro running Chrome Version 134.0.6998.36 (Official Build) (64-bit).
1) Update Google Chrome
Each new version of Chrome contains fresh features, security fixes, and performance improvements. So, it’s possible that updating to the latest version may help your speed woes. Even if it does not, it will keep you safer from online threats. When a new version is available, Chrome automatically updates in the background, when you close and re-open the browser.
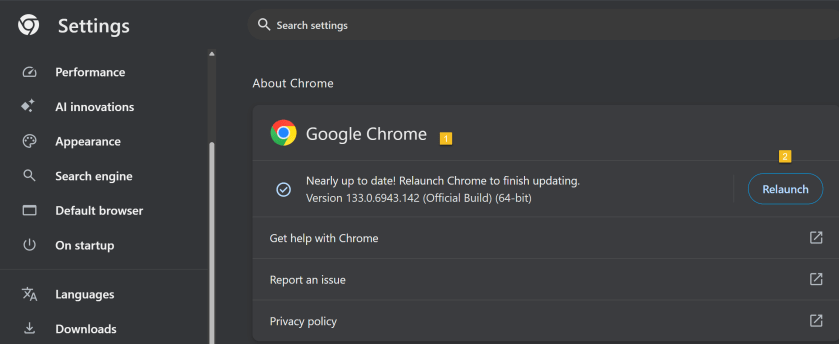
First, open Chrome and click the Menu icon (the 3 dots) in the upper right. From the Menu, click the Settings option. Next, on the left side, scroll down to the bottom and click on the About Chrome option.
If Chrome is not up-to-date, Chrome will automatically download. Now, click the Relaunch button to update Chrome and reopen the browser. Your Chrome browser is now up-to-date. Refer to the below image:
Updating Google Chrome
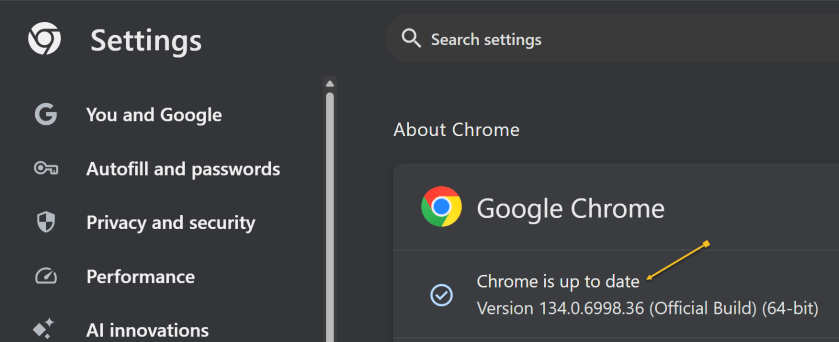
To check which version of Chrome you are running, repeat the above. Chrome will show the version and indicate it is up-to-date. See the below image:
Google Chrome up to date
2) Clear Google Cache
To clear your cache in Google Chrome, you clear your browsing data. This will clear your cache, cookies, and other browsing history.
Clearing your cache can fix problems with loading or formatting on websites.
In the Chrome browser:
Open Chrome and click the Menu icon (the 3 dots) in the upper right.
From the Menu, click the Settings option.
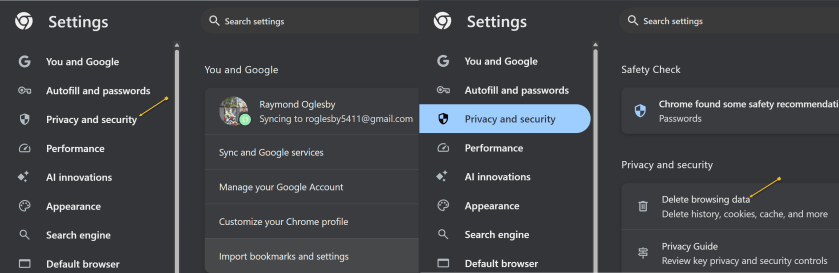
On the left side, click Privacy and security option.
Under the Privacy and security section click the Delete browsing data button. See the following image:
Accessing Privacy and security options
A new dialogue box will open.
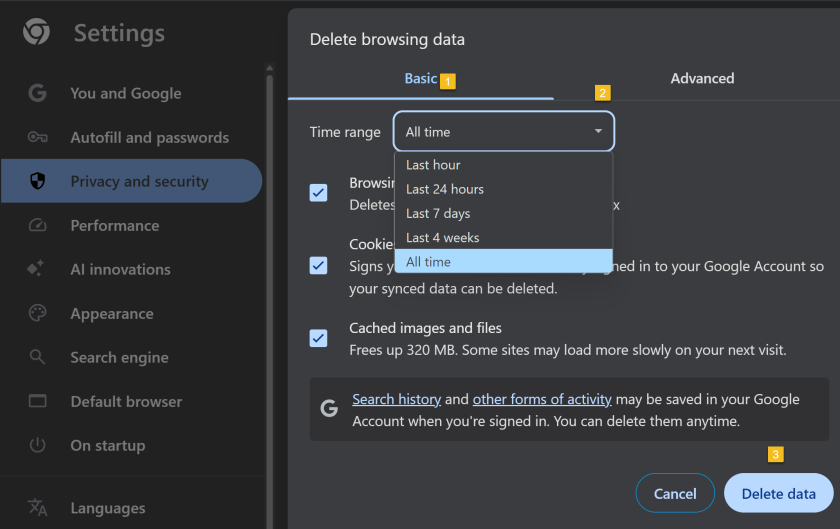
Click the Basic menu option.
Select the period to delete from in the Time range drop down menu (To clear all cached data and cookies, select All time, this is recommended).
Ensure check boxes for Browsing history. Cookies and other site data and Cached images and files are ticked.
Click on Delete data and wait for that dialogue box to exit.
Close all open Chrome tabs.
Restart Chrome.
Refer to the below image:
Selecting what data and when to delete
3) Upgrade Chrome Security
Once upon a time, Google developed the Chrome Cleanup Tool, an application that helps find and remove unwanted software (UwS), toolbars, and other automatically installed extensions that antivirus probes may miss from Windows devices. These types of programs can slow down your browser, so checking it for unwanted add-ons every so often is a must.
Unfortunately, the program was shut down in 2023. However, Google says users will remain “automatically protected” by its Safe Browsing features in Chrome. For extra protection, navigate to:
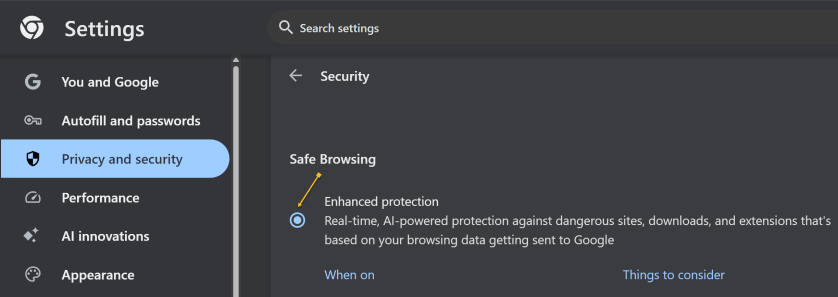
Settings >Privacy and security > Security, > Enhanced Protection
And enable which offers “real-time, AI-powered protection against dangerous sites, downloads, and extensions that’s based on your browsing data getting sent to Google.” See the below image:
Enable Enhanced protection
4) Manage Performance Settings
There are two types of people in the world: Those who open just a few tabs at a time, then close them, and those who hoard tabs like they have never heard of bookmarking. If you are the latter, it’s a safe bet what’s causing your slowdown, and you should take action. Not sure which tabs to close? Hover over a tab, and the pop-up preview shows how much memory it’s taking up.
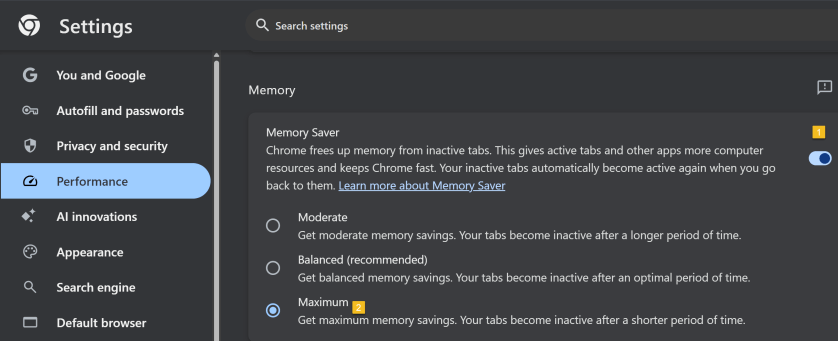
For something more automatic, Google introduced Memory Saver mode in 2022. This feature frees up resources from unused tabs in order to improve performance on tabs that are in use. While this feature should be enabled by default, you can open:
Settings > Performance > Memory Saver
and set to Maximum so tabs become inactive sooner. See the following image:
Setting Memory Saver to Maximum
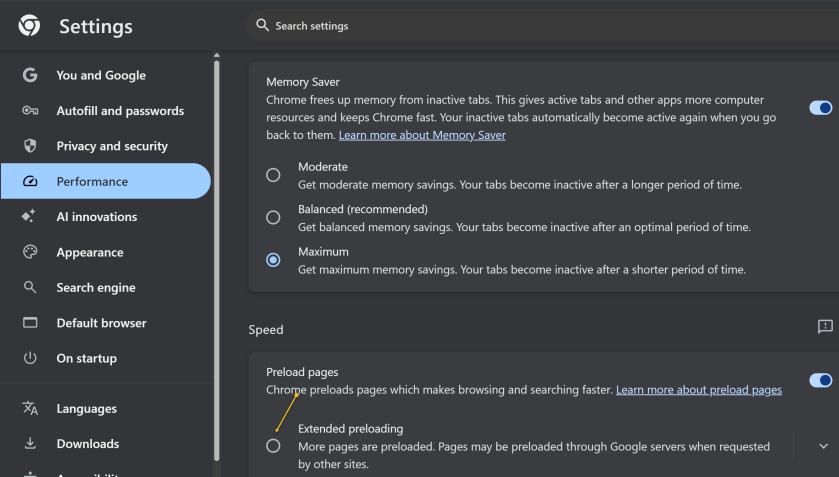
While you are here, go one further and scroll down to the Speed section. Make sure Preload pagesis enabled so websites and search results load faster. For an extra boost, enable Extended preloading for an even faster experience, though Google will be able to see what sites are being preloaded for you. Refer to the below image:
Enable Preload and Extended preloading
Disclaimer
Technology is constantly evolving, and smartphone and desktop tech rarely remains static. Therefore, the information in this post is only accurate as of the date it was written. Blog posts that are older than six months may contain instructions that are no longer compatible with your device or operating system. We hope that the content from previous posts continues to function as intended. Thank you for reading TechSavvy.Life, where technology works for you.
Quote For the Day
“Technology is nothing. What’s important is that you have faith in people, that they’re basically good and smart, and if you give them tools, they’ll do wonderful things with them.”
-Steve Jobs
X (Twitter)
You are finished. Please feel free to share this post! One way to share is via Twitter.
Just click the Tweet icon below. This will launch Twitter where you click its icon to post the Tweet.
Checkout TechSavvy.Life for blog posts on smartphones, PCs, and Macs! You may email us at contact@techsavvy.life for comments or questions.
We value your feedback! Was this post helpful? Please share your comments with us. If you have a tech question related to your computer or smart device, feel free to reach out. Just send an email to contact@techsavvy.life, and be sure to include the device, app, and version you are using. To assist us further, you can also attach screenshots related to your inquiry.
The author’s Vietnam eBook on the “Battle for Tra Bong Vietnam: Events and Aftermath” can be accessed from a Kindle device or the Kindle App for a desktop or smartphone. The apps are free.
The author’s Vietnam eBook on the Battle for Tra Bong Vietnam: Events and Aftermath
Apple’s iOS 18 update enhances the Photos app with natural language search capabilities, allowing users to find images and videos more precisely by describing details. Users can combine elements or search for specific moments in videos.
InserRAYMOND OGLESBY @RaymondOglesby2 March 4, 2025 – 4 minutes read time
Overview
Apple’s iOS 18 update brings powerful new search functions to the Photos app, allowing you to find specific images with unprecedented precision. Let’s explore the new Photos app.
Photos Searching
iOS 18, the key to effective searching in Photos is using natural language. Instead of simple keywords, try describing the photo you are looking for in detail. The app can now understand complex queries and find images based on specific elements within them.
The new search function is also pretty handy at finding objects and scenes. Try queries like “car next to lake” or “sunset over Tulsa.” You can combine multiple elements in your search, such as “blue flowers in vase by window.”
For food lovers, searches like “pizza with mushrooms” or “steak and chips on the table” can help you find culinary inspiration from your photo library. When searching for people, you can now include details about their appearance or actions. “Rachel in the green hat with a wine glass” or “Susan in a wedding dress” are examples of how specific you can get.
Videos Searching
The Photos app can even search within videos. If you remember a specific moment in a video but can not recall which one, try describing the scene. For instance, “baby crawling” or “fireworks over Grand Lake” can take you directly to that moment.
Note! For these advanced search features to work, the Photos app needs time to index your library. This process happens on your device to protect your privacy, so be patient if searches aren’t immediately accurate after updating to iOS 18.
Why You Will Like This Tip:
Find Photos of nearly anything using the new search feature.
Search for objects or text that appear in your photos.
System Requirements
This tip works on iPhones running iOS 18 or later. The screenshots are from iPhone 14 Pro running iOS 18.1
Click here to learn how to update your iPhone to the latest iOS version.
Using Photos Search
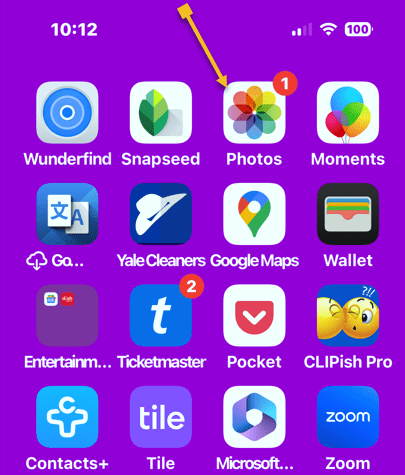
First, open the Photos app. Refer to the below image:
Selecting your Photos app
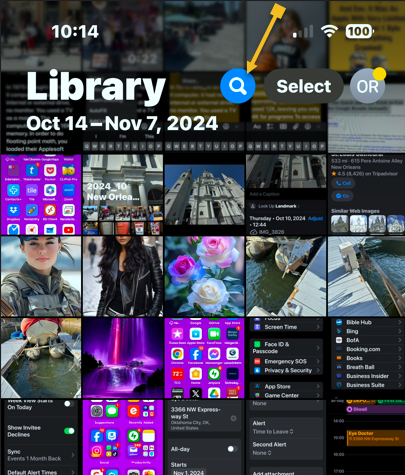
Next, tap the Search icon. See the below image:
Selecting the Search icon
Now, you will see some personalized suggestions, which you can tap. Or you can tap the Search bar to type in your own search terms. See the following image:
Selecting the Search button
Next, once you enter a search term, you will see all the photos in your library that match. Refer to the below image:
Entering your Search criteria
For example, we are searching for “Aletha Niagara Falls”. Now, we can see all the photos related to “Aletha in Niagara Falls”. See the below image:
Your results
Related
Aletha, my wife, also has a blog at Watercress Words, exploring and sharing the HEART of health.
Summary
That’s how to search photos or videos on the iPhone. Try it out yourself! Put in a few search terms and see what you get! While iOS 18 made some controversial changes to the Photos app, this is one change that you will love. It’s super easy to find the exact photo you are looking for every time.
Disclaimer
Technology is constantly evolving, and smartphone and desktop tech rarely remains static. Therefore, the information in this post is only accurate as of the date it was written. Blog posts that are older than six months may contain instructions that are no longer compatible with your device or operating system. We hope that the content from previous posts continues to function as intended. Thank you for reading TechSavvy.Life, where technology works for you.
Quote For the Day
. “We are stuck with technology when what we really want is just stuff that works.”
― Douglas Adams
X (Twitter) Info
Pretty impressive Photos app? Please feel free to share this post! One way to share is via Twitter.
Just click the Tweet icon below. This will launch Twitter where you click its icon to post the Tweet.
Checkout TechSavvy.Life for blog posts on smartphones, PCs, and Macs! You may email us at contact@techsavvy.life for comments or questions.
We value your feedback! Was this post helpful? Please share your comments with us. If you have a tech question related to your computer or smart device, feel free to reach out. Just send an email to contact@techsavvy.life, and be sure to include the device, app, and version you are using. To assist us further, you can also attach screenshots related to your inquiry.
The author’s Vietnam eBook on the “Battle for Tra Bong Vietnam: Events and Aftermath” can be accessed from a Kindle device or the Kindle App for a desktop or smartphone. The apps are free.
The author’s Vietnam eBook on the Battle for Tra Bong Vietnam: Events and Aftermath
RAYMOND OGLESBY @RaymondOglesby2 February 25, 2025 – 7 minutes read time
Overview
Not sure whether to hook your new monitor up to your computer using HDMI or DisplayPort? Different ports have different capabilities and compatibilities. Let’s find out which is best.
What is Best?
One often overlooked consideration when choosing your PC monitor is the ports that come with it. The two primary standards are HDMI and DisplayPort, which offer different features and capabilities. Displays often use one over the other, while some even feature both options. But which should you use? The answer, as always, is “it depends.”
Let’s break down the major differences between standards, and help you identify which will better suit your individual needs and setup. Refer to the below image for the rear view of our Dell 8960 PC which supports both:
Rear View of Dell 8960 PC
HDMI
Let’s start by talking about HDMI, the standard with which you are probably most familiar. See the below image:
HDMI cable
HDMI is most commonly used on TVs, sending high-definition video and audio signals over one cable for an easy, clean setup. There have been multiple versions of HDMI, each improving on the last. On modern monitors, you will find any combination of the following:
HDMI 1.4: Supports up to 4K (4,096 by 2,160) at 24Hz, 4K (3,840 by 2,160) at 30Hz, or 1080p at 120Hz.
HDMI 2.0: Supports up to 4K at 60Hz, and later versions (HDMI 2.0a and 2.0b) include support for HDR.
HDMI 2.1: Supports up to 10K resolution at 120Hz, adds improved HDR with dynamic metadata and enhanced Audio Return Channel (eARC) to send Dolby Atmos and DTS:X audio from display to receiver. HDMI 2.1 includes a variable refresh rate, like FreeSync, though some HDMI 2.0 monitors also support it.
HDMI 2.1a: Adds Source-Based Tone Mapping (SBTM).
HDMI 2.1b: Adds up to 48Gbps in bandwidth.
HDMI 2.2: Introduced at CES 2025, it supports 96Gbps data-transfer speeds, 12K resolution, and a Latency Indication Protocol (LIP) specification that assists in synchronizing audio and video signals between devices. However, it will take years before devices and media catch up to this new standard.
These are somewhat simplified explanations of each HDMI version, as there are other feature improvements in each standard, but they are the things most users will care about. If you want to take full advantage of those specifications, you will also need an HDMI cable capable of the correct bandwidth.
For example, if you are running 4K at 60Hz with HDR, you will want a cable labeled Premium High Speed or 18Gbps (or better). For 8K at high refresh rates, you may need even more bandwidth, so check the description and reviews of any cable you plan to buy. Lower-spec cables may still work under certain circumstances, but can be finicky, adding “snow” to the image or not routing your surround sound audio properly. If you ever experience issues, make sure the cable is up to snuff.
In addition to the above, all modern HDMI ports should support AMD’sFreeSync technology, which eliminates screen tearing in games by matching the monitor’s refresh rate to your video card’s output framerate (with newer HDMI versions supporting FreeSync at higher refresh rates). Nvidia’s similar G-Sync technology, however, does not always work over HDMI; on many monitors, it’s DisplayPort only.
DisplayPort
DisplayPort looks similar to HDMI but is a connector more common on PCs than TVs. See the following image:
DisplayPort cable
It still allows for high-definition video and (in many cases) audio, but its standards are a bit different. On modern monitors, you will likely find any of the following:
DisplayPort 1.2: Supports up to 4K at 60Hz, some 1.2a ports may also support AMD’s FreeSync
DisplayPort 1.3: Supports up to 4K at 120Hz or 8K at 30Hz
DisplayPort 1.4: Supports up to 8K at 60Hz and HDR
DisplayPort 2.0: Supports 16K with HDR at 60Hz and 10K without HDR at 80Hz.
DisplayPort 2.1: Adds USB4 compatibility.
When shopping for a DisplayPort cable,we recommend picking one from DisplayPort’s certified cables list to ensure it performs as advertised. In addition, DisplayPort has a few other useful features. First, it supports AMD’s FreeSync and Nvidia’s G-Sync, so you can have a tear-free gaming experience no matter which brand of card you use (as long as your monitor supports the technology, of course).
You can also drive multiple monitors from one DisplayPort connection, rather than having to use multiple ports, which is handy. Laptops can even send DisplayPort signals through a USB-C port. Similarly, some modern laptops feature Thunderbolt 2/3/4, which can route DisplayPort signals over a different connection. Many DisplayPort cables also have clips to keep them securely in your monitor, which is both a pro and a con because they can sometimes be tough to get out!
Which Cable to Use?
One cable is not better than the other across the board, but each has its place. Refer to the below image:
Both display cables
First, you will need an output on your GPU that matches the desired input on your monitor, as well as an appropriate cable. If you are choosing between DisplayPort 1.4 and IDMI 2.0, DisplayPort would be the better option. If a monitor only gives you the choice between, say, HDMI 2.0 and DisplayPort 1.2, HDMI could be the way to go for HDR support, as long as all your devices support the HDMI version.
Ultimately, if you are a gamer looking for the highest-end performance and the most future-proofed standard, DisplayPort 2.1 is the best option. It offers the highest maximum data transfer rate (at 77.37 Gbps, it’s nearly double HDMI 2.1’s 42.6 Gbps maximum), much higher refresh rates at both 4K and 8K than HDMI (240 Hz and 85 Hz vs.144 Hz and 30 Hz), as well as higher Display Stream Compression (DSC) resolutions and refresh rates than IDMI. This is especially important for monitors that require compression to reach their highest resolution/frame rate specs.
That said, DisplayPort 2.1 adoption is far from universal on the monitor side, and many GPUs do not provide the bandwidth required to properly make full use of it regardless. DisplayPort 2.1 supports three different transmission modes, called Ultra High Bit Rate: UHBR10, UHBR13.5 and UHBR20. Only UHBR20 takes full advantage of the full bandwidth potential of DisplayPort 2.1, and only the most recent graphics cards support it. The best choice you can make is what’s best for your particular setup. Check every link in the chain before you buy a cable, so you can pick the best combination for optimal performance.
Source: Various PC manufacturers
Disclaimer
Technology is constantly evolving, and smartphone and desktop tech rarely remains static. Therefore, the information in this post is only accurate as of the date it was written. Blog posts that are older than six months may contain instructions that are no longer compatible with your device or operating system. We hope that the content from previous posts continues to function as intended. Thank you for reading TechSavvy.Life, where technology works for you.
Quote For the Day
Don’t become a slave to technology – manage your phone, don’t let it manage you.
-Richard Branson
X (Twitter) Info
That’s it. Please feel free to share this post! One way to share is via Twitter.
Just click the Tweet icon below. This will launch Twitter where you click its icon to post the Tweet.
Checkout TechSavvy.Life for blog posts on smartphones, PCs, and Macs! You may email us at contact@techsavvy.life for comments or questions.
We value your feedback! Was this post helpful? Please share your comments with us. If you have a tech question related to your computer or smart device, feel free to reach out. Just send an email to contact@techsavvy.life, and be sure to include the device, app, and version you are using. To assist us further, you can also attach screenshots related to your inquiry.
The author’s Vietnam eBook on the “Battle for Tra Bong Vietnam: Events and Aftermath” can be accessed from a Kindle device or the Kindle App for a desktop or smartphone. The apps are free.
The author’s Vietnam eBook on the Battle for Tra Bong Vietnam: Events and Aftermath
The Look Up feature on iPhones allows users to quickly access definitions, thesaurus entries, and related websites by highlighting text and selecting the option. Available on iOS 16 or later, it enhances vocabulary learning and information retrieval across apps.
RAYMOND OGLESBY @RaymondOglesby2 February 18, 2025 – 3 minutes read time
Overview
Sometimes, while browsing the internet, you will come across words you do not understand or subjects you want to learn more about.
The Look Up feature allows you to easily look up the definition of words. Its menu provides links to several options: Apple’s dictionary, other dictionaries, Siri-suggested websites, Wikipedia, the App Store, and more.
You can even use Look Up as a free thesaurus app, or use the Look Up feature in Safari to find additional references to a word or phrase on the internet.
Let’s explore looking up words on iPhone with the Look Up feature.
Why You Will Like This Feature
Quickly check the definition of words or phrases with just a few taps.
Easily find websites or apps related to specific words.
System Requirements
This tip works on iPhones running iOS 16 or later.
Screenshots are from iPhone 14 Pro running iOS 18.3
Click here to learn how to update your iPhone to the latest iOS version.
Using Look Up Feature
First, anywhere you can select text, tap and hold to highlight the text. Refer to the below image:
Highlight text to look up
Next, above the word or phrase, a horizontal menu or a drop down menu will appear depending on your iOS. Tap the arrow to the right or select the Look Up option (as shown). See the below image:
Selecting the Look Up option
Now the results will appear in a pop-up. Usually, you will see a dictionary definition of the word(s). Pull up on the window to see more results. See the following image:
The dictionary meaning of the highlighted text
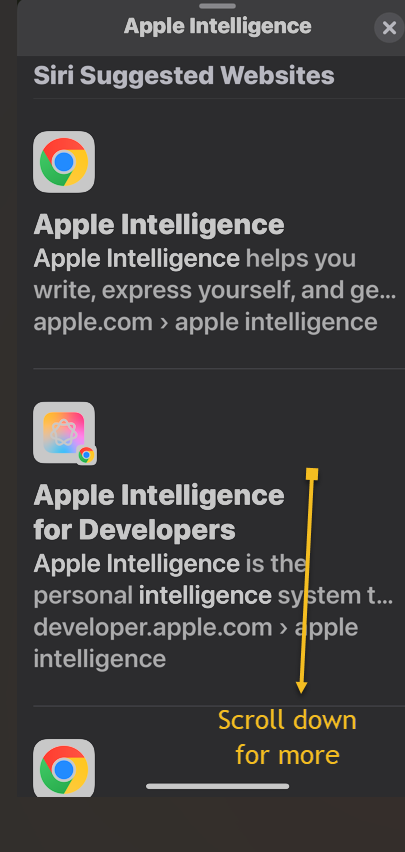
Bext, depending on the text you selected, you will see various results from different websites and apps. Scroll down to see more results. Refer to the below image:
Additional results for the highlighted text
That’s how to use the Look Up feature on your iPhone. While we demonstrated this feature from a WordPress blog, it can be used anywhere where you can select text.
Disclaimer
Technology is constantly evolving, and smartphone and desktop tech rarely remains static. Therefore, the information in this post is only accurate as of the date it was written. Blog posts that are older than six months may contain instructions that are no longer compatible with your device or operating system. We hope that the content from previous posts continues to function as intended. Thank you for reading TechSavvy.Life, where technology works for you.
Quote For the Day
Technology is nothing. What’s important is that you have faith in people, that they’re basically good and smart, and if you give them tools, they’ll do wonderful things with them.
– Steve Jobs
(X) Twitter Info
That’s it. Please feel free to share this post! One way to share is via Twitter.
Just click the Tweet icon below. This will launch Twitter where you click its icon to post the Tweet.
Checkout TechSavvy.Life for blog posts on smartphones, PCs, and Macs! You may email us at contact@techsavvy.life for comments or questions.
We value your feedback! Was this post helpful? Please share your comments with us. If you have a tech question related to your computer or smart device, feel free to reach out. Just send an email to contact@techsavvy.life, and be sure to include the device, app, and version you are using. To assist us further, you can also attach screenshots related to your inquiry.
The author’s Vietnam eBook on the “Battle for Tra Bong Vietnam: Events and Aftermath” can be accessed from a Kindle device or the Kindle App for a desktop or smartphone. The apps are free.
The author’s Vietnam eBook on the Battle for Tra Bong Vietnam: Events and Aftermath
Apple has introduced the Time to Leave feature for iOS 18, which alerts users when it’s time to depart for calendar events. By enabling Location Services and adjusting settings in the Calendar app, users receive timely notifications that include traffic conditions, ensuring they arrive on time to their destinations.
RAYMOND OGLESBY @RaymondOglesby2 February 11, 2025 – 3 minutes read time
Overview
Have you ever wished your iPad or iPhone would not only remind you of calendar events but also give a calendar alert when it’s time to depart? Well, now you can. Apple has just introduced the new Time to Leave feature, which automatically calculates when you need to leave your current location so you can arrive at your destination on time. Let’s explore how to use the Time to Leave feature.
Why You Will Like This Tip:
Get notified when it’s time to get in your car and head to your appointment or meet-up.
With built-in drive time reminders, you need never be late again!
System Requirements
The steps below will only work on an iPhone updated to iOS 18. The screenshots are from iPhone 14 Pro running iOS 18.3.
Click here to learn how to update your iPhone to the latest iOS version.
You will also need to be sure Location Services is enabled. Head to:
Settings > Privacy & Security > Location Services
and turn the toggle to the ON position.
Setup and Use Time to Leave Feature
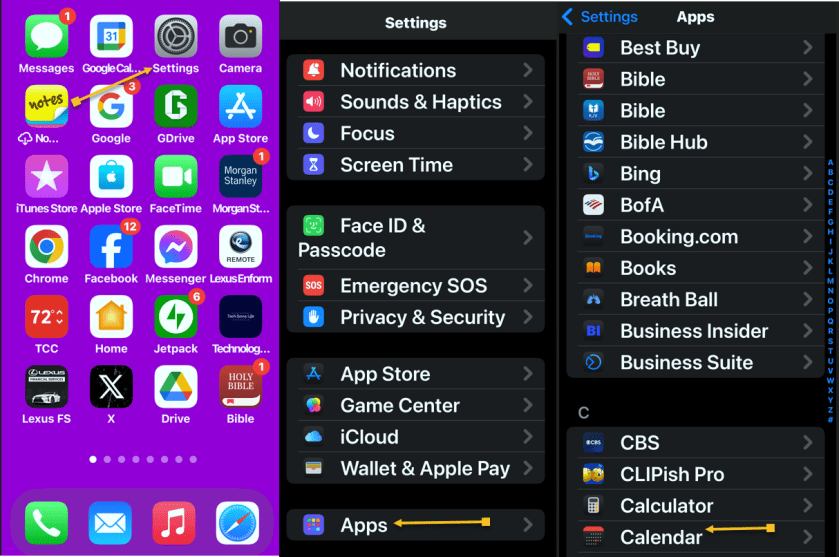
First, navigate to:
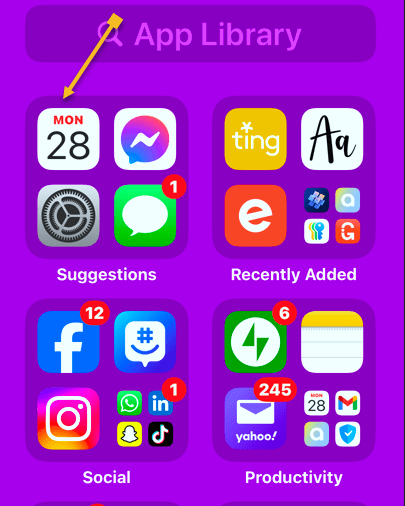
Settings > Apps > Calendar
Refer to the below image:
Open the Calendar app
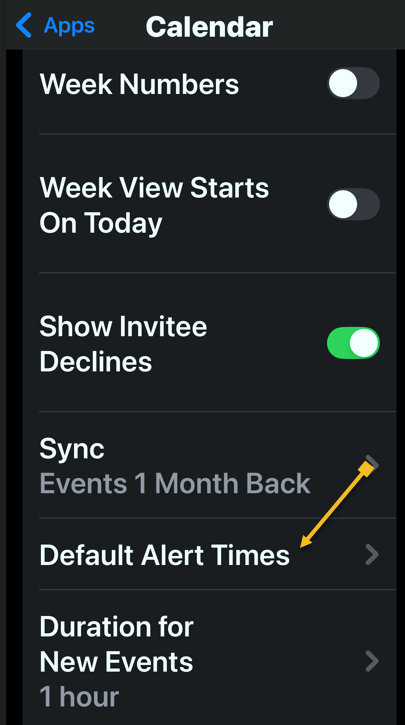
Next, tap the Default Alert Times option. See the below image:
Select the Default Alert Times option
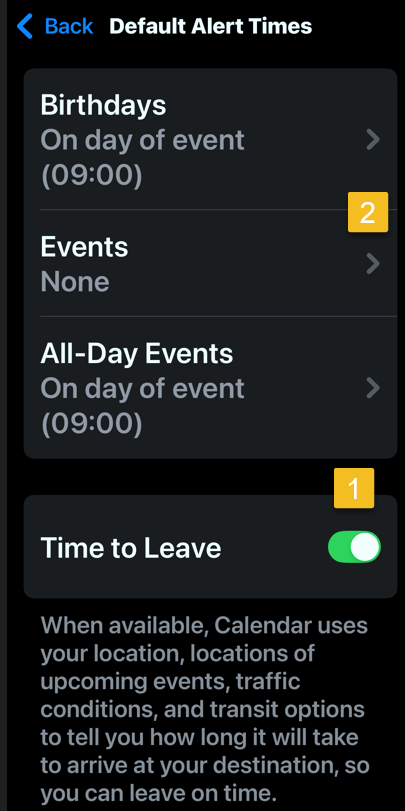
Now, toggle Time to Leave to the ON position.
Note! the Event must be set to None for this feature to work!
See the following image:
Enable Time to Leave toggle
Next, open the Calendar app. Refer to the below image:
Open the Calendar app
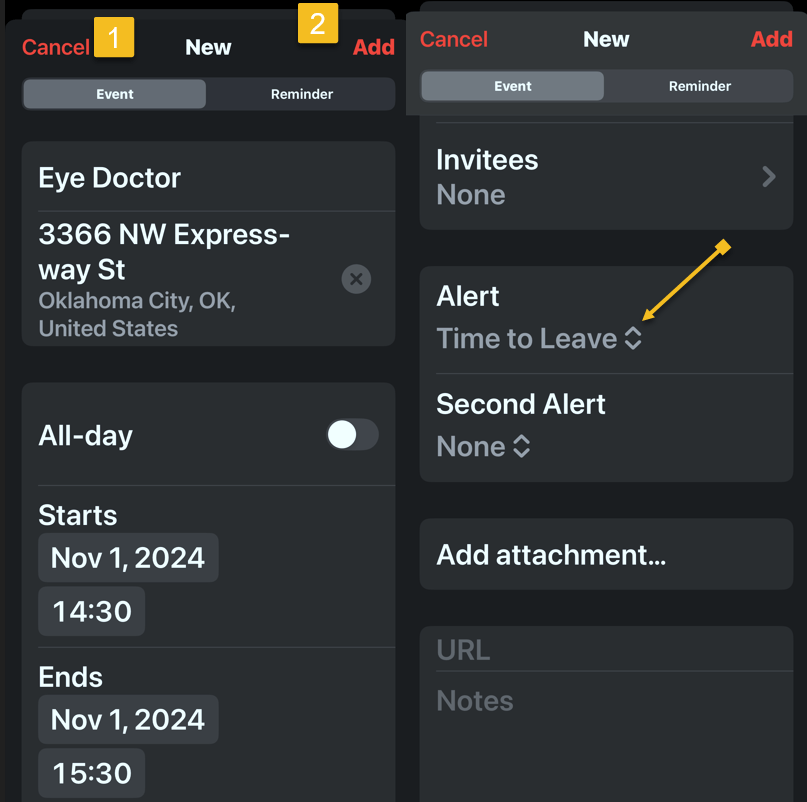
Now, create a calendar event as you normally would, then tap the Add icon. You will see that your Time to Leave alert has been automatically added to the event. See the below image:
Create a calendar event
Next, open your Calendar and find your event. Tap the event to see its details. Notice the Time to Leave alert. See the following image:
Time to Leave details
At the designated time, you will receive a Notification about the event that includes traffic conditions and travel time to reach your destination. Refer to the below image:
Your Time to Leave notification
Now you know how to enable and use Time to Leave alerts in your iPad and iPhone Calendar settings
Disclaimer
Technology is always changing. Rarely is there static tech for smartphones and desktops. Thus, the contents of this post are only valid at the time of writing. Blog posts older than six months may have directions incompatible with your device or OS. Hopefully, older post content will continue to work as advertised. Thank you for reading TechSavvy.Life for Technology at Work For You.
Quote For the Day
The great myth of our times is that technology is communication.
Libby Larsen
X (Twitter) Info
That’s it. Please feel free to share this post! One way to share is via Twitter.
Just click the Tweet icon below. This will launch Twitter where you click its icon to post the Tweet.
Checkout TechSavvy.Life for blog posts on smartphones, PCs, and Macs! You may email us at contact@techsavvy.life for comments or questions.
Was this post helpful? We would love to hear your comments. Do you have a computer or smart device tech question? I will do my best to answer your inquiry. Just send an email to contact@techsavvy.life. Please mention the device, app, and version you are using. To help us, you can send screenshots of the data related to your question.
The author’s Vietnam eBook on the “Battle for Tra Bong Vietnam: Events and Aftermath” can be accessed from a Kindle device or the Kindle App for a desktop or smartphone. The apps are free.
The Emergency SOS feature lets you call for help in many different ways, including discreetly by holding down a button, via satellite, and even automatically if
RAYMOND OGLESBY @RaymondOglesby2 February 4, 2025 – 4 minutes read time
Overview
The Emergency SOS feature lets you call for help in many different ways, including discreetly by holding down a button, via satellite, and even automatically if a car crash or fall is detected. After an Emergency SOS call ends, your iPhone will automatically send a message with your location to your Emergency contact(s). Add an extra layer of security to your life by adding your iPhone emergency contact(s).
Why You Will Like This Tip
Give your loved ones peace of mind by adding them as Emergency contacts.
Customize your Emergency SOS settings to suit your needs.
System Requirements
This tip works on iPhones 14 and above running iOS 18 or later.
Screenshots are from iPhone 14 Pro running iOS 18.3
Click here to learn how to update your iPhone to the latest iOS version.
Setup Emergency Contacts
There are many different ways to set up and activate Emergency SOS depending on what devices and device models you have. Only iPhone 14 and newer models can use Emergency SOS via satellite and have automatic Crash Detection (on by default.) iPhones running iOS 18 can use Live Video during emergency calls. You will need a newer Apple Watch model to use automatic Fall Detection. Here’s how to set your iPhone’s Emergency SOS contact(s). In this example, we are setting up Zoey Oglesby as an emergency contact,
First, open the Health app on your iPhone. Refer to the below image:
Find and open the Health app
Next, tap your Profile icon in the to right corner. See the below image:
Select your Profile icon
Now, select Medical ID. See the following image:
Select the Medical ID option
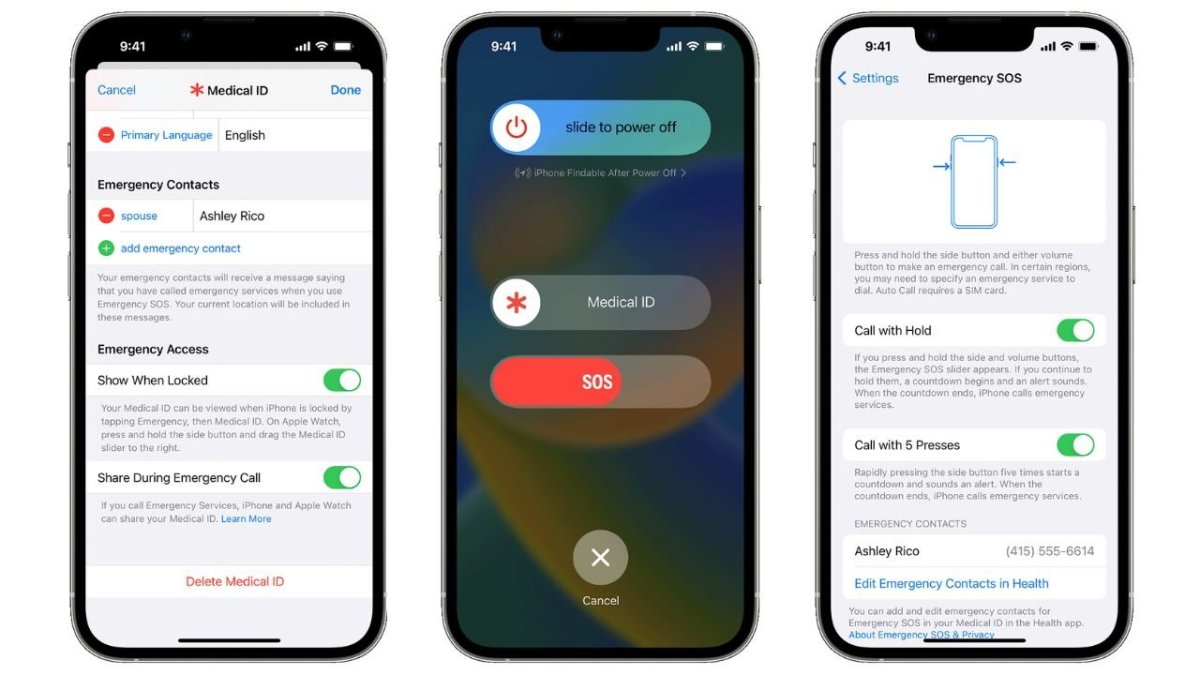
Next, under Emergency Access section, toggle Show When Locked and Share During Emergency Call to ON. Refer to the below image:
Toggle Show When Locked and Share During Emergency Call to ON
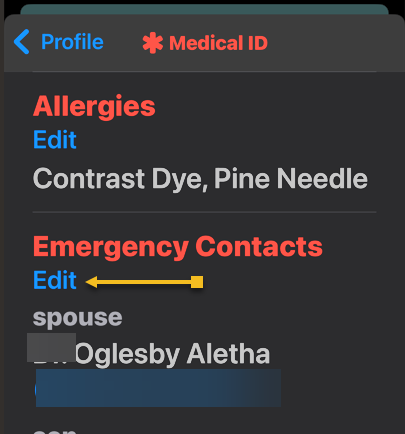
Now, scroll down to Emergency Contacts and tap Edit. See the below image:
Select to Edit Emergency Contacts
Next, tap the green plus sign to add a new emergency contact. See the following image:
Select the plus icon to Add Emergency Contact
Now, your Contacts will pop up. Find the contact you want and tap on their name. Refer to the below image:
Select a contact
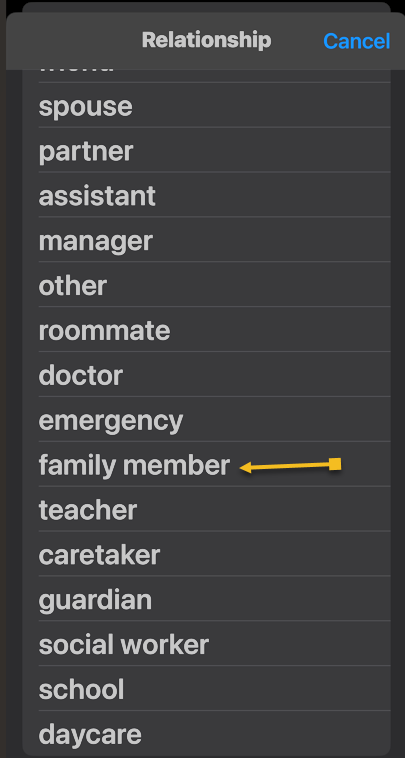
Next, select their relationship with you. See the below image:
Select their Relationship with you
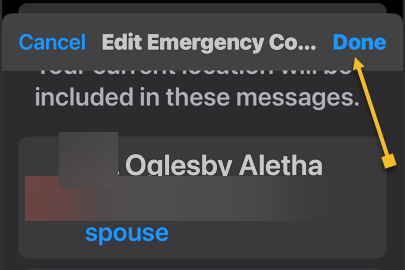
Next, tap Done. See the following image:
Select Done to add the contact
Your emergency contact(s) will now receive a text message and your location should you make an emergency call using Emergency SOS on your iPhone. In your Contacts, the emergency contact(s) are indicated by an asterisk (*) next to their name. Refer to the image below, where four family members are indicated as emergency contacts (others are on a different contact page):
Your added Emergency Contacts indicated by an asterisk (*)
Accessing your Medical ID within the Health app allows you to display only your emergency contacts. When the Show When Locked option is turned on, your emergency contact information will appear on the Lock screen.
Disclaimer
Technology is constantly evolving, and smartphone and desktop tech rarely remains static. Therefore, the information in this post is only accurate as of the date it was written. Blog posts that are older than six months may contain instructions that are no longer compatible with your device or operating system. We hope that the content from previous posts continues to function as intended. Thank you for reading TechSavvy.Life, where technology works for you.
Quote For the Day
The technology you use impresses no one. The experience you create with it is everything.
-Sean Gerety
X (Twitter) Info
That’s it. You have just setup emergency contacts that may save your life. Please feel free to share this post! One way to share is via Twitter.
Just click the Tweet icon below. This will launch Twitter where you click its icon to post the Tweet.
Checkout TechSavvy.Life for blog posts on smartphones, PCs, and Macs! You may email us at contact@techsavvy.life for comments or questions.
We value your feedback! Was this post helpful? Please share your comments with us. If you have a tech question related to your computer or smart device, feel free to reach out. Just send an email to contact@techsavvy.life, and be sure to include the device, app, and version you are using. To assist us further, you can also attach screenshots related to your inquiry.
The author’s Vietnam eBook on the “Battle for Tra Bong Vietnam: Events and Aftermath” can be accessed from a Kindle device or the Kindle App for a desktop or smartphone. The apps are free.
The author’s Vietnam eBook on the Battle for Tra Bong Vietnam: Events and Aftermath