RAYMOND OGLESBY @RaymondOglesby2
August 8, 2023
This is for Windows XP through Windows 11. Screenshots are from Windows 10
At the top of our shortlist of outstanding apps is Everything. This app has been around for a long time but we have recently discovered the Windows app. It’s now an integral part of our Windows apps.
What is Everything
Everything is a Windows freeware file search application created by programmer David Carpenter in 2008.
The single most notable thing about Everything is the speed.
If you have ever used Windows file search (File Explorer)or even some third-party file search tools, the most memorable thing about the experience is how long it takes.
Even after all these years, Windows file search is agonizingly slow. Truly, it’s agony. In an age of inexpensive SSDs with instant booting and instant program loading, waiting thirty seconds for Windows to grind through a search feels like torture. It does not matter if you are still using Windows 7 or upgraded to Windows 11, Windows search has never been speedy.
Everything sidesteps the shortcomings of the Windows file search by doing something that was novel when the application was first released and remains novel; it taps right into the file table at the file system level for lightning-fast search.
How fast is it? It’s so fast that if you create a new file, by the time you open up the Everything search box a moment later, the file is instantly in the index. It’s unlikely you could create the file and get to the search box fast enough to beat the nearly instantaneous addition of the entry into the Everything index.
The only downside to Everything is that it works off the file table and the file names and does not index the contents of the files. If you need a tool that will look deep into documents and help you find key phrases, this tool is not it. But if you are just trying to find where, exactly, you put your tax returns from five years ago, it’s almost magical in its speed and efficiency.
Why Is It Indispensable
We have a huge number of files, across a huge number of folders and drives. But as long as we name files and folders sensibly as they come in, it does not matter where they end up. They could be on the C drive, the G drive (portable external drive), or even buried in a network drive hosted somewhere (you can enable network drive search in the Everything settings).
No matter where the files are, you can find them if you member even a fraction of the folder or file name. Old taxes, work forms, Photoshop projects, comic books you hoarded five years ago, you name it. If you want it, you can churn it up to the surface with a few keywords.
For example, I need to find old tax returns to answer questions from the IRS about depreciation. That made me say, “Didn’t I squirrel those returns somewhere?” and sure enough, I did. I might have forgotten where they were, but Everything did not. Refer to the below image:

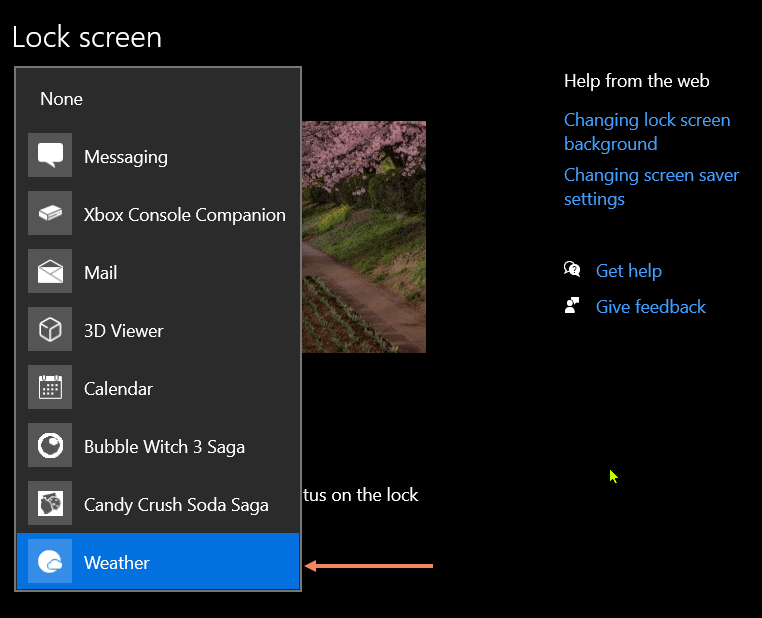
You do not need wildcards for your search. Everything search implies wildcard searches; the app will find all files/folders that include your search criteria. In the menu bar, select Search to view more options. See the below image:

It instantly scanned hundreds of thousands of files and folders on my computer and the attached drives to find exactly what I wanted.
If you can remember anything about the file; part of the name, the file extension, the root directory it might be deeply buried in; you can dig it up with a few keystrokes.
Even on my laptops, where the files are definitely not stacked terabytes deep, I still install Everything, I certainly do not want to be stuck waiting for Windows search to sift through the files at a slow pace.
it’s freeware. So Download it. The website name has an odd name, Voidtools, but this is the download page.
Take Notice
If you need to download this app or any other on a desktop or laptop, always download it from the manufacturer. Another safe bet is to download from a store like Apple Store or Microsoft Store.
Never download from these websites:
FileHorse
Softonic
CNET
Download 82
Softlay
Dealnews
Windowsinside
Us7p
Files10
Soft112
UpdateStar
Techno360
ColorMango
MajorGeeks
FileHonor
FilesWin
iGeeksBlog
Neowin
Linenseapps
Business Wire
SoftwareKeep
TechShout
Windows Latest’
Wondershare
Slant
iMobie
BitsDuJour
Softfree.eu
Uptodown
FreeProSoftz
TechWhoop
Tickcoupon
CrackDJ
AbbasPC
Giev Away of the Day
GroovyPost
TechGeek365
TechMoran
Digital Connect Mag
Malavida
…. and 16 more
The above websites should be banned. If you download from any other site besides the manufacturer or a store, expect viruses and malware to appear. If this happens, immediately Shutdown and/or Restart your PC and run a virus scan.
As a test, I downloaded it from File Horse. I got popups from Google Chrome saying my PC has been hacked followed by a full webpage saying my PC is corrupted. I got rid of the messages. but I had more problems. The FtleHorse website gave the site access to everything on my PC. I had to manually go through Google Privacy and Security Settings to block each access.
I recommend only using Voidtools website for downloading. Then feel the speed of searching, Everything, on your computer instantly.
Disclaimer
Technology is always changing and rarely is there static tech for smartphones and desktops. Thus, the contents of this post are only valid at the time of writing. Blog posts older than six months may have directions incompatible with your device or OS. Hopefully, older post content will continue to work as advertised. Thank you for reading TechSavvy.Life for Technology at Work For You.
Quote For the Day
The most intractable problem today is not pollution or technology or war; but the lack of belief that the future is very much in the hands of the individual.
Margaret Mead
Tweet Info
You are finished. Please feel free to share this post! One way to share is via Twitter.
Just click the Tweet icon below. This will launch Twitter where you click its icon to post the Tweet.
Checkout TechSavvy.Life for blog posts on smartphones, PCs, and Macs! You may email us at contact@techsavvy.life for comments or questions.
Tweet
I Would Like to Hear From You
Please feel free to leave a comment. I would love to hear from you. Do you have a computer or smart device tech question? I will do my best to answer your inquiry. Just send an email to contact@techsavvy.life. Please mention the device, app, and version you are using. To help us out, you can send screenshots of your data related to your question.
Author’s E-Book
You can access the e-book from a Kindle device, the Kindle App for the desktop or smartphone, which is a free app.