Finding your PowerShell version helps you know what PowerShell features you have access to. By using a PowerShell command we can reveal its version number.
Finding your PowerShell version helps you know what PowerShell features you have access to. By using a PowerShell command we can reveal its version number. Let’s explore this simple feature.
This is for devices running Windows 10
Copyright Scott Adams, Inc./Distributed by Universal Uclick for UFS
Find Your Version
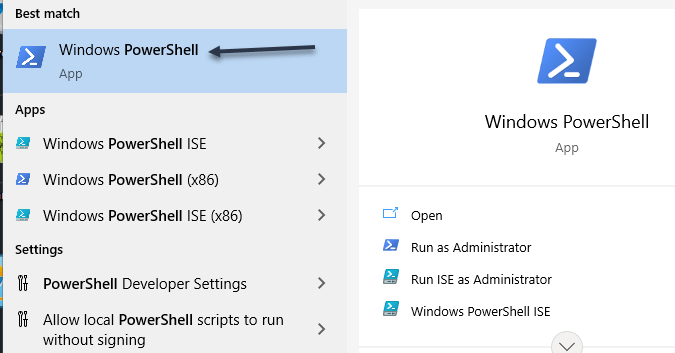
First, open the Start menu. In the Cortana search box, enter Windows PowerShell, and click the search results in upper left-hand corner. Refer to below image:
Accessing PowerShell
Now, in the PowerShell window that opens, type the following command and press Enter:
$PSVersionTable
See below image:
Entering the command
The PowerShell command will display various numbers. The first value that says PSVersion is your PowerShell version. See following image:
Displaying your version number
You may now close the PowerShell window.
PowerShell Updates
Windows 10 updates the built-in PowerShell tool when you install system updates. This means you should keep your device up-to-date to ensure that you are always running the latest version of PowerShell.
Also, know that PowerShell 7 is different from the version that’s usually installed on Windows 10 PCs. To install this version, either download the installer file or run a command from PowerShell.
Quote For the Day
The universe is not required to be in perfect harmony with human ambition.
Carl Sagan
That’s it. Please feel free to share this post! One way to share is via Twitter.
Just click the Tweet icon below. This will launch Twitter where you click its icon to post the Tweet.
Check out TechSavvy.Life for blog posts on smartphones, PCs, and Macs! You may email us at contact@techsavvy.life for comments or questions.
Please feel free to leave a comment. I would love hearing from you. Do you have a computer or smart device tech question? I will do my best to answer your inquiry. Just send an email to contact@techsavvy.life. Please mention the device, app and version that you are using. To help us out, you can send screenshots of your data related to your question.
The author’s Vietnam eBook on the Battle for Tra Bong: Events and Aftermath
What does it mean to pin a post on Facebook? A pinned post is a status update that you manually select to stay at the top of your page’s timeline, meaning it will not slip down as you continue to add other posts to your page.
What does it mean to pin a post on Facebook? A pinned post is a status update that you manually select to stay at the top of your page’s timeline, meaning it will not slip down as you continue to add other posts to your page. Let’s explore how to do this.
This is for devices running Facebook
Copyright Scott Adams, Inc./Distributed by Universal Uclick for UFS
You can only have one post pinned to your profile at a time. If you try to pin a second post, that second post gets pinned and the first post gets unpinned.
Pin to Your Profile
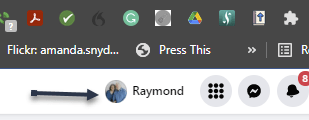
First, launch a web browser on your computer and access the Facebook site. Next, log in to your account and in the top right-hand corner of the site, click your profile icon. Refer to below image:
Accessing your Profile
Now, on your profile page that opens, find the post you want to pin. At the top right-hand corner of the post, click the three dots menu. See below image:
Selecting the 3 dots menu
Next, from the three-dots menu, select Pin post. See following image:
Selecting to Pin your post
And immediately, Facebook will pin the selected post to the top of your profile page. Scroll up your profile and your pinned post will appear there. Refer to below image:
Your pinned post
To unpin a pinned post, from the top right-hand corner of the pinned post, select the three dots menu and click Unpin post in the menu. See below image:
Selecting to Unpin your post
Facebook will remove the post from the top of your profile page. It will continue to appear at its original location in your profile, though. Now, refresh the page or exit Facebook.
In addition to your personal profile, you can pin a post to your Facebook page, too.
First, access your page and find a post to pin. (Note! I am doing this on my business page using my iPhone). Next, at the top right-hand corner of the post, click the three dots menu. See following image:
Selecting the 3 dots menu
Now, from the three-dots menu, select Pin to Top. Refer to below image:
Selecting to Pin your post
Next, Facebook will add your selected post to the top of the page.
To remove the post from the top of the page, from the top right-hand corner of the post, click the three dots menu. Next, from the menu that opens, select “Unpin from Top. See below image:
Selecting to Unpin your post
Quote For the Day
You can’t just ask customers what they want and then try to give that to them. By the time you get it built, they’ll want something new.
Steve Jobs
That’s it. You now know how to pin/unpin a Facebook post. Please feel free to share this post! One way to share is via Twitter.
Just click the Tweet icon below. This will launch Twitter where you click its icon to post the Tweet.
Check out TechSavvy.Life for blog posts on smartphones, PCs, and Macs! You may email us at contact@techsavvy.life for comments or questions.
Please feel free to leave a comment. I would love hearing from you. Do you have a computer or smart device tech question? I will do my best to answer your inquiry. Just send an email to contact@techsavvy.life. Please mention the device, app and version that you are using. To help us out, you can send screenshots of your data related to your question.
The author’s Vietnam eBook on the Battle for Tra Bong Vietnam: Events and Aftermath
When it comes time to turn off a Windows 10 PC, you might not know the best way to do it. But there’s more than one way to shut down your computer, and we will show you seven different methods that do the trick.
When it comes time to turn off a Windows 10 PC, you might not know the best way to do it. But there’s more than one way to shut down your computer, and we will show you seven different methods that do the trick.
This is for Windows 10 devices
Copyright Scott Adams, Inc./Distributed by Universal Uclick for UFS
If your PC is “stuck”, one of these methods should do the trick. I have a shutdown/restart process on this PC that runs every night at 10 pm. I find this very helpful in clearing out the cache and other files so that I have a “clean” PC every morning. Also, by doing this, your PC will perform better. We do not advise keeping your device running all the time. Its best to turn it off or shutdown/restart your PC ever so often. Let’s explore seven ways to turn off your PC.
Method 1 – Use the Power Button
Perhaps the easiest way to turn off your Windows PC is by pressing the power button. Years ago, you always had to shut down Windows within the software itself before flipping your PC’s power switch so that you did not lose any data. These days, PC power buttons are wired to send a signal to the operating system to begin a shutdown process when you push it. (Note! It is recommend that you hold down the button only for a few seconds to avoid shutdown problems). The button can also be configured to put your PC to sleep.
The only catch is that the power button on many laptops do not usually shut down the machine. Instead, it often puts the laptop to sleep or turns off the display. If that’s the case, you might be better off using a shutdown method as listed below. Refer to below image:
Push this button, resembles HAL in 2001 A Space Odyssey
Method 2 – Use Login Power Icon
On your Windows 10 login screen, click the power icon in lower right-hand corner. Next, click the Shut down option.
Method 3 – Use the Start Menu Icon
First, click the Start button, which is the Windows logo button in the left-hand corner of your screen.
Next, in the Start menu that pops up, select the Power icon in the left side of the menu. Next, click Shut down in the small secondary menu that appears. After a moment, all apps will close, and the PC will power off. See below image:
Accessing Start Menu icon
Method 4 – Use Right-Click On Start Menu
You can also shut down your device from a hidden menu if you right-click the Start menu or press Windows+X on your keyboard.
After the menu is loaded, select Shut down or Sign out. Now, choose the Shut down option from the sub-menu. See following image:
Using Right-Click on Start Menu
Method 5 – Use Ctrl-Alt-Del Keyboard Shortcut
If you press Ctrl+Alt+Delete on your keyboard, a special screen will appear that allows you to launch the Task Manager, Switch user, and more. You can turn off your PC from here, too. Like in Method 2, in the lower-right corner of the screen, click the Power icon and select Shut down in the menu. Refer to below image:
Using Ctrl-Alt-Del shortcut
Method 6 – Use Alt-F4 Keyboard Shortcut
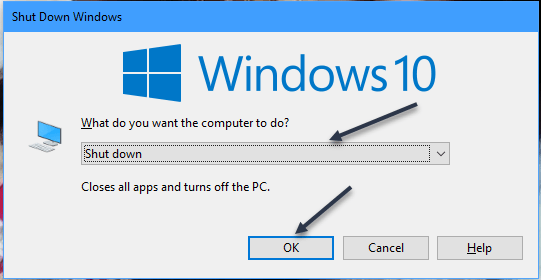
In Windows, this shortcut usually closes the currently active window. But if you click the de3sktop (or minimize all windows) and press Alt+F4, a special Shut Down Windows box will appear. In the drop-down menu, select Shut down (although it’s usually selected by default), and then click OK. Your PC will shut down after that. See below image:
Using Alt-F4 shortcut
Method 7 – Use the Command Prompt
If you prefer to do things from the Command Prompt, you can shut down from there as well. First, open the Start menu and type Command in the Cortana search box, and then hit Enter. In the search results at upper-right hand corner, click on Command Prompt. With the prompt open, type
shutdown /s
at the prompt and press Enter. You will see a warning pop-up that lets you know that Windows is about to shut down. After a minute, Windows will shut down fully and your PC will power off. See following image:
Using Command Prompt
Quote For the Dquote
I do not fear computers. I fear the lack of them.
Isaac Asimov
Now you know some ways to shut down your PC. Please feel free to share this post! One way to share is via Twitter.
Just click the Tweet icon below. This will launch Twitter where you click its icon to post the Tweet.
Check out TechSavvy.Life for blog posts on smartphones, PCs, and Macs! You may email us at contact@techsavvy.life for comments or questions.
Please feel free to leave a comment. I would love hearing from you. Do you have a computer or smart device tech question? I will do my best to answer your inquiry. Just send an email to contact@techsavvy.life. Please mention the device, app and version that you are using. To help us out, you can send screenshots of your data related to your question.
The author’s Vietnam eBook on the Battle for Tra Bong: Events and Aftermath
Sooner or later, you will need the Developer Tab in Word, Excel, PowerPoint, or Outlook. Even if you know nothing about programming, there are buttons on the Developer tab that are necessary for some of the clever features in Office.
Sooner or later, you will need the Developer Tab in Word, Excel, PowerPoint, or Outlook. Even if you know nothing about programming, there are buttons on the Developer tab that are necessary for some of the clever features in Office.
The Developer tab is not displayed by default, but you can add it to the ribbon in a few easy steps.
This is for devices running Microsoft Office
Copyright Scott Adams, Inc./Distributed by Universal Uclick for UFS
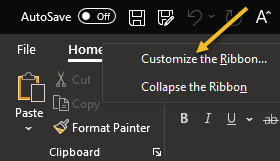
First, open an Office app, like Word, and any document. Now, right-click within any Tab in the Ribbon and select Customize the Ribbon. Refer to below image:
Select Customize the Ribbon option
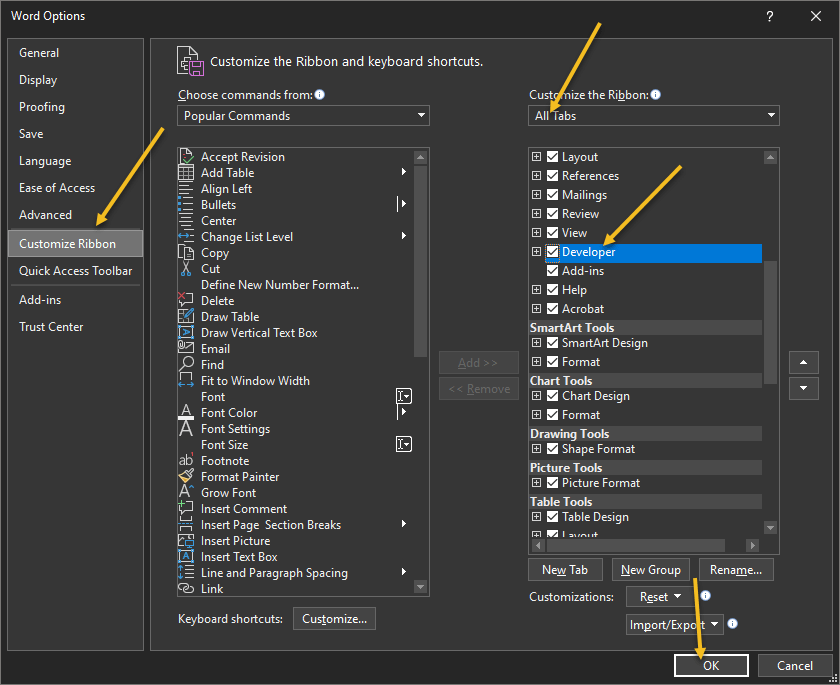
Next, in the right-hand side, select All Tabs from the drop down menu and simply checkmark the Developer tab box. Now, select OK to enable the Developer tab. See below image:
Enable the Developer tab
Next, exit your Office app, restart the app and load your document. You will see the Developer tab in your ribbon. Just click the tab to view its options. See following image:
Your Developer tab
Quote For the Day
‘Fahrenheit 451’ postulates a lot of things I didn’t want to have happen.
Ray Bradbury
That was easy. Please feel free to share this post! One way to share is via Twitter.
Just click the Tweet icon below. This will launch Twitter where you click its icon to post the Tweet.
Check out TechSavvy.Life for blog posts on smartphones, PCs, and Macs! You may email us at contact@techsavvy.life for comments or questions.
Please feel free to leave a comment. I would love hearing from you. Do you have a computer or smart device tech question? I will do my best to answer your inquiry. Just send an email to contact@techsavvy.life. Please mention the device, app and version that you are using. To help us out, you can send screenshots of your data related to your question.
The author’s Vietnam eBook on the Battle for Tra Bong Vietnam: Events and Aftermath
The Power User Menu is available by default (you do not have to download it) in Windows 10, Windows 8.1, or Windows 8 as a pop-up menu with shortcuts to management, configuration, and other “power user” Windows tools.
The Power User Menu is available by default (you do not have to download it) in Windows 10, Windows 8.1, or Windows 8 as a pop-up menu with shortcuts to management, configuration, and other “power user” Windows tools.
It’s also referred to as the Win+X Menu.
This is for devices running Windows 10
Copyright Scott Adams, Inc./Distributed by Universal Uclick for UFS
What’s in the Power User Menu
The Power User Menu is, at its most basic, a context menu that provides quick access to some of Windows 10’s more advanced or frequently accessed features.
Here’s a list of what’s on the Power User Menu by default, along with a shortcut key that you can use to launch that program from the menu. With the Power User Menu already open, just hit one of those keys to immediately open that shortcut. (Note! According to your configuration, all of these options may not be listed.)
Apps and Features (F): Opens Apps & Features in the Settings app.
Mobility Center: Opens Windows Mobility Center, a place in which to quickly adjust certain audio, visual, and battery settings.
Power Options (B): Opens Power & Sleep in the Settings app.
Event Viewer (O): Opens Event Viewer, which shows a log of app and system messages.
System (V): Shows the system information of your machine in the Settings app.
Device Manager (M): Opens Device Manager, which lets you configure and/or troubleshoot your PC hardware.
Network Connections (W): Opens your network status information in the Settings app.
Disk Management (K): Opens Disk Management, which allows you to manage your disks and drives.
Computer Management (G): Opens Computer Management, a feature that contains admin tools like Event Viewer and Disk Management.
Windows PowerShell (i): Launches PowerShell.
Windows PowerShell Admin (A): Launches PowerShell as an admin.
Task Manager (T): Opens Task Manager, which displays resource usage and process statistics.
Settings (N): Opens the Windows Settings app.
File Explorer (E): Opens File Explorer.
Search (S): Opens Windows Search and places the cursor in the Search bar.
Run (R): Opens Run, a feature that lets you open folders and run programs with commands.
Shut Down or Sign Out: (First, press U, and then press i to Sign Out, S to Sleep, U to Shut Down, or R to Restart).
Desktop (D): Minimizes everything.
Open the Power Menu
There are two equally simple ways to access the Power User Menu. If you are a fan of keyboard shortcuts, then press Win+X The Power User Menu will open. Another way is by just right-clicking the Start menu in the bottom-left-hand corner of your desktop. The Power User Menu will then open. Refer to below image:
The Power User Menu
How to Customize the Menu
One of the easiest ways to remove, reorder, rename, or add items to Power User Menu, is to use a graphical program that can do it for you.
The favorite is Win+X Menu Editor, which lets you add your own programs to the menu as well as Control Panel shortcuts, Administrative Tools items, and other shutdown options like Hibernation and Switch User. It’s also just a click away to restore all the defaults and get the regular Power User Menu back. The problem with this app is its preinstalled software requirements. The Editor wants you to install WinZip and WinZip Driver Updater. The WinZip app has a trial version (21 days), the Updater does not offer a trial version. To me, these requirements are a major downside to installing the Editor unless the apps are already installed.
Quote For the Day
You’re unlikely to discover something new without a lot of practice on old stuff, but further, you should get a heck of a lot of fun out of working out funny relations and interesting things.
Richard P Feynman
That’s it. Now you know what the Power User Menu is and how to access it. Please feel free to share this post! One way to share is via Twitter.
Just click the Tweet icon below. This will launch Twitter where you click its icon to post the Tweet.
Check out TechSavvy.Life for blog posts on smartphones, PCs, and Macs! You may email us at contact@techsavvy.life for comments or questions.
Please feel free to leave a comment. I would love hearing from you. Do you have a computer or smart device tech question? I will do my best to answer your inquiry. Just send an email to contact@techsavvy.life. Please mention the device, app and version that you are using. To help us out, you can send screenshots of your data related to your question.
The author’s Vietnam eBook on the Battle for Tra Bong Vietnam: Events and Aftermath
Google Chrome 93 is officially here. There is plenty to be excited about. For example, with Chrome 93, progressive web apps (PWAs) feel a lot more like native desktop apps, as clicking on a link can open an associated web app. There’s also improved multi-screen support for web apps, making this an update web app users will love.
Google Chrome 93 is officially here. There is plenty to be excited about. For example, with Chrome 93, progressive web apps (PWAs) feel a lot more like native desktop apps, as clicking on a link can open an associated web app. There’s also improved multi-screen support for web apps, making this an update web app users will love. Let’s explore how to install Chrome 93.
This is for Windows, Android, Mac, iPhone, and iPad
Copyright Scott Adams, Inc./Distributed by Universal Uclick for UFS
Some new features are related to recently closed tabs, a Material You theme for Android 12, a new Google Search UI on Android, the ability to sync Two-Factor OTP codes across devices (a true game-changer), the ability to use note-taking apps right from the browser, a new context menu on iPhone, and so much more.
Chrome 93 will now also show Google Drive documents on the New Tab page. The suggested documents will appear in a card underneath the Search Bar, allowing you to easily access recently edited Google Docs or Sheets.
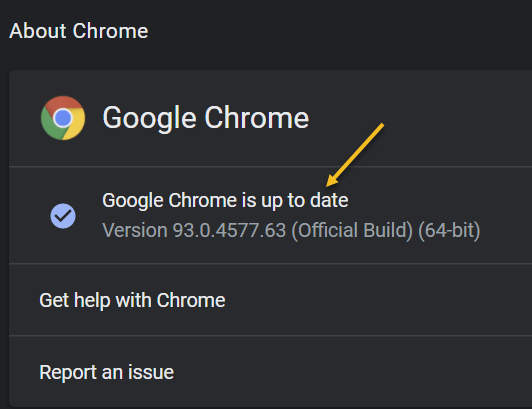
First, you can check for an update by going to the three-dot menu hamburger icon on the top-right of Chrome. Next, click Help followed by About Google Chrome. Refer to below image:
Selecting the About option
Now, the Chrome Settings window open. If Chrome is outdated, it will automatically download and install the latest version. See below image:
Your Chrome version
Now, close Chrome and restart the app.
If you are on iPhone or Android, update the app as you would for any other application.
Quote For the Day
The most remarkable discovery in all of astronomy is that the stars are made of atoms of the same kind as those on the earth.
Richard P Feynman
You are finished. Please feel free to share this post! One way to share is via Twitter.
Just click the Tweet icon below. This will launch Twitter where you click its icon to post the Tweet.
Check out TechSavvy.Life for blog posts on smartphones, PCs, and Macs. You may email us at contact@techsavvy.life for comments or questions.
Please feel free to leave a comment. I would love hearing from you. Do you have a computer or smart device tech question? I will do my best to answer your inquiry. Just send an email to contact@techsavvy.life. Please mention the device, app and version that you are using. To help us out, you can send screenshots of your data related to your question.
The author’s Vietnam eBook on the Battle for Tra Bong Vietnam: Events and Aftermath
If your cursor keeps overshooting your target on your Windows 10 desktop, the culprit might be a feature known as Mouse Acceleration. Disabling it might increase your pointer accuracy, letting you land right on point every time.
If your cursor keeps overshooting your target on your Windows 10 desktop, the culprit might be a feature known as Mouse Acceleration. Disabling it might increase your pointer accuracy, letting you land right on point every time.
This is for devices running Windows 10
Copyright Scott Adams, Inc./Distributed by Universal Uclick for UFS
What is Mouse Acceleration
Mouse Acceleration in Windows 10 is a feature that increases the distance and speed at which your cursor moves across the screen in response to the speed with which you move your physical mouse.
With Mouse Acceleration enabled, if you were to quickly move your physical mouse three inches, your cursor could travel from one side of the screen to the other. However, if you were to move your mouse the exact same distance, only much slower, your cursor might only make it halfway across the screen.
This feature is enabled on Windows 10 devices by default, and the goal is to enhance the precision of your cursor. For many, it has the exact opposite effect; especially for gamers. If you find this to be the case for you, you can disable it.
Turn Off the Feature
First, in the Cortana search box (next to the Windows logo key), type Mouse and click Mouse settings from the search results in upper left-hand corner. Refer to below image:
Selecting Mouse settings
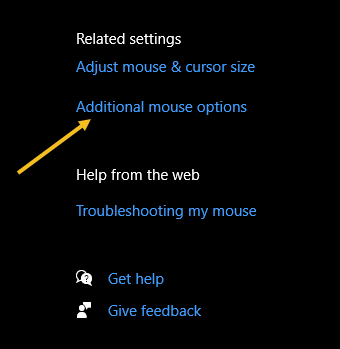
Next, find the Related settings group to the right of the Mouse settings window (or the bottom if your window size is small). Now, click Additional mouse options. See below image:
Selecting more mouse options
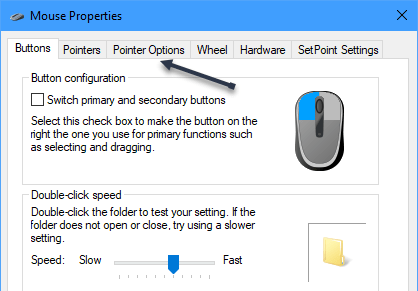
Next, in the Mouse Properties window, click the Pointer Options tab. See following image:
Selecting Pointer Options tab
Now, under the Motion group, uncheck Enhance pointer precision, and then click Apply. Refer to below image:
Turn off pointer precision
Now close the Mouse Properties window and exit Settings. Your mouse acceleration is now disabled.
This should help you more accurately land on your targets. But if you are a gamer and you are still having problems, you may want to read up on “mouse DPI and polling rates” and invest in a mouse that’s designed for gaming.
Quote For the Day
There are worse crimes than burning books. One of them is not reading them.
Ray Bradbury
That’s it. Please feel free to share this post! One way to share is via Twitter.
Just click the Tweet icon below. This will launch Twitter where you click its icon to post the Tweet.
Check out TechSavvy.Life for blog posts on smartphones, PCs, and Macs! You may email us at contact@techsavvy.life for comments or questions.
Please feel free to leave a comment. I would love hearing from you. Do you have a computer or smart device tech question? I will do my best to answer your inquiry. Just send an email to contact@techsavvy.life. Please mention the device, app and version that you are using. To help us out, you can send screenshots of your data related to your question.
The author’s Vietnam eBook on the Battle for Tra Bong Vietnam: Events and Aftermath
If you take advantage of Excel’s charts for helpful visual displays of your data, check out the People Graph option to create a simple depiction of the number of people or items you have logged in your spreadsheet.
If you take advantage of Excel’s charts for helpful visual displays of your data, check out the People Graph option to create a simple depiction of the number of people or items you have logged in your spreadsheet.
This is for devices running Excel. Screenshots are from Excel for Office 365 and Windows 10.
Copyright Scott Adams, Inc./Distributed by Universal Uclick for UFS
You can display things like the number of visitors to your website, downloads of your app, sign-ups for your event, calls to your support center, and much more.
Add People Graph Add-In
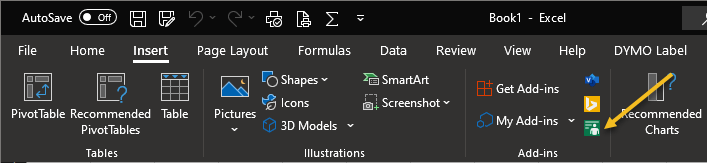
People Graph is an Add-In developed by Microsoft, and there’s already a button for it in your Excel ribbon. But before you can use it, you will have to trust the add-in to install it. First, open the Insert tab in Excel and look for the Add-ins group. Click the button for People Graph. Refer to below image:
Select the Add-In
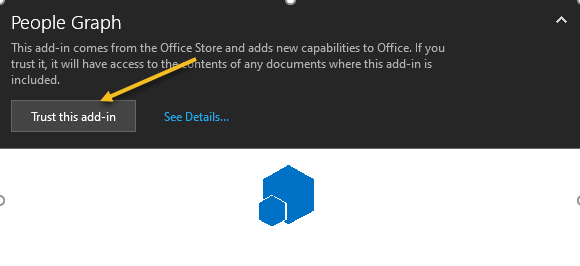
Next, You will see a pop-up window with a link to See Details. This takes you to the Add-In on the Office Store, where you can read an overview, reviews, and other details. Click Trust this add-in to get started. See below image:
Trust the Add-In option
Now, once the add-in is installed in Excel, you can click the button on the Insert tab to use the feature.
Insert a People Graph
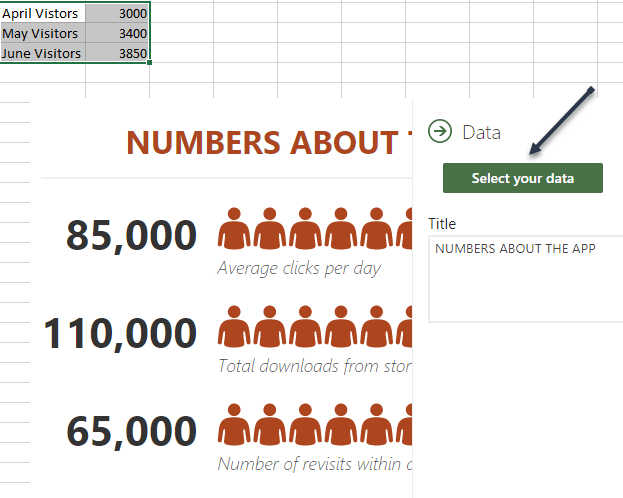
Whenever you hit the People Graph button in the ribbon, you will see a sample graph. First. click the Data icon that looks like a small grid. See following image:
Select the People Graph button
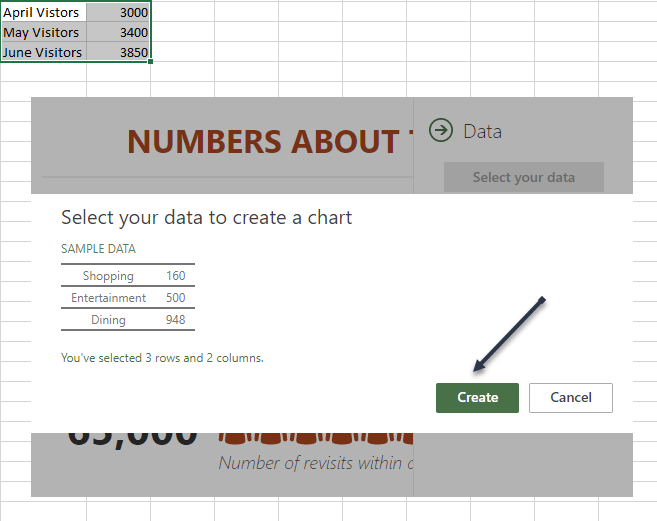
Optionally, you can enter your graph Title before selecting your data, or you can just head back to this spot to add the title later. Next, click Select your data, and then drag through the cells that you want to use. Currently, you must use two columns of data, but you can have multiple rows. Refer to below image:
Select your data
Now, click Create on the People Graph screen. See below image:
Create the People Graph
Customize Your PeopleGraph
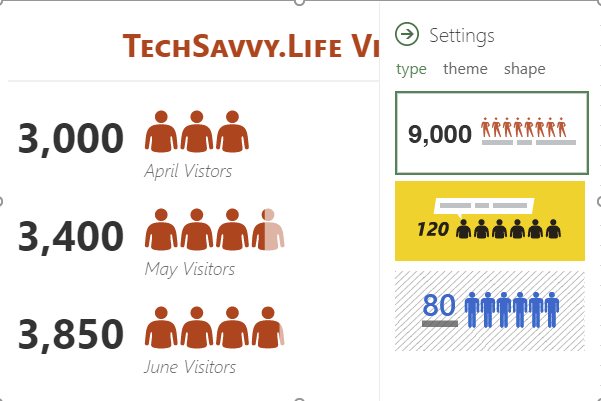
First, click the gear icon to open the Settings. You can then move through the three settings for type, theme, and shape. See following image;
Select the Settings gear icon
You can currently pick from three graph types. Each has a slightly different layout and appearance. Now, click Type, and then choose one on the right side. Refer to below image:
Select your Type of graph
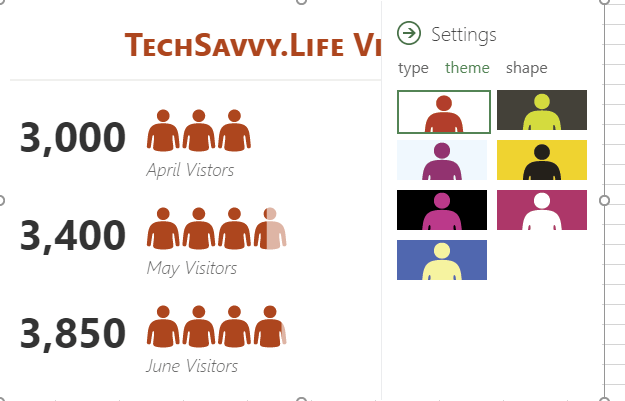
Next, you can select a Theme that changes the background and colors of your graph. Click Theme, and choose one of the seven options. See below image:
Select your theme for the graph
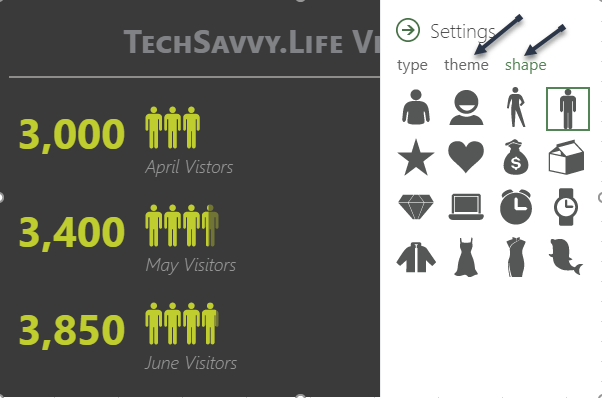
Finally, you can use a different Shape. So if your data is better represented by a Shape other than people, you can choose the best fit. Now, click Shape and pick from the 16 options. See following image:
Select the Shape of your graph
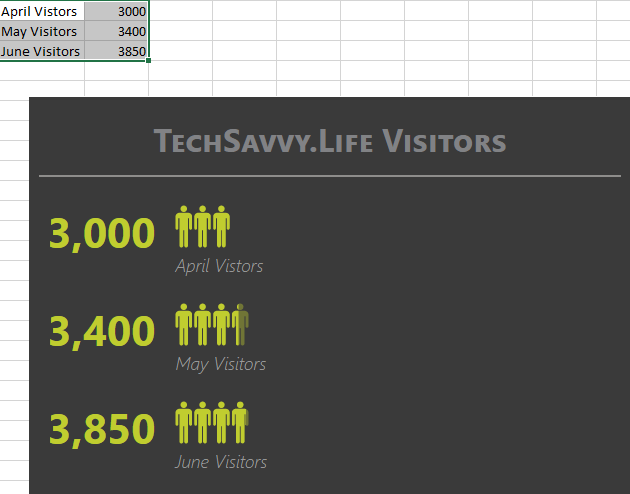
Next, you can select and drag your People Graph wherever you want it on your spreadsheet. And if you edit the data on which the graph is based, Excel will update the graph automatically. Refer to below image:
Your final result
Other Options
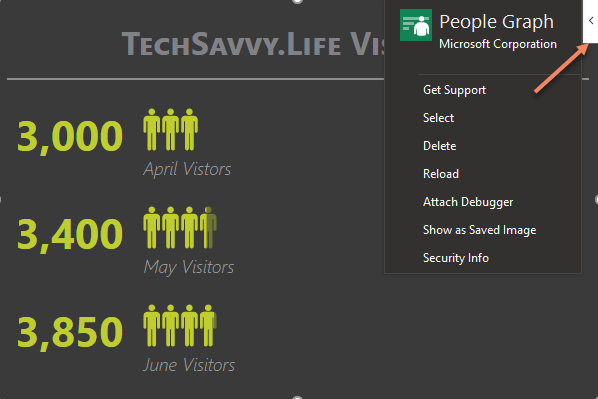
On the top right of your People Graph, you will see an arrow (Windows) or an Info icon (Mac). When you click, you will see several actions .Choose Reload to refresh the graph, Delete to remove it, and Select to select the graph if you want to move it. You also have options to Get Support, Attach Debugger, and view the Security info. See below image:
Select Other Options
If you are looking for a simple way to visually display data, especially if it includes a number of people like customers, clients, or contacts, try out the People Graph in Microsoft Excel.
Quote For the Day
If you don’t like what you’re doing, then don’t do it
Ray Bradbury
That’s it. Please feel free to share this post! One way to share is via Twitter.
Just click the Tweet icon below. This will launch Twitter where you click its icon to post the Tweet.
Check out TechSavvy.Life for blog posts on smartphones, PCs, and Macs! You may email us at contact@techsavvy.life for comments or questions.
Please feel free to leave a comment. I would love hearing from you. Do you have a computer or smart device tech question? I will do my best to answer your inquiry. Just send an email to contact@techsavvy.life. Please mention the device, app and version that you are using. To help us out, you can send screenshots of your data related to your question.
The author’s Vietnam eBook on the Battle for Tra Bong Vietnam: Events and Aftermath
It is possible to add videos to a PowerPoint Kiosk or self-running presentation. You have been able to do this for years but it’s become a lot easier in recent versions of Office. Making the video work within a self-running presentation takes a little extra trickery. L
It is possible to add videos to a PowerPoint Kiosk or self-running presentation. You have been able to do this for years but it’s become a lot easier in recent versions of Office. Making the video work within a self-running presentation takes a little extra trickery. Let’s explore how to do this.
This is for devices running PowerPoint
Copyright Scott Adams, Inc./Distributed by Universal Uclick for UFS
Here are the steps:
Go to the presentation and add a blank slide where you want the video to go.
Insert the video onto the slide from Insert | Video.
Make any changes you want to the video; trimming, effects, fades , and so on.
Ensure that Video Tools | Playback | Video Options | Start is set to Automatically. Refer to below image:
Set the Playback to automatically
Using the slider below the video, note the running time of the video.
Switch to the Transitions tab. Under Timing | Advance Slide | After set the duration to the same (our video is 41 seconds) or a little more than the video playback time. See below image:
Set the timing for the video
With those settings the video will automatically play when the slide appears and will advance to the next slide when the video ends. If the video slide gets ‘stuck’ set the Advance Slide duration to match the video playing time.
Quote For The Day
The saddest aspect of life right now is that science gathers knowledge faster than society gathers wisdom
Isaac Asimov
That was easy. Please feel free to share this post! One way to share is via Twitter.
Just click the Tweet icon below. This will launch Twitter where you click its icon to post the Tweet.
Check out TechSavvy.Life for blog posts on smartphones, PCs, and Macs! You may email us at contact@techsavvy.life for comments or questions.
Please feel free to leave a comment. I would love hearing from you. Do you have a computer or smart device tech question? I will do my best to answer your inquiry. Just send an email to contact@techsavvy.life. Please mention the device, app and version that you are using. To help us out, you can send screenshots of your data related to your question.
The author’s Vietnam eBook on the Battle for Tra Bong: Events and Aftermath
Saving documents from the Microsoft 365 suite is a simple process. As you do, your Word, Excel, and PowerPoint files are saved to the default location of your choosing. If you wish to change this location, you can do so.
Saving documents from the Microsoft 365 suite is a simple process. As you do, your Word, Excel, and PowerPoint files are saved to the default location of your choosing. If you wish to change this location, you can do so. Let’s explore how this is done.
This is for Windows and Office 365
Copyright Scott Adams, Inc./Distributed by Universal Uclick for UFS
Microsoft’s recommendation is to save files to your OneDrive location. However, you might want to save all of your Microsoft 365 files to your local drive. By default, Office will use your Documents folder when you save files on your PC.
Thankfully, you do not have to change the saved location every time manually. Instead, you can set a new default. Better still, if you make the change in one Microsoft 365 app, the change carries over to every other one.
Make Your PC the Default Save Location
First, open an Office application, like Word, and click File > Options. (The Options is found in lower left-hand pane). Refer to below image:
Selecting Options
Next, the Word Options window will appear. Click the Save tab in the left-hand pane. See below image:
Selecting Save option
Now, under the Save Documents section, check the box next to Save to computer by default and click Browse. This will launch File Explorer for you to choose a location. See following image:
Set default location
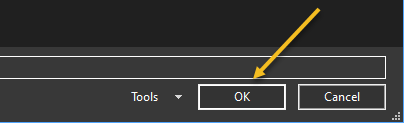
Next. click the OK button in the bottom-right corner of the window to apply the change. Refer to below image:
Apply your change
Now, check your default save file location and click OK. Your Word option screen will close. The next time you save an Office file, your computer will be the default save location to the drive or folder you have chosen. (Note! I did not change the default location. This is for demonstration purposes only). See below image:
Check default location and save
Quote For the Day
People who think they know everything are a great annoyance to those of us who do.
Isaac Asimov
That’s it. Please feel free to share this post! One way to share is via Twitter.
Just click the Tweet icon below. This will launch Twitter where you click its icon to post the Tweet.
Check out TechSavvy.Life for blog posts on smartphones, PCs, and Macs! You may email us at contact@techsavvy.life for comments or questions.
Please feel free to leave a comment. I would love hearing from you. Do you have a computer or smart device tech question? I will do my best to answer your inquiry. Just send an email to contact@techsavvy.life. Please mention the device, app and version that you are using. To help us out, you can send screenshots of your data related to your question.
The author’s Vietnam eBook on the Battle for Tra Bong: Events and Aftermath