iPhones with iOS 14 or later, now support Picture -In-Picture (PIP) mode like their cousin, the iPad. By default, when you switch from playing a full-screen video in a supported media app, it will continue playing in the corner of the screen. If you find this annoying, like me, you can easily turn it off.
iPhones with iOS 14 or later, now support Picture -In-Picture (PIP) mode like their cousin, the iPad. By default, when you switch from playing a full-screen video in a supported media app, it will continue playing in the corner of the screen. If you find this annoying, like me, you can easily turn it off. Here’s how to do this.
This is for the iPhone running iOS 14
Copyright Scott Adams, Inc./Distributed by Universal Uclick for UFS
To Tweet about this post, click the Tweet icon below to launch Twitter, then click its Tweet icon to post.
Check out TechSavvy.Life for their blog posts on smartphone apps, PCs. and Macs!
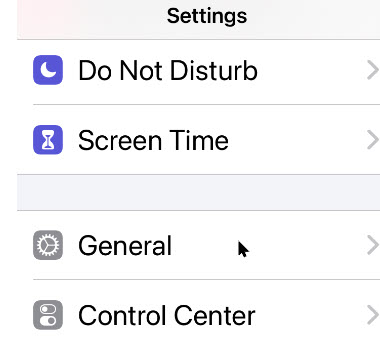
First, launch Settings (the gear icon). Refer to below image:
Accessing Settings
Now, scroll down and tap on the General option. See below image:
Accessing the General option
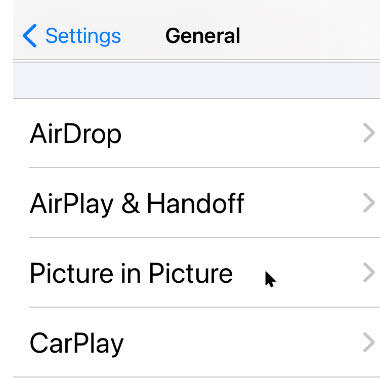
Next, tap on the Picture in Picture option. See following image:
Accessing the PIP option
Tap on it to open the Picture in Picture settings. Now, toggle off (disable) the Start PIP Automatically option. Refer to below image:
Disabling the PIP option
Now, the next time you return to the Home Screen while playing a video, the Picture-in-Picture will not pop-up automatically. To manually open Picture-in–Picture, just tap the Picture-in-Picture button (if the app you are using supports it.)
That’s it. You just disabled a possible annoying feature of iOS 14.
I hope you have found this post helpful. If so, click the Tweet icon below. This will launch Twitter where you click its icon to post the Tweet.
I have found TechSavvy.Life blog posts extremely helpful. Check them out for posts on smart phone apps, Macs and PCs!>
Please feel free to leave a comment. I would love hearing from you. Do you have a computer or smart device tech question? I will do my best to answer your inquiry. Please mention the device, app and version that you are using. To help us out, you can send screenshots of your data related to your question.
The author’s Vietnam eBook on the Battle for Tra Bong: Events and Aftermath
In recent months, the USA has had numerous forest, refinery, and chemical fires, to name a few If you are worried about local air quality from these fires, pollen, or other environmental pollution, you can check the current Air Quality Index (AQI) using your iPhone or iPad. Currently, Apple only supports checking the AQI in certain countries that includes the USA, United Kingdom, India, and Germany. Apple plans to roll out the AQI in more regions in the future.
In recent months, the USA has had numerous forest, refinery, and chemical fires, to name a few If you are worried about local air quality from these fires, pollen, or other environmental pollution, you can check the current Air Quality Index (AQI) using your iPhone or iPad. Currently, Apple only supports checking the AQI in certain countries that includes the USA, United Kingdom, India, and Germany. Apple plans to roll out the AQI in more regions in the future.
This is for the iPhone and iPad
Copyright Scott Adams, Inc./Distributed by Universal Uclick for UFS
To Tweet about this post, click the Tweet icon below to launch Twitter, then click its Tweet icon to post.
Check out TechSavvy.Life for their blog posts on smartphone apps, PCs. and Macs!
The Air Quality Index (AQI) is a numerical indicator of regional outdoor air quality in your area. Each country has its own way of determining air quality. For example, in the USA, the AQI iss defined by the Environmental Protextion Agengy (EPA) as a composite scale from 0 to 500 that incorporates inormation about five different pollutants (ground-level ozone, particle pollution, carbon monoxide, sulfur dioxide, and nitrogen dioxide) into one index.
The USA. AQI is divided into six categories, each with its own color. An AQI above 100 means the air quality is dangerous to sensitive groups. As the AQI rises, the number of people impacted by the poor air quality increases. Refer to below image:
Air Quality Index chart
Other countries use their own custom AQI methodology, but the color codes are similar to the USA. Regardless of country, the goal of every AQI is to stand the crummy air and avoid getting sick . It is wise to know what the air is like so you can make the best decisions for your health.
Check AQI using Apple Maps
One of the fastest ways to check AQI for your area is by using Apple Maps on your iPhone or iPad running iOS or iPadOS 12.2 or later.
First, launch Settings. See below image:
Accessing Settings
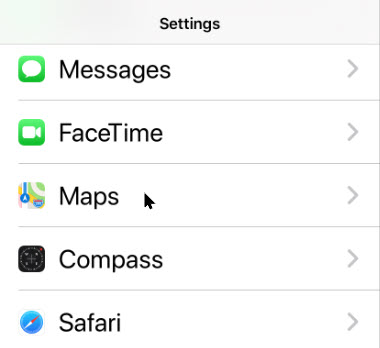
Next, scroll down till you see Maps and tap it. See followingimage:
Accessing Maps
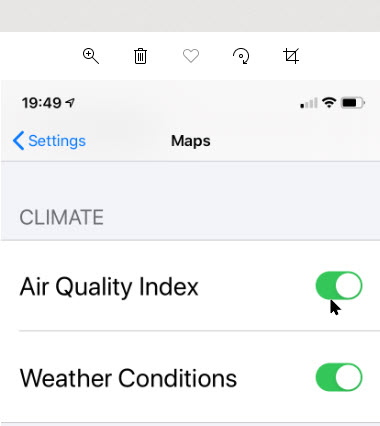
Now, scroll down to the CLIMATE section and enable Air Quality Index. Refer to below image:
Accessing Air Quality Index
Next, open the Apple Maps app and then tap the navigation arrow to center the map on your current location. (It is assumed you have enabled Location Services). See below image:
Accessing your current location
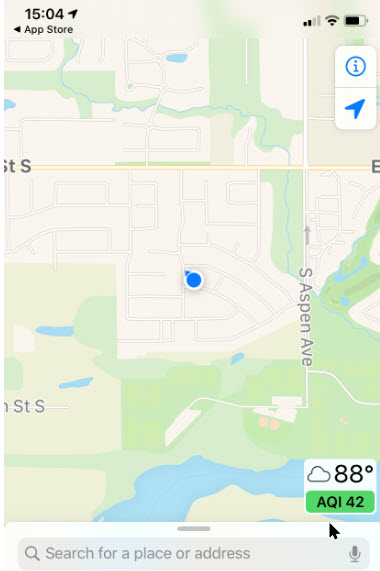
Once the map is correctly positioned, look for a small rectangular box in the bottom-right corner of your screen. If your country is supported, you will see a local temperature and an AQI number along with a category color code. See following image:
Positioning your current location
If you don’t see an AQI number in the corner, it might not be available in your country via Apple Maps. If the feature is supported, reposition the map, zoom in enough, wait a moment, and that area’s AQI will appear in the corner of your screen. Refer to below image:
Your local AQI from the Maps app
Check AQI using Apple Weather
You can also check the AQI using the Apple Weather pre-installed app. Open the the Weather app and then scroll down to the bottom of your local forecast page. There you will see the Air Qualtiy Index and Air Quality indication. Pretty neat! See below image:
Your local AQI from the Weather app
Third Party App
For a more global view of AQI, you may want to check out the Air Matters app, available on the Apple App store for the iPhone or iPad. Click here to preview and/or download. The free version comes with ads, but you can remove the ads with their paid version.
I hope you have found this post helpful. If so, click the Tweet icon below. This will launch Twitter where you click its icon to post the Tweet.
I have found TechSavvy.Life blog posts extremely helpful. Check them out for posts on smart phone apps, Macs and PCs!
Please feel free to leave a comment. I would love hearing from you. Do you have a computer or smart device tech question? I will do my best to answer your inquiry. Please mention the device, app and version that you are using. To help us out, you can send screenshots of your data related to your question.
The author’s Vietnam eBook on the Battle for Tra Bong: Events and Aftermath
If you have ever taken a Live Photo on your iPhone,it has basically created a short video clip attached to an image. If you do not like the resulting photo (or want to use a different one), it is possible to extract a different photo from the video clip that you can save or share
If you have ever taken a Live Photo on your iPhone it has basically created a short video clip attached to an image. If you do not like the resulting photo (or want to use a different one), it is possible to extract a different photo from the video clip that you can save or share. Let us explore how to do this.
This is for the iPhone
Copyright Scott Adams, Inc./Distributed by Universal Uclick for UFS
To Tweet about this post, click the Tweet icon below to launch Twitter, then click its Tweet icon to post.
Check out TechSavvy.Life for their blog posts on smartphone apps, PCs. and Macs!
First, open the Photos app. Browse your photos until you find the Live Photo you would like to work on. Tap it to view it in detail. Now, tap the Edit button in the upper-right corner of your screen. Refer to below image:
Accessing the Edit icon
Next, on the Edit screen, tap the Live Photo icon near the bottom of the screen; the one that looks like three concentric circles. See below image:
Accessing the Live Photo icon
Extract an Image
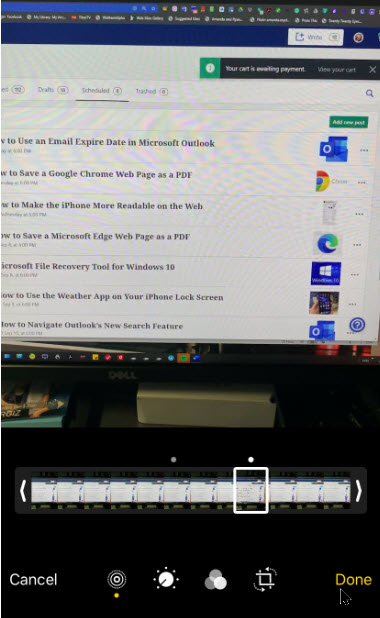
A filmstrip will appear just below the photo. Drag your finger along the filmstrip until you find the image that you would like to extract. You will be making this the Key Photo, or the one you want to visually represent the Live Photo when viewed in the Photos app.
Now, lift your finger from the film strip, then tap the Make Key Photo pop-up. See following image:
Accessing Make Key Photo option
The Key Photo will be set. Next, tap Done to leave the Edit screen. Refer to below image:
Save your changes
When you return to the photo detail screen, notice that the image has changed to the one you selected.
Duplicate the Live Photo
To extract the image while leaving the original Live Photo intact, we are going to duplicate it.
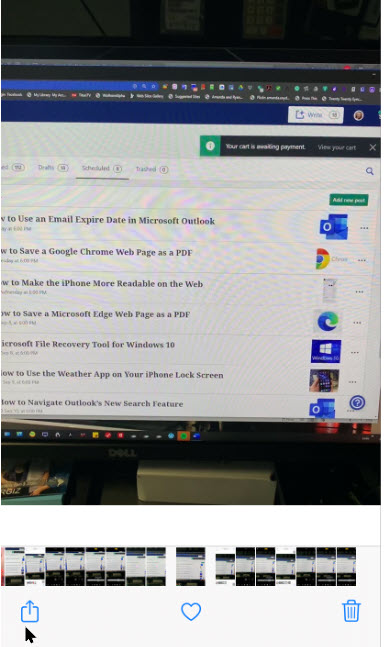
First, tap the Share button which looks like a square with an arrow pointing upward out of it at the bottom left hand corne of your screen. See below image:
Accessing the Share button
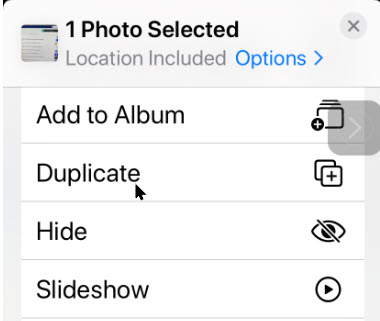
Next, in the Share menu, swipe down and tap Duplicate. See following image:
Accessing the Duplicate option
Next, from the pop-up, tap Duplicate as Still Photo. Refer to below image:
Selecting make a Duplicate as Still Photo
Revert Back to Original
After that, a new duplicate photo of the key frame you picked will appear in your Photos library just beside the original Live Photo.
If you would like, you can also return to your original Live Photo. On the photo, tap Edit again, then tap Revert to restore the Live Photo to its original settings.
The resolution of the extracted photo may not match that of a typical still photo on the iPhone. That’s because you have just extracted a still frame from a video, and Apple devices record video frames at a lower resolution than still photos.
I hope you have found this post helpful. If so, click the Tweet icon below. This will launch Twitter where you click its icon to post the Tweet.
I have found TechSavvy.Life blog posts extremely helpful. Check them out for posts on smart phone apps, Macs and PCs!
Please feel free to leave a comment. I would love hearing from you. Do you have a computer or smart device tech question? I will do my best to answer your inquiry. Please mention the device, app and version that you are using. To help us out, you can send screenshots of your data related to your question.
The author’s Vietnam eBook on the Battle for Tra Bong: Events and Aftermath
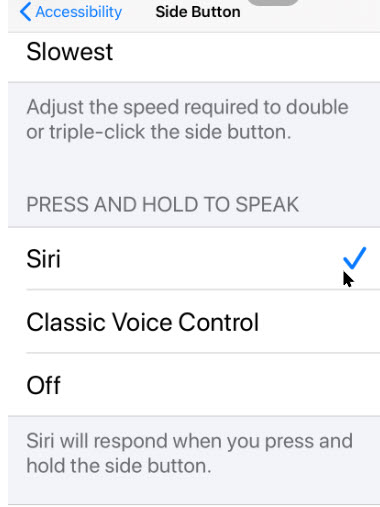
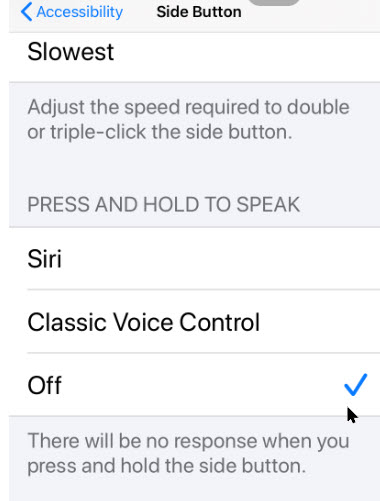
It is easy to accidentally trigger Siri on your iPhone by pressing and holding either the Side button (on newer models), or the Home button (on older ones). If you are like me, this is annoying. I find myself trying to stop Siri by pressing harder, which only changes Siri help commands. Or, I find myself turning off the iPhone by accident. Fortunately, there is an easy way to disable this feature. Siri voice commands will still be available.
It is easy to accidentally trigger Siri on your iPhone by pressing and holding either the Side button (on newer models), or the Home button (on older ones). If you are like me, this is annoying. I find myself trying to stop Siri by pressing harder, which only changes Siri help commands. Or, I find myself turning off the iPhone by accident. Fortunately, there is an easy way to disable this feature. Siri voice commands will still be available. Let’s explore how to do this.
This is for the iPhone
Copyright Scott Adams, Inc./Distributed by Universal Uclick for UFS
To Tweet about this post, click the Tweet icon below to launch Twitter, then click its Tweet icon to post.
Check out TechSavvy.Life for their blog posts on smartphone apps, PCs. and Macs!
Please feel free to leave a comment. I would love hearing from you. Do you have a computer or smart device tech question? I will do my best to answer your inquiry. Please mention the device, app and version that you are using. To help us out, you can send screenshots of your data related to your question.
The author’s Vietnam eBook on the Battle for Tra Bong: Events and Aftermath
One of the new features that has arrived with iOS 14 that didn’t make a big splash but will be super useful for all users is something called Back Tap. The new iPhone feature lets you customize Double and Triple taps on the back of your iPhone to use for Shortcuts automations, Accessibility features, and iOS system actions.
One of the new features that has arrived with iOS 14 that did not make a big splash but will be super useful for all users is something called Back Tap. The new iPhone feature lets you customize Double and Triple taps on the back of your iPhone to use for Shortcuts automations, Accessibility features, and iOS system actions.
Possibilities for iPhone Back Tap custom controls are pretty much only limited by your imagination since the feature works with Shortcuts app automations. But if you want to keep things simpler, you can assign a Double or Triple tap on the back of your iPhone to do things like open Control Center, take a screenshot, or enable Accessibility features like AssistiveTouch, VoiceOver, Zoom, etc.
How Does It Work
Back Tap uses the accelerometer in the iPhone 8 or higher to detect taps on the back side of your device running iOS 14. You assign the actions you want to launch upon tapping.
Back Tap works from the Home Screen, within apps (including third-party), and even from your your lock screen.
Let’s explore how to launch the built-in iOS 14 actions upon tapping.
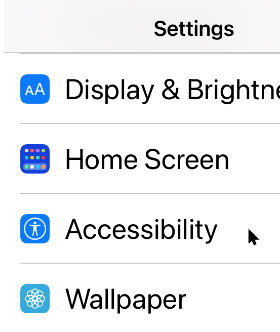
First, open Settings (the gear icon). Refer to below image:
Accessing Settings
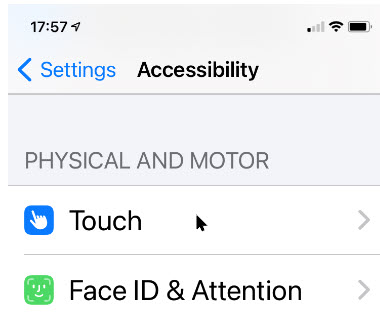
Now, scroll down and tap the Accessibility option. See below image:
Accessing Accessibility
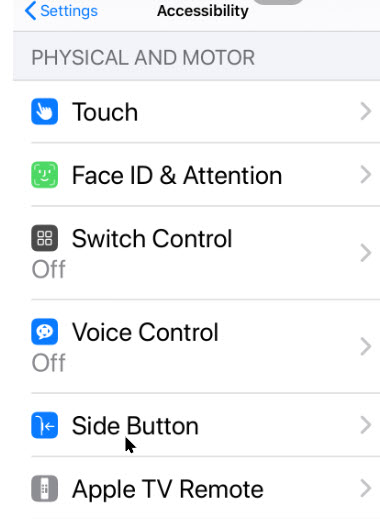
Under Accessibility option, scroll down and tap the Touch option. See following image:
Accessing Touch
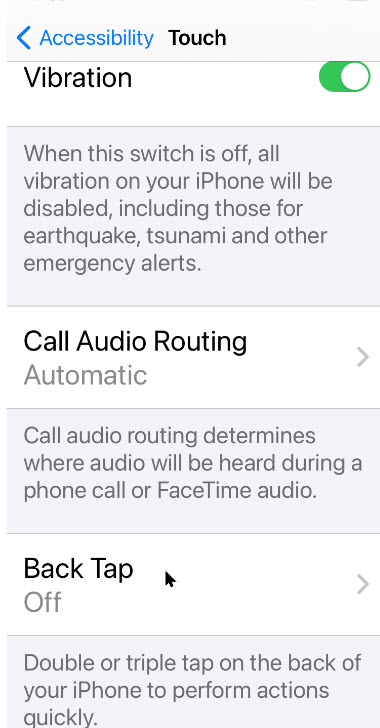
On the Touch Settings screen, scroll down until you see the Back Tap option, now tap it. Refer to below image:
Accessing Back Tap
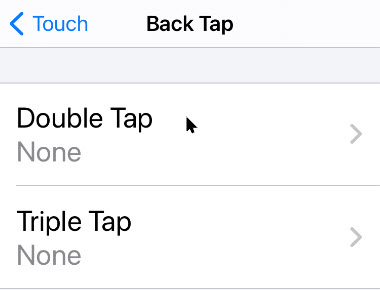
Next, in Back Tap settings, you can set the an action to either Double Tap or TripleTap on back of the iPhone. See below image:
Selecting your Back Tap option
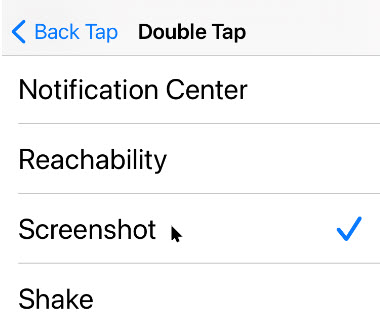
Chose one of the list of available actions. At the bottom you will find the System actions. See following image for my example in selecting Screenshot for a Triple Tap.
Selecting your Back Tap action
Scroll to the bottom to see your shortcuts. If you don’t see any or you want to create one, follow along. Here is how you can build a Camera Shortcut, then attach it to the Back Tap iOS 14 accessibility gesture.
Create a Shortcut
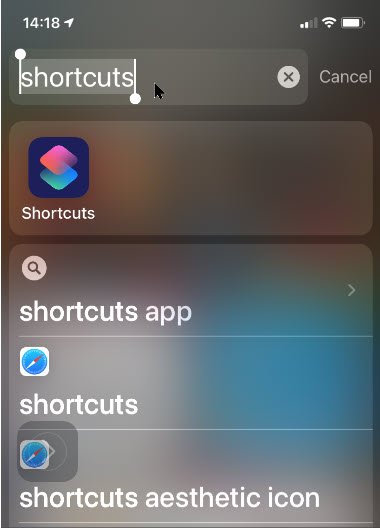
Open Shortcuts on your iPhone by swiping past your first Home Screen, then enter Shortcuts in the Search Box and tap the app. Refer to below image:
Entering Shortcuts search
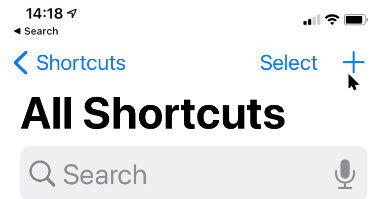
Tap the plus (+) button in the upper-right corner. See below image:
Selecting the Add icon
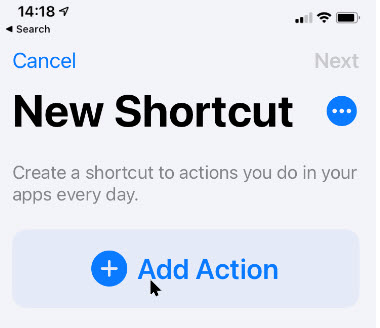
Tap Add Action. Refer to below image:
Selecting the Add Action option
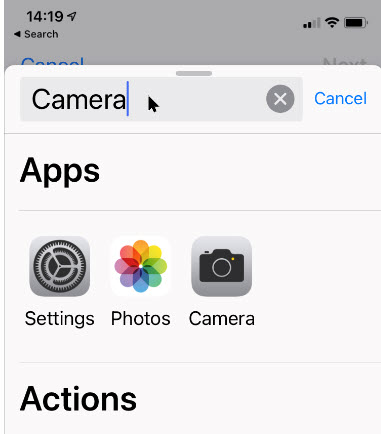
Tap the Search Bar. Now ttype in Camera and tap the app. See below image:
Entering the Camera search
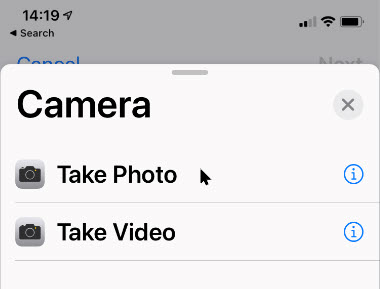
Tap your selection, Take Photo Or Take Video. See following image:
Selecting your Camera option
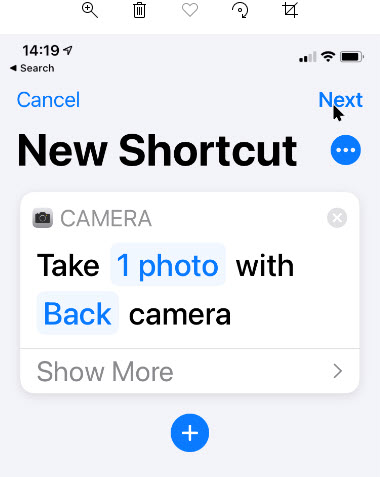
Tap Next in upper right-hand corner. Refer to below image:
Accessing the Next link
Enter a shortcut name, like Camera Shortcut and tap Done in upper right-hand corner. See below image:
Entering a Shortcut name
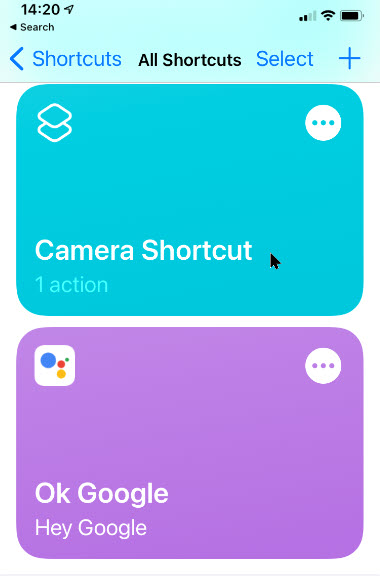
Your Shortcut(s) will be displayed. See following image;
Viewing your Shortcuts
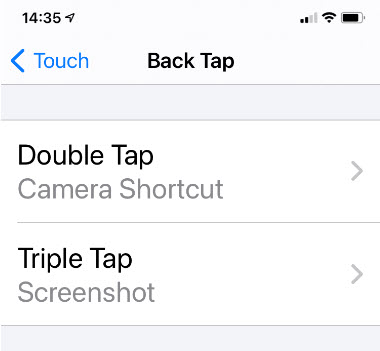
Now exit Shortcuts. You’have now successfully created your Camera shortcut. Just follow the above steps and chose this as an action to be associated with Double or Triple Back Tap. Refer to below image for my example of assigning Camera Shortcut to Double Tap and Screenshot to Triple Tap:
Displaying your Back Tap actions
That’s it. In writing this blog post, I have found the Double Tap to be too sensitive; the associated action goes off accidentally.
I hope you have found this post helpful. If so, click the Tweet icon below. This will launch Twitter where you click its icon to post the Tweet.
I have found TechSavvy.Life blog posts extremely helpful. Check them out for posts on smart phone apps, Macs and PCs!
Please feel free to leave a comment. I would love hearing from you. Do you have a computer or smart device tech question? I will do my best to answer your inquiry. Please mention the device, app and version that you are using. To help us out, you can send screenshots of your data related to your question.
The author’s Vietnam eBook on the Battle for Tra Bong: Events and Aftermath
Microsoft Word can warn you about the Oxford or “serial comma”, whether you prefer to use the extra comma or not. It is a feature in the latest Word 365 and Word 2019 and goes back to Word 2002. By default, the option is off.
Microsoft Wordcan warn you about the Oxford or “serial comma”, whether you prefer to use the extra comma or not. It is a feature in the latest Word 365 and Word 2019 and goes back to Word 2002. By default, the option is off.
The Oxford comma is one of those grammatical things that most people do not worry about. It is a question of whether to add a comma at the end of a list, for example:
Raymond is teaching on Word, Excel, Access and Outlook.
Or using the Oxford comma:
Raymond is teaching on Word, Excel, Access, and Outlook.
It is okay to ingnore the Oxford comma for personal documents, emails, tweets and your personal Facebook page. However for business purposes, especially legal documents, you should use the Oxford comma. Avoiding the use of the Oxford comma has resulted in various lawsuits forcing companies to pay employees millions; what was implied without the comma failed in the courts. Moral of the lawsuits; use the Oxford comma for clarity and to avoid lawsuits.
In our example, using the Oxford comma says Raymond is teaching each class separately. Without the comma denotes that Raymond is teaching Access and Outlook as a combined class.
The setting for the Oxford comma has changed in the various Word versions.
This is for Word 365, Word 2019, and Word 2016 for PCs and Macs
Copyright Scott Adams, Inc./Distributed by Universal Uclick for UFS
To Tweet about this post, click the Tweet icon below to launch Twitter, then click its Tweet icon to post.
Check out TechSavvy.Life for their blog posts on smartphone apps, PCs. and Macs!
Open a Word document. Next, click the File menu option. Now, navigate to
Options > Proofing > Writing Style > Settings
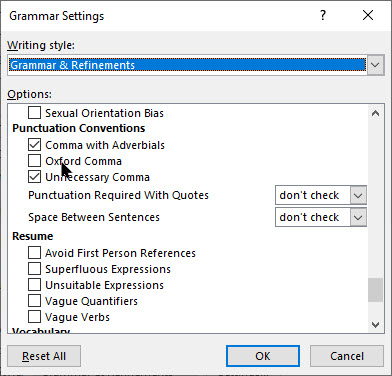
Now, scroll down the long list till you see the Oxford Comma checkbox in the Punctuation Conventions section. Refer to below image:
The Oxford Comma option
Setting the Oxford Comma
Checking the box will enforce the comma in lists. A missing Oxford comma will show a red dashed line with the suggestion “A comma before “and” or “or” could make this clearer.” See below image:
The Oxford Comma suggestion
Grammar checking in English is hard but the software does a remarkable job. This being said, the feature is not perfect and is no substitute for proof reading.
While discussing grammer, there is another similar situation. I see a lot of blog posts using words like “It’s” or Doesn”t”. The correct usage is to avoid using the apostrophe. In my examples, you would spell out the words to say “It is” and “Does not” for clarity.
I hope you have found this post helpful. If so, click the Tweet icon below. This will launch Twitter where you click its icon to post the Tweet.
I have found TechSavvy.Life blog posts extremely helpful. Check them out for posts on smart phone apps, PCs and Macs!
Please feel free to leave a comment. I would love hearing from you. Do you have a computer or smart device tech question? I will do my best to answer your inquiry. Please mention the device, app and version that you are using. To help us out, you can send screenshots of your data related to your question.
The author’s Vietnam eBook on the Battle for Tra Bong: Events and Aftermath
If you want to take a screengrab on your iPhone you may be thinking you have to press the Up Volume and Side Button at the same time. This was the way ever since Apple introduced the iPhone X. But with iOS 14 and later, there’s a new way and it’s extremely handy.
If you want to take a screengrab on your iPhone you may be thinking you have to press the Up Volume and Side Button at the same time. This was the way ever since Apple introduced the iPhone X. But with iOS 14 and later, there’s a new way and it’s extremely handy.
You can now take a screenshot just by tapping its back, thanks to a new accessibility feature called Back Tap, Let’s explore how to set up this feature.
How Does This Work
Back Tap, first introduced in iOS 14, uses the accelerometer in an iPhone 8 or later to detect if you have tapped on the back side of your device. In Settings, you can configure two or three taps to launch certain actions. Apple considers this an accessibility feature, but it is for everyone. With this tip, a quick screenshot is only just two or three taps away.
First, open Settings (the gear icon). Refer to below image:
Accessing Settings
Now, scroll down and tap the Accessibility option. See below image:
Accessing the Accessibility option
Under Accessibility option, scroll down and tap the Touch option. See following image:
Accessing the Touch option
On the Touch Settings screen, scroll down until you see the Back Tap option, now tap it. Refer to below image:
Accessing the Back Tap option
Next, in Back Tap settings, you can set the screenshot action to either Double Tap or Three Taps on back of the iPhone. See below image:
Selecting your Back Tap preference
Now, scroll down the pop-up list that appears and select the Screenshot option. See following image:
Selecting the Screenshot optiond
Next, go back one menu level to make sure your selection is saved, then exit Settings.
Now, the next time you tap two or three times on the back of your iPhone (according to your selection), you will capture the current screen and save it to an image file. These images can be later viewed in your photo album.
That’s it. This feature is one of several you can setup for using the Back Tap.
I hope you have found this post helpful. If so, click the Tweet icon below. This will launch Twitter where you click its icon to post the Tweet.
I have found TechSavvy.Life blog posts extremely helpful. Check them out for posts on smart phone apps, Macs and PCs!
Please feel free to leave a comment. I would love hearing from you. Do you have a computer or smart device tech question? I will do my best to answer your inquiry. Please mention the device, app and version that you are using. To help us out, you can send screenshots of your data related to your question.
The author’s Vietnam eBook on the Battle for Tra Bong: Events and Aftermath
So as to not clutter up your Home Screen, newly-downloaded apps from the App Store can be sent directly to the App Library. But what if you later want to open the app without digging through the library?
Ina previous post, we discussed how to move an app from your Home Screen to your App Library. In this post, we are learning the opposite; moving an app from your App Library to your Home Screen in iOS 14.
So as to not clutter up your Home Screen, newly-downloaded apps from the App Store can be sent directly to the App Library. But what if you later want to open the app without digging through the library?
In regards to moving an app, we are not deleting an app. Your app remains in the App Library. Apple should have used the terminalogy of “copying” an app instead of “moving” one. Anyway, lets explore how to move an app from the App Library to your Home Screen.
This is for the iPhone running iOS 14
Copyright Scott Adams, Inc./Distributed by Universal Uclick for UFS
Check out TechSavvy.Life for their blog posts on smartphone apps, PCs. and Macs!
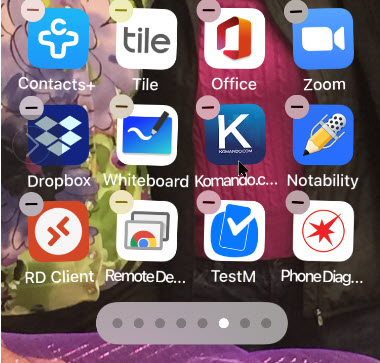
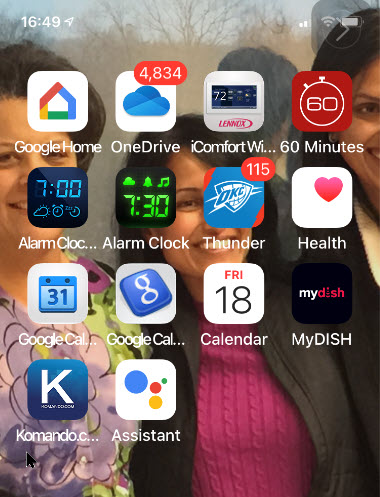
First, swipe over to the right-most Home Screen page, or press on the Dots Bar at bottom of screen and swipe; to view your App Library. Next, locate an app that you would like to move that isn’t already on your Home Screen. Press and hold down on the app. In my example, I am wanting to move the Kim Komando app under the Entertainment grouping. Refer to below image:
Locating an app to move
Next, tap the Add to Home Screen option from the pop-up context menu.Note! the app has moved to a different position because Apple automatically organizes the apps based on usage. See below image:
Selecting Add to Home Screen option
The application will be moved and placed on your Home Screen automatically in the first unused icon area which may not be your first screen. In my example, the app is moved to my eighth page because my preceeding seven pages are full. See following image:
The app added to Home Screen
Heading back to the App Library, notice that the Kim Komando app is still in the App Library under the Enertainment grouping. Refer to below image:
The app is still in your App Library
If an app is already on one of your Home Screens(s) (visible or hidden), the Add to Home Screen option won’t appear in the pop-up context menu. Instead, you’ll have to enter Jiggle mode.
Enter Jiggle Mode
Locate an app (not a folder) in your iPhone’s App Library that’s already on your Home Screen. Press and hold on the app’s icon. After a second, a pop-up context menu will appear. Continue holding down on the app until it appears on your Home Screen.
You will activate Jiggle mode (where your apps and folders will bounce around on your screen). See below image:
Entering Jiggle mode
Placing Your App
Hold down on your app and place it wherever you like on your iPhone. Tap the Done button in the top-right corner when you are finished moving the app. In my example, I am moving the Kim Komado app to the sixth screen. (Note! In between screengrabs, I deleted a page.) See following image:
Placing your app
Use the Search Bar
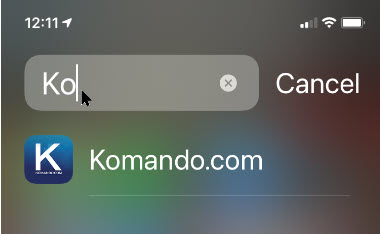
If you can not find a specific app in one of the App Library’s automatically-generated groupings, you can tap on the Search Bar at the top to locate the application. Just type in a few characters of the app name. Refer to below image:
Using the Search Bar to find your app
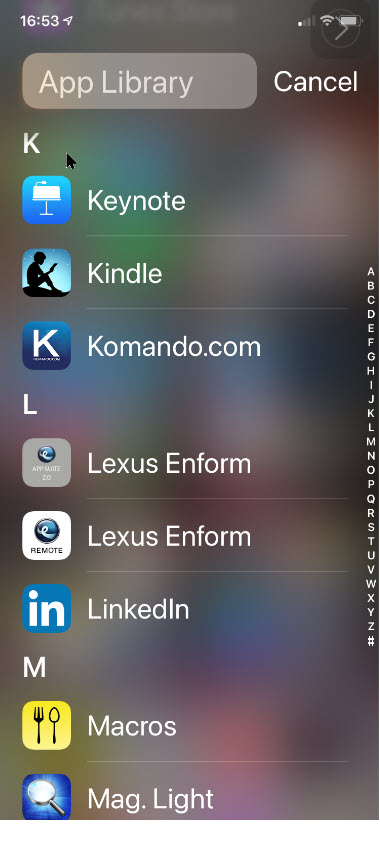
Use the Alphabet List
You may use the alphabetical list to find an app. Next, press and hold the listing until it is highlighted. The block will look like it is hovering above the rest of the menu when properly selected. See following image for my selection of “K”.
Using the alphabetical list to locate your app
In my example, when I release the hold, I can see the Kim Komando app. Refer to below image:
Viewing the found app
Enter Home Screen
Now, press and hold the app to move it to the left or right. You will be immediately shifted to your Home Screen with Jiggle mode enabled. See below image:
App being added to your Home Screen
Tap the Done button in the top-right corner when you are finished moving the app. See See following image for my placement of the Kim Komando from App Linrary to Home Screen by swiping left:
That was a lot of swipes and knowing when and where to swipe. I find iOS 14 cumbersome to use; it’s like Apple created the App Library feature as an afterthought. Have you found the App Library useful?
I have found TechSavvy.Life blog posts extremely helpful. Check them out for posts on smart phone apps, Macs and PCs!
Please feel free to leave a comment. I would love hearing from you. Do you have a computer or smart device tech question? I will do my best to answer your inquiry. Please mention the device, app and version that you are using. To help us out, you can send screenshots of your data related to your question.
The author’s Vietnam eBook on the Battle for Tra Bong: Events and Aftermath
October is designated as National Cybersecurity Awareness Month with this event marking the 17th year that we in the cybersecurity community promote increased awareness on cybersecurity and privacy issues.
October is designated as National Cybersecurity Awareness Month with this event marking the 17th year that we in the cybersecurity community promote increased awareness on cybersecurity and privacy issues. After 17 years, you might think that we should be winding down; that we don’t have much left to say on this subject. The truth is the exact opposite. Every year more and more of our daily lives and services move to the digital world. Last year my family began doing most of our grocery shopping online and now this year due to the global events of 2020, most families, including ours, moved our children’s school online. Increased cybersecurity awareness it seems is needed now more than ever.
Password Security
For this month, I wanted to share with you some thoughts and advice about passwords. You have probably read a lot of advice on passwords in the past like “make them long and unguessable”, “use a password manager”, or “don’t use the same password on more than one website”. All this advice is great, and I still recommend you do all of these steps. Most browsers have a built-in password manager that’s pretty good, easy to setup, and will even sync your passwords between your phone and computer if you use the same browser. However, the truth is that passwords by themselves are not enough to keep you fully safe on the Internet. I view password like a VCR or 8-track player. Old technology for the past that can’t keep up with today’s 4K, blue ray, and streaming Internet. Passwords provide a very minimal level of protection, but they need some help.
Multi-Factor Security
The good news is that help is already here, you just have to setup it up or turn it on. We call this additional level of security, Multi-Factor or just MFA for short. You also may see it called “Two-Factor” Authentication. You have probably already been exposed to it at your job or place of business, but it simply means using an additional level of security beyond a password. This might be a text message with a one-time code, an automated phone call, or a smart phone application. There are many different types of MFA setups. Personally, I use the smart phone version anywhere I can as I always have my phone handy.
So the question is where should you be using MFA. The easy answer is everywhere! Any place or website you use a password to login you should look and see if that website has MFA. Its usually tucked away in the account setting. You might be surprised when you find out that almost every important website you use today have some form of MFA features. Facebook, Google, Microsoft, Twitter, Amazon, Paypal, Ebay, most email providers, any financial websites, etc. They all support MFA and I highly recommend you turn it on. Especially if the website has your credit card or gift cards stored or any place you make an online purchase.
Turing on MFA takes a little extra work but it makes a big difference in online safely. Criminals and hackers may be able to guess your password, but it’s much harder for them to also steal your phone.
A Big Thank You
Thanks to Michael for being our guest and creating this blog post.
I have found TechSavvy.Life blog posts extremely helpful. Check them out for posts on smart phone apps, Macs and PCs!
Please feel free to leave a comment. I would love hearing from you. Do you have a computer or smart device tech question? I will do my best to answer your inquiry. Please mention the device, app and version that you are using. To help us out, you can send screenshots of your data related to your question.
The author’s Vietnam eBook on the Battle for Tra Bong: Events and Aftermath
Apple added an App Library to the iPhone with the release of iOS 14. To view the App Library page, swipe all the way to the left, or press on the Dots Bar at bottom of screen and swipe; it will be your last page. To exit the App Library, swipe up. Ready to remove an app from your Home Screen to reduce your screen clutter?
In a previous post, we discussed how to move an app from your App Library to your Home Screen. In this post, we are learning the opposite; moving an app from your Home Screen to your App Library in iOS 14.
Apple added an App Library to the iPhone with the release of iOS 14. To view the App Library page, swipe all the way to the left, or press on the Dots Bar at bottom of screen and swipe; it will be your last page. To exit the App Library, swipe up. Ready to remove an app from your Home Screen to reduce your screen clutter? Lets explore how this is done
This is for the iPhone running iOS 14
Copyright Scott Adams, Inc./Distributed by Universal Uclick for UFS
Check out TechSavvy.Life for their blog posts on smartphone apps, PCs. and Macs!
First, locate an app on your Home Screen you would like to move. Press and hold down the app. In my example, I am wanting to move the Kim Komando app. Refer to below image:
Viewing the Kim Komando app on the Home Screen
Next, tap the Remove App option from the pop-up context menu. See below image:
The pop-up menu for the Kim Komando app
Your iPhone will display a message asking if you want to move the selected app to the App Library or delete it. Just select the Move to App Library. See following image:
The message notification for the Kim Komando app
Use Alphabetical List
The app will now disappear from your Home Screen. Now, swipe over to the right-most Home Screen page, or press on the Dots Bar at bottom of screen and swipe; to view your App Library. You can find the app that you moved in one of the automatically-generated groupings, or by tapping on the App Library Search bar, or by tapping on a letter in the alphabetical list of installed apps. Refer to below image for searching by the alphabetical list:
Accessing the alphabetical list
Use Search Bar
You may start typing into the App Library SearchBar the first couple of letters of the app’s name to find it. See below image in locating the Kim Komandoapp:
Typing in a few characters to locate the Kim Komando app
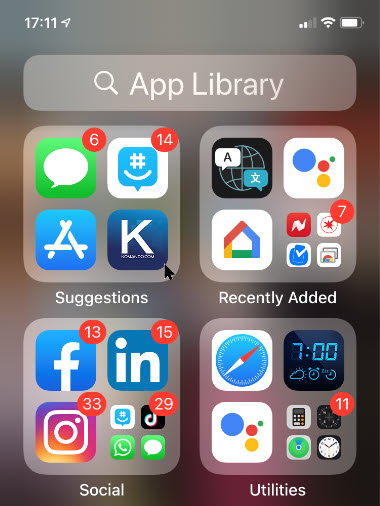
Launch the App
Once you have found the app, just tap it to launch the app. See following image for my Kim Komando app in the Suggestions library:
The App Library showing the Kim Komando app
For now, Apple doesn’t allow you to create your own groups or to decide which app should go in which group. Hopefully, Apple will improve the feature over the coming months.
Please feel free to leave a comment. I would love hearing from you. Do you have a computer or smart device tech question? I will do my best to answer your inquiry. Please mention the device, app and version that you are using. To help us out, you can send screenshots of your data related to your question.
The author’s Vietnam eBook on the Battle for Tra Bong: Events and Aftermath