RAYMOND OGLESBY @RaymondOglesby2
September 26, 2023
This is for the desktop running Edge. Screenshots are from Windows 10
Does Microsoft Edge keep placing its shortcut on your desktop without you telling it to do so? Your frustration will soon be over, as we will show you how to stop Microsoft’s web browser from creating its shortcut and cluttering your desktop. Let’s find out how this is done.
The most reliable way to prevent Edge from making its shortcut on your desktop is by tweaking a value in your Windows registry. This value tells Edge whether to make the shortcut and once you set it to OFF, the browser will not make any shortcuts.
Using the Registry Editor
Note: Making accidental incorrect changes in your Windows registry can make your PC unstable. So, be very careful while editing the values in your registry.
First, open the Run dialog box by pressing Windows+R. In the box, type the following and press Enter.
regedit
Next, in the User Account Control prompt, select Yes.
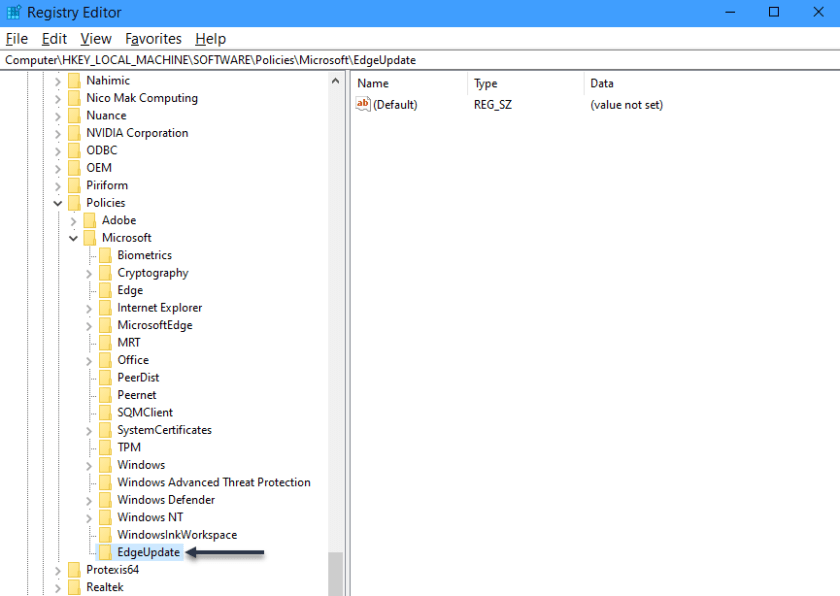
Now, in the Registry Editor, using the options on the left, navigate to the following path:
HKEY_LOCAL_MACHINE\SOFTWARE\Policies\Microsoft\EdgeUpdate
Next, if you do not see the EdgeUpdate path, create it manually by right-clicking Microsoft in the left sidebar, choosing
New > Key, using “EdgeUpdate
as the key name, and click Enter. Refer to the below image:
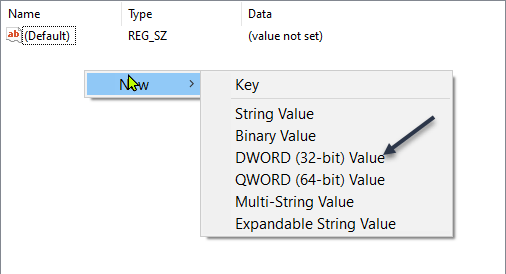
Now, on the right pane, click anywhere blank and select
New > DWORD (32-bit Value)
See the below image:
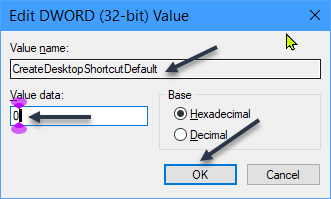
Next, use CreateDesktopShortcutDefault as the entry name and press Enter. Then, double-click the entry to open it. In the open box, click the Value Data field and type “0”. Then, choose OK. See the following image:
Now, close the Registry Editor and restart your PC. You will notice that Edge does not create its shortcut anymore.
Using Startup Programs List
If for some reason the registry edit above does not work for you, you can also work to stop Edge from automatically launching on your PC’s boot. If you remove the program from your startup list, it will not be able to make the shortcut.
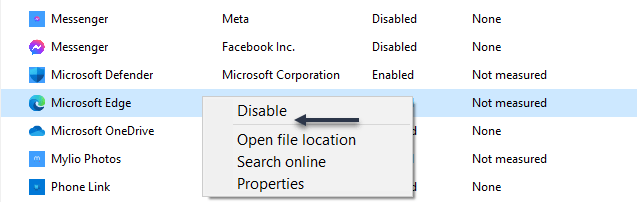
First, right-click your Start menu icon and choose Task Manager. Refer to the below image:

Next, in the Task Manager, access the Startup Apps section. Here, right-click msedge or Microsoft Edge and choose Disable. See the below image:
Now, Windows stops Edge from automatically launching on boot, preventing it from making its desktop shortcut.
Set Edge as Non-Default
If you have set Edge as the default web browser, make it the non-default browser to prevent it from creating a desktop shortcut. You should use this method if the above methods have failed to work for you.
Ensure you have at least one non-Edge web browser installed on your PC. You have various web browsers to choose from, including Chrome, Firefox, and Brave.
For Windows 10
First, navigate to
Settings > Apps > Default Apps
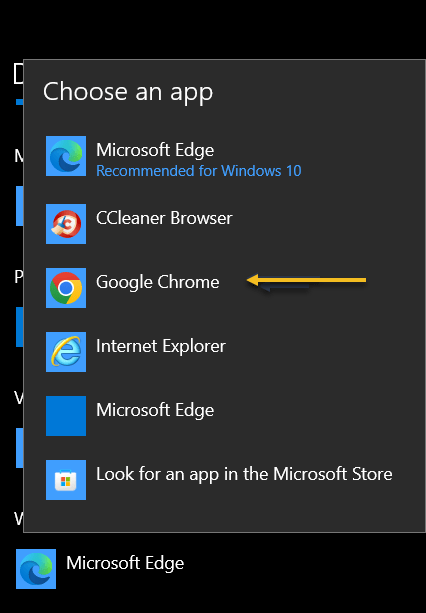
Next, in the Web Browser section, click Microsoft Edge and choose another web browser to make it the default. Refer to the following image:
Now, restart your PC, and that’s it.
Disclaimer
Technology is always changing and rarely is there static tech for smartphones and desktops. Thus, the contents of this post are only valid at the time of writing. Blog posts older than six months may have directions incompatible with your device or OS. Hopefully, older post content will continue to work as advertised. Thank you for reading TechSavvy.Life for Technology at Work For You.
Quote For the Day
Don’t worry about failure; you only have to be right once.
Drew Houston
Tweet Info
That’s it. Please feel free to share this post! One way to share is via Twitter.
Just click the Tweet icon below. This will launch Twitter where you click its icon to post the Tweet.
Checkout TechSavvy.Life for blog posts on smartphones, PCs, and Macs! You may email us at contact@techsavvy.life for comments or questions.
Tweet
I Would Like to Hear From You
Please feel free to leave a comment. I would love to hear from you. Do you have a computer or smart device tech question? I will do my best to answer your inquiry. Just send an email to contact@techsavvy.life. Please mention the device, app, and version you are using. To help us out, you can send screenshots of your data related to your question.
Author’s E-Book
You can access the e-book from a Kindle device, the Kindle App for the desktop or smartphone, which is a free app.