RAYMOND OGLESBY @RaymondOglesby2
April 20, 2022
If you do not like someone following you on Twitter but do not want to block them, you can remove them from your follower list. This only takes a few clicks. Let’s explore how to do it on Twitter’s desktop and mobile site.
This is for the devices using Twitter

Note: As of the writing, the option to remove a follower is only available on Twitter’s desktop and mobile site. The option is not yet available on Twitter for Android or iOS.
The Old and New Methods
Twitter has launched the ability to remove followers at the end of 2021. Earlier, if you wanted to remove a follower, you had to block them. Doing so basically removed that user from your follower’s list, prevented them from following you again, and also hid your tweets from them.
In the new method of removing followers, you can remove someone from your follower’s list without blocking them. Twitter does not notify a user when you remove them from your follower’s list. However, they may notice they are not following you anymore, and they can then choose to follow you again. You will need to block them if you do not want them capable of following you, or choose the nuclear option and delete your Twitter account as a last resort.
Remove Followers Using Desktop
To delete a follower from your Twitter profile on a Windows, Mac, Linux, or Chromebook computer, use the Twitter desktop website.
First, open a web browser on your computer and launch the desktop Twitter site. Log in to your account if you have not already done so.
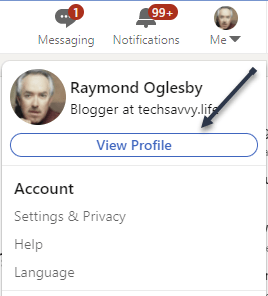
Next, in Twitter’s left sidebar, click the Profile option (the person icon). Refer to the below image:

Now, your profile page will open. Here, beneath your profile information, click the Followers link to see your followers list. See the below image:

Next, on the follower’s page, find the follower you want to remove. Then, next to that user’s name, click the Menu icon (the three dots). See the following image:

Now, in the three-dots Menu, click Remove this follower. Refer to the below image:

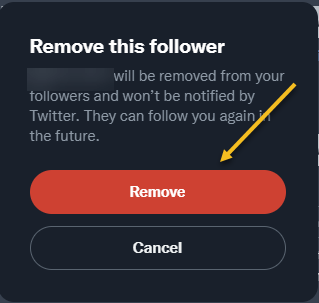
Next, you will see a Remove this follower prompt. Just click the Remove button. See the below image:
Warning: Make sure you really want to remove that follower before clicking “Remove.” Twitter will not show any further prompts and will immediately remove that user from your followers list.
Now, you are all set. Your selected follower is now removed from your Twitter followers list.
Remove Followers Using Mobile
If you are on an iPhone, iPad, or Android phone, you can use Twitter’s mobile site to remove a follower from your account.
First, open a web browser on your phone and launch the mobile Twitter site (mobile.twitter.com/home). If you launch Twitter.com (as you do on the desktop), the removal process will not work. Sign in to your Twitter account if not already done so.
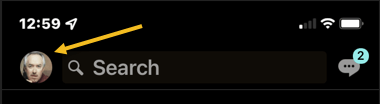
Next, in Twitter’s top left-hand corner, tap your Profile icon. See the following image:

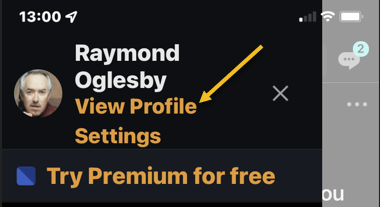
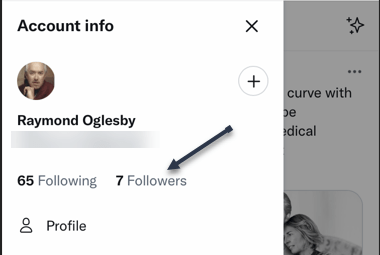
Now, an Account info menu will open. Here, tap the Followers link. Refer to the below image:
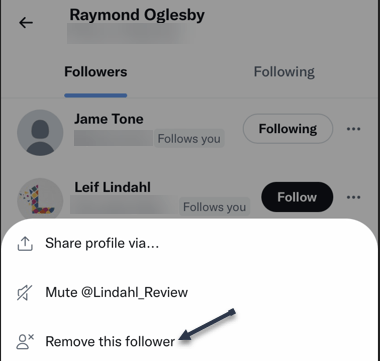
Next, on the follower’s page, find the follower you want to remove. Then, next to that user’s name, tap the Menu icon (the three dots). See the below image:

Now, in the three-dots Menu, tap Remove this follower. See the following image:
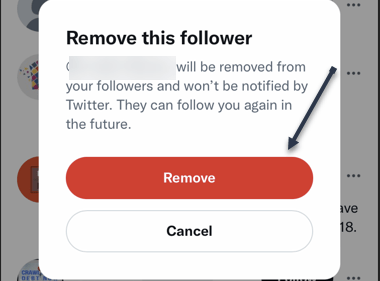
Next, you will see a Remove this follower prompt. Just tap the Remove button. Refer to the below image:
Warning: Make sure you really want to remove that follower before clicking “Remove.” Twitter will not show any further prompts and will immediately remove that user from your followers list.
Now, you are all set. Your selected follower is now removed from your Twitter followers list.
Quote For the Day
I have not failed. I’ve just found 10,000 ways that won’t work.
Thomas Edison
That’s it. Please feel free to share this post! One way to share is via Twitter.
Just click the Tweet icon below. This will launch Twitter where you click its icon to post the Tweet.
Check out TechSavvy.Life for blog posts on smartphones, PCs, and Macs! You may email us at contact@techsavvy.life for comments or questions.
Tweet
I Would Like to Hear From You
Please feel free to leave a comment. I would love to hear from you. Do you have a computer or smart device tech question? I will do my best to answer your inquiry. Just send an email to contact@techsavvy.life. Please mention the device, app, and version you are using. To help us out, you can send screenshots of your data related to your question.
Author’s E-book
You can access the e-book from a Kindle device, the Kindle App for the desktop or smartphone, which is a free app.