This post provides tips for handling AI-generated summaries in Google search results. It explains how to disable these overviews using specific search modifiers.
RAYMOND OGLESBY @RaymondOglesby2 July 23, 2024 – 3 minutes read time
This is for devices running Google or Bing. Screenshots are from Windows 10 desktop
Get the Latest Desktop Google Update
Open Google, click the 3-dot menu icon (upper right corner), then click the Settings option. If Google is outdated, it will automatically update.
Why You Will Like This Tip
View your Google or Bing search results without an AI-generated summary.
Narrow your search results to what you just want to preview.
Overview
We rely on Google every day to provide us information. But what happens when our source of knowledge becomes messy and unreliable? AI Overviews utilize Google’s Gemini AI to provide an answer to your query right on the search page; no need to click.
Using the AI Modifier
Still in its infancy, this feature occasionally surfaces incorrect information, so some web surfers look to disable it entirely. There are a few ways to make an AI Overview go away, but no method is as simple as tricking Google itself into getting rid of it. Google uses search modifiers, named operators, which help narrow search results. Here are a few examples:
Use quotations (” “) to search for the exact phrase
Add site: to search a single website
Search for a certain type of file with filetype:
Exclude terms with a minus (-) symbol. The minus symbol stands for NOT.
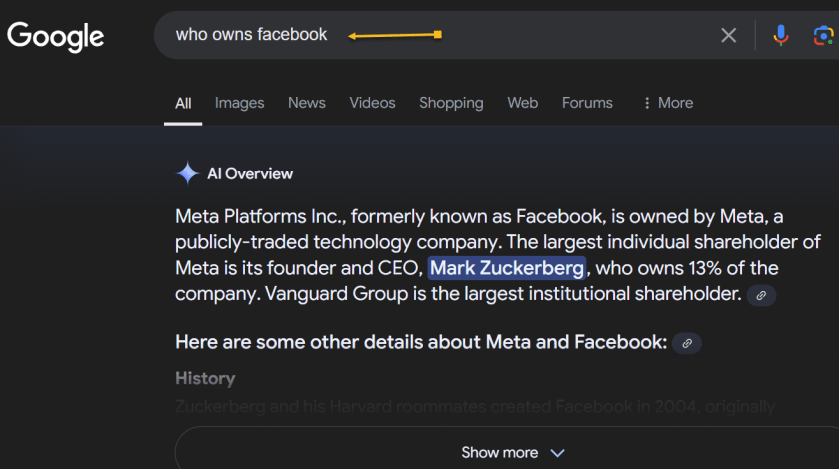
If we ask “who owns Facebook” an AI-generated summary will be displayed. Refer to the below image:
With AI-generated summary
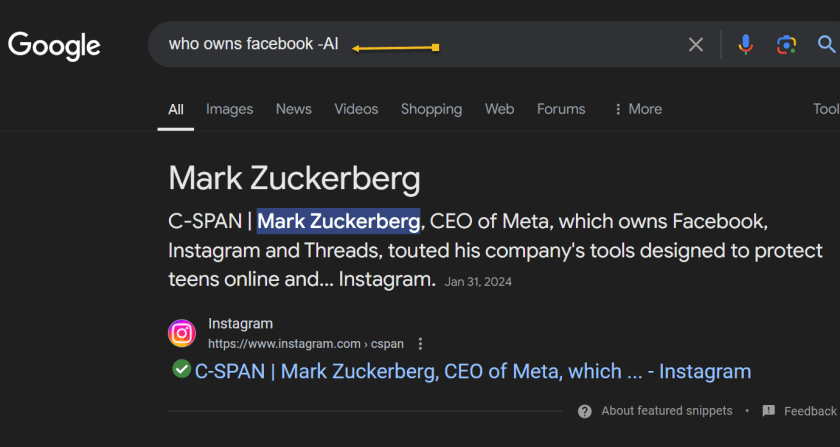
And if you add the term -AI at the end of the query, an overview is not generated. It’s a very simple solution to the AI Overview problem that can be quickly repeated on subsequent queries without needing multiple steps. See the below image:
Without AI-generated summary
However, it’s worth noting that this does not work because of the -AI modifier. On subsequent tests, we found that putting pretty much anything in there (Ex: -i, –sports, -farm) also did the same thing.
Summary
So, no, Google did not add a secret AI kill switch to its search engine. Instead, AI Overviews are likely only available under certain conditions, and by using a search modifier, you circumvent those parameters. Still, it’s an easy way to game the system until we get an easier way to disable these overlays.
Disclaimer
Technology is always changing. Rarely is there static tech for smartphones and desktops. Thus, the contents of this post are only valid at the time of writing. Blog posts older than six months may have directions incompatible with your device or OS. Hopefully, older post content will continue to work as advertised. Thank you for reading TechSavvy.Life for Technology at Work For You.
Quote For the Day
“Real gs move in silence like lasagna.”
Lil Wayne
X (Twitter) Info
That was easy. Please feel free to share this post! One way to share is via Twitter.
Just click the Tweet icon below. This will launch Twitter where you click its icon to post the Tweet.
Checkout TechSavvy.Life for blog posts on smartphones, PCs, and Macs! You may email us at contact@techsavvy.life for comments or questions.
Was this post helpful? We would love to hear your comments. Do you have a computer or smart device tech question? I will do my best to answer your inquiry. Just send an email to contact@techsavvy.life. Please mention the device, app, and version you are using. To help us, you can send screenshots of the data related to your question.
The author’s Vietnam eBook on the “Battle for Tra Bong Vietnam: Events and Aftermath” can be accessed from a Kindle device or the Kindle App for a desktop or smartphone. The apps are free.
The author’s Vietnam eBook on the Battle for Tra Bong Vietnam: Events and Aftermath
The content provides a guide on safeguarding personal information from appearing in Google search results. Users can monitor their information’s visibility and request removal if necessary. Specific steps are outlined for monitoring, requesting removal, and reporting illegal content. .
This is for devices using Google Search. Works best on a desktop/laptop. Screenshots are from Windows 10
Table of Contents
Learn When Your Information Appears Submit a Manual Request Illegal Activity Find Your Results Step 1: Find Results About You Step 2: Review the Results About You Step 3: Request Removal of Results About You View Your Results Step 1: Report URLs on Google Search Step 2: Check for Email Confirmation Step 3: Monitor the Status of Your Requests Policy Requirements for Removal Requests Invisible? Not! Email Notifications Related
Looking for more privacy? Here’s how to remove your phone number, email, physical address, and lots of other personal data about yourself from Google’s search results.
Personally Identifiable Information (PII) is what every bad actor wants. If they get their hands on it, it can be used to rob, impersonate, or even endanger you on the internet and in the real world. One of the prime places to find it is via Google, and while Google can not stop that info from appearing on other websites, you can try to remove it from search results.
Let’s explore how to get notified when your PII appears in a search and how to tell Google to stop it from happening again. Like with other endless settings and features in Google, this is a complex process.
Learn When Your Information Appears
You are unable to tell Google to delete your info if the search is not even finding and displaying it. Google has an option to notify you when that happens.
The spot to visit is called the Results About You activity page. You have to be logged into Google for it to work. Follow the prompts on the screen as Google asks you for your physical addresses, emails, and phone numbers. Tell Google how you want to be notified (email or push notification via the Google app). Then wait. Refer to the below images:
Your Get Started pageFill in your criteriaHow to be notifiedGoogle Search is working
After a few hours, you should receive a report from Google on what’s turning up that’s yours PII-wise. You can also just go back to the Results About You page to check it. Plus, you can tick off the boxes next to any result you want to make sure is removed from the search. The status of your request will also be displayed (eventually). Just be patient.
Submit a Manual Request
The above is just your address/contact Info. Google will also let you request to remove other things online that you may find harmful. That includes:
National/government ID numbers
Bank accounts
Credit card numbers
Personal signatures
Login info and credentials
Medical records
“Irrelevant pornography” (that is, explicit material somehow tied to your name)
Login credentials
Deepfake porn you may appear in against your will
You can request this without even having to prove that the data floating out there is a problem (with some exceptions).
If you own the website displaying the information you do not want to show, Google spells out how to block a URL or specific site pages from Google search results.
Removing info requires that you know if it is appearing only in Google search results or in results on a separate website. If the latter, Google may not be very effective, and it asks whether you have contacted the site’s owner first to remove the information. It also suggests ways to get in touch with a site.
Maybe you do not want to get in touch with a site or you have already tried and were unsuccessful. Google asks you a series of questions, such as what type of info you would like removed, narrowing it down to one specific thing when possible. It will also ask whether the content is being shared with the intent of doxing you; that’s when someone shares your PII with the intent to harm you. You may need to enter a lot of data, but the more detail you provide, the less likely it is that Google will have to follow up with you before nuking the PII in search results.
Google says if your PII appears on a live page you control and you have already updated it to remove the information, it should eventually go away. But the page might be cached by the search engine, so you should request to remove outdated web pages. You will need specific URLs for the pages; you can submit up to 1,000 on the form. See the following images:
Request to refresh outdated contentSubmit your request
Illegal Activity
If you see something in a Google search that’s illegal, such as potentially criminal content, intellectual property infringement, or Child Sexual Abuse Material (CSAM), Refer to the below image:
Find and Remove Personal Contact Info in Google Search Results
When you use Results about you, you can find out if your personal contact info, like your home address, phone number, or email address shows up in search results.
Find Your Results
Step 1: Find Results About You
Go to the Results about you page.
In the Google App:
Log in to the Google app.
To open the menu, click your Google Account avatar.
From the menu, select Results about you.
From the mobile web or desktop:
Log in to your Google Account.
To open the menu, click your Google Account avatar.
From the menu, select Manage your Google Account > Data & privacy.
In the History settings, select My Activity > Other activity.
Scroll down to the Results about you section, and select Manage results about you.
Select Get started or Settings.
Enter your name and the contact info that you want to find in search results.
Google uses this information to check for search results that show this info.
You can also enter these types of contact info in the form:
Nickname
Maiden Name
Multiple personal phone numbers
Multiple addresses
Multiple email addresses
Set up notifications
You can choose to receive email notifications if Google finds results with your contact info. You can also receive push notifications through the Google app. If you have notifications on, you will receive a notification to let you know if the results match your info. After that, you will receive a new notification when new results are found that match your contact info.
Step 2: Review the Results About You
If you have notifications on, you will get a notification within a few hours to let you know if any search results match your name and personal contact info. You can also check directly from the Results about you page.
To view your results, from the Results about you page, go to the Results to review tab.
When you select a result, you can learn more about it, like the website it’s from, or the contact info it contains.
Step 3: Request Removal of Results About You
If you see a result that you would rather keep private, you can request to remove it from search results.
To remove more than one result, select the checkbox next to each result, then click Request to remove.
To remove a single result, select the result to expand, then click Request to remove.
If you do not want to start a removal request, you can also choose Mark as reviewed.
Google considers some results valuable to the public. These can include government or educational websites, online newspapers, or business websites. If your result is from a website like this, you won’t find a Remove result option.
To confirm your removal request and for status updates when your request has been reviewed, you will get an email. You can check the status of your requests anytime from Results about you under Removal requests.
View Your Results
Step 1: Report URLs on Google Search
On desktop or mobile, log in with your Google Account.
You will get an update on the status of your requests through the email address associated with your account.
If you want to request the removal of a result for someone else, or if you do not want to log in, you can use the detailed removal request form instead.
On Google Search, search for your name.
To find results that show your personal contact info, you can search for your name and your home city, or your name and your home address.
To reach About this result panel, click More.
Select Remove result > It shows my personal contact info.
Go through the reporting flow.
Submit your request.
After you submit your request, select I’m done.
Tip: Make sure to enter your name and the personal contact info shown on the result page exactly as they appear on the result. For example, if the result shows:
Additional Information
Your nickname: Enter your nickname in the form.
An old home address: Enter the old home address in the form.
More than one type of contact info: You only need to include one type of contact info in your request form. This includes your phone number and your home address.
More than one type of contact info: You do not need to submit multiple removal requests for the same URL.
Step 2: Check for Email Confirmation
Within the next few hours, you will receive an email confirmation that your request was submitted.
After you select a specific request, you can check details like the:
Link to the page you flagged
Submission day and time
Request ID
Contact info you flagged on the page
Tip: There may be a delay between when a request is approved and the result is removed from search results. You can check if your info is already removed within a few hours after it was approved.
Policy Requirements for Removal Requests
After you submit a request, Google will review it to make sure it meets policy requirements for removal. Requests must meet the following policy requirements:
The contact info displayed on the result has to be your personal info. To request to remove professional info that’s been posted with the intent to harm you, use the detailed removal request form.
You do not control the info yourself. This means contact info that you can remove from the internet yourself, like info on a social media page or a personal blog that you own.
As Google Search seeks to provide users with useful info, it won’t remove info that’s valuable to the public. For example, Google won’t remove results for web pages that are owned by:
Educational or government institutions
Newspapers
See the following image for your request being processed:
Your removal request is in process
For now, just wait while Google processes the request. When Google has finished the Removal requests status will change. Refer to the below image:
Your removal request is approved
You will receive a Request approved notification. Just click the See details button for additional information. Refer to the below image:
Confirmation of your removal request
Your removal request details are now displayed. See the following image:
Details of your removal request
Invisible? Not!
Scrubbing the search engines of your digital footprint is not the same as taking it off the internet. Search engines did not put the info out there; they indexed it, grabbing the data from some other source. They might snag it again from a different source.
You are never going to be completely free of search engine results unless you delete any traces of yourself and get offline entirely. You could always try services such as Abine’s DeleteMe or other personal data removal services and many others, which do what they can to prevent your information from being used by data brokers, though for a subscription fee.
Until you delete all your old email accounts, stop using mobile apps and location services, quit social media, stop online shopping, and never sign into anything ever again, some entity will have something on you. Trying to hide something only makes it easier to find.
Email Notifications
Once you have set up Google Search based on your criteria, you will receive emails regarding new search results about you. Refer to the below image:
Technology is always changing. Rarely is there static tech for smartphones and desktops. Thus, the contents of this post are only valid at the time of writing. Blog posts older than six months may have directions incompatible with your device or OS. Hopefully, older post content will continue to work as advertised. Thank you for reading TechSavvy.Life for Technology at Work For You.
Quote For the Day
You don’t learn to walk by following rules. You learn by doing and falling over.
-Richard Branson
Tweet Info
That’s it. Please feel free to share this post! One way to share is via Twitter.
Just click the Tweet icon below. This will launch Twitter where you click its icon to post the Tweet.
Checkout TechSavvy.Life for blog posts on smartphones, PCs, and Macs! You may email us at contact@techsavvy.life for comments or questions.
Please feel free to leave a comment. I would love to hear from you. Do you have a computer or smart device tech question? I will do my best to answer your inquiry. Just send an email to contact@techsavvy.life. Please mention the device, app, and version you are using. To help us out, you can send screenshots of your data related to your question.
Author’s E-Book
You can access the E-book from a Kindle device, or the Kindle App for a desktop or smartphone. The apps are free.
The author’s Vietnam eBook on the Battle for Tra Bong Vietnam: Events and Aftermath
You may have noticed that opening a link in Outlook behaves differently and not in your chosen browser. That’s because Microsoft wants to push their Edge browser, though they have some excuses for the change.
This is for devices running Microsoft Outlook. Screenshots are from Microsoft Outlook 365 in Windows 10
You may have noticed that opening a link in Outlook behaves differently and not in your chosen browser. That’s because Microsoft wants to push their Edge browser, though they have some excuses for the change.
When you click on a link in Outlook for Windows, it might open in the Edge browser, even though you have chosen a different default browser in Windows settings (like Chrome or Firefox).
And instead of just opening the web page, the email appears in a right side-pane alongside the link you clicked. Refer to the below image:
Side-by-Side View
According to Microsoft, this change means “No more disruptive switching—just your email and the web content you need to reference, in a single, side-by-side view.” They may have a point and it’s a change that suits some people.
It’s also a shameless attempt to push people to the Edge browser by overriding their browser choice with Microsoft’s preference.
This applies to Windows 10 or 11 only. Microsoft only says this is for ‘Outlook’ not which versions, but presumably Outlook 365 for Windows. For now, it only works on Microsoft-hosted emails including Outlook.com/Hotmail however it will be extended to Gmail later.
Change Browser via Windows
First, the default browser is chosen in Windows. To set up this browser, head to:
Settings | Apps | Default Apps
and choose your preferred browser. See the below image:
Setting Chrome as the web browser in Windows
Change the Search Engine and Default Browser
Next, for Chrome, ensure you have set the search engine. To find out, open Chrome and head to:
Menu (the 3 dots in the upper right) | Settings | Search engine
and, if necessary, set your search engine to Chrome. See the following image:
Setting Chrome as the search engine
Now, for Chrome, ensure you have set the default browser. To find out, open Chrome and head to:
Menu (the 3 dots in the upper right) | Settings | Default browser
Refer to the below image:
Your default browser
The reason why we are doing the above is to ensure we are using Google products. You can have Firefox as your browser and Chrome as your search engine.
Change Outlook Links Default Browser
Next, open Outlook and go to:
File | Options | Advanced | Link Handling
to change the browser to Default Browser. See the below image:
Setting Default Browser in Outlook
Side-by-Side View May Not Work
To be honest, you may not get this feature to work no matter what combination of Outlook, Windows, and Edge you try. We prefer to test for ourselves and not take Microsoft’s word. If your email links open in your browser with no side-by-side view, do not worry.
Disclaimer
Technology is always changing and rarely is there static tech for smartphones and desktops. Thus, the contents of this post are only valid at the time of writing. Blog posts older than six months may have directions incompatible with your device or OS. Hopefully, older post content will continue to work as advertised. Thank you for reading TechSavvy.Life for Technology at Work For You.
Quote For the Day
Ideas are easy. Implementation is hard.
Guy Kawasaki
Tweet Info
That’s it. Please feel free to share this post! One way to share is via Twitter.
Just click the Tweet icon below. This will launch Twitter where you click its icon to post the Tweet.
Checkout TechSavvy.Life for blog posts on smartphones, PCs, and Macs! You may email us at contact@techsavvy.life for comments or questions.
Please feel free to leave a comment. I would love to hear from you. Do you have a computer or smart device tech question? I will do my best to answer your inquiry. Just send an email to contact@techsavvy.life. Please mention the device, app, and version you are using. To help us out, you can send screenshots of your data related to your question.
Author’s E-Book
You can access the e-book from a Kindle device, the Kindle App for the desktop or smartphone, which is a free app.
The author’s Vietnam eBook on the Battle for Tra Bong Vietnam: Events and Aftermath
By default, when you search for something on Google, the site displays 10 results per page. If you would like to see more results, you can increase the results count from a Settings option on Google. (Note! As of this writing, this feature is only available for the desktop).
By default, when you search for something on Google, the site displays 10 results per page. If you would like to see more results, you can increase the results count from a Settings option on Google. (Note! As of this writing, this feature is only available for the desktop). In this blog post, we will show you how easily this is done.
This is for desktop devices using Google Search
Copyright Scott Adams, Inc./Distributed by Universal Uclick for UFS
To view more search results without having to click the next page number for your Windows, Mac, Linux, or Chromebook computer, first, open a web browser on your computer and access the Google site.
At the bottom right-hand corner of the Google site, click Settings. Refer to the below image:
Accessing Google Search Settings
Next, from the pop-up menu that opens, select Search settings. See the below image:
Accessing Search settings option
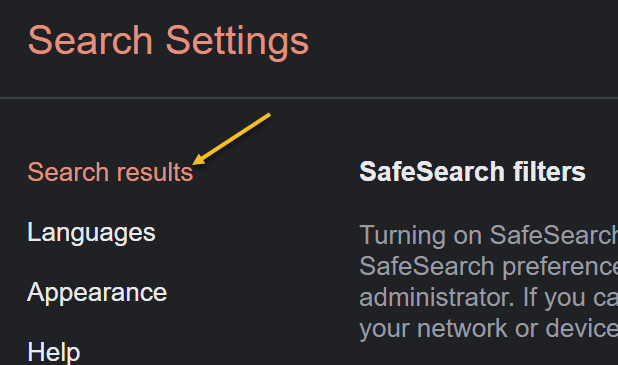
Now, on the Search Settings page, from the left sidebar, select Search results. See the following image:
Accessing Search results option
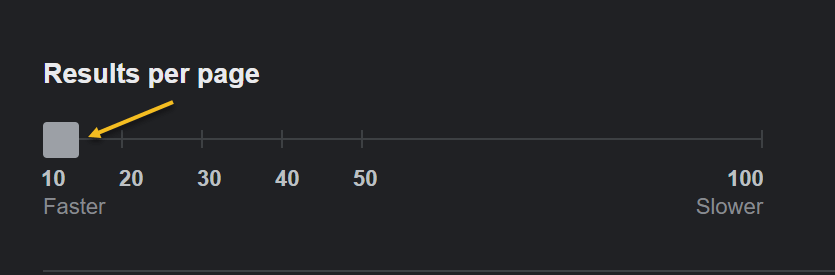
Next, on the right pane, you will see a Results per page slider. To increase the number of results per page, drag this slider to the right. Beneath the slider, you will see the number of search results you can enable on Google. Your options are 10, 20, 30, 40, 50, and 100. (Note! Your searches will be slower if you choose to display more results per page than the default). Refer to the below image:
Setting the slider for the number of search results per page
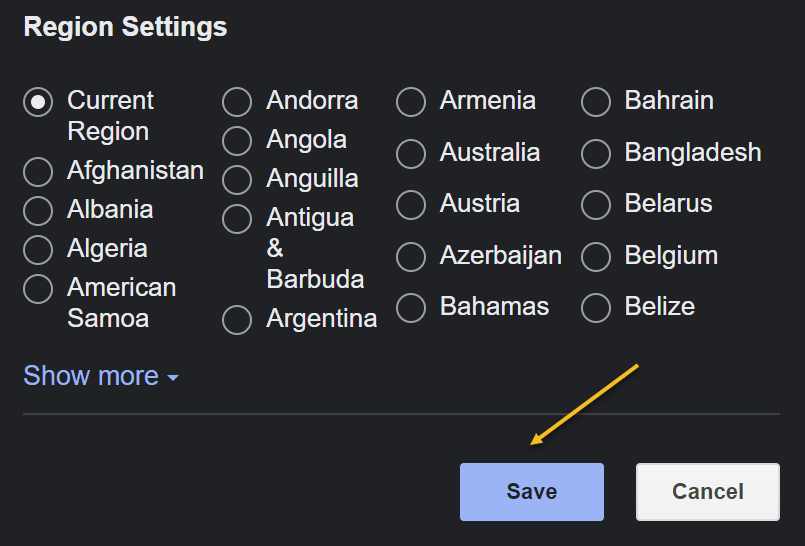
Now, to save your changes, scroll down to the bottom of the page, and click Save. See the below image:
Save your changes
Next, in the prompt, Your preferences have been saved, click OK. See the following image:
Confirming your changes
You will now see your selected number of search results per page on Google Search on your desktop. If you ever want to modify this option, you can head to the same menu and choose a new number.
Here is a helpful insight on using Google Search for you to consider. As of this writing, Chrome 95 has a bug in its Reading List option. To research, this or any other problem, start with the highest level then drill-down levels. For example, you would enter the following text for the search:
Google Chrome 95 Reading List option Add current tab is dimmed
The highest level is Google, next is Chrome 95, and so on. You will get better search results by following this guideline.
Quote For the Day
When you’re an engineer, you want to analyze things a lot. But if you believe that the most important data points are people, then you have to make conclusions in relatively short order. Because you want to push the people who are doing great. And you want to either develop the people who are not or, in a worst case, they need to be somewhere else.
Tim Cook
That’s it. Please feel free to share this post! One way to share is via Twitter.
Just click the Tweet icon below. This will launch Twitter where you click its icon to post the Tweet.
Check out TechSavvy.Life for blog posts on smartphones, PCs, and Macs! You may email us at contact@techsavvy.life for comments or questions.
Please feel free to leave a comment. I would love to hear from you. Do you have a computer or smart device tech question? I will do my best to answer your inquiry. Just send an email to contact@techsavvy.life. Please mention the device, app, and version you are using. To help us out, you can send screenshots of your data related to your question.
The author’s Vietnam eBook on the Battle for Tra Bong Vietnam: Events and Aftermath