RAYMOND OGLESBY @RaymondOglesby2
December 15, 2021
It’s not always convenient to delete your entire history, but you can instead choose to delete specific websites from your history (and the data they leave behind on your device). Let’s explore how this is done.
This is for the iPhone and iPad using Safari

How to Remove Websites History
Safari will record any websites you visit unless you use Private Browsing. Once a website is in your history it will appear in the URL bar when you start typing a related term. There are all sorts of reasons you may want to prune specific websites, and it’s easy to do so.
First, open Safari and tap on the Bookmarks icon at the bottom of the screen that resembles an open book. Refer to the below image:

Next, a pop-up will appear with three tabs for your Bookmarks, Reading List, and History. Tap on the Clock icon to view your history. See the below image:

Now, you can now swipe left on any entry in your history and tap Delete to remove it for good. See the following image:

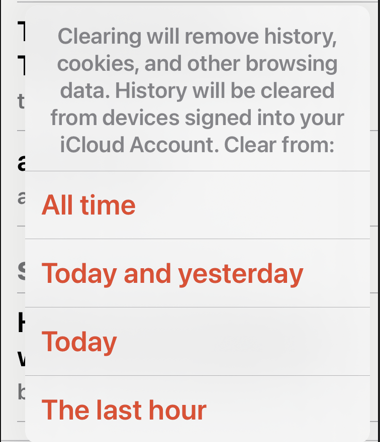
Rather than scrolling through your entire history of visited websites, you can also search for specific terms or URLs using the on-screen search box. If you tap the Clear button at the bottom right-hand corner, you can remove website history based on a timeframe, like All time, Today and yesterday, Today, and The last hour. Refer to the below image:
But that’s not the only evidence a website may have left behind on your device.
How to Delete Website Data
Websites leave all sorts of data on your device including cached images and cookies. If you want to remove all signs of a website, it’s important to remove website data as well.
First, launch:
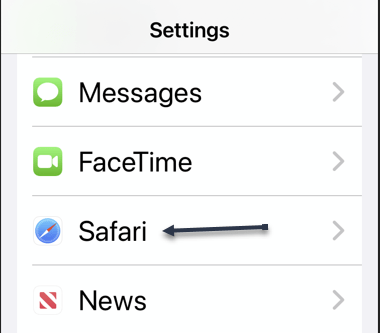
Settings > Safari > Advanced > Website Data
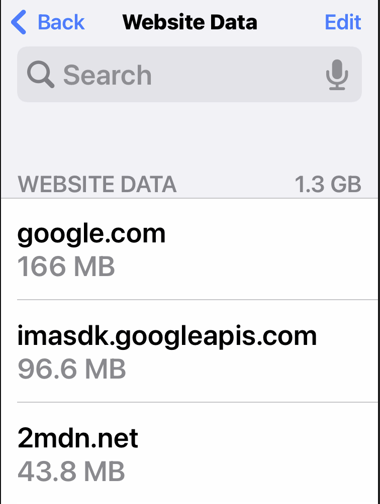
This menu may take a little while to load as Safari fetches a full list of website data and estimates how much storage each entry takes up on your device. See the below image:
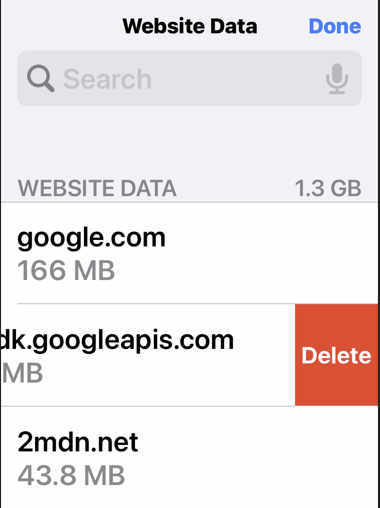
Next, you can now follow the same procedure as above by swiping left on any websites you would like to remove and tapping the Delete button that appears. See the following image:
Now, you can also search for specific websites using the search bar at the top of the screen, or nuke everything using the Remove All Website Data button at the bottom of the list. Refer to the below image:

Note! If you do remove website data (or wipe everything), there may be some drawbacks like having to log in again or having your shopping cart emptied.
Private Browsing Mode
You can use Private Browsing mode in Safari at any point to visit a website without it being recorded to your device. To do so, tap on the tab icon in the lower right corner of the screen followed by the number of tabs you have open at the bottom of the screen. From here tap Private to switch for a private browsing session. See the below image:

Note! All tabs in your private browsing session will remain open until you close them, so make sure you close anything that may compromise your privacy.
Quote For the Day
I’m excited about Augmented Reality because unlike Virtual Reality, which closes the world out, AR allows individuals to be present in the world but hopefully allows an improvement on what’s happening presently.
Tim Cook
You are finished. Please feel free to share this post! One way to share is via Twitter.
Just click the Tweet icon below. This will launch Twitter where you click its icon to post the Tweet.
Check out TechSavvy.Life for blog posts on smartphones, PCs, and Macs! You may email us at contact@techsavvy.life for comments or questions.
Tweet
I Would Like to Hear From You
Please feel free to leave a comment. I would love to hear from you. Do you have a computer or smart device tech question? I will do my best to answer your inquiry. Just send an email to contact@techsavvy.life. Please mention the device, app, and version you are using. To help us out, you can send screenshots of your data related to your question.