Understanding iPhone Camera Lenses: A Guide

The post discusses the evolution and function of iPhone camera lenses since the iPhone 11 Pro, detailing the Wide, Ultra Wide, and Telephoto lenses. It emphasizes the significance of each lens type, particularly noting the advancements in the iPhone 16 Pro Max. Users can enhance photography with third-party lens options.

RAYMOND OGLESBY @RaymondOglesby2
September 23, 2025 – 7 minutes read time

Since the release of the iPhone 11 Pro in September 2019, seeing three lenses on an iPhone has become the norm, at least for the Pro models. In this post we will explain why iPhones, iPads, and most Android phones have multiple lenses and what each iPhone 16 lens does. Let’s go over all the different iPhone camera lenses!

  • The Wide lens is the main camera lens that every iPhone has.
  • Most models after the iPhone 11 have an Ultra Wide lens.
  • Only the Pro models have an iPhone telephoto lens.

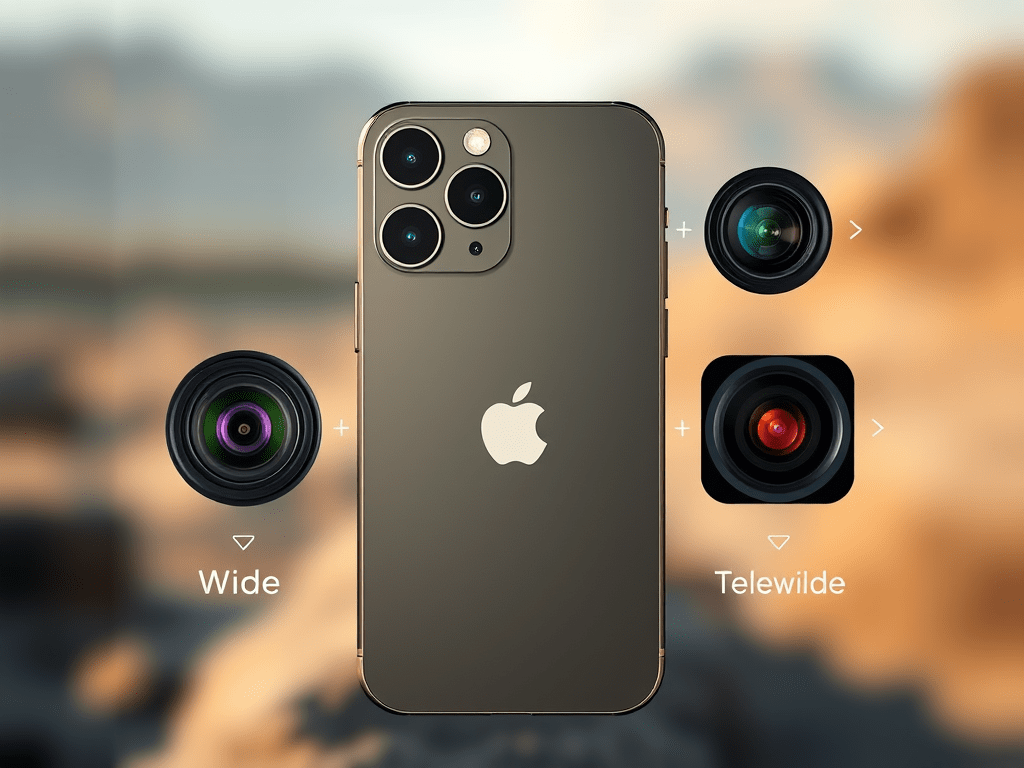
The wide camera lens on the iPhone is the standard lens that has no optical zoom and shows the subject the way you see it with your eyes. Every iPhone that ever existed has had one, but that does not mean that they are all the same.

The Original 2007 iPhone’s wide lens had a resolution of 320×480 and 2 Megapixels with a pixel size of 163 pixels per inch. Today’s most powerful iPhone, the iPhone 16 Pro Max, has a resolution of 2796×1290 and 48 Megapixels with 460 pixels per inch. The iPhone 16e has a new type of camera lens that Apple calls a 2-in-1 48 MP Fusion camera. It’s a single lens that can functions both as a wide lens and a telephoto lens.

Typically, on an iPhone with three cameras (or an iPhone with two cameras), the bottom lens will be the Wide lens. If your device only has one lens, you can buy a third-party telephoto or macro lens for your iPhone, regardless of its model.

Ultra Wide Angle Lens: iPhone SE 2 & SE 3, & 11–16

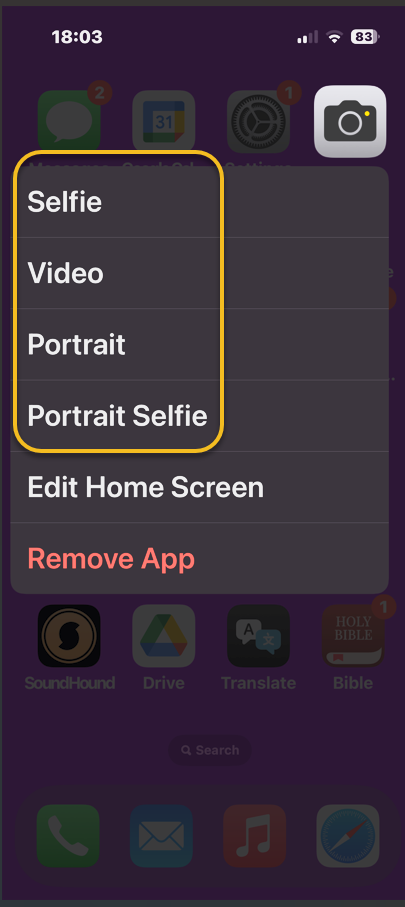
The Ultra Wide lens can be used to “zoom out” of the frame before taking the photo. It is sometimes called a fisheye lens. If you are backed against a wall and want the camera to show more of what’s ahead of you, switch to the Ultra Wide lens. The Ultra Wide lens is also the key to taking great macro mode photos.

Keep in mind that the image may appear distorted around the edges when you use this lens. This is sometimes called the fisheye effect. You can turn on Lens Correction in your Camera settings to make it look more natural. You can find an Ultra Wide Angle lens, sometimes simply called the wide-angle lens, on the iPhone SE 2, iPhone SE 3, and any model of iPhone 11 to 16.

When you see an iPhone with two lenses, one will be the regular Wide lens, and the other will be the Ultra Wide lens. On an iPhone with three cameras, the Ultra Wide lens is in the middle. What many people do not realize is that even though the Wide lens has a 0.5x zoom, you can pinch your fingers to zoom between the range of 0.5 and 1x.

Telephoto Lens: Pro Models of iPhone 11–16

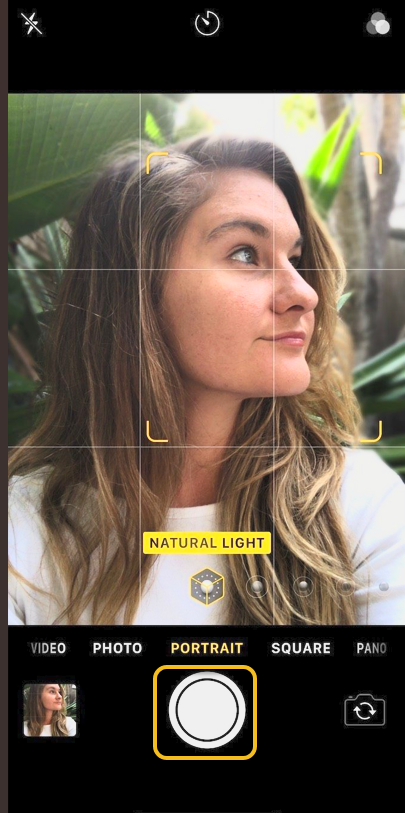
What is a Telephoto lens? The iPhone zoom lens, officially known as the Telephoto lens, has a higher zoom and can take close-up photos of your subject; it is useful for Portrait mode photos. The Telephoto lens can help you see faraway objects closer without compromising quality. For example, if your subject is a wild animal and you cannot get physically closer, you might use the Telephoto lens on your iPhone to make it look closer than it actually is.

So which iPhone has a Telephoto lens? Only the Pro models of the iPhone 11 through the 16 have the Telephoto lens. The iPhone 16 Telephoto lens is the top one and has a 5x zoom with a focal length of 120 mm, ƒ/2.8 aperture, as well as a 2x zoom that has a focal length of 48 mm, ƒ/1.78 aperture, and a digital zoom of up to 25x. What’s confusing is that 5x zoom does not mean that the image will be magnified five times. The magnification depends on the focal length of the lens.

Every iPhone Telephoto lens happens to have a different zoom:

  • The iPhone 11 has a 2x zoom
  • The iPhone 12 has a 2.5x zoom
  • The iPhone 13 has a 3x zoom.
  • The iPhone 14 has a 2x and a 3x zoom
  • The iPhone 15 has a 2x and a 5x zoom
  • The iPhone 16 has a 2x and a 5x zoom

Note! The two telephoto zooms on the Pro models of iPhone 14, 15, and 16 are why Portrait mode on these phones has a different zoom amount, so if you upgrade to a newer model, you’ll notice that it has a different magnification.

iPhone is known for having one of the best phone cameras on the market, thanks to its powerful lenses. When shopping for a new iPhone, you may be wondering which iPhone has the best camera. Currently, the iPhone 16 Pro Max has the best resolution and highest zoom, but every iPhone with ‘zoom lenses’ (Pro models with Telephoto lenses) is an excellent option. Plus, it has LiDAR sensors for better low-light photography. While the newest pro model tends to have the best camera, even older models and the SE take great photos, so it really depends on your individual photography and videography needs. Next, find out how to share your pictures with your non-iPhone friends!

  • Can you buy third-party iPhone camera lenses?Yes! Many third-party companies create lenses and other iPhone camera attachments that can be clipped onto your existing lenses. I recommend checking out Sandmarc and Moment lenses in particular. Moment has a great telephoto lens for iPhone (also called a zoom lens for iPhone or a telescoping lens for iPhone).
  • What is LiDAR? LiDAR sensors accurately measure distances between objects.
  • How does the iPhone telephoto lens work? The iPhone telephoto lens lets you “zoom in” or take close-up photos of your subjects or a landscape. The slight protrusion of the lenses is what makes it possible for newer iPhones to have up to 5x digital (and 25x optical) zoom.

Technology is constantly evolving, and smartphone and desktop tech rarely remains static. Therefore, the information in this post is only accurate as of the date it was written. Blog posts that are older than six months may contain instructions that are no longer compatible with your device or operating system. We hope that the content from previous posts continues to function as intended. Thank you for reading TechSavvy.Life, where technology works for you.

“When it comes to technology, curiosity is the new currency.” 

– Susan Wojcicki, Former CEO of YouTube

That’s it. Please feel free to share this post! One way to share is via Twitter.

Just click the Tweet icon below. This will launch Twitter where you click its icon to post the Tweet.

Checkout TechSavvy.Life for blog posts on smartphones, PCs, and Macs! You may email us at contact@techsavvy.life for comments or questions.

We value your feedback! Was this post helpful? Please share your comments with us. If you have a tech question related to your computer or smart device, feel free to reach out. Just send an email to contact@techsavvy.life, and be sure to include the device, app, and version you are using. To assist us further, you can also attach screenshots related to your inquiry.

Author’s eBook

The author’s Vietnam eBook on the “Battle for Tra Bong Vietnam: Events and Aftermath” can be accessed from a Kindle device or the Kindle App for a desktop or smartphone. The apps are free.

The author’s Vietnam eBook on the Battle for Tra Bong Vietnam: Events and Aftermath

How to Remove Duplicate Photos on iPhone

The Photos app helps users efficiently manage storage by identifying and merging duplicate photos on iPhones. Users can choose to delete lower-quality versions while retaining higher-quality images. The process allows for manual or automatic merging, ensuring that storage is optimized and photos remain organized. If mistakes occur, deleted photos can be restored within 30 days.

RAYMOND OGLESBY @RaymondOglesby2
September 16, 2025 – 5 minutes read time

Duplicate photos take up valuable storage space and make it harder to keep your photos organized. The Photos app has the perfect solution for putting an end to duplicates once and for all!

Understanding the algorithm used by the Photos app to delete duplicate photos can save you the headache of attempting to retrieve a version of a photo you wanted to keep.

Let’s explore how to automatically find duplicate photos on iPhones and merge them to delete the lower-quality image.

  • Save space and declutter your Photos app by automatically merging duplicate photos.
  • Keep the higher quality version of duplicated photos.

This tip was performed on an iPhone 14 Pro running iOS 18.6.1.

Click here to learn how to update your iPhone to the latest iOS version.

First, open the Photos app . Refer to the image below:

Duplicate 1
Selecting the Photos app

Next, scroll down until you see Utilities and select Duplicates underneath. If you do not see Duplicates as an option, you can select the Customize & Reorder button by scrolling to the bottom to get this option. See the image below:

Duplicate 2
Selecting Duplications option

Now, you will see a list of duplicate photos, including the date you took or saved them, and the size of each image. See the following image:

D Duplicate 3
Date and Size of the duplicate photo

Next, you can go through them individually and tap on the one you wish to delete, then tap the Trash icon. Refer to the image below:

Duplicate 4
Delete a photo via the Trash icon

Now, you can also tap Select in the top right corner. See the image below:

Duplicate 5
Accessing the Select option

Next, you can either go through and tap the individual photos that you wish to delete so that you have more control over what you are keeping, or you can tap Select All. See the following image:

Duplicate 6
Accessing the Select All option

Now, if you tap Merge and confirm that you wish to merge the duplicates, it will keep the highest-quality image and relevant metadata while moving the rest to Recently Deleted. Refer to the image below:

Duplicate 7
Selecting to merge all duplicates

Next, you can also go through individually and tap Merge to manually delete the duplicate. See the image below:

Duplicate 8
Selecting to merge one duplicate

Now you know how to delete duplicate pictures on iPhones automatically or one by one, if you are worried about deleting something you wanted to keep, you have 30 days to restore it from Recently Deleted folder.

Note! Please keep in mind that the Photos app will identify duplicate photos of various qualities. If you just want to keep the photos on your phone and do not plan on printing them or entering photo contests, a lower-quality image might not be a problem for you. In this case, you may want to delete the higher-quality one because it takes up more storage, but otherwise, you will probably want to keep the higher-quality photo. It is also possible that one of the photos will be a Live photo while the other is not. Finally, it is possible that you edited one by blurring out sensitive information, yet it still shows up next to the unblurred one as a duplicate. If you automatically select them all and merge them, your iPhone will pick the highest-quality image with the most data. So while it should pick the best quality image, which is generally also the unedited version, because doctoring a photo lowers image quality, we cannot be sure that it will always pick the one you prefer. So keep in mind that this process may require some manual editing if you do not do it manually on a case-by-case basis.

Now you know how to find duplicate photos on iPhones and then merge them automatically or manually, all via the Photos app. Merging is a quick way to delete them and doing this helps you quickly clean up your Photos app and enjoy more storage on your phone. Before the iOS 16 update, you needed to use a duplicate picture finder app, but all subsequent software updates have included this handy feature.

Technology is constantly evolving, and smartphone and desktop tech rarely remains static. Therefore, the information in this post is only accurate as of the date it was written. Blog posts that are older than six months may contain instructions that are no longer compatible with your device or operating system. We hope that the content from previous posts continues to function as intended. Thank you for reading TechSavvy.Life, where technology works for you.

“The advancement of technology is based on making it fit in so that you don’t really even notice it.”

– Mark Weiser, Chief Technologist at Xerox PARC

That’s it. Please feel free to share this post! One way to share is via Twitter.

Just click the Tweet icon below. This will launch Twitter where you click its icon to post the Tweet.

Checkout TechSavvy.Life for blog posts on smartphones, PCs, and Macs! You may email us at contact@techsavvy.life for comments or questions.

We value your feedback! Was this post helpful? Please share your comments with us. If you have a tech question related to your computer or smart device, feel free to reach out. Just send an email to contact@techsavvy.life, and be sure to include the device, app, and version you are using. To assist us further, you can also attach screenshots related to your inquiry.

Author’s eBook

The author’s Vietnam eBook on the “Battle for Tra Bong Vietnam: Events and Aftermath” can be accessed from a Kindle device or the Kindle App for a desktop or smartphone. The apps are free.

The author’s Vietnam eBook on the Battle for Tra Bong Vietnam: Events and Aftermath

Access Selfie, Video, and Portrait Modes Instantly

In iOS 26, the Camera app’s controls are hidden, complicating mode selection. A useful tip allows users to open the Camera in desired modes (Selfie, Video, Portrait) directly from the Home Screen via a long press. This method saves time and enhances usability for capturing moments.

RAYMOND OGLESBY @RaymondOglesby2
September 9, 2025 – 3 minutes read time

In iOS 26, the Camera app controls have been tucked away, making the display cleaner but making it more challenging to find the camera mode (like selfie, video, or portrait) you want. We all know that taking the perfect photo can require lightning reflexes, so here’s how to launch into your camera mode of choice right from your Home Screen, bypassing your in-app controls altogether.

Why You Will Like This Tip

  • Open your Camera in the exact mode you’re looking for, whether Selfie, Video, or Portrait.
  • Save time by not swiping between modes.
  • Avoid confusion with the iOS 26 Camera layout.

This tip can be performed on an iPhone running iOS 26 to be available in September 2025. This tip works on earlier OS versions as well such as iOS 18.6.

Click here to learn how to update your iPhone to the latest iOS version.

Did you know you can open your Camera app to a specific mode right from your Home Screen? No need to swipe to find the right one. All you have to do is long-press on your Camera icon and then select either Selfie, Video, Portrait, or Portrait Selfie.

Note! This only works from your Home Screen, not from a Lock Screen shortcut.

First, on your Home Screen, long-press on your Camera app icon. Refer to the image below:

Selfie 1
Selecting the Camera app

Next, tap SelfieVideoPortrait, or Portrait Selfie from the menu. See the image below:

Selfie 2
Selecting a camera option

Now, yourCamera app will open in your selected mode, ready to shoot. Tap the Capture/Record icon , and you are set! See the following image:

Selfie 3
Selecting the icon to take a selfie

Say cheese! Your photos will capture as usual, and if you want to switch modes, you can do it in the now-open Camera app.

Technology is constantly evolving, and smartphone and desktop tech rarely remains static. Therefore, the information in this post is only accurate as of the date it was written. Blog posts that are older than six months may contain instructions that are no longer compatible with your device or operating system. We hope that the content from previous posts continues to function as intended. Thank you for reading TechSavvy.Life, where technology works for you.

“In a tech-savvy world, true innovation lies in being people-savvy.”

 – Whitney Wolfe Herd, Founder of Bumble

You are finished. Please feel free to share this post! One way to share is via Twitter.

Just click the Tweet icon below. This will launch Twitter where you click its icon to post the Tweet.

Checkout TechSavvy.Life for blog posts on smartphones, PCs, and Macs! You may email us at contact@techsavvy.life for comments or questions.

We value your feedback! Was this post helpful? Please share your comments with us. If you have a tech question related to your computer or smart device, feel free to reach out. Just send an email to contact@techsavvy.life, and be sure to include the device, app, and version you are using. To assist us further, you can also attach screenshots related to your inquiry.

Author’s eBook

The author’s Vietnam eBook on the “Battle for Tra Bong Vietnam: Events and Aftermath” can be accessed from a Kindle device or the Kindle App for a desktop or smartphone. The apps are free.

The author’s Vietnam eBook on the Battle for Tra Bong Vietnam: Events and Aftermath

Mastering Pinned Collections in iOS 18 Photos

The iOS 18 Photos app introduces the Pinned Collections widget, allowing users to pin their favorite albums for quick access. This guide details steps to pin, unpin, reorder, and modify albums within the app, ensuring a personalized and efficient photo management experience on the iPhone.

RAYMOND OGLESBY @RaymondOglesby2
August 19, 2025 – 4 minutes read time

The iPhone’s new Photos app on iOS 18 has been one of the update’s most controversial changes. That’s why we are here to help you navigate these new changes. In this tip, we will explore how to pin an album in the iOS 18 18 Photos app.

The new Photos app has a widget called Pinned Collections, which you can place at the top of the app for easy access to your most-used albums. In this tip, we will explore how to pin an album in the iOS 18 18 Photos app.

  • Keep albums easily accessible from your Pinned Collections.
  • Pin photo albums to the top of the Photos app.

This tip was performed on an iPhone 4Pro running iOS 18.5.

Click here to learn how to update your iPhone to the latest iOS version.

First, open the Photos app. Refer to the image below/

Pin Album 1
Selecting the Photos app

Next, scroll down and tap Albums. See the image below:

Pin Album 2
Selecting Albums

Now, locate the album you want and long press it. See the following image:

Pin Album 3
Selecting an Album

Next, tap Pin. If the collection is already pinned, you can tap Unpin to remove it from your collection. Refer to the image below:

Pin Album 4
Selecting the Pin or Unpin option

Now, tap Pinned to reveal your your Pinned Collections. See the image below:

Pin Album 5
Selecting Pinned Collections

Next, you will find the album there. See the following image:

Pin Album 6
Your newly added album

First, open the Photos app, then scroll to the bottom, and tap Customize & Reorder. Refer to the image below:

Pin Album 7
Selecting Customize & Reorder option

Next, touch and hold the three lines next to the collection you want to move and drag it to a new position.

Note! Its best to hold and drag to the right then up or down to your new position in order to see what you are doing.

See the image below:

Pin Album 8
Reorder your collections

Navigate to your Pinned Collections and tap Modify in the upper right. See the following image:

Pin Album 9
Selecting the Modify option

The collections with a red circle are in your Pinned Cillections. Those with a green circle can ce added by tapping on the collection. Refer to the image below:

Pin Album 10
Your Pinned Collections and available collections to be pinned

That’s how to pin/unpin, reorder,, and modify an album in the iOS 18 Photos app. Now, you can quickly access the album whenever you need.

Disclaimer

Technology is constantly evolving, and smartphone and desktop tech rarely remains static. Therefore, the information in this post is only accurate as of the date it was written. Blog posts that are older than six months may contain instructions that are no longer compatible with your device or operating system. We hope that the content from previous posts continues to function as intended. Thank you for reading TechSavvy.Life, where technology works for you.

“Robots are not going to replace humans, they’re going to make their jobs much more humane.”

– Sabine Hauert, Roboticist

You are finished. Please feel free to share this post! One way to share is via Twitter.

Just click the Tweet icon below. This will launch Twitter where you click its icon to post the Tweet.

Checkout TechSavvy.Life for blog posts on smartphones, PCs, and Macs! You may email us at contact@techsavvy.life for comments or questions.

We value your feedback! Was this post helpful? Please share your comments with us. If you have a tech question related to your computer or smart device, feel free to reach out. Just send an email to contact@techsavvy.life, and be sure to include the device, app, and version you are using. To assist us further, you can also attach screenshots related to your inquiry.

Author’s eBook

The author’s Vietnam eBook on the “Battle for Tra Bong Vietnam: Events and Aftermath” can be accessed from a Kindle device or the Kindle App for a desktop or smartphone. The apps are free.

The author’s Vietnam eBook on the Battle for Tra Bong Vietnam: Events and Aftermath

Set Up Emergency Info on Your iPhone Now

IRAYMOND OGLESBY @RaymondOglesby2
August 5, 2025 –7 minutes read time

NOTICE:

This is the most relevant and important blog post we have published to date. If you are an iPhone user, please setup this feature. For Android users, the steps are similar.

This post is a MUST READ to implement emergency access for yourself or others!!!

This simple tip could save your life: Make your emergency medical information and contact numbers visible on your locked phone so you are prepared if the worst happens.

What would happen if you were out in public and needed urgent care but could not communicate with first responders? Do you have an ID on you? Is there any way for them to know your drug allergies? Are you wearing a medical bracelet that indicates any major health issues? How will they call your emergency contacts? Your phone, even when it’s locked, could be your lifeline. 

There’s a way to put emergency information on your phone and make it accessible from the lock screen. It’s extremely important to do it, and everyone should know how to find this information in case someone near you has an emergency. Let’s explore how this is done

  • Help save your life in case of an emergency.
  • Make sure someone helping you in an emergency can access your critical health information and get in touch with your emergency contact(s).

System Requirements

This tip was performed on iPhone 14 Pro running iOS 18.5

Click here to learn how to update your iPhone to the latest iOS version.

First, open Medical ID. There are three ways to get there:

  1. Long-press the Apple Health app and choose Medical ID
  2. Open the Health app, tap your profile image, and select Medical ID. If you have not opened the Health app in a while, it may prompt you to complete a Health Checklist, which will also take you to the Medical ID screen.
  3. Go to:Settings > Apps > Health > Medical ID.

Next, from the Medical ID screen, tap “Edit”or “Add“. Please provide as much information as you wish. If you are not taking medications and have no known allergies, you should write “None” or “None known” so medical professionals know you did not simply skip those questions. For Emergency Contact, you can only select a name and phone number from your Contacts app. So, make sure whoever you want to list is in your Contacts. If you have yet to do this, Click here on how to set up your Emergency Contact(s).

Now, under Emergency Access, toggle on Show When Locked and Share During Emergency Call. There’s a spot for a profile photo at the very top of the page. Put in a recent picture of your face (I have yet to do this). It could help emergency responders recognize that they are viewing your information and not someone else’s. When you are finished, press Done at the top right. Refer to the image below:

Emergency 1
Setting up your Emergency Info

Now that you have your emergency info set, you need to know how to find it from the Lock screen. Go ahead and practice with your own phone. That way, you know how it works if you ever have to help someone else. This is a good skill to teach kids, too.

First, from the Lock screen (when the phone asks for a passcode), tap Emergency in the lower left corner to make a dial pad appear. Tap Medical ID at the bottom left to make the emergency information visible.

Next, scroll down, and you can call anyone listed as an emergency contact by tapping on their phone number. See the image below:

Emergency 2
Using Emergency Contact

There’s another way to make an emergency call and send your phone’s location to all your emergency contacts. Apple calls it SOS (not to be confused with Emergency SOS via satellite for placing calls in dead zones). SOS is designed so you can use it quickly and immediately, even if you need to hide the fact that you are using it. The only bad part about SOS is the instructions are different for iPhone 7 and earlier, though as those older devices are phased out, it’s less of a concern.

For iPhone 8 and later:

Press and hold the side button and either volume button until an “SOS Emergency Call” slider appears on the screen. Slide your finger on it to call local emergency services. If you need to hide the phone or can not operate the screen, hold down the buttons. A countdown begins, and an alert sounds. If you release the buttons after the countdown, your phone automatically dials emergency services.

For iPhone 7 and earlier:

Press the side or top button quickly five times. An SOS slider appears on the screen. (In India, you only have to press rapidly three times, and then a call goes out automatically.) Slide your finger on Emergency Call to call emergency services.

After the call ends, the phone automatically sends a text message to all emergency contacts listed in the Health app, unless you choose to cancel it. This message contains the phone’s current location, even if Location Services is off; the phone automatically turns it on temporarily when you use the SOS feature. If the phone’s location changes, the contacts receive an update via text. See the following image:

Emergency 3
Using SOS

If your phone does not have a way to access emergency information when locked, there’s a hack that easily bypasses this limitation. All you need to do is add all the relevant info into a note-taking app, take a screenshot, and then set it as the wallpaper on your Lock screen. Take a look at your lock screen and make sure the information is legible. You may need to adjust it if the clock or other functional information is obstructing it.

Source: Apple Support, Asurion, PCMag

Disclaimer

Technology is constantly evolving, and smartphone and desktop tech rarely remains static. Therefore, the information in this post is only accurate as of the date it was written. Blog posts that are older than six months may contain instructions that are no longer compatible with your device or operating system. We hope that the content from previous posts continues to function as intended. Thank you for reading TechSavvy.Life, where technology works for you.

“Computing is not about computers anymore. It is about living.”

– Nicholas Negroponte, Founder of MIT Media Lab

That’s it. Please feel free to share this post! One way to share is via Twitter.

Just click the Tweet icon below. This will launch Twitter where you click its icon to post the Tweet.

Checkout TechSavvy.Life for blog posts on smartphones, PCs, and Macs! You may email us at contact@techsavvy.life for comments or questions.

We value your feedback! Was this post helpful? Please share your comments with us. If you have a tech question related to your computer or smart device, feel free to reach out. Just send an email to contact@techsavvy.life, and be sure to include the device, app, and version you are using. To assist us further, you can also attach screenshots related to your inquiry.

Author’s eBook

The author’s Vietnam eBook on the “Battle for Tra Bong Vietnam: Events and Aftermath” can be accessed from a Kindle device or the Kindle App for a desktop or smartphone. The apps are free.

The author’s Vietnam eBook on the Battle for Tra Bong Vietnam: Events and Aftermath

Enhance Your iPhone Photos with Simple Captions

The Photos app on iPhone allows users to add captions to photos without needing extra apps. These captions sync with iCloud and are searchable, enhancing photo organization and retrieval. The process involves selecting a photo, swiping up, and entering a caption. This functionality aids in remembering details of captured moments.

RAYMOND OGLESBY @RaymondOglesby2
July 29, 2025 – 4 minutes read time

Did you know that your Photos app comes with a built-in feature that allows you to add captions to photos on your iPhone? You do not need to download an extra app to add captions. Any captions added to photos on your iPhone will sync to the cloud if iCloud Photo Library is enabled.

Picture captions are handy for searching your iPhone’s Photo Library and reminding you of specific details when you come across the photo later. For these reasons, it’s best to keep the captions practical yet straightforward—we recommend including notes about a holiday or occasion, if applicable, and any other relevant keywords you may think of later when searching for that photo. Here’s how to name pictures on iPhone and iPad. 

  • Captions added to photos on iPhone or iPad help keep track of picture details.
  • Photo captions are searchable and appear in search results, making important photos easy to find.
  • Photo captions are automatically applied to your synced iCloud photos.

This tip works on most iPhones, but the screenshots below were captured on an iPhone 14 Pro running iOS 18.5.

Click here to learn how to update your iPhone to the latest iOS version.

First, open the Photos app. Refer to the image below:

Caption 1
Selecting the Photos app

Next, tap on a photo you’d like to add a caption to. See the image below:

Caption 2
Selecting a photo

Now, when the photo opens, swipe up on the photo to reveal the Add a Caption area. 

Tip: Make sure to place your finger on the photo itself before you swipe up, otherwise, you might accidentally start scrolling through recent photos instead of pulling up the photo information card.

See the following image:

Caption 3
Swiping up to reveal hidden menu

Next, tap Add a Caption. Refer to the image below:

Caption 4
Selecting Add a Caption box

Now, type in your photo caption using the keyboard that appears, then tap Done to save it. See the image below:

Caption 5
Adding and Saving your caption

Next, if you want to verify that your caption was added, tap on the original photo and swipe up to reveal the caption. See the following imag:

Caption 6
Your Caption added to the original photo

And that’s how you add a caption to an iPhone photo. We especially love being able to access these photo captions across our devices.

Disclaimer

Technology is constantly evolving, and smartphone and desktop tech rarely remains static. Therefore, the information in this post is only accurate as of the date it was written. Blog posts that are older than six months may contain instructions that are no longer compatible with your device or operating system. We hope that the content from previous posts continues to function as intended. Thank you for reading TechSavvy.Life, where technology works for you.

“Every once in a while, a new technology, an old problem, and a big idea turn into an innovation.”

– Dean Kamen, Inventor of the Segway

That’s it. Please feel free to share this post! One way to share is via Twitter.

Just click the Tweet icon below. This will launch Twitter where you click its icon to post the Tweet.

Checkout TechSavvy.Life for blog posts on smartphones, PCs, and Macs! You may email us at contact@techsavvy.life for comments or questions.

We value your feedback! Was this post helpful? Please share your comments with us. If you have a tech question related to your computer or smart device, feel free to reach out. Just send an email to contact@techsavvy.life, and be sure to include the device, app, and version you are using. To assist us further, you can also attach screenshots related to your inquiry.

Author’s eBook

The author’s Vietnam eBook on the “Battle for Tra Bong Vietnam: Events and Aftermath” can be accessed from a Kindle device or the Kindle App for a desktop or smartphone. The apps are free.

The author’s Vietnam eBook on the Battle for Tra Bong Vietnam: Events and Aftermath

Find iPhone Settings Fast with Search Bar Tips

The post discusses the iPhone Settings Search feature, allowing users to easily locate specific settings without extensive scrolling. By tapping the Dynamic Island to reveal the Search bar, users can search for app settings or other iPhone features directly. This tool enhances efficiency when managing iPhone settings.

RAYMOND OGLESBY @RaymondOglesby2
July 22, 2025 –4 minutes read time

There are numerous iPhone settings, too many to remember. Fortunately, there is a way to search for any iPhone setting with your iPhone Settings Search bar. This is particularly useful when searching for settings for a specific app or feature, but you are unsure exactly where to find them.

For instance, if you wanted to set your iPhone to Dark Mode permanently, but you are not sure if it is located under Display, Focus, or Accessibility. Using the Settings Search bar bypasses the need to know exactly where everything is. Let’s explore how to search an iPhone Settings menu.

  • Easily locate settings options without having to scroll through the whole iPhone Settings menu.
  • Quickly find settings and preferences you’re unfamiliar with instead of clicking hopelessly.

This tip was performed on iPhone 14 Pro running iOS 18.5,

Click here to learn how to update your iPhone to the latest iOS version.

First, tap your Settings icon to open. Refer to the image below:

Settings 1
Selecting the Settings app

Next, if you do not see the Starch box, tap the “notch”area (the Dynamic Island)” at top of screen to reveal the iPhone Settings Search bar. See the image below;

Settings 2
Tapping the Dynamic Island to reveal the Search bar

Now, if you want to search for a particular app’s settings, tap the Search bar. See the following image:

Settings 3
Accessing the Search bar

Next, type in the name of an app. Refer to the image below:

Settings 4
Entering an app in the Search bar

Now, tap the app when it appears to access its settings. See the image below:

Settings 5
Revealing the settings for the app

Next, if you want to search for a particular iPhone setting, but are unsure where it’s located, type in the name of the setting. In this case, Accessibility, and all Accessibility settings appear underneath. Now, tap one of the Search results, and you will be taken to the appropriate settings! See the following image:

Settings 6
Revealing the settings for an option

Isn’t that so convenient? Now you know how to find the iPhone Settings Search bar and find that particular iPhone setting you have been looking for!

Disclaimer

Technology is constantly evolving, and smartphone and desktop tech rarely remains static. Therefore, the information in this post is only accurate as of the date it was written. Blog posts that are older than six months may contain instructions that are no longer compatible with your device or operating system. We hope that the content from previous posts continues to function as intended. Thank you for reading TechSavvy.Life, where technology works for you.

“Computers are like Old Testament gods: lots of rules and no mercy.”

 – Joseph Campbell, Mythologist and Writer

That’s it. Please feel free to share this post! One way to share is via Twitter.

Just click the Tweet icon below. This will launch Twitter where you click its icon to post the Tweet.

Checkout TechSavvy.Life for blog posts on smartphones, PCs, and Macs! You may email us at contact@techsavvy.life for comments or questions.

We value your feedback! Was this post helpful? Please share your comments with us. If you have a tech question related to your computer or smart device, feel free to reach out. Just send an email to contact@techsavvy.life, and be sure to include the device, app, and version you are using. To assist us further, you can also attach screenshots related to your inquiry.

Author’s eBook

The author’s Vietnam eBook on the “Battle for Tra Bong Vietnam: Events and Aftermath” can be accessed from a Kindle device or the Kindle App for a desktop or smartphone. The apps are free.

The author’s Vietnam eBook on the Battle for Tra Bong Vietnam: Events and Aftermath

How to Rearrange Albums in iPhone Photos

This post provides a guide on rearranging albums in Apple’s Photos app on iPhone and iPad. Users can sort albums by Date Modified, Name, or Custom Order, and utilize the drag-and-drop method for moving albums. The instructions are applicable for iOS 18.5 and emphasize a precise drag method for successful rearrangement.

IRAYMOND OGLESBY @RaymondOglesby2
July 15, 2025 – 3 minutes read time

Want to learn how to rearrange albums on an iPhone or iPad in Apple’s Photos app? When you make a photo album on your iPhone, the Photos app automatically sorts in the Albums tab when it was created.

You can rearrange albums on iPhone in two different ways. Let’s explore how to rearrange your albums in the Photos app.

  • Learn how to rearrange albums in Photos on your iPhone or iPad using the drag and drop method.
  • Learn how to sort albums on iPhone by Date Modified, Name, or Custom Order. 
  • Learn how to move albums around on iPhone so you can find your albums quickly and easily. 

This tip was performed in iPhone 14 Pro running iOS 18.5.

Click here to learn how to update your iPhone to the latest iOS version.

First, ipen the Photos app. Refer to the image below:

Photos 1
Selecting the Photos app

Next, scroll down and tap Albums. See the image below:

Photos 2
Selecting Albums

Now, tap the More icon. See the following image:

Photos 3
Selecting the More icon

Next, tap a photo album sorting option. Refer to the image below:

Photos 4
Accessing the sort options

Now, back in Albums, you can also touch and hold the center of a photo album you want to move, then drag it to a new place. Release your finger to drop the album in its new location.

Note! Make sure you drag down or up and to the right. Dragging the album straight up or down will not work. In our example, we are moving the Pinterest album below the Instagram album. See the image below:

Photos 5
Moving the Pinterest album below the Instagram album

When you are done, close the Photos app, and you are finished rearranging albums on your iPhone or iPad.

Now you know how to reorder albums on iPhone and iPad!

Disclaimer

Technology is constantly evolving, and smartphone and desktop tech rarely remains static. Therefore, the information in this post is only accurate as of the date it was written. Blog posts that are older than six months may contain instructions that are no longer compatible with your device or operating system. We hope that the content from previous posts continues to function as intended. Thank you for reading TechSavvy.Life, where technology works for you.

“If you think technology can solve your security problems, then you don’t understand the problems and you don’t understand the technology.”

– Bruce Schneier, Security Technologist

That’s it. Please feel free to share this post! One way to share is via Twitter.

Just click the Tweet icon below. This will launch Twitter where you click its icon to post the Tweet.

Checkout TechSavvy.Life for blog posts on smartphones, PCs, and Macs! You may email us at contact@techsavvy.life for comments or questions.

We value your feedback! Was this post helpful? Please share your comments with us. If you have a tech question related to your computer or smart device, feel free to reach out. Just send an email to contact@techsavvy.life, and be sure to include the device, app, and version you are using. To assist us further, you can also attach screenshots related to your inquiry.

Author’s eBook

The author’s Vietnam eBook on the “Battle for Tra Bong Vietnam: Events and Aftermath” can be accessed from a Kindle device or the Kindle App for a desktop or smartphone. The apps are free.

The author’s Vietnam eBook on the Battle for Tra Bong Vietnam: Events and Aftermath

How to Access Your iPhone or iPad App Privacy Report

Apple prioritizes user privacy on iPhones and iPads, featuring an App Privacy Report that details how apps utilize personal data and device features. Users can easily access this report through the Settings app to monitor data access, app interactions, and website visits, enhancing understanding of app behavior and privacy.

RAYMOND OGLESBY @RaymondOglesby2
July 1, 2025 – 4 minutes read time

Apple takes privacy very seriously when it comes to its products. The iPhone and iPad are no exception, and both include an App Privacy Report. The iOS App Privacy Report shows you how certain apps have been using your data and accessing certain device features.

Accessing the App Privacy Report on an iPhone or iPad is surprisingly easy. The amount of data it reveals is outstanding. Let’s explore this feature.

  • Check your app privacy report to see what type of data your apps have been accessing.
  • Use your app privacy report to see which apps or websites are the most intrusive.

This tip was performed on an iPhone 14 Pro running iOS 18.5.

Click here to learn how to update your iPhone to the latest iOS version.

First, open the Settings app. Refer to the image below:

Privacy 1
Selecting the Settings app

Next, tap Privacy & Security.option.See the image below:

Privacy 2
Selecting the Privacy & Security option

Now, scroll down and tap App Privacy Report. See the following image:

Privacy 3
Selecting the App Privacy Report option

Next, if this is the first time you have accessed this screen, you might see an option to turn on App Privacy Report. If you already have this feature turned on, you will see a list of apps that have accessed your data or sensors in the past week. Refer to the image below:

Privacy 4
Your Data & Sensor Access

Now, under that section, there is App Network Activity. These are apps that have contacted domains in the last week. See the image below:

Privacy 5
Your App Network Activity

Next is Website Network Activity. These are websites that you have visited in the last week, including your most contacted domains. See the following image:

Privacy 6
Your Website Network Activity

Next is Most Contacted Domains, all of which were contacted by one or more apps or websites in the past seven days. Refer to the image below:

Privacy 7
Your Most Contacted Domains

Now, at the bottom is an option to Turn Off App Privacy Report. See the image below:

Privacy 8
Selecting the Turn Off App Privacy Report option

Next, under any section, you can tap Show All to see more apps, websites, domains, etc. See the following image:

Privacy 9
Selecting to Show All

Now, you can also tap any app or domain in any section to see additional information about it. For example, we selected Facebook. Refer to the image below:

Privacy 10
Selecting Facebook access

Next, you will see a list of the domains this app has contacted. If you were to tap a domain rather than an app in the previous step, you would see a list of apps that have contacted that domain. See the image below:

Privacy 11
Your Domains contacted by Facebook

Now, if you tap an app under Data & Sensor Access list, you can see exactly what kind of data that app is collecting. See the following image:

Privacy 12
Selecting the Calendar app

For example, we can see that the Calendar app accessed my contacts 16 minutes ago. Refer to the image below:

Privacy 13
Your Contacts last accessed

That’s the iPadOS and iOS App Privacy Report. You can access this report on your iPhone or iPad at any time and get the most up-to-date data.

Disclaimer

Technology is constantly evolving, and smartphone and desktop tech rarely remains static. Therefore, the information in this post is only accurate as of the date it was written. Blog posts that are older than six months may contain instructions that are no longer compatible with your device or operating system. We hope that the content from previous posts continues to function as intended. Thank you for reading TechSavvy.Life, where technology works for you.

“The rise of powerful AI will be either the best or the worst thing ever to happen to humanity.”

– Stephen Hawking, Theoretical Physicist

That’s it. Please feel free to share this post! One way to share is via Twitter.

Just click the Tweet icon below. This will launch Twitter where you click its icon to post the Tweet.

Checkout TechSavvy.Life for blog posts on smartphones, PCs, and Macs! You may email us at contact@techsavvy.life for comments or questions.

We value your feedback! Was this post helpful? Please share your comments with us. If you have a tech question related to your computer or smart device, feel free to reach out. Just send an email to contact@techsavvy.life, and be sure to include the device, app, and version you are using. To assist us further, you can also attach screenshots related to your inquiry.

Author’s eBook

The author’s Vietnam eBook on the “Battle for Tra Bong Vietnam: Events and Aftermath” can be accessed from a Kindle device or the Kindle App for a desktop or smartphone. The apps are free.

The author’s Vietnam eBook on the Battle for Tra Bong Vietnam: Events and Aftermath

How to Jump to the Top or Bottom of Pages on iPhone

This post discusses a useful iPhone gesture that allows users to quickly scroll to the top of any app or page by tapping the Clock or Battery Indicator. It also explains how to use the Scrollbar to reach the bottom of web pages. The tips can enhance navigation across various applications.

RAYMOND OGLESBY @RaymondOglesby2
June 24, 2025– 4 minutes read time

Did you know that a simple iPhone gesture can save you seconds or millions of tedious scrolling back to the top of most apps? Across all apps, pages, and platforms, this simple tip will automatically return you to the top of any screen. Whether you want to know how to scroll to the top of Messages or Photos on iPhone, Instagram, or Facebook, or you have been searching in the Settings app, we will show you this simple feature.

One of my guiltiest pastimes is spending way too much time scrolling through Wikipedia pages on the Safari app. Some of the articles, while extremely informative, are excessively long. This simple trick will shoot you right back to the top of that Wikipedia article or any app.

Although not as fast, you can “scroll to the bottom” of web pages and certain documents through the Scrollbar. Let’s explore how to scroll up to the top or down to the bottom.

  • Don’t waste time scrolling all the way back up to the top or down to the bottom.
  • You can use this “scroll to the top” tip on any app, platform, or page.
  • You can access the bottom of a page using the Scrollbar.

This tip was performed on an iPhone 14 Pro running iOS 18.5.

Click here to learn how to update your iPhone to the latest iOS version.

First, open any app, and simply tap either the Clock, the Battery Indicator, or even the Dynamic Island itself at the top of your screen. Refer to the image below:

Scroll 1
Opening the Settings app, scroll to the bottom and tapping the Dynamic Island area

It should return you back to the top immediately. Be sure when you are doing this, you are tapping at the level of the Clock or Battery Indicator. If you tap just below, nothing will happen. See the image below:

Scroll 2
You are taken to the top of the Settings app

First, swipe once to reveal the Scrollbar on the right side of a page; then, tap and hold on the gray pill on the edge.

Next, when you feel a haptic (feedback) tap on your iPhone. That’s your signal you have now picked up the Scrollbar.

Now, while holding your finger on the Scrollbar swipe downwards to quickly scroll to the bottom of the page. Once you’ve reached the bottom, release your finger from the screen. See the following image:

Scroll 3
Using the Scrollbar

It’s that simple! This “scroll to the top” tip works in nearly any app with screens you can scroll down on, whether you have scrolled through endless emails, a playlist in music, etc. The use of the Scrollbar allows you to quickly go to the bottom of a page. So, now you know how to jump to the top or bottom on an iPhone.

Disclaimer

Technology is constantly evolving, and smartphone and desktop tech rarely remains static. Therefore, the information in this post is only accurate as of the date it was written. Blog posts that are older than six months may contain instructions that are no longer compatible with your device or operating system. We hope that the content from previous posts continues to function as intended. Thank you for reading TechSavvy.Life, where technology works for you.

“I think that’s the single best piece of advice: constantly think about how you could be doing things better and questioning yourself.” 

Elon Musk,

That’s it. Please feel free to share this post! One way to share is via Twitter.

Just click the Tweet icon below. This will launch Twitter where you click its icon to post the Tweet.

Checkout TechSavvy.Life for blog posts on smartphones, PCs, and Macs! You may email us at contact@techsavvy.life for comments or questions.

We value your feedback! Was this post helpful? Please share your comments with us. If you have a tech question related to your computer or smart device, feel free to reach out. Just send an email to contact@techsavvy.life, and be sure to include the device, app, and version you are using. To assist us further, you can also attach screenshots related to your inquiry.

Author’s eBook

The author’s Vietnam eBook on the “Battle for Tra Bong Vietnam: Events and Aftermath” can be accessed from a Kindle device or the Kindle App for a desktop or smartphone. The apps are free.

The author’s Vietnam eBook on the Battle for Tra Bong Vietnam: Events and Aftermath