How to Remove People from iPhone Photos Album

The article explains how to remove a person from the People album in Apple’s Photos app on iPhone or iPad. Users can easily hide photos of individuals without deleting them from their main library.

RAYMOND OGLESBY @RaymondOglesby2
July 28, 2026 – 3 minutes read time

The People album in Apple’s Photos app is a very handy feature for finding pictures of a particular person. But what if there’s a particular person whose People album you want to remove?

It’s easy to remove a person from the People album on your iPhone or iPad. Do not worry, though, if you can always add back the person you removed. Here’s how to remove a People album in Photos on iPhone.

  • Hide photos on iPhone of people you don’t want to see in the People album.
  • Keep photos of the person in your regular photos library, without seeing them in the People album.

This tip was performed on an iPhone 17 Pro running iOS 26.5.

Click here to learn how to update your iPhone to the latest iOS version.

1. Open the Photos app on your iPhone. Refer the image below:
Delete Album 1
Selecting the Photos app

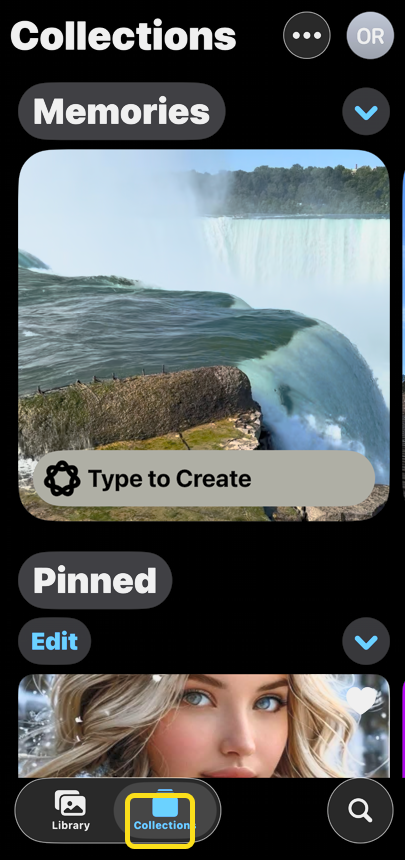
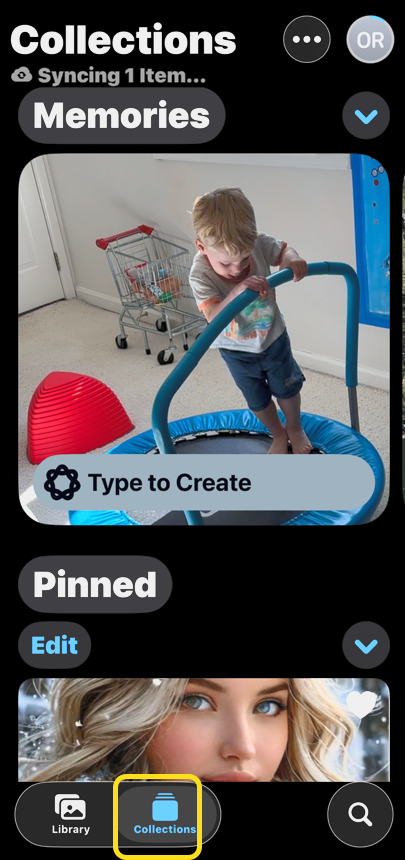
2. Tap the Collections tab. See the image below;
Delete Album 2
Selecting the Collections tab

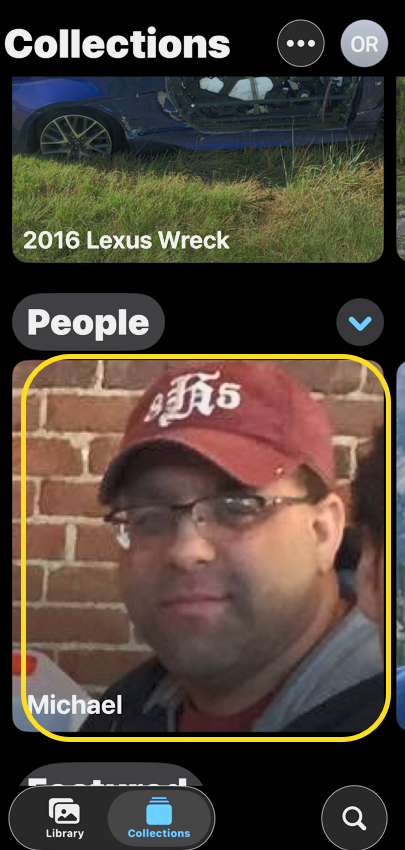
3. In the People section, tap the person album that you want to remove. See the following image:
Delete Album 3
Selecting a People album you want removed

4. Tap the More icon. Refer to the image below:

Delete Album 4
Selecting the More icon

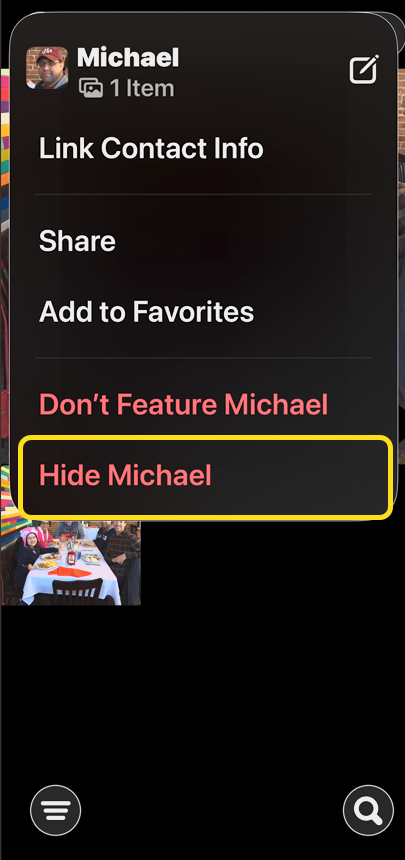
5. Tap Hide (Name). See the image below:
Delete Album 5
Selecting to Hide the album option

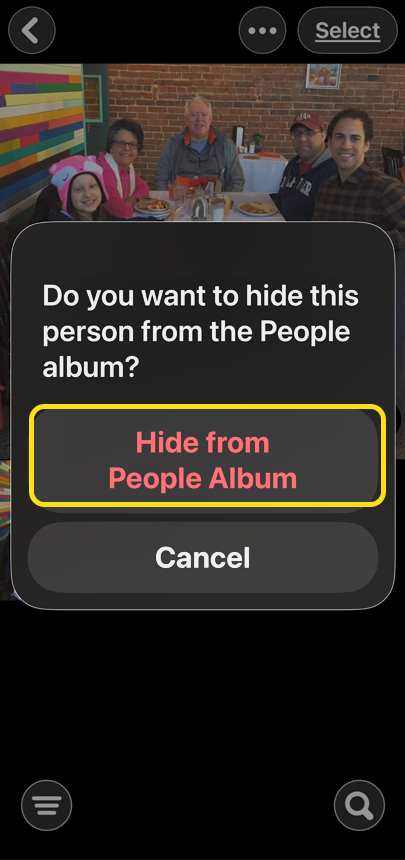
6. Tap Hide from People Album. See the following image:
Delete Album 6
Confirming to Hide the album

Technology is constantly evolving, and smartphone and desktop tech rarely remains static. Therefore, the information in this post is only accurate as of the date it was written. Blog posts that are older than six months may contain instructions that are no longer compatible with your device or operating system. We hope that the content from previous posts continues to function as intended. Thank you for reading TechSavvy.Life, where technology works for you.

As a technology, the book is like a hammer. That is to say, it is perfect: a tool ideally suited to its task. Hammers can be tweaked and varied but will never go obsolete. Even when builders pound nails by the thousand with pneumatic nail guns, every household needs a hammer.

– James Gleick

That’s it. Please feel free to share this post! One way to share is via Twitter.

Just click the Tweet icon below. This will launch Twitter where you click its icon to post the Tweet.

Checkout TechSavvy.Life for blog posts on smartphones, PCs, and Macs! You may email us at contact@techsavvy.life for comments or questions.

We value your feedback! Was this post helpful? Please share your comments with us. If you have a tech question related to your computer or smart device, feel free to reach out. Just send an email to contact@techsavvy.life, and be sure to include the device, app, and version you are using. To assist us further, you can also attach screenshots related to your inquiry.

Author’s eBook

The author’s Vietnam eBook, “Battle for Tra Bong Vietnam: Events and Aftermath”, is available on Kindle devices and the Kindle App for desktop, laptop, and smartphone. The apps are free.
The author’s Vietnam eBook on the Battle for Tra Bong Vietnam: Events and Aftermath

How to Organize iPhone Photos: Create Albums Easily

The content discusses how to create and organize photo albums in the iPhone’s Photos app. It emphasizes the benefits of using albums for easier access and sharing of memories. The article provides a step-by-step guide for creating a new album, highlighting the app’s features for selecting and adding photos.

RAYMOND OGLESBY @RaymondOglesby2
July 21, 2026 – 4 minutes read time

iPhone photo albums are the best way to keep your Photos app organized. Creating albums to sort your photos and videos can help you easily share specific memories with loved ones or simply make them easier to access whenever you need them.

All the photos and videos you take or save to the Photos app end up in your Library. While you can search the Photos app to find the exact content you are interested in seeing, creating and using albums is the best way to keep things organized and shareable. Let’s explore how to make iPhone albums!

  • Learn how to create an album on iPhone to keep your memories organized.
  • Creating iPhone photo albums is the best way to quickly access certain photos and videos and share them with others.

This tip was checked on an iPhone 17 Pro running iOS 26.5.

Click here to learn how to update your iPhone to the latest iOS version.

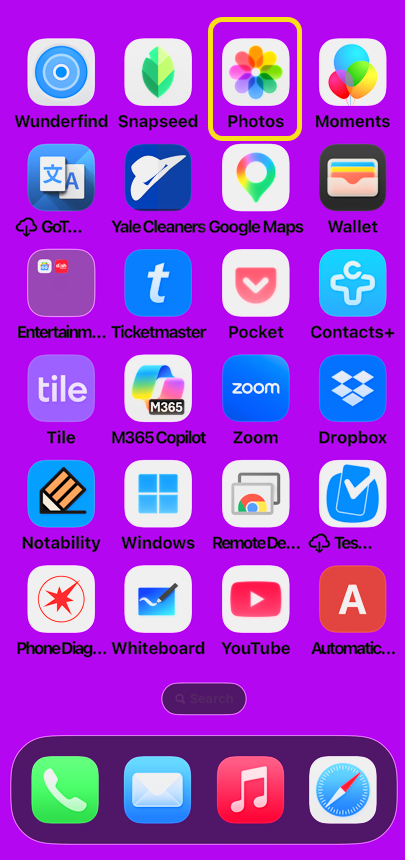
1. Open the Photos app. Refer to the image below:

Create Album 1
Selecting the Photos app

2. Tap the Collections tab at the bottom of the screen. See the image below:

Create Album 2
Selecting the Collections icon

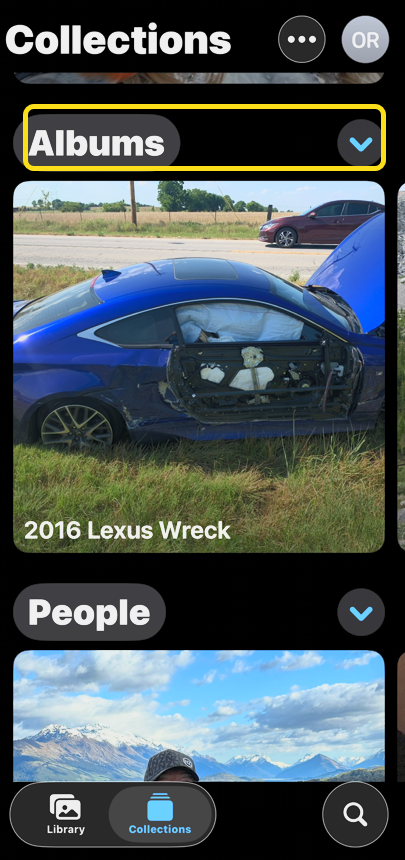
3. Scroll down and tap Albums. See the following image:

Create Album 3
Selecting the Albums tab

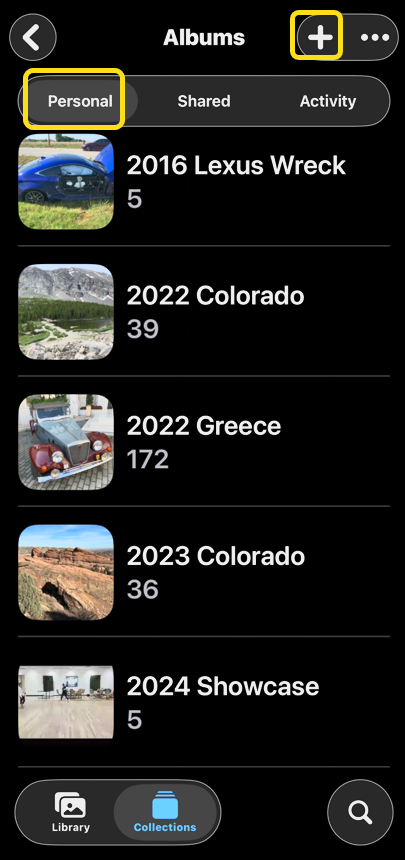
4. Under Albums, make sure Personal is selected, then tap the plus sign in the top right. Refer to the image below:

Create Album 4
Selecting the Personal option and the plus sign

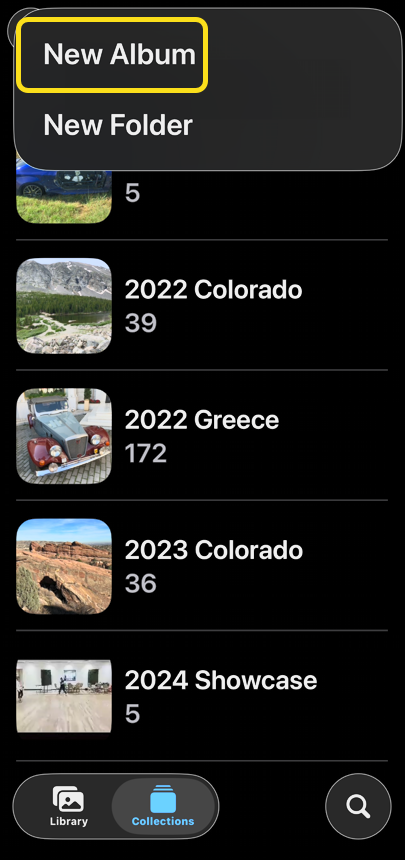
5. Select New Album. See the image below:

Create Album 5
Selecting the New Album option

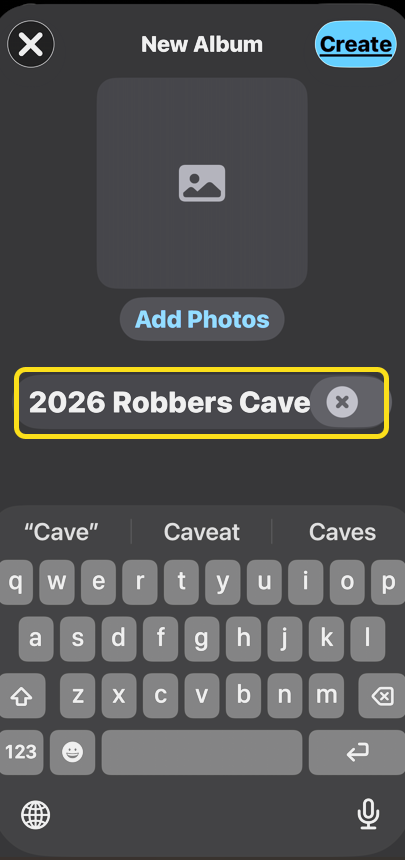
6. Type the name of your album. See the following image:

Create Album 6
Naming your new Album

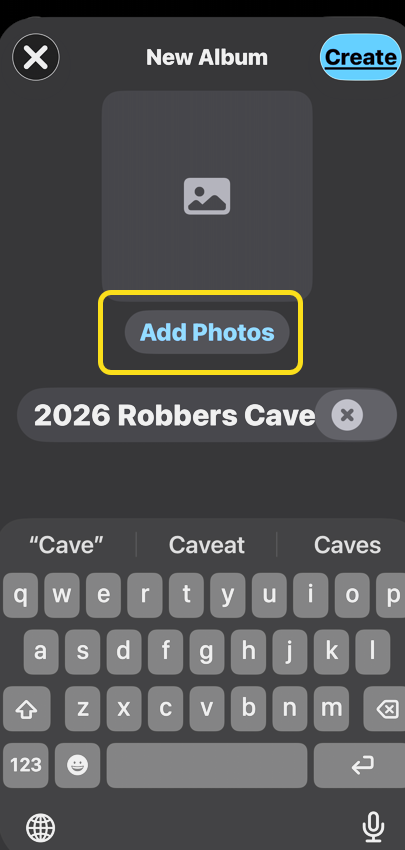
7. Now you can either add photos to the album or create the album to add them later. Let’s tap Add Photos for this example. Refer to the image below:

Create Album 7
Selecting the Add Photos option

8. Here you can tap on the photos you wish to add. You can search your Library, scroll through your Photos, Collections, or use the Filter feature to find what you are looking for. Once you are done selecting photos, tap the check mark in the blue circle. You can always add more photos and videos or delete content from your album at a later time. See the image below:

Create Album 8
Selecting your photos and tapping the Done icon

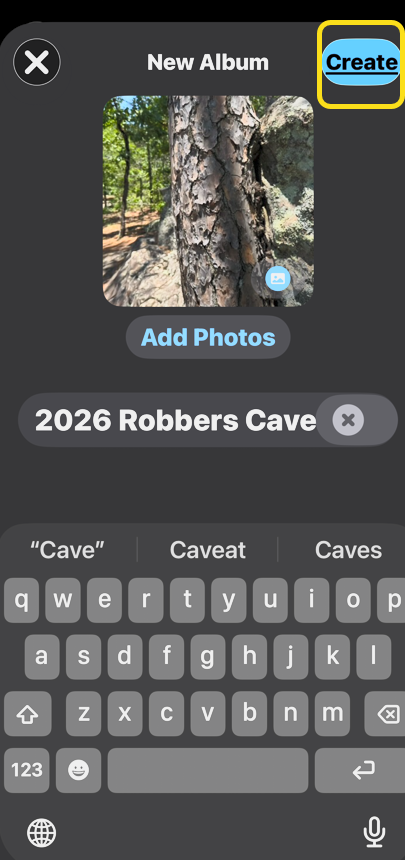
9. Tap Create, and your new album will show up in your Albums collection. See the following image:

Create Album 9
Selecting the Create option

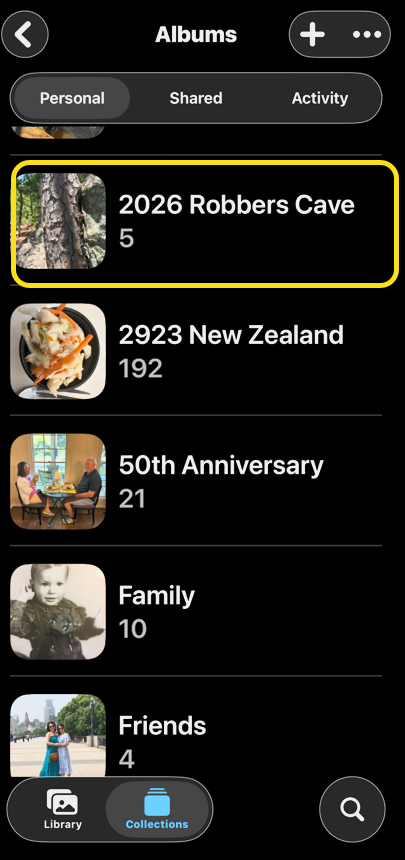
10. You might need to swipe down to refresh the app to see your new album appear in your Albums list. Refer to the image below:

Create Album 10
Your new album

Now you know how to create an album on iPhone and iPad in the Photos app.

Technology is constantly evolving, and smartphone and desktop tech rarely remains static. Therefore, the information in this post is only accurate as of the date it was written. Blog posts that are older than six months may contain instructions that are no longer compatible with your device or operating system. We hope that the content from previous posts continues to function as intended. Thank you for reading TechSavvy.Life, where technology works for you.

Technology is dominated by two types of people: those who understand what they do not manage and those who manage what they do not understand.

– Archibald Putt

You are finished. Please feel free to share this post! One way to share is via Twitter.

Just click the Tweet icon below. This will launch Twitter where you click its icon to post the Tweet.

Checkout TechSavvy.Life for blog posts on smartphones, PCs, and Macs! You may email us at contact@techsavvy.life for comments or questions.

Author’s eBook

The author’s Vietnam eBook, “Battle for Tra Bong Vietnam: Events and Aftermath”, is available on Kindle devices and the Kindle App for desktop, laptop, and smartphone. The apps are free.
The author’s Vietnam eBook on the Battle for Tra Bong Vietnam: Events and Aftermath

How to Rearrange Photo Albums on iPhone and iPad

The article provides a guide on how to rearrange photo albums in the Photos app on iPhone and iPad. It explains methods for sorting albums by different criteria and demonstrates a simple drag-and-drop technique for reordering them. The information is applicable to iOS 26.5, highlighting the need for current updates.

RAYMOND OGLESBY @RaymondOglesby2
July 14, 2026 – 4 minutes read time

When you make a photo album on your iPhone, the Photos app automatically sorts that picture album in the Albums tab in order of when the album was created. You can rearrange albums on iPhone in two different ways.

Want to learn how to rearrange albums on an iPhone or iPad in Apple’s Photos app? Read on to learn how to organize photos by rearranging how your albums appear in the Photos app.

  • Learn how to rearrange albums in Photos on your iPhone or iPad using the drag-and-drop method.
  • Learn how to sort albums on iPhone by Date Modified, Name, or Custom Order. 
  • Learn how to move albums around on iPhone so you can find your albums quickly and easily.

This tip was tested on an iPhone 17 Pro running iOS 26.5.

Click here to learn how to update your iPhone to the latest iOS version.

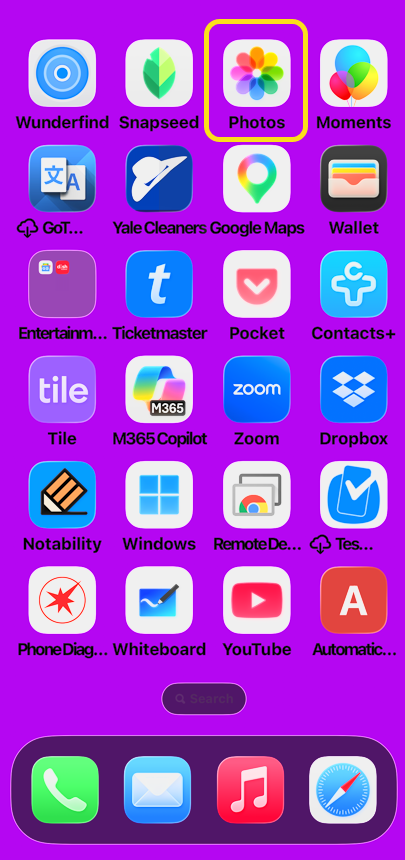
1. Open the Photos app. Refer to the image below:

Photos 1
Selecting the Photos app

2. Tap the Collections tab at the bottom of the screen. See the image below:

Photos 2
Selecting the Collections icon

3. Scroll down and tap Albums. See the following image:

Photos 3
Selecting the Albums tab

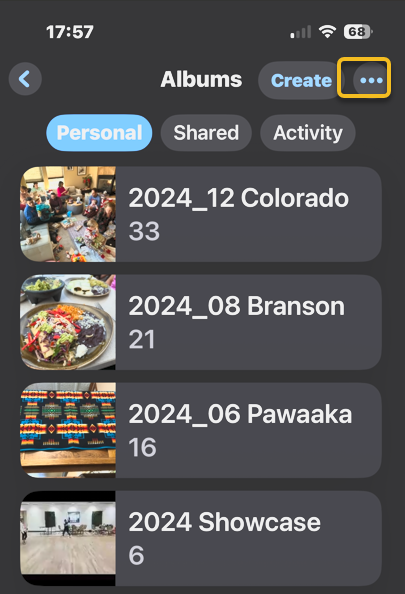
4. Tap the More icon. Refer to the image below:

Photos 4
Selecting the More icon

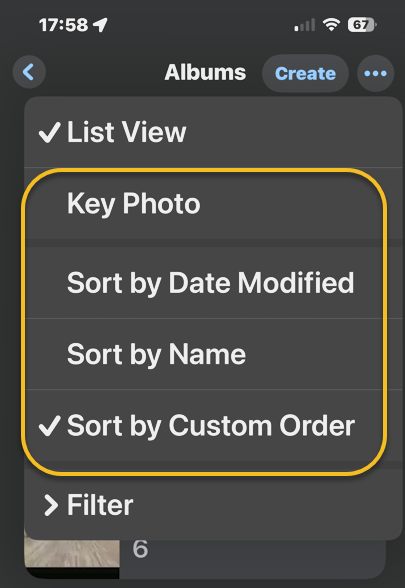
5. Tap a photo album sorting option. Choose Sort by Name to sort albums alphabetically.

Note! In order for this tip to work, the List View menu option must be checked.

See the image below:

Photos 5
Selecting the Sort by Name option

6. Head back to Albums. See the following image:

Photos 6
Returning back to Albums

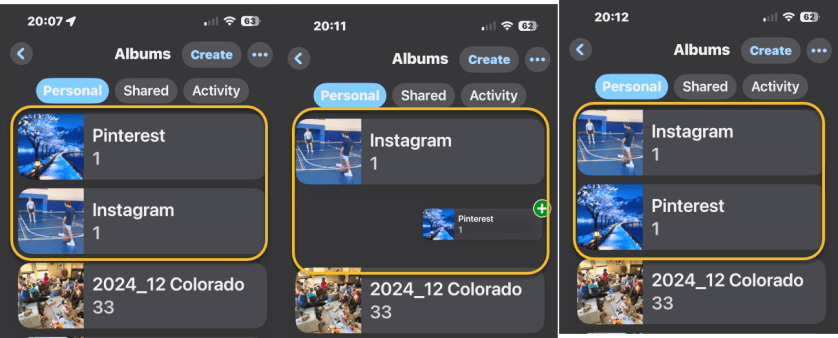
7. Here you can also touch and hold the center of a photo album you want to move, then drag it to a new place. You may need to try this more than once, as sometimes a menu pops up, and sometimes the album is ready to be dragged and dropped. Refer to the image below:

Photos 7
Drag and drop an album

8. Release your finger to drop the album in its new location. See the image below:

Photos 8
Release your finger after dragging

8. When you are done, close the Photos app, and you have finished rearranging albums on your iPhone or iPad.

Now you know how to organize photos on your iPhone or iPad by reordering albums.

Technology is constantly evolving, and smartphone and desktop tech rarely remains static. Therefore, the information in this post is only accurate as of the date it was written. Blog posts that are older than six months may contain instructions that are no longer compatible with your device or operating system. We hope that the content from previous posts continues to function as intended. Thank you for reading TechSavvy.Life, where technology works for you.

Programs must be written for people to read, and only incidentally for machines to execute.

– Harold Abelson

That’s it. Please feel free to share this post! One way to share is via Twitter.

Just click the Tweet icon below. This will launch Twitter where you click its icon to post the Tweet.

Checkout TechSavvy.Life for blog posts on smartphones, PCs, and Macs! You may email us at contact@techsavvy.life for comments or questions.

We value your feedback! Was this post helpful? Please share your comments with us. If you have a tech question related to your computer or smart device, feel free to reach out. Just send an email to contact@techsavvy.life, and be sure to include the device, app, and version you are using. To assist us further, you can also attach screenshots related to your inquiry.

Author’s eBook

The author’s Vietnam eBook, “Battle for Tra Bong Vietnam: Events and Aftermath”, is available on Kindle devices and the Kindle App for desktop, laptop, and smartphone. The apps are free.
The author’s Vietnam eBook on the Battle for Tra Bong Vietnam: Events and Aftermath

Mastering Pinned Collections in iOS 18 Photos

The iOS 18 Photos app introduces the Pinned Collections widget, allowing users to pin their favorite albums for quick access. This guide details steps to pin, unpin, reorder, and modify albums within the app, ensuring a personalized and efficient photo management experience on the iPhone.

RAYMOND OGLESBY @RaymondOglesby2
August 19, 2025 – 4 minutes read time

The iPhone’s new Photos app on iOS 18 has been one of the update’s most controversial changes. That’s why we are here to help you navigate these new changes. In this tip, we will explore how to pin an album in the iOS 18 18 Photos app.

The new Photos app has a widget called Pinned Collections, which you can place at the top of the app for easy access to your most-used albums. In this tip, we will explore how to pin an album in the iOS 18 18 Photos app.

  • Keep albums easily accessible from your Pinned Collections.
  • Pin photo albums to the top of the Photos app.

This tip was performed on an iPhone 4Pro running iOS 18.5.

Click here to learn how to update your iPhone to the latest iOS version.

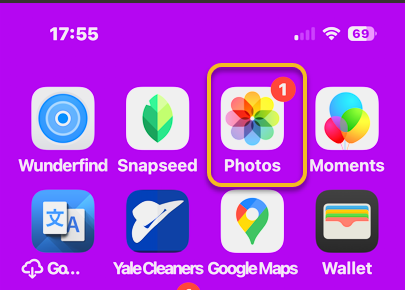
First, open the Photos app. Refer to the image below/

Pin Album 1
Selecting the Photos app

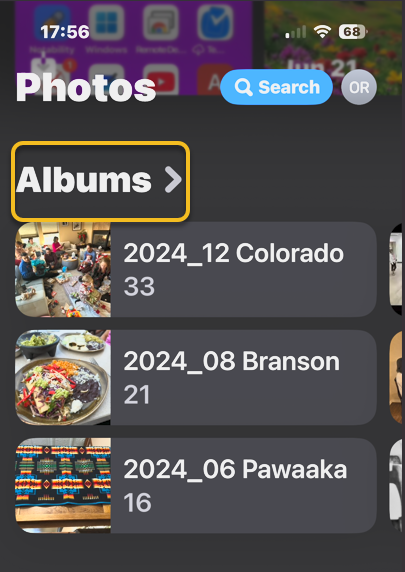
Next, scroll down and tap Albums. See the image below:

Pin Album 2
Selecting Albums

Now, locate the album you want and long press it. See the following image:

Pin Album 3
Selecting an Album

Next, tap Pin. If the collection is already pinned, you can tap Unpin to remove it from your collection. Refer to the image below:

Pin Album 4
Selecting the Pin or Unpin option

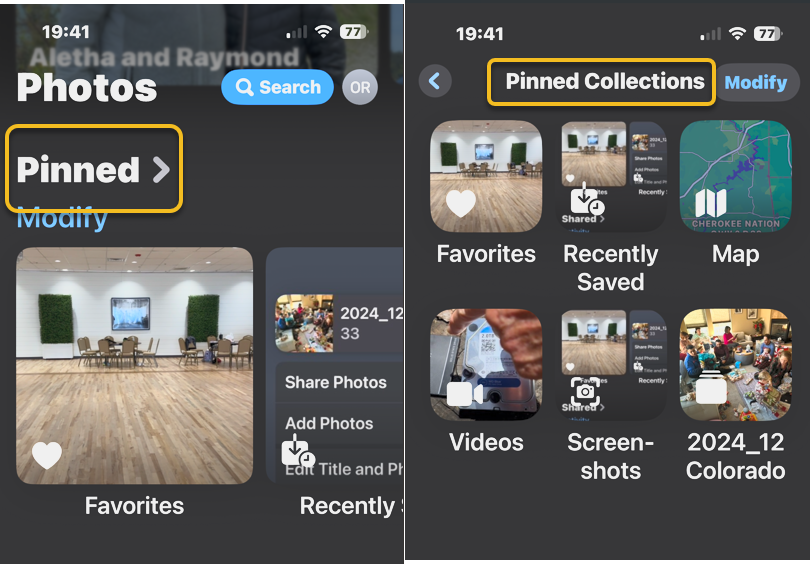
Now, tap Pinned to reveal your your Pinned Collections. See the image below:

Pin Album 5
Selecting Pinned Collections

Next, you will find the album there. See the following image:

Pin Album 6
Your newly added album

First, open the Photos app, then scroll to the bottom, and tap Customize & Reorder. Refer to the image below:

Pin Album 7
Selecting Customize & Reorder option

Next, touch and hold the three lines next to the collection you want to move and drag it to a new position.

Note! Its best to hold and drag to the right then up or down to your new position in order to see what you are doing.

See the image below:

Pin Album 8
Reorder your collections

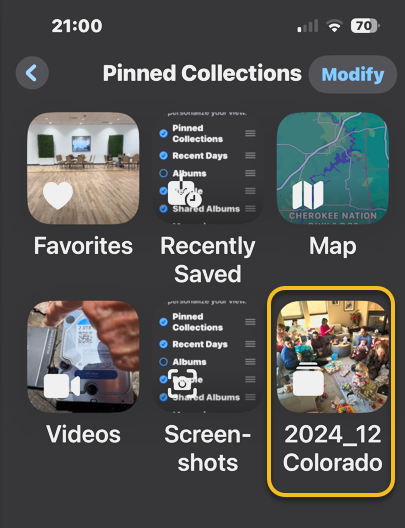
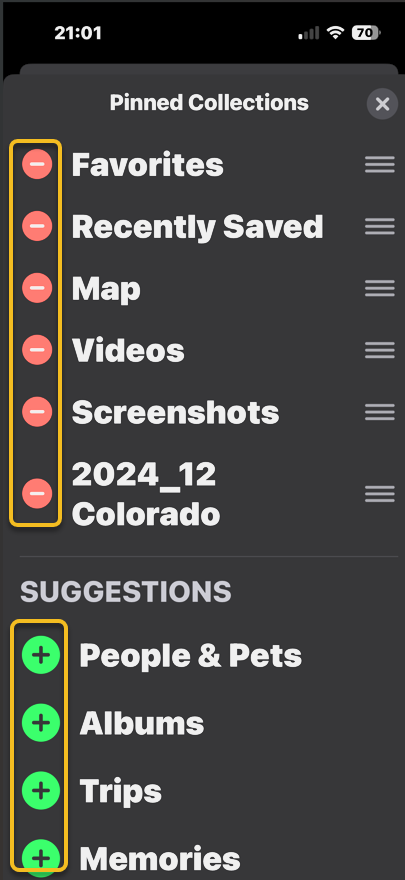
Navigate to your Pinned Collections and tap Modify in the upper right. See the following image:

Pin Album 9
Selecting the Modify option

The collections with a red circle are in your Pinned Cillections. Those with a green circle can ce added by tapping on the collection. Refer to the image below:

Pin Album 10
Your Pinned Collections and available collections to be pinned

That’s how to pin/unpin, reorder,, and modify an album in the iOS 18 Photos app. Now, you can quickly access the album whenever you need.

Disclaimer

Technology is constantly evolving, and smartphone and desktop tech rarely remains static. Therefore, the information in this post is only accurate as of the date it was written. Blog posts that are older than six months may contain instructions that are no longer compatible with your device or operating system. We hope that the content from previous posts continues to function as intended. Thank you for reading TechSavvy.Life, where technology works for you.

“Robots are not going to replace humans, they’re going to make their jobs much more humane.”

– Sabine Hauert, Roboticist

You are finished. Please feel free to share this post! One way to share is via Twitter.

Just click the Tweet icon below. This will launch Twitter where you click its icon to post the Tweet.

Checkout TechSavvy.Life for blog posts on smartphones, PCs, and Macs! You may email us at contact@techsavvy.life for comments or questions.

We value your feedback! Was this post helpful? Please share your comments with us. If you have a tech question related to your computer or smart device, feel free to reach out. Just send an email to contact@techsavvy.life, and be sure to include the device, app, and version you are using. To assist us further, you can also attach screenshots related to your inquiry.

Author’s eBook

The author’s Vietnam eBook on the “Battle for Tra Bong Vietnam: Events and Aftermath” can be accessed from a Kindle device or the Kindle App for a desktop or smartphone. The apps are free.

The author’s Vietnam eBook on the Battle for Tra Bong Vietnam: Events and Aftermath

How to Rearrange Albums in iPhone Photos

This post provides a guide on rearranging albums in Apple’s Photos app on iPhone and iPad. Users can sort albums by Date Modified, Name, or Custom Order, and utilize the drag-and-drop method for moving albums. The instructions are applicable for iOS 18.5 and emphasize a precise drag method for successful rearrangement.

IRAYMOND OGLESBY @RaymondOglesby2
July 15, 2025 – 3 minutes read time

Want to learn how to rearrange albums on an iPhone or iPad in Apple’s Photos app? When you make a photo album on your iPhone, the Photos app automatically sorts in the Albums tab when it was created.

You can rearrange albums on iPhone in two different ways. Let’s explore how to rearrange your albums in the Photos app.

  • Learn how to rearrange albums in Photos on your iPhone or iPad using the drag and drop method.
  • Learn how to sort albums on iPhone by Date Modified, Name, or Custom Order. 
  • Learn how to move albums around on iPhone so you can find your albums quickly and easily. 

This tip was performed in iPhone 14 Pro running iOS 18.5.

Click here to learn how to update your iPhone to the latest iOS version.

First, ipen the Photos app. Refer to the image below:

Photos 1
Selecting the Photos app

Next, scroll down and tap Albums. See the image below:

Photos 2
Selecting Albums

Now, tap the More icon. See the following image:

Photos 3
Selecting the More icon

Next, tap a photo album sorting option. Refer to the image below:

Photos 4
Accessing the sort options

Now, back in Albums, you can also touch and hold the center of a photo album you want to move, then drag it to a new place. Release your finger to drop the album in its new location.

Note! Make sure you drag down or up and to the right. Dragging the album straight up or down will not work. In our example, we are moving the Pinterest album below the Instagram album. See the image below:

Photos 5
Moving the Pinterest album below the Instagram album

When you are done, close the Photos app, and you are finished rearranging albums on your iPhone or iPad.

Now you know how to reorder albums on iPhone and iPad!

Disclaimer

Technology is constantly evolving, and smartphone and desktop tech rarely remains static. Therefore, the information in this post is only accurate as of the date it was written. Blog posts that are older than six months may contain instructions that are no longer compatible with your device or operating system. We hope that the content from previous posts continues to function as intended. Thank you for reading TechSavvy.Life, where technology works for you.

“If you think technology can solve your security problems, then you don’t understand the problems and you don’t understand the technology.”

– Bruce Schneier, Security Technologist

That’s it. Please feel free to share this post! One way to share is via Twitter.

Just click the Tweet icon below. This will launch Twitter where you click its icon to post the Tweet.

Checkout TechSavvy.Life for blog posts on smartphones, PCs, and Macs! You may email us at contact@techsavvy.life for comments or questions.

We value your feedback! Was this post helpful? Please share your comments with us. If you have a tech question related to your computer or smart device, feel free to reach out. Just send an email to contact@techsavvy.life, and be sure to include the device, app, and version you are using. To assist us further, you can also attach screenshots related to your inquiry.

Author’s eBook

The author’s Vietnam eBook on the “Battle for Tra Bong Vietnam: Events and Aftermath” can be accessed from a Kindle device or the Kindle App for a desktop or smartphone. The apps are free.
The author’s Vietnam eBook on the Battle for Tra Bong Vietnam: Events and Aftermath