How to Alphabetize Notes on iPhone and iPad

The Notes app on Apple devices sorts notes by default based on the most recent update. However, users can change settings to organize notes alphabetically by title or first line. This enhances note accessibility and organization. The guide also addresses setting defaults for new notes.

RAYMOND OGLESBY @RaymondOglesby2
June 3, 2025– 3 minutes read time

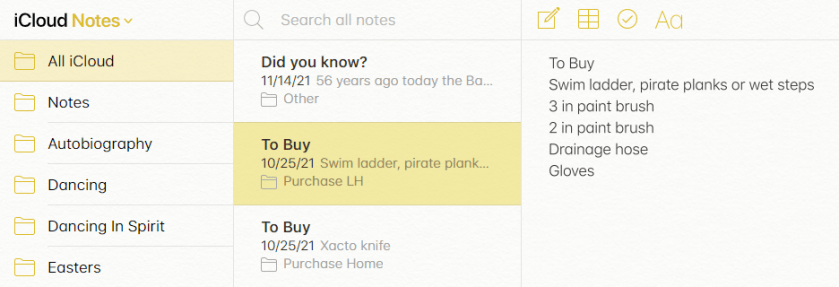
Can you alphabetize in Notes? Yes! By default, the Notes app sorts your notes by most recently updated. Even if you created a note years ago, if you edit that note, it will appear at the top of the list afterward.

But you can easily sort your notes alphabetically by changing your Settings. Your notes will then be sorted according to either the title or first line (if the note does not have a title). Let explore how to sort Apple Notes alphabetically on iPhone or iPad.

  • Alphabetize notes by note titles or the beginning of your note, instead of by date created or last edited.
  • Alphabetize notes on iPhone and iPad to make your notes more organized and easier to find.

This tip was performed on an iPhone 14 Pro running iOS 18.5.

Click here to learn how to update your iPhone to the latest iOS version.

First, open the Settings app. Refer to below image:

Notes 1
Selecting Settings

Next, scroll down and tap Apps. See the image below:

Notes 2
Selecting Apps

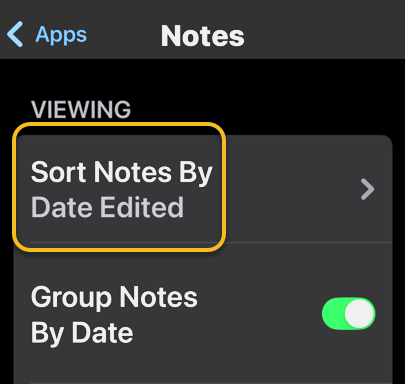
Now, rap Notes. See the following image:

Notes 3
Selecting Notes

Next, tap Sort Notes By: Refer to image below:

Notes 4
Selecting the Sort Notes By option

Now, tap Title. See the image below:

Notes 5
Selecting the Title option

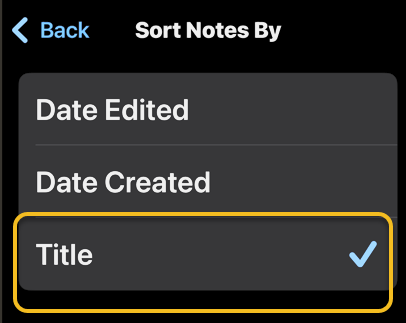
Choosing Title will sort your Notes alphabetically. You can also select Date Created if you would rather have all your notes sorted by the day each was started.

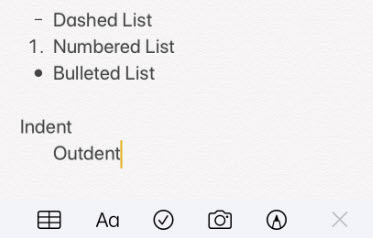
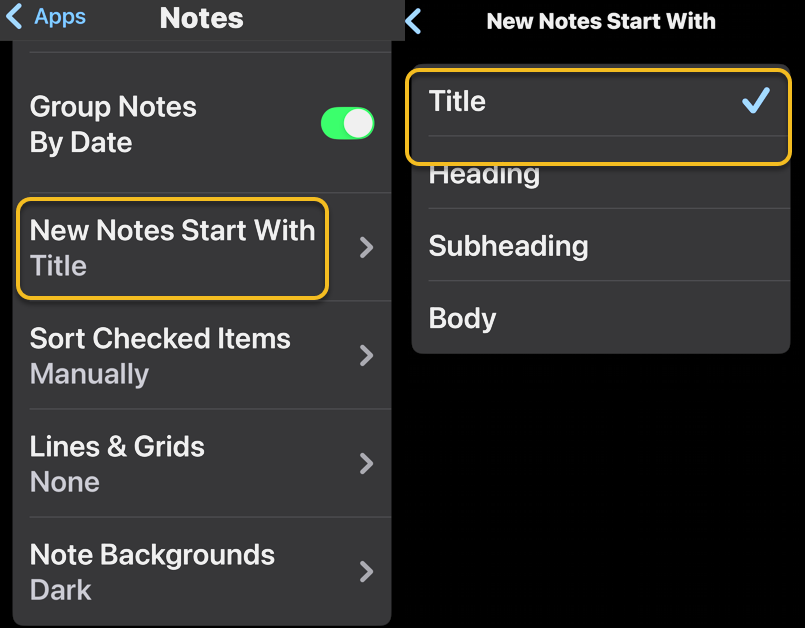
You may want to set a couple of defaults. One is to set the Title as the default heading for a New Note. See the following image:

Notes 6
Selecting the New Notes Start With Title option

If you prefer a New Note with lines or grids, you can choose from various styles. Refer to the image below:

Notes 7
Selecting a Style for a New Note

Disclaimer

Technology is constantly evolving, and smartphone and desktop tech rarely remains static. Therefore, the information in this post is only accurate as of the date it was written. Blog posts that are older than six months may contain instructions that are no longer compatible with your device or operating system. We hope that the content from previous posts continues to function as intended. Thank you for reading TechSavvy.Life, where technology works for you.

“Technology is not just a tool. It can give learners a voice that they may not have had before.”

― George Couros

You are finished. Please feel free to share this post! One way to share is via Twitter.

Just click the Tweet icon below. This will launch Twitter where you click its icon to post the Tweet.

Checkout TechSavvy.Life for blog posts on smartphones, PCs, and Macs! You may email us at contact@techsavvy.life for comments or questions.

We value your feedback! Was this post helpful? Please share your comments with us. If you have a tech question related to your computer or smart device, feel free to reach out. Just send an email to contact@techsavvy.life, and be sure to include the device, app, and version you are using. To assist us further, you can also attach screenshots related to your inquiry.

Author’s eBook

The author’s Vietnam eBook on the “Battle for Tra Bong Vietnam: Events and Aftermath” can be accessed from a Kindle device or the Kindle App for a desktop or smartphone. The apps are free.

The author’s Vietnam eBook on the Battle for Tra Bong Vietnam: Events and Aftermath

How to Save Web Pages in iPhone Notes

The article explains how to save web pages to the iPhone Notes app for future reference. Users can share links with additional notes for better organization, particularly when managing projects.

RAYMOND OGLESBY @RaymondOglesby2
November 12, 2024 – 4 minutes read time

Did you find a web page you want to save for later? You can easily share it to the Notes app so that you can return to it again. Or if you find an article relevant to a project you are working on, you can share it with one of your notes, add text, and open your note anytime to find the link. Let’s explore how this is done.

  • Save articles to read at a later date.
  • Easily keep your thoughts about an important website in one place.
  • Keep related web pages together in one note when planning projects.

This tip works on iPhones running iOS 16 or later. The screenshots are from iPhone 14 Pro running iOS 18.

Click here to learn how to update your iPhone to the latest iOS version.

To share a webpage, you first need to open the page in Safari and tap the Share icon. Refer to the below image:

Notes 1
Selecting the Share icon

Next, scroll through the app list, and tap Notes. See the below image:

Notes 2
Selecting the Notes app

Now, tap a New Note to select whether you want to save this page to a new note or an existing one. See the following image:

Notes 3
Selecting a New note

Next, choose where to save the new note, then tap Choose Note or Folder. Refer to the below image:

Notes 4
Selecting a location for the new note and a folder

Now, tap the Search Bar to search for a specific one, or scroll and select one. In our example, we are selecting the Quick Notes folder. See the below image:

otes 5
Selecting the Search or scroll to find one

Next, tap Create New Note to create a new note and save the website to it. See the following image:

Notes 6
Selecting the Create New Note button

Next, tap Add text to your note… if there are any extra details you want to add. Refer to the below image:

Notes 7
Optional, add text for the new note

Now, tap Save. See the below image:

Notes 8
Save your note

If you save it as a new note, it will have the same title as the web page. You can tap the thumbnail to open the article when you open your Note. See the following image:

Notes 9
Your new note with a thumbnail of your page

That’s how to add a hyperlink in the iPhone Notes app for sharing. You can return to this note when you want to read that article.

Disclaimer

Technology is always changing. Rarely is there static tech for smartphones and desktops. Thus, the contents of this post are only valid at the time of writing. Blog posts older than six months may have directions incompatible with your device or OS. Hopefully, older post content will continue to work as advertised. Thank you for reading TechSavvy.Life for Technology at Work For You.

“Order is one of the needs of life which, when it is satisfied, produces a real happiness.”

-Maria Montessori

That’s it. Please feel free to share this post! One way to share is via Twitter.

Just click the Tweet icon below. This will launch Twitter where you click its icon to post the Tweet.

Checkout TechSavvy.Life for blog posts on smartphones, PCs, and Macs! You may email us at contact@techsavvy.life for comments or questions.

Was this post helpful? We would love to hear your comments. Do you have a computer or smart device tech question? I will do my best to answer your inquiry. Just send an email to contact@techsavvy.life. Please mention the device, app, and version you are using. To help us, you can send screenshots of the data related to your question.

The author’s Vietnam eBook on the “Battle for Tra Bong Vietnam: Events and Aftermath” can be accessed from a Kindle device or the Kindle App for a desktop or smartphone. The apps are free.

The author’s Vietnam eBook on the Battle for Tra Bong Vietnam: Events and Aftermath

How to Scan a Document on iPhone and iPad

Scanners had their moment, but nowadays it’s not as necessary to own one. However, that does not mean you never need to scan a document or photo. Thankfully, you probably have some tools to do it without a scanner.

RAYMOND OGLESBY @RaymondOglesby2
September 5, 2023

This is for the iPhones and Tablets. Screenshots are from iPhone 14 Pro running iOS 16+

Scanners had their moment, but nowadays it’s not as necessary to own one. However, that does not mean you never need to scan a document or photo. Thankfully, you probably have some tools to do it without a scanner.

If you find yourself scanning a lot of documents and photos, it’s a good idea to invest in an actual scanner. Most people only need to scan a few things a year, so we will show you some good alternatives.

Scan Photos and Documents

A scanner is essentially just a camera that takes a photo of your document in a specific way. Well, you carry a camera with you every day, so why not use that as a scanner?

A smartphone camera is usually perfectly fine for getting the job done as a scanner. The results will not be as crisp and clear as an actual scanner, but it will get the point across. Here are some suggestions for taking photos of a document.

  • Lighting: Place the document on a flat surface with good lighting. Try to avoid casting a shadow on the document with your hand and phone.
  • Placement: Take the photo straight on to avoid any weird angles. This can be done directly above or at a right angle by propping up the document. Do whichever results in the best lighting with the fewest shadows.
  • Framing: Make sure to take the photo from far enough away so the entire document is in view. After you take the photo, crop it to the document so you do not see any of the surroundings.

The camera on your phone will suffice in many situations, but sometimes a more professional-looking scan is necessary. For that, you will want to turn to a document scanner app. You already have one installed on your iPhone, iPad, or Android phone.

Scan Using the Files App on iPhone

Phones and iPads have a built-in Document Scanner feature. This tool is not its own app, but you will find it both in Apple’s Files app and the Apple Notes app. Many websites suggest using the Notes app to scan a document, and that works fine; but you can also use the Files app, which is convenient if you just want to scan the document to a file.

To scan a document on an iPhone or iPad with the Files app, first, open the Files app and go to the location you want to save your scanned document to. For example, to keep it in your iCloud Drive, open the iCloud Drive location. To save it in your iPhone’s Downloads folder, open Downloads.

Next, tap the Menu button (it looks like a “”) at the top-right corner of the screen and tap Scan Documents to get started. Refer to the below image:

iPhone Scan 1
Selecting to scan from the Files app into the Downloads folder

Now, position the document in view of your iPhone or iPad’s camera and hold it still. Your device will automatically capture an image of the document, and you will see it flash on the screen. See the below image:

iPhone Scan 2
The scanned document in Files

Next, to scan a multi-page document, position the second page in view of your iPhone or iPad’s camera. Continue this process to capture as many pages as you like. When you are done, tap Save, and you will get a combined PDF file containing each page. See the following image:

iPhone Scan 3
The scanned document is in the Downloads folder

Scan Using the Notes App on iPhone

You can also use the Notes app to scan documents. First, open the Notes app on your iPhone or iPad, open an existing note or create a new note, tap the camera icon, and tap Scan Documents. The Notes app will then save your scanned documents as notes rather than files Refer to the below image:

iPhone Scan 4
Selecting to scan from the Notes app

Next, your saved document is in the Notes app. See the below image:

iPhone Scan 5
The scanned document in Notes
Disclaimer

Technology is always changing and rarely is there static tech for smartphones and desktops. Thus, the contents of this post are only valid at the time of writing. Blog posts older than six months may have directions incompatible with your device or OS. Hopefully, older post content will continue to work as advertised. Thank you for reading TechSavvy.Life for Technology at Work For You.

Quote For the Day

Whatever you’re thinking, think bigger.

Tony Hsieh

Tweet Info

That’s it. Please feel free to share this post! One way to share is via Twitter.

Just click the Tweet icon below. This will launch Twitter where you click its icon to post the Tweet.

Checkout TechSavvy.Life for blog posts on smartphones, PCs, and Macs! You may email us at contact@techsavvy.life for comments or questions.

I Would Like to Hear From You

Please feel free to leave a comment. I would love to hear from you. Do you have a computer or smart device tech question? I will do my best to answer your inquiry. Just send an email to contact@techsavvy.life. Please mention the device, app, and version you are using. To help us out, you can send screenshots of your data related to your question.

Author’s E-Book

You can access the e-book from a Kindle device, the Kindle App for the desktop or smartphone, which is a free app.

The author’s Vietnam eBook on the Battle for Tra Bong Vietnam: Events and Aftermath

How to Undo/Redo in Apple Notes App

If you ever make a mistake when using Apple Notes, you have a couple of ways to quickly undo and redo your changes.

RAYMOND OGLESBY @RaymondOglesby2
May 5, 2022

If you ever make a mistake when using Apple Notes, you have a couple of ways to quickly undo and redo your changes. Let’s explore how they work on your iPhone.

This is for devices using Apple Notes. Screenshots are from iPhone XR

Dilbert and Key
Copyright Scott Adams, Inc./Distributed by Universal Uclick for UFS

Enable Shake to Undo

If you use Notes on your iPhone, let’s ensure that Shake to Undo is enabled. For iOS 15 or higher, head to:

Settings > Accessibility > Touch

and enable the toggle Shake to Undo to ON. Refer to the below image:

Undo 1
Enable Shake to Undo toggle

Undo/Redo By a Shake

First, make sure the note in which you want to undo or redo changes is open on your iPhone. See the below image:

Undo 2
The Apple Note with incorrect spelling

Next, bring up the Undo menu by shaking your phone. Just do this as if you are shaking a bottle.

Now, you see an Undo Typing menu. Tap Undo here to delete the changes you just made to your note. See the following image:

Undo 3
Selecting Undo option

Next, if you would like to redo your changes, shake your iPhone again. This time, in the Undo Typing menu, tap the Redo Typing option. Refer to the below image:

Undo 4
Selecting Undo Typing option

Undo/Redo By a Menu

If your movement is restricted, use the menu option to undo and redo your changes.

First, on your Note’s screen, tap the Markup icon at the bottom. See the below image:

Undo 5
Selecting Markup option

Next, you will see two icons at the top of your Note’s screen. The arrow pointing in the left direction is for undoing changes, and the arrow pointing in the right direction is for redoing changes. Tap one of these two icons. See the following image:

Undo 6
Selecting Undo or Redo option

And your changes will be made to your current note.

Undo Deleted Notes

If you have mistakenly deleted a note, you can also undo that note deletion. Your removed notes are available to restore for up to 30 days.

First, in the Notes app, open the Recently Deleted folder. Refer to the below mage:

Undo 7
Selecting the Recently Deleted folder

Next, in the top right-hand corner, select Edit and choose the note(s) to recover. Then, in the bottom left-hand corner, tap Move. See the below image:

Undo 8
Selecting an Apple Note to be moved

Now, select the folder in which you would like to store your notes. See the following image:

Undo 9
Choosing a folder for the deleted note to be moved to

And your deleted notes are now back.

Quote For the Day

To advise is not to compel.

Anton Chekhov

Tweet Info

That’s it. Please feel free to share this post! One way to share is via Twitter.

Just click the Tweet icon below. This will launch Twitter where you click its icon to post the Tweet.

Check out TechSavvy.Life for blog posts on smartphones, PCs, and Macs! You may email us at contact@techsavvy.life for comments or questions.

I Would Like to Hear From You

Please feel free to leave a comment. I would love to hear from you. Do you have a computer or smart device tech question? I will do my best to answer your inquiry. Just send an email to contact@techsavvy.life. Please mention the device, app, and version you are using. To help us out, you can send screenshots of your data related to your question.

Author’s E-book

You can access the e-book from a Kindle device, the Kindle App for the desktop or smartphone, which is a free app.

The author’s Vietnam eBook on the Battle for Tra Bong Vietnam: Events and Aftermath

How to Copy, Paste and Translate Text from Photos on iPhone and iPad

With iOS 15 or iPadOS 15.1 or later, you can use Live Text to copy the text in photos, translate languages, make phone calls, and more.

RAYMOND OGLESBY @RaymondOglesby2
April 28, 2022

With iOS 15 or iPadOS 15.1 or later, you can use Live Text to copy the text in photos, translate languages, make phone calls, and more. Let’s explore this feature.

This is for iPhone and iPad running OS 15 or higher. Screenshots are from iPhone XR

Dilbert and Robot
Copyright Scott Adams, Inc./Distributed by Universal Uclick for UFS

The Live Text feature can easily identify text. The text can then be copied, translated, or used for a search. Live Text also can capture text from your photos. So, instead of retyping text from a photo, the use of Live Text is a time saver.

To use Live Text, you need an iPhone XR, iPhone XS, or a newer model. For the iPad, an iPad 8th generation or later, iPad Mini 5th generation or later, iPad Pro 11 inches or 12.9 inches.

Enable Live Text

First, to turn on Live Text for all supported languages, head to:

Settings > General > Language & Region

Next, toggle the Live Text switch to ON. Refer to the below image:

Live Text 1
Enabling Live Text

Copy and Paste Text

First, open a photo with some text. See the below image:

Live Text 2
Opening a photo that contains text

Next, touch and hold some word(s), and move the handles to adjust your selection.

Now. a pop-up menu will open. Here, either tap Select or Select All. You can also select all by tapping the Live Text button in the lower right-hand corner of the image. See the following image:

Live Text 3
Selecting All of the photo text

Next, from the pop-up menu, you can Paste your copied photo text. In our example, we are pasting it into Apple Notes. Refer to the below image:

Live Text 4
Selecting the Paste option in Apple Notes

Now, you will see your copied text. Tap Done when finished. See the below image:

Live Text 5
Your pasted text from a photo

Translate Text

To Translate text, you follow the above steps, except chose a photo with text in a foreign language. First, from the pop-up menu, tap on Translate. You might need to tap Continue, then choose a language to translate in or tap Change Language. Your copied and pasted text will be translated. See the following image:

Live Text 6
Selecting to Translate your photo text

Additionally, you can copy and paste links and even make phone calls using Live Text.

Quote For the Day

The more refined one is, the more unhappy.

Anton Chekhov

Tweet Info

That’s it. Please feel free to share this post! One way to share is via Twitter.

Just click the Tweet icon below. This will launch Twitter where you click its icon to post the Tweet.

Check out TechSavvy.Life for blogposts on smartphones, PCs, and Macs! You may email us at contact@techsavvy.life for comments or questions.

I Would Like to Hear From You

Please feel free to leave a comment. I would love to hear from you. Do you have a computer or smart device tech question? I will do my best to answer your inquiry. Just send an email to contact@techsavvy.life. Please mention the device, app, and version you are using. To help us out, you can send screenshots of your data related to your question.

Author’s E-book

You can access the e-book from a Kindle device, the Kindle App for the desktop or smartphone, which is a free app.

The author’s Vietnam eBook on the Battle for Tra Bong Vietnam: Events and Aftermath
qr-post-copy-paste-and-translate-text-from-photos-on-iphone-and-ipad
QR code for this blog post

How to Use Apple Notes in a Browser

Apple Notes syncs between devices for anyone with an Apple ID, which is required to use devices like the iPhone, iPad, and Mac computers. Unfortunately, there’s no native app for Windows or Android users, but the web version can make a suitable substitute.

RAYMOND OGLESBY @RaymondOglesby2
December 22, 2021

Apple Notes syncs between devices for anyone with an Apple ID, which is required to use devices like the iPhone, iPad, and Mac computers. Unfortunately, there’s no native app for Windows or Android users, but the web version can make a suitable substitute. Let’s explore how to use Apple Notes on the web.

This is for devices using Notes on iCloud

Dilbert and Time
Copyright Scott Adams, Inc./Distributed by Universal Uclick for UFS

Turn on iCloud Sync for Notes

If you use Apple Notes on an Apple device, first ensure you have iCloud sync enabled so that new notes and changes are pushed to all of your devices. This should be enabled by default, but it’s a good idea to check.

First, on an iPhone or iPad, you can do this under:

Settings > [Your Name] > iCloud

and enabling the Apple Notes setting. Refer to the below image:

Notes 1
Enabling iCloud Notes sync

On a Mac, this can be turned on under:

System Preferences > Apple ID

and checkmark the Notes setting.

When making notes, make sure that you are placing them in your iCloud folders since it’s possible to have offline folders too that are device-specific. See the below image:

Notes 2
Ensuring Notes are under iCloud

Once enabled, new notes will be placed in iCloud by default.

Access Notes in a Browser via iCloud

Next, with your Mac, iPhone, and iPad now syncing Apple Notes to iCloud, you can access them using a web browser by heading to iCloud.com and logging in with your Apple ID. See the following image:

Notes 3
Signing in to iCloud.com

Now, you may need to pass a two-factor authentication check, so make sure you choose to Trust this computer if you want to log in faster in the future. You should only trust personal computers and smartphones that you own, and never trust a computer or device that you share with others. Refer to the below image:

Notes 4
Trusting your device

Next, once you are in, click on Notes to see a web-based version of the Apple Notes app. You can use this to access and edit existing notes, create new ones, and share with other iCloud users. See the below image:

Notes 5
Selecting iCloud Notes on the web

While you can access locked notes by entering your Apple ID password, you can not apply a lock to existing or new notes. See the following image for a listing of your Notes:

Notes 6
Listing of your iCloud Notes

Turn iCloud Into an App on Windows or Android

Now, you can keep Apple Notes open in its own pinned tab, but it may be more convenient to turn the web app into an application or shortcut you can run from your Start menu or Android home screen.

  • Windows users can do this using Chrome or Edge, pin it to your Taskbar, and apply a custom icon if you like. You will need to log in from time to time, but as long as you Trust your browser when entering the two-factor authentication code this process will not be quite as tedious.
  • Android users can also do this using Chrome, which places a shortcut on your home screen.

Next, you will receive a message about signing in to iCloud from a browser. Refer to the below image:

Notes 7
Apple message

Apple Notes is just one service you can take advantage of using a browser thanks to iCloud’s web interface.

Quote For the Day

Every time you think the problem is ‘out there,’ that very thought is the problem.

Stephen Covey

You are finished. Please feel free to share this post! One way to share is via Twitter.

Just click the Tweet icon below. This will launch Twitter where you click its icon to post the Tweet.

Checkout TechSavvy.Life for blog posts on smartphones, PCs, and Macs! You may email us at contact@techsavvy.life for comments or questions.

I Would Like to Hear From You

Please feel free to leave a comment. I would love to hear from you. Do you have a computer or smart device tech question? I will do my best to answer your inquiry. Just send an email to contact@techsavvy.life. Please mention the device, app, and version you are using. To help us out, you can send screenshots of your data related to your question.

The author’s Vietnam eBook on the Battle for Tra Bong Vietnam: Events and Aftermath

How to Format Notes on iPhone and iPad

Using Apple Notes is a fast way to capture thoughts and take notes on your iPhone or iPad. You can do more than just take plain text notes. Instead you can organize your notes by using formatting tools to make them stand out from plain text. Let’s explore how to do this.

This is for iPhone and iPad

Dilbert and High Risk

Copyright Scott Adams, Inc./Distributed by Universal Uclick for UFS

When you start a new note, Apple formats the first line into a Title format. You can change this by going to your Settings app, then navigate to:

Notes > New Notes > Starts With

and select your format. By default, the rest of your note is plain text.

As mentioned earlier, you can use formatting tools. These tools include headings, lists, indentations and more. These features are somewhat obscure for a new user.

The Formatting Toolbar

After opening a new note, tap on the screen to bring up the keyboard, if not already in view. Next, tap on the Aa button above the keyboard, the format row. You will see the text formatting tools that you can use. Refer to below image:

Notes 1
Accessing the formatting toolbar

The keyboard is replaced by the formatting toolbar split into three rows. See below image:

Notes 2
The formatting toolbar

From the first row, the Title Heading, Subheading and more are available to use. Monospaced is the only available font style to use in Notes. See following image:

Notes 3
The titles formatting

When the toolbar is open, tap the X to close, tap the plus sign (+) to open, both to the left of the toolbar.

From the middle row, you can change selected text to Bold, Italic, Underline or Strikethrough formats. You may select multiple formats. Refer to below image:

Notes 4
The text formatting

The last row has different bullet styles, indent and outdent formats. See below image:

Notes 5
The lists formatting

The Checklist is separate from the formatting toolbar. To add a checklist, tap on the Checklist icon. Simply, start typing in your item. Tap the Enter key to add a new item. To stop the checklist, tap the Enter key on an empty line. Refer to below image:

Notes 6
The checkbox formatting

To create a numbered list, start by typing 1 and then your first entry. To end your list, tap the Enter key on a blank line.

The Toolbar Examples

For a look at all our examples, see below image:

Notes 7
The entire formatting examples

I Would Like to Hear From You

Please feel free to leave a comment. I would love hearing from you. Do you have a computer or smart device tech question? I will do my best to answer your inquiry. Please mention the device, app and version that you are using. To help us out, you can send screenshots of your data related to your question.

The author’s Vietnam eBook on the Battle for Tra Bong: Events and Aftermath