Hidden Features in Windows 11 Settings You Should Know

Windows 11’s Settings app is loaded with unexpected features beyond basic configurations. It allows wireless file sharing via Nearby Sharing, Dynamic Lock using Bluetooth, and clipboard syncing across devices, including Android. Other highlights include Storage Sense for disk cleanup, projecting from other devices, and an End Task button for frozen applications.

InRAYMOND OGLESBY @RaymondOglesby2
January 13, 2026 – 11 minutes read time

The Windows 11 Settings app isn’t just for configuring your PC’s display and changing your password. It’s also packed with surprisingly weird (and mostly useful) features that give the desktop OS a bit of flair. For example, did you know that it has a native option for sharing files wirelessly between your PCs? Or that you could sync your clipboard to an Android phone? We dug deep through the Settings app to surface the most unexpected capabilities in Windows. Simply press Windows key + I to open the Settings app and get started.

Learn some hidden useful Windows 11 Settings options.

Make Windows 11 easier to use.

This post was performed on Windows 11 Pro desktop running 25H2 version.
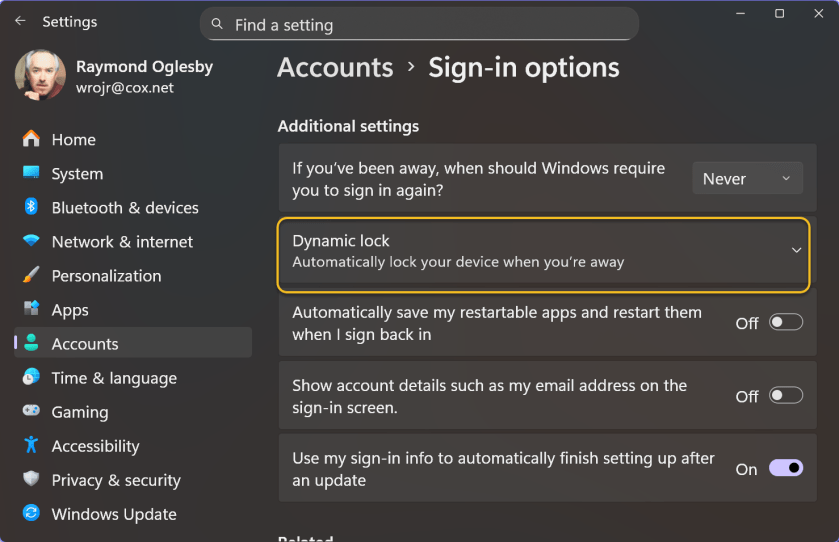
Windows 11 can track your phone’s movements via its Bluetooth signal strength, locking your PC when your phone moves too far away from your computer. Microsoft calls this feature Dynamic Lock, and it serves as an alternative to the Windows key+L shortcut. To activate Dynamic Lock, head to:

Accounts > Sign-In Options > Additional Settings

Refer to the image below:

Settings 1
Dynamic Lock

Some modern Windows 11 PCs with presence sensors do not need to rely on your phone for this feature—they know when you are sitting in front of them. This is probably the more convenient solution in the long term, especially since presence sensors work well with Windows Hello facial recognition. Your PC’s presence sensor notices when you sit back down, and the IR camera checks your face before automatically signing you in. However, until this type of hardware becomes mainstream, setting up Dynamic Lock to work with your phone is the next best option.
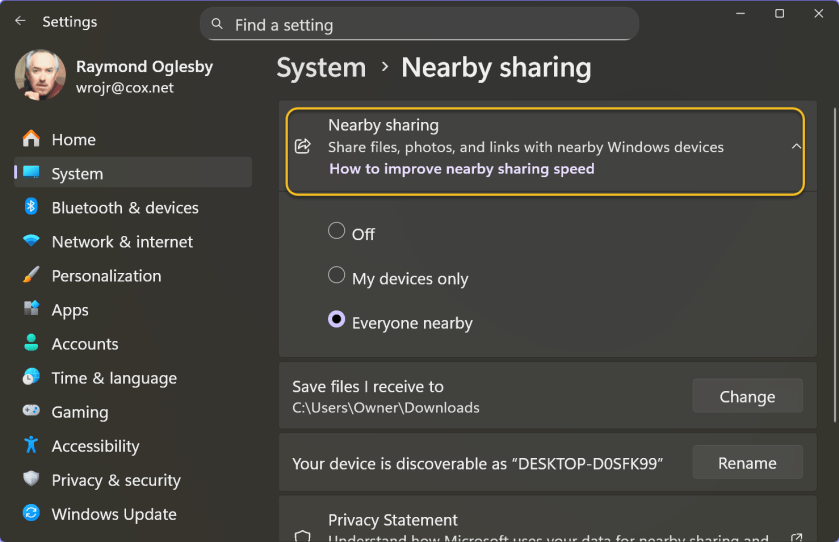
What if Microsoft built the Windows version of Apple’s AirDrop, but nobody noticed? That’s exactly what Nearby Sharing is. I do not think I have ever seen Microsoft seriously promote it.

Nearby Sharing lets you share files, photos, and website links between close by PCs using Bluetooth or Wi-Fi. You can restrict it to devices signed in with the same Microsoft account or allow anyone nearby to send you things. To activate and configure this feature, head to:

System > Nearby Sharing > Share

For example, you can right-click a file in File Explorer and select the Share option. You will see Nearby Sharing as an option here.

Nearby Sharing works only between Windows devices. See the image below:
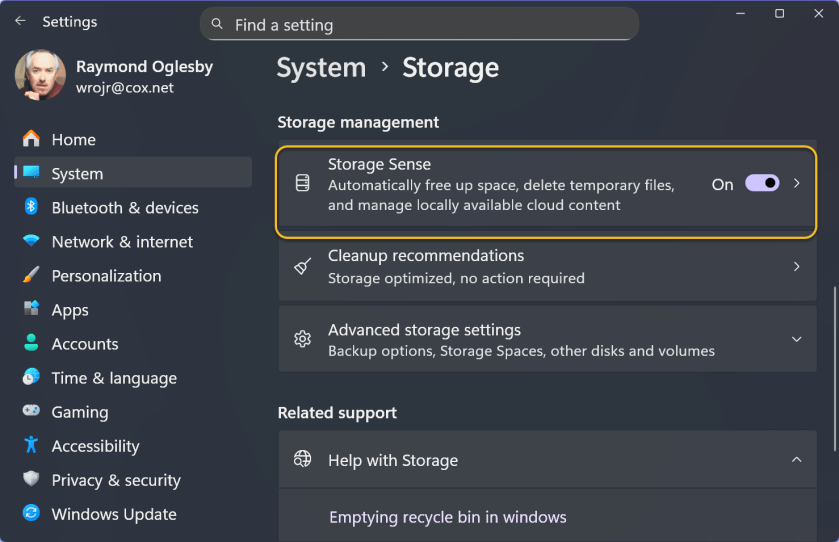
Settings 2
Nearby Sharing

Windows 11 offers multiple methods for freeing up disk space. You can turn to the classic Disk Cleanup tool, for example, or use something called Storage Sense. The most interesting option under the Storage Sense umbrella is the ability to purge files from your Downloads folder. But it can also automatically clean up temporary files and empty your Recycle Bin. Be sure to save all necessary information from those locations before enabling these settin Simply head to:

System > Storage > Storage Sense

to get started. Under Cleanup schedules, you can choose to have Windows automatically delete files from your Downloads folder if you have not opened them in one, 14, 30, or 60 days. Yes, Windows 11 can automatically delete downloads you have not touched in 24 hours, if you like to live dangerously. See the following image:
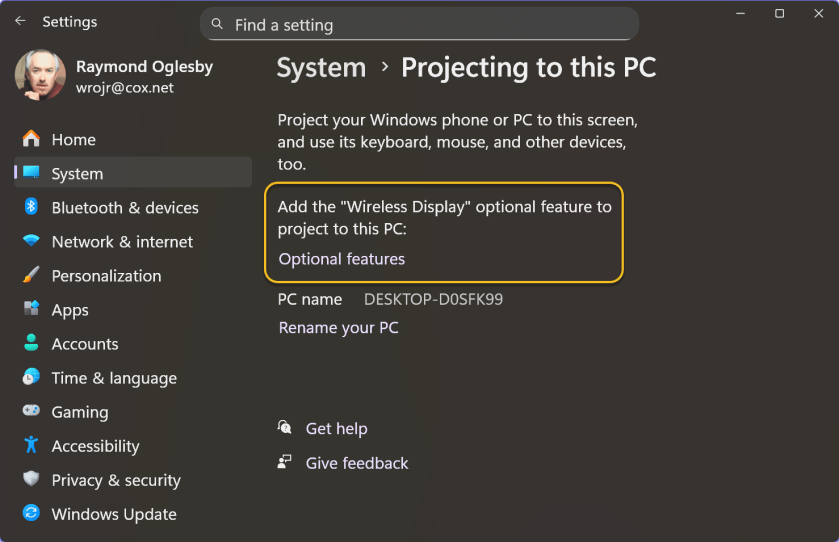
Settings 3
Storage Sense

Sure, you can project from your Windows PC to an external display. But did you know that you can project from another device—like a PC or phone—and use your PC’s display as a target. To set this up, head to:

System > Projecting to this PC

Windows will ask you to install the Wireless Display optional feature to continue. After activating it, you can press Windows key+K on another PC on your network and cast to your PC’s display.

This capability could be useful if you have a Windows 11 laptop with a small screen and want to interact with it on your larger all-in-one (AIO)machine.

Here’s another oddity: This screen says you can “Project your Windows phone or PC to this screen.” Hey Microsoft, it’s 2026! People no longer have Windows phones. Refer to the image below:
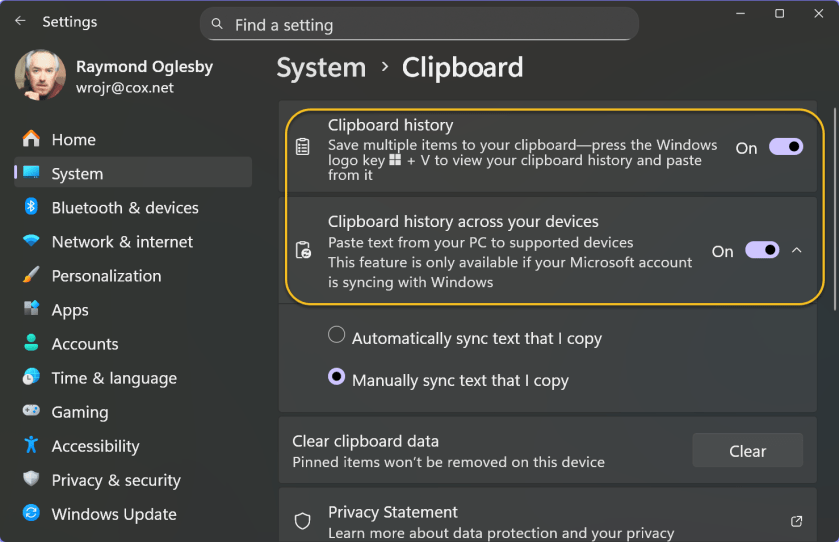
Settings 4
Project to Tour PC

You might be aware that Windows 11 has a clipboard history feature (press Windows key+V to see it), but you might not know that Windows can sync your clipboard between PCs. If you activate that feature, you can copy text on your desktop PC and paste it on your laptop. The clipboard sync feature is strangely configurable and powerful.

Windows offers multiple types of clipboard sync. One is automatic: Everything you copy syncs to your other Windows PCs. The other is manual: You can copy some text, press Windows key+V, and then choose to push that content to your other PCs. In other words, Windows does not sync anything you copy to the cloud until you explicitly request it.

You can also sync your Clipboard to your Android phone by signing into the Microsoft-owned SwiftKey keyboard with your Microsoft account. iPhone users are out of luck—the SwiftKey app does not offer the Clipboard sync feature on iOS. See the image below:
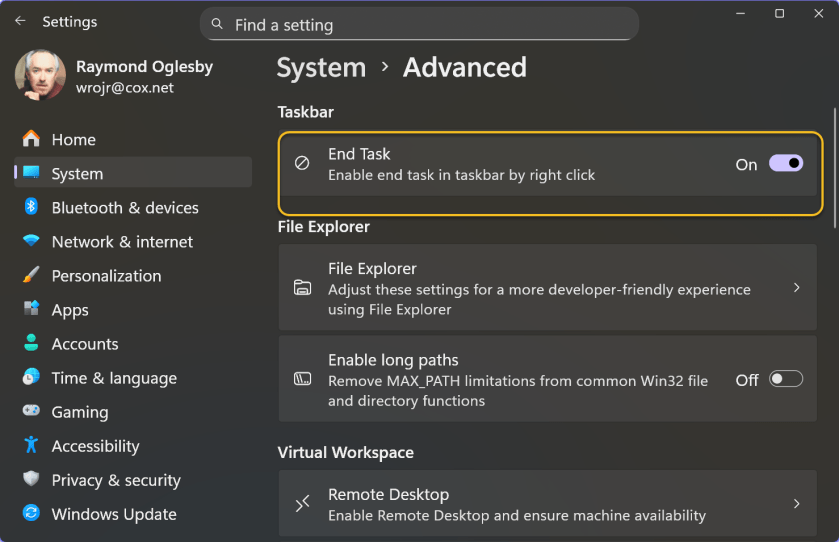
Settings 5
Clipboard Sync

If a program freezes or starts to misbehave, you normally have to visit the Task Manager and use the End Task feature to forcibly close it. If you find yourself doing that often, Microsoft has a convenient shortcut for you: You can add an End Task button on the taskbar. After that, you can right-click an application icon and select End Task to forcibly close it. It’s not ideal for day-to-day use—you are forcibly closing an application without giving it a chance to save your work and any data—but it definitely comes in handy sometimes. To turn this on, head to:

System > Advanced

and activate the End Task toggle under the Taskbar section. see the following image:

Settings 6
End Task Button

Game Mode, which is on by default, is not as straightforward as it sounds. In theory, it means that Windows should detect when you are playing a game and limit background tasks to improve performance. When Game Mode originally launched with Windows 10’s Creators Update in 2017, it was more aggressive. Microsoft provided APIs for game developers to manage the system.

Now, Game Mode primarily prevents Windows from sending notifications that interrupt your gameplay. Microsoft makes a vague promise that Game Mode stops Windows Update from installing driver updates while you are gaming and “helps achieve a more stable frame rate depending on the specific game and system,” with no further explanation. YouTube is full of benchmark videos showing no real change in game performance with Game Mode on or off. To find this toggle, head to:

Gaming > Game Mode

The good news is you likely will never have to turn Game Mode off—it should never break anything because it does not do much. Refer to the image below:

Settings 7
Game Mode

Did you know that Windows 11 supports eye-tracking hardware without any third-party software? What this means is you can use your eyes to control your PC, including clicking and typing. Of course, you need very specific hardwareto use this accessibility feature, such as a Tobii eye tracking device.

Despite Microsoft pushing PCs with IR cameras and presence sensors, Windows can not perform eye-tracking with standard hardware. Perhaps that’s something we should expect to see in the future as Windows increasingly embraces AI. Imagine if Copilot Vision could see what you were looking at. Right now, even an AI laptop with an NPU for on-device AI processing ca not do much more. Related options are in:

Accessibility > Eye control

See the image below:

Settings 8
Eye Tracking

Windows Aero launched with Windows Vista and became even better with Windows 7. Some beloved Aero features, such as the Aero Glass translucent interface, are no longer available. (Check out macOS Tahoe if you enjoyed that aesthetic.) Microsoft rebranded other Aero features, however: Aero Snap, for example, evolved into Snap Layouts for arranging desktop windows.

One odd feature that somehow survived under a new name is Aero Shake. It allows you to grab a window’s title bar with your mouse and shake it to minimize all other windows. It’s off by default but was apparently important enough that Microsoft kept it around. To activate this option, head to:

System > Multitasking

and then look for the 
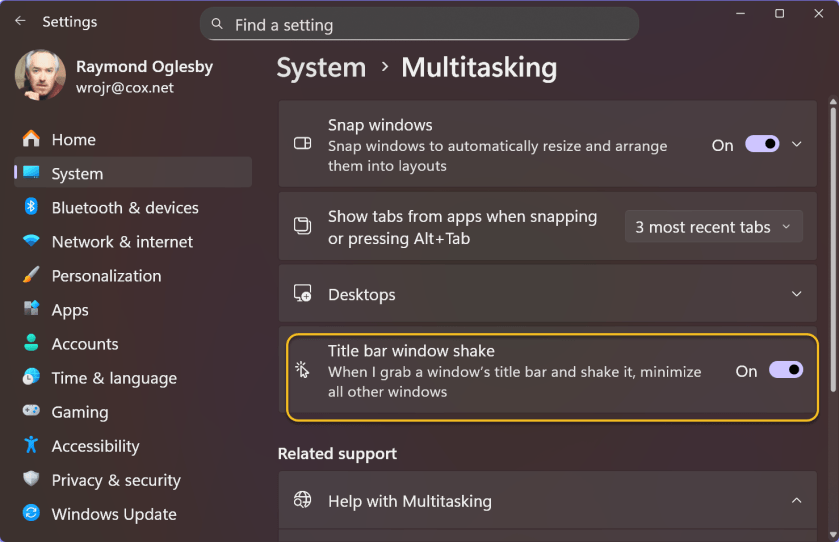
Title Bar Window Shake option. See the following image:
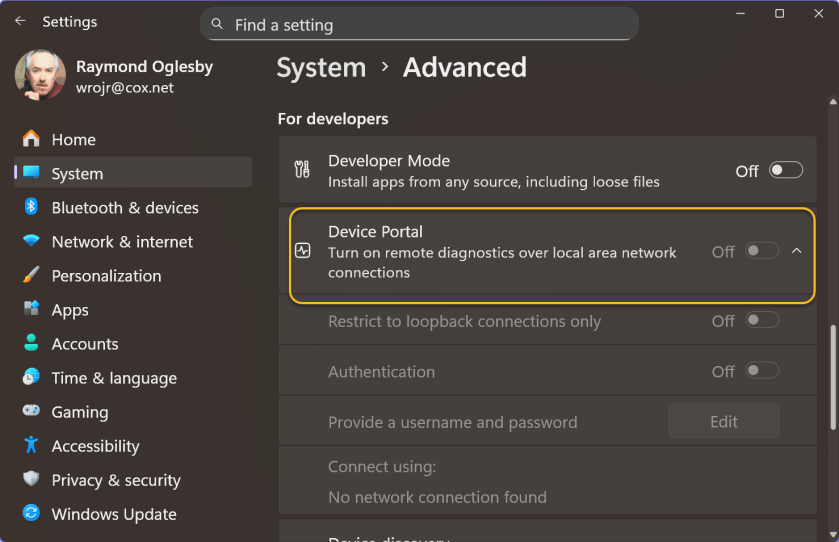
Settings 9
Title Bar Shake

Windows 11 has a Device Portal web interface for “remote diagnostics over local area network connections.” You can activate it via the

System > Advanced

pane. Just turn on Developer Mode and then Device Portal.

This web interface is very strange. It includes an empty Mixed Reality page—functionality that is now no longer available in Windows. It also features a Window Manager page that does not show a single window open on your PC’s desktop. The File Explorer page also highlights the long-forgotten 3D Objects folder. It’s downright bizarre.

The Device Portal was originally meant for managing Microsoft HoloLens hardware, as Microsoft explains. The Window Manager page presumably only shows the kind of floating Mixed Reality windows you would see on a HoloLens. Of course, HoloLens is now dead—Microsoft handed its US military contract off to Anduril earlier this year. Mixed Reality and 3D Objects are gone, too.

But the ghost of HoloLens past lives on, available just a few clicks away in Windows 11’s Settings app. If your PC is not on a network, the options are unavailable. Refer to the image below:
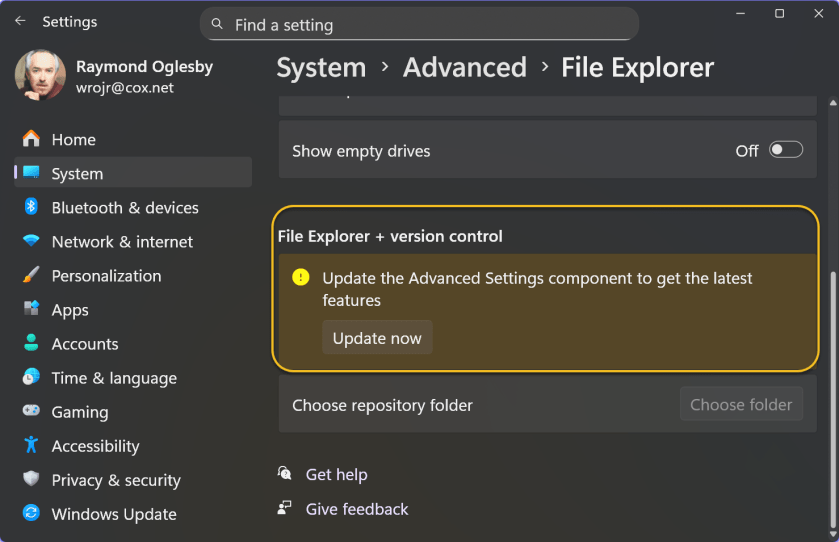
Settings 10
Device Portal

Advanced Windows Settings provides additional functionality to the Advanced page inside Windows settings, such as File Explorer with version control integration. File Explorer with version control integration lets you view Git information directly in your source folder. Head to:

System > Advanced > File Explorer

Under the File Explorer + version control section, click the Update Now button to see if you have the latest Advanced Settings control. See the image below:

Settings 11
File Explorer

Although Microsoft has not finished migrating all the useful options from Windows 11’s Control Panel to the Settings app yet, the latter is already (and amusingly) becoming a junk drawer full of historical options. Exploring the Settings app is like walking through a Windows history museum. Some options only make sense if you understand Microsoft’s original intentions when they were released. Perhaps Microsoft’s Mu-based AI agent can clean things up in the future.

Technology is constantly evolving, and smartphone and desktop tech rarely remains static. Therefore, the information in this post is only accurate as of the date it was written. Blog posts that are older than six months may contain instructions that are no longer compatible with your device or operating system. We hope that the content from previous posts continues to function as intended. Thank you for reading TechSavvy.Life, where technology works for you.

Let’s go invent tomorrow instead of worrying about what happened yesterday – Steve Jobs

You are finished. Please feel free to share this post! One way to share is via Twitter.

Just click the Tweet icon below. This will launch Twitter where you click its icon to post the Tweet.

Checkout TechSavvy.Life for blog posts on smartphones, PCs, and Macs! You may email us at contact@techsavvy.life for comments or questions.

We value your feedback! Was this post helpful? Please share your comments with us. If you have a tech question related to your computer or smart device, feel free to reach out. Just send an email to contact@techsavvy.life, and be sure to include the device, app, and version you are using. To assist us further, you can also attach screenshots related to your inquiry.

Author’s eBook

The author’s Vietnam eBook on the “Battle for Tra Bong Vietnam: Events and Aftermath” can be accessed from a Kindle device or the Kindle App for a desktop or smartphone. The apps are free.

The author’s Vietnam eBook on the Battle for Tra Bong Vietnam: Events and Aftermath

Find iPhone Settings Fast with Search Bar Tips

The post discusses the iPhone Settings Search feature, allowing users to easily locate specific settings without extensive scrolling. By tapping the Dynamic Island to reveal the Search bar, users can search for app settings or other iPhone features directly. This tool enhances efficiency when managing iPhone settings.

RAYMOND OGLESBY @RaymondOglesby2
July 22, 2025 –4 minutes read time

There are numerous iPhone settings, too many to remember. Fortunately, there is a way to search for any iPhone setting with your iPhone Settings Search bar. This is particularly useful when searching for settings for a specific app or feature, but you are unsure exactly where to find them.

For instance, if you wanted to set your iPhone to Dark Mode permanently, but you are not sure if it is located under Display, Focus, or Accessibility. Using the Settings Search bar bypasses the need to know exactly where everything is. Let’s explore how to search an iPhone Settings menu.

  • Easily locate settings options without having to scroll through the whole iPhone Settings menu.
  • Quickly find settings and preferences you’re unfamiliar with instead of clicking hopelessly.

This tip was performed on iPhone 14 Pro running iOS 18.5,

Click here to learn how to update your iPhone to the latest iOS version.

First, tap your Settings icon to open. Refer to the image below:

Settings 1
Selecting the Settings app

Next, if you do not see the Starch box, tap the “notch”area (the Dynamic Island)” at top of screen to reveal the iPhone Settings Search bar. See the image below;

Settings 2
Tapping the Dynamic Island to reveal the Search bar

Now, if you want to search for a particular app’s settings, tap the Search bar. See the following image:

Settings 3
Accessing the Search bar

Next, type in the name of an app. Refer to the image below:

Settings 4
Entering an app in the Search bar

Now, tap the app when it appears to access its settings. See the image below:

Settings 5
Revealing the settings for the app

Next, if you want to search for a particular iPhone setting, but are unsure where it’s located, type in the name of the setting. In this case, Accessibility, and all Accessibility settings appear underneath. Now, tap one of the Search results, and you will be taken to the appropriate settings! See the following image:

Settings 6
Revealing the settings for an option

Isn’t that so convenient? Now you know how to find the iPhone Settings Search bar and find that particular iPhone setting you have been looking for!

Disclaimer

Technology is constantly evolving, and smartphone and desktop tech rarely remains static. Therefore, the information in this post is only accurate as of the date it was written. Blog posts that are older than six months may contain instructions that are no longer compatible with your device or operating system. We hope that the content from previous posts continues to function as intended. Thank you for reading TechSavvy.Life, where technology works for you.

“Computers are like Old Testament gods: lots of rules and no mercy.”

 – Joseph Campbell, Mythologist and Writer

That’s it. Please feel free to share this post! One way to share is via Twitter.

Just click the Tweet icon below. This will launch Twitter where you click its icon to post the Tweet.

Checkout TechSavvy.Life for blog posts on smartphones, PCs, and Macs! You may email us at contact@techsavvy.life for comments or questions.

We value your feedback! Was this post helpful? Please share your comments with us. If you have a tech question related to your computer or smart device, feel free to reach out. Just send an email to contact@techsavvy.life, and be sure to include the device, app, and version you are using. To assist us further, you can also attach screenshots related to your inquiry.

Author’s eBook

The author’s Vietnam eBook on the “Battle for Tra Bong Vietnam: Events and Aftermath” can be accessed from a Kindle device or the Kindle App for a desktop or smartphone. The apps are free.

The author’s Vietnam eBook on the Battle for Tra Bong Vietnam: Events and Aftermath

How to Fix Photo Quality on iPhone

TechSavvy.Life explores an iPhone Camera app setting called Prioritize Faster Shooting, which allows quick, successive photography, specifically for iPhone models XS/XR or later running on iOS 14 and above. However, enabling this feature reduces photo quality due to shorter image processing time. Users can personalize this setting in their iPhone settings.

RAYMOND OGLESBY @RaymondOglesby2
January 16, 2024

This is for the iPhone XS/XR or later running iOS 14 or higher. Screenshots are from iPhone 14 Pro running iOS 17+

The iPhone is a great camera out of the box. Just set the phone up and start taking photos and recording videos without worrying about advanced settings. However, if you do want to take your photo skills to the next level, all sorts of iPhone photo tricks can help you improve your game. The iPhone’s Camera app holds settings that can also enhance the pictures and clips coming out of your iPhone.

One of those image settings can come in handy when you do not want to miss a shot. But it can also ruin photo quality, as the iPhone might devote less time to processing the image.

Called Prioritize Faster Shooting, the setting is straightforward. It does what it says; it enables faster shooting, especially if you take lots of burst photos. The setting lets the iPhone capture more shots per unit of time, which can be useful if you are following certain events and want to capture everything. But it might not be worth taking so many shots if the quality of the resulting images has to suffer.

The setting comes enabled by default. To disable this feature, head to:

Settings > Camera > Prioritize Faster Shooting

and toggle to the OFF position. Reger to the below image:

Fix Photo 1
To disable, turn the option to OFF

To enable, set the toggle to the ON position.

If you do not find the setting, you probably use an older iPhone or iOS. You must either update the software or get a new iPhone to take advantage of Prioritize Faster Shooting.

Technology is always changing and rarely is there static tech for smartphones and desktops. Thus, the contents of this post are only valid at the time of writing. Blog posts older than six months may have directions incompatible with your device or OS. Hopefully, older post content will continue to work as advertised. Thank you for reading TechSavvy.Life for Technology at Work For You.

. “You don’t learn to walk by following rules. You learn by doing and falling over.”

Richard Branson

That’s it. Please feel free to share this post! One way to share is via Twitter.

Just click the Tweet icon below. This will launch Twitter where you click its icon to post the Tweet.

Checkout TechSavvy.Life for blog posts on smartphones, PCs, and Macs! You may email us at contact@techsavvy.life for comments or questions.

Please feel free to leave a comment. I would love to hear from you. Do you have a computer or smart device tech question? I will do my best to answer your inquiry. Just send an email to contact@techsavvy.life. Please mention the device, app, and version you are using. To help us out, you can send screenshots of your data related to your question.

You can access the e-book from a Kindle device, the Kindle App for the desktop or smartphone, which is a free app.

The author’s Vietnam eBook on the Battle for Tra Bong Vietnam: Events and Aftermath

3 iPhone Settings to Check

Year after year, Apple rolls out new features and settings for its iPhones, adding more customization options that change how we use our phones.

RAYMOND OGLESBY @RaymondOglesby2
April 25, 2023

Year after year, Apple rolls out new features and settings for its iPhones, adding more customization options that change how we use our phones.

Now is a good time to review some settings. Take a few minutes to peruse these three settings and make sure you are getting the most out of your iPhone.

This is for the iPhone. Screenshots are from iPhone 14 Pro running iOS 16+

Check Individual Settings

First, if a factory reset is too drastic, you can handpick the settings that need a refresh. Head to:

Settings > General > Transfer or Reset iPhone > Reset

Next, tap Reset All Settings to refresh your iPhone’s network settings, keyboard dictionary, location settings, privacy settings, and Apple Pay cards all in one shot, without deleting your photos, contacts, or other data and media. Refer to the below image:

iPhone Check 1
Reset Settings

Or update them one by one (the preferred method).

  • Having connectivity problems? Choose Reset Network Settings to remove previously used networks and VPNs (that were not installed using a configuration profile).
  • If there’s an issue with your phone’s layout, try Reset Home Screen Layout to return Apple’s built-in apps to the Home screen, like they would be on a new phone out of the box.
  • Each time you tap on a word or spelling the phone does not know, it notes it and saves the information to your dictionary. If something goes wrong, try Reset Keyboard Dictionary to erase all the words you have added and reset the suggested words you see while typing.
  • To revoke location access for people or apps, tap Reset Location and Privacy to restore those settings to their default. (For people, this can also be managed from the Find My app.) When you re-open apps that used your location, like Uber or Google Maps, they will likely ask you to grant them access to your location again.

Enable Safety Check

In iOS 16, Apple added Safety Check to quickly disconnect from people and apps that may be tracking you, either with or without your knowledge. In the case of domestic abuse or other harmful situations, this feature can help restore control of the iPhone to its owner.

It can also be helpful to revisit share settings that you made in the past and forgot about to disconnect from anyone who may still have access to your content, location, or settings.

First, to review the people and apps you are sharing information with, head to

Settings > Privacy & Security > Safety Check > Manage Sharing & Access

to see your current settings and decide if you want to change anything or not. See the below image:

iPhone Check 4
Running Safety Check

Fix Notifications

If there are some apps that are not notifying you when you think they should be, there is no single solution to fix those settings. Instead, you will have to change things manually for individual apps: First, head to:

Settings > Notifications

to find a list of all the apps on your phone. Next, choose Scheduled Summary to see if any apps have been set to deliver notifications at a specific time.

You can also inspect an individual app. An app’s notifications can be enabled or disabled from the Allow Notifications toggle at the top of the screen. You can also decide whether the app notifies you on the Lock Screen, Notification Center, and uses Banners.

If you scroll to the bottom of the Notifications section, you can turn off, or back on, AMBER Alerts, Emergency Alerts, and Public Safety Alerts. See the following image:

iPhone Check 7
Fix Notifications
Disclaimer

Technology is always changing and rarely is there static tech for smartphones and desktops. Thus, the contents of this post are only valid at the time of writing. Blog posts older than six months may have directions incompatible with your device or OS. Hopefully, older post content will continue to work as advertised. Thank you for reading TechSavvy.Life for Technology at Work For You.

Quote For the Day

Science knows no country, because knowledge belongs to humanity, and is the torch which illuminates the world.

Louis Pastuer

Tweet Info

You are finished. Please feel free to share this post! One way to share is via Twitter.

Just click the Tweet icon below. This will launch Twitter where you click its icon to post the Tweet.

Checkout TechSavvy.Life for blog posts on smartphones, PCs, and Macs! You may email us at contact@techsavvy.life for comments or questions.

I Would Like to Hear From You

Please feel free to leave a comment. I would love to hear from you. Do you have a computer or smart device tech question? I will do my best to answer your inquiry. Just send an email to contact@techsavvy.life. Please mention the device, app, and version you are using. To help us out, you can send screenshots of your data related to your question.

Author’s E-Book

You can access the e-book from a Kindle device, the Kindle App for the desktop or smartphone, which is a free app.

The author’s Vietnam eBook on the Battle for Tra Bong Vietnam: Events and Aftermath

How to Reset Windows 10 Settings App

On Windows 10, you can reset the Settings app when it does not want to open, keeps crashing, or when you are experiencing other problems.

On Windows 10, you can reset the Settings app when it does not want to open, keeps crashing, or when you are experiencing other problems.

If you are dealing with these problems, Windows 10 includes a way to reset the Settings app using the built-in secret option. Let’s explore how to reset the Settings app when it’s not working.

This is for devices running Windows 10

Dilbert and Files
Copyright Scott Adams, Inc./Distributed by Universal Uclick for UFS

Like with resetting any other app, when you reset the Settings app, it removes a variety of settings and brings them back to their default values. This can fix bugs and other problems that are caused by your custom settings.

To start resetting Settings, first, click your Start menu. Now, in the Cortana search box (next to the Start menu) type in “settings” (without the quotes). Next, in the search results, right-click the app and select App settings. Refer to below image:

Reset 1
sAccessing App settings

In the Settings window, scroll down to the Reset section and click Reset. See below image:

Reset 2
Accessing Reset section

You will get a prompt stating your app’s data will be deleted. Click Reset in the prompt to continue. See following image:

Reset 3
Selecting the Settings Reset option

The Settings app is now reset. Now, you can launch it as mentioned above or by pressing Windows+I.

If this does not fix your issue, you might want to reset your entire Windows 10 PC. (We recommend you only do this as a last resort). This brings all your settings to their default states, potentially fixing many issues on the computer.

The first principle is that you must not fool yourself and you are the easiest person to fool.

Richard P Feynman

That’s it. Please feel free to share this post! One way to share is via Twitter.

Just click the Tweet icon below. This will launch Twitter where you click its icon to post the Tweet.

Check out TechSavvy.Life for blog posts on smartphones, PCs, and Macs! You may email us at contact@techsavvy.life for comments or questions.

I Would Like to Hear From You

Please feel free to leave a comment. I would love hearing from you. Do you have a computer or smart device tech question? I will do my best to answer your inquiry. Just send an email to contact@techsavvy.life. Please mention the device, app and version that you are using. To help us out, you can send screenshots of your data related to your question.

The author’s Vietnam eBook on the Battle for Tra Bong: Events and Aftermath