

The default sound input device is the device that Windows uses to record or hear sound. When you connect more than one microphone or other recording devices to your PC, you can select which device you want to use by default.
This is for devices running Windows 10

Windows 10 users often need to juggle several microphones. There might be one built into a PC, one on a webcam, on a headset, and perhaps a podcasting microphone.
It’s worth noting that in some apps (such as Zoom), you can select your microphone device within the app, and that choice will function independently of the Windows system sound settings.
To set your default microphone system-wide, follow the steps below. Every app that uses the default Windows microphone, that is the default option for most apps, will use it.
Using Settings to Set the Default Microphone
Before we begin, it’s worth mentioning that if you have only one microphone, it will be the default.
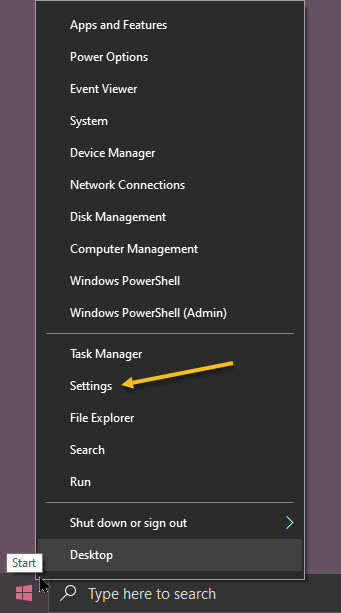
First, open Settings by clicking the Start menu and selecting the gear icon in the lower left-hand corner of your screen. You can also press Windows+i to open it. Refer to below image:
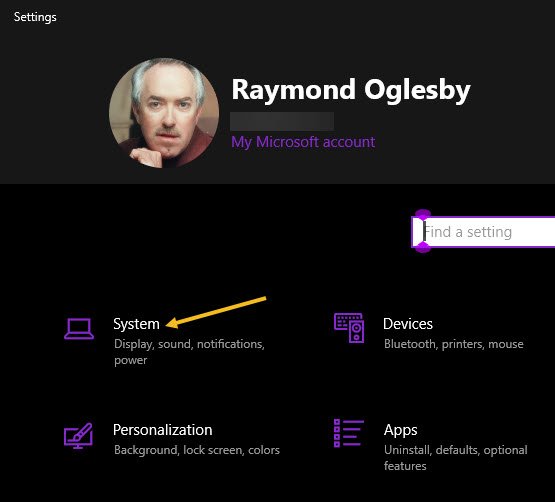
Now, in the Settings window, click the System option. See below image:
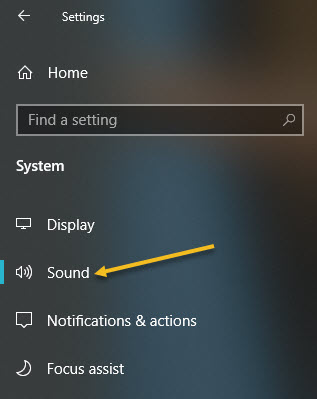
Next, on your System screen, click the Sound option from the sidebar menu. See following image:
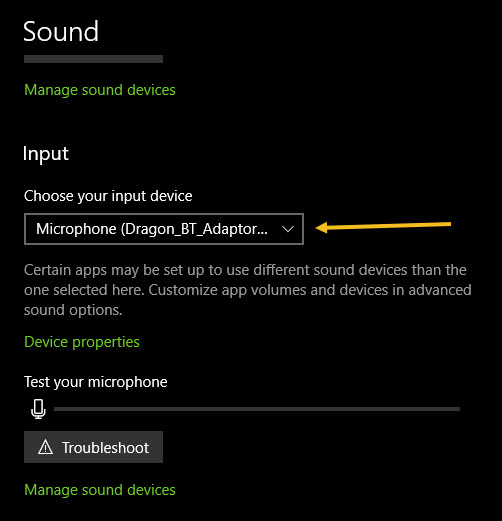
Now, scroll down to the Input section. In the drop-down menu labeled Choose your input device, select the microphone you would like to use as your default device. Refer to below image:
Once you have selected a device from the drop-down menu, Windows will use that device as your default microphone. Now, exit Settings.
Using Control Panel to Set the Default Microphone
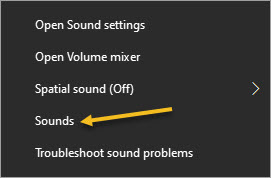
First, right-click the speaker icon in the system tray in the lower right-hand corner of your screen and select Sounds from the pop-up menu. See below image:
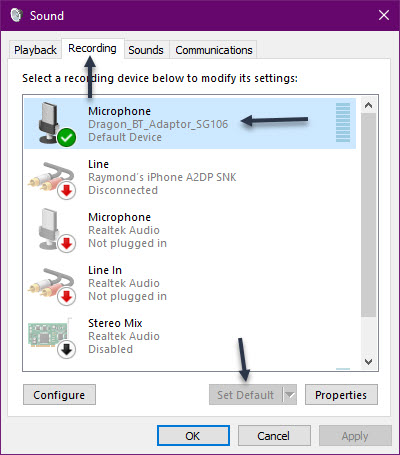
Next, click the Recording tab. Now, you will see a list of recording devices recognized by your system, which includes microphones. Select the microphone you would like to use as the default from the list and click the Set Default button. Note! If there is only one microphone listed, it will be the default. See following image:
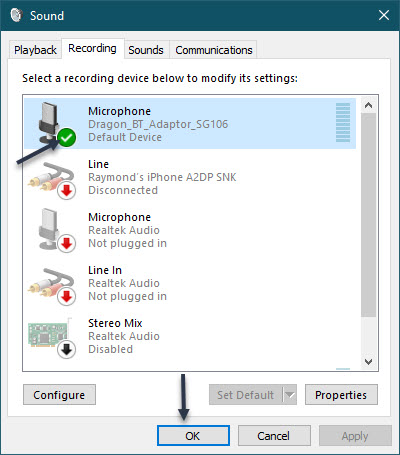
The microphone you have selected will have a green checkmark beside it and include the label Default Device. Next, click OK to close your Sound window. Refer to below image:
If you want to change your default microphone again, just select Sounds from the speaker icon in the System tray and follow the above steps for using the Control Panel to set the default microphone.
You are finished setting your default microphone. Now you may close any openwindows. Please feel free to share this post! One way to share is via Twitter.
Just click the Tweet icon below. This will launch Twitter where you click its icon to post the Tweet.
Check out TechSavvy.Life for blog posts on smartphones, PCs, and Macs! You may email us at contact@techsavvy.life for comments or questions.
Tweet
I Would Like to Hear From You
Please feel free to leave a comment. I would love hearing from you. Do you have a computer or smart device tech question? I will do my best to answer your inquiry. Just send an email to contact@techsavvy.life. Please mention the device, app and version that you are using. To help us out, you can send screenshots of your data related to your question.
