

Google collects and remembers “tons” of information about your activity, including your web, search, YouTube, and location history. Google auto-deletes for new users after 18 months but it will remember history forever if you previously enabled this feature with the default options.
As an existing user, you have four options in making Google delete your data; after 36 months, 18 months, 3 months, or stop activity collection entirely. The options are buried in Google Settings.
This is for devices running Google. Screenshots are from iPhone XR

Note! Google uses this history to personalize your experience, including your web search results and recommendations. Deleting it will make your Google experience less “personalized.”
Let’s explore how to set up this auto-delete function..
Control Web and App Activity
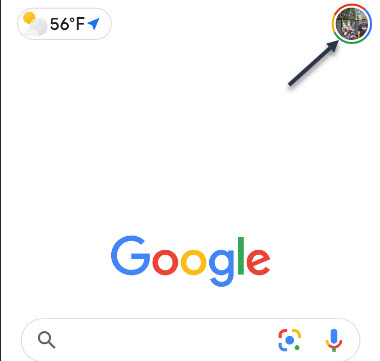
First, launch Google and tap your profile photo. Refer to below image:
Now, tap the Google Account settings option See below image:

Next, scroll down to Privacy & personalization section and tap Manage your data & personalization. See following image:

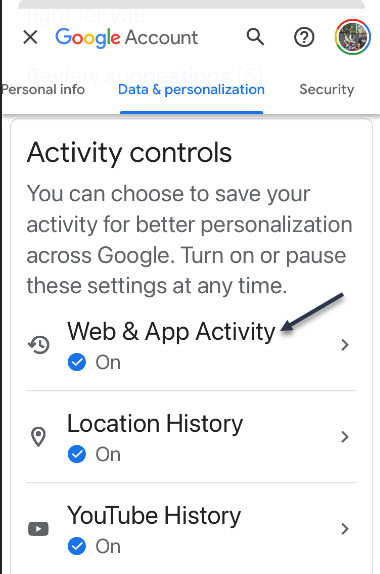
Now, scroll down to Activity controls section. Here, tap the Web & App Activity option. Refer to below image:
Next, toggle to On the Web & App Activity toggle. Next, tap the Auto-delete (Off) switch to turn in On. See below image:

Now, select one of four options. See following image where I selected Auto -delete activity older than 18 months and tap the Next button:

A Confirmation screen will be displayed. Just tap the Confirm button in lower right-hand corner. Refer to below image:

Now, you will see a Preference saved dialog box. Just tap Got It text in lower right-hand corner. See below image:

Control Location and YouTube Activity
Next, go back to Activity controls section and repeat above steps for Location History and YouTube History.
Let’s say you Search, read articles, watch videos, or see photos on ‘drones’. Google will send out ad links for ‘drones’, this is called ‘ad personalization’. Through these sponsored ads is one way Google makes money. You can turn off these ads but at the expense of a ‘depersonalization experience’.
Control Ad Personalization
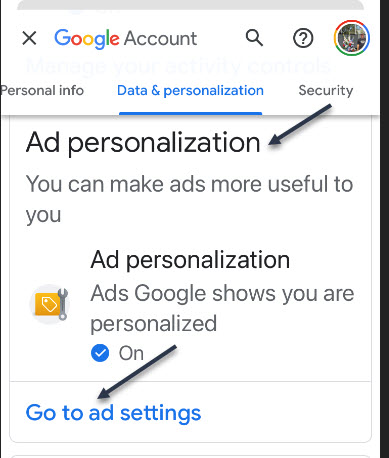
Now, go back to Activity controls and scroll down a little till you see the Ad personalization section and tap the Go to ad settings link. See following image:
Next, toggle the Ad personalization switch to ON. Refer to below image:

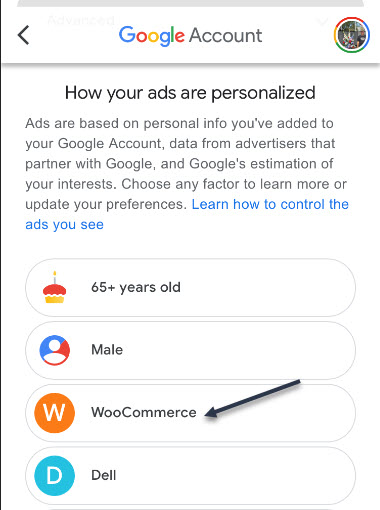
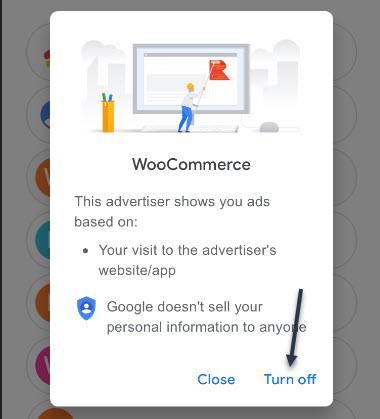
Here you will see a listing of companies/others who are using ad personalization. See below image where I selected WooCommerce:
Now, you will be presented a dialog box to Turn off or Close. Next, tap the Turn off button to no longer see this company/others targeted ads. See following image:
Now, a confirmation dialog box appears where you have to tap the Turn off button again. Google makes you go through ‘hoops’ to reduce their ads. Refer to below image:

Really, Turn Off Ads?
Google is making you go through a myriad of selections. Notice the text that states turning off your selected ad will stay off for at least 90 days. Your selected ad will stay off for this period, then guess what, the ad comes back! Google wants to make money off these ads; they do not want you to turn them off. See above image.
That’s it. Please feel free to share this post! One way to share is via Twitter.
Just click the Tweet icon below. This will launch Twitter where you click its icon to post the Tweet.
Check out TechSavvy.Life for blog posts on smartphones, PCs, and Macs! You may email us at contact@techsavvy.life for comments or questions.
Tweetd
I Would Like to Hear From You
Please feel free to leave a comment. I would love hearing from you. Do you have a computer or smart device tech question? I will do my best to answer your inquiry. Just send an email to contact@techsavvy.life. Please mention the device, app and version that you are using. To help us out, you can send screenshots of your data related to your question.
