I am Raymond Oglesby, an Information Technology (IT) specialist with 30 years in the field. I have taught Microsoft Applications and troubleshot computers in 15 countries and many States. My career was focused on mainframes and desktops from application development to implementation. I have written hundreds of programs for various architectures. I decided to start a blog to share my knowledge and experiences with you. I plan on updating this blog at least twice a week about smart phone apps to Windows.
Please feel free to leave a Comment or Tweet. I would love to hear from you. Do you have a computer tech question? I will do my best to answer your inquiry. Please mention the app and version that you are using. To help me out, you can send screenshots of your data related to your question.
If you do not wish to listen to certain songs or hide those songs so they do not play when you are using Spotify, we will show you how. You can unhide your songs in the future if you change your mind.
This is for iPhone and Android. Screenshots are from iPhone 14 Pro running iOS 16+ and Windows 10
If you do not wish to listen to certain songs or hide those songs so they do not play when you are using Spotify, we will show you how. You can unhide your songs in the future if you change your mind.
Note: You can not hide songs in your own playlists. If you do not want a specific song in your playlist, simply remove it from the list.
Hide Songs on Spotify
To hide a song so it does not play when you are listening to your music, use the following steps in the Spotify app on your iPhone or Android phone.
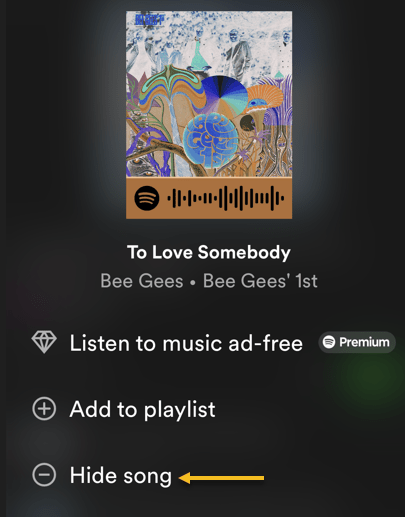
First, launch Spotify on your phone and find the music track to hide. Then, next to the song, tap the three dots (the Menu icon). Refer to the below image:
Accessing the Menu of the song to Hide
Next, in the menu that opens, select Hide Song. See the below image:
Selecting the option to Hide your song
Now, Spotify will immediately hide your song in your list. See the following image:
Your hidden song is greyed out
Unhide Songs on Spotify
If you have changed your mind about a song and want to unhide that song, follow the following steps to see your hidden songs and unhide them.
First, open Spotify on your phone. Then, find the playlist or album where you hid your song.
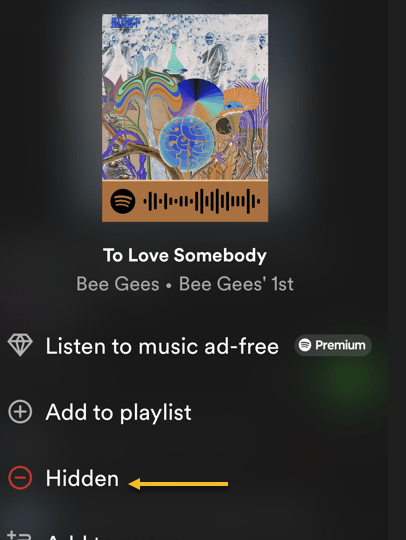
Next, find your hidden song (which will be grayed out), and next to that song, tap the three dots (the Menu icon). Refer to the below image:
Accessing the Menu to unhide a song
Now, in the open menu, select Hidden. See the below image:
Selecting the option to unhide your song
Now, Spotify will unhide your song, allowing you to tap and play it. See the following image:
Your hidden song is now visible
For Desktop Only
You can not hide songs on Spotify’s desktop and web versions. Only the platform’s mobile app allows you to hide and unhide songs, as of this writing.
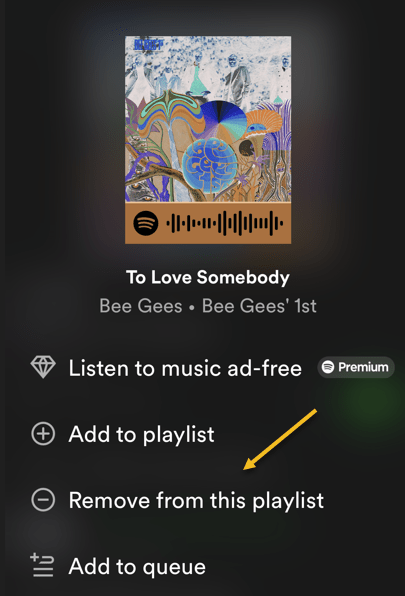
If you have an unwanted song in your playlist (not a Spotify sample playlist), remove it from your list and the app will not play it. To do that, access your playlist and find that song. Next to the song, click the three dots (the Menu icon) and choose Remove from this playlist. See the following image:
Selecting to remove your song on the desktop
Spotify will remove the selected song from your playlist, and you are all done.
Disclaimer
Technology is always changing and rarely is there static tech for smartphones and desktops. Thus, the contents of this post are only valid at the time of writing. Blog posts older than six months may have directions incompatible with your device or OS. Hopefully, older post content will continue to work as advertised. Thank you for reading TechSavvy.Life for Technology at Work For You.
Quote For the Day
“Motivation is what gets you started. Habit is what keeps you going.
Jim Rohn
Tweet Info
That’s it. Please feel free to share this post! One way to share is via Twitter.
Just click the Tweet icon below. This will launch Twitter where you click its icon to post the Tweet.
Checkout TechSavvy.Life for blog posts on smartphones, PCs, and Macs! You may email us at contact@techsavvy.life for comments or questions.
Please feel free to leave a comment. I would love to hear from you. Do you have a computer or smart device tech question? I will do my best to answer your inquiry. Just send an email to contact@techsavvy.life. Please mention the device, app, and version you are using. To help us out, you can send screenshots of your data related to your question.
Author’s E-Book
You can access the e-book from a Kindle device, the Kindle App for the desktop or smartphone, which is a free app.
The author’s Vietnam eBook on the Battle for Tra Bong Vietnam: Events and Aftermath
Scanners had their moment, but nowadays it’s not as necessary to own one. However, that does not mean you never need to scan a document or photo. Thankfully, you probably have some tools to do it without a scanner.
This is for the iPhones and Tablets. Screenshots are from iPhone 14 Pro running iOS 16+
Scanners had their moment, but nowadays it’s not as necessary to own one. However, that does not mean you never need to scan a document or photo. Thankfully, you probably have some tools to do it without a scanner.
If you find yourself scanning a lot of documents and photos, it’s a good idea to invest in an actual scanner. Most people only need to scan a few things a year, so we will show you some good alternatives.
Scan Photos and Documents
A scanner is essentially just a camera that takes a photo of your document in a specific way. Well, you carry a camera with you every day, so why not use that as a scanner?
A smartphone camera is usually perfectly fine for getting the job done as a scanner. The results will not be as crisp and clear as an actual scanner, but it will get the point across. Here are some suggestions for taking photos of a document.
Lighting: Place the document on a flat surface with good lighting. Try to avoid casting a shadow on the document with your hand and phone.
Placement: Take the photo straight on to avoid any weird angles. This can be done directly above or at a right angle by propping up the document. Do whichever results in the best lighting with the fewest shadows.
Framing: Make sure to take the photo from far enough away so the entire document is in view. After you take the photo, crop it to the document so you do not see any of the surroundings.
The camera on your phone will suffice in many situations, but sometimes a more professional-looking scan is necessary. For that, you will want to turn to a document scanner app. You already have one installed on your iPhone, iPad, or Android phone.
Scan Using the Files App on iPhone
Phones and iPads have a built-in Document Scanner feature. This tool is not its own app, but you will find it both in Apple’s Files app and the Apple Notes app. Many websites suggest using the Notes app to scan a document, and that works fine; but you can also use the Files app, which is convenient if you just want to scan the document to a file.
To scan a document on an iPhone or iPad with the Files app, first, open the Files app and go to the location you want to save your scanned document to. For example, to keep it in your iCloud Drive, open the iCloud Drive location. To save it in your iPhone’s Downloads folder, open Downloads.
Next, tap the Menu button (it looks like a “…”) at the top-right corner of the screen and tap Scan Documents to get started. Refer to the below image:
Selecting to scan from the Files app into the Downloads folder
Now, position the document in view of your iPhone or iPad’s camera and hold it still. Your device will automatically capture an image of the document, and you will see it flash on the screen. See the below image:
The scanned document in Files
Next, to scan a multi-page document, position the second page in view of your iPhone or iPad’s camera. Continue this process to capture as many pages as you like. When you are done, tap Save, and you will get a combined PDF file containing each page. See the following image:
The scanned document is in the Downloads folder
Scan Using the Notes App on iPhone
You can also use the Notes app to scan documents. First, open the Notes app on your iPhone or iPad, open an existing note or create a new note, tap the camera icon, and tap Scan Documents. The Notes app will then save your scanned documents as notes rather than files Refer to the below image:
Selecting to scan from the Notes app
Next, your saved document is in the Notes app. See the below image:
The scanned document in Notes
Disclaimer
Technology is always changing and rarely is there static tech for smartphones and desktops. Thus, the contents of this post are only valid at the time of writing. Blog posts older than six months may have directions incompatible with your device or OS. Hopefully, older post content will continue to work as advertised. Thank you for reading TechSavvy.Life for Technology at Work For You.
Quote For the Day
Whatever you’re thinking, think bigger.
Tony Hsieh
Tweet Info
That’s it. Please feel free to share this post! One way to share is via Twitter.
Just click the Tweet icon below. This will launch Twitter where you click its icon to post the Tweet.
Checkout TechSavvy.Life for blog posts on smartphones, PCs, and Macs! You may email us at contact@techsavvy.life for comments or questions.
Please feel free to leave a comment. I would love to hear from you. Do you have a computer or smart device tech question? I will do my best to answer your inquiry. Just send an email to contact@techsavvy.life. Please mention the device, app, and version you are using. To help us out, you can send screenshots of your data related to your question.
Author’s E-Book
You can access the e-book from a Kindle device, the Kindle App for the desktop or smartphone, which is a free app.
The author’s Vietnam eBook on the Battle for Tra Bong Vietnam: Events and Aftermath
Have you ever wanted to check how long it would take for your iPhone or iPad to charge completely? Maybe, you do not like to frequently check how much your device has charged? Well, this particular iOS shortcut intends to do just that. It’s pretty simple to set up and use on your device.
This is for iPhone and iPad. Screenshots are from iPhone 14 Pro running iOS 16+
Have you ever wanted to check how long it would take for your iPhone or iPad to charge completely? Maybe, you do not like to frequently check how much your device has charged? Well, this particular iOS shortcut intends to do just that. It’s pretty simple to set up and use on your device.
Anyone could estimate that your iPhone can fully charge from 0 to 100% in roughly about 2-3 hours. But, this is a very rough estimation. The actual time it takes could vary anywhere between two and three hours, or sometimes even lower depending on whether you have enabled Airplane mode or not. The Charge Time iOS shortcut can make a far more approximate guess from the current battery percentage and tell you how long it’d take to fully charge if you plug it in.
Check Your Charging Time
For those unaware, the Shortcuts app is one of the stock apps for devices running iOS 13/iPadOS 13 or later. We will be using the Shortcuts app to determine the charging time for your device.
First, head to this Charge Time link and tap Get Shortcut to download the shortcut on your iPhone or iPad. This shortcut is not available on the App Store nor is it pre-loaded on your device. You can use the link above or perform a Google search to locate the shortcut.
There are other charging time shortcuts from various sources. This post is only for the Charge Time shortcut as mentioned above.
Note! You may receive a screen asking to enable cookies and other data. Select the items you wish to share.
Refer to the below image:
Get the shortcut
Next, the Shortcuts app will launch on your device and display the Charge Time shortcut. At the bottom, tap on Add Shortcut to proceed. See the below image:
Add the shortcut
Now, this will install the shortcut and add it to the All Shortcuts and My Shortcuts gallery. See the following image:
Added shortcut
Next, tap on the Charge Time shortcut to reveal its menu. From here, tap the Details option. Refer to the below image:
Accessing shortcut options
Now, tap the Add to Home Screen link. See the below image:
Add the shortcut to your Home screen
Next, a preview screen will display the Charge Time shortcut. At the top of this screen, tap Add. See the following image:
Shortcut preview screen
Now, the Charge Time shortcut will be added to your Home screen (the first empty space it finds). Refer to the below image:
Shortcut added to your Home screen
Next, simply tap on the Charge Time icon. You will get a pop-up message at the top of your screen stating how long it will take for your device to charge to 100%. Tap Done or Cancel (depending on if you have made any changes) to close the pop-up. See the below image:
Results of running your shortcut
Before closing the pop-up message, you have more options. Long press on the pop-up message. At the top of the screen, you will notice a down arrow next to the message.
If you say, “Hey Siri, Charge Time”; the shortcut will run but you are unable to use a long press on the pop-up message to view options.
See the following image:
Accessing the drop-down arrow
Now, tap on this down arrow to upload as a text document, save to Files or Print. Finally, to exit, tap Done. Refer to the following image:
Options for the shortcut
That’s pretty much all you have to do.
Charge Time Is An Estimate
It’s important to note the result you get is just an approximate value and not completely accurate to the minute.
As useful as this shortcut is, we would like to point out that there’s one major downside to it. This might be a dealbreaker for a lot of users. The Charge Time shortcut only takes into account the standard charger that comes in the box with your iPhone. Nowadays, people use fast chargers, wireless chargers, or even MagSafe to charge their iPhones, and if you are one of them, this shortcut will not be helpful.
Having said that, there are still plenty of iPhone owners who did not purchase the optional fast charger and instead use the one that came in the box, so it’s not like the shortcut is useless at all. Hopefully, this shortcut was useful for you.
Disclaimer
Technology is always changing and rarely is there static tech for smartphones and desktops. Thus, the contents of this post are only valid at the time of writing. Blog posts older than six months may have directions incompatible with your device or OS. Hopefully, older post content will continue to work as advertised. Thank you for reading TechSavvy.Life for Technology at Work For You.
Quote For the Day
Customers don’t care about your solution. They care about their problems.
Dave McClure
Tweet Info
That’s it. Please feel free to share this post! One way to share is via Twitter.
Just click the Tweet icon below. This will launch Twitter where you click its icon to post the Tweet.
Checkout TechSavvy.Life for blog posts on smartphones, PCs, and Macs! You may email us at contact@techsavvy.life for comments or questions.
Please feel free to leave a comment. I would love to hear from you. Do you have a computer or smart device tech question? I will do my best to answer your inquiry. Just send an email to contact@techsavvy.life. Please mention the device, app, and version you are using. To help us out, you can send screenshots of your data related to your question.
Author’s E-Book
You can access the e-book from a Kindle device, the Kindle App for the desktop or smartphone, which is a free app.
The author’s Vietnam eBook on the Battle for Tra Bong Vietnam: Events and Aftermath
This is for iPhone, iPad, Android, and Desktop. Screenshots are from iPhone and Windows 10
Google Lens is an image and text recognition app that uses Google Search to deliver results based on what it sees in photos.
You have probably seen the colorful camera icon in the Google Search bar or the Google app. It’s an unassuming shortcut that leads to a variety of impressive abilities. This is Google Lens, and it’s a Google app you should know.
What is Google Lens
Google Lens is most easily described as the visual component of Google Search. You typically do Google Searches with HR text queries, but Google Lens uses images and your camera as input. It identifies things in images; such as QR codes, plants, text, and products; then delivers information or search results related to the object or text.
Long-time smartphone users may remember an app called “Google Goggles.” It was launched in 2010, and it was one of our first looks at what image recognition software could do with the cameras we were starting to carry around with us everywhere. Goggles was the precursor to Google Lens.
Google Lens was officially launched in 2017 and pre-installed on the Pixel 2 smartphone. Since then, Lens has slowly crept into more and more Google services: Google Assistant, Google Search, and Google Photos. Google Lens will also be integrated with the company’s AI chatbot, Google Bard.
What Does Google Lens Do
Google Lens essentially lets you do Google Searches by simply pointing your camera at things. What it can do with what it sees is pretty amazing. Google Lens can tell you a lot more than just what you’re looking at.
Got a math equation that you can not figure out? Do not bother typing the whole thing into your calculator point Google Lens at it. See some text in the real world that you do not feel like manually typing? Snap a photo and let Google Lens copy it for you. Find a weird bug in your backyard that you are not sure about? Google Lens can identify it for you.
These are just some of the simple things you can do with Google Lens. It can also read text from the real world out loud, translate text, search the web for an image you found, and tell you where to buy something you see out in the world.
How to Use
Google Lens is available in the Google app for iPhone, iPad, and Android; simply tap the colorful camera icon in the search bar. In a desktop browser such as Google Chrome or Microsoft Edge, you can use Lens by clicking the icon in the search bar on Google.com.
Using an iPhone, iPad, and Android
To use Google Lens on the iPhone, iPad, and Android, first, open the Google app and tap the colorful camera icon on the right side of the search bar. Refer to the below image:
Selecting Google Lens
Next, you can choose from different functions under the shutter button before pointing your camera at an object or text and snapping a photo. See the below image:
Accessing your search
Now, you can also use photos you already took from the section under the viewfinder for Lens searches. See the following image:
Choosing an image
That’s how easy it is to use Google Lens! If you have an Android phone, you may also be able to use Lens directly from one of the multiple modes in the camera app.
Using on the Desktop
To use Google Lens on the web, in a desktop browser such as Google Chrome or Microsoft Edge, first head to Google.com and tap the colorful camera icon on the right side of the search bar. Refer to the below image:
Selecting Google Lens
Next, you can either drag a photo into the box, browse for a photo on your device, or paste a link to a photo. See the below image:
Drag and Drop an image to search
Now you can select text in the image, see visually similar images, or click Find the Image Source to try and find where the image originated from. See the following image:
Your image search results
Disclaimer
Technology is always changing and rarely is there static tech for smartphones and desktops. Thus, the contents of this post are only valid at the time of writing. Blog posts older than six months may have directions incompatible with your device or OS. Hopefully, older post content will continue to work as advertised. Thank you for reading TechSavvy.Life for Technology at Work For You.
Quote For the Day
Tribalism is a social form which can exist at any level of technology. It’s a complete illusion to associate it with low levels of technology. It is probably, in fact, a form of social organization second only to the family in its ability to endure.
Terance McKenna
Tweet Info
That’s it. Please feel free to share this post! One way to share is via Twitter.
Just click the Tweet icon below. This will launch Twitter where you click its icon to post the Tweet.
Checkout TechSavvy.Life for blog posts on smartphones, PCs, and Macs! You may email us at contact@techsavvy.life for comments or questions.
Please feel free to leave a comment. I would love to hear from you. Do you have a computer or smart device tech question? I will do my best to answer your inquiry. Just send an email to contact@techsavvy.life. Please mention the device, app, and version you are using. To help us out, you can send screenshots of your data related to your question.
Author’s E-Book
You can access the e-book from a Kindle device, the Kindle App for the desktop or smartphone, which is a free app.
The author’s Vietnam eBook on the Battle for Tra Bong Vietnam: Events and Aftermath
To see if your phone is being tapped, look for apps using too much battery or data, listen for weird noises in phone calls, and watch for weird behavior like random mic activation or redirected websites. You can also use MMI or USSD codes to check your call forwarding status.
This is for the iPhone and Android. Screenshots are from iPhone 14 Pro running iOS 16+
For better or worse, our smartphones are always with us, so if someone taps into the camera or mic, it’s a serious problem. But how can you tell if your phone is being tapped, and how do you protect yourself?
How to Tell
If someone gains access to your phone they can potentially send fake emails, read your personal messages, record your calls, and all sorts of other nefarious behavior. But can you even tell if someone’s hacked your phone? Let’s explore a few ways to find out.
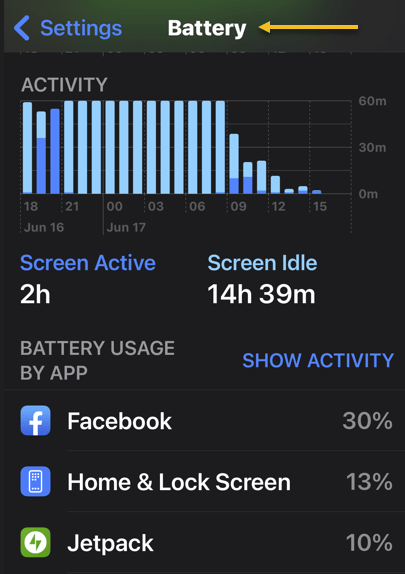
1) Battery Life is Failing
If your phone constantly overheats seemingly for no reason and the battery drains quickly without any apparent cause, your phone might be hacked. Malicious software running in the background can drain your battery without any apps running and can be anything from malware that’s reading your email to call-recording spyware.
If you are already a heavy phone user, your battery probably gets hot anyway. Streaming video or playing games for long periods of time, for example, will cause your phone to heat up which is pretty normal. If you have not been using your phone a lot and the battery still heats up or can no longer hold a charge, you might want to check for malicious software.
To do that, check your battery settings. On either an Android or iPhone you can see which apps are using the most battery by going to:
Settings > Battery
where you will see which apps are using the most power. If there are apps on that list you do not remember installing, or a third-party app that should not be using much power, uninstall them immediately. Refer to the below image:
Battery Settings
2) Weird Noises
A high-pitched hum or strange, pulsating static on the line could be a sign your calls are being recorded. If you hear static or other strange sounds like clicking or beeping even when you are not calling someone, that’s another sign, especially when your phone’s been tapped by the police.
Hearing these sounds once or twice at random is probably okay, but if it happens consistently, check your phone. You can try using a sound-bandwidth sensor app from another phone set to a low frequency. If it picks up several sounds over a minute, your phone may be compromised.
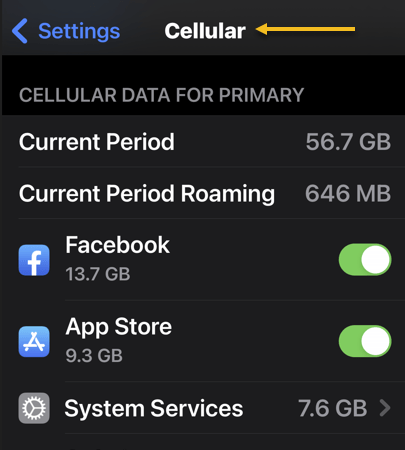
3) High Data Use
Spyware and malware will routinely use a lot of data; constantly sending information back to whoever hacked your device. If your location or data icons at the top of your screen regularly move or light up, that could be a sign someone is sending data from your phone or controlling it remotely. Higher than normal data use can also show up as a higher phone bill if you do not have an unlimited data plan.
iPhones and Android phones both let you check your data usage to see if your phone is (possibly) tapped. To do it on an iPhone, go to:
Settings > Cellular
See the below image:
Cellular Settings
On Android, go to
Settings > Network & Internet
It may also be under:
Connections > Data usage or > Mobile data usage.
4) Unusual Activity
If your phone has trouble shutting down, that could be a sign it’s being tapped. Randomly shutting down on its own is another sign of trouble. When turning off your phone, check to see if the backlight stays on even when the phone is powered off or if the shutdown fails altogether.
Other strange behaviors your phone could exhibit if it’s been compromised include popup ads, the screen lighting up at random, and messages you do not recognize that push you to follow unfamiliar links. Also, performance often slows way down.
Watch out for your camera or mic turning on randomly. If you keep seeing the camera light go on when you did not open an app that uses the camera, it could be a sign your phone’s been hacked. Some malicious software lets hackers access your camera without turning the light on, so always dig deeper if you think something’s fishy.
5) Websites Look Strange
Some forms of malicious software can infiltrate your browser, showing you a fake web page that looks legitimate, then harvesting your login credentials when you type them in. If you are browsing on your phone and the web page you are looking at acts strange or does not look quite like it’s supposed to, close the browser and check your phone for malware by scanning it or taking it to a professional.
Protect Your Phone From Being Tapped
If you want to make sure your phone is never compromised, avoid downloading any apps that are not from the Google Play Store or Apple’s App Store. Even when using the mainstream app stores, though, do a Google search of the app and the developer to double-check that they are on the level before you download; bad apps can and do occasionally get past their vetting processes.
Download trusted anti-malware and antivirus apps and use them regularly. If you can afford a premium subscription, do it. If not, there are some great free options available.
Using a VPN to obscure your true IP address can make it harder for someone who’s trying to track you to pin down your location. If you can, try a few out and use one regularly when are in public or on an unsecured connection
.You can also check and see whether your calls and messages are being forwarded to other devices using Man-Machine Interface (MMI) codes. They will be different depending on the network but can allow you to discover and cut off any unauthorized forwarding. To use them, dial the desired MMI code with your keypad, then hit the call button.
If you are on a GSM network (like AT&T and T-Mobile):
*#002# — Lists all call and data forwarding settings
##002# — Clears all call and data forwarding settings
If you’re on a CDMA network (like Verizon and US Cellular):
*72 — Lists all call and data forwarding settings
*73 — Clears all call and data forwarding settings
Unfortunately, MMI codes only work on Android devices, but you can use the USSD (Unstructured Supplementary Service Data) code *#21# on an iPhone to check your call forwarding status and see if your calls are being forwarded anywhere else.
If you are done your due diligence but you are still experiencing these symptoms, take your phone to a professional. Odds are they will have the tools to scan more deeply and remove any bad software that could be causing the problem.
Disclaimer
Technology is always changing and rarely is there static tech for smartphones and desktops. Thus, the contents of this post are only valid at the time of writing. Blog posts older than six months may have directions incompatible with your device or OS. Hopefully, older post content will continue to work as advertised. Thank you for reading TechSavvy.Life for Technology at Work For You.
Quote For the Day
Our inventions are wont to be pretty toys, which distract our attention from serious things. They are but improved means to an unimproved end.
David Thoreau
Tweet Info
That’s it. Please feel free to share this post! One way to share is via Twitter.
Just click the Tweet icon below. This will launch Twitter where you click its icon to post the Tweet.
Checkout TechSavvy.Life for blog posts on smartphones, PCs, and Macs! You may email us at contact@techsavvy.life for comments or questions.
Please feel free to leave a comment. I would love to hear from you. Do you have a computer or smart device tech question? I will do my best to answer your inquiry. Just send an email to contact@techsavvy.life. Please mention the device, app, and version you are using. To help us out, you can send screenshots of your data related to your question.
Author’s E-Book
You can access the e-book from a Kindle device, the Kindle App for the desktop or smartphone, which is a free app.
The author’s Vietnam eBook on the Battle for Tra Bong Vietnam: Events and Aftermath
At the top of our shortlist of outstanding apps is Everything. This app has been around for a long time but we have recently discovered the Windows app.
This is for Windows XP through Windows 11. Screenshots are from Windows 10
At the top of our shortlist of outstanding apps is Everything. This app has been around for a long time but we have recently discovered the Windows app. It’s now an integral part of our Windows apps.
What is Everything
Everything is a Windows freeware file search application created by programmer David Carpenter in 2008.
The single most notable thing about Everything is the speed.
If you have ever used Windows file search (File Explorer)or even some third-party file search tools, the most memorable thing about the experience is how long it takes.
Even after all these years, Windows file search is agonizingly slow. Truly, it’s agony. In an age of inexpensive SSDs with instant booting and instant program loading, waiting thirty seconds for Windows to grind through a search feels like torture. It does not matter if you are still using Windows 7 or upgraded to Windows 11, Windows search has never been speedy.
Everything sidesteps the shortcomings of the Windows file search by doing something that was novel when the application was first released and remains novel; it taps right into the file table at the file system level for lightning-fast search.
How fast is it? It’s so fast that if you create a new file, by the time you open up the Everything search box a moment later, the file is instantly in the index. It’s unlikely you could create the file and get to the search box fast enough to beat the nearly instantaneous addition of the entry into the Everything index.
The only downside to Everything is that it works off the file table and the file names and does not index the contents of the files. If you need a tool that will look deep into documents and help you find key phrases, this tool is not it. But if you are just trying to find where, exactly, you put your tax returns from five years ago, it’s almost magical in its speed and efficiency.
Why Is It Indispensable
We have a huge number of files, across a huge number of folders and drives. But as long as we name files and folders sensibly as they come in, it does not matter where they end up. They could be on the C drive, the G drive (portable external drive), or even buried in a network drive hosted somewhere (you can enable network drive search in the Everything settings).
No matter where the files are, you can find them if you member even a fraction of the folder or file name. Old taxes, work forms, Photoshop projects, comic books you hoarded five years ago, you name it. If you want it, you can churn it up to the surface with a few keywords.
For example, I need to find old tax returns to answer questions from the IRS about depreciation. That made me say, “Didn’t I squirrel those returns somewhere?” and sure enough, I did. I might have forgotten where they were, but Everything did not. Refer to the below image:
Everything displaying tax returns
You do not need wildcards for your search. Everything search implies wildcard searches; the app will find all files/folders that include your search criteria. In the menu bar, select Search to view more options. See the below image:
Accessing the Search options
It instantly scanned hundreds of thousands of files and folders on my computer and the attached drives to find exactly what I wanted.
If you can remember anything about the file; part of the name, the file extension, the root directory it might be deeply buried in; you can dig it up with a few keystrokes.
Even on my laptops, where the files are definitely not stacked terabytes deep, I still install Everything, I certainly do not want to be stuck waiting for Windows search to sift through the files at a slow pace.
it’s freeware. So Download it. The website name has an odd name, Voidtools, but this is the download page.
Take Notice
If you need to download this app or any other on a desktop or laptop, always download it from the manufacturer. Another safe bet is to download from a store like Apple Store or Microsoft Store.
Never download from these websites:
FileHorse Softonic CNET Download 82 Softlay Dealnews Windowsinside Us7p Files10 Soft112 UpdateStar Techno360 ColorMango MajorGeeks FileHonor FilesWin iGeeksBlog Neowin Linenseapps Business Wire SoftwareKeep TechShout Windows Latest’ Wondershare Slant iMobie BitsDuJour Softfree.eu Uptodown FreeProSoftz TechWhoop Tickcoupon CrackDJ AbbasPC Giev Away of the Day GroovyPost TechGeek365 TechMoran Digital Connect Mag Malavida …. and 16 more
The above websites should be banned. If you download from any other site besides the manufacturer or a store, expect viruses and malware to appear. If this happens, immediately Shutdown and/or Restart your PC and run a virus scan.
As a test, I downloaded it from File Horse. I got popups from Google Chrome saying my PC has been hacked followed by a full webpage saying my PC is corrupted. I got rid of the messages. but I had more problems. The FtleHorse website gave the site access to everything on my PC. I had to manually go through Google Privacy and Security Settings to block each access.
I recommend only using Voidtools website for downloading. Then feel the speed of searching, Everything, on your computer instantly.
Disclaimer
Technology is always changing and rarely is there static tech for smartphones and desktops. Thus, the contents of this post are only valid at the time of writing. Blog posts older than six months may have directions incompatible with your device or OS. Hopefully, older post content will continue to work as advertised. Thank you for reading TechSavvy.Life for Technology at Work For You.
Quote For the Day
The most intractable problem today is not pollution or technology or war; but the lack of belief that the future is very much in the hands of the individual.
Margaret Mead
Tweet Info
You are finished. Please feel free to share this post! One way to share is via Twitter.
Just click the Tweet icon below. This will launch Twitter where you click its icon to post the Tweet.
Checkout TechSavvy.Life for blog posts on smartphones, PCs, and Macs! You may email us at contact@techsavvy.life for comments or questions.
Please feel free to leave a comment. I would love to hear from you. Do you have a computer or smart device tech question? I will do my best to answer your inquiry. Just send an email to contact@techsavvy.life. Please mention the device, app, and version you are using. To help us out, you can send screenshots of your data related to your question.
Author’s E-Book
You can access the e-book from a Kindle device, the Kindle App for the desktop or smartphone, which is a free app.
The author’s Vietnam eBook on the Battle for Tra Bong Vietnam: Events and Aftermath
The days of pulling your hair out and trying to deal with zip files on your iPhone or iPad are behind us. Thanks to the Files app, it’s pretty easy to unzip files and create zip files.
This is for the iPhone and iPad. Screenshots are from iPhone 14 Pro running iOS 16+
The days of pulling your hair out and trying to deal with zip files on your iPhone or iPad are behind us. Thanks to the Files app, it’s pretty easy to unzip files and create zip files. Let’s explore this feature.
Introduced in iOS 11, the Files app was a long-requested feature for both the iPhone and iPad. It drastically improved file management capabilities and made it easy to deal with zip files without additional apps or hacks.
Create a Zip File
First, open the Files app. Refer to the below image:
Open the Files app
Next, navigate to the files or folders you would like to zip. See the below image:
Locating Files or Folders to Zip
Now, tap the three-dot Menu icon and choose Select. The Select option is visible on an iPad in the top bar without the menu. See the following image:
Accessing the Select option
Next, select all the files or folders you would like to zip together. Refer to the below image:
Selecting Files or Folders to Zip
Now, with the files selected, tap the three-dot Menu icon in the bottom right and choose Compress. See the below image:
Selecting the Compress option
The zip file will be created. Press and hold the zip file to see the option to Rename it or Move it somewhere else. See the following image:
Choosing to Rename the Zip file
That’s all there is to it! Files management was a pain to deal with on the iPhone and iPad for a long time, but the Files app swiftly fixed that situation.
Open a Zip File
First, open the Files app. Refer to the below image:
Open the Files app
Next, navigate to the zip file’s location. If you downloaded it to your iPhone, it will likely be in the Download folder under On My iPhone.
Now, tap the file to unzip it. Your iPhone will extract the zip file’s contents to the current folder. See the below image:
Opening the Zip file
That’s really all there is to it. Apple just assumes that if you are selecting a zip file you probably want to open it. If you want to take a peek inside without unzipping the file, press, and hold, then select Quick Look from the menu (see the last image under Create a Zip File to see the option).
Disclaimer
Technology is always changing and rarely is there static tech for smartphones and desktops. Thus, the contents of this post are only valid at the time of writing. Blog posts older than six months may have directions incompatible with your device or OS. Hopefully, older post content will continue to work as advertised. Thank you for reading TechSavvy.Life for Technology at Work For You.
Quote For the Day
Most of the time spent wrestling with technologies that don’t quite work yet is just not worth it for end users, however much fun it is for nerds.
Douglas Adams
Tweet Info
That’s it. Please feel free to share this post! One way to share is via Twitter.
Just click the Tweet icon below. This will launch Twitter where you click its icon to post the Tweet.
Checkout TechSavvy.Life for blog posts on smartphones, PCs, and Macs! You may email us at contact@techsavvy.life for comments or questions.
Please feel free to leave a comment. I would love to hear from you. Do you have a computer or smart device tech question? I will do my best to answer your inquiry. Just send an email to contact@techsavvy.life. Please mention the device, app, and version you are using. To help us out, you can send screenshots of your data related to your question.
Author’s E-Book
You can access the e-book from a Kindle device, the Kindle App for the desktop or smartphone, which is a free app.
The author’s Vietnam eBook on the Battle for Tra Bong Vietnam: Events and Aftermath
Using Google Photos‘ slideshow feature, you can have all or specific album photos play one after another automatically. You can make this slideshow on both your desktop and your mobile device.
This is for the desktop and smartphones. Screenshots are from Windows 10 and iPhone 14 Pro running iOS 16+
Using Google Photos‘ slideshow feature, you can have all or specific album photos play one after another automatically. You can make this slideshow on both your desktop and your mobile device. Let’s explore how this is done.
On Your Desktop
To create a slideshow on your desktop computer, first, open a web browser and launch the Google Photos site. Sign in to your account on the site if you have not already.
Next, once you see your photos, if you want to include all your photos in the slideshow, then click the first photo on the main screen to open it in full screen.
Now, once the photo opens in full screen, at the top-right corner, click the three dots (the Menuicon). Refer to the below image:
Selecting the Menu icon
Next, in the menu that opens, click Slideshow. See the below image:
Selecting the Slideshow option
Now, your browser will go full screen and your slideshow will start playing. Sit back, relax, and enjoy recollecting your memories with your photos.
Next, you can stop the slideshow at any time by pressing the Esc key on your keyboard. See the following image:
Exiting the Slideshow
Now, if you would like to make a slideshow using photos from a specific album, then access that album on Google Photos. On the album page, in the top-right corner, click the three dots (the Menu icon). Refer to the below image:
Selecting the Menu icon
Next, from the three dots (the Menu icon), select Slideshow to start playing your photos. You can close the slideshow by pressing the Esc key. See the below image:
Selecting the Slideshow option
On Your Mobile
To play your photos slideshow on your phone, first, launch the Google Photos app on your phone.
Next, to include all your photos in the slideshow, then tap the first photo on the main screen.
Now, when your photo opens in full screen, in the top-right corner, tap the three dots (the Menu icon). See the following image:
Selecting the Menu icon
Next, from the three dots (the Menu icon), select Slideshow to start playing your photos. Refer to the below image:
Selecting the Slideshow option
Now, Google Photos will start playing a slideshow for all your photos. If you would like to stop this slideshow, tap anywhere on the screen then tap Done in the top-left corner. See the below image:
Exiting the Slideshow
To create a slideshow using photos from a particular album, first, tap Library and choose your photo album. Select the first photo in the album, then in the top-right corner, tap the three dots (the Menu icon). See the following image:
Selecting the Menu icon
Next, in the menu that opens, tap Slideshow. Refer to the below image:
Selecting the Slideshow option
Now, your slideshow containing photos only from the selected album will play. If you would like to stop this slideshow, tap anywhere on the screen then tap Done in the top-left corner. See the below image:
Exiting the Slideshow
Disclaimer
Technology is always changing; there is rarely static tech for smartphones and desktops. Thus, the contents of this post are only valid at the time of writing. Blog posts older than six months may have directions incompatible with your device or OS. Hopefully, older post content will continue to work as advertised. Thank you for reading TechSavvy.Life for Technology at Work For You.
Quote for the Day
My view is that if your philosophy is not unsettled daily then you are blind to all the universe has to offer.
Neil deGrasse Tyson
Tweet Info
That’s it. Please feel free to share this post! One way to share is via Twitter.
Just click the Tweet icon below. This will launch Twitter where you click its icon to post the Tweet.
Checkout TechSavvy.Life for blog posts on smartphones, PCs, and Macs! You may email us at contact@techsavvy.life for comments or questions.
Meta, formerly known as Facebook, has made a history of copying features from other platforms. This time, Meta has launched Threads, a social media app connected to Instagram that works more like Twitter and should eventually connect to Mastodon.
As of this writing, We have reached 50,000 views in 487 posts!!!
This is for devices that use social media
Meta, formerly known as Facebook, has made a history of copying features from other platforms. This time, Meta has launched Threads, a social media app connected to Instagram that works more like Twitter and should eventually connect to Mastodon.
Meta, as the maker of Facebook, Instagram, and WhatsApp, has been after Twitter for many, many years. The company attempted to buy Twitter back in 2008, but that did not work out. Last year, Elon Musk acquired Twitter, and then promptly ran it into the ground. That has led to a surge in popularity for Twitter-like platforms, and now Meta’s app is live.
What Is Threads
Threads is a micro-blogging platform that looks and feels just like Twitter, letting you post texts up to 500 characters. This is almost twice Twitter’s 280-character standard limit, but still just enough for posts to not look like so much text. The platform itself is heavily linked to Instagram, and if you have an Instagram account, you can sign up for Threads with a couple of taps. All handles are pre-reserved; your username on Instagram will be your username on Threads. Refer to the below image of Threads:
Threads is actually seeing plenty of adoption, with the platform getting up to 20 million users within the first hours of launch. However, many of those accounts are brands instead of actual people. Instagram’s user base is in the billions, so we can only expect this number to keep increasing as time passes.
As it keeps growing, we can also expect a number of other changes, too. Threads is supposed to play nice with Mastodon and the Fediverse, and it will be getting ActivityPub support down the road. The exact degree to which Mastodon and Threads will be interoperable remains to be seen, but you will be able to follow and interact with Mastodon users from Threads. Likewise, Mastodon users will be able to follow Threads users by using their full username, such as “@john@threads.net.”
Pause Before You Download
Be aware of Threads Privacy Policy and the Dara the app collects. In our opinion, the app collects way too much data about you. This includes Data from your: Health/Fitness, Financial info, Contact info, User Content, Browsing history, Usage data, Diagnostics, Purchases, Location, Contacts, Search history, Identifiers, Sensitive data, and Other data.
In contrast, Facebook and Instagram only track Contact info, Identifiers, and Other data.
According to its Privacy Policy, you cannot delete your Threads account, until you delete your Instagram account. You can deactivate your Threads account at any time but you cannot delete your Threads account without also deleting your Instagram account.
Our Summary
We recommend you wait until the Data collection and Privacy Policy issues are addressed.
If You Want to Download the App
If you want to give it a spin, Threads is now available from the Apple App Store and the Google Play Store. In the Apple App Store and Google Play Store, the app name is “Threads, an Instagram app”. There are other Threads apps, so ensure you download the correct one.
Disclaimer
Technology is always changing and rarely is there static tech for smartphones and desktops. Thus, the contents of this post are only valid at the time of writing. Blog posts older than six months may have directions incompatible with your device or OS. Hopefully, older post content will continue to work as advertised. Thank you for reading TechSavvy.Life for Technology at Work For You.
Quote For the Day
Always deliver more than expected.
Larry Page
Tweet Info
That’s it. Please feel free to share this post! One way to share is via Twitter.
Just click the Tweet icon below. This will launch Twitter where you click its icon to post the Tweet.
Just click the Tweet icon below. This will launch Twitter where you click its icon to post the Tweet.
Please feel free to leave a comment. I would love to hear from you. Do you have a computer or smart device tech question? I will do my best to answer your inquiry. Just send an email to contact@techsavvy.life. Please mention the device, app, and version you are using. To help us out, you can send screenshots of your data related to your question.
Author’s E-Book
You can access the e-book from a Kindle device, the Kindle App for the desktop or smartphone, which is a free app.
The author’s Vietnam eBook on the Battle for Tra Bong Vietnam: Events and Aftermath
You may have noticed that opening a link in Outlook behaves differently and not in your chosen browser. That’s because Microsoft wants to push their Edge browser, though they have some excuses for the change.
This is for devices running Microsoft Outlook. Screenshots are from Microsoft Outlook 365 in Windows 10
You may have noticed that opening a link in Outlook behaves differently and not in your chosen browser. That’s because Microsoft wants to push their Edge browser, though they have some excuses for the change.
When you click on a link in Outlook for Windows, it might open in the Edge browser, even though you have chosen a different default browser in Windows settings (like Chrome or Firefox).
And instead of just opening the web page, the email appears in a right side-pane alongside the link you clicked. Refer to the below image:
Side-by-Side View
According to Microsoft, this change means “No more disruptive switching—just your email and the web content you need to reference, in a single, side-by-side view.” They may have a point and it’s a change that suits some people.
It’s also a shameless attempt to push people to the Edge browser by overriding their browser choice with Microsoft’s preference.
This applies to Windows 10 or 11 only. Microsoft only says this is for ‘Outlook’ not which versions, but presumably Outlook 365 for Windows. For now, it only works on Microsoft-hosted emails including Outlook.com/Hotmail however it will be extended to Gmail later.
Change Browser via Windows
First, the default browser is chosen in Windows. To set up this browser, head to:
Settings | Apps | Default Apps
and choose your preferred browser. See the below image:
Setting Chrome as the web browser in Windows
Change the Search Engine and Default Browser
Next, for Chrome, ensure you have set the search engine. To find out, open Chrome and head to:
Menu (the 3 dots in the upper right) | Settings | Search engine
and, if necessary, set your search engine to Chrome. See the following image:
Setting Chrome as the search engine
Now, for Chrome, ensure you have set the default browser. To find out, open Chrome and head to:
Menu (the 3 dots in the upper right) | Settings | Default browser
Refer to the below image:
Your default browser
The reason why we are doing the above is to ensure we are using Google products. You can have Firefox as your browser and Chrome as your search engine.
Change Outlook Links Default Browser
Next, open Outlook and go to:
File | Options | Advanced | Link Handling
to change the browser to Default Browser. See the below image:
Setting Default Browser in Outlook
Side-by-Side View May Not Work
To be honest, you may not get this feature to work no matter what combination of Outlook, Windows, and Edge you try. We prefer to test for ourselves and not take Microsoft’s word. If your email links open in your browser with no side-by-side view, do not worry.
Disclaimer
Technology is always changing and rarely is there static tech for smartphones and desktops. Thus, the contents of this post are only valid at the time of writing. Blog posts older than six months may have directions incompatible with your device or OS. Hopefully, older post content will continue to work as advertised. Thank you for reading TechSavvy.Life for Technology at Work For You.
Quote For the Day
Ideas are easy. Implementation is hard.
Guy Kawasaki
Tweet Info
That’s it. Please feel free to share this post! One way to share is via Twitter.
Just click the Tweet icon below. This will launch Twitter where you click its icon to post the Tweet.
Checkout TechSavvy.Life for blog posts on smartphones, PCs, and Macs! You may email us at contact@techsavvy.life for comments or questions.
Please feel free to leave a comment. I would love to hear from you. Do you have a computer or smart device tech question? I will do my best to answer your inquiry. Just send an email to contact@techsavvy.life. Please mention the device, app, and version you are using. To help us out, you can send screenshots of your data related to your question.
Author’s E-Book
You can access the e-book from a Kindle device, the Kindle App for the desktop or smartphone, which is a free app.
The author’s Vietnam eBook on the Battle for Tra Bong Vietnam: Events and Aftermath