How to Make Messages Disappear in Instagram

Instagram is a popular outlet for spontaneous texts thanks to its variety of filters and options. These are also the kind of conversations you do not want others to save permanently.

RAYMOND OGLESBY @RaymondOglesby2
December 2, 2021

Instagram is a popular outlet for spontaneous texts thanks to its variety of filters and options. These may be the kind of conversations you do not want others to save permanently. Let’s explore how to make the messages disappear.

This is for iPhone and Android running Instagram

Dilbert and Alone
Copyright Scott Adams, Inc./Distributed by Universal Uclick for UFS

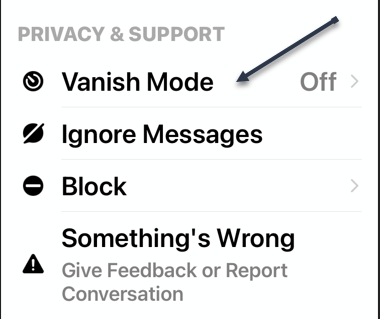
For creating self-destructing texts, Instagram offers a feature called Vanish Mode on its messaging service. An identical feature can be found in Facebook Messenger. Any text or media you send in Vanish Mode is automatically removed as soon as the recipient sees it.

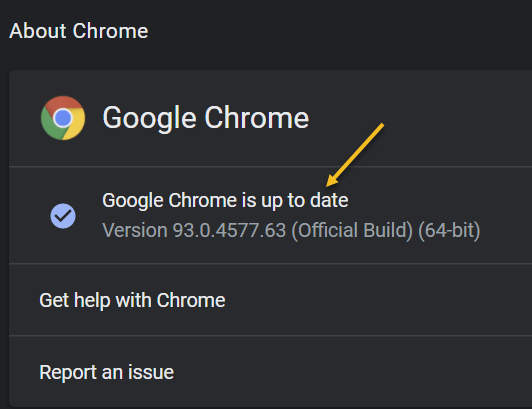
First, make sure you have the latest version of the Instagram app on your Android or iPhone.

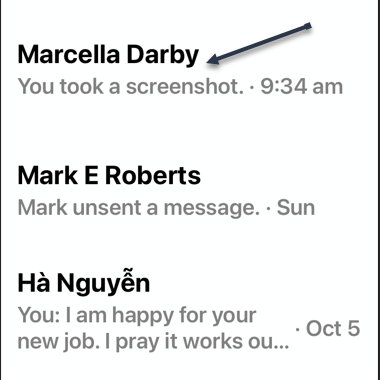
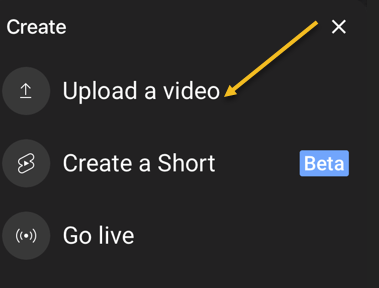
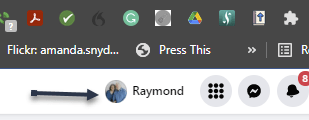
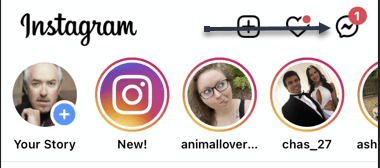
Next, open the Instagram app on your phone and swipe in from the left edge of the screen (or tap the text bubble button at the top right) to view a list of your messages. Refer to the below image:

Instagram 1
Selecting to view messages

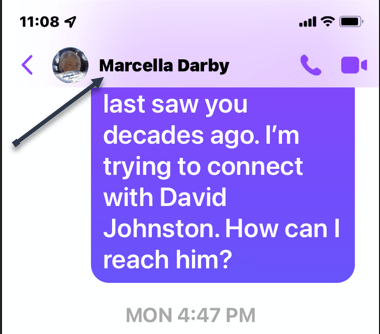
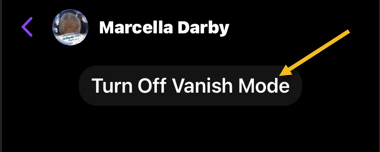
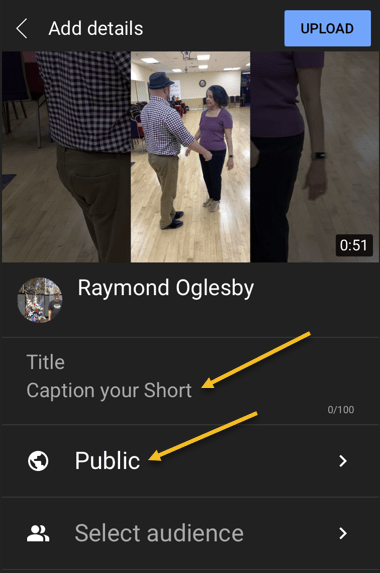
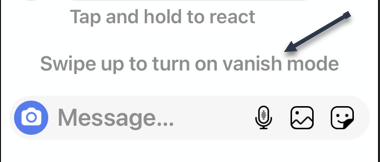
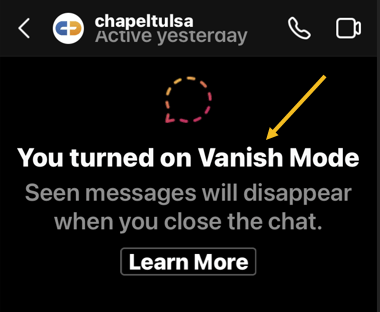
Now, perform a swipe-up gesture above the text box to activate Vanish Mode. Once that’s successful, Instagram will update your chat background with a darker shade and throw in a few animations to let you know Vanish Mode is active. See the below image:

Instagram 2
Activating Vanish Mode by swiping up on a text box

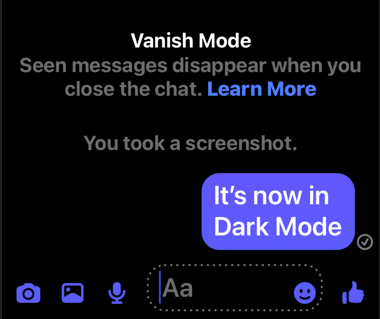
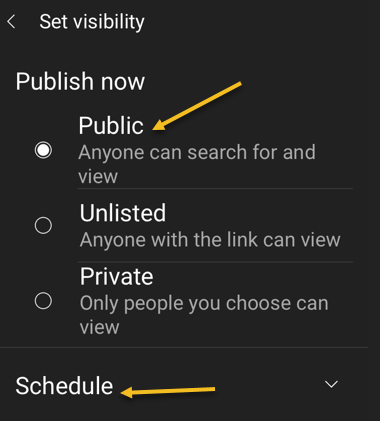
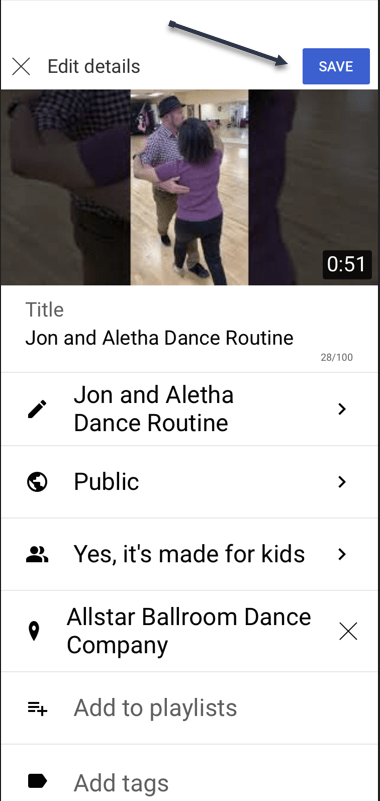
Next, in Vanish Mode, you can continue to chat normally and send messages in all the usual formats, like direct stories, voice clips, and more. See the following image:

Instagram 3
You are in Vanish Mode

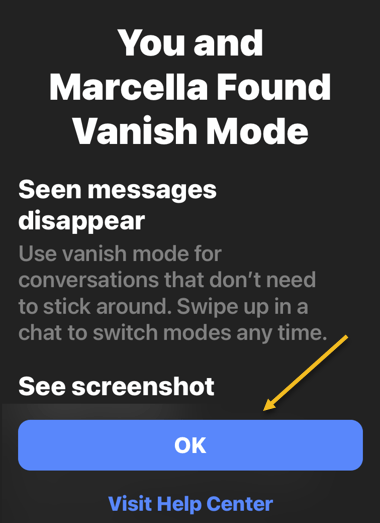
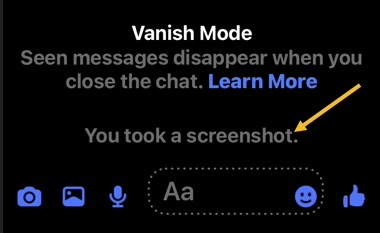
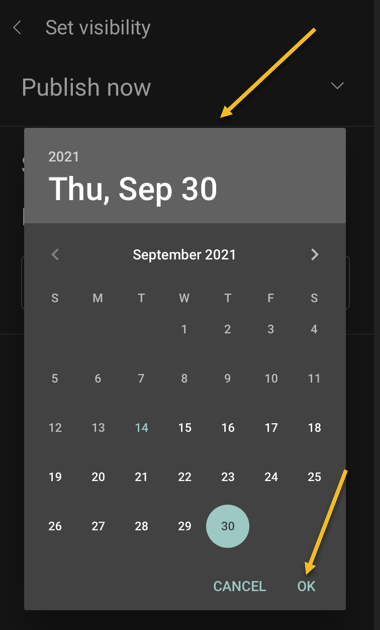
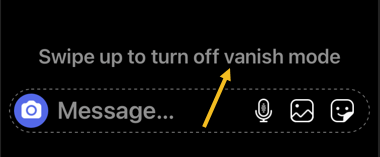
The difference is that once you swipe up again to leave Vanish Mode and the other person reads whatever you have sent, Instagram will delete those messages. Refer to the below image:

Instagram 4
Exiting Vanish Mode by swiping up

Now, while the recipient is free to take a screenshot of your messages in Vanish Mode, Instagram will notify you if and when they do.

Note! Instagram retains your Vanish Mode media and texts for up to an hour after they have been deleted. This is in case the recipient files a report for abuse and harassment and Instagram needs the Vanish Mode data to take action.

Quote For the Day

When you’re young, you look at television and think, there’s a conspiracy. The networks have conspired to dumb us down. But when you get a little older, you realize that’s not true. The networks are in business to give people exactly what they want.

Steve Jobs

That was easy. Please feel free to share this post! One way to share is via Twitter.

Just click the Tweet icon below. This will launch Twitter where you click its icon to post the Tweet.

Check out TechSavvy.Life for blog posts on smartphones, PCs, and Macs! You may email us at contact@techsavvy.life for comments or questions.

I Would Like to Hear From You

Please feel free to leave a comment. I would love hearing from you. Do you have a computer or smart device tech question? I will do my best to answer your inquiry. Just send an email to contact@techsavvy.life. Please mention the device, app, and version you are using. To help us out, you can send screenshots of your data related to your question.

The author’s Vietnam eBook on the Battle for Tra Bong Vietnam: Events and Aftermath

How to Make Messages Disappear in Messenger

Privacy is an important thing to consider when putting all of your conversations into a messaging app. With Facebook Messenger’s Vanish Mode, you can make sensitive messages disappear after the recipient has read them. It’s a nice privacy trick.

RAYMOND OGLESBY @RaymondOglesby2
November 30, 2021

Privacy is an important thing to consider when putting all of your conversations into a messaging app. With Facebook Messenger’s Vanish Mode, you can make sensitive messages disappear after the recipient has read them. It’s a nice privacy trick.

Vanish Mode is also available on Instagram and it works exactly the same as Facebook Messenger. The idea is you start Vanish Mode, say what you want to say, then leave Vanish Mode. After your messages have been seen, they disappear.

This is for iPhone, iPad, and Android using Messenger

Dilbert and Job
Copyright Scott Adams, Inc./Distributed by Universal Uclick for UFS

First, open Messenger and start a conversation with someone you are friends with. Refer to the below image:

FB 1
Selecting a friend to start a conversation

Next, while in the conversation view, press down and hold while swiping up from the text box. You will see a little indicator to help you get into Vanish Mode. The tiny dot is barely visible. On the below screenshot, you will notice the top of the screen has changed color. See the below image:

FB 2
Entering Vanish Mode

Now, on your first use of Vanish Mode, a confirmation screen will be displayed. Tap OK to continue. See the following image:

FB 3
Vanish Mode confirmation

Next, in Vanish Mode, the background will be dark. You can now have a conversation like you normally would. Refer to the below image:

FB 4
In Vanish Mode

Now, if you or the recipient takes a screenshot while you are in Vanish Mode, you will be notified. See the below image:

FB 5
Notification either you or the recipient has taken a screenshot

Next, when you are ready for everything to disappear, tap on Turn Off Vanish Mode. You can also do the swipe-up gesture again. See the following image:

FB 6
Exiting Vanish Mode

Note! Messenger retains your Vanish Mode media and texts for up to an hour after they have been deleted. This is in case the recipient files a report for abuse and harassment and Messenger needs the Vanish Mode data to take action.

You can also turn on Vanish Mode via the recipient profile. Scroll down to the Privacy & Support section and toggle Vanish Mode to ON. Refer to the below image:

FB 7
Entering Vanish Mode from recipient profile

Quote For the Day

The reason that Apple is able to create products like the iPad is because we’ve always tried to be at the intersection of technology and the liberal arts.

Steve Jobs

That’s all there is to it. Think of it like walking into a sound-proof room to have a secret conversation. You can enter Vanish Mode for a while and then leave when you are done.

Just click the Tweet icon below. This will launch Twitter where you click its icon to post the Tweet.

Check out TechSavvy.Life for blog posts on smartphones, PCs, and Macs! You may email us at contact@techsavvy.life for comments or questions.

I Would Like to Hear From You

Please feel free to leave a comment. I would love hearing from you. Do you have a computer or smart device tech question? I will do my best to answer your inquiry. Just send an email to contact@techsavvy.life. Please mention the device, app, and version you are using. To help us out, you can send screenshots of your data related to your question.

The author’s Vietnam eBook on the Battle for Tra Bong Vietnam: Events and Aftermath

How to Change Your Instagram Profile Photo

Got a new photo and want to show it off to your Instagram followers? Instagram makes it easy to change your profile picture.

RAYMOND OGLESBY @RaymondOglesby2
November 18, 2021

Got a new photo and want to show it off to your Instagram followers? Instagram makes it easy to change your profile picture.

Unlike Facebook, you can change your profile picture without posting. There is no notification when you change your profile photo, it just changes. Let’s explore how this is done.

This is for. iPhone/iPad and Android using Instagram

Dilbert and Manager
Copyright Scott Adams, Inc./Distributed by Universal Uclick for UFS

On your iPhone/iPad or Android phone, use the Instagram app to update your profile picture.

First, launch the Instagram app on your phone. In the app, from the bar at the bottom, select the profile icon (which is the last icon in that row). Refer to the below image:

Accessing your profile

Next, on your profile screen, beneath your profile details, tap the Edit Profile option. See the below image:

Selecting Edit Profile option

Now, beneath your current profile picture, tap Change Profile Photo. See the following image:

Selecting to change profile photo

Next, from the bottom of your app, Instagram will open a Change Profile Photo or Synced Profile Photo menu.

Now, if you want to replace your profile picture with a picture saved on your phone, tap New Profile Photo in the menu. To add a photo from your Facebook profile, tap Import from Facebook.

Tip: Use the Remove Profile Photo option if you simply want to delete the current picture from your Instagram profile.

We will choose the Choose From Library option. Refer to the below image:

Selecting where to get your profile photo

Next, Instagram will open your phone’s gallery. Here, select the photo that you would like to make your profile picture on Instagram. When you select a photo, the app will display editing options that are optional. Tap Done to continue. See the below image:

Selecting your profile photo

Now, Instagram will take you to your profile page, and you will see your new profile picture there. Tap Done to continue. See the following image:

Your new profile photo

Next, if you have enabled Sync profile photo, (from Choose From Library screen above) your new photo will be synced to Facebook. Tap OK to continue. Refer to the below image:

Syncing enabled

Now, go back to the above screen and tap Manage Sync Settings. A confirmation dialog will be displayed regarding your profile photo sync between Facebook and Instagram. See the below image:

Your sync confirmation

Next, exit Instagram.

Quote For the Day

Older people sit down and ask, ‘What is it?’ but the boy asks, ‘What can I do with it?’.

Steve Jobs

That’s it. Please feel free to share this post! One way to share is via Twitter.

Just click the Tweet icon below. This will launch Twitter where you click its icon to post the Tweet.

Check out TechSavvy.Life blog posts on smartphones, PCs, and Macs! You may email us at contact@techsavvy.life for comments or questions.

I Would Like to Hear From You

Please feel free to leave a comment. I would love to hear from you. Do you have a computer or smart device tech question? I will do my best to answer your inquiry. Just send an email to contact@techsavvy.life. Please mention the device, app, and version you are using. To help us out, you can send screenshots of your data related to your question.

The author’s Vietnam eBook on the Battle for Tra Bong Vietnam: Events and Aftermath

How to Turn Off Entering a Password For Your Microsoft Account

Microsoft is leading the way for a passwordless future. You no longer are required passwords to login to your Microsoft account as you can now use the Microsoft Authenticator app, Windows Hello, a security key or a verification code sent via SMS or email.

RAYMOND OGLESBY @RaymondOglesby2
November 4, 2021

Microsoft is leading the way for a passwordless future. You no longer are required passwords to login to your Microsoft account as you can now use the Microsoft Authenticator app, Windows Hello, a security key or a verification code sent via SMS or email. Let’s explore how to setup this feature.

The company has been preparing for a passwordless future for quite some time and its reason behind is the fact that passwords can be easily manipulated.

Vasu Jakkal, Corporate VP of Microsoft’s Security, Compliance and Identity, said “Weak passwords are the entry point for the majority of attacks across enterprise and consumer accounts. There are a whopping 579 password attacks every second—that’s 18 billion every year,” Jakkal added.

This is for devices using Microsoft Account. Screenshots are from iPhone XR.

Dilbert and Tails
Copyright Scott Adams, Inc./Distributed by Universal Uclick for UFS

First, install the Microsoft Authenticator app and link it to your Microsoft account. There are several authenticator apps, ensure you install the correct one from Microsoft. Refer to below image:

Password 1
Download and install the Microsoft Authenticator app

Next, open your Microsoft account. See below image:

Password 2
Your Microsoft account

Now, scroll down to Advanced security section and toggle on Passwordless account. See following image:

Password 3
Setting Passwordless account option

Then follow the on-screen prompts and approve the notification from the Authenticator app.

Your Microsoft account is now passwordless. You can always go back to using a password for your account.

Quote For the Day

A lot of people in our industry haven’t had very diverse experiences. So they don’t have enough dots to connect, and they end up with very linear solutions without a broad perspective on the problem. The broader one’s understanding of the human experience, the better design we will have.

Steve Jobs

That’s it. Please feel free to share this post! One way to share is via Twitter.

Just click the Tweet icon below. This will launch Twitter where you click its icon to post the Tweet.

Check out TechSavvy.Life for blog posts on smartphones, PCs, and Macs! You may email us at contact@techsavvy.life for comments or questions.

I Would Like to Hear From You

Please feel free to leave a comment. I would love hearing from you. Do you have a computer or smart device tech question? I will do my best to answer your inquiry. Just send an email to contact@techsavvy.life. Please mention the device, app and version that you are using. To help us out, you can send screenshots of your data related to your question.

The author’s Vietnam eBook on the Battle for Tra Bong Vietnam: Events and Aftermath

How to Make YouTube Videos Fill iPhone Screen

Smartphone displays are rarely the same aspect ratio as YouTube videos. That leaves black bars on the sides. You can pinch-to-zoom to fill the screen, but if you are always doing that, you might as well make it default.

RAYMOND OGLESBY @RaymondOglesby2
November 2, 2021

Smartphone displays are rarely the same aspect ratio as YouTube videos. That leaves black bars on the sides. You can pinch-to-zoom to fill the screen, but if you are always doing that, you might as well make it default. Let’s explore how to setup viewing a YouTube video in full screen.

This is is for the iPhone, iPad, and Android. Screenshots are from iPhone XR.

Dilbert and Manual
Copyright Scott Adams, Inc./Distributed by Universal Uclick for UFS

First, open the YouTube app on your iPhone, iPad, or Android device. Now, tap your profile icon in the top-right-hand corner. Refer to below image:

YouTube 1
Accessing your Profile icon

Next, tap Settings from the menu. See below image:

YouTube 2
Accessing Settings

Now, go to the General section. See following image:

YouTube 3
Accessing General section

Next, toggle the switch for Zoom to fill screen to ON. Refer to below image:

YouTube 4
Toggle ON the Zoom to fill screen

Now, you will no longer need to zoom in on every YouTube video to take up the entire screen.

Quote For the Day

An iPod, a phone, an internet mobile communicator… these are NOT three separate devices! And we are calling it iPhone! Today Apple is going to reinvent the phone. And here it is.

Steve Jobs

You are finished. Please feel free to share this post! One way to share is via Twitter.

Just click the Tweet icon below. This will launch Twitter where you click its icon to post the Tweet.

Check out TechSavvy.Life for blog posts on smartphones, PCs, and Macs! You may email us at contact@techsavvy.life for comments or questions.

I Would Like to Hear From You

Please feel free to leave a comment. I would love hearing from you. Do you have a computer or smart device tech question? I will do my best to answer your inquiry. Just send an email to contact@techsavvy.life. Please mention the device, app and version that you are using. To help us out, you can send screenshots of your data related to your question.

The author’s Vietnam eBook on the Battle for Tra Bong Vietnam: Events and Aftermath

How to Upload a Smartphone Video to YouTube

Do you have videos on your smartphone that you want to upload to YouTube but not sure how to do this? If you have recorded videos with your smartphone, you can upload them directly to your YouTube channel from your iPhone or Android device.

RAYMOND OGLESBY @RaymondOglesby2
October 27, 2021

Do you have videos on your smartphone that you want to upload to YouTube but not sure how to do this? If you have recorded videos with your smartphone, you can upload them directly to your YouTube channel from your iPhone or Android device. Let’s see how this is done.

This is for iPhone and Android

Dilbert and No
Copyright Scott Adams, Inc./Distributed by Universal Uclick for UFS

First, to upload a video to YouTube from your iPhone or Android device, you will need the official YouTube app on your phone. Download and install the app on your iPhone or Android device, if you have not already done so. To search for the app on an iPhone, go to your very first screen, the Spotlight Search, and type in “YouTube” to locate the app.

Uploading a Video

Next, launch the YouTube app on your phone and log in to your YouTube (Google) account. Then, from the bar at the bottom of the app, select the “+” (plus) sign. Refer to below image:

YouTube 1
Accessing the Add icon

Now, YouTube will open a Create menu. Select Upload a video from this menu. Note! If you want to make a YouTube Short, tap the Create a Short option, or, to stream a video, tap the Go live option. See below image:

YouTube 2
Selecting to Upload a video

Next, you will see an Upload screen that displays all your phone’s videos. Here, tap the video that you would like to upload to YouTube. Then, when the video begins to play, tap NEXT at the top-right corner of the app. See following image:

YouTube 3
Your Video to upload

Add Details

Now, you are on the Add details screen. Here, tap the Title field and enter a title for your video. Then tap Public to choose who can watch your video on YouTube. Refer to below image:

YouTube 4
Add some details about your Video

Set Visibility, Schedule, and Audience

Next, on the Set Visibility screen, select one of these visibility options for your video:

  • Public: This allows anyone on YouTube to watch your video.
  • Unlisted: With this option, only the people you share your video’s link with can watch the video.
  • Private: Only you and the people you choose can watch the video.

Now, tap Schedule to release your video on YouTube at a specific time. See below image:

YouTube 5
Selecting who can see your Video

Set your date then tap OK. See following image:

YouTube 6
Selecting the Video scheduled date

Set your time then tap OK. Refer to below image:

YouTube 7
Selecting the Video scheduled time

Your scheduled release of the video is displayed. See below image:

YouTube 8
Your Video release date and time

Next, tap the Select audience option. See following image:

YouTube 9
Selecting your Audience

If your video is meant for kids, select the Yes, it’s made for kids option. Otherwise, select the No, it’s not made for kids option. If you choose the No… option, you can specify further options by tapping Age restriction (advanced). Next, at the top-right corner of the app, tap Upload (not shown). Refer to below image where we selected the video is made for kids:

YouTube 10
Selecting who is your Audience

Edit Your Video Details

Your video will begin to upload to YouTube. When that’s done, go to Library > Your videos section of the YouTube app. Then, tap the video 3 dots menu button. Now, tap Edit to open the Edit Details screen and make any changes. When you are finished, tap Save. See below image:

YouTube 12
Edit your Video details

Your Videos Listing

Next, access Your videos section to see your uploaded video. See following image:

YouTube 13
Your recently uploaded Video

And that’s how you begin your journey of becoming a YouTuber!

Quote For the Day

Remembering that you are going to die is the best way I know to avoid the trap of thinking you have something to lose. You are already naked. There is no reason not to follow your heart.

Steve Jobs

You are finished. Please feel free to share this post! One way to share is via Twitter.

Just click the Tweet icon below. This will launch Twitter where you click its icon to post the Tweet.

Check out TechSavvy.Life for blog posts on smartphones, PCs, and Macs! You may email us at contact@techsavvy.life for comments or questions.

I Would Like to Hear From You

Please feel free to leave a comment. I would love hearing from you. Do you have a computer or smart device tech question? I will do my best to answer your inquiry. Just send an email to contact@techsavvy.life. Please mention the device, app and version that you are using. To help us out, you can send screenshots of your data related to your question.

The author’s Vietnam eBook on the Battle for Tra Bong Vietnam: Events and Aftermath

How to Pin/UnPin a Facebook Post

What does it mean to pin a post on Facebook? A pinned post is a status update that you manually select to stay at the top of your page’s timeline, meaning it will not slip down as you continue to add other posts to your page.

RAYMOND OGLESBY @RaymondOglesby2
October 5, 2021

What does it mean to pin a post on Facebook? A pinned post is a status update that you manually select to stay at the top of your page’s timeline, meaning it will not slip down as you continue to add other posts to your page. Let’s explore how to do this.

This is for devices running Facebook

Dilbert and Phone
Copyright Scott Adams, Inc./Distributed by Universal Uclick for UFS

You can only have one post pinned to your profile at a time. If you try to pin a second post, that second post gets pinned and the first post gets unpinned.

Pin to Your Profile

First, launch a web browser on your computer and access the Facebook site. Next, log in to your account and in the top right-hand corner of the site, click your profile icon. Refer to below image:

FB 1
Accessing your Profile

Now, on your profile page that opens, find the post you want to pin. At the top right-hand corner of the post, click the three dots menu. See below image:

FB 2
Selecting the 3 dots menu

Next, from the three-dots menu, select Pin post. See following image:

FB 3
Selecting to Pin your post

And immediately, Facebook will pin the selected post to the top of your profile page. Scroll up your profile and your pinned post will appear there. Refer to below image:

FB 4
Your pinned post

To unpin a pinned post, from the top right-hand corner of the pinned post, select the three dots menu and click Unpin post in the menu. See below image:

FB 5
Selecting to Unpin your post

Facebook will remove the post from the top of your profile page. It will continue to appear at its original location in your profile, though. Now, refresh the page or exit Facebook.

Related

How to Pin/Unpin a Twitter Tweet

Pin to Your Page

In addition to your personal profile, you can pin a post to your Facebook page, too.

First, access your page and find a post to pin. (Note! I am doing this on my business page using my iPhone). Next, at the top right-hand corner of the post, click the three dots menu. See following image:

FB 6
Selecting the 3 dots menu

Now, from the three-dots menu, select Pin to Top. Refer to below image:

FB 7
Selecting to Pin your post

Next, Facebook will add your selected post to the top of the page.

To remove the post from the top of the page, from the top right-hand corner of the post, click the three dots menu. Next, from the menu that opens, select “Unpin from Top. See below image:

FB 8
Selecting to Unpin your post

Quote For the Day

You can’t just ask customers what they want and then try to give that to them. By the time you get it built, they’ll want something new.

Steve Jobs

That’s it. You now know how to pin/unpin a Facebook post. Please feel free to share this post! One way to share is via Twitter.

Just click the Tweet icon below. This will launch Twitter where you click its icon to post the Tweet.

Check out TechSavvy.Life for blog posts on smartphones, PCs, and Macs! You may email us at contact@techsavvy.life for comments or questions.

I Would Like to Hear From You

Please feel free to leave a comment. I would love hearing from you. Do you have a computer or smart device tech question? I will do my best to answer your inquiry. Just send an email to contact@techsavvy.life. Please mention the device, app and version that you are using. To help us out, you can send screenshots of your data related to your question.

The author’s Vietnam eBook on the Battle for Tra Bong Vietnam: Events and Aftermath

How to Check if Chrome 93 is Installed

Google Chrome 93 is officially here. There is plenty to be excited about. For example, with Chrome 93, progressive web apps (PWAs) feel a lot more like native desktop apps, as clicking on a link can open an associated web app. There’s also improved multi-screen support for web apps, making this an update web app users will love.

RAYMOND OGLESBY @RaymondOglesby2
JSeptember 21, 2021

Google Chrome 93 is officially here. There is plenty to be excited about. For example, with Chrome 93, progressive web apps (PWAs) feel a lot more like native desktop apps, as clicking on a link can open an associated web app. There’s also improved multi-screen support for web apps, making this an update web app users will love. Let’s explore how to install Chrome 93.

This is for Windows, Android, Mac, iPhone, and iPad

Dilbert and Stats
Copyright Scott Adams, Inc./Distributed by Universal Uclick for UFS

Some new features are related to recently closed tabs, a Material You theme for Android 12, a new Google Search UI on Android, the ability to sync Two-Factor OTP codes across devices (a true game-changer), the ability to use note-taking apps right from the browser, a new context menu on iPhone, and so much more.

Chrome 93 will now also show Google Drive documents on the New Tab page. The suggested documents will appear in a card underneath the Search Bar, allowing you to easily access recently edited Google Docs or Sheets.

First, you can check for an update by going to the three-dot menu hamburger icon on the top-right of Chrome. Next, click Help followed by About Google Chrome. Refer to below image:

Chrome 93 1
Selecting the About option

Now, the Chrome Settings window open. If Chrome is outdated, it will automatically download and install the latest version. See below image:

Chrome 93 2
Your Chrome version

Now, close Chrome and restart the app.

If you are on iPhone or Android, update the app as you would for any other application.

Quote For the Day

The most remarkable discovery in all of astronomy is that the stars are made of atoms of the same kind as those on the earth.

Richard P Feynman

You are finished. Please feel free to share this post! One way to share is via Twitter.

Just click the Tweet icon below. This will launch Twitter where you click its icon to post the Tweet.

Check out TechSavvy.Life for blog posts on smartphones, PCs, and Macs. You may email us at contact@techsavvy.life for comments or questions.

I Would Like to Hear From You

Please feel free to leave a comment. I would love hearing from you. Do you have a computer or smart device tech question? I will do my best to answer your inquiry. Just send an email to contact@techsavvy.life. Please mention the device, app and version that you are using. To help us out, you can send screenshots of your data related to your question.

The author’s Vietnam eBook on the Battle for Tra Bong Vietnam: Events and Aftermath

How to Highlight Blank or Error Cells in Excel

Spotting things in a spreadsheet can be much quicker when you nightlight them. With conditional formatting in Microsoft Excel, you can make finding blank cells or formula errors easier.

RAYMOND OGLESBY @RaymondOglesby2
August 26, 2021

Spotting things in a spreadsheet can be much quicker when you highlight them. With conditional formatting in Microsoft Excel, you can make finding blank cells or formula errors easier. Let’s explore how this feature works.

This is for devices running Microsoft Excel

Dilbert and Yoga
Copyright Scott Adams, Inc./Distributed by Universal Uclick for UFS

Highlight Blank Cells

When you have a spreadsheet full of data that you expect to fill every cell, you can easily overlook cells that are left empty.

First, open the sheet and select the cells where you want to apply the formatting. Next, go to the Home tab and click Conditional Formatting in the Styles group of the Ribbon. Now, choose New Rule. Refer to below image:

Excel 1
Select New Rule option

Next, in the New Formatting Rule window that appears, click Format only cells that contain under Select a Rule Type at the top. See below image:

Excel 2
Select a Rule Type option

Now, at the bottom, pick Blanks in the Format only cells with drop-down box. Next, click Format to the lower right of the preview to select how to format the blank cells. See following image:

Excel 3
Select Format Cells with blanks

Now, in the Format Cells window, use the tabs at the top for Font, Border, and Fill to choose your formatting. Click OK. For our example, we are using Fill to color our blank cells bright yellow. Refer to below image:

Excel 4
Select choose a Fill color

You will be back on the New Formatting Rule window, where you will see a preview of the formatting for blank cells. If you are happy with it, click OK to apply the conditional formatting. See below image:

Excel 5
Save your changes

You should then see any empty cells in the range that you selected highlighted with the formatting that you picked. See following image:

Excel 6
Your final result

Highlight Error Cells

Even though Microsoft Excel does a decent job of of pointing errors out to you, they might not be noticeable if you have a large sheet to scroll through. To make sure that you see the errors quickly, conditional formatting is the way to go.

You will actually follow the same process that you used in the previous section to highlight blanks, but with one difference.

First, switch to the Home tab, click Conditional Formatting, and then choose New Rule. Refer to below image:

Excel 7
Select New Rule option

Next, in the New Formatting Rule window, pick Format only cells that contain at the top. But this time, pick Errors in the Format only cells with drop-down box at the bottom. Now, click Format to choose the formatting. See below image:

Excel 8
Select Format for errors

For this example, adjust the Font options to make the cells with errors bold and red. Click OK. After you pick the formatting, click OK again to apply the rule. See following image:

Excel 9
Select formatting for errors

Now, those errors will be very visible! Refer to below image:

Excel 10
Your final result

Quote For the Day

The true delight is in the finding out rather than in the knowing

Isaac Asimov

You are finished. Please feel free to share this post! One way to share is via Twitter.

Just click the Tweet icon below. This will launch Twitter where you click its icon to post the Tweet.

Check out TechSavvy.Life for blog posts on smartphones, PCs, and Macs! You may email us at contact@techsavvy.life for comments or questions.

I Would Like to Hear From You

Please feel free to leave a comment. I would love hearing from you. Do you have a computer or smart device tech question? I will do my best to answer your inquiry. Just send an email to contact@techsavvy.life. Please mention the device, app and version that you are using. To help us out, you can send screenshots of your data related to your question.

The author’s Vietnam eBook on the Battle for Tra Bong: Events and Aftermath

How to Use Advanced Search to Find Tweets

Twitter has tons of information that flows by faster than we can comprehend. Fortunately, it’s possible to search for tweets using various parameters.

5RAYMOND OGLESBY @RaymondOglesby2
August 5, 2021

Twitter has tons of information that flows by faster than we can comprehend. Fortunately, it’s possible to search for tweets using various parameters. Let’s explore this feature.

This is for devices running Twitter

Copyright Scott Adams, Inc./Distributed by Universal Uclick for UFS

Search Tweets by Dates Range

Twitter provides both a mobile and a desktop browser Advanced Search page that lets you search for tweets posted within a certain date range. If you are on a mobile device, open your browser and click here for mobile. For the desktop browser, open your browser and click here for desktop.

Now, on the Advanced Search page, scroll all the way down to the bottom to the Dates section. There, you will find two parameters: From and To. Refer to below image:

Accessing Dates section

Next, choose your desired month, day, and year for each parameter. Here’s what they do:

  • From: Set this to find tweets posted after midnight (12:00 a.m.) on this date.
  • To: Set this to find tweets posted up until midnight (12:00 a.m.) on this date.

While this sounds simple, using the parameters can be confusing. For example, if you want to find tweets only from May 20, 2021, you would set From to “May 20, 2021” and To to “May 21, 2021.” You will get tweets posted between midnight on May 20 until midnight on May 21. You would not set both fields to the same date. See below image:

Setting From and To date

Similarly, if you wanted to find only tweets from the month of May 2021, you would set From to “May 1, 2021” and To to “June 1, 2021.” That way, your search will cover all 31 days of May.

Now, scroll up and enter another parameter, such as a search term in the Words section, or an account name in the Accounts section. Next, click Search when you are done. See following image for an Account search:

Search an Account

When you see the results, you can further sort them by different criteria using tabs located just below the search bar. Top shows the matching tweets with the most engagements. Latest shows all matching tweets in reverse chronological order. Refer to below image for the Latest using my domain name:

Display Latest posts for an Account

See below image for my Top posts using my Twitter name:

Display Top posts for a Twitter name

If you need to do another search, just revisit Twitter’s advanced search page and search again. It includes many parameters that allow you to narrow down tweets on certain dates, people, photos, videos, and much more.

Search Tweets by Date Range Using Inline Parameters

Another way of searching for tweets from a specific date or dates is using inline search parameters that you type directly into the search box in the Twitter app or on the Twitter website.

Here are three parameters that you can use:

Note! the following are just examples, not for literal input.

  • From: Find tweets posted only by this Twitter account. For example: from:raymondxxx  or from:techsavvy.
  • Since: Find tweets posted since 12:00 a.m. on this date. The date format is YYYY-MM-DD. For example: since:2021-05-01.
  • Until: Find tweets posted until 12:00 a.m. on this date. The date format is YYYY-MM-DD. For example: until:2021-06-01.

For example, if you would like to see all tweets posted by the “techsavvy” Twitter account between May 1, 2021 and June 1, 2021, you would type the following into the Twitter search box:

from:techsavvy until:2021-06-01 since:2021-05-01

If you wanted to find all posts about “Safari” by “raymondxxx” posted on May 15, 2021, you would enter:

safari from:raymondxxx since:2021-05-15 until:2021-05-16

And so on. This kind of quick inline search can be quite powerful once you get the syntax of the date format. You can also find embarrassing old tweets and delete them.

Quote For the Day

There ain’t no answer. There ain’t gonna be any answer. There never has been an answer. That’s the answer.

Gertrude Stein

You are finished with learning how to find tweets using Advance Search. Please feel free to share this post! One way to share is via Twitter.

Just click the Tweet icon below. This will launch Twitter where you click its icon to post the Tweet.

Check out TechSavvy.Life for blog posts on smartphones, PCs, and Macs! You may email us at contact@techsavvy.life for comments or questions.

I Would Like to Hear From You

Please feel free to leave a comment. I would love hearing from you. Do you have a computer or smart device tech question? I will do my best to answer your inquiry. Just send an email to contact@techsavvy.life. Please mention the device, app and version that you are using. To help us out, you can send screenshots of your data related to your question.

The author’s Vietnam eBook on the Battle for Tra Bong: Events and Aftermath