You can start Google Chrome to open a specific page, a new tab, or continue where you left off from the On starup option. We will show you how to set this option to load your Google Apps. You can use the same procedure to load any website at startup or create a bookmark.
This is for the Desktop and iPhone. Screenshots are from Windows 10 and iPhone 14 Pro running iOS 17+
You can start Google Chrome to open a specific page, a new tab, or continue where you left off from the On startup option. We will show you how to set this option to load your Google Apps. You can use the same procedure to load any website at startup or create a bookmark.
Setup the On Startup Option
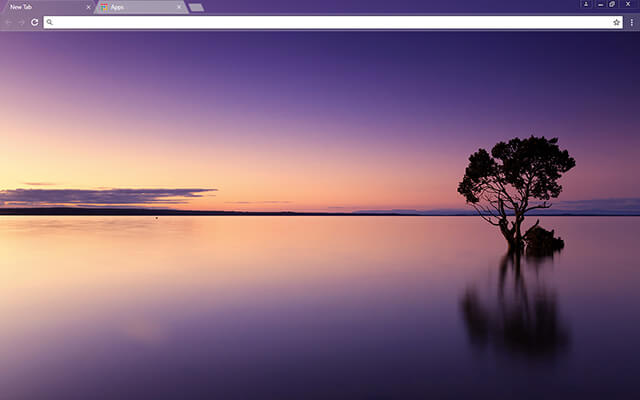
Your Google Apps can be displayed using the On startup option. First, to set this option, open Chrome and click the Menu (the 3 dots) in the upper right corner, then navigate to:
Settings > On startup
Next, under the Open a specific page or set of pages option, enter the following:
chrome://apps/
Refer to the below image:
Setting On startup option to your Google Apps
Now whenever you start Chrome, your Google Apps page will be displayed.
By doing the above, you can just click the Home button next to the address bar to display your Google Apps anytime. See the below image:
Accessing the Home button to view your Google Apps page
Clicking the Home button next to the address bar will display the page you have set as the On startup page.
Setup the Google Apps Bookmark on Desktop
If you do not have the On startup option set to Google Apps, why not create a bookmark for it. Following are the steps to do this.
First, open the Google Apps page you want to bookmark in Chrome. See the following image:
Setting your Google Apps page to bookmark
Next, click the Star icon in the address bar. Refer to the below image:
Adding your Google Apps page as a bookmark
Now, choose a name and location for your bookmark then hit Done. See the below image:
Editing your Google Apps bookmark
Next, head to your saved bookmark to see your Google Apps entry. See the following image:
Your saved Google Apps bookmark
Setup the Google Apps Bookmark on iPhone
First, open the Google Apps page you want to bookmark in Chrome then tap the Share button. Refer to the below image:
Setting your Google Apps page
Next, tap the Add to Bookmarks option. See the below image:
Adding your Google Apps bookmark
Edit the Google Apps Bookmark on iPhone
First, tap the Menu (the 3 dots) at the bottom right corner. See the following image:
Accessing the Menu option
Next, tap the Edit Bookmark option. Refer to the below image:
Choosing to edit your Google Apps bookmark
Now, change as necessary, then tap Done. See the below image:
Editing your Google Apps bookmark
Not only do bookmarks save you time as you do not need to type in a URL or search for your most frequently visited sites on Google every time you visit, but they are also great for keeping track of articles and videos you plan to head back to later. If you do not have Google Apps set as your startup page, creating a bookmark allows you to easily display the page.
Disclaimer
Technology is constantly changing; there is rarely static tech for smartphones and desktops. Thus, the contents of this post are only valid at the time of writing. Blog posts older than six months may have directions incompatible with your device or OS. Hopefully, older post content will continue to work as advertised. Thank you for reading TechSavvy.Life for Technology at Work For You.
Quote for the Day
“The best vision is insight.”
Malcolm Forbes
Tweet Info
That’s it. Please feel free to share this post! One way to share is via Twitter.
Just click the Tweet icon below. This will launch Twitter where you click its icon to post the Tweet.
Checkout TechSavvy.Life for blog posts on smartphones, PCs, and Macs! You may email us at contact@techsavvy.life for comments or questions.
Please feel free to leave a comment. I would love to hear from you. Do you have a computer or smart device tech question? I will do my best to answer your inquiry. Just send an email to contact@techsavvy.life. Please mention the device, app, and version you are using. To help us out, you can send screenshots of your data related to your question.
Author’s E-Book
You can access the e-book from a Kindle device, the Kindle App for the desktop or smartphone, which is a free app.
The author’s Vietnam eBook on the Battle for Tra Bong Vietnam: Events and Aftermath
This post provides instructions for customizing the Google homepage on both the Google website and Google Chrome. It covers enabling Dark Mode, changing the homepage color and background, managing shortcuts, and installing themes from the Chrome Web Store. The post also includes a disclaimer about technology changes and a quote for the day.
This is for devices using Google. Screenshots are from Windows 10
How many times a day do you navigate to Google.com to look up something on the internet? Modern browsers allow you to search directly from the address bar, so there are a few reasons to load up Google Search’s homepage, but some people can not shake the habit. If that’s you, at least customize it to your needs. Here’s how to customize your Google Homepage.
Enable Google Search Dark Mode
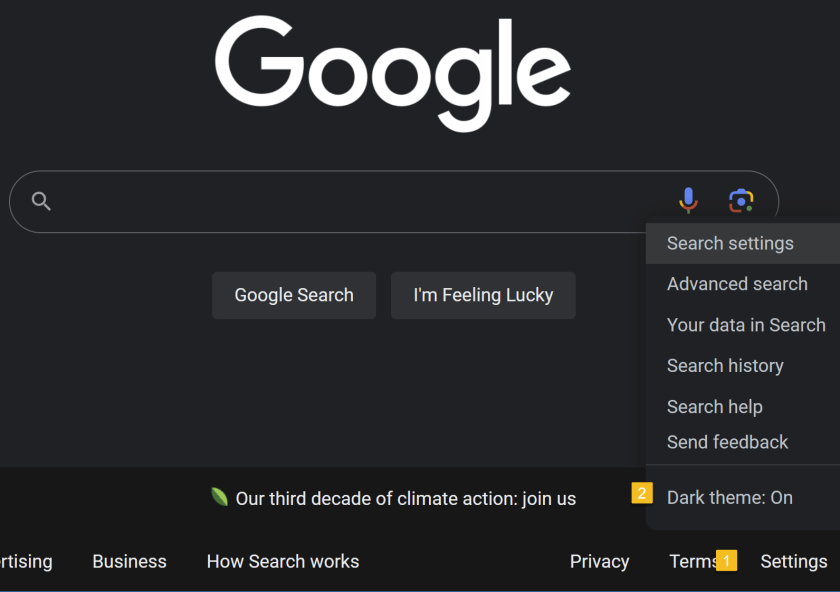
The barebones aesthetic of Google.com keeps things simple…and bright. Turn down the lights with Dark Mode. Click the Settings button in the lower-right corner of the screen, where you can toggle the Dark theme on and off to change the theme you see on Google Search results pages. Refer to the below image:
Set Dark Mode
Customize Google Chrome Homepage
Are you a Google Chrome user? If so, chances are your homepage is set to Google already, which adds a few shortcuts to Google’s usually minimalist screen. Unlike the Google website, this version of Google Search only follows the default theme setting of your operating system.
To customize Chrome’s Homepage, click the Customize Chrome link in the bottom-right of the screen to open options related to appearance, shortcuts, and what Google calls Cards. Change the color of Chrome’s homepage and menus by choosing one of the preset colors in the menu or selecting the color picker option. See the below image:
Set your color
For more options, click Change Theme to see several available categories. You can set your homepage to feature Chrome’s brand colors or select among collections of landscapes, space, art, and various artists. Each option gives you a background and color theme. You can also upload your own picture to use as a background. See the following image:
Set your background
From the Customize Chrome menu, you can also tell Google whether or not you want to show shortcuts on the Homepage. Enable My shortcuts to manually set what websites should be included or the Most visited sides to have Google suggest websites based on how often you visit them. Lastly, Google has a Cards section that allows you to see recent Google Drive files, shopping carts, and recipes. You can turn this section off or disable certain components.
Install Themes
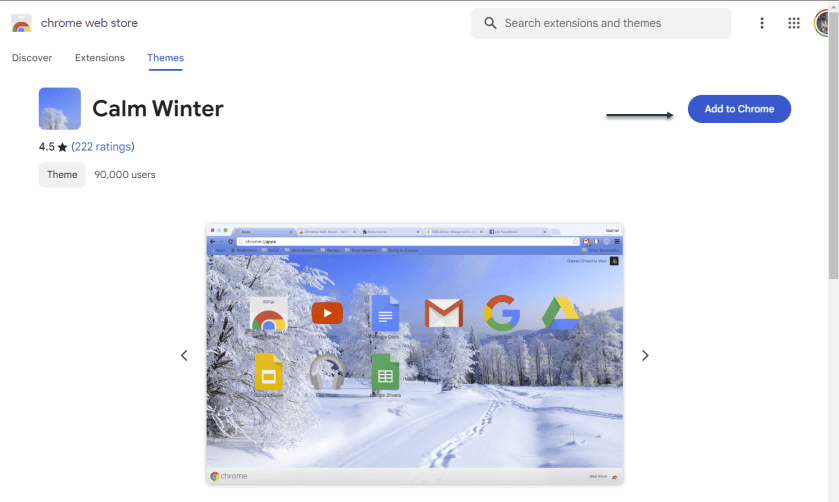
You can also customize your Google Homepage on Chrome with the help of themes from the Chrome Web Store. Open the Customize Chrome menu and click Change Theme, then choose the Chrome Web Store listing at the bottom. (Or open Settings > Appearance > Theme.) Refer to the below image:
Search the Chrome Web Store
Choose the Themes tab on the web store sidebar to search through various categories. Click into a category, then select a theme you like and choose Add to Chrome to download the theme and apply it to your Google page. See the below image:
Select a theme
Disclaimer
Technology is always changing and rarely is there static tech for smartphones and desktops. Thus, the contents of this post are only valid at the time of writing. Blog posts older than six months may have directions incompatible with your device or OS. Hopefully, older post content will continue to work as advertised. Thank you for reading TechSavvy.Life for Technology at Work For You.
Quote For the Day
Think big. Start small.
Seth Godin
Tweet Info
That’s it. Please feel free to share this post! One way to share is via Twitter.
Just click the Tweet icon below. This will launch Twitter where you click its icon to post the Tweet.
Checkout TechSavvy.Life for blog posts on smartphones, PCs, and Macs! You may email us at contact@techsavvy.life for comments or questions.
Please feel free to leave a comment. I would love to hear from you. Do you have a computer or smart device tech question? I will do my best to answer your inquiry. Just send an email to contact@techsavvy.life. Please mention the device, app, and version you are using. To help us out, you can send screenshots of your data related to your question.
Author’s E-Book
You can access the e-book from a Kindle device, the Kindle App for the desktop or smartphone, which is a free app.
The author’s Vietnam eBook on the Battle for Tra Bong Vietnam: Events and Aftermath
Google Drive’s latest update allows users to scan documents directly to cloud storage on iPhone, a feature previously available on Android only. The new design includes a Camera button for initiating the scan and saving it as a PDF file. The app also uses machine learning to suggest relevant titles for saved images. The post cautions that the information is only valid at the time of writing due to the constant evolution of technology.
This is for the iPhone using the latest update for Google Drive. Screenshots are from iPhone 14 Pro running iOS 17+
Google Drive users will be glad to know the cloud storage app has a new handy feature. The app lets you scan documents directly to your cloud storage on your iPhone. The feature is already available on Android; the same functionality has made its way to iPhone.
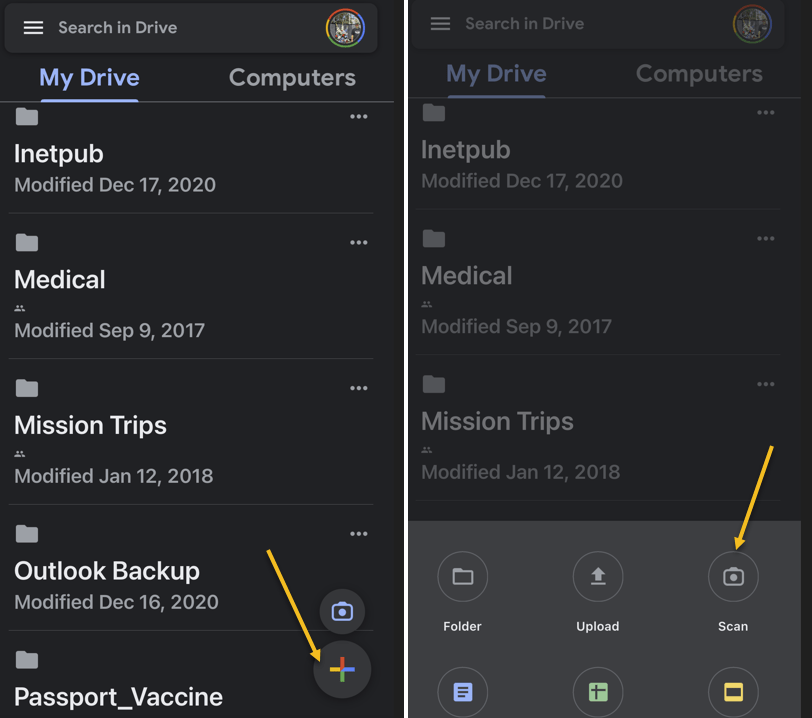
The new Google Drive redesign comes with a new Camera button above the “+” button in the lower right corner. Another option to start a scan from the Google Drive home page is to tap that “+” sign and choose the Scan option. Both will take you to the iPhone’s Camera. Refer to the below image:
Selecting options to scan
Tap the button to initiate a document scan that will feel familiar. Just place the document or receipt from the Camera and take the photo.
The document-scanning feature lets you capture multiple images to scan a document with more than one page.
Once the photo is taken, you can perform the usual edits for such types of images. You can crop and rotate the image and change the color. That can be useful if you want your photo to look like a scanned document.
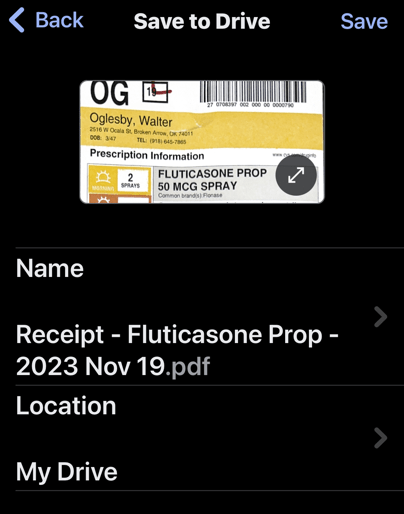
When you are ready to save the scan, press the Save button, and Google Drive will use machine learning to suggest a relevant title for the image or set of images that will be saved as a new PDF file. See the below image:
Save your scan as a PDF file
That’s another handy feature, as it will save you time and ensure you find and retrieve the scan with ease in the future.
As a reminder, your iPhone already has a built-in document scanner feature. You can scan documents directly into the Notes app with similar ease. If you sync Notes across iPhone, iPad, and Mac, you will always have the scanned document available.
However, the Google Drive alternative is also a great option. Some iPhone users might prefer scanning documents to Google’s cloud storage directly.
Disclaimer
Technology is always changing and rarely is there static tech for smartphones and desktops. Thus, the contents of this post are only valid at the time of writing. Blog posts older than six months may have directions incompatible with your device or OS. Hopefully, older post content will continue to work as advertised. Thank you for reading TechSavvy.Life for Technology at Work For You.
Quote For the Day
“Perfection is not attainable, but if we chase perfection we can catch excellence.”
Vince Lombardi
Tweet Info
You are finished. Please feel free to share this post! One way to share is via Twitter.
Just click the Tweet icon below. This will launch Twitter where you click its icon to post the Tweet.
Checkout TechSavvy.Life for blog posts on smartphones, PCs, and Macs! You may email us at contact@techsavvy.life for comments or questions.
Please feel free to leave a comment. I would love to hear from you. Do you have a computer or smart device tech question? I will do my best to answer your inquiry. Just send an email to contact@techsavvy.life. Please mention the device, app, and version you are using. To help us out, you can send screenshots of your data related to your question.
Author’s E-Book
You can access the e-book from a Kindle device, the Kindle App for the desktop or smartphone, which is a free app.
The author’s Vietnam eBook on the Battle for Tra Bong Vietnam: Events and Aftermath
Google Image Search allows users to perform a reverse image search by either using a URL from a website or a local image on your device. To do so, paste the image’s URL or upload the image file onto the Google Images search bar. Google will then provide visually similar images and may also help identify the original source of the image. However, pinpointing the exact origin of the image may not always be successful.
This is for devices using Google. Screenshots are from Windows 10
Google Image Search is a great way to find images similar to one you already have or to help you track down the original source of a photo. Let’s find out how to do a reverse image search.
Search For an Image From a Website
If you would like to search for an image that appears on a website, you can paste the URL into the Google Images search bar; drag and drop an image or browse your files. We will show you how to do both.
For the first method, you need the URL of the image itself, not just the address for the page on which the image appears. The easiest way to grab that URL is to right-click the image and select the Copy image address. Refer to the below image:
Selecting the Copy image address option
Next, with the URL in your clipboard, head to Google Images and click the Google Lens icon. See the below image:
Selecting the Google Lens icon
Now, in the Paste image link text box, paste the URL you copied earlier and click Search. See the following image:
Paste the image link
Next, you will see visually similar images in the right sidebar, and you can click Find image source to see where the image originated from. Keep in mind that this is not an exact science. Google often can not find the source, if there is one. Refer to the below image:
Selecting Find image source
Now, if there’s a specific part of the image you would like to search for, you can use the handles to adjust which part of the image is selected. See the below image:
Find image source by using the handles
That’s it! This is definitely the easiest method for searching Google with images. There are also ways to do reverse image searches on Android and iPhone or iPad.
Search for an Image You Already Have
To search Google Images with a local image you already have; maybe one you downloaded from the web; use the Google Lens icon in the Google Images search bar. You will be able to drag and drop an image or browse your files.
First, head on over to the Google Images page and click the Google Lens icon. See the following image:
Selecting the Google Lens icon
Next, you can either drag an image from another window; such as the file explorer; or click upload a file to browse for photos on your computer. Refer to the below image:
Selecting to drag and drop an image or upload a file
Now, after the image uploads, you will be brought to a page with visually similar images in the right sidebar. Click Find image source to see where the image originated from. One thing to note is with images that have not been grabbed from the web, it’s not as easy to find the original source. See the below image:
Selecting Find image source
Next, if there’s a specific part of the image you would like to search for, you can use the handles to adjust which part of the image is selected. See the following image:
Find image source by using the handles
How about that! This is a great way to find similar images, or maybe you want to find different sizes of an image you already have. Google Search is a powerful tool, and Google Lens drives a lot of image-related search functions. It’s a pretty impressive tool in itself.
Disclaimer
Technology is always changing and rarely is there static tech for smartphones and desktops. Thus, the contents of this post are only valid at the time of writing. Blog posts older than six months may have directions incompatible with your device or OS. Hopefully, older post content will continue to work as advertised. Thank you for reading TechSavvy.Life for Technology at Work For You.
Quote For the Day
When you want to succeed as bad as you want to breathe, then you’ll be successfull.
Eric Thomas
Tweet Info
That’s it. Please feel free to share this post! One way to share is via Twitter.
Just click the Tweet icon below. This will launch Twitter where you click its icon to post the Tweet.
Checkout TechSavvy.Life for blog posts on smartphones, PCs, and Macs! You may email us at contact@techsavvy.life for comments or questions.
Please feel free to leave a comment. I would love to hear from you. Do you have a computer or smart device tech question? I will do my best to answer your inquiry. Just send an email to contact@techsavvy.life. Please mention the device, app, and version you are using. To help us out, you can send screenshots of your data related to your question.
Author’s E-Book
The author’s Vietnam eBook on the Battle for Tra Bong Vietnam: Events and Aftermathsd
Using Google Photos‘ slideshow feature, you can have all or specific album photos play one after another automatically. You can make this slideshow on both your desktop and your mobile device.
This is for the desktop and smartphones. Screenshots are from Windows 10 and iPhone 14 Pro running iOS 16+
Using Google Photos‘ slideshow feature, you can have all or specific album photos play one after another automatically. You can make this slideshow on both your desktop and your mobile device. Let’s explore how this is done.
On Your Desktop
To create a slideshow on your desktop computer, first, open a web browser and launch the Google Photos site. Sign in to your account on the site if you have not already.
Next, once you see your photos, if you want to include all your photos in the slideshow, then click the first photo on the main screen to open it in full screen.
Now, once the photo opens in full screen, at the top-right corner, click the three dots (the Menuicon). Refer to the below image:
Selecting the Menu icon
Next, in the menu that opens, click Slideshow. See the below image:
Selecting the Slideshow option
Now, your browser will go full screen and your slideshow will start playing. Sit back, relax, and enjoy recollecting your memories with your photos.
Next, you can stop the slideshow at any time by pressing the Esc key on your keyboard. See the following image:
Exiting the Slideshow
Now, if you would like to make a slideshow using photos from a specific album, then access that album on Google Photos. On the album page, in the top-right corner, click the three dots (the Menu icon). Refer to the below image:
Selecting the Menu icon
Next, from the three dots (the Menu icon), select Slideshow to start playing your photos. You can close the slideshow by pressing the Esc key. See the below image:
Selecting the Slideshow option
On Your Mobile
To play your photos slideshow on your phone, first, launch the Google Photos app on your phone.
Next, to include all your photos in the slideshow, then tap the first photo on the main screen.
Now, when your photo opens in full screen, in the top-right corner, tap the three dots (the Menu icon). See the following image:
Selecting the Menu icon
Next, from the three dots (the Menu icon), select Slideshow to start playing your photos. Refer to the below image:
Selecting the Slideshow option
Now, Google Photos will start playing a slideshow for all your photos. If you would like to stop this slideshow, tap anywhere on the screen then tap Done in the top-left corner. See the below image:
Exiting the Slideshow
To create a slideshow using photos from a particular album, first, tap Library and choose your photo album. Select the first photo in the album, then in the top-right corner, tap the three dots (the Menu icon). See the following image:
Selecting the Menu icon
Next, in the menu that opens, tap Slideshow. Refer to the below image:
Selecting the Slideshow option
Now, your slideshow containing photos only from the selected album will play. If you would like to stop this slideshow, tap anywhere on the screen then tap Done in the top-left corner. See the below image:
Exiting the Slideshow
Disclaimer
Technology is always changing; there is rarely static tech for smartphones and desktops. Thus, the contents of this post are only valid at the time of writing. Blog posts older than six months may have directions incompatible with your device or OS. Hopefully, older post content will continue to work as advertised. Thank you for reading TechSavvy.Life for Technology at Work For You.
Quote for the Day
My view is that if your philosophy is not unsettled daily then you are blind to all the universe has to offer.
Neil deGrasse Tyson
Tweet Info
That’s it. Please feel free to share this post! One way to share is via Twitter.
Just click the Tweet icon below. This will launch Twitter where you click its icon to post the Tweet.
Checkout TechSavvy.Life for blog posts on smartphones, PCs, and Macs! You may email us at contact@techsavvy.life for comments or questions.
You may have noticed that opening a link in Outlook behaves differently and not in your chosen browser. That’s because Microsoft wants to push their Edge browser, though they have some excuses for the change.
This is for devices running Microsoft Outlook. Screenshots are from Microsoft Outlook 365 in Windows 10
You may have noticed that opening a link in Outlook behaves differently and not in your chosen browser. That’s because Microsoft wants to push their Edge browser, though they have some excuses for the change.
When you click on a link in Outlook for Windows, it might open in the Edge browser, even though you have chosen a different default browser in Windows settings (like Chrome or Firefox).
And instead of just opening the web page, the email appears in a right side-pane alongside the link you clicked. Refer to the below image:
Side-by-Side View
According to Microsoft, this change means “No more disruptive switching—just your email and the web content you need to reference, in a single, side-by-side view.” They may have a point and it’s a change that suits some people.
It’s also a shameless attempt to push people to the Edge browser by overriding their browser choice with Microsoft’s preference.
This applies to Windows 10 or 11 only. Microsoft only says this is for ‘Outlook’ not which versions, but presumably Outlook 365 for Windows. For now, it only works on Microsoft-hosted emails including Outlook.com/Hotmail however it will be extended to Gmail later.
Change Browser via Windows
First, the default browser is chosen in Windows. To set up this browser, head to:
Settings | Apps | Default Apps
and choose your preferred browser. See the below image:
Setting Chrome as the web browser in Windows
Change the Search Engine and Default Browser
Next, for Chrome, ensure you have set the search engine. To find out, open Chrome and head to:
Menu (the 3 dots in the upper right) | Settings | Search engine
and, if necessary, set your search engine to Chrome. See the following image:
Setting Chrome as the search engine
Now, for Chrome, ensure you have set the default browser. To find out, open Chrome and head to:
Menu (the 3 dots in the upper right) | Settings | Default browser
Refer to the below image:
Your default browser
The reason why we are doing the above is to ensure we are using Google products. You can have Firefox as your browser and Chrome as your search engine.
Change Outlook Links Default Browser
Next, open Outlook and go to:
File | Options | Advanced | Link Handling
to change the browser to Default Browser. See the below image:
Setting Default Browser in Outlook
Side-by-Side View May Not Work
To be honest, you may not get this feature to work no matter what combination of Outlook, Windows, and Edge you try. We prefer to test for ourselves and not take Microsoft’s word. If your email links open in your browser with no side-by-side view, do not worry.
Disclaimer
Technology is always changing and rarely is there static tech for smartphones and desktops. Thus, the contents of this post are only valid at the time of writing. Blog posts older than six months may have directions incompatible with your device or OS. Hopefully, older post content will continue to work as advertised. Thank you for reading TechSavvy.Life for Technology at Work For You.
Quote For the Day
Ideas are easy. Implementation is hard.
Guy Kawasaki
Tweet Info
That’s it. Please feel free to share this post! One way to share is via Twitter.
Just click the Tweet icon below. This will launch Twitter where you click its icon to post the Tweet.
Checkout TechSavvy.Life for blog posts on smartphones, PCs, and Macs! You may email us at contact@techsavvy.life for comments or questions.
Please feel free to leave a comment. I would love to hear from you. Do you have a computer or smart device tech question? I will do my best to answer your inquiry. Just send an email to contact@techsavvy.life. Please mention the device, app, and version you are using. To help us out, you can send screenshots of your data related to your question.
Author’s E-Book
You can access the e-book from a Kindle device, the Kindle App for the desktop or smartphone, which is a free app.
The author’s Vietnam eBook on the Battle for Tra Bong Vietnam: Events and Aftermath
We are all constantly absorbing information online. Bionic Reading is an approach to reading that can help you read faster, retain more information, and boost your productivity in your favorite web browser, like Chrome.
This is for desktops using Chromeor other browsers. Screenshots are from Windows 10
We are all constantly absorbing information online. Bionic Reading is an approach to reading that can help you read faster, retain more information, and boost your productivity in your favorite web browser, like Chrome.
Bionic Reading Explained
Bionic reading is amethod of reading that combines traditional reading with technology-assistedtools. This helps readers increase their reading speed, improve their comprehension and retention, and ultimately become more productive in their reading activities.
Was the above paragraph easier and quicker to read? If you said yes, then you have just experienced some of the benefits of Bionic Reading. Now, imagine that but for a whole article, essay, or book.
Your brain does not always read every letter of every word. It only intakes enough information for you to understand a word, and then it moves on to the next one. The bolding of the first half of each word lets your mind fast-track through paragraphs.
The bolding aspect is the most notable factor in Bionic Reading, but there’s more as well. A lot of apps and extensions also remove colors from images and change white or black backgrounds to gray. These changes help your eyes focus on the text.
Why Use Bionic Reading
Using Bionic Reading in Chrome, or any other web browser, can offer several benefits.
It can help you read faster and more efficiently, which allows you to cover more material in less time.
Bionic Reading can also help you retain more information by training your brain to focus on the most important parts of any text.
As a result of the two above-mentioned benefits, it can improve your productivity by allowing you to process information more effectively. This can be particularly useful in academic or work-related settings.
Bionic Reading in any browser can be a valuable tool for anyone looking to optimize their online reading experience.
Think of Bionic Reading as akin to Speed Reading but they are different in their approach. Speed Reading is the process of rapidly recognizing and absorbing phrases or sentences on a page all at once, rather than identifying individual words.
How Bionic Reading Helps You
Bionic Reading helps you read faster and more efficiently with techniques including skimming, scanning, chunking, and altering images to be easier on the eye. Refer to the below image:
Bionic Reading example from Chrome Web Store
For example, when you skim a text, you quickly glance through it to get a general idea of the content without reading every word. Similarly, when you scan a text, you search for specific keywords or phrases that are relevant to your reading goals.
By using these techniques, you can save time and energy. Bionic Reading tools like web browser extensions or apps can help automate some of these techniques.
Bionic Reading Trains Your Brain to Retain Information
By using Bionic Reading, you can begin to retain more information by training your brain to focus on the most crucial parts of any text, such as key concepts, arguments, or evidence.
Through using techniques like skimming or scanning (as mentioned above), you can quickly identify the main points of the text and decide what information is relevant to your reading goals. In turn, this uses less mental energy.
By consistently applying these techniques, you can train your brain to become more efficient at processing and retaining information. Studying, researching, and editing your own work can become easier as a result.
Bionic Reading Improves Your Productivity
Before we go into how Bionic Reading increases your productivity, you need a frame of reference for how your productivity can suffer through everyday means.
Using your eyes takes up about 50% of your brain power. That’s more than any of your other senses. We, as humans, heavily rely on our vision for pretty much everything we do.
As your brain becomes able to retain more information, you will need to re-read the same text less often.
Reading faster and more efficiently drastically cuts down on the stress your eyes and brain suffer while researching, writing, and doing similar work, especially when you are mentally digesting new information.
To summarize, by improving your reading efficiency and training your brain to better retain information, your productivity should increase.
At the top of a Chrome window, click the Menu icon (the 3 dots) to open the Menu. Now, click More Tools > Extensions to view the extension. See the following image:
Bionic Reading Chrome extension
After installing it, you can manage the Bionic Reading extension through the Extensions menu at the top-right of your window (click the little jigsaw piece icon). Refer to the below image:
Activate Bionic Reading
You are now ready to begin using the Bionic Reading extension! When you want to activate it on any given webpage, all you need to do is click the jigsaw piece icon at the top-right of your window and then click the Bionic Reading icon. To turn Bionic Reading off, do the same thing again. See the below image:
Bionic Reading example
Everything is removed from the web page but the text. That’s all there is to it! Start saving your energy for tougher tasks by letting Bionic Reading do the heavy visual lifting.
Disclaimer
Technology is always changing and rarely is there static tech for smartphones and desktops. Thus, the contents of this post are only valid at the time of writing. Blog posts older than six months may have directions incompatible with your device or OS. Hopefully, older post content will continue to work as advertised. Thank you for reading TechSavvy.Life for Technology at Work For You.
Quote For the Day
I would like to die on Mars. Just not on impact.
Elon Musk
Tweet Info
That’s it. Please feel free to share this post! One way to share is via Twitter.
Just click the Tweet icon below. This will launch Twitter where you click its icon to post the Tweet.
Checkout TechSavvy.Life for blog posts on smartphones, PCs, and Macs! You may email us at contact@techsavvy.life for comments or questions.
Please feel free to leave a comment. I would love to hear from you. Do you have a computer or smart device tech question? I will do my best to answer your inquiry. Just send an email to contact@techsavvy.life. Please mention the device, app, and version you are using. To help us out, you can send screenshots of your data related to your question.
Author’s E-Book
You can access the e-book from a Kindle device, the Kindle App for the desktop or smartphone, which is a free app.
The author’s Vietnam eBook on the Battle for Tra Bong Vietnam: Events and Aftermath
Want to clear your browser history quickly? There’s a keyboard shortcut for that. It works in any browser, including Google Chrome, Apple Safari, Microsoft Edge, and Mozilla Firefox (on both Windows PCs and Macs.)
Want to clear your browser history quickly? There’s a keyboard shortcut for that. It works in any browser, including Google Chrome, Apple Safari, Microsoft Edge, and Mozilla Firefox (on both Windows PCs and Macs.)
Depending on your web browser of choice, you can speed things up in the future by activating the Clear button with a few keystrokes. You may have to tab through the interface to select the Clear button before hitting Enter.
Here’s how it works on a few popular browsers on a Windows 10 or Windows 11 PC:
Google Chrome: Press Ctrl+Shift+Delete and press Enter.
Mozilla Firefox: Press Ctrl+Shift+Delete and press Enter.
Microsoft Edge: Press Ctrl+Shift+Delete and press Enter.
You can now configure exactly what you want to delete. Your browser will remember the settings you pick here, so you will only have to set this up once.
You can pick a time range, or history from a time period like the last hour, last 24 hours, last week, or from all time. You can also pick the types of data: browsing history, download history, cookies, cached files, and more.
When you are done, click the Clear data or Clear now button. Refer to the below image for Chrome:
Selecting to Clear data in Chrome
Incognito Mode
In the future, you can eliminate the need to clear your browser history by browsing in a private-browsing mode, like Incognito Mode in Chrome. You will just have to close the private-browsing window, and your browser will immediately forget the history associated with your private browsing.
You can use keyboard shortcuts to open and close a private-browsing mode window, too.
Google Chrome: Press Ctrl+Shift+N
Mozilla Firefox: Press Ctrl+Shift+P
Safari or Chrome on a Mac: Press Command instead of Ctrl; for example, press Shift+Command+N.
When you are done, press Ctrl+W to close a single tab or Ctrl+Shift+W to close an entire window. (On a Mac, press Command instead of Ctrl.)
Just remember that Incognito Mode does not offer complete privacy online. It only prevents your web browser from storing your browsing history locally. You may want to combine it with a VPN to boost your online privacy.
Disclaimer
Technology is always changing and rarely is there static tech for smartphones and desktops. Thus, the contents of this post are only valid at the time of writing. Blog posts older than six months may have directions incompatible with your device or OS. Hopefully, older post content will continue to work as advertised. Thank you for reading TechSavvy.Life for Technology at Work For You.
Quote For the Day
Knowledge is of no value unless you put it into practice.
Anton Chekhov
Tweet Info
That was easy. Please feel free to share this post! One way to share is via Twitter.
Just click the Tweet icon below. This will launch Twitter where you click its icon to post the Tweet.
Checkout TechSavvy.Life for blog posts on smartphones, PCs, and Macs! You may email us at contact@techsavvy.life for comments or questions.
Please feel free to leave a comment. I would love to hear from you. Do you have a computer or smart device tech question? I will do my best to answer your inquiry. Just send an email to contact@techsavvy.life. Please mention the device, app, and version you are using. To help us out, you can send screenshots of your data related to your question.
Author’s E-Book
You can access the e-book from a Kindle device, the Kindle App for the desktop or smartphone, which is a free app.
The author’s Vietnam eBook on the Battle for Tra Bong Vietnam: Events and Aftermath
Most web browsers have a built-in “Reader Mode” that converts web pages into a more reader-friendly view. Strangely, Google Chrome does not have this feature; unless you know how to find it.
Most web browsers have a built-in “Reader Mode” that converts web pages into a more reader-friendly view. Strangely, Google Chrome does not have this feature; unless you know how to find it. Let’s find out where it is.
This is for devices running Google Chrome. Screenshots are from Windows 10
Google Chrome has included a hidden Reader Mode all the way back to version 75. However, it’s never been upgraded to a stable, standard feature. Even Microsoft Edge; which is also based on Chromium; has a Reader Mode. So let’s enable it in Chrome.
Enable Hidden Reader Mode
First, we will need to enable a Chrome feature flag. Open the Chrome browser on your computer, and type:
chrome://flags
in the address bar, and hit Enter. Refer to the below image:
Accessing Chrome flags
Next, search for “Reader Mode” in the text box at the top and enable the flag titled “Enable Reader Mode.” See the below image:
Enabling Reader Mode
Now, after enabling the flag, click the “Relaunch” button at the bottom of the screen to apply the changes. See the following image:
Restarting Chrome
Next, when you now visit a webpage that has a lot of text, you will see a little book icon on the right side of the address bar. Click it to switch to Reader Mode.
You can also click:
Menu > Enter Reader Mode
to activate it. Refer to the below image:
Selecting the Reader Mode icon
Now, you are now looking at a much simpler, less cluttered view of the webpage. Images still appear, but ads and some other items are removed. To adjust the view, click the “A” icon in the top right. See the below image:
Changing Font size
Next, from here you can change the font, text size, and background color. See the following image:
Customizing appearance
That’s all there is to it! You can now minimize distractions while reading long articles in Chrome. It’s strange that Google has kept this a hidden feature for years, but at least you know how to enable it yourself.
Disclaimer
Technology is always changing and rarely is there static tech for smartphones and desktops. Thus, the contents of this post are only valid at the time of writing. Blog posts older than six months may have directions incompatible with your device or OS. Hopefully, older post content will continue to work as advertised. Thank you for reading TechSavvy.Life for Technology at Work For You.
Quote For the Day
Man is still the most extraordinary computer of all.
John F Kennedy
Tweet Info
That’s it. Please feel free to share this post! One way to share is via Twitter.
Note!Twitter may be no longer supported by WordPress. If so, the below Tweet button will not work.
Just click the Tweet icon below. This will launch Twitter where you click its icon to post the Tweet.
Checkout TechSavvy.Life for blog posts on smartphones, PCs, and Macs! You may email us at contact@techsavvy.life for comments or questions.
Please feel free to leave a comment. I would love to hear from you. Do you have a computer or smart device tech question? I will do my best to answer your inquiry. Just send an email to contact@techsavvy.life. Please mention the device, app, and version you are using. To help us out, you can send screenshots of your data related to your question.
The author’s Vietnam eBook on the Battle for Tra Bong Vietnam: Events and Aftermath
Google Chrome is a very popular browser despite being infamously greedy with your computer’s resources. If you feel like Chrome is starting to get slow, let’s speed it up.
Google Chrome is a very popular browser despite being infamously greedy with your computer’s resources. If you feel like Chrome is starting to get slow, let’s speed it up.
This is for devices running Google Chrome. Screenshots are from Windows 10
Update Chrome
The simplest thing you can do is make sure Chrome is up to date. This will ensure that you always have the latest improvements and optimizations for Chrome. The browser will usually install updates automatically, but you can update manually to be sure.
To manually update Chrome, head to:
Menu (3 dots) > Settings > About Chrome
If not up-to-date, Chrome will automatically update. Refer to the below image:
Update Chrome
Preload Images
Chrome has a feature that allows it to “predict” which links it thinks you might open and preload in the background. That way, if you do click the link, it will already be partially loaded.
If you want to enable this feature. First, head to:
Menu (3 dots) > Settings > Privacy and Security > Cookies and Other Site Data
Next, toggle the switch ON for Preload pages for faster browsing and searching. See the below image:
Select to Reload Images
Tabs Under Control
Chrome has some built-in tools to help mitigate the performance impact of having a lot of tabs open, but keeping your tabs tidy on your own will help even more.
There are a couple of things you can do if you are someone that constantly has tons of tabs open. The easiest thing to do is use Chrome’sReading List and Bookmarks features. That way, you can save pages for later without actually keeping them open in a tab.
Use Energy Saver
As the name implies, Chrome’s Energy Saver feature is intended to help improve battery life when your laptop is unplugged. However, it can also be used to speed up performance in a pinch.
Energy Saver limits background activity, visual effects, and video frame rates. Limiting those things helps stretch out your battery, which is a result of Chrome not asking your computer to work as hard. You can only use Energy Saver if your computer is running on battery or below 20% power. Head to:
Menu (3 dots) > Settings > Performance
and toggle ON the Energy Saver switch.
Memory Saver
With the latest release of Chrome on the desktop, there is a new performance setting so Chrome uses up to 40% and 10GB less memory to keep your tabs running smoothly.
If you have a bunch of tabs open in Chrome that you plan to come back to later; Memory Saver mode frees up memory from tabs you are not currently using so the active websites you are browsing are fast. This is especially useful if you are running other intensive applications, like editing family videos or playing games. Any inactive tabs will be reloaded when you need them. Head to:
Menu (3 dots) > Settings > Performance
and toggle ON the Memory Saver switch. See the following image:
Enable Memory Saver
Hardware Acceleration
Hardware acceleration is a feature that allows Chrome to take advantage of your computer’s GPU to speed up processes. Hardware can perform some functions faster than software running on the CPU alone.
When enabled, Chrome will utilize your computer’s GPU for graphics-intensive tasks, like playing games and watching videos. It’s typically enabled by default but can be disabled if there are driver compatibility issues. You can ensure it’s enabled by heading to:
Menu (3 dots) > Settings > System
and toggle ON the option Use hardware acceleration when available. Refer to the below image:
Select to Use Hardware Acceleration
Check Task Manager
If you feel like Chrome is particularly sluggish, there might be a rogue extension causing it. Chrome has its own built-in Task Manager that lets you see what’s running in the browser; extensions, web pages, and apps; and how many resources each individual thing is using.
Chrome’sTask Manager shows each tab and all the extensions that are currently running. You can see the memory footprint and CPU usage. If a process uses too much CPU, you can simply tap the End Process button and see if that fixes the problem.
The Task Manager can be found in:
Menu (the 3 dots) > More Tools > Task Manager
Just click on the option from the drop-down menu. See the below image:
Check the Task Manager
Check Extensions
Similar to how you might have apps on your phone that you do not use anymore, there are probably some Extensions in Chrome that you could get rid of. They could be running in the background and eating up resources.
Regardless of performance, it’s generally a good idea to routinely check up on your Extensions. Chrome gives you the option to “Disable” by turning the Toggle to OFF or “Remove.” Disabling will keep the Extension installed, but it cannot run. To check your Extensions, head to:
?Menu (3 dots} > More Tools > Extensions
See the following image:
Check your Extensions
Clear Your Browsing Data
Chrome collects a lot of data while you are browsing to improve your experience. All this site data, cookies, and cached images and files can add up over time. Occasionally clearing this data can potentially lighten up your browser, but it also means you will need to re-sign into websites.
There are two ways to do this. First, head to:
Menu (the 3 dots) > More Tools >Clear Browsing Data
Second, you can use the keyboard shortcut Ctrl + Shift + Del. Both methods will bring up a menu with options (Basic or Advanced) for clearing the data.
Checkmark any option(s) and click Clear data. Refer to the below image:
Clear your Browsing Data
Reset Without Uninstalling
The “nuclear option” for speeding up Chrome is performing a browser reset. This will essentially bring Chrome back to the way it was when you first installed it while still saving some of your personal stuff.
A browser reset will reset the search engine, homepage, startup tabs, new tab page, pinned tabs, content settings, cookies, site data, extensions, and themes. However, it will not erase your bookmarks, browser history, or saved passwords.
To perform a browser reset, head to:
Menu (3 dots) > Settings > Reset settings > Restore settings to their original defaults
See the below image:
Reset Settings
Just click the option. Next, you will see a confirmation screen. Here, click on the Reset settings button. See the following image:
Reset Settings confirmation. Use with caution
Disclaimer
Technology is always changing and rarely is there static tech for smartphones and desktops. Thus, the contents of this post are only valid at the time of writing. Blog posts older than six months may have directions incompatible with your device or OS. Hopefully, older post content will continue to work as advertised. Thank you for reading TechSavvy.Life for Technology at Work For You.
Quote For the Day
“While we’re all very dependent on technology, it doesn’t always work.
Bill Gates
Tweet Info
That’s it. Please feel free to share this post! One way to share is via Twitter.
Just click the Tweet icon below. This will launch Twitter where you click its icon to post the Tweet.
Checkout TechSavvy.Life for blog posts on smartphones, PCs, and Macs! You may email us at contact@techsavvy.life for comments or questions.
Please feel free to leave a comment. I would love to hear from you. Do you have a computer or smart device tech question? I will do my best to answer your inquiry. Just send an email to contact@techsavvy.life. Please mention the device, app, and version you are using. To help us out, you can send screenshots of your data related to your question.
Author’s E-Book
You can access the e-book from a Kindle device, the Kindle App for the desktop or smartphone, which is a free app.
The author’s Vietnam eBook on the Battle for Tra Bong Vietnam: Events and Aftermath