Microsoft Word will auto adjust table column widths to fit the content you are entering. This is the default setting for a Word table. There are times you may not want this, instead, you want to control the column widths.
The default setting may push the table beyond the right margin or a column widens unnecessarily.
So, let’s see how to turn off AutoFit option and do table adjustments yourself.
This is for Office 365 Microsoft Word on PCs, Macs and similar platforms. Other versions of Word will be similar.
Copyright Scott Adams, Inc./Distributed by Universal Uclick for UFS
Turn Off AutoFit Feature
To turn off this feature, first, place your cursor anywhere in the table you want to change.
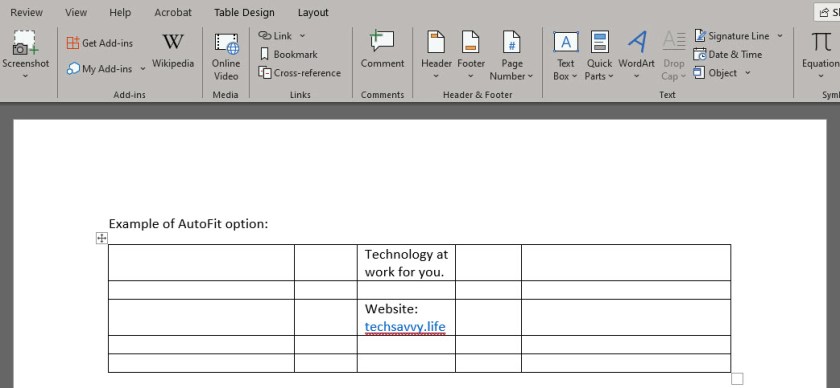
Next, go to the Layout tab located in right hand side, not to be confused with the other Layout tab to the left side of the screen. Note! This option only appears when you are in a table. Refer to below image:
Now, click AutoFit and select the Fixed Column Width option. See below image:
You can now drag the column borders to your desired width. The column borders you set will stay that way even if you enter longer text into them. See following image:
Now, you can control Word’s table column widths. That’s it.
I Would Like to Hear From You
Please feel free to leave a comment. I would love hearing from you. Do you have a computer or smart device tech question? I will do my best to answer your inquiry. Please mention the device, app and version that you are using. To help us out, you can send screenshots of your data related to your question.
The author’s Vietnam eBook on the Battle for Tra Bong: Events and Aftermath
It is easy to preview files without opening them in Windows 10, thanks to the Preview Pane feature in File Explorer. You can see thumbnails of most images, videos, audio files and some text-based documents. Lets see how to do this.
You may have heard about a security flaw in using the preview pane, but that was fixed in Windows 10 update released on April 14, 2020. If you have the latest updates, it’s safe to use.
This is for Windows 10 operating system
Copyright Scott Adams, Inc./Distributed by Universal Uclick for UFS
Opening File Explorer
There are at least three ways to access the File Explorer:
Open File Explorer by pressing Windows+E
Click the Explorer folder icon in your taskbar
Click the Explorer option in your Start menu
Accessing the Preview Pane
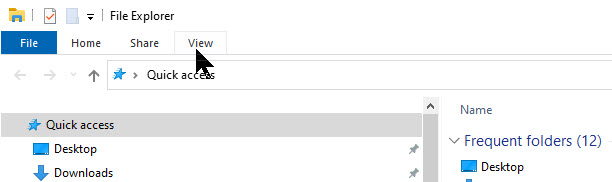
In the menu bar at the top of the File Explorer window, click View. See below image:
Selecting the View option
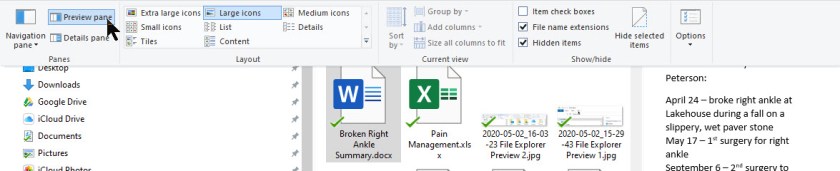
Find Preview pane option in the upper-left of the toolbar and click on it. Refer to below image:
Selecting the Preview pane option
The Preview pane will be highlighted and isnow activated. Navigate the File Explorer to a folder that has documents you’d like to preview. When you select a file, you will see its preview thumbnail in the right side of the window. See following image:
The results of Previw pane option displayed on the right
Accessing the Details Pane
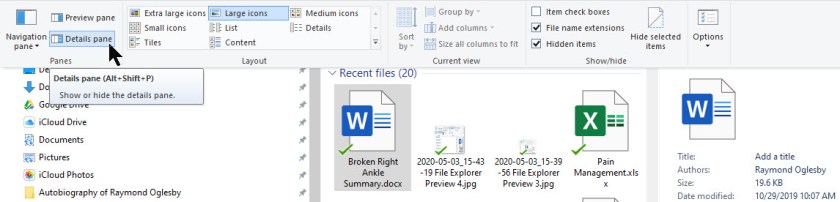
File Explorer also has a related feature called Details Pane. To turn it on, click View in the Explorer menu bar, then click the Details pane option in the toolbar (it’s right below the Preview pane option). Refer to below image:
Selecting the Details pane option
When you highlight a file with Details pane turned on, you will see a tiny thumbnail (for applicable file types) and some details about the file, such as its size, date created, date modified, etc. in the right portion of the window. See following image:
The results of Details pane option displayed on the right
To return to the normal view of File Explorer, first, you have to click on View, then, either click the Preview or Details pane option depending on which one is highlighted.
You also have other options under the View tab to see your contents; like the size of your icons; extra large, large, medium and small, as well as by list, details, tiles and content.
Keyboard Shortcuts
It’s also possible to quickly toggle the Preview and Details panes using keyboard shortcuts. First, open File Explorer, then use the below shortcuts:
Press Alt+P to open or close the Preview pane
Press Alt+Shift+P to open or close the Details pane
That its. You have successfully explored two seldom used options of the File Explorer in Windows 10.
I Would Like to Hear From You
Please feel free to leave a comment. I would love hearing from you. Do you have a computer or smart device tech question? I will do my best to answer your inquiry. Please mention the device, app and version that you are using. To help us out, you can send screenshots of your data related to your question.
The author’s Vietnam eBook on the Battle for Tra Bong: Events and Aftermath
In Windows 10, it’s easy to enable and use a virtual device, like a keyboard. This is super handy if you have a touch screen device. There are times when using a mouse or touchpad is inconvenient and problematic with kids or pets squirming on your lap.
This how-to guide shows you how to enable and use the virtual interface built into Windows 10.
This is for Windows 10 operating system
Copyright Scott Adams, Inc./Distributed by Universal Uclick for UFS
Enable the Virtual Device
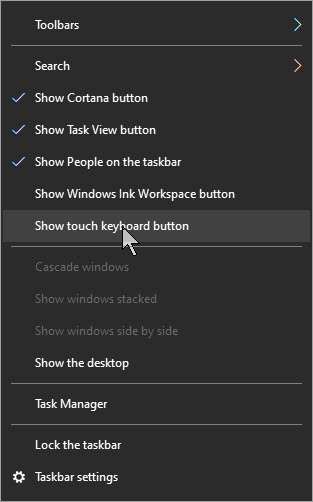
It’s super easy to enable the virtual interface. Just right-click on any open area of your Taskbar and select Show touch keyboard button. Refer to below image:
View the touch keyboard option
You should now see a keyboard icon in the Taskbar tray. See below image:
Showing the touch keyboard icon
Use the Virtual Device
To bring up a virtual keyboard, click on that icon.
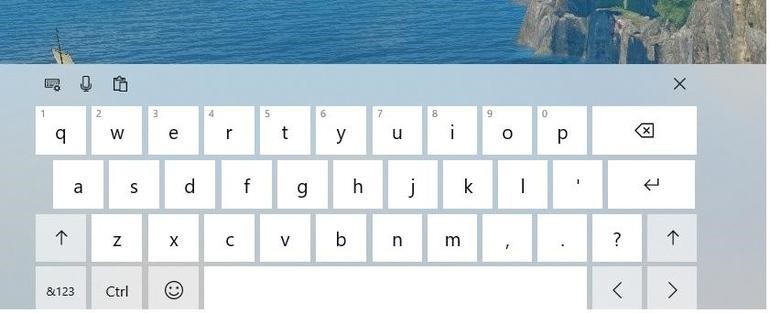
If you have a touch display, you may now tap the keys with your finger or use your mouse or touchpad for selecting the keys. To close the virtual keyboard, click the X in upper right hand corner. See following image:
The default touch keyboard
To change the default setting, you can tap or click one of the icons in upper left hand corner. There are three keyboard layouts to choose from, including a full QWERTY keyboard. See below image:
The QWERTY touch keyboard
You can opt to enable your microphone for the interface dictation or select one of the touchpad options. There is also an option to choose a different language for your virtual keyboard.
I Would Like to Hear From You
Please feel free to leave a comment. I would love hearing from you. Do you have a computer or smart device tech question? I will do my best to answer your inquiry. Please mention the device, app and version that you are using. To help us out, you can send screenshots of your data related to your question.
The author’s Vietnam eBook on the Battle for Tra Bong: Events and Aftermath
Several of the more powerful applications, tools and utilities available in Windows 10 are locked behind disabled settings and a labyrinth of configurations menus. We can reach some of these power tools through Developer Settings. Lets get started.
This is for Windows 10 devices
Copyright Scott Adams, Inc./Distributed by Universal Uclick for UFS
Access Developer Settings
Click the Start button
Select Settings (the gear icon)
Select Update & Security
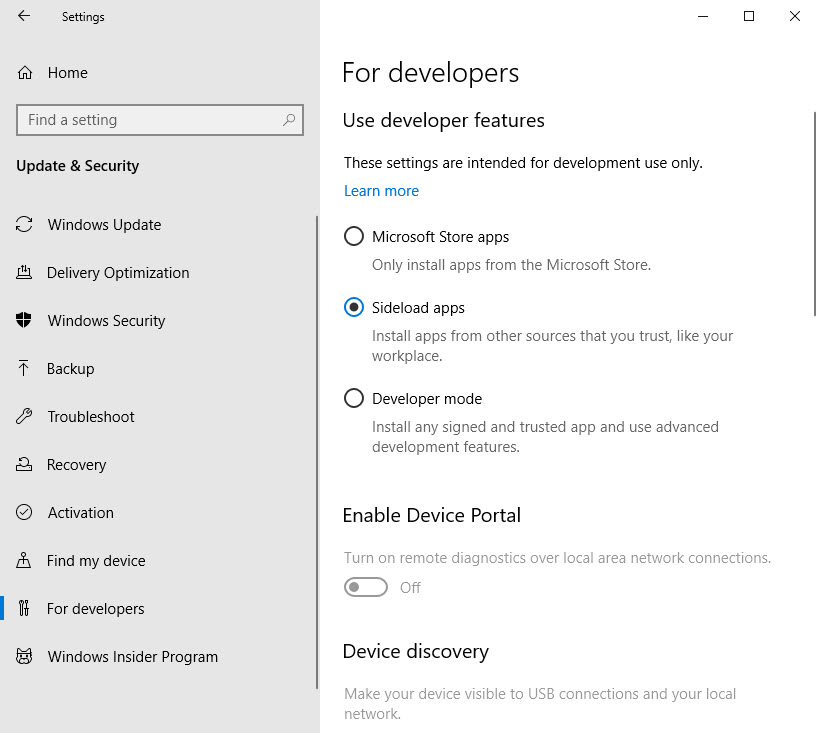
Select For Developers
My wifes computer always wants to only install apps from the Microsoft Store. To turn this off, select Sideload apps which allows third party apps to be installed
I suggest you leave Developer mod setting disabled
Device Portal and Device Discovery is to see, configure and manage your PC remotely over a network or USB connection. Unless you have a need for this, leave the features unchecked. See following image:
For Developers screen
To view or change the other features, scroll down the right pane(For Developers)
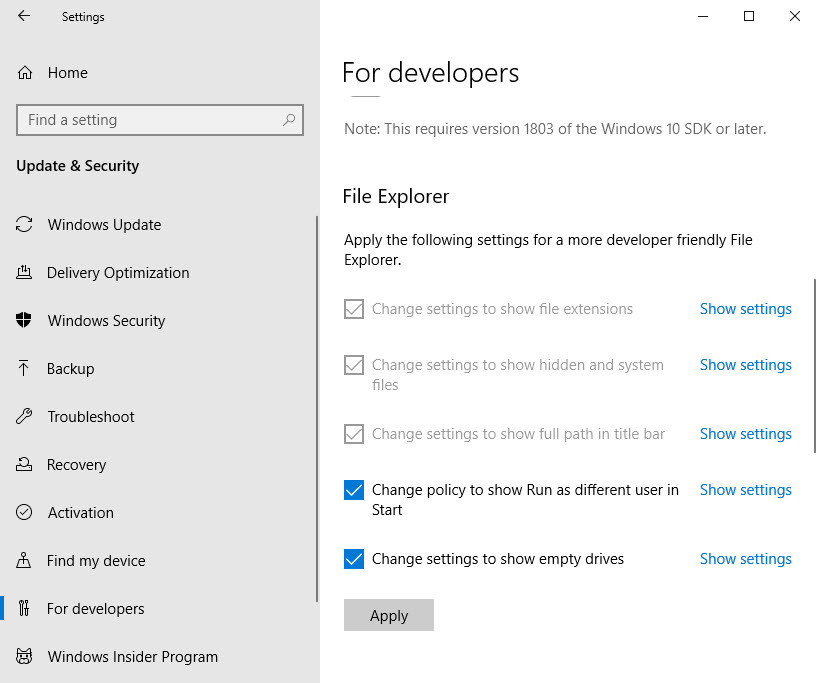
The File Explorer
Note! In the File Explorer, Remote Desktop and Powershell sections, click the Show Settings blue link to view or change the setting.If you change a setting, remember to click OK at the bottom of the dialog box to save your change.
These options will be familar to power users. The benefits of the settings are fairly self-explanatory. Refer to below image:
For Developers File Explorer screen
Click Apply to save any changes
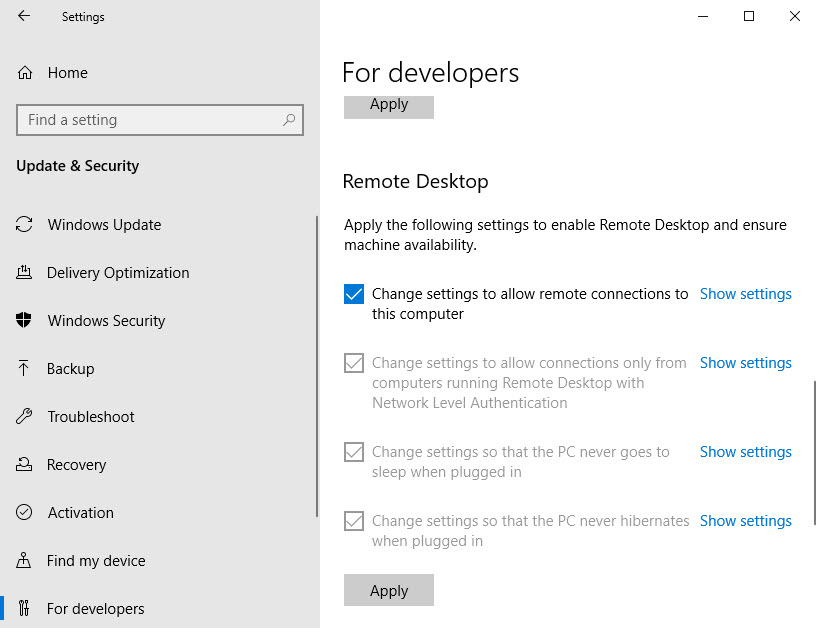
Remote Desktop Functions
Remote access to a workstation connected to a local enterprise network through a VPN is often required. To enable a secure remote connection, these settings must be enabled. See following image:
For Developers Remote Access screen
Click Apply to save any changes
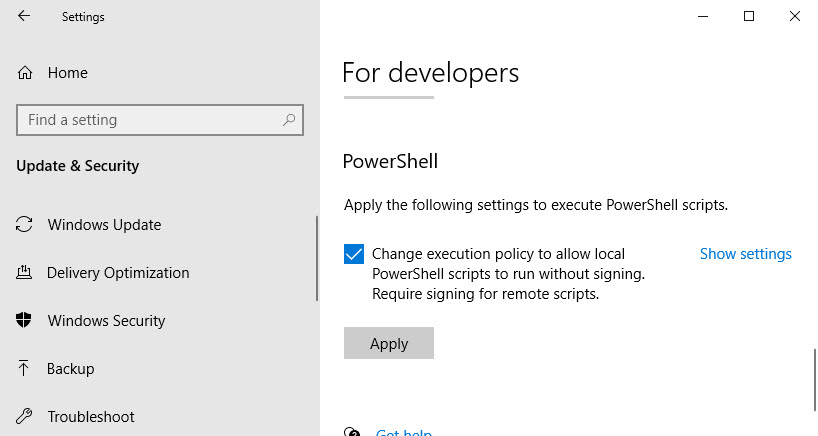
The Powershell
This allows developers to run special utility scripts that have no certificate associated with them. If you are not running Powershell scripts on a regular basis, its best to leave the setting disabled. Refer to following image:
For Developers Powershell screen
Click Apply to save any changes
While many of the configurationn settings located in the For Developers section can be managed from other configuration menus and screens, in Windows 10 they are conviently located in a central location. In previous versions of Windows, power users had to track down these settings. Now, they are in one place.
I Would Like to Hear from You
Please feel free to leave a comment. I would love hearing from you. Do you have a computer or smart device tech question? I will do my best to answer your inquiry. Please mention the device, app and version that you are using. To help me out, you can send screenshots of your data related to your question.
The author’s Vietnam eBook on the Battle for Tra Bong: Events and Aftermath
Word’s Caption feature allows you to insert captions after figures, tables or equations in your document. You can choose to have Word insert them automatically or do it yourself manually. Lets learn how to add and edit captions to set apart elements in your document.
You are not limited to figures, tables or equations; you can create a new label like Picture or Photo. If you are using Chapters in your document, you can add the Chapter number to your caption. Almost any object or inserted item in Word can be captioned.
This is for PCs, Macs and similar platforms that support Microsoft Word
Copyright Scott Adams, Inc./Distributed by Universal Uclick for UFS
Add a Caption
There are two ways to add a caption:
Select the figure/table/equation, right click and select Insert Caption. (Note! This method works only for figures and tables, not equations.)
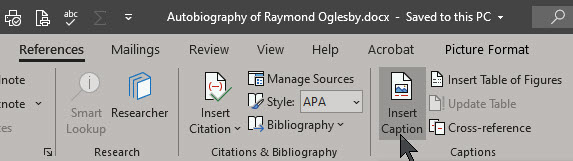
Select the figure/table/equation, go to the References tab on the ribbon and select Insert Caption. See below image:
If you don’t select the object and choose References > Insert Caption the caption will be inserted where the cursor is placed.
Your Caption Options
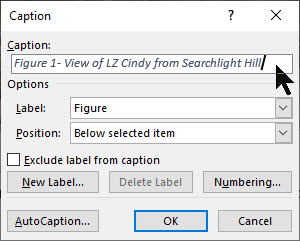
The Caption dialog box will now open, with a number of options for you to set. Refer to below image;
Below are the options to chose from:
Captions – type in the label you want
Label – or more correctly caption prefix. Choose table, equation or figure. This will automatically add that label to the caption.
New Label – If you want your captions to have a label other than the ones provided, you can add a new one from the New Label option. (For example, Word provides the options Equation, Figure and Table, but if you are including photos in your document, you may prefer to label them Picture or Photo.)
Exclude Label from Captions – check this box and no label/prefix will be included. The caption will just contain the number and the text that you enter.
Position – caption to appear above or below the object. Only works if the object is selected before Insert Caption. Otherwise this field will be disabled and the caption placed where you have set your cursor.
AutoCaption certain types of objects can be automatically captioned when they are included in a document.
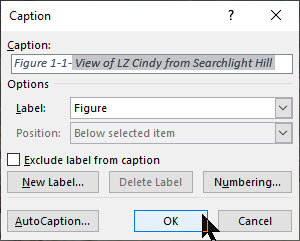
The caption will now appear in the specified location, with its number automatically allocated. See following image:
Figure 1- View of LZ Cindy from Searchlight Hill
Numbering Options for Your Captions
If you want to change the format of the numbering system on your captions, do this by clicking the Numbering button in the Caption dialog box. Refer to below image:
The Caption Numbering dialog box will open. See below image:
Format: Choose the numbering format you want to use:
Numerals (1, 2, 3, 4…)
Lowercase letters (a, b, c, d…)
Uppercase letters (A, B, C, D…)
Lowercase Roman numerals (i, ii, iii, iv…)
Uppercase Roman numerals (I, II, III, IV…)
And others depending on the installed language packs.
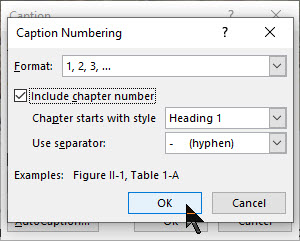
Include Chapter Number: If your document contains chapters, you can choose to have the numbering restart for each chapter and have the chapter number included in the caption numbering system.
First select the Caption in your Word document. Then you need to link the Style (e.g. Heading 1) with a multi-level list at Home > Paragraph > Multi-Level List > Define Multi-Level List > More. This adds automatic numbering to each style so the captions have a number to show. See following image;
Chapter Starts with Style: Select what level of heading you would like to signify a new chapter.
Use Separator: Choose the separator that you would like to use between the chapter number and the caption number (hyphen, period, colon or em-dash).
Change Your Caption Settings
Changing the caption settings isn’t obvious because right-clicking doesn’t show an option to open the Caption dialog.
The trick is to select the whole caption then References > Captions > Insert Caption. Refer to below image:
This opens the Caption dialog with the current settings.
Updating Your Caption Numbering
At the core of captions are field codes. Updating the caption numbering is the same as any other field code updates.
Select the whole document with Ctrl+A then update fields with F9 (or right-click to choose Update Field).
Change Your Caption Text
The text after the caption label can be edited in the document. Just click in the caption text and type as usual. See following image;
I Would Like to Hear From You
Please feel free to leave a comment. I would love hearing from you. Do you have a computer or smart device tech question? I will do my best to answer your inquiry. Please mention the device, app and version that you are using. To help us out, you can send screenshots of your data related to your question.
The author’s Vietnam eBook on the Battle for Tra Bong: Events and Aftermath
The Insert Key was needed in early versions of Windows. In our modern day of Windows, the key is no longer needed. Now, we just place our cursor where we want to insert text and start typing. If we use the Insert Key, our text is overwritten. This can be frustrating as we find ourselves clicking Undo and starting over.
Every key has a corresponding key scan code that tells Windows how to handle the keystroke. We can find this code and change it to a null character in the Windows Registry, which disables the key.
Instead of editing the Registry directly, we are going to use a free software utility to perform this task.
This is for desktop/laptop using Windows 10. SharpKeys will run on Vista through Windows 10.
Copyright Scott Adams, Inc./Distributed by Universal Uclick for UFS
Running Regbak Software
First, open and run the program. Next, click on the New Backup button to create a Registry backup. Refer to below image:
Selecting a new backup
A backup dialog box will appear. Here you can chose a Backup Folder. It is recommended you use the default. Next, give the backup a Description of your choice, then click Start. See below image:
Chosing the backup location and entering a description
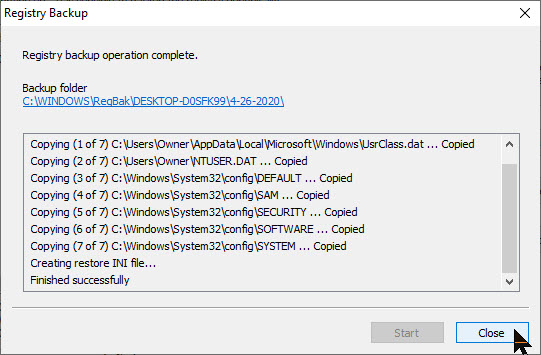
When the program has finished, you will receive a message at the top of the screen that the backup operation has completed. At the bottom of the dialog box, check for the mesage that the operation finished successfully. Now, click Close. See following image:
Completing the process
A final dialog box will appear showing your newly created Registry backup entry. Additionally, by highlighting an entry you can either Restore or Delete a Registry backup. Click Close to end the program. Refer to below image:
Exit the program
SharpKeys Overview
SharpKeys is free software for you to edit specific Registry entries. It uses a Graphical User Interface (GUI) to remap keys on your keyboard. This software makes it easy to edit the Registry without using the built-in Registry Editor. Using the Editor is time consuming and error prone.
Note! This program requires Administrative Privileges to run. Please open the program as an Administrator by right-clicking on the program under Start, and click on More > Run as Administrator.
Once the program is running, click the Add button. See below image:
Opening the program
Scroll through the list on the left and click on Special: Insert (E0_52). Next, click on Turn Key Off (00_00) from the list on the right. To remap the Insert Key, click OK. Refer to below image:
Selecting the Insert Key to be remapped
The value in parentheses is the key scan code associated with it. We are replacing the Insert Key code of E0_52 to a non-existence code of 00_00, which will disable the key.
Next, click the Write to Registry button. The software will add the new code for the Insert Key to the Registry for you. See following image:
Write the null key scan code to the Registry
To complete the process, click OK. Refer to below image:
Restart message
To exit the program, click Close. See below image:
Exit the program
For the changes to take effect, you will need to log out or restart your computer.
You can use SharpKeys to remap a host of other keyboard characters.
Undoing Your Change
If you have made no other changes, you can use Wise Registry Cleaner or Regbak to restore the Registry depending on which software you used to create a Registry backup. If you have made other changes and wish to restore the Insert Key function, those changes will be lost.
Another method is using the Registry Editor to reenable the Insert Key function. This method is very technical, frustrating and error prone; so I don’t recommend doing this.
I Would Like to Hear From You
Please feel free to leave a comment. I would love hearing from you. Do you have a computer or smart device tech question? I will do my best to answer your inquiry. Please mention the device, app and version that you are using. To help us out, you can send screenshots of your data related to your question.
The author’s Vietnam eBook on the Battle for Tra Bong: Events and Aftermath
Whenever you log-in to Windows 10, your name appears above the password entry. What if you want to change your name? This post addresses this issue.
Whether you use a local account or a Microsoft Account, it’s relative easy to change your display name.
This is for Windows 10 devices
Copyright Scott Adams, Inc./Distributed by Universal Uclick for UFS
Changing Your Display Name for a Microsoft Account
To change you name for a Microsoft Account, you need to open your account preferences on the Microsoft website.
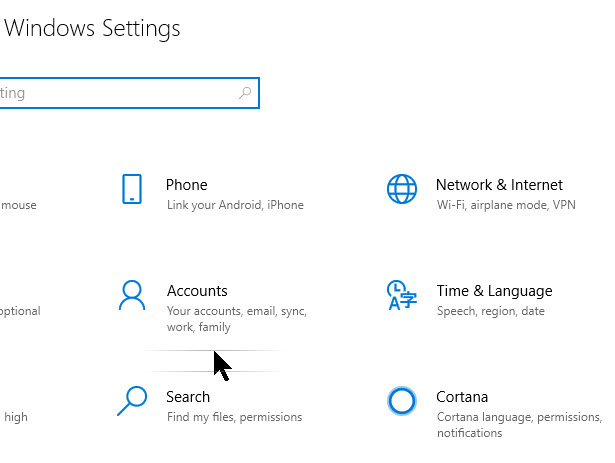
Opens the Settings app by pressing the Windows key+I or type in Settings in the Cortana search field, then click the Settings app at top of the screen. Then click on the Accounts option. Refer to below image:
Selecting your Accounts option
Below your name and photo, click on Manage my Microsoft account. See following image:
Selecting Manange my Microsoft account
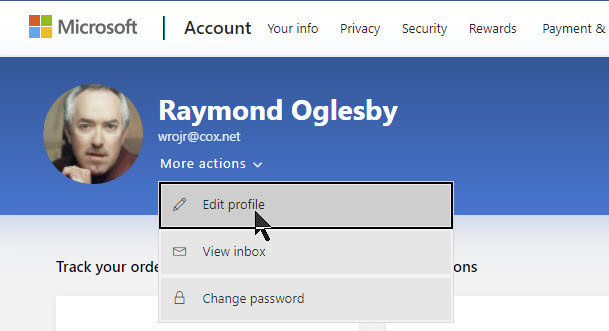
Signin to your Microsoft Account if not already signed. This will open your account preferences in your browser. After your browser opens, click the More Actions drop-down box, then click on Edit Profile from the options list. See below image:
Selecting Edit Profile
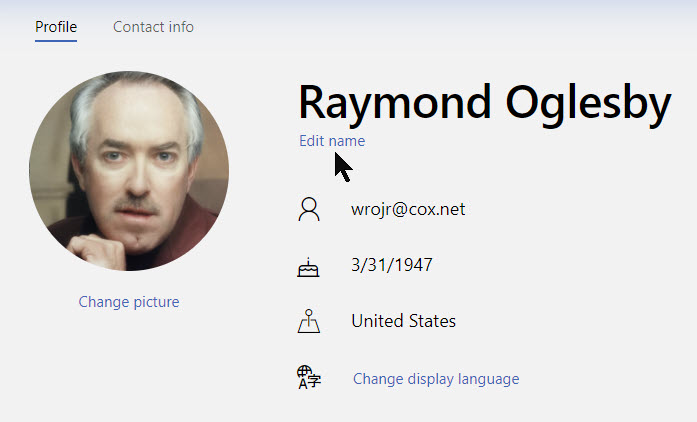
Below your name, click Edit Name. Refer to below image:
Selecting Edit your name
Enter your first and last name, solve the CAPTCHA challenge, then click Save to update your name. See following image:
Changing your firsr and/or last name and entering the CAPTCHA letters
When your Profile page reloads, it will update with the name change.
Note! When you change your Microsoft Account name, it changes on all devices that you use to log-in with this account.
For your new name to show on your Windows 10 log-in screen, you will have to log out of Windows 10. Be sure to save any unsaved work or applications before signing out.
Changing Your Display Name for a Local Account
A local account is a basic approach in using Windows 10. Local accounts don’t have the added features like syncing files, settings, browser history, etc. across multiple devices.
If you want to change your local account name, fire up the Control Panel. In the Cortana search box, type in Control Panel then click on the Control Panel app at the top of the screen.
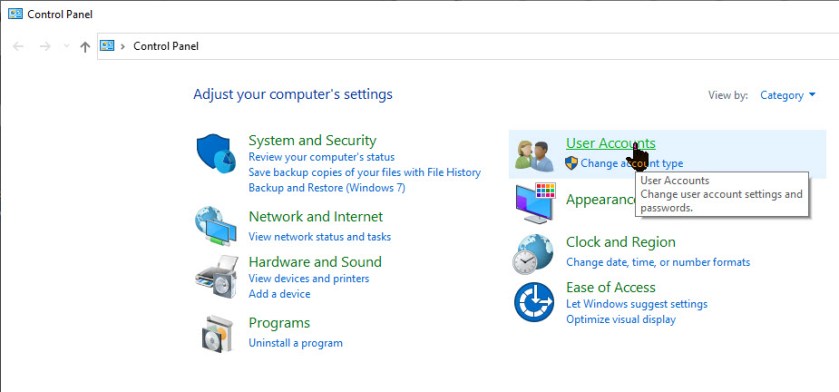
Next click on the User Accounts option. Refer to below image:
Selecting User Accounts from the Control Panel
Now click on User Accounts one more time. See below image:
Selecting User Accounts again
Now, select Change your account name option to change your log-in name. See following image:
Selection for changing your account name
Note:If an organization manages your device or you don’t have administrator privileges, you won’t be able to change your name.
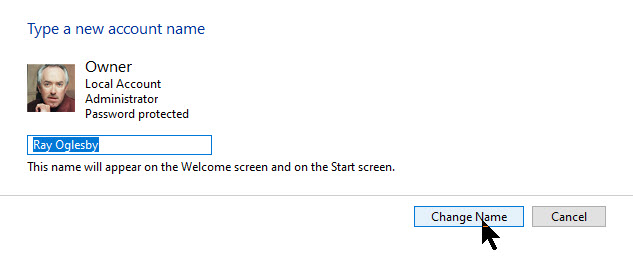
Enter the new log-in name into the text field, then click the Change Name button to save your changes. Refer to below image:
Changing your log-in name
You are done and may now close the Control Panel window. For your new name to show on your Windows 10 log-in screen, you will have to log out of Windows 10. Be sure to save any unsaved work or applications before signing out.
I Would Like to Hear From You
Please feel free to leave a comment. I would love hearing from you. Do you have a computer or smart device tech question? I will do my best to answer your inquiry. Please mention the device, app and version that you are using. To help me out, you can send screenshots of your data related to your question.
The author’s Vietnam eBook on the Battle for Tra Bong: Events and Aftermath
Creating and using custom AutoText entries for frequently used phrases is a great way to speed up your content creation in Microsoft Word. By default, Word has very few entries so you may want to add your own. The good news is you can set up these time-savers in just a few clicks!
The software does come with lots of AutoText Document fields, like Author, Company Info, Status and other built-in entries such as Headers, Footers, Tables, Watermarks, etc., that you can choose for your document. You can use these entries in addition to your own AutoText entries for your documents.
Note! Your AutoText entries maintain its formatting when inserted into a document.
This is for PCs, Macs and other platforms that support Word
Copyright Scott Adams, Inc./Distributed by Universal Uclick for UFS
Creating an AutoText Entry
To begin, highlight the text in your Word document that you’d like to use to create your new AutoText entry. Refer to below image:
Selecting the text for your AutoText entry
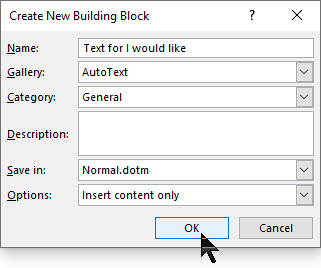
Press Alt+F3 to open the Create New Building Block window. Then, type in a name (within the 32-character limit) for your AutoText entry. Next, click OK. See following image:
Saving your AutoText entry
Your AutoText entry will be saved. Now that was easy.
Using an AutoText Entry
To use your AutoText entry, place your cursor where you want to insert the text in your Word document. Navigate to the Insert tab and click the Explore Quick Parts icon in the Text group. See below image:
Accessing your AutoText
A drop-down menu will be displayed. Hover your pointer over AutoText. Refer to below image:
Selecting the AutoText feature
A list of AutoText entries will appear. Select the one you want to use. See below image:
Inserting your custom AutoText entry
The entry you selected will be inserted into your document.
Deleting an AutoText Entry
If your AutoText list is getting crowded, or you made a mistake when you created a custom entry, you can delete them.
To do so, go back to the Insert tab and select the Text group. Then click the Explore Quick Parts icon, and then hover your pointer over AutoText.
From here, right-click the AutoText entry you want to delete. In the context pop-up menu that appears, click the option Organize and Delete. Refer to following image:
Accessing the Delete option
The Building Blocks Organizer window will be displayed with your AutoText entry highlighted. At the bottom of this dialog box, click on Delete. See below image:
The delete button at the end of the AutoText entries
A message box will appear asking you to confirm the deletion of your entry. To delete this entry, click Yes. Refer to below image:
Confirming your custom AutoText deletion
Now your entry will be deleted. You have successfully adding, inserted and deleted an AutoText entry. That’s it.
I Would Like to Hear from You
Please feel free to leave a comment. I would love hearing from you. Do you have a computer or smart device tech question? I will do my best to answer your inquiry. Please mention the device, app and version that you are using. To help us out, you can send screenshots of your data related to your question.
The author’s Vietnam eBook on the Battle for Tra Bong: Events and Aftermath
Your hard drive has been acting strange. It’s making clicking or screeching sounds, it’s unable to find files, crashes on boot, slow transfer speed or seems to be moving slowly. Your hard drive is dying.
Since it is a mechanical device it has moving parts unlike a Solid State Device (SSD) which has none. But even a SSD will eventually fail.
Even if your hard drive is healthy, over time, it will die. You should keep an eye on it’s health once in a while for your peace of mind. Let’s see how to do this.
This is for Windows 10 devices and Macs
Copyright Scott Adams, Inc./Distributed by Universal Uclick for UFS
To Tweet about this post, click the Tweet icon below to launch Twitter, then click its Tweet icon to post.
Check out TechSavvy.Life for their blog posts on smartphone apps, PCs. and Macs!
Most modern drives have a feature called S.M.A.R. T. (Self-Monitoring, Analysis and Reporting Technology) that monitors different drive attributes in an attempt to detect a failing disk. That way, your computer will automatically notify you before data loss occurs and the drive can be replaced while it still remains functional.
Check in Windows
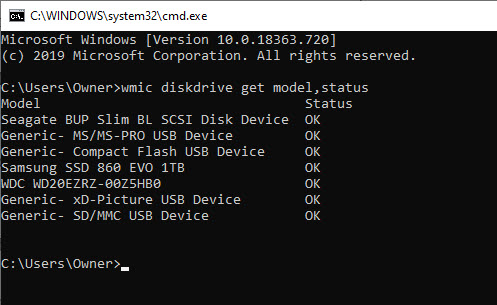
In Windows 10, you can manually check the S.M.A.R.T. status of your drives from the Command Prompt. Just right-click the Start button, select Run, and type “cmd“, then click OK or type “cmd” into the Cortana search bar, then click OK. In the Command Prompt pop-up box, type:
wmic diskdrive get model,status
It will return “Pred Fail” if your drive’s death is imminent; “Bad”, “Unknown” or “Caution” if its time to take care of a drive or “OK” if it thinks a drive is doing fine. Refer to below image:
Checking your hard drives health
Check on a Mac
On a Mac, you can check S.M.A.R.T. status by opening the Disk Utility program, clicking on the drive and looking at “S.M.A.R.T. Status” in the bottom left, which will either read “Verified” or “Failing”.
SMART Status can be Misleading
However, this basic S.M.A.R.T. information can be misleading. You only know when your drive is near death, but you can start to experience problems even if the basic S.M.A.R.T. status is okay.
You can also use Defraggler program I discussed in a previous post. When you use the Analyze feature of the program, it will show your disk health. Click here for the post on using Defraggler.
Manufacture Check
If you want an even deeper, more accurate picture into your drive’s health, check its manufacturer’s website for a dedicated tool; for example, Seagate has SeaTools for its drives, Western Digital has Data Lifeguard Diagnostic for its drives and Samsung has Samsung Magician for its SSDs. These tools can sometimes take into account certain technologies specific to their hard drives and SSDs.
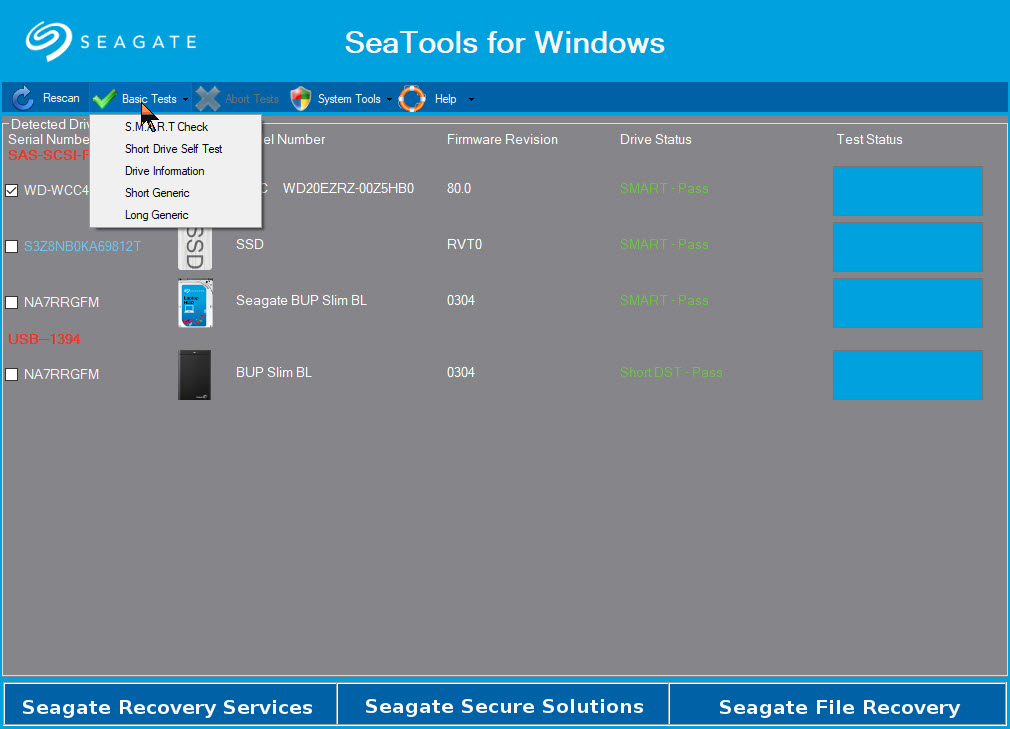
Note! You may find that the SeaTools (Seagate) utility is the only software you will need. In the below image, it can diagnose Samsung, Western Digital as well as Seagate using several methods:
SeaTools for Windows options
Is Your Drive Almost Dead
Drives with the “Pred Fail” status won’t necessarily fail tomorrow. They could chug along for a year or be dead as a doornail in a few days if not hours.
If you’re getting warnings, it’s time to back up your files before your drive fails. Failure to act may cost you serious money to recover your data.
Now is not the time for a full backup, however: you don’t want to stress the drive with too many reads or it could fail while you’re backing up. Instead, plug in an external drive and copy your most important files onto it; family photos, work documents and anything else that can’t easily be replaced. Then, once you know those are safe, you can try doing a full drive clone with something like EaseUS Todo Backup Free.
I got a S.M.A.R.T. status of “Pred Fail” on my main hard drive. I quickly backed up my important files to an external drive. I never finished before it died. I tried the trick off turning my desktop on its side, then upside down. I got a little more life from the hard drive. Then I removed the hard drive and gently shook the device. I could hear the spindle sliding; then I knew if was totally dead. But it’s worth trying this trick.
Is Your Drive Dead
If your hard drive has already stopped working, things get a lot tougher and you’ll probably need a professional data recovery service which can cost $1,000 or more. But if you have pricelrss data on the drive, it may be worth it to you.
Prepare for Hard Drive Failure
It’s not a matter of “if” your hard drive will fail; it’s a matter of “when”. All hard drives fail eventually and if you want to avoid losing all your important files, you absolutely have to back up your computer regularly; including when the drive is healthy.
Take some time to set up an automatic, cloud based backup like Google Backup and Sync using Google Drive. It is one of the best things you can do to protect yourself from heartache later on. Or at least back up to an external drive using Windows 10 built-in File History Tool.
If your drive failed catastrophically with no warning, you can get back up and running in no time by having an up-to-date backup.
That’s it. Please feel free to share this post! One way to share is via Twitter, as mentioned below.
I hope you have found this post helpful. If so, click the Tweet icon below. This will launch Twitter where you click its icon to post the Tweet.
I have found TechSavvy.Life blog posts extremely helpful. Check them out for posts on smart phone apps, Macs and PCs!
Please feel free to leave a comment. I would love hearing from you. Do you have a computer or smart device tech question? I will do my best to answer your inquiry. Please mention the device, app and version that you are using. To help me out, you can send screenshots of your data related to your question.
The author’s Vietnam eBook on the Battle for Tra Bong: Events and Aftermath
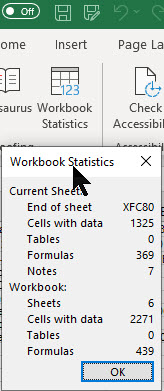
Microsoft Excel is getting a quick summary view of workbook statistics. This simple dialog box includes the boundaries of the sheets, tables, links, formulas and notes.
In a couple of clicks you can now view the workbook statistics.
This is for Excel in Office 365 on PCs and Macs
Copyright Scott Adams, Inc./Distributed by Universal Uclick for UFS
First, open an existing Excel workbook. Navigate to the Review tab and click on it. In the menu bar, head to the Proofing group. You will see the icon Workbook Statistics, just click on it to view. Refer to below image:
There are details for current sheet and the entire workbook. It is similar to Microsoft Word’s Word Count feature.
I Would Like to Hear From You
Please feel free to leave a comment. I would love hearing from you. Do you have a computer or smart device tech question? I will do my best to answer your inquiry. Please mention the device, app and version that you are using. To help us out, you can send screenshots of your data related to your question.
The author’s Vietnam eBook on the Battle for Tra Bong: Events and Aftermath