Microsoft Word will auto adjust table column widths to fit the content you are entering. This is the default setting for a Word table. There are times you may not want this, instead, you want to control the column widths.
The default setting may push the table beyond the right margin or a column widens unnecessarily.
So, let’s see how to turn off AutoFit option and do table adjustments yourself.
This is for Office 365 Microsoft Word on PCs, Macs and similar platforms. Other versions of Word will be similar.
Copyright Scott Adams, Inc./Distributed by Universal Uclick for UFS
Turn Off AutoFit Feature
To turn off this feature, first, place your cursor anywhere in the table you want to change.
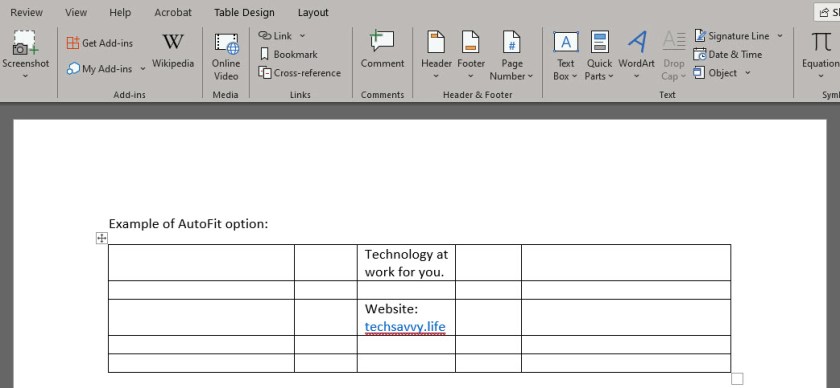
Next, go to the Layout tab located in right hand side, not to be confused with the other Layout tab to the left side of the screen. Note! This option only appears when you are in a table. Refer to below image:
Now, click AutoFit and select the Fixed Column Width option. See below image:
You can now drag the column borders to your desired width. The column borders you set will stay that way even if you enter longer text into them. See following image:
Now, you can control Word’s table column widths. That’s it.
I Would Like to Hear From You
Please feel free to leave a comment. I would love hearing from you. Do you have a computer or smart device tech question? I will do my best to answer your inquiry. Please mention the device, app and version that you are using. To help us out, you can send screenshots of your data related to your question.
The author’s Vietnam eBook on the Battle for Tra Bong: Events and Aftermath
Word’s Caption feature allows you to insert captions after figures, tables or equations in your document. You can choose to have Word insert them automatically or do it yourself manually. Lets learn how to add and edit captions to set apart elements in your document.
You are not limited to figures, tables or equations; you can create a new label like Picture or Photo. If you are using Chapters in your document, you can add the Chapter number to your caption. Almost any object or inserted item in Word can be captioned.
This is for PCs, Macs and similar platforms that support Microsoft Word
Copyright Scott Adams, Inc./Distributed by Universal Uclick for UFS
Add a Caption
There are two ways to add a caption:
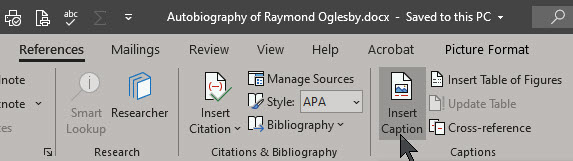
Select the figure/table/equation, right click and select Insert Caption. (Note! This method works only for figures and tables, not equations.)
Select the figure/table/equation, go to the References tab on the ribbon and select Insert Caption. See below image:
If you don’t select the object and choose References > Insert Caption the caption will be inserted where the cursor is placed.
Your Caption Options
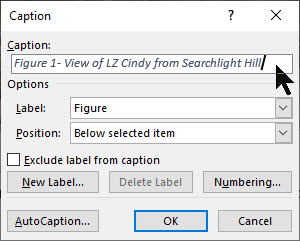
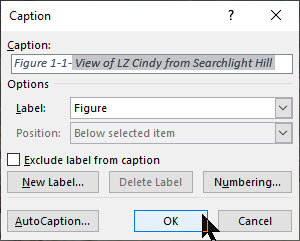
The Caption dialog box will now open, with a number of options for you to set. Refer to below image;
Below are the options to chose from:
Captions – type in the label you want
Label – or more correctly caption prefix. Choose table, equation or figure. This will automatically add that label to the caption.
New Label – If you want your captions to have a label other than the ones provided, you can add a new one from the New Label option. (For example, Word provides the options Equation, Figure and Table, but if you are including photos in your document, you may prefer to label them Picture or Photo.)
Exclude Label from Captions – check this box and no label/prefix will be included. The caption will just contain the number and the text that you enter.
Position – caption to appear above or below the object. Only works if the object is selected before Insert Caption. Otherwise this field will be disabled and the caption placed where you have set your cursor.
AutoCaption certain types of objects can be automatically captioned when they are included in a document.
The caption will now appear in the specified location, with its number automatically allocated. See following image:
Figure 1- View of LZ Cindy from Searchlight Hill
Numbering Options for Your Captions
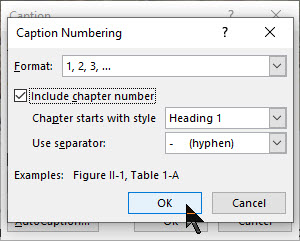
If you want to change the format of the numbering system on your captions, do this by clicking the Numbering button in the Caption dialog box. Refer to below image:
The Caption Numbering dialog box will open. See below image:
Format: Choose the numbering format you want to use:
Numerals (1, 2, 3, 4…)
Lowercase letters (a, b, c, d…)
Uppercase letters (A, B, C, D…)
Lowercase Roman numerals (i, ii, iii, iv…)
Uppercase Roman numerals (I, II, III, IV…)
And others depending on the installed language packs.
Include Chapter Number: If your document contains chapters, you can choose to have the numbering restart for each chapter and have the chapter number included in the caption numbering system.
First select the Caption in your Word document. Then you need to link the Style (e.g. Heading 1) with a multi-level list at Home > Paragraph > Multi-Level List > Define Multi-Level List > More. This adds automatic numbering to each style so the captions have a number to show. See following image;
Chapter Starts with Style: Select what level of heading you would like to signify a new chapter.
Use Separator: Choose the separator that you would like to use between the chapter number and the caption number (hyphen, period, colon or em-dash).
Change Your Caption Settings
Changing the caption settings isn’t obvious because right-clicking doesn’t show an option to open the Caption dialog.
The trick is to select the whole caption then References > Captions > Insert Caption. Refer to below image:
This opens the Caption dialog with the current settings.
Updating Your Caption Numbering
At the core of captions are field codes. Updating the caption numbering is the same as any other field code updates.
Select the whole document with Ctrl+A then update fields with F9 (or right-click to choose Update Field).
Change Your Caption Text
The text after the caption label can be edited in the document. Just click in the caption text and type as usual. See following image;
I Would Like to Hear From You
Please feel free to leave a comment. I would love hearing from you. Do you have a computer or smart device tech question? I will do my best to answer your inquiry. Please mention the device, app and version that you are using. To help us out, you can send screenshots of your data related to your question.
The author’s Vietnam eBook on the Battle for Tra Bong: Events and Aftermath
Creating and using custom AutoText entries for frequently used phrases is a great way to speed up your content creation in Microsoft Word. By default, Word has very few entries so you may want to add your own. The good news is you can set up these time-savers in just a few clicks!
The software does come with lots of AutoText Document fields, like Author, Company Info, Status and other built-in entries such as Headers, Footers, Tables, Watermarks, etc., that you can choose for your document. You can use these entries in addition to your own AutoText entries for your documents.
Note! Your AutoText entries maintain its formatting when inserted into a document.
This is for PCs, Macs and other platforms that support Word
Copyright Scott Adams, Inc./Distributed by Universal Uclick for UFS
Creating an AutoText Entry
To begin, highlight the text in your Word document that you’d like to use to create your new AutoText entry. Refer to below image:
Selecting the text for your AutoText entry
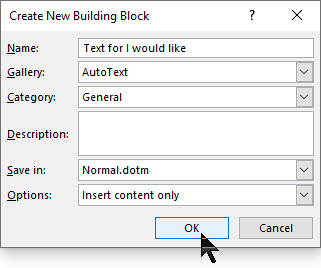
Press Alt+F3 to open the Create New Building Block window. Then, type in a name (within the 32-character limit) for your AutoText entry. Next, click OK. See following image:
Saving your AutoText entry
Your AutoText entry will be saved. Now that was easy.
Using an AutoText Entry
To use your AutoText entry, place your cursor where you want to insert the text in your Word document. Navigate to the Insert tab and click the Explore Quick Parts icon in the Text group. See below image:
Accessing your AutoText
A drop-down menu will be displayed. Hover your pointer over AutoText. Refer to below image:
Selecting the AutoText feature
A list of AutoText entries will appear. Select the one you want to use. See below image:
Inserting your custom AutoText entry
The entry you selected will be inserted into your document.
Deleting an AutoText Entry
If your AutoText list is getting crowded, or you made a mistake when you created a custom entry, you can delete them.
To do so, go back to the Insert tab and select the Text group. Then click the Explore Quick Parts icon, and then hover your pointer over AutoText.
From here, right-click the AutoText entry you want to delete. In the context pop-up menu that appears, click the option Organize and Delete. Refer to following image:
Accessing the Delete option
The Building Blocks Organizer window will be displayed with your AutoText entry highlighted. At the bottom of this dialog box, click on Delete. See below image:
The delete button at the end of the AutoText entries
A message box will appear asking you to confirm the deletion of your entry. To delete this entry, click Yes. Refer to below image:
Confirming your custom AutoText deletion
Now your entry will be deleted. You have successfully adding, inserted and deleted an AutoText entry. That’s it.
I Would Like to Hear from You
Please feel free to leave a comment. I would love hearing from you. Do you have a computer or smart device tech question? I will do my best to answer your inquiry. Please mention the device, app and version that you are using. To help us out, you can send screenshots of your data related to your question.
The author’s Vietnam eBook on the Battle for Tra Bong: Events and Aftermath
Over the past few months, I have researched on how to do this, create a footer that I can use repeatly without doing a manual insert of footer elements. I finally found an article on how to partly do this. In my example, we are going in inset a document footer with the latest date on the left, the document name in the middle and the page number on the right. Yes, it will take a little time but it’s worth the one-time investment. You will save time and effort in using this feature.
If you’ve got a favorite document footer like mine, you can save that using the Quick Parts feature of Microsoft Word. What a lot of users don’t know is that Quick Parts can be saved under different categories to be accessible under different menus.
Let’s use my favorite footer as an example. I’ve constructed one in a blank document using a three column table: the left column has the current Date, the middle column contains the File Name and the right column shows “Page X of Y“. Also, I’ve turned off the borders in the table; those lines you see are simply the grid lines that display in Word.
This is for Word for Office 365 PCs and Macs that support Quick Parts. Other versions of Word will be similar.
Copyright Scott Adams, Inc./Distributed by Universal Uclick for UFS
Lets get started.
Navigate to the the Insert tab, then to the Header option. Head to the bottom of the options and select Edit Footer. Your footer will be activated with the pointer in the left hand column.
Once again, go to the Insert tab, then select the Table option. Highlight the first 3 columns with your pointer. You will see 3 x 1 table description at top of your screen. Now, just click on the third grid element in the first row and the table will be inserted into your footer. See following image:
Selecting the table to be inserted for the custom footer
Inserting Current Date
In the first column of the footer table, type in the text Date: (there is one space after the text) then navigate to the Insert tab and click on the Date & Time option in the Text group. Select your date format and click OK. See below image:
Selecting the current Date format to be inserted into your custom footer
Inserting File Name
Now, hit the Tab key once, or move your pointer to the middle column. Again, go to the the Insert tab, then to the Footer option. Navigate to the bottom of the options and select Edit Footer. In the Insert group, select Document Info, then select File Name.
UPDATE: If you do not see Document Info, in the Search box type in “Add document info” and follow its steps.
Refet to below image:
Selecting the File Name to be inserted
Note! For demo purposes, I named this example document as &Filename. See below image:
Showing the inserteed Date and File Name for your custom footer
Inserting Page Number
Now, tab once more or position your pointer in the right column. Once again, from the Insert tab, select Page Number from the Header & Footer group. Next, hoover your pointer over Current Position and select Bold Numbers under the Page X of Y group. Refer to below image:
Inserting the Page Number as bold text for Page X of Y into your custom footer
Your footer elements will look similar to the following image:
Showing all elements for your custom footer
Formatting the Custom Footer
Now, you may want to align your footer elements. In my example, I am aligning the File Name to be centered. For the Page Number, I am choosing right justified. The Date is already left justified. At this point, you can change the font and/or font size and other formatting options. You may want to change font size for File Name to allow for long document names. Refer to below image:
Aligning the footer elements for your custom footer
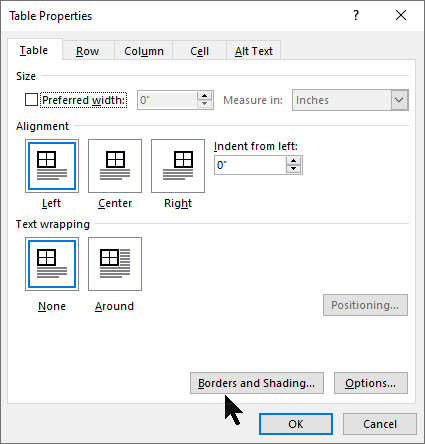
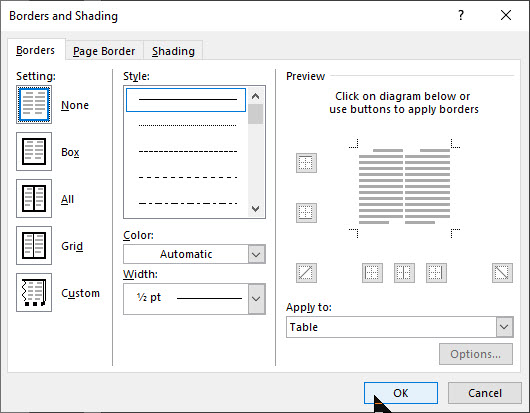
Next, lets remove the borders for our footer table. Right click on the “+” sign located to the left of the table, then select Table Properties. See below image:
Accessing the Table Properties for your custom footer
Now, select Borders and Shadings option. Under the Borders tab, select the None option, then click OK, then click OK again to remove the borders. Refer to below image:
Removing the borders for your custom footer
Your final footer result will be similar to the following image:
The final result of your custom footer
If you make a mistake, start from the miscue or start from stratch. As you can see, there are a lot of manual steps. So, instead of repeating all of the above just to insert a footer, we can easily access our favorite footer by using the Quick Parts feature.
Setting Up the Quick Part Feature
Highlight the footer with your pointer or click on the “+“sign located to the left of the table. Next, navigate back to the Insert tab. Select the Quick Parts option in the Text group. Then choose Save Selection to Quick Park Gallery. See below image:
Saving your custom footer to Quick Parts
Give the Footer a unique name, mine is My Best Footer. In the Gallery drop-down box, select Footers. In the Category drop-down box, select General. Now, give the footer a Description. When you are finished, click OK. Refer to below image:
Setting up the custom footer building block
Now your favorite footer will be an available selection whenever you click Footer on the Insert tab. Refer to following image:
Displaying your custom footer entry
Using Your Custom Footer
To try out your custom footer, open a blank document. Navigate to the Insert tab (click one), select the Footer option (click two). Locate your recent entry and click on it (click three). Your footer selection will be inserted. And you only used three clicks! See below image:
Inserting your custom footer into a document
There are a whole bunch of other Quick Parts Galleries available for you to save your favorite snippets in. For example, you could have a Quick Parts that inserts your “ Initials _____” on the last page of a draft. Another Quick Parts would be creating and inserting your favorite Watermark.
Edit Your Custom Footer Properties
Navigate to the Insert tab. Select the Quick Parts option in the Text group. Then choose the Building Blocks Organizer option. Next, locate and click on your custom footer entry. Then, click on the Edit Prolerties tab. Here you can change the custom Name, the Gallery, the Category, etc. Its best to leave the Gallery set to Footers and Category set to General.
UPDATE: To make your custom footer float to the top, select enter a new Category, and label it Alpha instead of selecting General.
Once you are finished, click OK. Refer to below image:
Editing your custom footer properties
Delete Your Custom Footer
Navigate back to the Insert tab. Select the Quick Parts option in the Text group. Then choose Building Blocks Organizer option. Next, locate and click on your custom footer entry. Then, click on the Delete tab. To complete the deletion process, click OK. See following image:
Deleting your custom footer
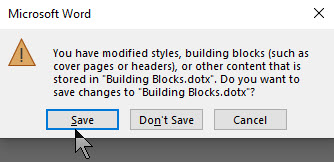
When you Exit Microsoft Word, you will see the following screen. Make sure you click Save to save your custom footer in the Building Blocks.dotx file, where your custom footer is stored. This is easy to overlook. If you don’t Save, you will lose your custom footer or any other snippet you created during your Word session.
Your final dialog box upon exiting Word. You must click Save to save your work.
You have successfully created, inserted, edited and deleted a custom footer.
I Would Like to Hear From You
Please feel free to leave a comment. I would love hearing from you. Do you have a computer or smart device tech question? I will do my best to answer your inquiry. Please mention the device, app and version that you are using. To help us out, you can send screenshots of your data related to your question.
The author’s Vietnam eBook on the Battle for Tra Bong: Events and Aftermath
I get frustrated when Microsoft Word does not remember my last zoom setting for a document. At times it seems to just forget. It will bring up four pages when I only want to work on one page. To help us out, let’s explore a few options of the Zoom feature.
The Zoom bar is located on the right side of the status bar at the bottom for a Word document. To use the Zoom bar, click and drag the slider to the right or left to zoom out or in. As you do so, the page percentage decreases or increases. Also, you can click the “+” or “-” sign to zoom out or in by 10% increments.
This is for Word for Office 365 Windows and Mac versions. Other versions of Word will be similar.
The Zoom Dialog
If you want more control, the Zoom Dialog Box offers a few more options. To access this, select View>Zoom. You will see the following screen:
Word Zoom options
You can choose a predefined option, like “75%”, as noted on the left hand side of the dialog box. Alternatively, you can choose the up and down arrows in the Percent button to increase or decrease the percentage in 1% increments. These percentages will differ depending on your device’s screen size of your Word windows (full screen, half screen, etc). When you are finished, click OK.
Some Shortcuts
If your are using a touchscreen or touchpad, you can take advantage of the pinch to zoom feature. This feature allows you to zoom out or in by placing two fingers on the screen. To Zoom out, you pinch your fingers together, to Zoom in, you separate your fingers.
If you are using a mouse, you can hold the Ctrl button and scroll the wheel up or down to Zoom in and out. Some mouses have separate flywheel buttons for zooming in or out.
I Would Like to Hear from You
Please feel free to leave a comment. I would love hearing from you. Do you have a computer or smart device tech question? I will do my best to answer your inquiry. Please mention the device, app and version that you are using. To help us out, you can send screenshots of your data related to your question.
The author’s Vietnam eBook on the Battle for Tra Bong: Events and Aftermath
Just how big can a Microsoft Word document be? The short answer, it depends. The amount of text, photos, images and videos content determines the document size. Also, your computer system resources plays a part.
The maximum file size of an “all text” document in Microsoft Word 2007 or later is 32 MB. If you add photos, images or videos, the maximum file size jumps to 512 MB or a half of a gigabyte. Although Word can handle a very large file, it becomes more unmanageable as you approach the 512 MB limit.
Older file formats use the “.doc” file extension while the newer versions, Word 2007 and above, use the “.docx” extension.
This is for Word for Office 365 Windows and Mac versions. Other versions of Word will be similar.
If you are working with the old format, “.doc” extension, you can covert the file to the newer format as follows:
Open Microsoft Word
Locate the file with a “.doc” extension
Click on File>Save As
From the drop down box, select Word Document (*.docx)
Click Save
Check Your Word Document File Size
There are several ways to check the size of your document. One way is as follows:
Open File Explorer
Locate the folder where the document resides
Click on View>Details
You will see the Size column denoting the file size
A second way is very similar.
Open File Explorer
Locate the file
Right click on the file name
Click on Properties
OR
Open File Explorer
Locate the file
Click Home on the main menu
Click Properties
Click Properties from the sub menu
A third way is from the Word document itself as follows:
Either using Word to locate and open the document or using File Explorer to locate the file; then double click to open
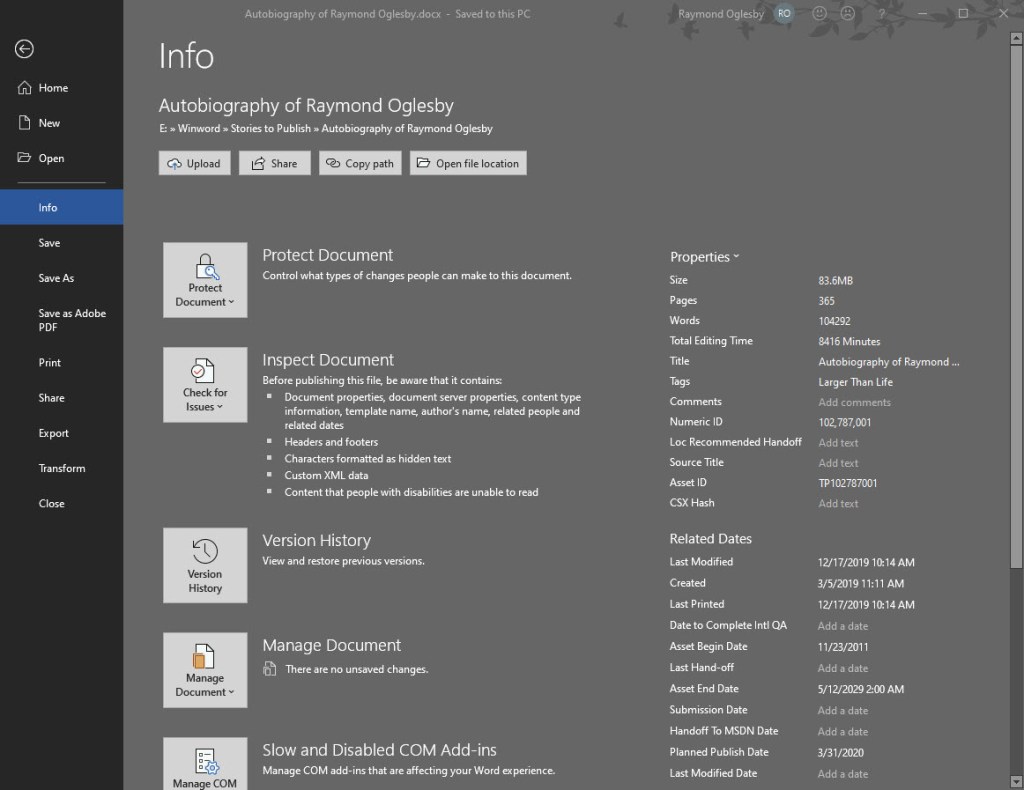
From the main menu, click on File>Info
Under Properties is the Size of the document
Your screen should look like the below image:
File Info screenshot
File Info Properties
Document properties, also known as metadata, are details about a file that describe or identify it. They include details such as title, author name, subject and keywords that identify the document’s topic or contents. You can use these keywords for searching Word documents. For example, in Word, you can use the Keywords property (also called Tags) to add the keyword “customers” to your sales documents. You can then search for all sales documents with that keyword.
Some entries can be changed. At the bottom of the File Info screen is the Show All Properties. Click on this to see more detail about your document. The grayed out options are the ones you can update.
Other properties are automatically updated. You can also search for these entries. For example, you can search for all files created after January 1, 2020, or for all files that were last changed yesterday.
A Personal Observation
I have an autobiography Word document that is 356 pages with 375 photos and images. The file size is only 83.6 MB (see above image). You should be able to manage a Word document with 1400 pages and 1400 images/photos and still not reach the 500 MB limit. Currently, I have no videos in the document. If I did, that would drastically increase the file size.
How to Reduce the Size of your Word Document
One way would be to split the document into two Word files. Of course, this would result in two Table of Contents, Bibliographies, etc. This may not be the right choice.
Another way is to compress the size of your images/photos. First, you should covert a “.doc” file extension document into the new “.docx” format as mentioned in this post.
To compress your images/photos, do the following:
Make a backup copy of your original Word document. Although you are using the Save As option to Save the file with a new file name, I prefer working with a backup copy.
Open your backup Word document
Click on File>Save As>More Options at the top of the screen
A screenshot is below:
More Options screenshot
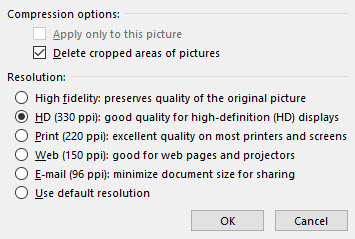
In the Save As dialog box, click Tools>Compress Pictures at the bottom of the screen
In the latest version of Word, you are presented with four Options as shown below:
Photos compression options
For the smallest possible size:
Click “Email (96 ppi) …“
Click OK
Click Save
This option will result in the poorest image quality. All your images/photos will be automatically compressed. Choosing any other option will result in a larger Word document.
Take a look at the results of your compressed document. Do you like the results? If not, then repeat the above steps with another backup copy of your document.
Once you are satisfied, then rename the compressed document back to the original file (overwrite the original file) or rename to a different file name.
I Would Like to Hear from You
Please feel free to leave a comment. I would love hearing from you. Do you have a computer tech question? I will do my best to answer your inquiry. Please mention the app and version that you are using. To help me out, you can send screenshots of your data related to your question.