
Over the past few months, I have researched on how to do this, create a footer that I can use repeatly without doing a manual insert of footer elements. I finally found an article on how to partly do this. In my example, we are going in inset a document footer with the latest date on the left, the document name in the middle and the page number on the right. Yes, it will take a little time but it’s worth the one-time investment. You will save time and effort in using this feature.
If you’ve got a favorite document footer like mine, you can save that using the Quick Parts feature of Microsoft Word. What a lot of users don’t know is that Quick Parts can be saved under different categories to be accessible under different menus.
Let’s use my favorite footer as an example. I’ve constructed one in a blank document using a three column table: the left column has the current Date, the middle column contains the File Name and the right column shows “Page X of Y“. Also, I’ve turned off the borders in the table; those lines you see are simply the grid lines that display in Word.
This is for Word for Office 365 PCs and Macs that support Quick Parts. Other versions of Word will be similar.

Lets get started.
Navigate to the the Insert tab, then to the Header option. Head to the bottom of the options and select Edit Footer. Your footer will be activated with the pointer in the left hand column.
Once again, go to the Insert tab, then select the Table option. Highlight the first 3 columns with your pointer. You will see 3 x 1 table description at top of your screen. Now, just click on the third grid element in the first row and the table will be inserted into your footer. See following image:

Inserting Current Date
In the first column of the footer table, type in the text Date: (there is one space after the text) then navigate to the Insert tab and click on the Date & Time option in the Text group. Select your date format and click OK. See below image:

Inserting File Name
Now, hit the Tab key once, or move your pointer to the middle column. Again, go to the the Insert tab, then to the Footer option. Navigate to the bottom of the options and select Edit Footer. In the Insert group, select Document Info, then select File Name.
UPDATE: If you do not see Document Info, in the Search box type in “Add document info” and follow its steps.
Refet to below image:

Note! For demo purposes, I named this example document as &Filename. See below image:

Inserting Page Number
Now, tab once more or position your pointer in the right column. Once again, from the Insert tab, select Page Number from the Header & Footer group. Next, hoover your pointer over Current Position and select Bold Numbers under the Page X of Y group. Refer to below image:

Your footer elements will look similar to the following image:

Formatting the Custom Footer
Now, you may want to align your footer elements. In my example, I am aligning the File Name to be centered. For the Page Number, I am choosing right justified. The Date is already left justified. At this point, you can change the font and/or font size and other formatting options. You may want to change font size for File Name to allow for long document names. Refer to below image:

Next, lets remove the borders for our footer table. Right click on the “+” sign located to the left of the table, then select Table Properties. See below image:
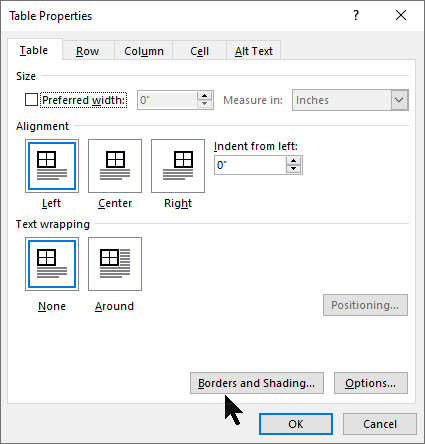
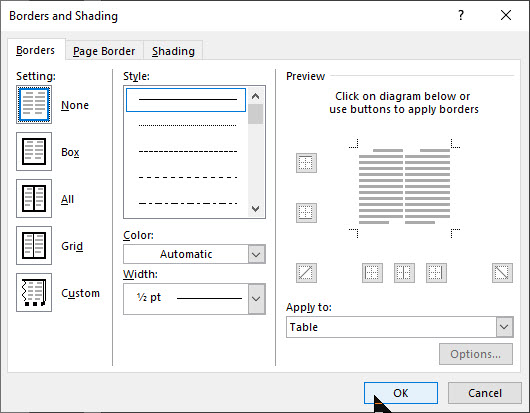
Now, select Borders and Shadings option. Under the Borders tab, select the None option, then click OK, then click OK again to remove the borders. Refer to below image:
Your final footer result will be similar to the following image:

If you make a mistake, start from the miscue or start from stratch. As you can see, there are a lot of manual steps. So, instead of repeating all of the above just to insert a footer, we can easily access our favorite footer by using the Quick Parts feature.
Setting Up the Quick Part Feature
Highlight the footer with your pointer or click on the “+“sign located to the left of the table. Next, navigate back to the Insert tab. Select the Quick Parts option in the Text group. Then choose Save Selection to Quick Park Gallery. See below image:

Give the Footer a unique name, mine is My Best Footer. In the Gallery drop-down box, select Footers. In the Category drop-down box, select General. Now, give the footer a Description. When you are finished, click OK. Refer to below image:

Now your favorite footer will be an available selection whenever you click Footer on the Insert tab. Refer to following image:

Using Your Custom Footer
To try out your custom footer, open a blank document. Navigate to the Insert tab (click one), select the Footer option (click two). Locate your recent entry and click on it (click three). Your footer selection will be inserted. And you only used three clicks! See below image:

There are a whole bunch of other Quick Parts Galleries available for you to save your favorite snippets in. For example, you could have a Quick Parts that inserts your “ Initials _____” on the last page of a draft. Another Quick Parts would be creating and inserting your favorite Watermark.
Edit Your Custom Footer Properties
Navigate to the Insert tab. Select the Quick Parts option in the Text group. Then choose the Building Blocks Organizer option. Next, locate and click on your custom footer entry. Then, click on the Edit Prolerties tab. Here you can change the custom Name, the Gallery, the Category, etc. Its best to leave the Gallery set to Footers and Category set to General.
UPDATE: To make your custom footer float to the top, select enter a new Category, and label it Alpha instead of selecting General.
Once you are finished, click OK. Refer to below image:

Delete Your Custom Footer
Navigate back to the Insert tab. Select the Quick Parts option in the Text group. Then choose Building Blocks Organizer option. Next, locate and click on your custom footer entry. Then, click on the Delete tab. To complete the deletion process, click OK. See following image:

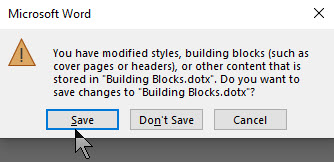
When you Exit Microsoft Word, you will see the following screen. Make sure you click Save to save your custom footer in the Building Blocks.dotx file, where your custom footer is stored. This is easy to overlook. If you don’t Save, you will lose your custom footer or any other snippet you created during your Word session.
You have successfully created, inserted, edited and deleted a custom footer.
I Would Like to Hear From You
Please feel free to leave a comment. I would love hearing from you. Do you have a computer or smart device tech question? I will do my best to answer your inquiry. Please mention the device, app and version that you are using. To help us out, you can send screenshots of your data related to your question.
