Five Useful YouTube Features

YouTube has been around since 2005, and it’s one of the most visited websites in the world. Tons of features have been added to the YouTube website and apps over the years.

RAYMOND OGLESBY @RaymondOglesby2
October 13, 2022

YouTube has been around since 2005, and it’s one of the most visited websites in the world. Tons of features have been added to the YouTube website and apps over the years. Here are some features you may not know about.

This is for devices using YouTube. Screenshots are from iPhone XR running iOS 15.6+

Dilbert and Dilbert
Copyright Scott Adams, Inc./Distributed by Universal Uclick for UFS

Save Videos to Watch Later

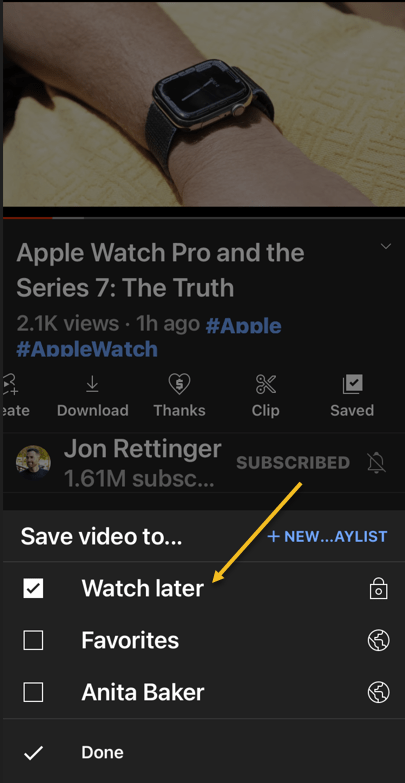
You have probably been browsing YouTube and come across a video that looks interesting. What if you do not have the time to watch it right at that moment? The Watch Later feature is perfect for this.

Watch Later is essentially just a playlist that you can add videos to for watching later. It’s great for saving videos that you do not want to forget about, and it works everywhere you can access the YouTube website or app.

First, find a YouTube video you want to watch later. Next, tap the Save icon in the toolbar below the video. Now, from the Menu that opens, select the Watch Later option. Refer to the below image:

YouTube Features 1
Selecting Watch Later option

Set YouTube Videos to Fill Your iPhone Screen

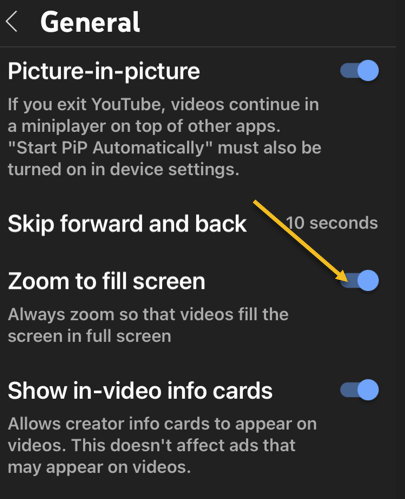
It’s pretty common for your phone’s display to have a different aspect ratio than YouTube videos. You can pinch to zoom to fill the full screen when watching a video, but you have to do that every time.

You can actually make it so videos will always fill the full screen. You will not have to pinch-to-zoom every time, but you will be able to zoom out if too much of the video is being cut off.

First, open the YouTube app on your iPhone or iPad device. Next, double-tap your profile icon in the top right-hand corner. Now, from the Manu that opens, select

Settings > General

and toggle Zoom to Fill Screen to ON. See the below image:

YouTube Features 2
Enabling Zoom to fill the screen

Skip Forward/Backward Fast

Here’s a quick tip that will save you a lot of time watching videos on the YouTube mobile app. Rather than using the seek bar to skip forward and back in the video, simply double-tap the left or right side of the video. See the following image:

YouTube Features 5
Skip Forward or Backward

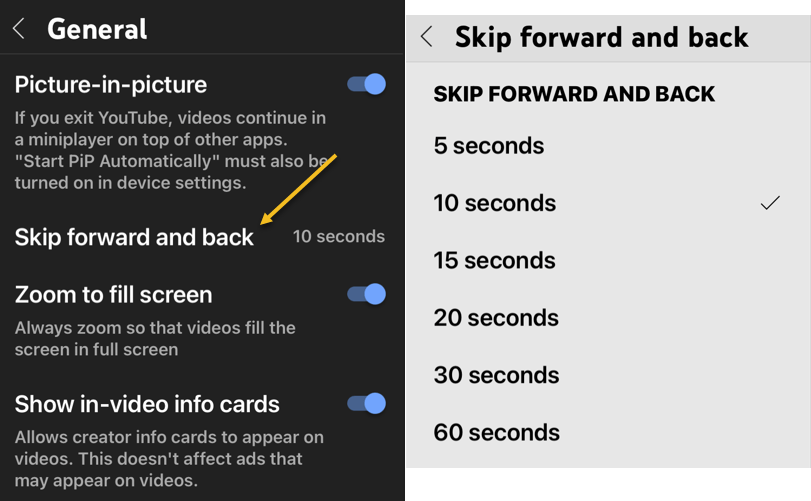
Change the Double-Tap Skip Time

Speaking of double-tapping to skip forward or back in a video, you can adjust the length of these skips. By default, it’s 10-seconds. You can customize this length from 5 to 60 seconds. It’s a great thing to do if you find yourself tapping the video too much.

First, open the YouTube app on your iPhone or iPad, device. Next, double-tap your profile icon in the top right-hand corner. Now, from the Manu that opens, select

Settings > General

and select the Skip Forward and Back option. Next, choose one of the time increments from the Menu. Refer to the below image:

YouTube features 3
Set timer for Skip Forward and Backward

Speed Up or Slow Down a Video

YouTube videos do not have to be played at the speed of how they were uploaded. You can speed up or slow down any video you want. This is super handy for rewatching moments in slow motion or getting through long videos a little faster.

The Playback Speed controls can be accessed on the web and mobile apps. You can select a speed anywhere between 0.25- 2 times the normal speed, with 1 being the normal speed.

First, open the YouTube app and play a video. Next, tap the screen once to bring up the toolbar, Now, tap the Settings icon located in the upper right-hand corner of the video frame.

Next, in the Menu that pops up, select Playback speed. In the list that appears, select the speed you would like. See the below image:

YouTube Features 4
Set timer for Playback speed

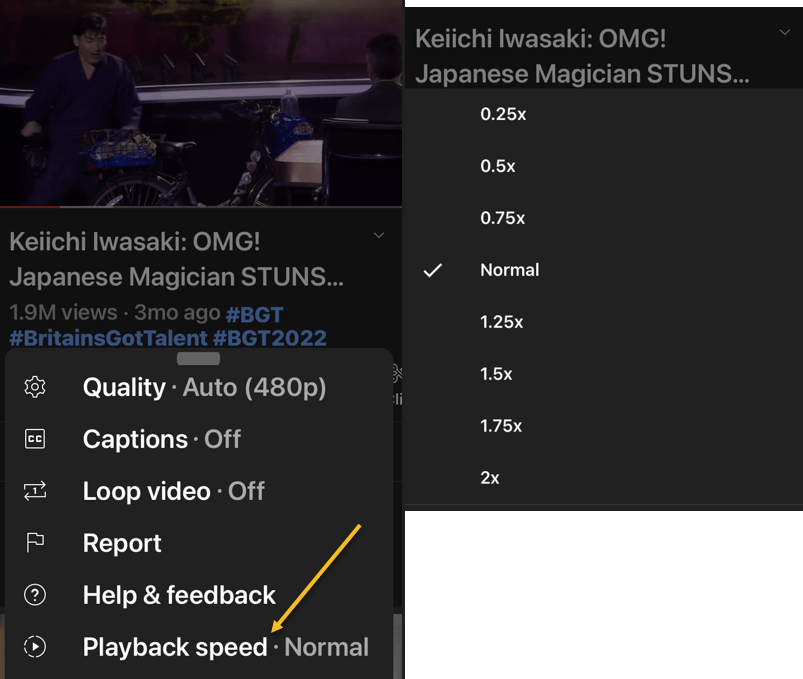
Now, close the Menu, and the video will resume at the selected speed. If you need to change it back to the regular speed, repeat the above and change the speed to 1 for normal speed.

Quote For the Day

An outlook… at the vast mysteries of the universe should only confirm our belief in the certainty of its Creator.

Wernher Von Braun

Tweet Info

That’s it. Please feel free to share this post! One way to share is via Twitter.

Just click the Tweet icon below. This will launch Twitter where you click its icon to post the Tweet.

Checkout TechSavvy.Life for blog posts on smartphones, PCs, and Macs! You may email us at contact@techsavvy.life for comments or questions.

I Would Like to Hear From You

Please feel free to leave a comment. I would love to hear from you. Do you have a computer or smart device tech question? I will do my best to answer your inquiry. Just send an email to contact@techsavvy.life. Please mention the device, app, and version you are using. To help us out, you can send screenshots of your data related to your question.

Author’s E-Book

You can access the e-book from a Kindle device, the Kindle App for the desktop or smartphone, which is a free app.

The author’s Vietnam eBook on the Battle for Tra Bong Vietnam: Events and Aftermath

How to Delete/Hide Chrome Shortcuts From New Tab Page

Google Chrome keeps shortcuts to your most visited sites on its home page. If you do not find this list useful, you can either individually remove these shortcuts or hide all the shortcuts at once.

RAYMOND OGLESBY @RaymondOglesby2
September 29, 2022

Google Chrome keeps shortcuts to your most visited sites on its home page. If you do not find this list useful, you can either individually remove these shortcuts or hide all the shortcuts at once. Let’s explore how to do this.

Tip: When you delete a shortcut, that item’s gone forever. However, you can bring back all your hidden shortcuts at once with a few clicks.

This is for devices running the latest version of Google Chrome. Screenshots are from Windows 10

Dilbert and Office
Copyright Scott Adams, Inc./Distributed by Universal Uclick for UFS

Delete a New Tab Shortcut

To individually remove your site shortcuts from the New Tab page, first, open a new tab in Chrome. You can do this by pressing Ctrl+T (Windows) or Command+T (Mac).

Next, on the New Tab page, find the shortcut you want to delete. Hover your cursor in that shortcut’s top-right corner, then click the three dots (the Menu icon) that appear. Refer to the below image:

Chrome Shortcuts 1
Accessing the shortcut Menu on the New Tab page

Now, in the three-dot Menu icon, choose Remove. See the below image:

Chrome Shortcuts 2
Selecting to Remove the shortcut

Instantly, Chrome will remove the selected shortcut from your New Tab page.

Note: If you accidentally delete a shortcut, you can restore it by clicking Undo in the confirmation message that opens at the bottom left-hand corner.

Hide All New Tab Shortcuts

If you do not wish to see any shortcuts at all, you can hide all of them with a few easy clicks.

First, launch a New Tab in Chrome. Then, in the New Tab screen’s bottom right-hand corner, select the Pencil icon for Customize this page. See the following image:

Chrome Shortcuts 3
Selecting the Pencil icon

Next, in the left sidebar of the open window, click Shortcuts. Refer to the below image:

Chrome Shortcuts 4
Selecting the Shortcuts option

Now, on the right pane, toggle the Hide Shortcuts option to ON. Then, at the bottom, click Done. See the below image:

Note: Later, to unhide your shortcuts and bring them back to your New Tab page, toggle the Hide Shortcuts option to OFF and click Done.

Chrome Shortcuts 5
Enabling to Hide shortcuts

Back on the New Tab page, you will find all your site shortcuts are gone.

Quote For the Day

Technology is so much fun but we can drown in our technology. The fog of information can drive out knowledge

Daniel J Boorstin

Tweet Info

That’s it. Please feel free to share this post! One way to share is via Twitter.

Just click the Tweet icon below. This will launch Twitter where you click its icon to post the Tweet.

Checkout TechSavvy.Life for blog posts on smartphones, PCs, and Macs! You may email us at contact@techsavvy.life for comments or questions.

I Would Like to Hear From You

Please feel free to leave a comment. I would love to hear from you. Do you have a computer or smart device tech question? I will do my best to answer your inquiry. Just send an email to contact@techsavvy.life. Please mention the device, app, and version you are using. To help us out, you can send screenshots of your data related to your question.

Author’s E-book

You can access the e-book from a Kindle device, the Kindle App for the desktop or smartphone, which is a free app.

The author’s Vietnam eBook on the Battle for Tra Bong Vietnam: Events and Aftermath

How To Setup Marketplace Alerts on Facebook

Facebook Marketplace has become the go-to place for selling things online. If you are on the lookout for a specific item, an alert can help you hopefully snag a great deal before everyone else.

RAYMOND OGLESBY @RaymondOglesby2
September 22, 2022

Facebook Marketplace has become the go-to place for selling things online. If you are on the lookout for a specific item, an alert can help you hopefully snag a great deal before everyone else. Let’s explore this Facebook feature.

Be aware that by using Marketplace, you may be scammed. In a recent survey, one in six (17%) respondents had been defrauded on the site.

Note! Technology is always changing. This means if you are implementing this post, your OS (PC, Mac), iOS (iPhone), iPadOS (iPad), and Android screens or text may not resemble this post’s contents, especially, if you are looking at a post years old.

This is for desktops using Facebook

Dilbert and Idiot
Copyright Scott Adams, Inc./Distributed by Universal Uclick for UFS

Setting up an alert will allow you to be notified when new items matching your search parameters are posted. You can skip the search process and always know when new items are posted.

First, head on over to Facebook.com in your desktop browser. Click the Marketplace icon in the sidebar or top bar. Refer to the below image:

FB Marketplace 1
Selecting Marketplace

Next, use the search box to enter what you are looking for. See the below image:

FB Marketplace 2
Locate an item

Now, click the Notify Me button under the search bar. See the following image:

FB Marketplace 3
Selecting Notify Me

Next, in the pop-up window that opens, enter a minimum and maximum price and adjust the search radius if you would like. Then click Create Alert to finish. Refer to the below image:

FB Marketplace 4
Setup search parameters

Now, to edit or remove an alert, repeat the search and click Edit Alert. See the below image:

FB Marketplace 5
Selecting to Edit Alert

Next, you will have the option to adjust the parameters or Remove Alert. See the following image:

FB Marketplace 6
Change Parameters or Remove Alert

Facebook Marketplace has a lot of advantages over other online sellers like Craigslist. If you do a lot of shopping in the Marketplace, you should take advantage of the alert feature.

Quote For the Day

It’s not that we use technology, we live technology.

Godfrey Reggio

Tweet Info

That’s it. Please feel free to share this post! One way to share is via Twitter.

Just click the Tweet icon below. This will launch Twitter where you click its icon to post the Tweet.

Checkout TechSavvy.Life for blog posts on smartphones, PCs, and Macs! You may email us at contact@techsavvy.life for comments or questions.

I Would Like to Hear From You

Please feel free to leave a comment. I would love to hear from you. Do you have a computer or smart device tech question? I will do my best to answer your inquiry. Just send an email to contact@techsavvy.life. Please mention the device, app, and version you are using. To help us out, you can send screenshots of your data related to your question.

Author’s E-Book

You can access the e-book from a Kindle device, the Kindle App for the desktop or smartphone, which is a free app.

The author’s Vietnam eBook on the Battle for Tra Bong Vietnam: Events and Aftermath

Avoid These Mistakes When Sitting in an Office Chair

Are you trying to maintain good posture but find yourself constantly slouching? If you are experiencing body aches or pain, you are probably doing one or more of these six posture mistakes.

RAYMOND OGLESBY @RaymondOglesby2

September 15, 2022

Are you trying to maintain good posture but find yourself constantly slouching? If you are experiencing body aches or pain, you are probably doing one or more of these six posture mistakes. Let’s explore how to correct your posture.

This is for an office environment

Dilbert and Credit
Copyright Scott Adams, Inc./Distributed by Universal Uclick for UFS

Crossing Your Legs

Although it’s tempting to cross your legs while sitting, it’s actually not good for your posture. It may feel comfortable, but crossing your legs can put extra stress on your hips and lower back. You may start feeling the need to slouch, too.

The best way to sit is with both feet flat on the floor. If you are unable to plant your feet firmly, you can get a footrest to help. Simply place one where you would normally rest your feet and set them on top. This will help take the strain off your lower body so you can comfortably sit back in your office chair. As an alternative, you can get up to walk around or stretch, which leads us to the next mistake. Refer to the below image:

Posture 1
Crossing your legs

Sitting Down Too Long

Even with good posture, your muscles will start tightening up if you sit for too long. You may start to feel restless and possibly experience some pain or aching around your body. This is why it’s important to take breaks every 30 minutes or so to get up and move around.

You do not have to stand up for a long time. Go for a small walk or do some plight stretching. Just do anything to keep your body active, it could be as simple as swinging your arms around. The key is to increase blood flow and loosen up your muscles. You can set a timer to go off every 30 minutes to remind you to take a break. See the below image:

Posture 2
Sitting too long

Hunching Over

Most people already know that hunching over is bad for your posture. When you are hunched over, it puts a lot of strain on your spine and neck. This is why you will often feel pain in these areas after sitting at a desk all day. Your back’s going to feel most of the strain, especially since your spine will not be in a neutral position.

To correct this, you want to set your chair between 90 degrees and 120 degrees so that you can sit with a straight or slightly reclined back. This will take the strain off your spine and keep your body aligned. See the following image:

Posture 3
Hunching over

Leaning Your Head Forward

Many people tend to lean their heads forward when they are trying to focus on something or while slouching, and even more so while using the computer or playing video games. Leaning your head forward is a common cause of neck pain, as it puts extra weight and strain on it. Human heads are heavy, so when you are leaning forward even slightly, it puts excess stress on your neck muscles.

The easiest way to solve this is by leaning back on a chair with a high back. This type of backrest supports your head and neck, so you never have to lean forward. If your chair does not have a high back, you will have to remind yourself to not lean forward. Refer to the below image:

Posture 4
Head leaning forward

Looking At Poorly Positioned Monitor

Where you position your monitor can also affect your posture. If it’s too high or low, you will end up putting unnecessary strain on your neck and eyes. The screen also should not be too close or far, as it can cause eye strain and fatigue.

You should position your monitor 20-30 inches away from your eyes, which is about arm’s length. Adjust the height so that you are able to read the first line of text at eye level or slightly below it.

Change the font to a san-serif typeface, so it’s easier to read. Also, use a font size that’s large enough for you to see without squinting or needing to lean forward. See the below image:

Monitor not in a position

Using a Non-Ergonomic Chair

One of the most common posture mistakes is sitting on chairs that are not ergonomic for extended periods. Ergonomic chairs promote good posture by supporting your entire body. You can practically adjust every part of the chair to support your frame. This includes the height and tilt of the chair,

If you can afford an ergonomic chair, you should always choose it over a regular one. Non-ergonomic chairs can cause long-term pain in your back, neck, and shoulders, especially if you are sitting on them for many hours. These chairs are not designed for extended use, as they provide little to no support. This is why you will constantly find yourself slouching or hunching over.

Invest in an ergonomic chair if you sit for long hours each day. They are absolutely worth the investment. Not only do they promote good posture and prevent pain, but they are also very comfortable to be seated in. With these chairs, you sit in them all day without complaining.

We recommend considering a gaming chair, since they are always ergonomic, and they offer great value for their price! See the following image:

Posture 6
Non-Ergonomic chair

Quote For the Day

Technology like art is a soaring exercise of the human imagination.

Dainel Bell

Tweet Info

That’s it. Please feel free to share this post! One way to share is via Twitter.

Just click the Tweet icon below. This will launch Twitter where you click its icon to post the Tweet.

Checkout TechSavvy.Life for blog posts on smartphones, PCs, and Macs! You may email us at contact@techsavvy.life for comments or questions.

I Would Like to Hear From You \

Please feel free to leave a comment. I would love to hear from you. Do you have a computer or smart device tech question? I will do my best to answer your inquiry. Just send an email to contact@techsavvy.life. Please mention the device, app, and version you are using. To help us out, you can send screenshots of your data related to your question.

Author’s E-book

You can access the e-book from a Kindle device, the Kindle App for the desktop or smartphone, which is a free app.

The author’s Vietnam eBook on the Battle for Tra Bong Vietnam: Events and Aftermath

How to Follow Someone on Facebook

Once you follow a personal account or a page on Facebook, you start seeing that entity’s posts in your News feed. This is a great way to get updates from your favorite people or brands without being friends.

RAYMOND OGLESBY @RaymondOglesby2
August 23, 2022

Once you follow a personal account or a page on Facebook, you start seeing that entity’s posts in your News feed. This is a great way to get updates from your favorite people or brands without being friends. Let’s explore following a person on Facebook.

This is for devices using Facebook. Screenshots are from Windows 10 and iPhone XR

Dilbert and Crypto
Copyright Scott Adams, Inc./Distributed by Universal Uclick for UFS

Following vs Friending

When you follow someone, you do not have to add them as a friend. You can see that entity’s posts and other content in your News feed while not becoming a part of their friend’s list. This option is usually used to follow celebrities and the pages that interest you on this social platform.

To follow someone and to add someone as a friend are two different things on Facebook.

The convention on Facebook is that when you add someone as a friend, it’s likely you know that person personally. You add people like your real-life friends, colleagues, and family as “friends” on Facebook.

Know that while Facebook allows you to have up to 5,000 friends at a time, there’s no such limit for followers. Also, keep in mind that people and pages can choose not to allow themselves to be followed. In such cases, you will not see the Follow button on these entities’ pages on Facebook.

Follow People

To follow a personal account on Facebook, all you have to do is visit that person’s profile page and click or tap an option.

On Desktop

On your computer, first, launch a web browser and open Facebook. Log in to your account if you have not already.

Next, after logging in, access the profile page of the person you want to follow. On this page, in the tab list beneath the person’s name, click the three dots (the Menu icon) or the Friends button. Refer to the below image:

Accessing the Menu

Now, in the three-dot Menu, choose Follow. If you do not see the Follow option, that person has yet to enable others to follow them. See the below image:

Selecting to Follow

Tip: Later, to unfollow this person, click Following followed by Unfollow on the person’s profile page.

You are now following the selected person in your Facebook account. The person’s posts will appear in your News feed.

On Mobile

To follow a person from your phone or tablet, first, launch the Facebook app on your mobile device. Then, open the profile page of the person you want to follow.

Next, on the profile page, beneath the person’s name, tap the three dots (the Menu icon). See the following image:

Accessing the Menu

Now, in the Profile Settings menu, choose Follow. Refer to the below image:

Selecting to Follow

Tip: In the future, to unfollow this person, tap Following followed by Unfollow.

You are now following the selected person in your Facebook account. The person’s posts will appear in your News feed.

Follow Pages

Following a page is as easy as doing so for a personal account.

On Desktop

On your computer, first, launch a web browser and open Facebook. Log in to your account if you have not already.

Next, open the page you wish to follow. On the page screen, at the far right of the tab list, click the three lines or the three dots (the Menu icon), whichever is shown. See the below image:

Accessing the Menu

Now, in the Menu, choose Follow. If you do not see the Follow option, that person has yet to enable others to follow their page. See the following image:

Selecting to Follow

Tip: Later, to unfollow a page, visit the page, click the three lines or the three dots (the Menu icon), and choose Follow Settings. Then enable Unfollow This Page and click Update.

You are now following the selected person’s page posts in your Facebook account. The person’s page posts will appear in your News feed.

On Mobile

On your mobile phone or tablet, first, launch the Facebook app. Access the page to follow, then tap the three lines or three dots (the Menu icon). Refer to the below image:

Accessing the Menu

Next, from the Menu that opens, select Follow. See the below image:

Selecting to Follow

Tip: To unfollow a page, tap the three lines or three dots (the Menu icon) and select Manage Follow Settings. Then tap Unfollow.

You are now following your favorite page on Facebook.

Quote For the Day

Let’s go invent tomorrow instead of worrying about what happen yesterday.

Steve Jobs

Tweet Info

That’s it. Please feel free to share this post! One way to share is via Twitter.

Just click the Tweet icon below. This will launch Twitter where you click its icon to post the Tweet.

Checkout TechSavvy.Life for blog posts on smartphones, PCs, and Macs! You may email us at contact@techsavvy.life for comments or questions.

I Would Like to Hear From You

Please feel free to leave a comment. I would love to hear from you. Do you have a computer or smart device tech question? I will do my best to answer your inquiry. Just send an email to contact@techsavvy.life. Please mention the device, app, and version you are using. To help us out, you can send screenshots of your data related to your question.

Author’s E-book

You can access the e-book from a Kindle device, the Kindle App for the desktop or smartphone, which is a free app.

The author’s Vietnam eBook on the Battle for Tra Bong Vietnam: Events and Aftermath

How to Remove the Icons in Search Box in Windows 10/11

You may have noticed new, and ever-changing, little icons in the Search box on Windows 10’s Taskbar. That’s a “search highlight.” If you are like us, we found these icons very annoying.

RAYMOND OGLESBY @RaymondOglesby2
July 23, 2022

You may have noticed new, and ever-changing, little icons in the Search box on Windows 10’s Taskbar. That’s a “search highlight.” If you are like us, we found these icons very annoying. Here’s what it is and how to remove it.

This is for Windows 10 and 11. Screenshots are from Windows 10

Dilbert and Pills
Copyright Scott Adams, Inc./Distributed by Universal Uclick for UFS

Why the Icons

The icons are a part of a new feature rolled out to Windows 10 and Windows 11 as part of an April 2022 update.

The particular feature is called Search Highlights and it integrates a rotating set of icons into the right-hand side of the toolbar Search box. Depending on the day, the icons are specific; such as to celebrate the U.S. Open golf tournament, or more generic with suggested backgrounds, like photos of U.S. national parks.

In addition to placing the icons in the Search box, the Search Highlights feature also puts “highlighted” content into the Search menu on both Windows 10 and Windows 11. The highlights include news, trending stories, word and quote of the day tiles (presumably rolled out on slow news days,) as well as a trending searches tile.

If you like Microsoft’s bid to mimic a sort of Google daily doodle combined with a little news showcase in your Search menu then you can, naturally, just leave things how they are.

But if you had a less than positive reaction to the change, it’s thankfully very simple to turn off. Yea!

Remove the Icons

First, on Windows 10, you will see the icons in the Search box. Refer to the below image:

Icons 1
The icons in the Search box

Next, right-click on a blank area in your Taskbar to pull up the menu, select Search and uncheck Show search highlights option to get rid of these silly icons. Refer to the below image:

Icons 2
Remove the icons by unchecking Show search highlights

Although there’s no Search box (and thus no new icons) on Windows 11, you can still turn off the highlights in the Search menu. Just head to:

Settings > Privacy & Security > Search Permissions > More Settings

In the More Settings section just toggle OFF the switch Show Search Highlights.

With that simple change, there will not be any more icons in the Search box or news highlights in the Search menu.

Quote For the Day

The machine does not isolate man from the great problems of nature but plunges him more deeply into them.

Antoine de Saint-Exupery

Tweet Info

That’s it. Please feel free to share this post! One way to share is via Twitter.

Just click the Tweet icon below. This will launch Twitter where you click its icon to post the Tweet.

Checkout TechSavvy.Life for blog posts on smartphones, PCs, and Macs! You may email us at contact@techsavvy.life for comments or questions.

I Would Like to Hear From You

Please feel free to leave a comment. I would love to hear from you. Do you have a computer or smart device tech question? I will do my best to answer your inquiry. Just send an email to contact@techsavvy.life. Please mention the device, app, and version you are using. To help us out, you can send screenshots of your data related to your question.

Author’s E-book

You can access the e-book from a Kindle device, the Kindle App for the desktop or smartphone, which is a free app.

The author’s Vietnam eBook on the Battle for Tra Bong Vietnam: Events and Aftermath

Using the Ctrl+Shift+V Shortcut

Tired of pasting and getting weird fonts and formatting in Windows 10 or 11? Avoid using Notepad as an intermediary. Try Ctrl+Shift+V shortcut and you will get only the text you want.

RAYMOND OGLESBY @RaymondOglesby2
August 11, 2022

Tired of pasting and getting weird fonts and formatting in Windows 10 or 11? Avoid using Notepad as an intermediary. Try Ctrl+Shift+V shortcut and you will get only the text you want. Here’s why.

This is for Windows 10/11 and Mac. Screenshots are from Windows 10

Dilbert and Metaverse
Copyright Scott Adams, Inc./Distributed by Universal Uclick for UFS

Paste Without Formatting

By default, when you normally Copy with Ctrl+C and Paste with Ctrl+V in Windows, the clipboard captures not only the text you have selected but also the styling that goes with it. That includes font style, text color, attributes such as bold and italics, and even bulleted lists.

Fortunately, there’s an easy way to avoid it. The next time you want to paste only the text without any formatting or style information, press Ctrl+Shift+V on your keyboard in Windows 10/11. (On a Mac, you can press Option+Shift+Command+V for a similar result).

Microsoft Word Fix

In Microsoft Word, Ctrl+Shift+V does not work. Instead, you will need to use a special option in the ribbon menu. To do so, switch to the Home tab and click Paste, then select the icon that looks like a clipboard with an “A” on it (Keep Text Only) which will paste without formatting. Refer to the below image:

Word Shortcut 1
Selecting the Keep Text Only option

You can also change the default behavior in Word to always paste without formatting. To do so, navigate to

File > Options

In the Options menu that opens, click Advanced in the sidebar, then choose Keep Text Only in the Cut, Copy, and Paste drop-down menus. This way, you can make Ctrl+V always paste as Keep Text Only in Word. See the below image:

Word Shortcut 2
Selecting the Keep Text Only option for Pasting within the same document

Quote For the Day

Our business is about technology, yes.But its also about operations and customer relationships.

Michael Dell

Tweet Info

That’s it. Please feel free to share this post! One way to share is via Twitter.

Just click the Tweet icon below. This will launch Twitter where you click its icon to post the Tweet.

Checkout TechSavvy.Life for blog posts on smartphones, PCs, and Macs! You may email us at contact@techsavvy.life for comments or questions.

I Would Like to Hear From You

Please feel free to leave a comment. I would love to hear from you. Do you have a computer or smart device tech question? I will do my best to answer your inquiry. Just send an email to contact@techsavvy.life. Please mention the device, app, and version you are using. To help us out, you can send screenshots of your data related to your question.

Author’s E-Book

You can access the e-book from a Kindle device, the Kindle App for the desktop or smartphone, which is a free app.

The author’s Vietnam eBook on the Battle for Tra Bong Vietnam: Events and Aftermath

How to Make Taskbar Clock Display Seconds in Windows 10

Windows 10’s taskbar Clock can display the precise time down to the second. This feature requires a Registry hack to enable and only works on Windows 10.

RAYMOND OGLESBY @RaymondOglesby2
August 4, 2022

Windows 10’s taskbar Clock can display the precise time down to the second. This feature requires a Registry hack to enable and only works on Windows 10. Let’s find out.

This is for Windows 10

Dilbert and Selfish
Copyright Scott Adams, Inc./Distributed by Universal Uclick for UFS

Editing the Registry

Warning: The Registry Editor is a powerful tool and misusing it can render your system unstable or even inoperable. This is a pretty simple hack and, as long as you stick to the instructions, you should not have any problems. If you have never worked with the Registry Editor before, consider reading about how to use the Registry Editor before you get started. And definitely back up the Registry and create a System Restore point before making changes.

First, open the Registry Editor by clicking Start, typing “regedit” into the Cortana search box at the bottom of the Start menu, and pressing Enter. Give the Registry Editor permission to make changes to your PC. Refer to the below image:

Clock 1
Selecting the Registry Editor

Next, use the left sidebar to navigate to the following key in the Registry Editor:

HKEY_CURRENT_USER\Software\Microsoft\Windows\CurrentVersion\Explorer\Advanced

See the below image:

Clock 2
Accessing the Advanced Key

Now, right-click the Advanced key in the left pane and select:

New > DWORD (32-bit) Value

See the following image:

Clock 3
Accessing the 32-bit DWORD

Next, name the value

ShowSecondsInSystemClock

and press Enter. If you type “Sustem” instead of “System” or “Second” instead of “Seconds” in the name, these will not work, it must be the exact wording. Refer to the below image:

Clock 4
Naming the new Key

Now, double-click the value you just created, enter a value data of 1, and click OK. See the below image;

Clock 5
Assigning the value of 1 to the new Key

Next, you can now close the Registry Editor. You will have to sign out and sign back in again before your changes will take effect. To view the Clock with seconds, view the Date and Time in your System Tray in the lower right-hand corner. See the following image:

Clock 6
The Clock with seconds in System Tray

Quote For The Day

Making duplicate copies and computer printouts of things no one wanted even one of in the first place is giving America a new sense of purpose.

Andy Rooney

Tweet Info

That’s it. Please feel free to share this post! One way to share is via Twitter.

Just click the Tweet icon below. This will launch Twitter where you click its icon to post the Tweet.

Checkout TechSavvy.Life for blog posts on smartphones, PCs, and Macs! You may email us at contact@techsavvy.life for comments or questions.

I Would Like to Hear From You

Please feel free to leave a comment. I would love to hear from you. Do you have a computer or smart device tech question? I will do my best to answer your inquiry. Just send an email to contact@techsavvy.life. Please mention the device, app, and version you are using. To help us out, you can send screenshots of your data related to your question.

Author’s E-Book

You can access the e-book from a Kindle device, the Kindle App for the desktop or smartphone, which is a free app.

The author’s Vietnam eBook on the Battle for Tra Bong Vietnam: Events and Aftermath

Is “FBI Surveillance Van” in Your Wi-Fi List

If you are trying to connect to a Wi-Fi access point and you see “FBI Surveillance Van” in your SSID list, should you be worried? Is there an FBI van outside your door?

RAYMOND OGLESBY @RaymondOglesby2
July 28, 2022

If you are trying to connect to a Wi-Fi access point and you see “FBI Surveillance Van” in your SSID list, should you be worried? Is there an FBI van outside your door? Let’s explore this surprisingly common situation.

This is for Wi-Fi routers

Dilbert and Musk
Copyright Scott Adams, Inc./Distributed by Universal Uclick for UFS

It’s a Joke

If you see “FBI Surveillance Van,” “FBI Van,” “NSA Van,” or “Police Surveillance Van” on your list of Wi-Fi routers or access points, do not worry; It’s just someone nearby playing a practical joke. This joke originated in the early days of Wi-Fi—in the 2000s; because it ties into a common fear that someone might be lurking nearby and watching you. Also, in the early days of Wi-Fi, some people used scary-sounding SSID names as a deterrent to keep people from connecting to their open (not password protected) Wi-Fi access points.

How is this possible? A Wi-Fi network name is called an SSID (“Service Set Identifier”), and people can enter any SSID they want in their Wi-Fi router or hotspot’s settings. Since everyone nearby connecting to Wi-Fi can see these SSIDs (unless they are hidden), some people use them as a public opportunity to crack a joke.

There are other dangers in using this kind of joke in the context of people who might take it seriously. In fact, an SSID named “FBI_SURVEILLANCE_VAN” made the news in 2011 in relation to a teen that plotted a violent event. This inspired a long discussion on Techdirt and a post on Gawker about whether it’s wise to name your router “FBI Surveillance Van,” even if you think it’s funny.

Is it Really a Joke?

As seen above, we already know the “FBI Surveillance Van” SSID is a joke based on ample cultural evidence on the internet. But beyond that, is there another way to know it’s just a joke?

Yes, we can. The point of law enforcement surveillance is to keep an eye on a suspect, often in secret, using a tactic called covert surveillance. The reason they keep the surveillance secret is that it might alter the suspect’s behavior if the suspect knew they were being watched.

So if an FBI van were parked nearby secretly watching someone, would they publicly announce it with an obvious Wi-Fi SSID name? No. Also, if the purported FBI agents inside this hypothetical surveillance van needed internet access, would they get it through a Wi-Fi router in their van? No, they would likely use an alternative, secure means of doing so that did not rely on consumer technology; or simply use cellular internet. They do not need to provide Wi-Fi access to your neighborhood.

Then there’s the question of the FBI’s choice of surveillance vehicle itself. Does the FBI really conduct surveillance from a van like we see in films? Possibly, but this 2008 account from NPR describes surveillance taking place mostly from ordinary cars, and sometimes on foot. What little evidence we have shows that they did use at least one van in the 1980s, but that was before the modern digital communications era.

So while we can not definitively say that the FBI is not spying on you, we can say this: If they are, it has nothing to do with a name in your Wi-Fi list.

Quote For the Day

One machine can do the work of fifty ordinary men. No machine can do the work of one extraordinary man.

Elbert Hubbard

Tweet Info

That’s it. Please feel free to share this post! One way to share is via Twitter.

Just click the Tweet icon below. This will launch Twitter where you click its icon to post the Tweet.

Check out TechSavvy.Life for blog posts on smartphones, PCs, and Macs! You may email us at contact@techsavvy.life for comments or questions.

I Would Like to Hear From You

Please feel free to leave a comment. I would love to hear from you. Do you have a computer or smart device tech question? I will do my best to answer your inquiry. Just send an email to contact@techsavvy.life. Please mention the device, app, and version you are using. To help us out, you can send screenshots of your data related to your question.

Author’s E-Book

You can access the e-book from a Kindle device, the Kindle App for the desktop or smartphone, which is a free app.

The author’s Vietnam eBook on the Battle for Tra Bong Vietnam: Events and Aftermath

How to Stop Facebook Messenger Opening at Startup for Windows 10/11

Recently, we had Facebook Messenger start loading at startup. We had not enabled this to happen; it seemed to have a mind of its own.

RAYMOND OGLESBY @RaymondOglesby2
July 14, 2022

Recently, we had Facebook Messenger start loading at startup. We had not enabled this to happen; it seemed to have a mind of its own. Let’s explore one way to fix this behavior.

This is for Windows 10 and 11. Screenshots are from Windows 10

Dilbert and Pill
Copyright Scott Adams, Inc./Distributed by Universal Uclick for UFS

Besides us, Windows users have raised complaints that Facebook Messenger opens up automatically as soon as the OS starts up.

Notably, this issue is not limited only to Facebook Messenger, but it is happening to other apps, including Windows Messenger, Skype, etc. as well.

The result of this is that the unwanted process running right during the startup makes the boot a bit slow, and hampers the overall performance of the Windows PC.

Reportedly, the issue is so severe that sometimes, users are also experiencing frozen screens, blue screens, high CPU and RAM usage, laptops getting heated up, etc., problems.

This can be pretty annoying if you simply do not use any of the apps on your PC.

Reasons for Startup Issue

Apps opening or running during Windows startup is quite common, but for some essential apps. For instance, system processes, antivirus software, and productivity tools load right during the startup.

However, there are a few notorious apps that muscle their way into the startup process. These apps are not necessary to load up during the startup as they are not essential.

There are a few reasons why several users are experiencing Facebook Messenger or other apps opening during Windows startup. 

The app is added to the list of start-up apps. This can be done by the software itself, without your input. For some users, apps like Facebook Messenger have made their way to the top of the startup apps list and caused trouble for them.

Besides, most apps come with a built-in toggle or option to run the program at startup. For obvious reasons, if this feature is turned on, your PC will load the program during startup.

Stop the App From Opening at Startup

The fix we like the best for Windows 10/11 is using Windows Settings.

First, press the Win + I buttons to open Settings, or right-click the Start icon, then the Settings option. Refer to the below image:

Startup Messenger 1
Accessing Settings

Next, on the Settings screen, click on Apps. See the below image:

Startup Messenger 2
Accessing Apps

Now, select Startup from the list of options in the left pane. See the following image:

Startup Messenger 3
Selecting Startup option

Next, locate the Messenger app. You may see two Messenger apps. To the right of the Messenger app(s), toggle the switch to OFF. Refer to the below image:

Startup Messenger 4
Toggle Messenger app(s) apps to OFF

Now, exit Settings and reboot. You should not see Facebook Messenger loaded.

Quote For The Day

The digital camera is a great invention because it allows us to reminisce. Instantly.

Demetri Martin

Tweet Info

You are finished. Please feel free to share this post! One way to share is via Twitter.

Just click the Tweet icon below. This will launch Twitter where you click its icon to post the Tweet.

Checkout TechSavvy.Life for blog posts on smartphones, PCs, and Macs! You may email us at contact@techsavvy.life for comments or questions.

I Would Like to Hear From You

Please feel free to leave a comment. I would love to hear from you. Do you have a computer or smart device tech question? I will do my best to answer your inquiry. Just send an email to contact@techsavvy.life. Please mention the device, app, and version you are using. To help us out, you can send screenshots of your data related to your question.

Author’s E-book

You can access the e-book from a Kindle device, the Kindle App for the desktop or smartphone, which is a free app.

The author’s Vietnam eBook on the Battle for Tra Bong Vietnam: Events and Aftermath