Microsoft is leading the way for a passwordless future. You no longer are required passwords to login to your Microsoft account as you can now use the Microsoft Authenticator app, Windows Hello, a security key or a verification code sent via SMS or email.
Microsoft is leading the way for a passwordless future. You no longer are required passwords to login to your Microsoft account as you can now use the Microsoft Authenticator app, Windows Hello, a security key or a verification code sent via SMS or email. Let’s explore how to setup this feature.
The company has been preparing for a passwordless future for quite some time and its reason behind is the fact that passwords can be easily manipulated.
Vasu Jakkal, Corporate VP of Microsoft’s Security, Compliance and Identity, said “Weak passwords are the entry point for the majority of attacks across enterprise and consumer accounts. There are a whopping 579 password attacks every second—that’s 18 billion every year,” Jakkal added.
This is for devices using Microsoft Account. Screenshots are from iPhone XR.
Copyright Scott Adams, Inc./Distributed by Universal Uclick for UFS
First, install the Microsoft Authenticator app and link it to your Microsoft account. There are several authenticator apps, ensure you install the correct one from Microsoft. Refer to below image:
Download and install the Microsoft Authenticator app
Next, open your Microsoft account. See below image:
Your Microsoft account
Now, scroll down to Advanced security section and toggle on Passwordless account. See following image:
Setting Passwordless account option
Then follow the on-screen prompts and approve the notification from the Authenticator app.
Your Microsoft account is now passwordless. You can always go back to using a password for your account.
Quote For the Day
A lot of people in our industry haven’t had very diverse experiences. So they don’t have enough dots to connect, and they end up with very linear solutions without a broad perspective on the problem. The broader one’s understanding of the human experience, the better design we will have.
Steve Jobs
That’s it. Please feel free to share this post! One way to share is via Twitter.
Just click the Tweet icon below. This will launch Twitter where you click its icon to post the Tweet.
Check out TechSavvy.Life for blog posts on smartphones, PCs, and Macs! You may email us at contact@techsavvy.life for comments or questions.
Please feel free to leave a comment. I would love hearing from you. Do you have a computer or smart device tech question? I will do my best to answer your inquiry. Just send an email to contact@techsavvy.life. Please mention the device, app and version that you are using. To help us out, you can send screenshots of your data related to your question.
The author’s Vietnam eBook on the Battle for Tra Bong Vietnam: Events and Aftermath
Smartphone displays are rarely the same aspect ratio as YouTube videos. That leaves black bars on the sides. You can pinch-to-zoom to fill the screen, but if you are always doing that, you might as well make it default.
Smartphone displays are rarely the same aspect ratio as YouTube videos. That leaves black bars on the sides. You can pinch-to-zoom to fill the screen, but if you are always doing that, you might as well make it default. Let’s explore how to setup viewing a YouTube video in full screen.
This is is for the iPhone, iPad, and Android. Screenshots are from iPhone XR.
Copyright Scott Adams, Inc./Distributed by Universal Uclick for UFS
First, open the YouTube app on your iPhone, iPad, or Android device. Now, tap your profile icon in the top-right-hand corner. Refer to below image:
Accessing your Profile icon
Next, tap Settings from the menu. See below image:
Accessing Settings
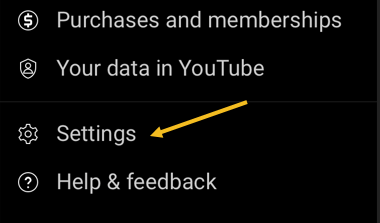
Now, go to the General section. See following image:
Accessing General section
Next, toggle the switch for Zoom to fill screen to ON. Refer to below image:
Toggle ON the Zoom to fill screen
Now, you will no longer need to zoom in on every YouTube video to take up the entire screen.
Quote For the Day
An iPod, a phone, an internet mobile communicator… these are NOT three separate devices! And we are calling it iPhone! Today Apple is going to reinvent the phone. And here it is.
Steve Jobs
You are finished. Please feel free to share this post! One way to share is via Twitter.
Just click the Tweet icon below. This will launch Twitter where you click its icon to post the Tweet.
Check out TechSavvy.Life for blog posts on smartphones, PCs, and Macs! You may email us at contact@techsavvy.life for comments or questions.
Please feel free to leave a comment. I would love hearing from you. Do you have a computer or smart device tech question? I will do my best to answer your inquiry. Just send an email to contact@techsavvy.life. Please mention the device, app and version that you are using. To help us out, you can send screenshots of your data related to your question.
The author’s Vietnam eBook on the Battle for Tra Bong Vietnam: Events and Aftermath
With so many devices and so many social media accounts, it can be hard to remember where you are logged in to which accounts. To protect yourself from potential hacks, it’s a good idea to log out of social media sites, like Facebook, once you are done with your session, especially if you are using someone else’s device.
With so many devices and so many social media accounts, it can be hard to remember where you are logged in to which accounts. To protect yourself from potential hacks, it’s a good idea to log out of social media sites, like Facebook, once you are done with your session, especially if you are using someone else’s device.
But, if you forgot to log out, or suspect an unauthorized third-party login, you can still log out of all devices at once from your Facebook’s account settings. Let’s explore how this is done.
This is for devices running Facebook
Copyright Scott Adams, Inc./Distributed by Universal Uclick for UFS
Use Mobile App
If you use an iPhone, iPad, or Android phone, you can use the official Facebook app to sign out from Facebook on all your devices at once.
First, launch the Facebook app on your smartphone.
In the Facebook app, tap the three horizontal lines menu. On an iPhone or iPad, this menu is at the bottom of the screen. On an Android phone, you will find this menu at the top-right corner of the display. Refer to below image:
Accessing the Menu
Next, scroll down the Menu screen that opens, and tap Settings & Privacy. See below image:
Accessing Settings & Privacy option
Now, select Settings. See following image:
Accessing Settings option
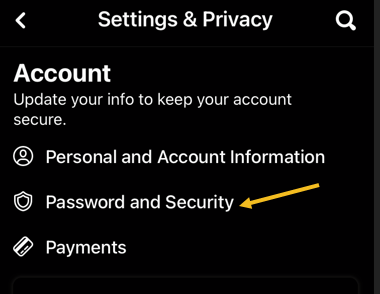
Next, scroll down to the Account section. Here, tap Password and Security. Refer to below image:
Accessing Password and Security option
Now, on the Where you’re logged In header, tap See All. (Note! My display text automatically changes size and the See All may be somewhat hidden depending on font size. See below image:
Accessing See All option
Facebook will display the list of devices where you use your account. At the bottom of this screen, tap Log Out of All Sessions. See following image:
Accessing Log Out Of All Sessions option
Next, select Log Out. Refer to below image:
Confirm your action by tapping Log Out
And Facebook will log you out from all your logged-in devices!
To use your Facebook account on those devices again, you will have to enter your Facebook username and password.
If you just want to log out of one session, tap the 3-dot icon to the right of a session, then tap Log Out and the session will be removed. See below image:
Log Out of one session
Use Facebook Site
If you are on a Windows, Mac, Linux, or Chromebook computer, use the Facebook site to sign yourself out from all your Facebook logged-in devices.
First, launch a web browser on your computer and open the Facebook site.
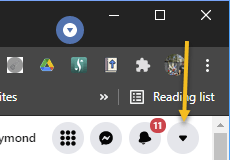
Next, at the top-right corner, click the down-arrow icon. See following image:
Accessing the Menu
Now, select Settings & Privacy. Refer to below image:
Accessing Settings & Privacy option
Next, choose Settings. See below image:
Accessing Settings option
Facebook will take you to your account’s settings page. Here, in the sidebar to the left, click Security and Login. See following image:
Accessing Security and Login option
Now, from the Where You’re Logged In section, click the See More option. Refer to below image:
Accessing See More option
Next, you will see a list of devices where you use your Facebook account. To sign out of all these devices, click Log Out Of All Sessions at the bottom-right corner of the Where You’re Logged In section. See below image:
Accessing Log Out Of All Sessions
Now, a Log Out of All Sessions prompt will appear. Next, click Log Out in the prompt to confirm your choice. See following image:
Confirm your action by tapping Log Out
And Facebook will log you out from all your logged-in devices!
To use your Facebook account on those devices again, you will have to enter your Facebook username and password.
If you just want to log out of one session, click the 3-dot icon to the right of the session, then click Log Out and the session will be removed. Refer to below image:
Log Out of one session
Quote For the Day
The thing that doesn’t fit is the thing that’s the most interesting: the part that doesn’t go according to what you expected.
Richard P Feynman
That’s it. Please feel free to share this post! One way to share is via Twitter.
Just click the Tweet icon below. This will launch Twitter where you click its icon to post the Tweet.
Check out TechSavvy.Life for blog posts on smartphones, PCs, and Macs! You may email us at contact@techsavvy.life for comments or questions.
Please feel free to leave a comment. I would love hearing from you. Do you have a computer or smart device tech question? I will do my best to answer your inquiry. Just send an email to contact@techsavvy.life. Please mention the device, app and version that you are using. To help us out, you can send screenshots of your data related to your question.
The author’s Vietnam eBook on the Battle for Tra Bong Vietnam: Events and Aftermath
Do you have videos on your smartphone that you want to upload to YouTube but not sure how to do this? If you have recorded videos with your smartphone, you can upload them directly to your YouTube channel from your iPhone or Android device.
Do you have videos on your smartphone that you want to upload to YouTube but not sure how to do this? If you have recorded videos with your smartphone, you can upload them directly to your YouTube channel from your iPhone or Android device. Let’s see how this is done.
This is for iPhone and Android
Copyright Scott Adams, Inc./Distributed by Universal Uclick for UFS
First, to upload a video to YouTube from your iPhone or Android device, you will need the official YouTube app on your phone. Download and install the app on your iPhone or Android device, if you have not already done so. To search for the app on an iPhone, go to your very first screen, the Spotlight Search, and type in “YouTube” to locate the app.
Uploading a Video
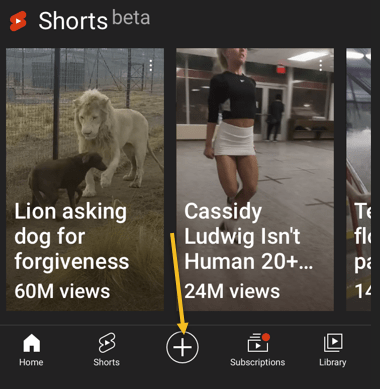
Next, launch the YouTube app on your phone and log in to your YouTube (Google) account. Then, from the bar at the bottom of the app, select the “+” (plus) sign. Refer to below image:
Accessing the Add icon
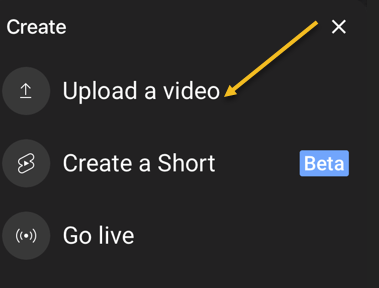
Now, YouTube will open a Create menu. Select Upload a video from this menu. Note! If you want to make a YouTube Short, tap the Create a Short option, or, to stream a video, tap the Go live option. See below image:
Selecting to Upload a video
Next, you will see an Upload screen that displays all your phone’s videos. Here, tap the video that you would like to upload to YouTube. Then, when the video begins to play, tap NEXT at the top-right corner of the app. See following image:
Your Video to upload
Add Details
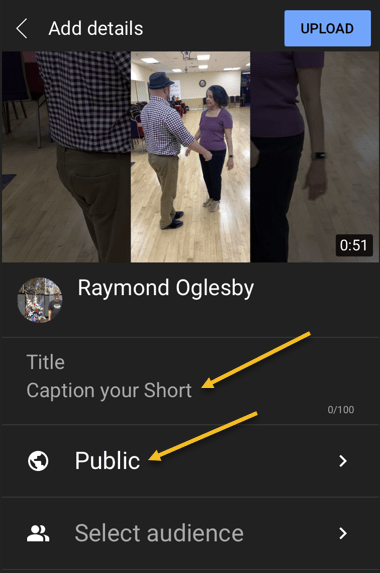
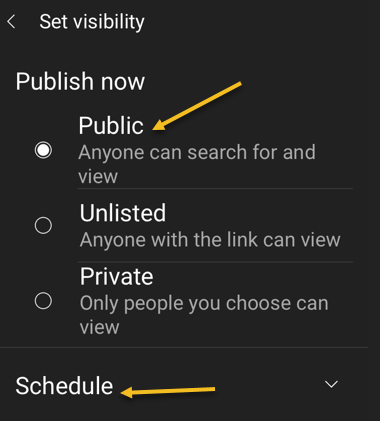
Now, you are on the Add details screen. Here, tap the Title field and enter a title for your video. Then tap Public to choose who can watch your video on YouTube. Refer to below image:
Add some details about your Video
Set Visibility, Schedule, and Audience
Next, on the Set Visibility screen, select one of these visibility options for your video:
Public: This allows anyone on YouTube to watch your video.
Unlisted: With this option, only the people you share your video’s link with can watch the video.
Private: Only you and the people you choose can watch the video.
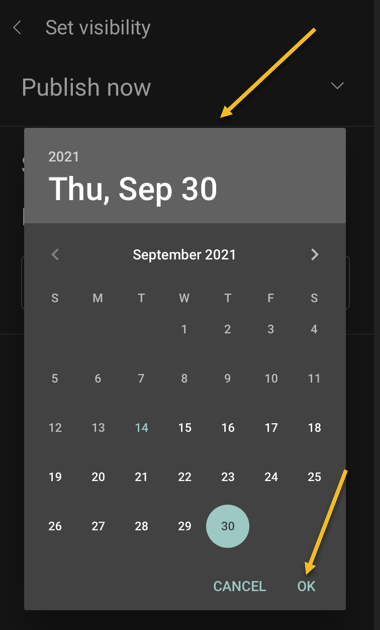
Now, tap Schedule to release your video on YouTube at a specific time. See below image:
Selecting who can see your Video
Set your date then tap OK. See following image:
Selecting the Video scheduled date
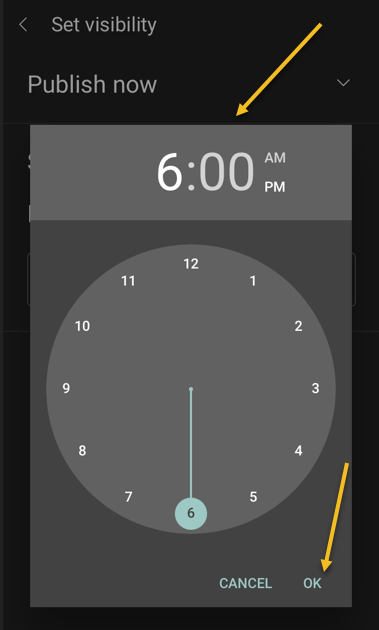
Set your time then tap OK. Refer to below image:
Selecting the Video scheduled time
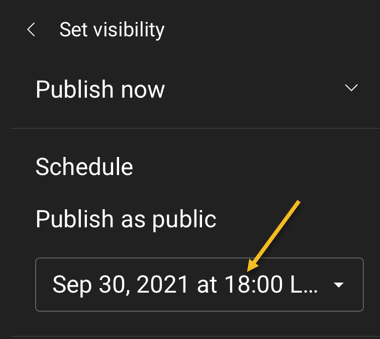
Your scheduled release of the video is displayed. See below image:
Your Video release date and time
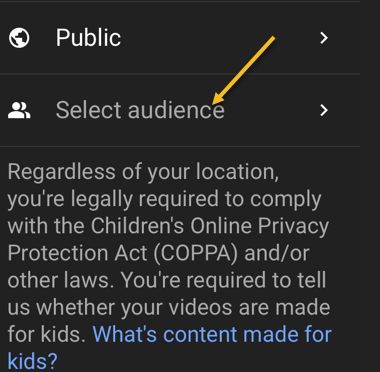
Next, tap the Select audience option. See following image:
Selecting your Audience
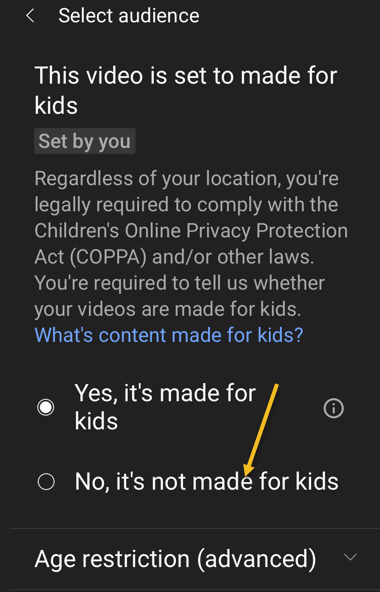
If your video is meant for kids, select the Yes, it’s made for kids option. Otherwise, select the No, it’s not made for kids option. If you choose the No… option, you can specify further options by tapping Age restriction (advanced). Next, at the top-right corner of the app, tap Upload (not shown). Refer to below image where we selected the video is made for kids:
Selecting who is your Audience
Edit Your Video Details
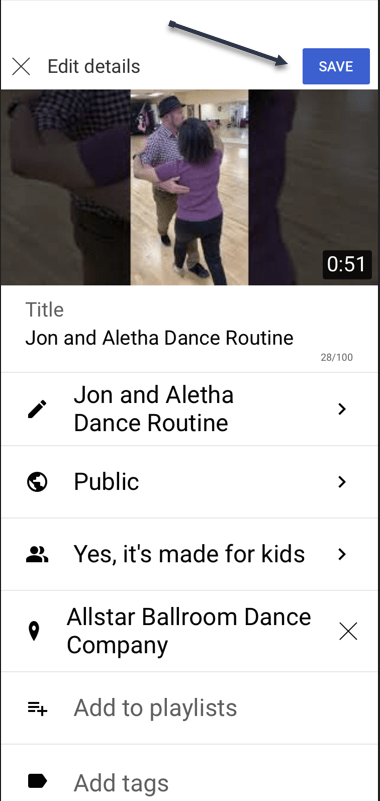
Your video will begin to upload to YouTube. When that’s done, go to Library > Your videos section of the YouTube app. Then, tap the video 3 dots menu button. Now, tap Edit to open the Edit Details screen and make any changes. When you are finished, tap Save. See below image:
Edit your Video details
Your Videos Listing
Next, access Your videos section to see your uploaded video. See following image:
Your recently uploaded Video
And that’s how you begin your journey of becoming a YouTuber!
Quote For the Day
Remembering that you are going to die is the best way I know to avoid the trap of thinking you have something to lose. You are already naked. There is no reason not to follow your heart.
Steve Jobs
You are finished. Please feel free to share this post! One way to share is via Twitter.
Just click the Tweet icon below. This will launch Twitter where you click its icon to post the Tweet.
Check out TechSavvy.Life for blog posts on smartphones, PCs, and Macs! You may email us at contact@techsavvy.life for comments or questions.
Please feel free to leave a comment. I would love hearing from you. Do you have a computer or smart device tech question? I will do my best to answer your inquiry. Just send an email to contact@techsavvy.life. Please mention the device, app and version that you are using. To help us out, you can send screenshots of your data related to your question.
The author’s Vietnam eBook on the Battle for Tra Bong Vietnam: Events and Aftermath
What does it mean to pin a post on Facebook? A pinned post is a status update that you manually select to stay at the top of your page’s timeline, meaning it will not slip down as you continue to add other posts to your page.
What does it mean to pin a post on Facebook? A pinned post is a status update that you manually select to stay at the top of your page’s timeline, meaning it will not slip down as you continue to add other posts to your page. Let’s explore how to do this.
This is for devices running Facebook
Copyright Scott Adams, Inc./Distributed by Universal Uclick for UFS
You can only have one post pinned to your profile at a time. If you try to pin a second post, that second post gets pinned and the first post gets unpinned.
Pin to Your Profile
First, launch a web browser on your computer and access the Facebook site. Next, log in to your account and in the top right-hand corner of the site, click your profile icon. Refer to below image:
Accessing your Profile
Now, on your profile page that opens, find the post you want to pin. At the top right-hand corner of the post, click the three dots menu. See below image:
Selecting the 3 dots menu
Next, from the three-dots menu, select Pin post. See following image:
Selecting to Pin your post
And immediately, Facebook will pin the selected post to the top of your profile page. Scroll up your profile and your pinned post will appear there. Refer to below image:
Your pinned post
To unpin a pinned post, from the top right-hand corner of the pinned post, select the three dots menu and click Unpin post in the menu. See below image:
Selecting to Unpin your post
Facebook will remove the post from the top of your profile page. It will continue to appear at its original location in your profile, though. Now, refresh the page or exit Facebook.
In addition to your personal profile, you can pin a post to your Facebook page, too.
First, access your page and find a post to pin. (Note! I am doing this on my business page using my iPhone). Next, at the top right-hand corner of the post, click the three dots menu. See following image:
Selecting the 3 dots menu
Now, from the three-dots menu, select Pin to Top. Refer to below image:
Selecting to Pin your post
Next, Facebook will add your selected post to the top of the page.
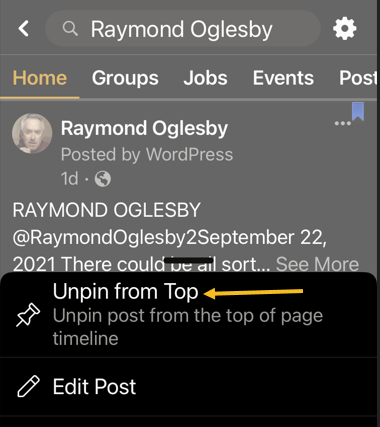
To remove the post from the top of the page, from the top right-hand corner of the post, click the three dots menu. Next, from the menu that opens, select “Unpin from Top. See below image:
Selecting to Unpin your post
Quote For the Day
You can’t just ask customers what they want and then try to give that to them. By the time you get it built, they’ll want something new.
Steve Jobs
That’s it. You now know how to pin/unpin a Facebook post. Please feel free to share this post! One way to share is via Twitter.
Just click the Tweet icon below. This will launch Twitter where you click its icon to post the Tweet.
Check out TechSavvy.Life for blog posts on smartphones, PCs, and Macs! You may email us at contact@techsavvy.life for comments or questions.
Please feel free to leave a comment. I would love hearing from you. Do you have a computer or smart device tech question? I will do my best to answer your inquiry. Just send an email to contact@techsavvy.life. Please mention the device, app and version that you are using. To help us out, you can send screenshots of your data related to your question.
The author’s Vietnam eBook on the Battle for Tra Bong Vietnam: Events and Aftermath
Google Chrome 93 is officially here. There is plenty to be excited about. For example, with Chrome 93, progressive web apps (PWAs) feel a lot more like native desktop apps, as clicking on a link can open an associated web app. There’s also improved multi-screen support for web apps, making this an update web app users will love.
Google Chrome 93 is officially here. There is plenty to be excited about. For example, with Chrome 93, progressive web apps (PWAs) feel a lot more like native desktop apps, as clicking on a link can open an associated web app. There’s also improved multi-screen support for web apps, making this an update web app users will love. Let’s explore how to install Chrome 93.
This is for Windows, Android, Mac, iPhone, and iPad
Copyright Scott Adams, Inc./Distributed by Universal Uclick for UFS
Some new features are related to recently closed tabs, a Material You theme for Android 12, a new Google Search UI on Android, the ability to sync Two-Factor OTP codes across devices (a true game-changer), the ability to use note-taking apps right from the browser, a new context menu on iPhone, and so much more.
Chrome 93 will now also show Google Drive documents on the New Tab page. The suggested documents will appear in a card underneath the Search Bar, allowing you to easily access recently edited Google Docs or Sheets.
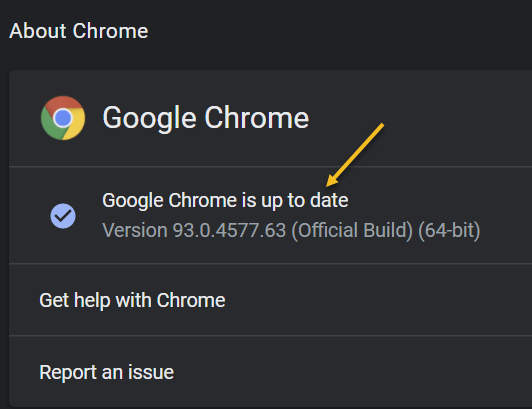
First, you can check for an update by going to the three-dot menu hamburger icon on the top-right of Chrome. Next, click Help followed by About Google Chrome. Refer to below image:
Selecting the About option
Now, the Chrome Settings window open. If Chrome is outdated, it will automatically download and install the latest version. See below image:
Your Chrome version
Now, close Chrome and restart the app.
If you are on iPhone or Android, update the app as you would for any other application.
Quote For the Day
The most remarkable discovery in all of astronomy is that the stars are made of atoms of the same kind as those on the earth.
Richard P Feynman
You are finished. Please feel free to share this post! One way to share is via Twitter.
Just click the Tweet icon below. This will launch Twitter where you click its icon to post the Tweet.
Check out TechSavvy.Life for blog posts on smartphones, PCs, and Macs. You may email us at contact@techsavvy.life for comments or questions.
Please feel free to leave a comment. I would love hearing from you. Do you have a computer or smart device tech question? I will do my best to answer your inquiry. Just send an email to contact@techsavvy.life. Please mention the device, app and version that you are using. To help us out, you can send screenshots of your data related to your question.
The author’s Vietnam eBook on the Battle for Tra Bong Vietnam: Events and Aftermath
Spotting things in a spreadsheet can be much quicker when you nightlight them. With conditional formatting in Microsoft Excel, you can make finding blank cells or formula errors easier.
Spotting things in a spreadsheet can be much quicker when you highlight them. With conditional formatting in Microsoft Excel, you can make finding blank cells or formula errors easier. Let’s explore how this feature works.
This is for devices running Microsoft Excel
Copyright Scott Adams, Inc./Distributed by Universal Uclick for UFS
Highlight Blank Cells
When you have a spreadsheet full of data that you expect to fill every cell, you can easily overlook cells that are left empty.
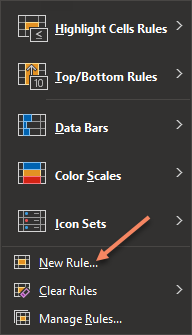
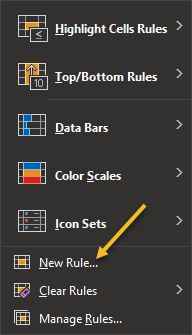
First, open the sheet and select the cells where you want to apply the formatting. Next, go to the Home tab and click Conditional Formatting in the Styles group of the Ribbon. Now, choose New Rule. Refer to below image:
Select New Rule option
Next, in the New Formatting Rule window that appears, click Format only cells that contain under Select a Rule Type at the top. See below image:
Select a Rule Type option
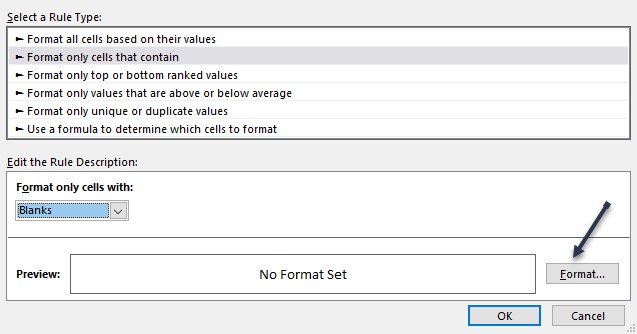
Now, at the bottom, pick Blanks in the Format only cells with drop-down box. Next, click Format to the lower right of the preview to select how to format the blank cells. See following image:
Select Format Cells with blanks
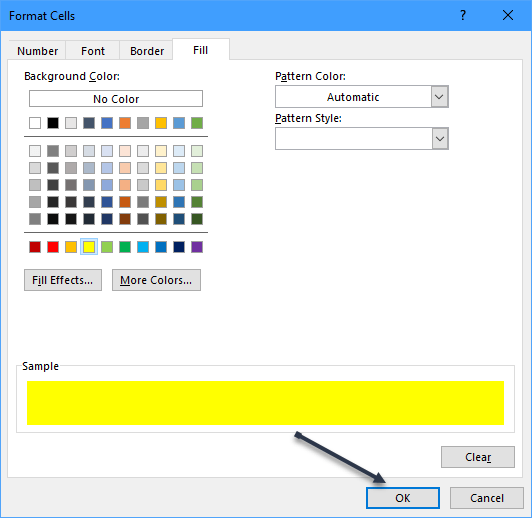
Now, in the Format Cells window, use the tabs at the top for Font, Border, and Fill to choose your formatting. Click OK. For our example, we are using Fill to color our blank cells bright yellow. Refer to below image:
Select choose a Fill color
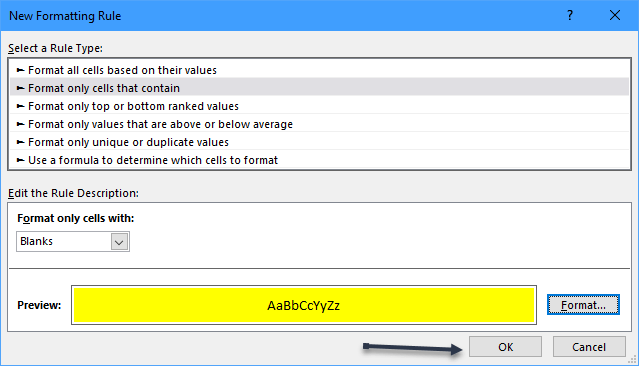
You will be back on the New Formatting Rule window, where you will see a preview of the formatting for blank cells. If you are happy with it, click OK to apply the conditional formatting. See below image:
Save your changes
You should then see any empty cells in the range that you selected highlighted with the formatting that you picked. See following image:
Your final result
Highlight Error Cells
Even though Microsoft Excel does a decent job of of pointing errors out to you, they might not be noticeable if you have a large sheet to scroll through. To make sure that you see the errors quickly, conditional formatting is the way to go.
You will actually follow the same process that you used in the previous section to highlight blanks, but with one difference.
First, switch to the Home tab, click Conditional Formatting, and then choose New Rule. Refer to below image:
Select New Rule option
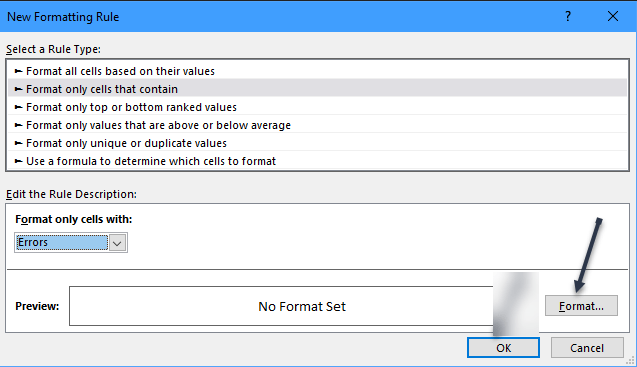
Next, in the New Formatting Rule window, pick Format only cells that contain at the top. But this time, pick Errors in the Format only cells with drop-down box at the bottom.Now, click Format to choose the formatting. See below image:
Select Format for errors
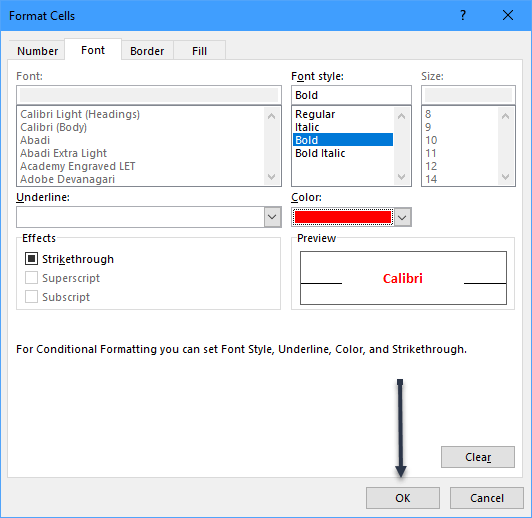
For this example, adjust the Font options to make the cells with errors bold and red. Click OK. After you pick the formatting, click OK again to apply the rule. See following image:
Select formatting for errors
Now, those errors will be very visible! Refer to below image:
Your final result
Quote For the Day
The true delight is in the finding out rather than in the knowing
Isaac Asimov
You are finished. Please feel free to share this post! One way to share is via Twitter.
Just click the Tweet icon below. This will launch Twitter where you click its icon to post the Tweet.
Check out TechSavvy.Life for blog posts on smartphones, PCs, and Macs! You may email us at contact@techsavvy.life for comments or questions.
Please feel free to leave a comment. I would love hearing from you. Do you have a computer or smart device tech question? I will do my best to answer your inquiry. Just send an email to contact@techsavvy.life. Please mention the device, app and version that you are using. To help us out, you can send screenshots of your data related to your question.
The author’s Vietnam eBook on the Battle for Tra Bong: Events and Aftermath
Twitter has tons of information that flows by faster than we can comprehend. Fortunately, it’s possible to search for tweets using various parameters. Let’s explore this feature.
This is for devices running Twitter
Copyright Scott Adams, Inc./Distributed by Universal Uclick for UFS
Search Tweets by Dates Range
Twitter provides both a mobile and a desktop browser Advanced Search page that lets you search for tweets posted within a certain date range. If you are on a mobile device, open your browser and click here for mobile. For the desktop browser, open your browser and click here for desktop.
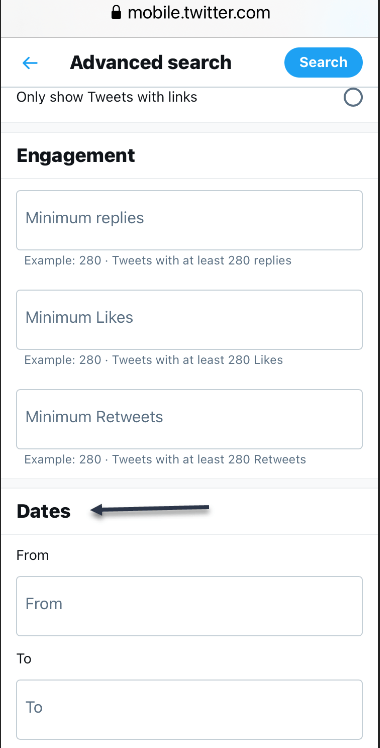
Now, on the Advanced Search page, scroll all the way down to the bottom to the Dates section. There, you will find two parameters: From and To. Refer to below image:
Accessing Dates section
Next, choose your desired month, day, and year for each parameter. Here’s what they do:
From: Set this to find tweets posted after midnight (12:00 a.m.) on this date.
To: Set this to find tweets posted up until midnight (12:00 a.m.) on this date.
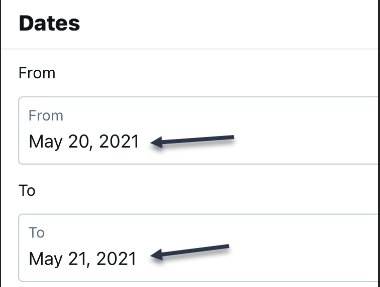
While this sounds simple, using the parameters can be confusing. For example, if you want to find tweets only from May 20, 2021, you would set From to “May 20, 2021” and To to “May 21, 2021.” You will get tweets posted between midnight on May 20 until midnight on May 21. You would not set both fields to the same date. See below image:
Setting From and To date
Similarly, if you wanted to find only tweets from the month of May 2021, you would set From to “May 1, 2021” and To to “June 1, 2021.” That way, your search will cover all 31 days of May.
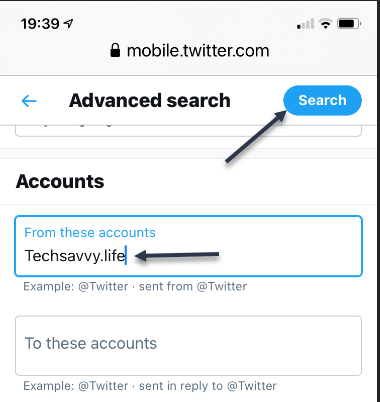
Now, scroll up and enter another parameter, such as a search term in the Words section, or an account name in the Accounts section. Next, click Search when you are done. See following image for an Account search:
Search an Account
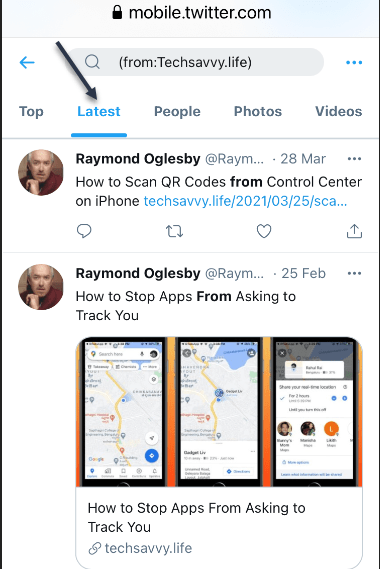
When you see the results, you can further sort them by different criteria using tabs located just below the search bar. Top shows the matching tweets with the most engagements. Latest shows all matching tweets in reverse chronological order. Refer to below image for the Latest using my domain name:
Display Latest posts for an Account
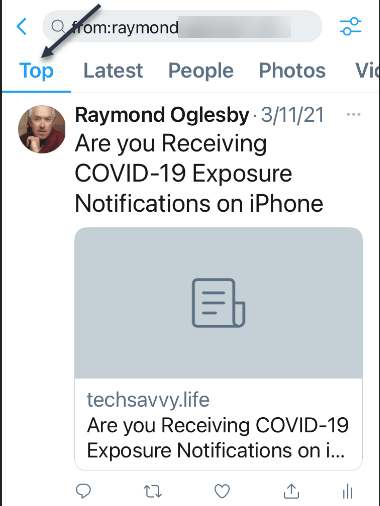
See below image for my Top posts using my Twitter name:
Display Top posts for a Twitter name
If you need to do another search, just revisit Twitter’s advanced search page and search again. It includes many parameters that allow you to narrow down tweets on certain dates, people, photos, videos, and much more.
Search Tweets by Date Range Using Inline Parameters
Another way of searching for tweets from a specific date or dates is using inline search parameters that you type directly into the search box in the Twitter app or on the Twitter website.
Here are three parameters that you can use:
Note! the following are just examples, not for literal input.
From: Find tweets posted only by this Twitter account. For example: from:raymondxxx or from:techsavvy.
Since: Find tweets posted since 12:00 a.m. on this date. The date format is YYYY-MM-DD. For example: since:2021-05-01.
Until: Find tweets posted until 12:00 a.m. on this date. The date format is YYYY-MM-DD. For example: until:2021-06-01.
For example, if you would like to see all tweets posted by the “techsavvy” Twitter account between May 1, 2021 and June 1, 2021, you would type the following into the Twitter search box:
from:techsavvy until:2021-06-01 since:2021-05-01
If you wanted to find all posts about “Safari” by “raymondxxx” posted on May 15, 2021, you would enter:
And so on. This kind of quick inline search can be quite powerful once you get the syntax of the date format. You can also find embarrassing old tweets and delete them.
Quote For the Day
There ain’t no answer. There ain’t gonna be any answer. There never has been an answer. That’s the answer.
Gertrude Stein
You are finished with learning how to find tweets using Advance Search. Please feel free to share this post! One way to share is via Twitter.
Just click the Tweet icon below. This will launch Twitter where you click its icon to post the Tweet.
Check out TechSavvy.Life for blog posts on smartphones, PCs, and Macs! You may email us at contact@techsavvy.life for comments or questions.
Please feel free to leave a comment. I would love hearing from you. Do you have a computer or smart device tech question? I will do my best to answer your inquiry. Just send an email to contact@techsavvy.life. Please mention the device, app and version that you are using. To help us out, you can send screenshots of your data related to your question.
The author’s Vietnam eBook on the Battle for Tra Bong: Events and Aftermath
Generally speaking, the more you tweet, the further your past tweets move down your profile page. However, Twitter makes it possible to pin a tweet so that it stays at the top of your page until you remove it.
If you use Twitter regularly, you may occasionally post a message that gains attention with other users or that you want to stand out from the rest of your feed.
Generally speaking, the more you tweet, the further your past tweets move down your profile page. However, Twitter makes it possible to pin a tweet so that it stays at the top of your page until you remove it.
Pinning tweets to the top of your Twitter profile will not take more than a few seconds, and you can unpin a tweet or choose a new one to pin in its place at any time. Let’s explore how to do this.
Note! You can only have one pinned tweet at a time. Pinning a new tweet will unpin any tweet you already have pinned.
This is for the iPhone and Android using Twitter
Copyright Scott Adams, Inc./Distributed by Universal Uclick for UFS
Pin a Tweet
Twitter’s mobile apps for iOS and Android allow you to pin tweets to your profile. You can also do this on your desktop.
First, open the Twitter app. Make sure you are logged in to your account.
Next, in the top-left corner of the app, tap the three horizontal lines. Refer to below image:
Accessing the Twitter menu
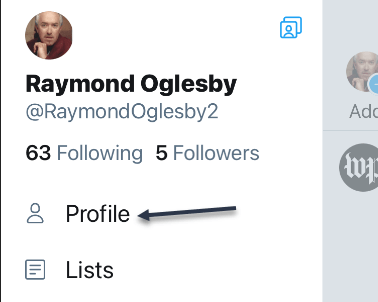
In the menu that opens, select Profile. See below image:
Accessing your Profile
Your Twitter profile opens. Now, scroll down and find the tweet to pin.
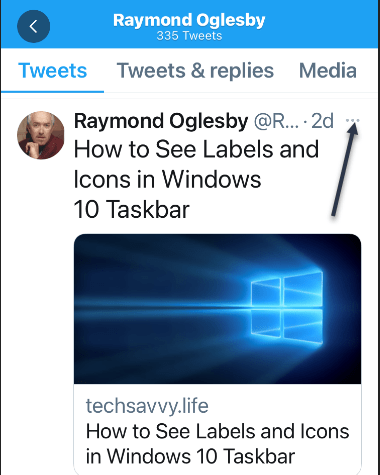
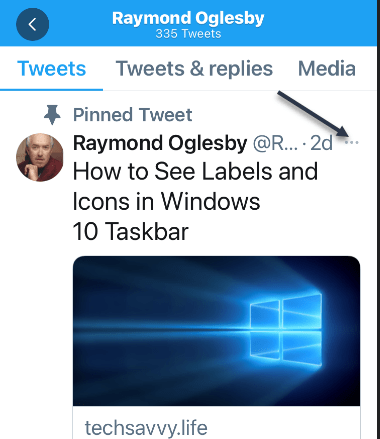
When you find the tweet, at the top-right corner of that tweet, tap the three-dots hamburger menu. See following image:
Accessing the Tweet menu
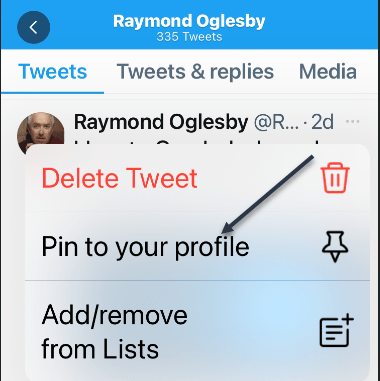
From the menu that pops up from the bottom of your phone’s screen, select Pin to profile. Refer to below image:
Accessing Pin tweet to your Profile
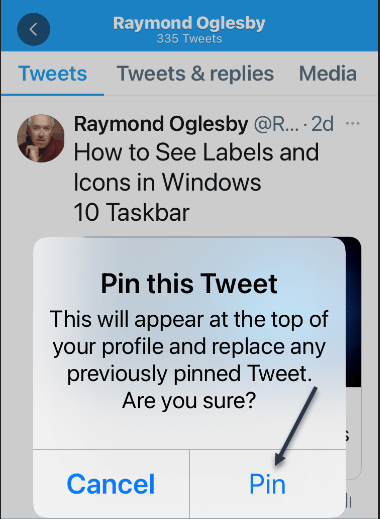
Select Pin in the prompt that appears in the middle of your phone’s screen. See below image:
Pin your tweet
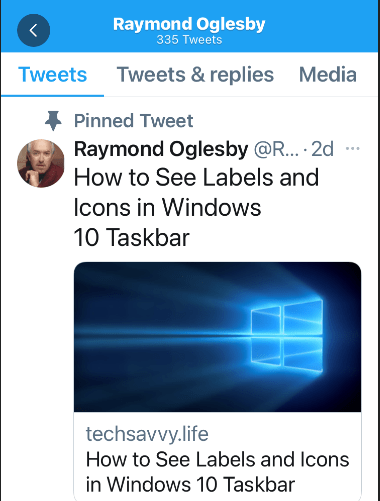
Your selected tweet is now pinned to your profile page. See following image:
Your pinned tweet
Unpin a Tweet
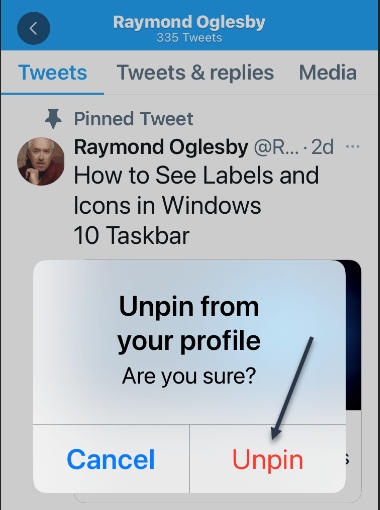
To unpin the tweet, scroll to the top of your profile page in Twitter’s mobile app. Then, at the top-right corner of the pinned tweet, tap the three-dots hamburger menu. Refer to below image:
Accessing your tweet menu
In the menu that appears from the bottom of your phone’s screen, tap Unpin from profile. See below image:
Accessing Unpin tweet from your Profile
Select Unpin in the prompt. See following image:
Unpin your tweet
And your tweet disappears from the top area of your Twitter profile.
It’s easy to pin and unpin tweets on Twitter, and you should make use of this feature to display your most important tweet at the top of your profile page.
Quote For the Day
The true sign of intelligence is not knowledge but imagination.
Albert Einstein
That’s it, a nifty feature. Please feel free to share this post! One way to share is via Twitter.
Just click the Tweet icon below. This will launch Twitter where you click its icon to post the Tweet.
Check out TechSavvy.Life for blog posts on smartphones, PCs, and Macs! You may email us at contact@techsavvy.life for comments or questions.
Please feel free to leave a comment. I would love hearing from you. Do you have a computer or smart device tech question? I will do my best to answer your inquiry. Just send an email to contact@techsavvy.life. Please mention the device, app and version that you are using. To help us out, you can send screenshots of your data related to your question.
The author’s Vietnam eBook on the Battle for Tra Bong: Events and Aftermath
Chances are good you will never seen malware up close and personal. Even if you threw caution to the winds and visited a dangerous site or clicked a treacherous link, your antivirus software probably wiped out any offending program before the latter could say boo. So, you might wonder, just what does malware look like? Would I even recognize a malware program if I saw it?
Chances are good you will never seen malware up close and personal. Even if you threw caution to the winds and visited a dangerous site or clicked a treacherous link, your antivirus software probably wiped out any offending program before the latter could say boo. So, you might wonder, just what does malware look like? Would I even recognize a malware program if I saw it?
To be fair, a lot of malicious programs do not look like anything at all. A virus, for example, tries its best to hide from view while infecting other files and computers. A bot sits quietly on your computer until it gets orders from the command and control center to spew some spam or participate in a DDoS attack on a major website. Trojans, by contrast, appear to be useful, legitimate programs, putting up a pretty façade to hide background activities like stealing your personal data. And when ransomware hollers for your attention, it’s bad news.
This is for all devices
Copyright Scott Adams, Inc./Distributed by Universal Uclick for UFS
The Horror of Ransomware
If a ransomware attack hits your computer, you will not know it at first. The ransomware stays out of sight, quietly encrypting your important files. Once the dirty work is done, the malware totally demands your attention with its ransom note. The perpetrators promise that if you pay the specified ransom (usually in Bitcoin or some other cryptocurrency) you will get your files back, but if they take your money and run, you do not have any recourse. You really do not want a direct encounter with ransomware.
Malware Bundled
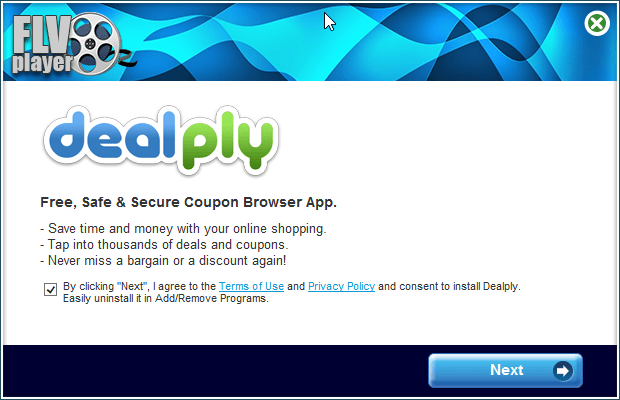
Sometimes the problem with an installation is notthe program itself, but the software that’s bundled with it. You may find completely legitimate software—even antivirus programs; bundled with adware, spyware, or other unwanted trash. In a case like that, the security vendor is not to blame. A third party created the deceptive bundle. AppEsteem is a young company with a mission to expose these deceptors and to warn legitimate companies when they stray too far toward the dark side of bundling.
The installer shown here offers a free player for FLV video files. Along with the player you are privileged to receive a shady Adware program masquerading as a coupon browser. There’s a checkbox that says you agree to its terms; uncheck the box and you can not proceed. No video player for you! The best thing that can happen with this kind of bundling is that you’re forced to install a program you did not want. Mostly it’s worse than that, because the bundled bonus is malware. Refer to below image:
Bundled Malware
Now here’s something handy; a multi-utility install program. If you read Russian, you know it’s “the fastest and most convenient way to install programs.” Just check the boxes for the ones you want and turn the installer loose. The list includes browsers, messenger programs, video players, even antivirus utilities. But when you install them, you also get a dose of malware. See below image:
Utility Pack Malware
Trojan Horses
Here, we have a sharp-looking utility designed, apparently, to ensure that your PC does not limp along with old, outdated drivers. However, if you try to update any drivers, or back up your existing drivers, you must pay. This is a model used both by some legitimate programs and by rogue antivirus scareware utilities. Lucky you, though: there’s a promotional price that ends today. Its overt activities are just a wee bit suspicious. See following image:
Driver Malware
Want to get into smartphone repair? This set of tools and manuals looks like it might be a big help. Alas, you ca not see just what you’re getting until you pay for your registration. While you are perusing schematics, it collects personal information behind the scenes and takes orders for further unwanted activity from a remote command and control server. Refer to below image:
Smartphone Malware
You probably do not know this, but the EXE files that represent programs on your Windows computer are also called PE files, short for Portable Executable. Every PE file starts with an extensive header that contains a ton of information telling Windows about the program. Malware researchers learn a lot by digging into that header. See below image:
Portable Executable Malware
Lets Hope You Don’t See These
As you can see, malicious programs, like legitimate programs, run the gamut from sad-looking attempts to totally professional ones. With any luck, and with powerful, up-to-date antivirus protection, these images are the only malware you will ever see. Malware is just one of many threats to your devices and private information.
A few reminders to keep the bad guys away in your emails and phone calls:
Do not click that link. Instead hover your mouse over each element of the email and look for anything suspicious. If suspicious, do not click that link – per my son, VP at True Digital Security.
Do not open emails from FedX, USPS, Wells Fargo, Walmart, Cox Communications, Thank You, SSA, or VA if you have no dealings with them. They will contact you by mail not by phone.
Do not give out personal informati0n over the phone. If you need to contact someone, you initiate the call.
Never buy gift cards or give out their serial number.
If your Userid or Password has been leaked in a data breech, change them as soon as possible.
Quote For the Day
I don’t pretend we have all the answers. But the questions are certainly worth thinking about.
Arthur C Clarke
That’s it. Please feel free to share this post! One way to share is via Twitter.
Just click the Tweet icon below. This will launch Twitter where you click its icon to post the Tweet.
Check out TechSavvy.Life for blog posts on smartphones, PCs, and Macs! You may email us at contact@techsavvy.life for comments or questions.
Please feel free to leave a comment. I would love hearing from you. Do you have a computer or smart device tech question? I will do my best to answer your inquiry. Just send an email to contact@techsavvy.life. Please mention the device, app and version that you are using. To help us out, you can send screenshots of your data related to your question.
The author’s Vietnam eBook on the Battle for Tra Bong: Events and Aftermath