How to Secure Your iOS Lock Screen

Do you want to configure your iOS Lock Screen to block those picking up your device from reading messages, viewing the Today View or interacting with Siri.

Do you want to configure your iOS Lock Screen to block those picking up your device from reading messages, viewing the Today View or interacting with Siri.

It may appear that securing our devices with Touch ID and Face ID is all we need to protect our data. However, there’s other data accessible on the Lock Screen that can still be read by potential data thieves or on-lookers that can gain valuable information.

Lets explore how to secure the Lock Screen so that your messages and push notifications aren’t visible to anyone except you when you pick up your device. We’ll do this by disabling push notification, Siri and the Today View when the device is locked.

By doing the above, you will make your device more secure and prevent onlookers, or someone picking up your device, from gaining access to your private information contained on the Lock Screen.

This is for the iPhone and iPad running iOS 13+. Screenshots are for iPhone

Dilbert and Stupid
Copyright Scott Adams, Inc./Distributed by Universal Uclick for UFS

Click to tweet on how you like TechSavvy.Life!

Disable Notification and the Today View

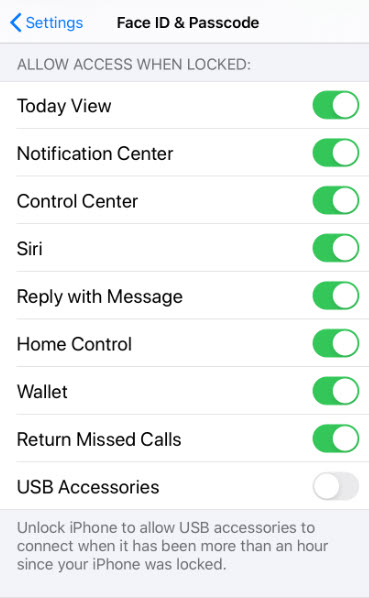
Open the Settings app. Next, select Face ID & Passcode. Enter your Passcode to proceed. Then, scroll down till you see the section ALLOW ACCESS WHEN LOCKED. Now, toggle off all options except for Siri. We will handle Siri in the Disable Siri section below. Just ignore the USB Accessories option. You will be toggling off 7 options. Refer to below for before toggling off image:

iPhone Lock Screen 1
Before disabling

Refer to below for after toggling off image:

iPhone Lock Screen 2
After disabling

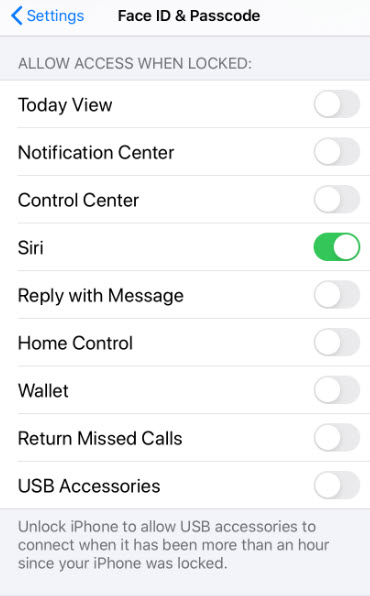
Unchecking items in this section will make them unavailable from the Lock Screen when the user is not authenticated by Passcode, Touch ID or Face ID.

There is an alternative feature if you are using a Face ID device.

Open the Settings app. Next, select Face ID & Passcode. Enter your Passcode to proceed. Scroll down to the ATTENTION section. Now, toggle on Attention Aware Features. See below image:

iPhone Lock Screen 3
Setting the Attention Aware Features

The Attention Aware Features setting is available on iPhone and iPads with Face ID.

When this option is enabled, you will be unable to view notifications on the Lock Screen or Notification Center until the face of the device owner is visible to the Face ID sensor. This feature also provides not dimming the screen when looking directly at it and lowering the volume when the device is picked up.

However, the Today View, will still be visible. You can disable this behavior from the Lock Screen by following instructions in Disable Notifications and the Today View section above.

Disable Siri

If you want to ensure the highest privacy protection, you can disable Siri on the Lock Screen till your device has been authenticated with the Passcode, Touch ID or Face ID.

Open the Settings app. Next, select Siri & Search. Toggle off the Allow Siri When Locked option. See following image:

iPhone Lock Screen 4
Disabling Siri

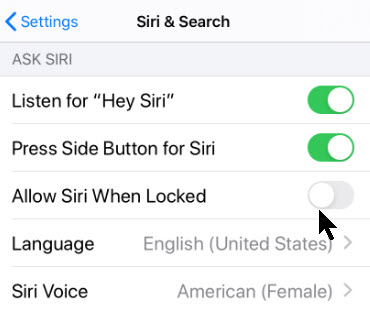
Now whenever you try to access Siri and any personal requests it allows, you will first need to enter your Passcode, Touch ID or Face ID.

Click to tweet if you find TechSavvy.Life blog posts extremely helpful. Check them out for posts on smart phone apps, Macs and PCs!

I Would Like to Hear From You

Please feel free to leave a comment. I would love hearing from you. Do you have a computer or smart device tech question? I will do my best to answer your inquiry. Please mention the device, app and version that you are using. To help us out, you can send screenshots of your data related to your question.

The author’s Vietnam eBook on the Battle for Tra Bong: Events and Aftermath

What Is Apple’s iCloud Service?

ICloud is Apple’s umbrella term for cloud-syncing feature. Basically, anything that is backed up or synced with Apple’s servers is considered a part of iCloud.

ICloud is Apple’s umbrella term for cloud-syncing feature. Basically, anything that is backed up or synced with Apple’s servers is considered a part of iCloud.

The purpose of iCloud is to store data securely on Apple’s remote servers. All your data is backed up and synchronized between all your devices. This allows you to retrieve your data in case you lose your smart device.

If so, you simply log into iCloud.com to retrieve your data or sign in with your Apple ID to automatically restore your data on your new smart device.

This is for smart devices and desktop/laptops. Screenshots are from iPhone and PC

Dilbert and Disband
Copyright Scott Adams, Inc./Distributed by Universal Uclick for UFS

Click to tweet on how you like TechSavvy.Life!

Sign In On Your Apple Device

Visit iCloud.com on your smart device and sign in with your Apple account to see what services are cloud synced.

When you sign in you can access most of these features:

  1. Photos
  2. Notes
  3. Reminders
  4. Find My iPhone

Refer to below image:

Your iCloud services on a smart device

Your Account Settings

From your smart device, you can also access your Accounts Settings by clicking the blue link. Here you can view your Storage. See below image:

Your smart device storage

To see everything that your iCloud account is backing up, open the Settings app on your smart device, select your Profile at the top of the list, then navigate to the iCloud section. Here you can enable or disable app data backup. See following image;

Enable/disable apps to be backed up

Manage Storage

To manage your iCloud storage. Click on the Manage Storage section. Refer to below image:

Manage your storage

Here you can upgrade to a monthly storage plan for more storage by clicking on Change Storage Plan. See below image:

Change your storage plan

You can purchase 50GB for $.99, 200GB for $2.99 or 2TB for $9.99 per month. See following image:

Set or upgrade your storage plan

Sign In On Your Desktop

Visit iCloud.com on your iPad, Mac or desktop and sign in with your Apple account to see what services are cloud synced.

When you sign in on your iPad, Mac or desktop you gain access to most of these features:

  1. Photos
  2. iCloud Drive
  3. Notes
  4. Mail
  5. Calendars
  6. Contacts
  7. Settings
  8. Reminders
  9. Pages, Numbers, or Keynote*
  10. Find My iPhone
  11. Find My Friends

See below image:

Your iCloud services from a desktop/laptop

Click to tweet if you find TechSavvy.Life blog posts extremely helpful. Check them out for posts on smart phone apps, Macs and PCs!

I Would Like to Hear From You

Please feel free to leave a comment. I would love hearing from you. Do you have a computer or smart device tech question? I will do my best to answer your inquiry. Please mention the device, app and version that you are using. To help us out, you can send screenshots of your data related to your question.

The author’s Vietnam eBook on the Battle for Tra Bong: Events and Aftermath

How to Find Text Using Safari on Your iPhone and iPad

At times it’s tough to find specific information within a web page in Safari for iPhone or iPad. Fortunately, Safari allows you to search for text on any currently open web page using either the touch screen or an attached keyboard. Let’s explore how to do this.

If you don’t have a keyboard hooked up to your iPhone or iPad, you can search for text within the current page using the touchscreen, although the feature is in a non-obvious place. This technique works both on iPhone and iPad.

This is for iPhone and iPad using the Safari web browser

Dilbert and Virus Deaths
Copyright Scott Adams, Inc./Distributed by Universal Uclick for UFS

Click to tweet on how you like TechSavvy.Life!

Find a Web Page

First, open Safari and navigate to the page you’d like to find text in. Once the page is loaded, tap on the Address Bar at the top of the screen. Refer to below image:

Safari Text 1
Locate a web page to Search

An on-screen keyboard will appear at the bottom of the screen and the current web page address will be highlighted. If you want, you can clear the address bar by tapping the backspace key on the keyboard (or tap on the small “X” in a circle beside the address). See below image:

Safari Text 2
Keyboard available for your Search

Set Your Search

Type in what you’d like to find on the page. Locate the On This Page section at the bottom of the search pop-up. Tap on the line just below it that starts with Find. See following image:

Safari Text 3

Enter your Search criteria

View Your Search

The pop-up will close and you will see the web page again with a search bar at the very bottom. Safari will highlight all occurrences of your search query on the current page. Refer to below image:

Safari Text 4
Your Search criteria highlighted

Navigate Your Search

You can cycle through the results, up and down the page, with the arrows beside the search bar. See below image:

Safari Text 5
Navigate your Search

Close Your Search

When you’re finished searching, tap Done in the lower-left corner of the screen. The Find in page mode will close. See following image:

Safari Text 6
Close your Search

Click to tweet if you find TechSavvy.Life blog posts extremely helpful. Check them out for posts on smart phone apps, Macs and PCs!

I Would Like to Hear From You

Please feel free to leave a comment. I would love hearing from you. Do you have a computer or smart device tech question? I will do my best to answer your inquiry. Please mention the device, app and version that you are using. To help us out, you can send screenshots of your data related to your question.

The author’s Vietnam eBook on the Battle for Tra Bong: Events and Aftermath

How Do You Start Safari With a Blank Page?

In the “old days”, back to iPhone 4, Safari was slooooow to load. By default, Safari either loads the last page you visited or your bookmarks. This tip will start Safari with a blank page. Then you can immediately begin searching for a particular topic without having to wait for graphics and text to load or for installed apps.

This is the second post in a series on Apple iPhone and its Safari web browser. I am updating and republishing this post. I just read another long blog about how to stop Safari from opening apps upon startup. All you have to do is start Safari with a blank page. Here’s how to do this.

In the “old days”, back to iPhone 4, Safari was slooooow to load. By default, Safari either loads the last page you visited or your bookmarks. This tip will start Safari with a blank page. Then you can immediately begin searching for a particular topic without having to wait for graphics and text to load or for installed apps.

This is for iPhone, iPad, and Mac using Safari web browser

Following are the steps to do this:

  • Tap on Safari, usually located in bottom right of your Home page
  • Tap on URL field and type “about:blank” (without quotation marks)
  • Tap Go (for iOS13 or higher)
  • Tap on the bottom Share arrow icon and scroll
  • Select Add to Home Screen to create a bookmark
  • Label the bookmark to something like “Blank Safari” (without any quotation marks)
  • Tap Add (for iOS13 or higher)
  • You will see a white blank Safari icon on your Home page. If you have several pages, it will appear on an empty icon space
  • You can drag this icon to wherever you want
  • When you tap this icon, Safari will instantly load a blank page

Your blank Safari screen should look like the following image:

Safari Blank Page
Just highlight the about:blank URL and enter your search criteria.

I Would Like to Hear from You

Please feel free to leave a comment. I would love to hear from you. Do you have a computer tech question? I will do my best to answer your inquiry. Please mention the app and version that you are using. To help me out, you can send screenshots of your data related to your question.

The author’s Vietnam eBook on the Battle for Tra Bong Vietnam: Events and Aftermath

How to Format Notes on iPhone and iPad

Using Apple Notes is a fast way to capture thoughts and take notes on your iPhone or iPad. You can do more than just take plain text notes. Instead you can organize your notes by using formatting tools to make them stand out from plain text. Let’s explore how to do this.

This is for iPhone and iPad

Dilbert and High Risk

Copyright Scott Adams, Inc./Distributed by Universal Uclick for UFS

When you start a new note, Apple formats the first line into a Title format. You can change this by going to your Settings app, then navigate to:

Notes > New Notes > Starts With

and select your format. By default, the rest of your note is plain text.

As mentioned earlier, you can use formatting tools. These tools include headings, lists, indentations and more. These features are somewhat obscure for a new user.

The Formatting Toolbar

After opening a new note, tap on the screen to bring up the keyboard, if not already in view. Next, tap on the Aa button above the keyboard, the format row. You will see the text formatting tools that you can use. Refer to below image:

Notes 1
Accessing the formatting toolbar

The keyboard is replaced by the formatting toolbar split into three rows. See below image:

Notes 2
The formatting toolbar

From the first row, the Title Heading, Subheading and more are available to use. Monospaced is the only available font style to use in Notes. See following image:

Notes 3
The titles formatting

When the toolbar is open, tap the X to close, tap the plus sign (+) to open, both to the left of the toolbar.

From the middle row, you can change selected text to Bold, Italic, Underline or Strikethrough formats. You may select multiple formats. Refer to below image:

Notes 4
The text formatting

The last row has different bullet styles, indent and outdent formats. See below image:

Notes 5
The lists formatting

The Checklist is separate from the formatting toolbar. To add a checklist, tap on the Checklist icon. Simply, start typing in your item. Tap the Enter key to add a new item. To stop the checklist, tap the Enter key on an empty line. Refer to below image:

Notes 6
The checkbox formatting

To create a numbered list, start by typing 1 and then your first entry. To end your list, tap the Enter key on a blank line.

The Toolbar Examples

For a look at all our examples, see below image:

Notes 7
The entire formatting examples

I Would Like to Hear From You

Please feel free to leave a comment. I would love hearing from you. Do you have a computer or smart device tech question? I will do my best to answer your inquiry. Please mention the device, app and version that you are using. To help us out, you can send screenshots of your data related to your question.

The author’s Vietnam eBook on the Battle for Tra Bong: Events and Aftermath

How to Use Widgets on Your iPhone and iPad

When you swipe right on your iPhone Lock or Home screen, you are presented with the Today View screen. On this screen are widgets from Apple main apps. If you want to customize this screen, you can add and customize widgets from Apple and/or third-party apps. Also, you can rearrange these widgets to your liking.

By default, Apple shows you the widgets from the Calendar, Siri App Suggestions, News, Weather and more. But that’s not all. When you go into the editing mode, you’ll discover that many of the apps that you have installed (whether they’re popular apps or not) include useful widgets.

You can add extra functionality to your iPhone using third-party app widgets. Here are a couple of recommendations:

This is for iPhone and iPad devices. Text and screenshots are for the iPhone.

Dilbert and Work
Copyright Scott Adams, Inc./Distributed by Universal Uclick for UFS

Accessing Your Widgets

Lets get started. First, swipe right when you’re on your iPhone’s Lock or Home screen to access the Today View. Here, you can swipe up to view more widgets and tap on any of the arrow buttons (to the right of the widget name) to expand or contract a widget. Refer to below image:

Widgets 1
Your Widgets screenshot

Editing a Widget

If we want to edit a widget, swipe all the way down to the bottom of the widgets screen and tap on the Edit button. See below image:

Widgets 2
Accessing the Edit button

At the top of the list are the widgets installed on your iPhone, they have a “-“ sign next to the widget name. See following image:

Widgets 3
Displaying your Widgets

Scroll down till you see the More Widgets listing, denoted by the “+” sign. Refer to below image:

Widgets 4
Listing of Widges you can add

Adding a Widget

When you see a widget you want to add, tap on that “+” sign next to the widget label. It will be added to the bottom of the enabled widgets list. Simply do this for each widget you want to add. In my example, I added the Bible widget. See following screen:

Widgets 5
Selecting a Widget to add

Remove a Widget

To remove a widget, navigate to the top of the list for the enabled widgets. Tap the “-“ sign left of the widget name, then tap the Remove option. Refer to below image for my removal of the Dropbox widget:

Widgets 6
Selecting a Widget to remove

This does not delete the iPhone app, only the widget associated with it.

Reorder Widgets

To reorder widgets, tap on the Hamburger icon to the right of the widget name and drag each item to a new location. See following image where I moved Siri App Suggestions to the top of the list:

Widgets 6
Rearrange a Widget

Saving Your Changes

To save all your changes, tap Done in upper right hand corner at the top of your enabled widgets list. Refer to below image:

Widgets 8
Saving all your changes

Note: Your must tap the Done option, if not, all your changes will be lost.

You will be taken back to the Today View with your saved changes.

When you add new apps, you can go back to the Edit screen and add new widgets to the Today View by following the above steps.

Checking if an App Has a Widget

To see if a widget is available for an app, press and hold the app icon. If it supports widgets, you will see the Add Widget link. Tap on it to add the widget to the bottom of Today View screen. See following image where I added back the Dropbox widget:

Widgets 9
Checking if your app has a Widget

As a confirmation, the Add Widget link will be replaced with a check mark. Refer to below image:

Widgets 10
Confirming your Widget has been added

That’s it. You have learned how to add, remove and rearrange your iPhone widgets. The process is similar for an iPad.

Feel free to tweet me. Thanks for reading this post and others.

I Would Like to Hear From You

Please feel free to leave a comment. I would love hearing from you. Do you have a computer or smart device tech question? I will do my best to answer your inquiry. Please mention the device, app and version that you are using. To help us out, you can send screenshots of your data related to your question.

The author’s Vietnam eBook on the Battle for Tra Bong: Events and Aftermath

How to Turn Off AutoFit Table Columns Feature in Word

Microsoft Word will auto adjust table column widths to fit the content you are entering. This is the default setting for a Word table. There are times you may not want this, instead, you want to control the column widths.

The default setting may push the table beyond the right margin or a column widens unnecessarily.

So, let’s see how to turn off AutoFit option and do table adjustments yourself.

This is for Office 365 Microsoft Word on PCs, Macs and similar platforms. Other versions of Word will be similar.

Dilbert and Security
Copyright Scott Adams, Inc./Distributed by Universal Uclick for UFS

Turn Off AutoFit Feature

To turn off this feature, first, place your cursor anywhere in the table you want to change.

Next, go to the Layout tab located in right hand side, not to be confused with the other Layout tab to the left side of the screen. Note! This option only appears when you are in a table. Refer to below image:

Word AutoFit 1

Now, click AutoFit and select the Fixed Column Width option. See below image:

Word AutoFit 2

You can now drag the column borders to your desired width. The column borders you set will stay that way even if you enter longer text into them. See following image:

Word AutoFit 3

Now, you can control Word’s table column widths. That’s it.

I Would Like to Hear From You

Please feel free to leave a comment. I would love hearing from you. Do you have a computer or smart device tech question? I will do my best to answer your inquiry. Please mention the device, app and version that you are using. To help us out, you can send screenshots of your data related to your question.

The author’s Vietnam eBook on the Battle for Tra Bong: Events and Aftermath

How to Use the Files App to Share Files and Folders

With the release of iOS 13.4 and above, you can now share files and folders using your favorite share connection. This feature is built into the Files app.

Apple engineers took a long time in releasing this feature. It’s about time. Let’s see how this is done.

This is for iPhone and iPad running iOS 13.4 or higher

Dilbert and Reports
Copyright Scott Adams, Inc./Distributed by Universal Uclick for UFS

Sharing a Folder

First, launch the Files app. Navigate to the iCloud folder you would like to share. Next, press and hold the folder until a menu appears. Now, select Share. See below image:

iPhone Files 1
Selecting the Share option for a folder

Next, select Add People. Refer to below image:

iPhone Files 2
Selecting the Add People option for the folder to be shared

Now, select a share method from the options like Mail, Messages, Messenger and so on. See following image:

iPhone Files 3
Selecting the share connection for the folder

Type in your subject and message, if necessary, then select your audience. When finished, Send your message. See below image:

iPhone Files 4
Selecting the recipient(s) for sharing the folder

Change Access Rights

First, launch the Files app. Navigate to the shared iCloud folder. Next, press and hold the folder until a menu appears. Select Share then select Show People. Refer to below image:

iPhone Files 5
Accessing the Show People option

Tap a person in the list. Refer below to my list:

iPhone Files 6
Selecting the recipient(s) to change access rights

You are given two options for Permission: Can make changes and View only. You can also change Who Can Access options for the folder by selecting Only people you invite and Anyone with the link. See below image:

iPhone Files 7
Setting the access rights

There is the option to remove the user’s access, just tap Stop Sharing and tap OK. See following image:

iPhone Files 8
Cancelling the sharing

I Would Like to Hear From You

Please feel free to leave a comment. I would love hearing from you. Do you have a computer or smart device tech question? I will do my best to answer your inquiry. Please mention the device, app and version that you are using. To help us out, you can send screenshots of your data related to your question.

The author’s Vietnam eBook on the Battle for Tra Bong: Events and Aftermath

How to Send a Message with Google Maps

By using Google Maps you can find the location of a restaurant, store or some other company. How about asking the business a question? In some cases, you can do so through Google Maps. If the entity supports Google Maps messaging feature, you can send a message to that company. If the company responds, you can carry on a back-and-forth conversation; like texting, but instead you are using Google Maps.

To date, this is the most unusual post I have written. Its relatively unknown to the business community. I recommend you try out my example before searching for a business in your area that uses Google Maps for messaging.

This feature is for your iOS (iPhone/iPad) or Android device or whatever smart device supports Google Maps

If you haven’t already done so, download and install Google Maps to your device.

Dilbert Purchasing
Copyright Scott Adams, Inc./Distributed by Universal Uclick for UFS

Search for a Business

  1. Launch Google Maps
  2. Search for a business you want to use or visit. In my example, I am searching for “Lobster House”. Refer to following image:
Google Maps 1
Search for Lobster House

If using my example, select the first entry. Refer to following screenshot:

Google Maps 2
Selecting First Entry for Lobster House

View the Overview Tab

Swipe Up below the map till you see the Overview tab, like the following image:

Google Maps 3
Overview Tab for Lobster House

If the company supports Google Maps messaging, in the center of the screen you will see a link that says “Contact us now

Type in Your Message

  1. Tap on this link
  2. Type in your message and tap the Send icon. A pertinent question might be reserving a table at a certain time instead of my example. Refer to following screen:
Google Maps 5
Messaging Lobster House

In my example of the “Lobster House”, they usually respond within a few hours. So, revisit the “Lobster House” for their reply by:

Search for Messages

  1. Searching for the business
  2. Swipe Up to view the Overview Tab
  3. Tap the 3 dots in upper right hand corner. Refer to following image:
Google Maps 6
Check for a Response

Reply to Messages

You will see the following screen. Tap on Message to view their reply. You can then reply back to the business if you need to.

Google Maps 7
The Message Screen

Whats challenging about this feature is finding a business that supports Google Maps messaging. Unfortunately, many do not. But, if a business of interest does offer messaging, you can use this feature to obtain more information about the company or perhaps, setup a reservation.

I Would Like to Hear from You

Please feel free to leave a comment. I would love hearing from you. Do you have a computer or smart device tech question? I will do my best to answer your inquiry. Please mention the device, app and version that you are using. To help us out, you can send screenshots of your data related to your question.

The author’s Vietnam eBook on the Battle for Tra Bong: Events and Aftermath

How to Add a Website on Your iPhone or iPad Home Screen

If you would like to access your favorite website from your iPhone or iPad Home screen (the first page), it’s easy to do. Using Safari, we can create a shortcut icon that allows you to just tap it to launch the site. It’s a handy way to speed up your iPhone or iPad experience. Note! The following guide is for an iPhone, but the steps are similar for an iPad.

This is for iPhone/iPad

Dilbert and Virus
Copyright Scott Adams, Inc./Distributed by Universal Uclick for UFS

Four Easy Steps

First, open Safari and navigate to the website you would like to appear on your Home screen. After the site has loaded, tap near the bottom of your screen. Now, make sure you can see the navigation toolbar at the bottom, then tap the Share icon (the rectangle with an up arrow). Refer to below image:

iPhone Website icon 1
Selecting the Share icon

The Share menu will appear. Swipe down thru the list, then tap Add to Home Screen. See below image:

iPhone Website icon 2
Chosing the option to add to Home screen

The menu for Add to Home Screen will appear. From this menu, give a name to the web icon using the on-screen keyboard. Next, tap Add in upper right hand corner. See following image:

iPhone Website icon 1
Assigning a name to the icon

The icon for the website will appear on your Home screen. If the first page of your Home screen is full of icons, your newly created icon will be placed in the first available page. Now, when you tap on the shortcut icon, Safari will open and load the website. Refer to below image:

iPhone Website icon 4
Your website icon on your Home screen or first available page

About the Web Shortcut Icon

The website icon we created with Safari looks and behaves like a regular app icon on the iPhone’s or iPad’s Home screen. You can rearrange it along with other apps, add it to a folder or drag it to the Dock.

You might notice that some websites have Home screen icons that seem perfectly tailored to the iPhone or iPad interface. That’s because these sites specifically created an image for this purpose. Your iPhone or iPad will generate a tiny thumbnail of the website to use as its icon.

I Would Like to Hear From You

Please feel free to leave a comment. I would love hearing from you. Do you have a computer or smart device tech question? I will do my best to answer your inquiry. Please mention the device, app and version that you are using. To help us out, you can send screenshots of your data related to your question.

The author’s Vietnam eBook on the Battle for Tra Bong: Events and Aftermath