Are you concerned someone may have access to your Twitter account? Do you know what devices are logged in? What if you moving to a new device; have you logged out of Twitter on the old device?
Your smart device keeps you logged in to such apps as Amazon, Apple, Facebook, Messenger, Microsoft and others. Each app has a feature to log out all devices. We want to explore logging out all devices for Twitter. Just follow these steps.
This is for iPhone or iPad and Twitter
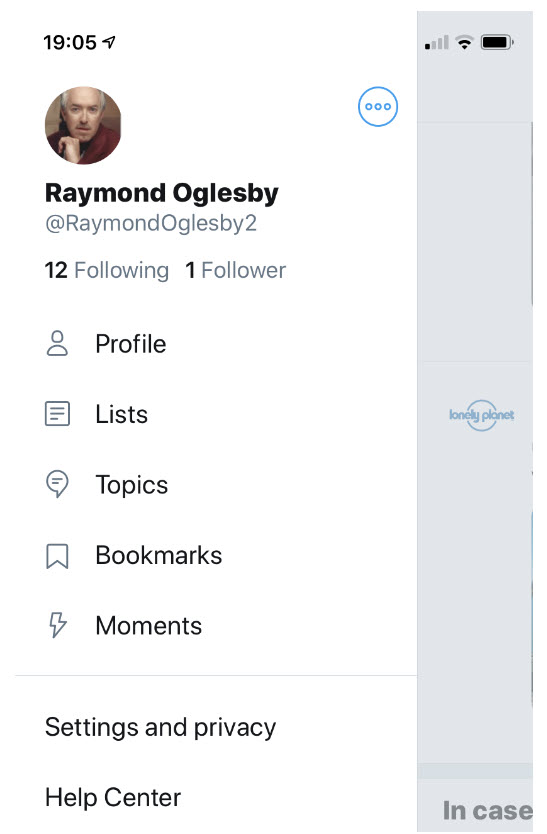
Your Profile Screen
Tap your profile photo or swipe left to right. You will see the following image:
Twitter Log Out Profile screenshot
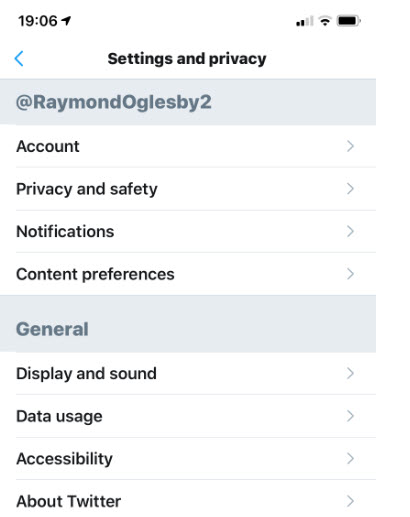
Your Settings Screen
Tap on Settings and privacy. You will see the following screen:
Twitter Log Out Settings screenshot
Your Account Screen
Tap on Account. Following is a screenshot:
Twitter Log Out Account screenshot
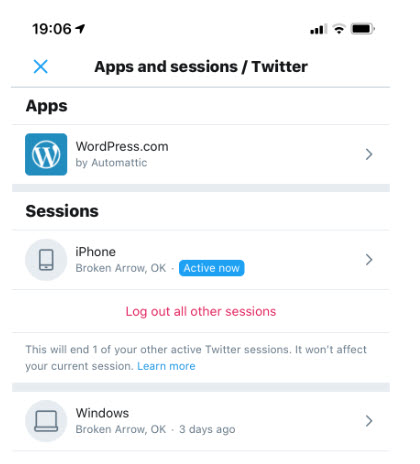
Your Sessions Screen
Tap on Apps and sessions. You will see the following screen:
Twitter Log Out Devices screenshot
Your Log Out Screen
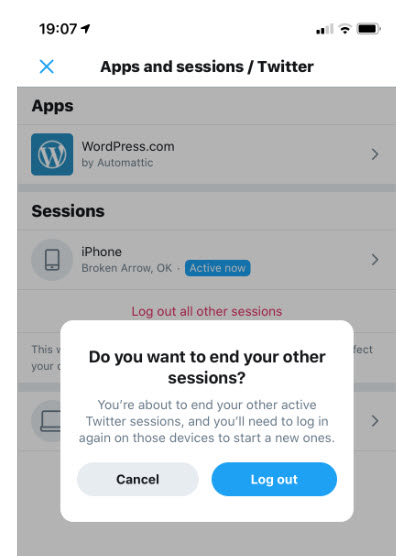
Your devices that have access to your account is displayed. Tap on Log out all other sessions. You will see the following screen:
Twitter Log Out All Sessions screenshot
Tap Log out
That’s it. You are done. You now will have to log back in to use Twitter.
Your Two Factor Authentication Screen
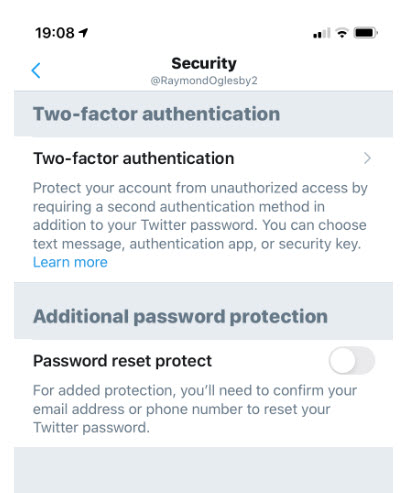
To make your Twitter account more secure, you may want to setup Two-factor authentication. This is on the third screen in this post, under the Account option. Just tap on Security and you will see the following screen:
Twitter Log Out Two-Factor Authentication screenshot
Select Two-factor authentication, choose one of three options displayed on your screen and follow its directions.
I recommend setting up Two-factor authentication whenever the option is available.
I Would Like to Hear from You
Please feel free to leave a comment. I would love hearing from you. Do you have a computer tech question? I will do my best to answer your inquiry. Please mention the app and version that you are using. To help me out, you can send screenshots of your data related to your question.
Apple has yet to make a big deal about their new operating system. In fact, some of these new features are hidden or have changed from their last update. I am going to discuss four new features; Battery Optimization, Update All, Rearranging Apps and Sharing Photo Location. You may want to check these out.
Apple unveils a new iPhone every year. Along with it comes a new mobile operating system (iOS), in this case iOS 13+. These features work on iPhones back to 6S and SE. If you have a 6 or 5s, you are stuck with iOS 12 variations.
This is for iPhone, iPad and Mac or any other device using iOS 13
Battery Optimization Feature
The first new feature I want to address is “Battery Optimization“. Its best to use for overnight charging. This feature learns how you charge your battery and sets up a routine of charging your phone to 80% until the time right before it knows you will wake up, at which point it will finish charging to 100%.
To set up, go to Settings>Battery>Battery Health and turn on Optimized Battery Charging. Once enabled, the slider control will be lit in green. Below is a screenshot:
Optimized Battery Charging screenshot
Where is the Update All Feature?
The second feature is somewhat tricky. I don’t know why Apple took something so simple in their previous iOS and made this feature difficult. I assume they want you to rely on automatic updates. The feature is “Update All Apps“. In the new iOS, this feature seems to be missing, but we will get it back. This feature is for those who don’t want to wait for automatic updates.
First, lets go ahead and setup “Automatic Downloads“. To setup, go to Settings>iTunes & App Store>Cellular Data. To enable this feature, turn on the Automatic Downloads. The slider control will be lit in green. We are doing this in case you forget to manually update your apps.
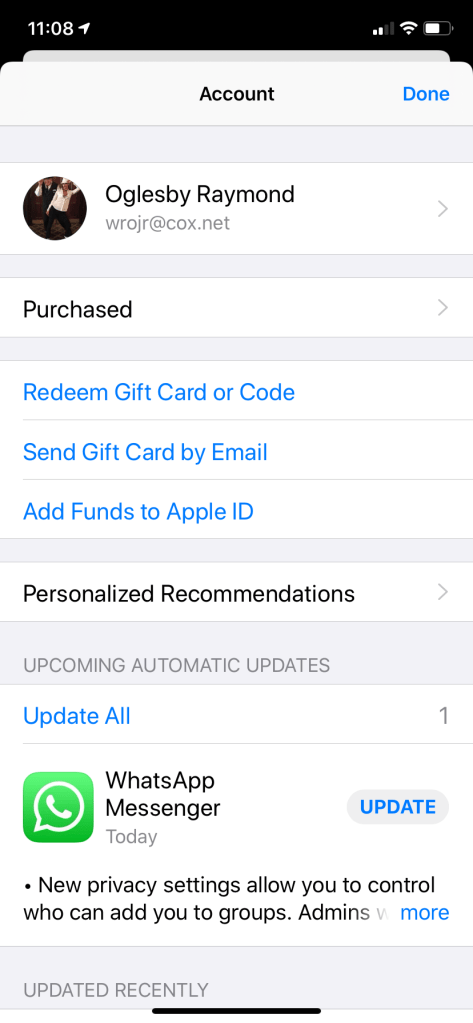
Now, lets get the Update All feature back. Go to the App Store app and click on your profile at the top (it should have a small photo of you). Your screen will look like the below screenshot:
Updated Recently screenshot
Your will notice the Updated Recently section followed by your iPhone Apps. To get the Update All feature, swipe down on the screen. Your screen will look as follows:
Update All screenshot
Notice the Update All feature magically appears IF you have pending updates. You can click this link to update all apps or manually update an app by clicking on its Update button.
Rearranging Apps Has Been Modified
The third feature is for Rearranging Apps. When you press and holdan app, a popup menu appears. These popups are different for each app. To get the “wiggles” for dragging an app to a different location or to create a folder by dragging apps on top of each other, continue topress and hold and the wiggles will appear. Even though the app icon may be hidden by the popup menu, just continue to press and hold. Tap Done at the top of the screen when finished.
A New Privacy Option for Photos
The last feature I want to mention is about a privacy option for photos. From the Photo app, select any number of photos you plan to share. Click the Share icon at the bottom. But before you share, click Options at the top; you will get the option to include location data or not. By removing the location data it makes it a lot harder for someone to track the location of the photo(s). Below is a screenshot of including the Location. To turn off, disable the Location slider control (the control will no longer be lit).
Location data for photos screenshot
I Would Like to Hear from You
Please feel free to leave a comment. I would love hearing from you. Do you have a computer tech question? I will do my best to answer your inquiry.Please mention the app and version that you are using. To help me out, you can send screenshots of your data related to your question.
Testimonials
I love you addressed nearly every frustrating feature change I have! Thanks for sharing and educating me.
Are you unable to share a Messenger video on your iPhone to social media, like Facebook? This share feature is not available on the smartphone. But it is possible on your desktop or laptop.
This is for any device using Messenger and Facebook
Messenger on iPhone
On your iPhone, open Messenger and find the video you want to share like the example below:
Messenger video
You can click the Up Arrow rectangle box to send the video to certain friends and/or Create a Group. But we want to share the video to Facebook. Following are the steps:
Messenger on Desktop/Laptop
Open Messenger or Facebook on your desktop/laptop then select Messenger
Move your mouse next to the Up Arrow rectangle box
A Reply and More actions will magically appear
Click on More
Click on Save to Facebook
Your screen will look like the below image:
Saving Messenger video to Facebook
Facebook
Open Facebook on your Desktop/Laptop
Go to Home menu option on Facebook
On the left hand side menu, expand Explore (if necessary) and locate Saved
Click on Saved and you will see the video as shown below:
Saved video on Facebook
Click on the Share button to share on Facebook
Sometimes the author has blocked a video from being shared. If so, the Share button will not be displayed.
Please feel free to leave a comment. I would love hearing from you. Do you have a computer tech question? I will do my best to answer your inquiry. Please mention the app and version that you are using. To help me out, you can send screenshots of your data related to your question.
Did you recently obtain a new iPhone? Are you concerned about losing the device? Apple owners can find the device with the Find My app for iOS 13 and above or Find My iPhone for older iOS. We are going to use iCloud to tract down your device.
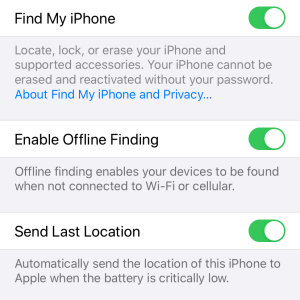
Before your iPhone goes missing, there are a few options to turn on. For iOS 13+, do the following:
Tap on Settings
Tap on <Your Name>
Tap on Find My
Tap on Find My iPhone
Enable all three slider controls by tap and hold, then slide until the option is lit (highlighted in green)
For older iOS, tap on Settings, <Your Name>, iCloud, Find My iPhone and enable all three slider controls
Your screen should look like the image below:
Find My iPhone Screenshot
First, using another device, try calling your number. If that doesn’t work, lets try using your browser to locate your device.
Once again, the following is for iOS 13+. The steps are similar for older iOS.
If you don’t have an iCloud account, you can download iCloud for Windows
Signin using your Apple ID and password
Your screen should look like the below image:
Signin to iCloud
Click the Find iPhone icon
Select the All Devices drop down box at the top of the screen and find your iPhone
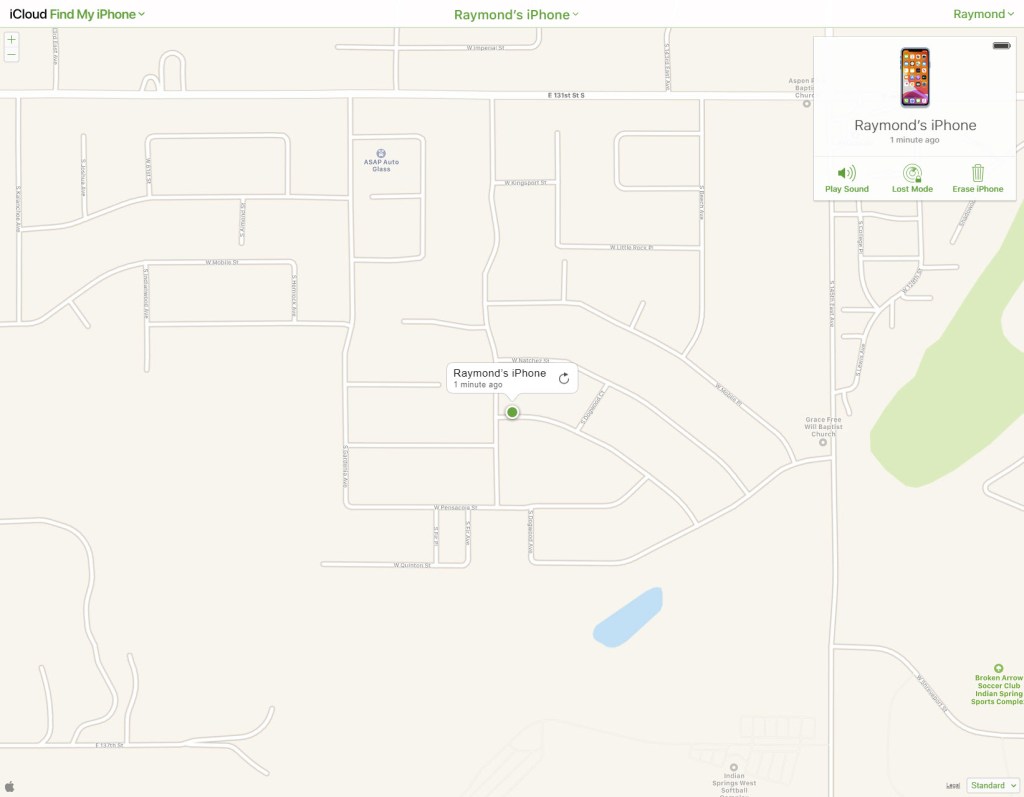
Select your iPhone on the map, its a green dot
Your results should look like the below image:
Screenshot of my iPhone location
You now have three options:
Play Sound on your iPhone
Place the iPhone in Lost Mode which locks the iPhone so no one can access it. If someone finds its, the device will display your contact information.
Erase iPhone. Please do not do this unless all hope is gone of recovering the device. Once the iPhone is erased, all personal information is gone. Your device can no longer be tracked through the app.
Locate Other Lost Devices
You may want to find any lost device like Airpods, headphones, Fitbit tracker, Apple Pencil, iPad, Apple Watch and others. As of this post, Wunderfind is a free iPhone app from the Apple Store. It is worth a look. Click here for a preview.
I Would Like to Hear from You
Please feel free to leave a comment. I would love hearing from you. Do you have a computer tech question? I will do my best to answer your inquiry. Please mention the app and version that you are using. To help me out, you can send screenshots of your data related to your question.
This is the first post in a series on “cleaning” your machine. The instructions are for a PC using the program CCleaner. There is a Mac version of CCleaner.
Your desktop and/or laptop needs a regular cleaning, like washing your car. When your system crashes, programs crash, your Internet browser fails to work properly, you perform lots of searches on the Internet; these issues leave junk files and traces of information on your Solid State Device (SSD) or hard drive(s). The more of these situations you experience, the slower your PC.
CCleaner can delete temporary files for Microsoft Edge, Internet Explorer, Google Chrome and Firefox. Some of the major options are built into Windows 10 latest update; you just have to find them. Some experts say that CCleaner is no longer needed. But I still find it useful. The details on how to use Windows 10 features similar to CCleaner will be available in a later post.
This tip explains how to get rid of these Junk files. You can do this manually or setup a schedule (Professional version only). I recommend you run this program for your PC desktop and/or laptop at least once a month.
The basic steps are to install the CCleaner program. The program is free or you can upgrade to a professional version for a price. Once installed (you only have to do this once), you can let the program Analyze your PC. Then you can Clean your machine.
I have used this program in many countries on all types of PCs. CCleaner has been in existence since 2004. By running this program at least once a month, your PC will be faster and smoother.
This is for Windows based operating systems
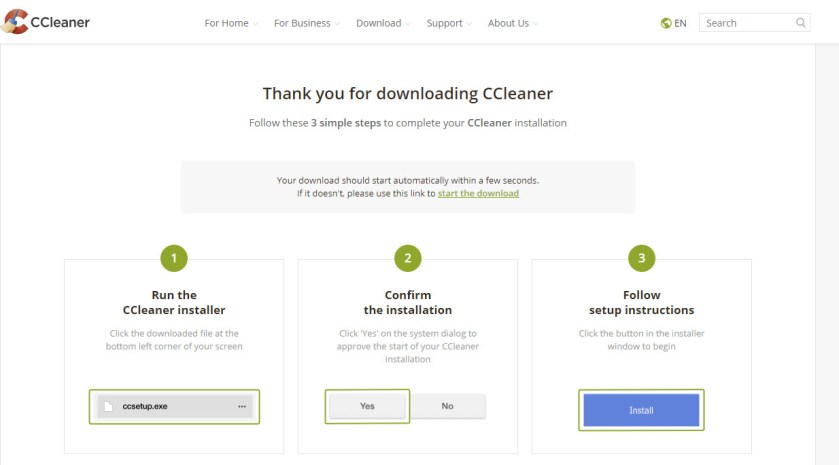
Install the program CCleaner (you only have to do this once).
Scroll down till you see the Download button (this is the Free version)
Click on Download
Follow the download instructions. Below is an image of what to expect:
CCleaner download
On your initial install you can immediately run the program. You are doing the Easy Clean option of CCleaner.
After downloading, click the Install button
Click the Run CCleaner button
Click the Start button
CCleaner may want you to close some programs. If so, click on the Close All button
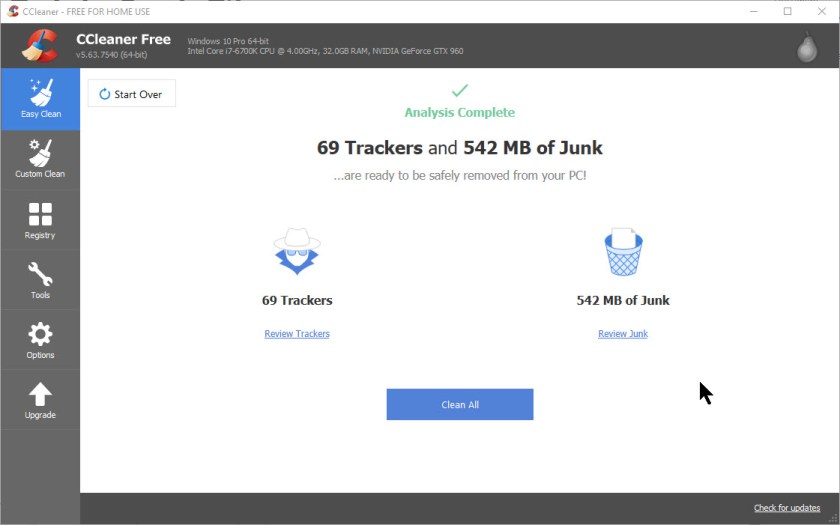
The program analyzes your machine and presents you with the following screen:
CCleaner analyze
Do not be surprised if you see tens of thousands of Junk files.
Now you are ready to click the Clean All button. When the program has finished you will be presented with the following screen:
CCleaner results
Now close CCleaner and restart your machine.
That’s it. You are done! CCleaner will add a shortcut to your desktop.
There are other options available:
Custom Clean for a more robust cleaning by changing the settings. I do not recommend changing any of these settings. If you do change them, they will remain set for subsequent runs of CCleaner or until you download a new version.
Registry allows you to find and fix Registry issues (always backup the registry first). I do not recommend you use this feature.
Tools has many sub options. The most useful for me is the Uninstall option which allows you to uninstall a program. If you highlight and right-click on a program name, you are presented with other options. I recommend only using the Uninstall option or click on the Uninstall button.
Options has many sub options as well. Sadly the Scheduling option is only available in the Professional version. I use none of these options.
Upgrade option is for updating the Free version to the Professional version.
On any screen you can Check for Updates. Just click to check.
My next post with be a will cover the topic of disk fragmentation; how to check and resolve the issue.
I Would Like to Hear from You
Please feel free to leave a comment. I would love hearing from you. Do you have a computer tech question? I will do my best to answer your inquiry. Please mention the app and version that you are using. To help me out, you can send screenshots of your data related to your question.
I am Raymond Oglesby with 30 years in Information Technology (IT). I have taught Microsoft Applications and troubleshot computers in 15 countries as well as many States. Half of my IT career has been on mainframe computing in a dozen computer languages; the other half in the Personal Computer (PC) client server environment.
I am starting my first blog on using technology at home or work. I plan on updating the blog twice a week. Stay tuned and hope you enjoy my blog.
Please feel free to leave a comment. I would love hearing from you. Do you have a computer tech question? I will do my best to answer your inquiry. Please mention the app and version that you are using. To help me out, you can send screenshots of your data related to your question.