Most web browsers have a built-in “Reader Mode” that converts web pages into a more reader-friendly view. Strangely, Google Chrome does not have this feature; unless you know how to find it.
Most web browsers have a built-in “Reader Mode” that converts web pages into a more reader-friendly view. Strangely, Google Chrome does not have this feature; unless you know how to find it. Let’s find out where it is.
This is for devices running Google Chrome. Screenshots are from Windows 10
Google Chrome has included a hidden Reader Mode all the way back to version 75. However, it’s never been upgraded to a stable, standard feature. Even Microsoft Edge; which is also based on Chromium; has a Reader Mode. So let’s enable it in Chrome.
Enable Hidden Reader Mode
First, we will need to enable a Chrome feature flag. Open the Chrome browser on your computer, and type:
chrome://flags
in the address bar, and hit Enter. Refer to the below image:
Accessing Chrome flags
Next, search for “Reader Mode” in the text box at the top and enable the flag titled “Enable Reader Mode.” See the below image:
Enabling Reader Mode
Now, after enabling the flag, click the “Relaunch” button at the bottom of the screen to apply the changes. See the following image:
Restarting Chrome
Next, when you now visit a webpage that has a lot of text, you will see a little book icon on the right side of the address bar. Click it to switch to Reader Mode.
You can also click:
Menu > Enter Reader Mode
to activate it. Refer to the below image:
Selecting the Reader Mode icon
Now, you are now looking at a much simpler, less cluttered view of the webpage. Images still appear, but ads and some other items are removed. To adjust the view, click the “A” icon in the top right. See the below image:
Changing Font size
Next, from here you can change the font, text size, and background color. See the following image:
Customizing appearance
That’s all there is to it! You can now minimize distractions while reading long articles in Chrome. It’s strange that Google has kept this a hidden feature for years, but at least you know how to enable it yourself.
Disclaimer
Technology is always changing and rarely is there static tech for smartphones and desktops. Thus, the contents of this post are only valid at the time of writing. Blog posts older than six months may have directions incompatible with your device or OS. Hopefully, older post content will continue to work as advertised. Thank you for reading TechSavvy.Life for Technology at Work For You.
Quote For the Day
Man is still the most extraordinary computer of all.
John F Kennedy
Tweet Info
That’s it. Please feel free to share this post! One way to share is via Twitter.
Note!Twitter may be no longer supported by WordPress. If so, the below Tweet button will not work.
Just click the Tweet icon below. This will launch Twitter where you click its icon to post the Tweet.
Checkout TechSavvy.Life for blog posts on smartphones, PCs, and Macs! You may email us at contact@techsavvy.life for comments or questions.
Please feel free to leave a comment. I would love to hear from you. Do you have a computer or smart device tech question? I will do my best to answer your inquiry. Just send an email to contact@techsavvy.life. Please mention the device, app, and version you are using. To help us out, you can send screenshots of your data related to your question.
The author’s Vietnam eBook on the Battle for Tra Bong Vietnam: Events and Aftermath
Google Chrome is a very popular browser despite being infamously greedy with your computer’s resources. If you feel like Chrome is starting to get slow, let’s speed it up.
Google Chrome is a very popular browser despite being infamously greedy with your computer’s resources. If you feel like Chrome is starting to get slow, let’s speed it up.
This is for devices running Google Chrome. Screenshots are from Windows 10
Update Chrome
The simplest thing you can do is make sure Chrome is up to date. This will ensure that you always have the latest improvements and optimizations for Chrome. The browser will usually install updates automatically, but you can update manually to be sure.
To manually update Chrome, head to:
Menu (3 dots) > Settings > About Chrome
If not up-to-date, Chrome will automatically update. Refer to the below image:
Update Chrome
Preload Images
Chrome has a feature that allows it to “predict” which links it thinks you might open and preload in the background. That way, if you do click the link, it will already be partially loaded.
If you want to enable this feature. First, head to:
Menu (3 dots) > Settings > Privacy and Security > Cookies and Other Site Data
Next, toggle the switch ON for Preload pages for faster browsing and searching. See the below image:
Select to Reload Images
Tabs Under Control
Chrome has some built-in tools to help mitigate the performance impact of having a lot of tabs open, but keeping your tabs tidy on your own will help even more.
There are a couple of things you can do if you are someone that constantly has tons of tabs open. The easiest thing to do is use Chrome’sReading List and Bookmarks features. That way, you can save pages for later without actually keeping them open in a tab.
Use Energy Saver
As the name implies, Chrome’s Energy Saver feature is intended to help improve battery life when your laptop is unplugged. However, it can also be used to speed up performance in a pinch.
Energy Saver limits background activity, visual effects, and video frame rates. Limiting those things helps stretch out your battery, which is a result of Chrome not asking your computer to work as hard. You can only use Energy Saver if your computer is running on battery or below 20% power. Head to:
Menu (3 dots) > Settings > Performance
and toggle ON the Energy Saver switch.
Memory Saver
With the latest release of Chrome on the desktop, there is a new performance setting so Chrome uses up to 40% and 10GB less memory to keep your tabs running smoothly.
If you have a bunch of tabs open in Chrome that you plan to come back to later; Memory Saver mode frees up memory from tabs you are not currently using so the active websites you are browsing are fast. This is especially useful if you are running other intensive applications, like editing family videos or playing games. Any inactive tabs will be reloaded when you need them. Head to:
Menu (3 dots) > Settings > Performance
and toggle ON the Memory Saver switch. See the following image:
Enable Memory Saver
Hardware Acceleration
Hardware acceleration is a feature that allows Chrome to take advantage of your computer’s GPU to speed up processes. Hardware can perform some functions faster than software running on the CPU alone.
When enabled, Chrome will utilize your computer’s GPU for graphics-intensive tasks, like playing games and watching videos. It’s typically enabled by default but can be disabled if there are driver compatibility issues. You can ensure it’s enabled by heading to:
Menu (3 dots) > Settings > System
and toggle ON the option Use hardware acceleration when available. Refer to the below image:
Select to Use Hardware Acceleration
Check Task Manager
If you feel like Chrome is particularly sluggish, there might be a rogue extension causing it. Chrome has its own built-in Task Manager that lets you see what’s running in the browser; extensions, web pages, and apps; and how many resources each individual thing is using.
Chrome’sTask Manager shows each tab and all the extensions that are currently running. You can see the memory footprint and CPU usage. If a process uses too much CPU, you can simply tap the End Process button and see if that fixes the problem.
The Task Manager can be found in:
Menu (the 3 dots) > More Tools > Task Manager
Just click on the option from the drop-down menu. See the below image:
Check the Task Manager
Check Extensions
Similar to how you might have apps on your phone that you do not use anymore, there are probably some Extensions in Chrome that you could get rid of. They could be running in the background and eating up resources.
Regardless of performance, it’s generally a good idea to routinely check up on your Extensions. Chrome gives you the option to “Disable” by turning the Toggle to OFF or “Remove.” Disabling will keep the Extension installed, but it cannot run. To check your Extensions, head to:
?Menu (3 dots} > More Tools > Extensions
See the following image:
Check your Extensions
Clear Your Browsing Data
Chrome collects a lot of data while you are browsing to improve your experience. All this site data, cookies, and cached images and files can add up over time. Occasionally clearing this data can potentially lighten up your browser, but it also means you will need to re-sign into websites.
There are two ways to do this. First, head to:
Menu (the 3 dots) > More Tools >Clear Browsing Data
Second, you can use the keyboard shortcut Ctrl + Shift + Del. Both methods will bring up a menu with options (Basic or Advanced) for clearing the data.
Checkmark any option(s) and click Clear data. Refer to the below image:
Clear your Browsing Data
Reset Without Uninstalling
The “nuclear option” for speeding up Chrome is performing a browser reset. This will essentially bring Chrome back to the way it was when you first installed it while still saving some of your personal stuff.
A browser reset will reset the search engine, homepage, startup tabs, new tab page, pinned tabs, content settings, cookies, site data, extensions, and themes. However, it will not erase your bookmarks, browser history, or saved passwords.
To perform a browser reset, head to:
Menu (3 dots) > Settings > Reset settings > Restore settings to their original defaults
See the below image:
Reset Settings
Just click the option. Next, you will see a confirmation screen. Here, click on the Reset settings button. See the following image:
Reset Settings confirmation. Use with caution
Disclaimer
Technology is always changing and rarely is there static tech for smartphones and desktops. Thus, the contents of this post are only valid at the time of writing. Blog posts older than six months may have directions incompatible with your device or OS. Hopefully, older post content will continue to work as advertised. Thank you for reading TechSavvy.Life for Technology at Work For You.
Quote For the Day
“While we’re all very dependent on technology, it doesn’t always work.
Bill Gates
Tweet Info
That’s it. Please feel free to share this post! One way to share is via Twitter.
Just click the Tweet icon below. This will launch Twitter where you click its icon to post the Tweet.
Checkout TechSavvy.Life for blog posts on smartphones, PCs, and Macs! You may email us at contact@techsavvy.life for comments or questions.
Please feel free to leave a comment. I would love to hear from you. Do you have a computer or smart device tech question? I will do my best to answer your inquiry. Just send an email to contact@techsavvy.life. Please mention the device, app, and version you are using. To help us out, you can send screenshots of your data related to your question.
Author’s E-Book
You can access the e-book from a Kindle device, the Kindle App for the desktop or smartphone, which is a free app.
The author’s Vietnam eBook on the Battle for Tra Bong Vietnam: Events and Aftermath
Open the Settings app, tap Safari, and toggle Block Pop-ups to OFF. This allows pop-ups in Safari on your iPhone. You can also allow pop-ups in other browsers like Google Chrome. Open your browser app’s Settings to find this option.
Summary: Open the Settings app, tap Safari, and toggle Block Pop-ups to OFF. This allows pop-ups in Safari on your iPhone. You can also allow pop-ups in other browsers like Google Chrome. Open your browser app’s Settings to find this option.
This is for the Safari and Chrome. Screenshots are from iPhone 14 Pro running iOS 16+
Copyright Scott Adams, Inc./Distributed by Universal Uclick for UFS
Allow Pop-Ups in Safari
To allow sites to open pop-up windows in your Safari browser, first, open the Settings app on your iPhone.
Next, in Settings, scroll down and tap Safari. Refer to the below image:
Accessing Safari
Now, on the Safari page, scroll down and toggle Block Pop-Ups to OFF.
Tip: To turn on Safari’s pop-up blocker in the future, re-enable the Block Pop-Ups option.
See the below image:
Toggle OFF to disable pop-ups
Allow Pop-Ups in Chrome
To enable pop-up windows in Chrome, first, launch the browser on your iPhone.
Next, when Chrome launches, in the bottom right-hand corner, tap the three-dot Menu and choose Settings. See the following image:
Accessing Chrome Settings
Now, in Settings, scroll down and tap Content Settings. Refer to the below image:
Accessing Content Settings
Next, tap Block Pop-Ups. See the below image:
Accessing Block Pop-ups
Now, toggle Block Pop-Ups to OFF. Then, in the top right-hand corner, tap Done.
Tip: To re-enable pop-ups in Google Chrome in the future, activate the Block Pop-Ups option.
See the following image:
Toggle OFF to disable pop-ups and tap Done
Disclaimer
Technology is always changing, and rarely is their static tech for smartphones and desktops. Thus, the contents of this post are only valid at the time of writing. Blog posts older than six months may have directions incompatible with your device or OS. Hopefully, older post content will continue to work as advertised. Thank you for reading TechSavvy.Life for Technology at Work For You.
Quote For the Day
We refuse to turn off our computers, turn off our phone, log off Facebook, and just sit in silence because in those moments we might actually have to face up to who we really are.
Jefferson Bethke
Tweet Info
That’s it. Please feel free to share this post! One way to share is via Twitter.
Just click the Tweet icon below. This will launch Twitter where you click its icon to post the Tweet.
Checkout TechSavvy.Life for blog posts on smartphones, PCs, and Macs! You may email us at contact@techsavvy.life for comments or questions.
Please feel free to leave a comment. I would love to hear from you. Do you have a computer or smart device tech question? I will do my best to answer your inquiry. Just send an email to contact@techsavvy.life. Please mention the device, app, and version you are using. To help us out, you can send screenshots of your data related to your question.
Author’s E-Book
You can access the e-book from a Kindle device, the Kindle App for the desktop or smartphone, which is a free app.
The author’s Vietnam eBook on the Battle for Tra Bong Vietnam: Events and Aftermath
Google’s Image Search results are sometimes so impressive that you want to save some of those images to your device. If you have found yourself in this situation, let’s explore how to download those images from your search results.
This is for mobile and desktop devices. Screenshots are from Windows 10 and iPhone 14 Pro running iOS 16+
Copyright Scott Adams, Inc./Distributed by Universal Uclick for UFS
Save Images On Desktop
To download an image on a desktop, you just pick your image, click an option, and your image is saved to your computer.
First, launch your favorite web browser on your computer and open Google Image Search. There, find the image you want to save to your machine. Refer to the below image:
Search Google Images
Next, on the search results page, access the image that you want to download. See the below image:
Find an image
Now, right-click your image, and from the menu that opens, choose to Save image as. See the following image:
Check the option to save your image
Next, your browser will open your computer’s standard Save As window. Here, select a folder to save your image in, type your image name in the File Name field, then click Save. Refer to the below image:
Save your image
Now, you have successfully downloaded your favorite image from your Image Search results. If you are not sure exactly where the image file went, check your Downloads folder from File Explorer.
If your downloaded file is of low resolution, then try downloading that image directly from the source site. To do that, on the Image Search results page, click the link, beneath the image, and not the image, to be taken to the image site. There, right-click the image and choose Save image as.
Download Images On Mobile
On your mobile phone, you can download images from Google’s Image Search results using Google Chrome, Apple Safari, or Microsoft Edge. Mozilla Firefox does not offer the option to save images.
To start, first, open your web browser (we are using Safari) and launch Google Image Search or type into the search box “images.google.com”. Find the image you would like to save to your phone.
Next, on the search results page, tap the image to download. See the below image:
Tap an image you want to download
Now, on your image full-screen page, tap and hold the image. See the following image:
Press and hold your image
Next, on iPhone or iPad, from the menu that opens in Safari, tap Save to Photos. Refer to the below image:
Select the option to save your image
Your iPhone will download and save the image on your local storage or in our example using Safari, your Photos app. See the below image:
Your saved image
Disclaimer
Technology is always changing and rarely is static for smartphones and desktops. Thus, the contents of this post are only valid at the time of writing. Blog posts older than six months may have directions incompatible with your device or OS. Hopefully, older post content will continue to work as advertised. Thank you for reading TechSavvy.Life for Technology at Work For You.
Quote For the Day
The technology you use impresses no one. The experience you create with it is everything.
Sean Cerety
Tweet Info
You are finished. Please feel free to share this post! One way to share is via Twitter.
Just click the Tweet icon below. This will launch Twitter where you click its icon to post the Tweet.
Checkout TechSavvy.Life for blog posts on smartphones, PCs, and Macs! You may email us at contact@techsavvy.life for comments or questions.
Please feel free to leave a comment. I would love to hear from you. Do you have a computer or smart device tech question? I will do my best to answer your inquiry. Just send an email to contact@techsavvy.life. Please mention the device, app, and version you are using. To help us out, you can send screenshots of your data related to your question.
Author’s E-Book
You can access the e-book from a Kindle device, the Kindle App for the desktop or smartphone, which is a free app.
The author’s Vietnam eBook on the Battle for Tra Bong Vietnam: Events and Aftermath
Google Chrome has had a built-in dark theme like Mozilla Firefox and Microsoft Edge since Chrome 74. You can even apply a dark theme to every web page you visit using third-party themes or an extension.
Google Chrome has had a built-in dark theme like Mozilla Firefox and Microsoft Edge since Chrome 74. You can even apply a dark theme to every web page you visit using third-party themes or an extension. Let’s explore this dark mode feature.
This is for devices running Windows 11 or 10. Screenshots are from Windows 10
Copyright Scott Adams, Inc./Distributed by Universal Uclick for UFS
Chrome offers a built-in dark mode on Windows 11 and Windows 10. It even makes all of Chrome’s context menus dark, too.
Dark Mode for Windows 11
First, open the Settings app and navigate to:
Personalization > Color
Next, click the drop-down menu to the right of Choose Your Mode and select Dark. Refer to the below image:
Setting Dark Mode for Windows 11
Next, close out the Settings app and launch Google Chrome. Unless you have manually set Chrome’s theme, it will match your system.
Dark Mode for Windows 10
First, head to:
Settings > Personalization > Colors
and select Dark under Choose your default app mode. See the below image:
Setting Dark Mode for Windows 10
Apply a Dark Theme
Chrome supports user-created themes, which you can download from the Chrome Web Store. To give Chrome a dark interface, all you have to do is install a dark theme. Google even provides a helpful collection of editor-selected dark themes. This will give your Chrome browser a dark mode on Windows 7, Linux, Chrome OS, and any operating system without a native dark theme.
Note! Google now offers some official Chrome browser themes, including a “Just Black” dark mode theme. You may want to give that a try.
We recommend Morpheon Dark, which is the most popular dark theme in the Store. Unlike some other dark themes, it provides a decent amount of contrast between your active tab, which is a bit lighter, and your inactive tabs, which are darker.
This theme turns darkens the Tab Bar, Title Bar, Toolbar, and New Tab page. That’s all you can theme in Chrome. You can not make Chrome’sContext Menus or Settings page dark, for example. See the following image:
Apply Morpheon Dark Mode
If you ever want to switch back to Chrome’s default theme you can. Head to:
Menu > Settings
Look for the Themes option under Appearance and then click Reset to Default. Refer to the below image:
Reset to the default theme
Disclaimer
Technology is always changing, and rarely is their static tech for smartphones and desktops. Thus, the contents of this post are only valid at the time of writing. Blog posts older than six months may have directions incompatible with your device or OS. Hopefully, older post content will continue to work as advertised. Thank you for reading TechSavvy.Life for Technology at Work For You.
Quote For the Day
Even the technology that promises to unite us, divides us. Each of us is now electronically connected to the globe, and yet we feel utterly alone.
Dan Brown
Tweet Info
You are finished. Please feel free to share this post! One way to share is via Twitter.
Just click the Tweet icon below. This will launch Twitter where you click its icon to post the Tweet.
Checkout TechSavvy.Life for blog posts on smartphones, PCs, and Macs! You may email us at contact@techsavvy.life for comments or questions.
Please feel free to leave a comment. I would love to hear from you. Do you have a computer or smart device tech question? I will do my best to answer your inquiry. Just send an email to contact@techsavvy.life. Please mention the device, app, and version you are using. To help us out, you can send screenshots of your data related to your question.
Author’s E-Book
You can access the e-book from a Kindle device, the Kindle App for the desktop or smartphone, which is a free app.
The author’s Vietnam eBook on the Battle for Tra Bong Vietnam: Events and Aftermath
Google Chrome keeps shortcuts to your most visited sites on its home page. If you do not find this list useful, you can either individually remove these shortcuts or hide all the shortcuts at once.
Google Chrome keeps shortcuts to your most visited sites on its home page. If you do not find this list useful, you can either individually remove these shortcuts or hide all the shortcuts at once. Let’s explore how to do this.
Tip: When you delete a shortcut, that item’s gone forever. However, you can bring back all your hidden shortcuts at once with a few clicks.
This is for devices running the latest version of Google Chrome. Screenshots are from Windows 10
Copyright Scott Adams, Inc./Distributed by Universal Uclick for UFS
Delete a New Tab Shortcut
To individually remove your site shortcuts from the New Tab page, first, open a new tab in Chrome. You can do this by pressing Ctrl+T (Windows) or Command+T (Mac).
Next, on the New Tab page, find the shortcut you want to delete. Hover your cursor in that shortcut’s top-right corner, then click the three dots (the Menu icon) that appear. Refer to the below image:
Accessing the shortcut Menu on the New Tab page
Now, in the three-dot Menu icon, choose Remove. See the below image:
Selecting to Remove the shortcut
Instantly, Chrome will remove the selected shortcut from your New Tab page.
Note: If you accidentally delete a shortcut, you can restore it by clicking Undo in the confirmation message that opens at the bottom left-hand corner.
Hide All New Tab Shortcuts
If you do not wish to see any shortcuts at all, you can hide all of them with a few easy clicks.
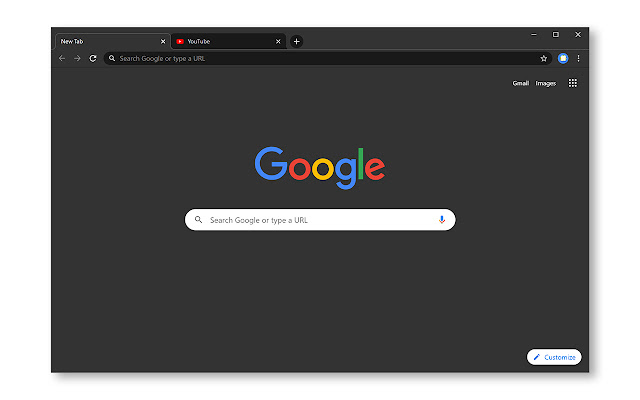
First, launch a New Tab in Chrome. Then, in the New Tab screen’s bottom right-hand corner, select the Pencil icon for Customize this page. See the following image:
Selecting the Pencil icon
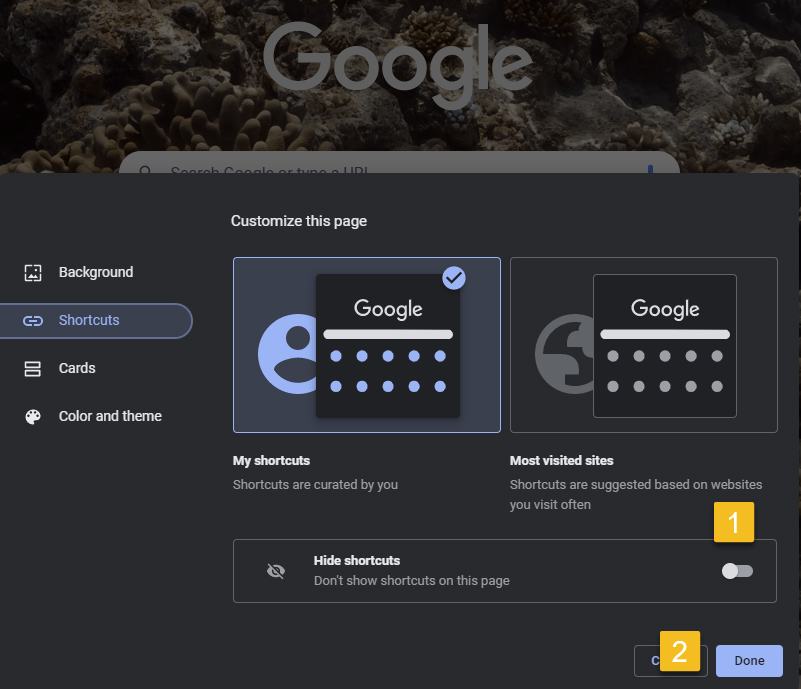
Next, in the left sidebar of the open window, click Shortcuts. Refer to the below image:
Selecting the Shortcuts option
Now, on the right pane, toggle the Hide Shortcuts option to ON. Then, at the bottom, click Done. See the below image:
Note: Later, to unhide your shortcuts and bring them back to your New Tab page, toggle the Hide Shortcuts option to OFF and click Done.
Enabling to Hide shortcuts
Back on the New Tab page, you will find all your site shortcuts are gone.
Quote For the Day
Technology is so much fun but we can drown in our technology. The fog of information can drive out knowledge
Daniel J Boorstin
Tweet Info
That’s it. Please feel free to share this post! One way to share is via Twitter.
Just click the Tweet icon below. This will launch Twitter where you click its icon to post the Tweet.
Checkout TechSavvy.Life for blog posts on smartphones, PCs, and Macs! You may email us at contact@techsavvy.life for comments or questions.
Please feel free to leave a comment. I would love to hear from you. Do you have a computer or smart device tech question? I will do my best to answer your inquiry. Just send an email to contact@techsavvy.life. Please mention the device, app, and version you are using. To help us out, you can send screenshots of your data related to your question.
Author’s E-book
You can access the e-book from a Kindle device, the Kindle App for the desktop or smartphone, which is a free app.
The author’s Vietnam eBook on the Battle for Tra Bong Vietnam: Events and Aftermath
Reading is great, but sometimes you want or need to listen. Let your computer or phone do the reading for you. Let’s explore some tools to do this.
This is for the mobile or desktop
Copyright Scott Adams, Inc./Distributed by Universal Uclick for UFS
Some people struggle with reading text on a screen, or physically can not. Others might want their computer to read something to them aloud while they do something else. There are plenty of reasons to use a text-to-speech tool, also called a “screen reader”.
Although there are standalone text-to-speech apps, you probably do not need them. That’s because every operating system, and several well-known pieces of software, offer a text-to-speech feature, and they are all quite good.
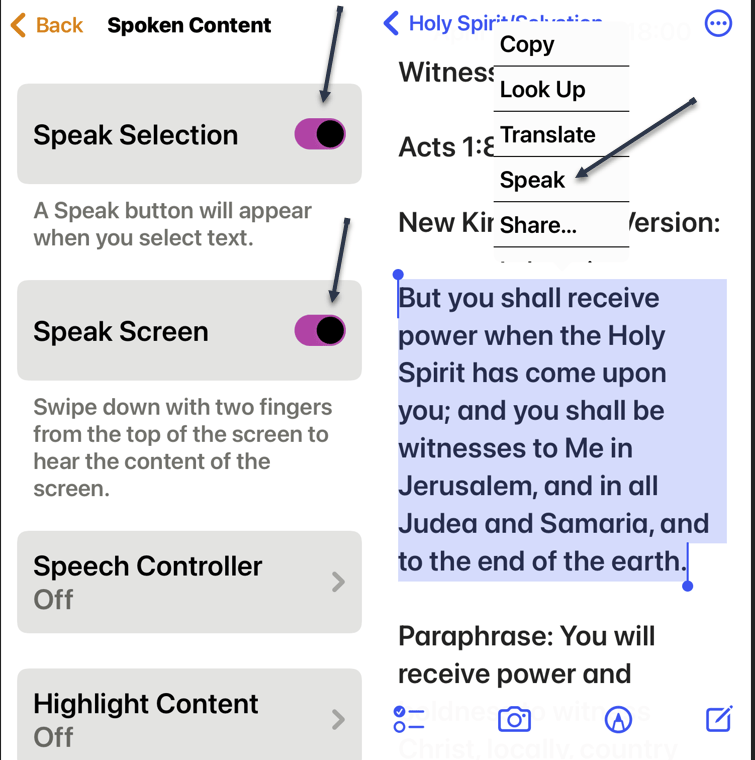
Spoken Content for iPhone
The iPhone’s text-to-speech feature is very easy to use. First, to turn it on, head to:
Settings > Accessibiltu > Spoken Content
and enable Speak Selection and Speak Screen. Once enabled, any text you highlight in any application will have a Speak option, which you tap to activate. We have highlighted some text from the Notes app to be read to us. Refer to the below image:
Spoken Content for iPhone
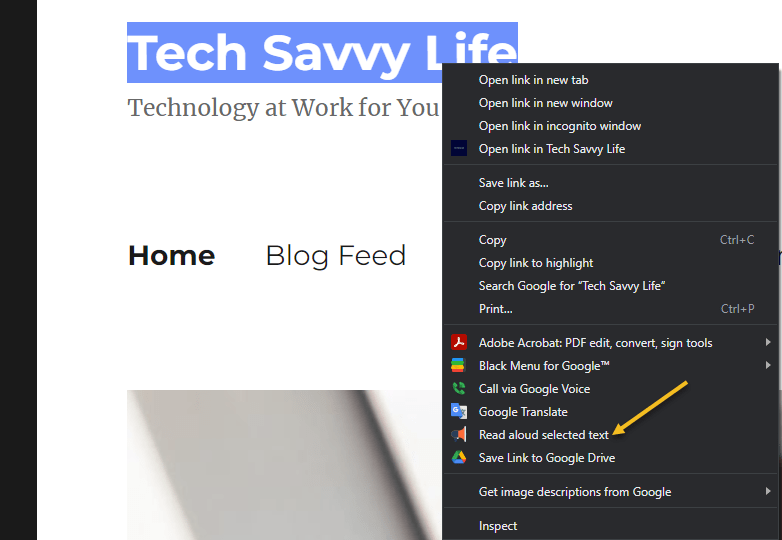
Read Aloud for Browsers
Read Aloud is an extension for Chrome, Firefox, and Edge that can read whatever website you currently have open. First, you will need to download the extension. After downloading, in Chrome, right-click on some highlighted text and choose the Read aloud selected text option. See the below image:
Read Aloud for browsers
Immersive Reader for Office and Edge
Microsoft Office applications have a built-in text-to-speech feature but it’s a little hard to find. First, in any document, click the Immersive Reader tab. If you do not see it, search for it, and from then on it should appear in your interface permanently. Highlight some text, then right-click and select Read Aloud to hear your document read back to you with the corresponding word highlighted as it goes. Immersive Reader is perfect for copy editing and reviewing long documents. See the following image:
Immersive Reader for Office
Microsoft Edge has this feature, too. Highlight some text, then right-click and select Real aloud selection. Refer to the below image:
Immersive Reader for Edge
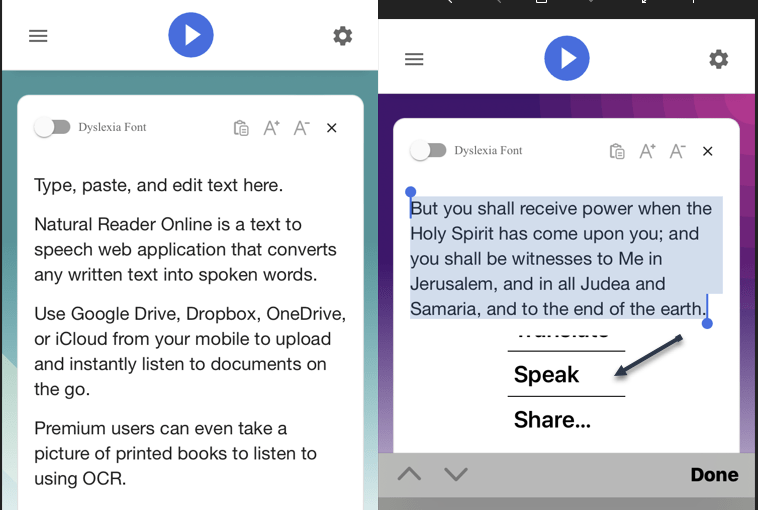
Natural Reader
First, download the mobile version (ours is for the iPhone). Then head to
NaturalReaders.com/online (note the plural in the URL)
and paste some text, highlighting it to hear it read on a mobile device. See the below image:
Natural Reader on mobile
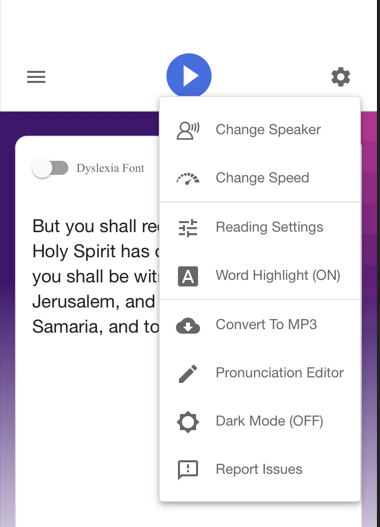
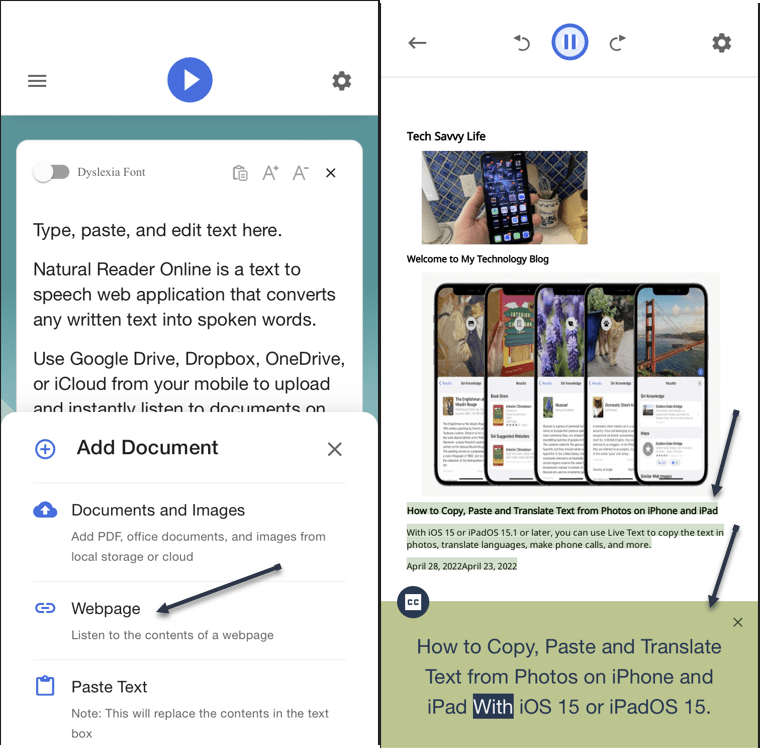
You can also drag documents into your browser window if you prefer. Natural Reader has a variety of voices, and you can control the speed of reading. Just click the Gear icon on the upper right-hand corner for options. See the following image:
Natural Reader options
You can upgrade for features like a Chrome extension, OCR for scanned documents, higher quality voices, and the ability to create MP3 files; these features cost $9.99 a month. The paid version also supports uploading documents, including Microsoft Word, Apple’s Pages, and even image files with text on them. The free version is perfect for quick listening. Refer to the below image for an example of listening to a webpage:
Natural Reader for web pages
Quote For the Day
Technology is so much fun but we can drown in our technology. The fog of information can drive out knowledge.
Daniel J Boorstin
Tweet Info
That’s it. Please feel free to share this post! One way to share is via Twitter.
Just click the Tweet icon below. This will launch Twitter where you click its icon to post the Tweet.
Check out TechSavvy.Life for blog posts on smartphones, PCs, and Macs! You may email us at contact@techsavvy.life for comments or questions.
Please feel free to leave a comment. I would love to hear from you. Do you have a computer or smart device tech question? I will do my best to answer your inquiry. Just send an email to contact@techsavvy.life. Please mention the device, app, and version you are using. To help us out, you can send screenshots of your data related to your question.
Author’s E-book
You can access the e-book from a Kindle device, the Kindle App for the desktop or smartphone, which is a free app.
The author’s Vietnam eBook on the Battle for Tra Bong Vietnam: Events and Aftermath
Are you not a big fan of Google Chrome’s Live Captions, which displays the text version of your media files? If so, it’s easy to turn this feature off/on both temporarily and permanently.
Are you not a big fan of Google Chrome’s Live Captions, which displays the text version of your media files? If so, it’s easy to turn this feature off/on both temporarily and permanently. Let’s explore this feature.
This is for devices using Google Chrome. Screenshots are from Windows 10
Copyright Scott Adams, Inc./Distributed by Universal Uclick for UFS
Temporary Disable Live Captions
You can turn off Chrome’s Live Captions for a specific playback session while keeping it enabled for all other sessions.
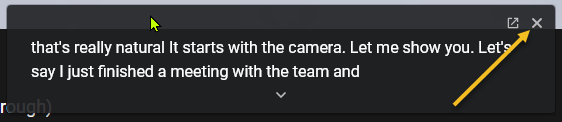
First, open a video containing a voice. The speaker’s voice will be displayed as Live Captions. To close this Live Captions, in the top right-hand corner of Chrome’s Live Captions box, click the “X” icon. Note! We are assuming the Live Captions option has been disabled (see below section). Refer to the below image:
Live Caption being displayed
Live Captions will immediately disappear from your screen, and you can enjoy your media playback without any interruptions.
Permanently Stop Live Captions
If you do not wish to see live captions for any of your media playbacks in Chrome, turn the feature OFF permanently and it will not bother you anymore.
First, from Chrome’s top right-hand corner, select the three dots icon (the Menu icon). See the below image:
Selecting the Menu icon
Next, in the Menu box, click Settings. See the following image:
Selecting Settings
Now, on the Settings screen, from the left sidebar, select Advanced. Refer to the below image:
Selecting Advanced
Next, in the expanded Advanced menu, click Accessibility. See the below image:
Selecting Accessibility
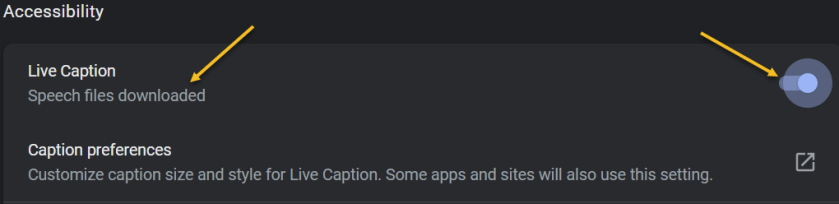
Now, on the right, in the Accessibility pane, toggle the Live Caption option to OFF. See the following image:
Disable Live Caption
If you want to enable the option again, toggle the Live Caption option to ON. You may see the message “Speech files downloaded” below the Live Caption. Refer to the below image:
Enable Live Caption
Going forward, Chrome will not display any captions for your media playbacks in the browser.
Quote For the Day
Technology is supposed to make our lives easier, allowing us to do things more quickly and efficiently. But too often it seems to make things harder, leaving us with fifty-button remote controls, digital cameras with hundreds of mysterious features and book-length manuals, and cars with dashboard systems worthy of the space shuttle.
James Surowiecki
Tweet Info
You are finished. Please feel free to share this post! One way to share is via Twitter.
Just click the Tweet icon below. This will launch Twitter where you click its icon to post the Tweet.
Check out TechSavvy.Life for blog posts on smartphones, PCs, and Macs! You may email us at contact@techsavvy.life for comments or questions.
Please feel free to leave a comment. I would love to hear from you. Do you have a computer or smart device tech question? I will do my best to answer your inquiry. Just send an email to contact@techsavvy.life. Please mention the device, app, and version you are using. To help us out, you can send screenshots of your data related to your question.
Author’s E-book
You can access the e-book from a Kindle device, the Kindle App for the desktop or smartphone, which is a free app.
The author’s Vietnam eBook on the Battle for Tra Bong Vietnam: Events and Aftermath
Google Chrome can save your website passwords and help you automatically fill them the next time you visit your sites.
There are several ways to turn on the password saving feature in Chrome. Note that Chrome syncs your passwords with your Google account, which means if you enable Chrome to save passwords on one device, that change automatically applies to all your signed-in devices. Let’s explore this feature on both desktop and mobile devices.
This is for desktop and mobile running Chrome. Screenshots are from Windows 10 and iPhone XR
Copyright Scott Adams, Inc./Distributed by Universal Uclick for UFS
Save Passwords on Desktop
To enable Chrome’s password manager on your Windows, Mac, Linux, or Chromebook computer, first, open Chrome on your computer.
Next, in Chrome’s top right-hand corner, click the three dots (the Menu icon). Refer to the below image:
Selecting the Menu icon
Now, from the three-dots Menu icon, select the Settings option. See the below image:
Accessing the Settings option
Next, on the left sidebar of the Settings page, click the Autofill option. See the following image:
Accessing the Autofill option
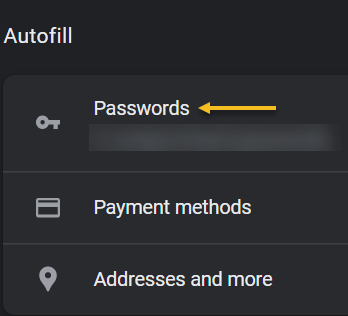
Now, on the right of the Autofill section, click the Passwords option. Refer to the below image:
Selecting the Passwords option
Next, toggle the Offer to save passwords option to ON at the top of the Passwords page. See the below image:
Enable Offer to save passwords
Note! If you decide you do not want password prompts, just toggle the Offer to save passwords to OFF.
From now on, when you log in to a site in Chrome on any of your devices, the browser will ask you to save your password for that site.
Save Passwords on Mobile
First, open Chrome on your iPhone, iPad, or Android device.
Next, tap the three dots (the Menu icon) in Chrome on your device. If you are on Android, these dots are in Chrome’s top right-hand corner. If you are on an iPhone or iPad, you will find the Menu icon in the bottom right-hand corner. See the following image:
Accessing the Menu icon
Now, in the menu that opens, tap the Settings option. Refer to the below image:
Accessing the Settings option
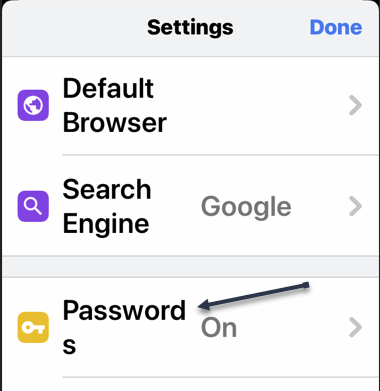
Next, in the Basics section of the Settings page, tap the Passwords option. See the below image:
Accessing the Passwords option
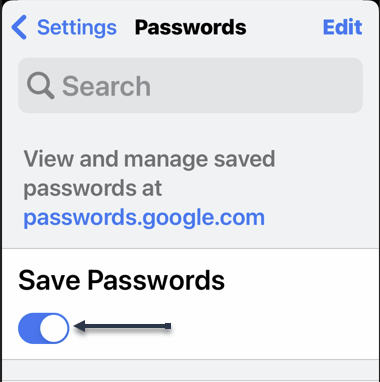
Now, on the Passwords page, toggle the Save Passwords option to ON. See the following image:
Enable Save Passwords
Save Passwords Using Password Manager Site
To use this method, first, open a web browser on your device and access the Google Password Manager site. Log in to the site with the same Google account that you use in Chrome.
Now, when the Password Manager site opens, in the top right-hand corner, click the password options (the gear icon). Refer to the below image:
Accessing Password options
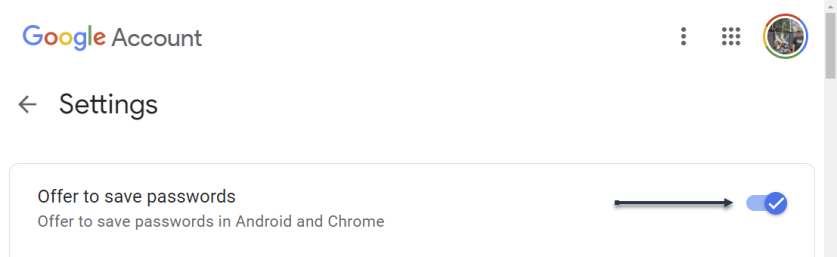
Next, the Settings page will open. Here, at the top, toggle the Offer to save passwords option to ON. See the below image:
Enable Offer to sasve passwords
From now on, no matter what method you used above, Chrome will start prompting you to save passwords on all your signed-in devices.
Quote For the Day
If people like you, they’ll listen to you, but if they trust you, they’ll do business with you.
Zig Ziglar
You are finished. Please feel free to share this post! One way to share is via Twitter.
Just click the Tweet icon below. This will launch Twitter where you click its icon to post the Tweet.
Check out TechSavvy.Life blog posts on smartphones, PCs, and Macs! You may email us at contact@techsavvy.life for comments or questions.
Please feel free to leave a comment. I would love to hear from you. Do you have a computer or smart device tech question? I will do my best to answer your inquiry. Just send an email to contact@techsavvy.life. Please mention the device, app, and version you are using. To help us out, you can send screenshots of your data related to your question.
Author’s E-book
You can access the e-book from a Kindle device, the Kindle App for the desktop or smartphone, which is a free app.
The author’s Vietnam eBook on the Battle for Tra Bong Vietnam: Events and Aftermath
In four major browsers; Chrome, Edge, Firefox, and Safari; on Windows, Mac, and Linux, you can easily drag and drop a shortcut link to a website straight to your desktop.
In four major browsers; Chrome, Edge, Firefox, and Safari; on Windows, Mac, and Linux, you can easily drag and drop a shortcut link to a website straight to your desktop. Let’s see how easily this is done.
This is for PCs, Macs, and web browsers. Screenshots are from Windows 10
Copyright Scott Adams, Inc./Distributed by Universal Uclick for UFS
Create Shortcut Using Chrome, Edge, and Firefox
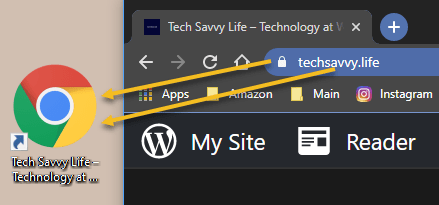
To create a desktop web shortcut, first open a Chrome, Edge, or Firefox browser window and navigate to the site you want to create a shortcut from. In the address bar at the top of the window, click and drag the Padlock icon (located to the left of the address) out of the browser window, or drag and drop the URL address onto your desktop. Refer to the below image:
Drag to create a shortcut on the desktop
Next, as soon as you click and drag, you will see the title or address of the website besides your pointer. When you are hovering over the desktop, release your mouse button, and a shortcut icon will be created. To use the shortcut, double-click it at any time, and the site will open in your default browser.
This shortcut does not have to stay on your desktop either; you can move it to any folder on your PC.
Create Shortcut Using Safari on Mac
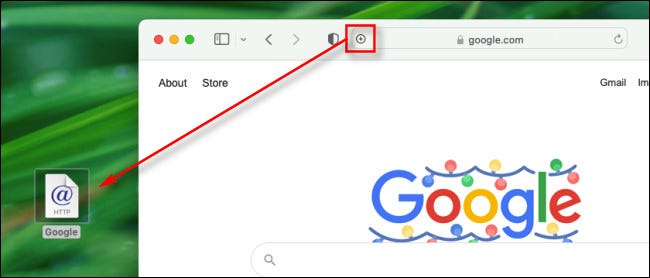
To make a desktop web shortcut on a Mac, first, open a Safari browser window and navigate to the site you want to create a shortcut to.
Next, in that window, hover your mouse cursor over the address bar at the top of the window, and a small Plus (“+”) icon will appear on the far left side. Click and drag the Plus icon onto your desktop and release your mouse or trackpad button. A shortcut icon will appear. See the below image:
Drag to create a shortcut on Mac
Now, you can double-click the shortcut icon, and your default browser app will open and automatically load the website stored in the link.
By the way, this is not the only drag-and-drop trick you can do with browsers. Most browsers also allow you to drag tabs between open windows of the same browser.
Please feel free to leave a comment. I would love to hear from you. Do you have a computer or smart device tech question? I will do my best to answer your inquiry. Just send an email to contact@techsavvy.life. Please mention the device, app, and version you are using. To help us out, you can send screenshots of your data related to your question.
Author’s E-book
You can access the e-book from a Kindle device, the Kindle App for the desktop or smartphone, which is a free app.
The author’s Vietnam eBook on the Battle for Tra Bong Vietnam: Events and Aftermath