The article emphasizes the importance of a web browser, specifically Google Chrome, in daily online activities. It provides four methods to enhance its performance: updating Chrome, clearing the cache, upgrading security settings, and managing performance settings like using Memory Saver. These steps aim to ensure a smoother browsing experience.
RAYMOND OGLESBY @RaymondOglesby2 March 11, 2025 – 6 minutes read time
Overview
In many ways, your web browser is as important as, if not more so than, your computer’s operating system. Think about it: Nearly everything you do, from writing emails and posting on social media to editing documents and streaming videos, can happen inside a browser. So when Chrome starts feeling sluggish, it can affect your whole online experience, professionally and personally. Do not get bogged down by your browser. Here are four ways to speed it up.
System Requirements
This tip works on devices running Google Chrome. Screenshots are from Windows 11 Pro running Chrome Version 134.0.6998.36 (Official Build) (64-bit).
1) Update Google Chrome
Each new version of Chrome contains fresh features, security fixes, and performance improvements. So, it’s possible that updating to the latest version may help your speed woes. Even if it does not, it will keep you safer from online threats. When a new version is available, Chrome automatically updates in the background, when you close and re-open the browser.
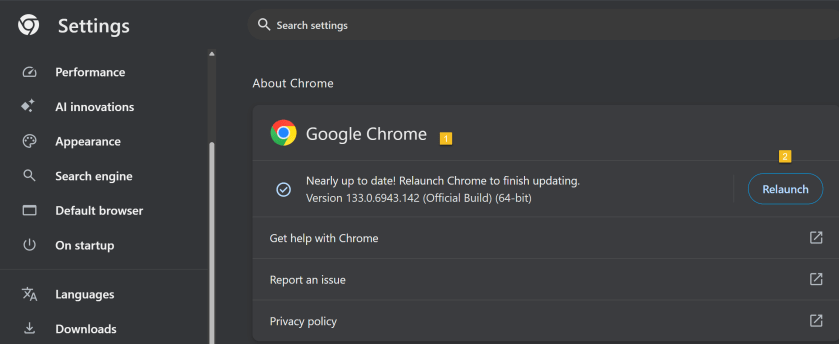
First, open Chrome and click the Menu icon (the 3 dots) in the upper right. From the Menu, click the Settings option. Next, on the left side, scroll down to the bottom and click on the About Chrome option.
If Chrome is not up-to-date, Chrome will automatically download. Now, click the Relaunch button to update Chrome and reopen the browser. Your Chrome browser is now up-to-date. Refer to the below image:
Updating Google Chrome
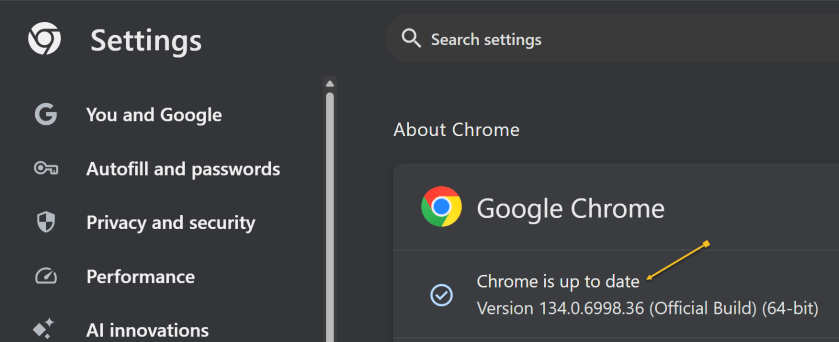
To check which version of Chrome you are running, repeat the above. Chrome will show the version and indicate it is up-to-date. See the below image:
Google Chrome up to date
2) Clear Google Cache
To clear your cache in Google Chrome, you clear your browsing data. This will clear your cache, cookies, and other browsing history.
Clearing your cache can fix problems with loading or formatting on websites.
In the Chrome browser:
Open Chrome and click the Menu icon (the 3 dots) in the upper right.
From the Menu, click the Settings option.
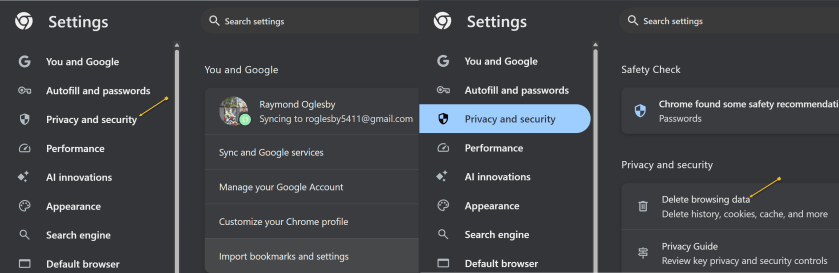
On the left side, click Privacy and security option.
Under the Privacy and security section click the Delete browsing data button. See the following image:
Accessing Privacy and security options
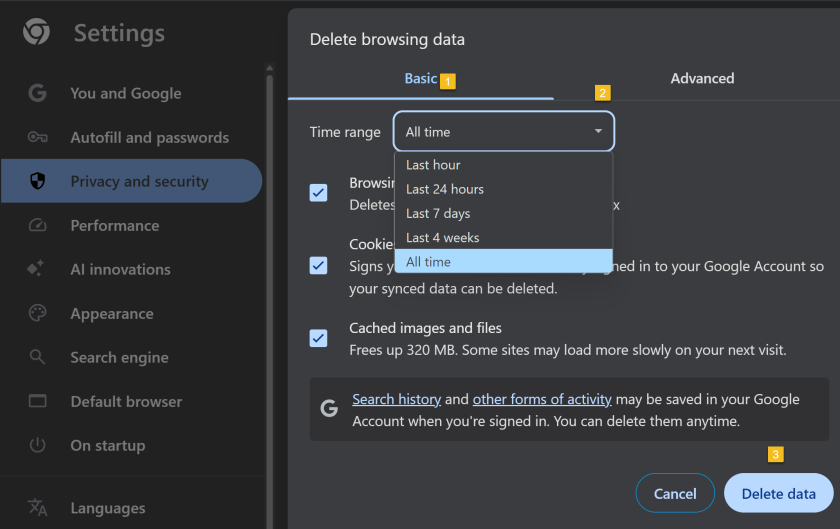
A new dialogue box will open.
Click the Basic menu option.
Select the period to delete from in the Time range drop down menu (To clear all cached data and cookies, select All time, this is recommended).
Ensure check boxes for Browsing history. Cookies and other site data and Cached images and files are ticked.
Click on Delete data and wait for that dialogue box to exit.
Close all open Chrome tabs.
Restart Chrome.
Refer to the below image:
Selecting what data and when to delete
3) Upgrade Chrome Security
Once upon a time, Google developed the Chrome Cleanup Tool, an application that helps find and remove unwanted software (UwS), toolbars, and other automatically installed extensions that antivirus probes may miss from Windows devices. These types of programs can slow down your browser, so checking it for unwanted add-ons every so often is a must.
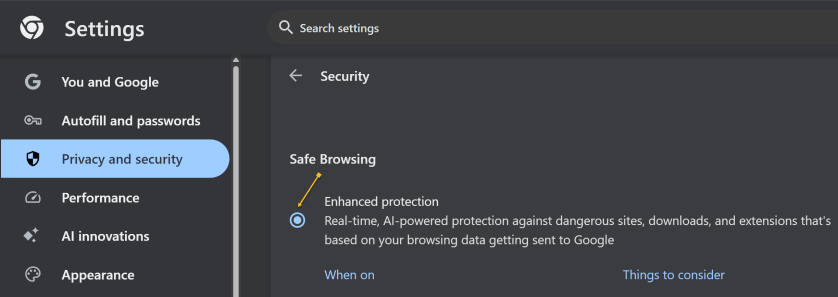
Unfortunately, the program was shut down in 2023. However, Google says users will remain “automatically protected” by its Safe Browsing features in Chrome. For extra protection, navigate to:
Settings >Privacy and security > Security, > Enhanced Protection
And enable which offers “real-time, AI-powered protection against dangerous sites, downloads, and extensions that’s based on your browsing data getting sent to Google.” See the below image:
Enable Enhanced protection
4) Manage Performance Settings
There are two types of people in the world: Those who open just a few tabs at a time, then close them, and those who hoard tabs like they have never heard of bookmarking. If you are the latter, it’s a safe bet what’s causing your slowdown, and you should take action. Not sure which tabs to close? Hover over a tab, and the pop-up preview shows how much memory it’s taking up.
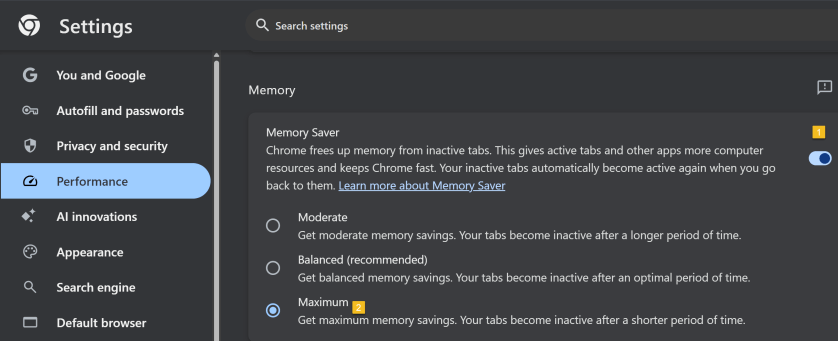
For something more automatic, Google introduced Memory Saver mode in 2022. This feature frees up resources from unused tabs in order to improve performance on tabs that are in use. While this feature should be enabled by default, you can open:
Settings > Performance > Memory Saver
and set to Maximum so tabs become inactive sooner. See the following image:
Setting Memory Saver to Maximum
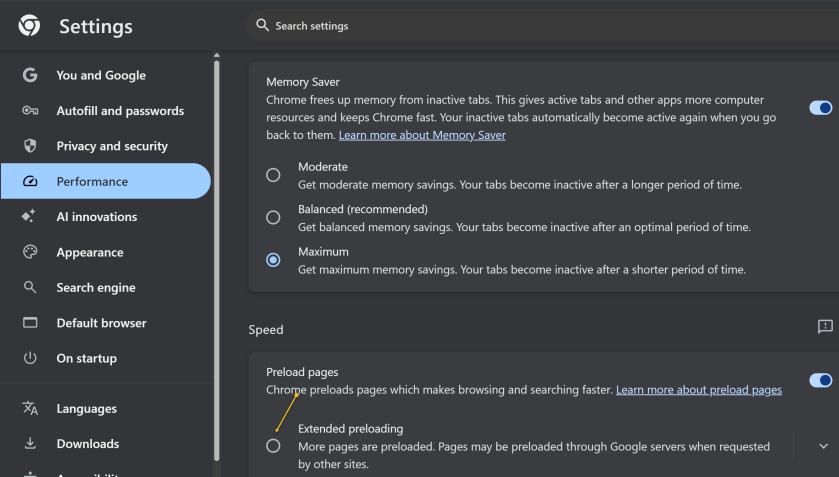
While you are here, go one further and scroll down to the Speed section. Make sure Preload pagesis enabled so websites and search results load faster. For an extra boost, enable Extended preloading for an even faster experience, though Google will be able to see what sites are being preloaded for you. Refer to the below image:
Enable Preload and Extended preloading
Disclaimer
Technology is constantly evolving, and smartphone and desktop tech rarely remains static. Therefore, the information in this post is only accurate as of the date it was written. Blog posts that are older than six months may contain instructions that are no longer compatible with your device or operating system. We hope that the content from previous posts continues to function as intended. Thank you for reading TechSavvy.Life, where technology works for you.
Quote For the Day
“Technology is nothing. What’s important is that you have faith in people, that they’re basically good and smart, and if you give them tools, they’ll do wonderful things with them.”
-Steve Jobs
X (Twitter)
You are finished. Please feel free to share this post! One way to share is via Twitter.
Just click the Tweet icon below. This will launch Twitter where you click its icon to post the Tweet.
Checkout TechSavvy.Life for blog posts on smartphones, PCs, and Macs! You may email us at contact@techsavvy.life for comments or questions.
We value your feedback! Was this post helpful? Please share your comments with us. If you have a tech question related to your computer or smart device, feel free to reach out. Just send an email to contact@techsavvy.life, and be sure to include the device, app, and version you are using. To assist us further, you can also attach screenshots related to your inquiry.
The author’s Vietnam eBook on the “Battle for Tra Bong Vietnam: Events and Aftermath” can be accessed from a Kindle device or the Kindle App for a desktop or smartphone. The apps are free.
The author’s Vietnam eBook on the Battle for Tra Bong Vietnam: Events and Aftermath
This post provides tips for handling AI-generated summaries in Google search results. It explains how to disable these overviews using specific search modifiers.
RAYMOND OGLESBY @RaymondOglesby2 July 23, 2024 – 3 minutes read time
This is for devices running Google or Bing. Screenshots are from Windows 10 desktop
Get the Latest Desktop Google Update
Open Google, click the 3-dot menu icon (upper right corner), then click the Settings option. If Google is outdated, it will automatically update.
Why You Will Like This Tip
View your Google or Bing search results without an AI-generated summary.
Narrow your search results to what you just want to preview.
Overview
We rely on Google every day to provide us information. But what happens when our source of knowledge becomes messy and unreliable? AI Overviews utilize Google’s Gemini AI to provide an answer to your query right on the search page; no need to click.
Using the AI Modifier
Still in its infancy, this feature occasionally surfaces incorrect information, so some web surfers look to disable it entirely. There are a few ways to make an AI Overview go away, but no method is as simple as tricking Google itself into getting rid of it. Google uses search modifiers, named operators, which help narrow search results. Here are a few examples:
Use quotations (” “) to search for the exact phrase
Add site: to search a single website
Search for a certain type of file with filetype:
Exclude terms with a minus (-) symbol. The minus symbol stands for NOT.
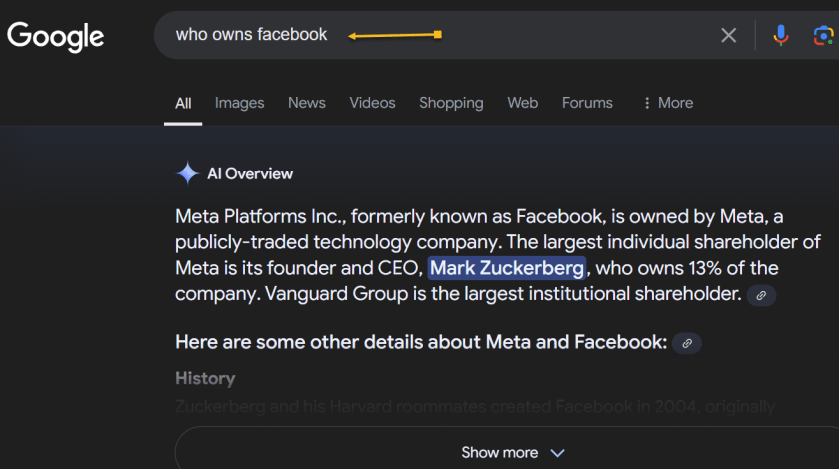
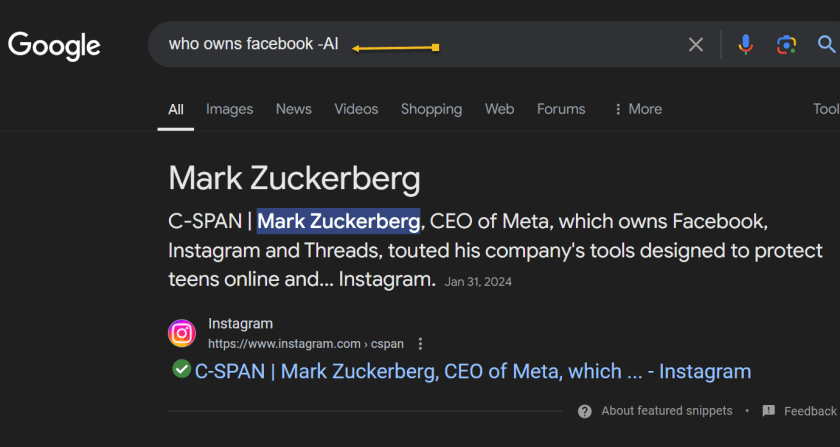
If we ask “who owns Facebook” an AI-generated summary will be displayed. Refer to the below image:
With AI-generated summary
And if you add the term -AI at the end of the query, an overview is not generated. It’s a very simple solution to the AI Overview problem that can be quickly repeated on subsequent queries without needing multiple steps. See the below image:
Without AI-generated summary
However, it’s worth noting that this does not work because of the -AI modifier. On subsequent tests, we found that putting pretty much anything in there (Ex: -i, –sports, -farm) also did the same thing.
Summary
So, no, Google did not add a secret AI kill switch to its search engine. Instead, AI Overviews are likely only available under certain conditions, and by using a search modifier, you circumvent those parameters. Still, it’s an easy way to game the system until we get an easier way to disable these overlays.
Disclaimer
Technology is always changing. Rarely is there static tech for smartphones and desktops. Thus, the contents of this post are only valid at the time of writing. Blog posts older than six months may have directions incompatible with your device or OS. Hopefully, older post content will continue to work as advertised. Thank you for reading TechSavvy.Life for Technology at Work For You.
Quote For the Day
“Real gs move in silence like lasagna.”
Lil Wayne
X (Twitter) Info
That was easy. Please feel free to share this post! One way to share is via Twitter.
Just click the Tweet icon below. This will launch Twitter where you click its icon to post the Tweet.
Checkout TechSavvy.Life for blog posts on smartphones, PCs, and Macs! You may email us at contact@techsavvy.life for comments or questions.
Was this post helpful? We would love to hear your comments. Do you have a computer or smart device tech question? I will do my best to answer your inquiry. Just send an email to contact@techsavvy.life. Please mention the device, app, and version you are using. To help us, you can send screenshots of the data related to your question.
The author’s Vietnam eBook on the “Battle for Tra Bong Vietnam: Events and Aftermath” can be accessed from a Kindle device or the Kindle App for a desktop or smartphone. The apps are free.
The author’s Vietnam eBook on the Battle for Tra Bong Vietnam: Events and Aftermath
The content provides a guide on safeguarding personal information from appearing in Google search results. Users can monitor their information’s visibility and request removal if necessary. Specific steps are outlined for monitoring, requesting removal, and reporting illegal content. .
This is for devices using Google Search. Works best on a desktop/laptop. Screenshots are from Windows 10
Table of Contents
Learn When Your Information Appears Submit a Manual Request Illegal Activity Find Your Results Step 1: Find Results About You Step 2: Review the Results About You Step 3: Request Removal of Results About You View Your Results Step 1: Report URLs on Google Search Step 2: Check for Email Confirmation Step 3: Monitor the Status of Your Requests Policy Requirements for Removal Requests Invisible? Not! Email Notifications Related
Looking for more privacy? Here’s how to remove your phone number, email, physical address, and lots of other personal data about yourself from Google’s search results.
Personally Identifiable Information (PII) is what every bad actor wants. If they get their hands on it, it can be used to rob, impersonate, or even endanger you on the internet and in the real world. One of the prime places to find it is via Google, and while Google can not stop that info from appearing on other websites, you can try to remove it from search results.
Let’s explore how to get notified when your PII appears in a search and how to tell Google to stop it from happening again. Like with other endless settings and features in Google, this is a complex process.
Learn When Your Information Appears
You are unable to tell Google to delete your info if the search is not even finding and displaying it. Google has an option to notify you when that happens.
The spot to visit is called the Results About You activity page. You have to be logged into Google for it to work. Follow the prompts on the screen as Google asks you for your physical addresses, emails, and phone numbers. Tell Google how you want to be notified (email or push notification via the Google app). Then wait. Refer to the below images:
Your Get Started pageFill in your criteriaHow to be notifiedGoogle Search is working
After a few hours, you should receive a report from Google on what’s turning up that’s yours PII-wise. You can also just go back to the Results About You page to check it. Plus, you can tick off the boxes next to any result you want to make sure is removed from the search. The status of your request will also be displayed (eventually). Just be patient.
Submit a Manual Request
The above is just your address/contact Info. Google will also let you request to remove other things online that you may find harmful. That includes:
National/government ID numbers
Bank accounts
Credit card numbers
Personal signatures
Login info and credentials
Medical records
“Irrelevant pornography” (that is, explicit material somehow tied to your name)
Login credentials
Deepfake porn you may appear in against your will
You can request this without even having to prove that the data floating out there is a problem (with some exceptions).
If you own the website displaying the information you do not want to show, Google spells out how to block a URL or specific site pages from Google search results.
Removing info requires that you know if it is appearing only in Google search results or in results on a separate website. If the latter, Google may not be very effective, and it asks whether you have contacted the site’s owner first to remove the information. It also suggests ways to get in touch with a site.
Maybe you do not want to get in touch with a site or you have already tried and were unsuccessful. Google asks you a series of questions, such as what type of info you would like removed, narrowing it down to one specific thing when possible. It will also ask whether the content is being shared with the intent of doxing you; that’s when someone shares your PII with the intent to harm you. You may need to enter a lot of data, but the more detail you provide, the less likely it is that Google will have to follow up with you before nuking the PII in search results.
Google says if your PII appears on a live page you control and you have already updated it to remove the information, it should eventually go away. But the page might be cached by the search engine, so you should request to remove outdated web pages. You will need specific URLs for the pages; you can submit up to 1,000 on the form. See the following images:
Request to refresh outdated contentSubmit your request
Illegal Activity
If you see something in a Google search that’s illegal, such as potentially criminal content, intellectual property infringement, or Child Sexual Abuse Material (CSAM), Refer to the below image:
Find and Remove Personal Contact Info in Google Search Results
When you use Results about you, you can find out if your personal contact info, like your home address, phone number, or email address shows up in search results.
Find Your Results
Step 1: Find Results About You
Go to the Results about you page.
In the Google App:
Log in to the Google app.
To open the menu, click your Google Account avatar.
From the menu, select Results about you.
From the mobile web or desktop:
Log in to your Google Account.
To open the menu, click your Google Account avatar.
From the menu, select Manage your Google Account > Data & privacy.
In the History settings, select My Activity > Other activity.
Scroll down to the Results about you section, and select Manage results about you.
Select Get started or Settings.
Enter your name and the contact info that you want to find in search results.
Google uses this information to check for search results that show this info.
You can also enter these types of contact info in the form:
Nickname
Maiden Name
Multiple personal phone numbers
Multiple addresses
Multiple email addresses
Set up notifications
You can choose to receive email notifications if Google finds results with your contact info. You can also receive push notifications through the Google app. If you have notifications on, you will receive a notification to let you know if the results match your info. After that, you will receive a new notification when new results are found that match your contact info.
Step 2: Review the Results About You
If you have notifications on, you will get a notification within a few hours to let you know if any search results match your name and personal contact info. You can also check directly from the Results about you page.
To view your results, from the Results about you page, go to the Results to review tab.
When you select a result, you can learn more about it, like the website it’s from, or the contact info it contains.
Step 3: Request Removal of Results About You
If you see a result that you would rather keep private, you can request to remove it from search results.
To remove more than one result, select the checkbox next to each result, then click Request to remove.
To remove a single result, select the result to expand, then click Request to remove.
If you do not want to start a removal request, you can also choose Mark as reviewed.
Google considers some results valuable to the public. These can include government or educational websites, online newspapers, or business websites. If your result is from a website like this, you won’t find a Remove result option.
To confirm your removal request and for status updates when your request has been reviewed, you will get an email. You can check the status of your requests anytime from Results about you under Removal requests.
View Your Results
Step 1: Report URLs on Google Search
On desktop or mobile, log in with your Google Account.
You will get an update on the status of your requests through the email address associated with your account.
If you want to request the removal of a result for someone else, or if you do not want to log in, you can use the detailed removal request form instead.
On Google Search, search for your name.
To find results that show your personal contact info, you can search for your name and your home city, or your name and your home address.
To reach About this result panel, click More.
Select Remove result > It shows my personal contact info.
Go through the reporting flow.
Submit your request.
After you submit your request, select I’m done.
Tip: Make sure to enter your name and the personal contact info shown on the result page exactly as they appear on the result. For example, if the result shows:
Additional Information
Your nickname: Enter your nickname in the form.
An old home address: Enter the old home address in the form.
More than one type of contact info: You only need to include one type of contact info in your request form. This includes your phone number and your home address.
More than one type of contact info: You do not need to submit multiple removal requests for the same URL.
Step 2: Check for Email Confirmation
Within the next few hours, you will receive an email confirmation that your request was submitted.
After you select a specific request, you can check details like the:
Link to the page you flagged
Submission day and time
Request ID
Contact info you flagged on the page
Tip: There may be a delay between when a request is approved and the result is removed from search results. You can check if your info is already removed within a few hours after it was approved.
Policy Requirements for Removal Requests
After you submit a request, Google will review it to make sure it meets policy requirements for removal. Requests must meet the following policy requirements:
The contact info displayed on the result has to be your personal info. To request to remove professional info that’s been posted with the intent to harm you, use the detailed removal request form.
You do not control the info yourself. This means contact info that you can remove from the internet yourself, like info on a social media page or a personal blog that you own.
As Google Search seeks to provide users with useful info, it won’t remove info that’s valuable to the public. For example, Google won’t remove results for web pages that are owned by:
Educational or government institutions
Newspapers
See the following image for your request being processed:
Your removal request is in process
For now, just wait while Google processes the request. When Google has finished the Removal requests status will change. Refer to the below image:
Your removal request is approved
You will receive a Request approved notification. Just click the See details button for additional information. Refer to the below image:
Confirmation of your removal request
Your removal request details are now displayed. See the following image:
Details of your removal request
Invisible? Not!
Scrubbing the search engines of your digital footprint is not the same as taking it off the internet. Search engines did not put the info out there; they indexed it, grabbing the data from some other source. They might snag it again from a different source.
You are never going to be completely free of search engine results unless you delete any traces of yourself and get offline entirely. You could always try services such as Abine’s DeleteMe or other personal data removal services and many others, which do what they can to prevent your information from being used by data brokers, though for a subscription fee.
Until you delete all your old email accounts, stop using mobile apps and location services, quit social media, stop online shopping, and never sign into anything ever again, some entity will have something on you. Trying to hide something only makes it easier to find.
Email Notifications
Once you have set up Google Search based on your criteria, you will receive emails regarding new search results about you. Refer to the below image:
Technology is always changing. Rarely is there static tech for smartphones and desktops. Thus, the contents of this post are only valid at the time of writing. Blog posts older than six months may have directions incompatible with your device or OS. Hopefully, older post content will continue to work as advertised. Thank you for reading TechSavvy.Life for Technology at Work For You.
Quote For the Day
You don’t learn to walk by following rules. You learn by doing and falling over.
-Richard Branson
Tweet Info
That’s it. Please feel free to share this post! One way to share is via Twitter.
Just click the Tweet icon below. This will launch Twitter where you click its icon to post the Tweet.
Checkout TechSavvy.Life for blog posts on smartphones, PCs, and Macs! You may email us at contact@techsavvy.life for comments or questions.
Please feel free to leave a comment. I would love to hear from you. Do you have a computer or smart device tech question? I will do my best to answer your inquiry. Just send an email to contact@techsavvy.life. Please mention the device, app, and version you are using. To help us out, you can send screenshots of your data related to your question.
Author’s E-Book
You can access the E-book from a Kindle device, or the Kindle App for a desktop or smartphone. The apps are free.
The author’s Vietnam eBook on the Battle for Tra Bong Vietnam: Events and Aftermath
Google One offers Dark Web Monitoring to track personal information in the hidden internet, aiming to provide proactive protection, convenience, and comprehensive monitoring. Users with a Google One membership can set up a monitoring profile to check for breached data. The feature is designed to help users stay informed and take action to protect their digital identity.
This is for the desktop using Google One. Screenshots are from Windows 10
Table of Contents
What is the Dark Web
Personal Information on the Dark Web
Who is Eligible
Set Up Monitoring Profile
How to Use Your Monitoring Profile
Dark Web Monitoring Feature
Enabling Dark Web Monitoring
Viewing Your Dark Web Report
Why Does Dark Web Monitoring Matter?
Not a Google One Member?
Availability of Dark Web Report
Conclusion
What is the Dark Web
The dark web is a hidden part of the internet not indexed by traditional search engines like Google, Bing, or Yahoo. It is intentionally designed to be anonymous, making it a haven for illegal activities such as the sale of stolen data, drugs, weapons, and more stuff of nightmares. It’s where cybercriminals often trade in stolen personal information like credit card numbers, login credentials, and social security numbers. It’s also where lots of stolen personal data from breaches end up for sale.
Personal Information on the Dark Web
With a Google One membership, you can set up a profile to monitor the dark web to see if your info is found in breaches.
You can check for data on the dark web that might be associated with your email address or other info you add to your monitoring profile. Breach results may contain information including:
Your name
Address
Phone number
Email
Social Security Number (SSN)
Username
Password
Tip: only accounts with a US billing method can add a Social Security Number to their monitoring profile.
Any information in the breach results will be displayed in redacted form to maintain data privacy.
With the results, you can review your information and make informed decisions about how to protect yourself.
Who is Eligible
You can set up a monitoring profile with a paid Google One membership. Click here for help on signing up for a Google One account.
You do not need a paid Google One membership to run a dark web report for the email address associated with your Google Account. Click here for help on scanning the dark web with your email address.
Set Up Monitoring Profile
You can monitor your Google Account email address or add other information to your monitoring profile.
On your computer, click here if you have a Google One account.
Under Dark web report, click Set up and then Start monitoring.
To include additional Google Account personal information in your monitoring profile:
Select the desired checkboxes.
Click Allow.
Confirm your selections and add any additional data you want to monitor.
Click Done.
How to Use Your Monitoring Profile
When you set up your monitoring profile in Google One, your profile info is used to check whether a match was found on the dark web. If matching info is found, we will email or notify you. You can find guidance to protect your personal information on the Google One website and app.
Google’s Dark Web Monitoring feature is designed to help users stay informed about the presence of their personal information on the dark web. Here’s how it works:
Continuous Scanning: One of Google’s many sophisticated algorithms scans the dark web continuously, looking for any signs of your personal information, such as email addresses, passwords, or financial details. The best part is you are in control of what it scans for.
Alerts: If Google’s monitoring system detects any of your information on the dark web, it will send you an alert. This alert will prompt you to secure your accounts and data.
Reporting: Once set up, you can view the report right away from your Google One homepage
Enabling Dark Web Monitoring
First, we need to set up the feature. Fortunately, Google has made this process relatively straightforward:
Access Your Google Account: Start by logging into your Google account. Click here to log in.
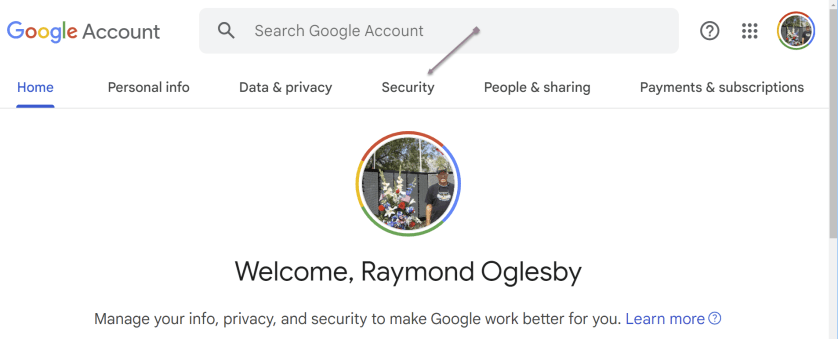
Security Tab: Once logged in, click the Security tab at the top of the page. This section contains various settings related to your account’s security.
Dark Web Monitoring: Scroll down to find the Dark Web Monitoring section. If it’s your first time accessing this feature, you might need to provide your password for verification.
Turn On Dark Web Monitoring: Click the Turn On button to activate the feature. Google will ask you to confirm your choice.
Verification: To ensure the security of this feature, Google may prompt you to re-enter your Google Account password.
Confirmation: Once you have completed the above steps, you should receive a confirmation message that Dark Web Monitoring is active for your account.
Refer to the below image:
Accessing the Security tab
s
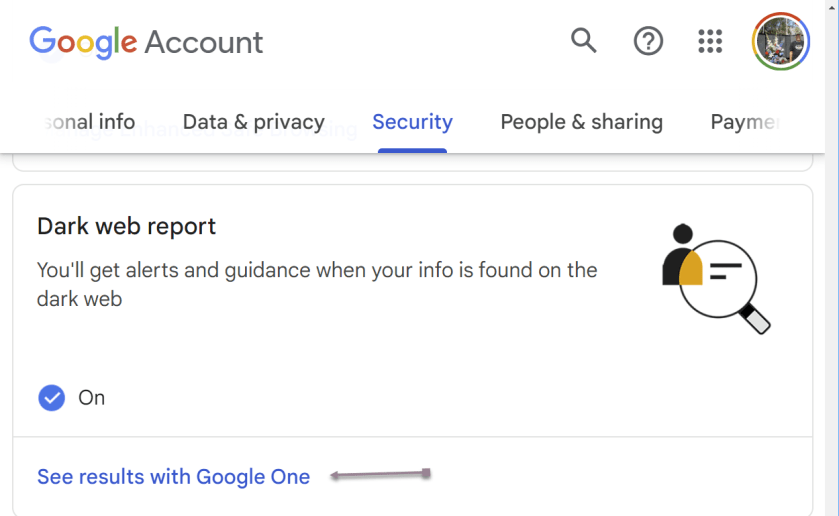
Viewing Your Dark Web Report
To view your report, click the Security tab, and scroll down to the Dark web report section. Now, click the link See results with Google One. See the below Image:
Selecting to view your results
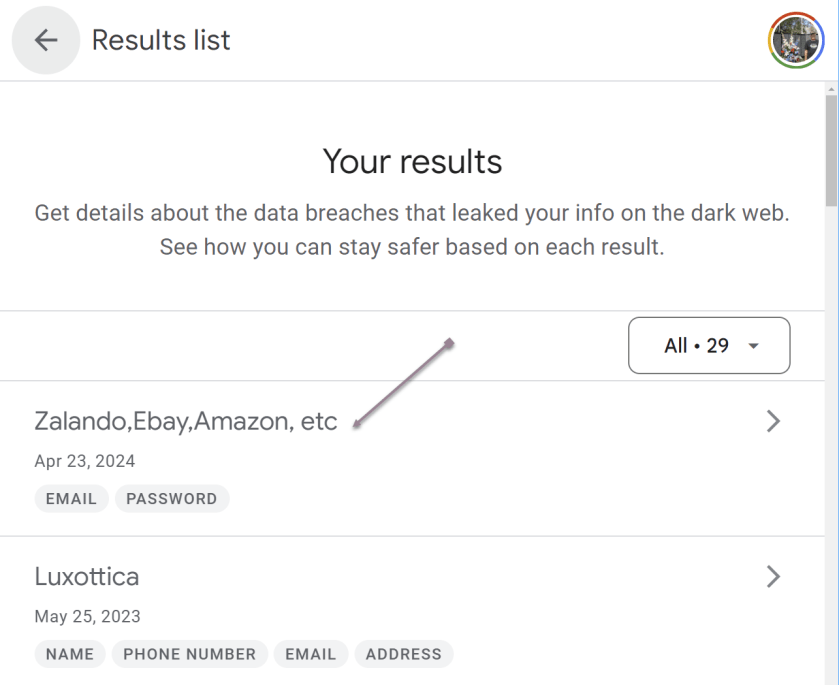
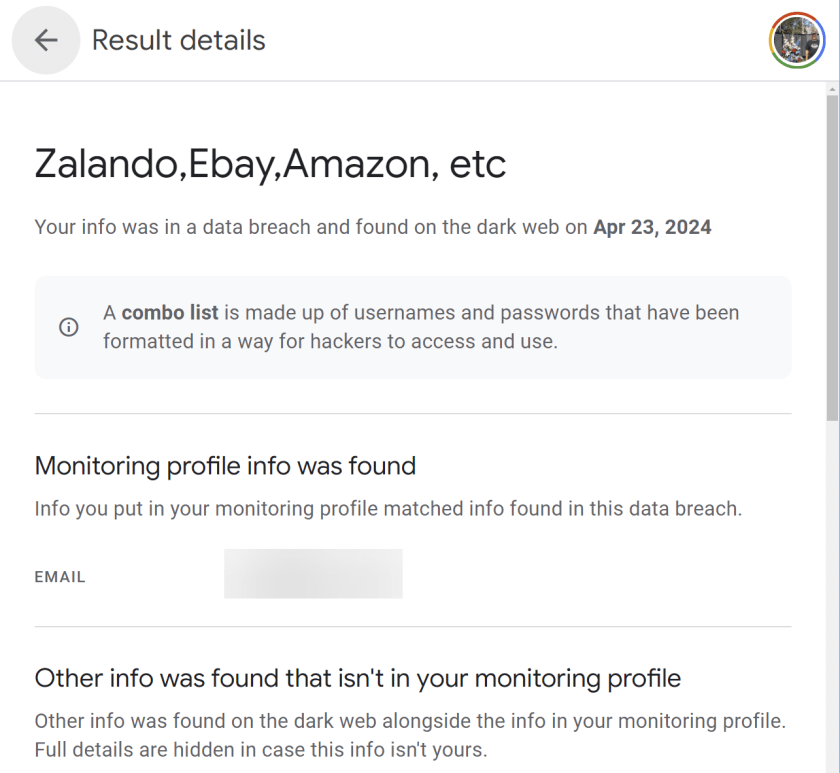
You will see a summary of your results. You can click an individual breech (or the All button; we have 29 breeches) to view detailed information and recommended actions. See the following image:
Selecting a single breach
The selected breech details are now displayed. Refer to the below image:
Viewing details of a single breach
Why Does Dark Web Monitoring Matter?
Proactive Protection: With this feature, Google aims to provide proactive protection. Instead of waiting until a data breach occurs, you can take action as soon as your information appears on the dark web, reducing the potential impact of cyberattacks.
User Convenience: Google’s Dark Web Monitoring is seamlessly integrated into the user experience, making monitoring their online security easier for everyday users. You need not be a cybersecurity expert to benefit from this feature.
Comprehensive Monitoring: Google’s vast resources and expertise allow for comprehensive dark web monitoring. It can scan many sources, increasing the likelihood of detecting compromised information.
Data Privacy: Google emphasizes data privacy and security. The company ensures that your personal data is protected while providing this service, addressing concerns about potential privacy breaches.
Not a Google One Member?
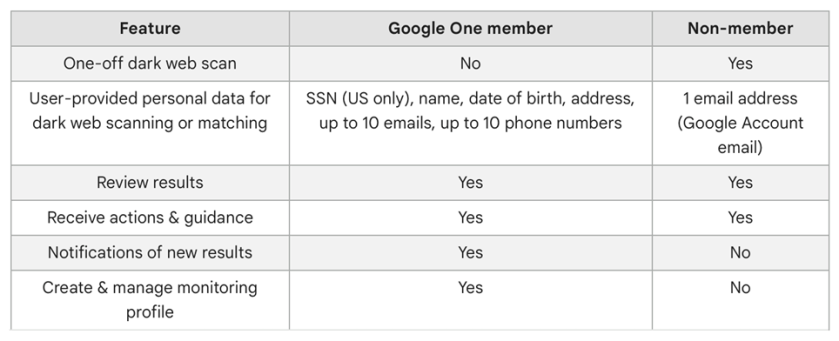
You can still access some features without the membership, it essentially boils down to whether you want continuous monitoring or not and if the other Google One features are enough to justify the monthly costs (depending on the plan you choose) Here’s a breakdown of what Google One members and non-members get. See the below image:
Google One and non-menbers features
Availability of Dark Web Report
The Dark Web Report is available in the following countries or regions.
Albania
Algeria
Argentina
Austria
Australia
Bangladesh
Belgium
Bolivia
Brazil
Canada
Chile
Colombia
Denmark
Ecuador
Finland
France
Germany
Greece
Iceland
India
Indonesia
Ireland
Israel
Italy
Japan
Mexico
Morocco
Netherlands
Nicaragua
Norway
Pakistan
Philippines
Senegal
Slovenia
South Korea
Spain
Sri Lanka
Sweden
Switzerland
Taiwan
Türkiye
Ukraine
United Kingdom
United States
Venezuela
Vietnam
Conclusion
Your personal data is constantly under threat. Google’s Dark Web Monitoring feature represents a significant step toward enhancing online security and protecting your digital identity. By providing continuous scanning, timely alerts, and actionable recommendations, Google empowers users to take control of their online safety. While no security measure is foolproof, this feature is a valuable addition to Google’s suite of tools aimed at helping users stay one step ahead of cybercriminals. Your digital identity is worth safeguarding, and it appears Google is here to help you.
Source: Google Help
Disclaimer
Technology is always changing. Rarely is there static tech for smartphones and desktops. Thus, the contents of this post are only valid at the time of writing. Blog posts older than six months may have directions incompatible with your device or OS. Hopefully, older post content will continue to work as advertised. Thank you for reading TechSavvy.Life for Technology at Work For You.
Quote For the Day
Visualize this thing you want. See it, feel it, believe in it. Make your mental blueprint and begin.
Robert Collier
Tweet Info
That’s it. Please feel free to share this post! One way to share is via Twitter.
Just click the Tweet icon below. This will launch Twitter where you click its icon to post the Tweet.
Checkout TechSavvy.Life for blog posts on smartphones, PCs, and Macs! You may email us at contact@techsavvy.life for comments or questions.
Please feel free to leave a comment. I would love to hear from you. Do you have a computer or smart device tech question? I will do my best to answer your inquiry. Just send an email to contact@techsavvy.life. Please mention the device, app, and version you are using. To help us out, you can send screenshots of your data related to your question.
Author’s E-Book
You can access the E-book from a Kindle device, or the Kindle App for a desktop or smartphone. The apps are free.
The author’s Vietnam eBook on the Battle for Tra Bong Vietnam: Events and Aftermath
This post provides instructions for customizing the Google homepage on both the Google website and Google Chrome. It covers enabling Dark Mode, changing the homepage color and background, managing shortcuts, and installing themes from the Chrome Web Store. The post also includes a disclaimer about technology changes and a quote for the day.
This is for devices using Google. Screenshots are from Windows 10
How many times a day do you navigate to Google.com to look up something on the internet? Modern browsers allow you to search directly from the address bar, so there are a few reasons to load up Google Search’s homepage, but some people can not shake the habit. If that’s you, at least customize it to your needs. Here’s how to customize your Google Homepage.
Enable Google Search Dark Mode
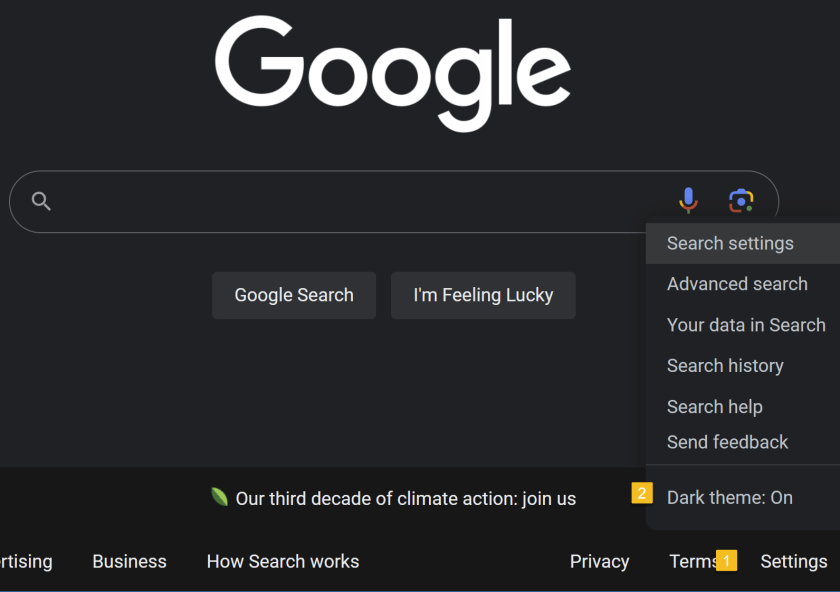
The barebones aesthetic of Google.com keeps things simple…and bright. Turn down the lights with Dark Mode. Click the Settings button in the lower-right corner of the screen, where you can toggle the Dark theme on and off to change the theme you see on Google Search results pages. Refer to the below image:
Set Dark Mode
Customize Google Chrome Homepage
Are you a Google Chrome user? If so, chances are your homepage is set to Google already, which adds a few shortcuts to Google’s usually minimalist screen. Unlike the Google website, this version of Google Search only follows the default theme setting of your operating system.
To customize Chrome’s Homepage, click the Customize Chrome link in the bottom-right of the screen to open options related to appearance, shortcuts, and what Google calls Cards. Change the color of Chrome’s homepage and menus by choosing one of the preset colors in the menu or selecting the color picker option. See the below image:
Set your color
For more options, click Change Theme to see several available categories. You can set your homepage to feature Chrome’s brand colors or select among collections of landscapes, space, art, and various artists. Each option gives you a background and color theme. You can also upload your own picture to use as a background. See the following image:
Set your background
From the Customize Chrome menu, you can also tell Google whether or not you want to show shortcuts on the Homepage. Enable My shortcuts to manually set what websites should be included or the Most visited sides to have Google suggest websites based on how often you visit them. Lastly, Google has a Cards section that allows you to see recent Google Drive files, shopping carts, and recipes. You can turn this section off or disable certain components.
Install Themes
You can also customize your Google Homepage on Chrome with the help of themes from the Chrome Web Store. Open the Customize Chrome menu and click Change Theme, then choose the Chrome Web Store listing at the bottom. (Or open Settings > Appearance > Theme.) Refer to the below image:
Search the Chrome Web Store
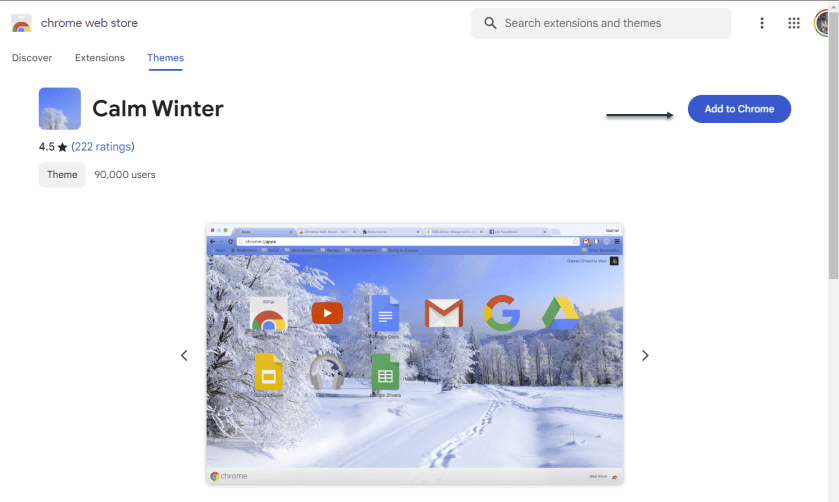
Choose the Themes tab on the web store sidebar to search through various categories. Click into a category, then select a theme you like and choose Add to Chrome to download the theme and apply it to your Google page. See the below image:
Select a theme
Disclaimer
Technology is always changing and rarely is there static tech for smartphones and desktops. Thus, the contents of this post are only valid at the time of writing. Blog posts older than six months may have directions incompatible with your device or OS. Hopefully, older post content will continue to work as advertised. Thank you for reading TechSavvy.Life for Technology at Work For You.
Quote For the Day
Think big. Start small.
Seth Godin
Tweet Info
That’s it. Please feel free to share this post! One way to share is via Twitter.
Just click the Tweet icon below. This will launch Twitter where you click its icon to post the Tweet.
Checkout TechSavvy.Life for blog posts on smartphones, PCs, and Macs! You may email us at contact@techsavvy.life for comments or questions.
Please feel free to leave a comment. I would love to hear from you. Do you have a computer or smart device tech question? I will do my best to answer your inquiry. Just send an email to contact@techsavvy.life. Please mention the device, app, and version you are using. To help us out, you can send screenshots of your data related to your question.
Author’s E-Book
You can access the e-book from a Kindle device, the Kindle App for the desktop or smartphone, which is a free app.
The author’s Vietnam eBook on the Battle for Tra Bong Vietnam: Events and Aftermath
Google Image Search allows users to perform a reverse image search by either using a URL from a website or a local image on your device. To do so, paste the image’s URL or upload the image file onto the Google Images search bar. Google will then provide visually similar images and may also help identify the original source of the image. However, pinpointing the exact origin of the image may not always be successful.
This is for devices using Google. Screenshots are from Windows 10
Google Image Search is a great way to find images similar to one you already have or to help you track down the original source of a photo. Let’s find out how to do a reverse image search.
Search For an Image From a Website
If you would like to search for an image that appears on a website, you can paste the URL into the Google Images search bar; drag and drop an image or browse your files. We will show you how to do both.
For the first method, you need the URL of the image itself, not just the address for the page on which the image appears. The easiest way to grab that URL is to right-click the image and select the Copy image address. Refer to the below image:
Selecting the Copy image address option
Next, with the URL in your clipboard, head to Google Images and click the Google Lens icon. See the below image:
Selecting the Google Lens icon
Now, in the Paste image link text box, paste the URL you copied earlier and click Search. See the following image:
Paste the image link
Next, you will see visually similar images in the right sidebar, and you can click Find image source to see where the image originated from. Keep in mind that this is not an exact science. Google often can not find the source, if there is one. Refer to the below image:
Selecting Find image source
Now, if there’s a specific part of the image you would like to search for, you can use the handles to adjust which part of the image is selected. See the below image:
Find image source by using the handles
That’s it! This is definitely the easiest method for searching Google with images. There are also ways to do reverse image searches on Android and iPhone or iPad.
Search for an Image You Already Have
To search Google Images with a local image you already have; maybe one you downloaded from the web; use the Google Lens icon in the Google Images search bar. You will be able to drag and drop an image or browse your files.
First, head on over to the Google Images page and click the Google Lens icon. See the following image:
Selecting the Google Lens icon
Next, you can either drag an image from another window; such as the file explorer; or click upload a file to browse for photos on your computer. Refer to the below image:
Selecting to drag and drop an image or upload a file
Now, after the image uploads, you will be brought to a page with visually similar images in the right sidebar. Click Find image source to see where the image originated from. One thing to note is with images that have not been grabbed from the web, it’s not as easy to find the original source. See the below image:
Selecting Find image source
Next, if there’s a specific part of the image you would like to search for, you can use the handles to adjust which part of the image is selected. See the following image:
Find image source by using the handles
How about that! This is a great way to find similar images, or maybe you want to find different sizes of an image you already have. Google Search is a powerful tool, and Google Lens drives a lot of image-related search functions. It’s a pretty impressive tool in itself.
Disclaimer
Technology is always changing and rarely is there static tech for smartphones and desktops. Thus, the contents of this post are only valid at the time of writing. Blog posts older than six months may have directions incompatible with your device or OS. Hopefully, older post content will continue to work as advertised. Thank you for reading TechSavvy.Life for Technology at Work For You.
Quote For the Day
When you want to succeed as bad as you want to breathe, then you’ll be successfull.
Eric Thomas
Tweet Info
That’s it. Please feel free to share this post! One way to share is via Twitter.
Just click the Tweet icon below. This will launch Twitter where you click its icon to post the Tweet.
Checkout TechSavvy.Life for blog posts on smartphones, PCs, and Macs! You may email us at contact@techsavvy.life for comments or questions.
Please feel free to leave a comment. I would love to hear from you. Do you have a computer or smart device tech question? I will do my best to answer your inquiry. Just send an email to contact@techsavvy.life. Please mention the device, app, and version you are using. To help us out, you can send screenshots of your data related to your question.
Author’s E-Book
The author’s Vietnam eBook on the Battle for Tra Bong Vietnam: Events and Aftermathsd
Using Google Photos‘ slideshow feature, you can have all or specific album photos play one after another automatically. You can make this slideshow on both your desktop and your mobile device.
This is for the desktop and smartphones. Screenshots are from Windows 10 and iPhone 14 Pro running iOS 16+
Using Google Photos‘ slideshow feature, you can have all or specific album photos play one after another automatically. You can make this slideshow on both your desktop and your mobile device. Let’s explore how this is done.
On Your Desktop
To create a slideshow on your desktop computer, first, open a web browser and launch the Google Photos site. Sign in to your account on the site if you have not already.
Next, once you see your photos, if you want to include all your photos in the slideshow, then click the first photo on the main screen to open it in full screen.
Now, once the photo opens in full screen, at the top-right corner, click the three dots (the Menuicon). Refer to the below image:
Selecting the Menu icon
Next, in the menu that opens, click Slideshow. See the below image:
Selecting the Slideshow option
Now, your browser will go full screen and your slideshow will start playing. Sit back, relax, and enjoy recollecting your memories with your photos.
Next, you can stop the slideshow at any time by pressing the Esc key on your keyboard. See the following image:
Exiting the Slideshow
Now, if you would like to make a slideshow using photos from a specific album, then access that album on Google Photos. On the album page, in the top-right corner, click the three dots (the Menu icon). Refer to the below image:
Selecting the Menu icon
Next, from the three dots (the Menu icon), select Slideshow to start playing your photos. You can close the slideshow by pressing the Esc key. See the below image:
Selecting the Slideshow option
On Your Mobile
To play your photos slideshow on your phone, first, launch the Google Photos app on your phone.
Next, to include all your photos in the slideshow, then tap the first photo on the main screen.
Now, when your photo opens in full screen, in the top-right corner, tap the three dots (the Menu icon). See the following image:
Selecting the Menu icon
Next, from the three dots (the Menu icon), select Slideshow to start playing your photos. Refer to the below image:
Selecting the Slideshow option
Now, Google Photos will start playing a slideshow for all your photos. If you would like to stop this slideshow, tap anywhere on the screen then tap Done in the top-left corner. See the below image:
Exiting the Slideshow
To create a slideshow using photos from a particular album, first, tap Library and choose your photo album. Select the first photo in the album, then in the top-right corner, tap the three dots (the Menu icon). See the following image:
Selecting the Menu icon
Next, in the menu that opens, tap Slideshow. Refer to the below image:
Selecting the Slideshow option
Now, your slideshow containing photos only from the selected album will play. If you would like to stop this slideshow, tap anywhere on the screen then tap Done in the top-left corner. See the below image:
Exiting the Slideshow
Disclaimer
Technology is always changing; there is rarely static tech for smartphones and desktops. Thus, the contents of this post are only valid at the time of writing. Blog posts older than six months may have directions incompatible with your device or OS. Hopefully, older post content will continue to work as advertised. Thank you for reading TechSavvy.Life for Technology at Work For You.
Quote for the Day
My view is that if your philosophy is not unsettled daily then you are blind to all the universe has to offer.
Neil deGrasse Tyson
Tweet Info
That’s it. Please feel free to share this post! One way to share is via Twitter.
Just click the Tweet icon below. This will launch Twitter where you click its icon to post the Tweet.
Checkout TechSavvy.Life for blog posts on smartphones, PCs, and Macs! You may email us at contact@techsavvy.life for comments or questions.
Most web browsers have a built-in “Reader Mode” that converts web pages into a more reader-friendly view. Strangely, Google Chrome does not have this feature; unless you know how to find it.
Most web browsers have a built-in “Reader Mode” that converts web pages into a more reader-friendly view. Strangely, Google Chrome does not have this feature; unless you know how to find it. Let’s find out where it is.
This is for devices running Google Chrome. Screenshots are from Windows 10
Google Chrome has included a hidden Reader Mode all the way back to version 75. However, it’s never been upgraded to a stable, standard feature. Even Microsoft Edge; which is also based on Chromium; has a Reader Mode. So let’s enable it in Chrome.
Enable Hidden Reader Mode
First, we will need to enable a Chrome feature flag. Open the Chrome browser on your computer, and type:
chrome://flags
in the address bar, and hit Enter. Refer to the below image:
Accessing Chrome flags
Next, search for “Reader Mode” in the text box at the top and enable the flag titled “Enable Reader Mode.” See the below image:
Enabling Reader Mode
Now, after enabling the flag, click the “Relaunch” button at the bottom of the screen to apply the changes. See the following image:
Restarting Chrome
Next, when you now visit a webpage that has a lot of text, you will see a little book icon on the right side of the address bar. Click it to switch to Reader Mode.
You can also click:
Menu > Enter Reader Mode
to activate it. Refer to the below image:
Selecting the Reader Mode icon
Now, you are now looking at a much simpler, less cluttered view of the webpage. Images still appear, but ads and some other items are removed. To adjust the view, click the “A” icon in the top right. See the below image:
Changing Font size
Next, from here you can change the font, text size, and background color. See the following image:
Customizing appearance
That’s all there is to it! You can now minimize distractions while reading long articles in Chrome. It’s strange that Google has kept this a hidden feature for years, but at least you know how to enable it yourself.
Disclaimer
Technology is always changing and rarely is there static tech for smartphones and desktops. Thus, the contents of this post are only valid at the time of writing. Blog posts older than six months may have directions incompatible with your device or OS. Hopefully, older post content will continue to work as advertised. Thank you for reading TechSavvy.Life for Technology at Work For You.
Quote For the Day
Man is still the most extraordinary computer of all.
John F Kennedy
Tweet Info
That’s it. Please feel free to share this post! One way to share is via Twitter.
Note!Twitter may be no longer supported by WordPress. If so, the below Tweet button will not work.
Just click the Tweet icon below. This will launch Twitter where you click its icon to post the Tweet.
Checkout TechSavvy.Life for blog posts on smartphones, PCs, and Macs! You may email us at contact@techsavvy.life for comments or questions.
Please feel free to leave a comment. I would love to hear from you. Do you have a computer or smart device tech question? I will do my best to answer your inquiry. Just send an email to contact@techsavvy.life. Please mention the device, app, and version you are using. To help us out, you can send screenshots of your data related to your question.
The author’s Vietnam eBook on the Battle for Tra Bong Vietnam: Events and Aftermath
Google Chrome is a very popular browser despite being infamously greedy with your computer’s resources. If you feel like Chrome is starting to get slow, let’s speed it up.
Google Chrome is a very popular browser despite being infamously greedy with your computer’s resources. If you feel like Chrome is starting to get slow, let’s speed it up.
This is for devices running Google Chrome. Screenshots are from Windows 10
Update Chrome
The simplest thing you can do is make sure Chrome is up to date. This will ensure that you always have the latest improvements and optimizations for Chrome. The browser will usually install updates automatically, but you can update manually to be sure.
To manually update Chrome, head to:
Menu (3 dots) > Settings > About Chrome
If not up-to-date, Chrome will automatically update. Refer to the below image:
Update Chrome
Preload Images
Chrome has a feature that allows it to “predict” which links it thinks you might open and preload in the background. That way, if you do click the link, it will already be partially loaded.
If you want to enable this feature. First, head to:
Menu (3 dots) > Settings > Privacy and Security > Cookies and Other Site Data
Next, toggle the switch ON for Preload pages for faster browsing and searching. See the below image:
Select to Reload Images
Tabs Under Control
Chrome has some built-in tools to help mitigate the performance impact of having a lot of tabs open, but keeping your tabs tidy on your own will help even more.
There are a couple of things you can do if you are someone that constantly has tons of tabs open. The easiest thing to do is use Chrome’sReading List and Bookmarks features. That way, you can save pages for later without actually keeping them open in a tab.
Use Energy Saver
As the name implies, Chrome’s Energy Saver feature is intended to help improve battery life when your laptop is unplugged. However, it can also be used to speed up performance in a pinch.
Energy Saver limits background activity, visual effects, and video frame rates. Limiting those things helps stretch out your battery, which is a result of Chrome not asking your computer to work as hard. You can only use Energy Saver if your computer is running on battery or below 20% power. Head to:
Menu (3 dots) > Settings > Performance
and toggle ON the Energy Saver switch.
Memory Saver
With the latest release of Chrome on the desktop, there is a new performance setting so Chrome uses up to 40% and 10GB less memory to keep your tabs running smoothly.
If you have a bunch of tabs open in Chrome that you plan to come back to later; Memory Saver mode frees up memory from tabs you are not currently using so the active websites you are browsing are fast. This is especially useful if you are running other intensive applications, like editing family videos or playing games. Any inactive tabs will be reloaded when you need them. Head to:
Menu (3 dots) > Settings > Performance
and toggle ON the Memory Saver switch. See the following image:
Enable Memory Saver
Hardware Acceleration
Hardware acceleration is a feature that allows Chrome to take advantage of your computer’s GPU to speed up processes. Hardware can perform some functions faster than software running on the CPU alone.
When enabled, Chrome will utilize your computer’s GPU for graphics-intensive tasks, like playing games and watching videos. It’s typically enabled by default but can be disabled if there are driver compatibility issues. You can ensure it’s enabled by heading to:
Menu (3 dots) > Settings > System
and toggle ON the option Use hardware acceleration when available. Refer to the below image:
Select to Use Hardware Acceleration
Check Task Manager
If you feel like Chrome is particularly sluggish, there might be a rogue extension causing it. Chrome has its own built-in Task Manager that lets you see what’s running in the browser; extensions, web pages, and apps; and how many resources each individual thing is using.
Chrome’sTask Manager shows each tab and all the extensions that are currently running. You can see the memory footprint and CPU usage. If a process uses too much CPU, you can simply tap the End Process button and see if that fixes the problem.
The Task Manager can be found in:
Menu (the 3 dots) > More Tools > Task Manager
Just click on the option from the drop-down menu. See the below image:
Check the Task Manager
Check Extensions
Similar to how you might have apps on your phone that you do not use anymore, there are probably some Extensions in Chrome that you could get rid of. They could be running in the background and eating up resources.
Regardless of performance, it’s generally a good idea to routinely check up on your Extensions. Chrome gives you the option to “Disable” by turning the Toggle to OFF or “Remove.” Disabling will keep the Extension installed, but it cannot run. To check your Extensions, head to:
?Menu (3 dots} > More Tools > Extensions
See the following image:
Check your Extensions
Clear Your Browsing Data
Chrome collects a lot of data while you are browsing to improve your experience. All this site data, cookies, and cached images and files can add up over time. Occasionally clearing this data can potentially lighten up your browser, but it also means you will need to re-sign into websites.
There are two ways to do this. First, head to:
Menu (the 3 dots) > More Tools >Clear Browsing Data
Second, you can use the keyboard shortcut Ctrl + Shift + Del. Both methods will bring up a menu with options (Basic or Advanced) for clearing the data.
Checkmark any option(s) and click Clear data. Refer to the below image:
Clear your Browsing Data
Reset Without Uninstalling
The “nuclear option” for speeding up Chrome is performing a browser reset. This will essentially bring Chrome back to the way it was when you first installed it while still saving some of your personal stuff.
A browser reset will reset the search engine, homepage, startup tabs, new tab page, pinned tabs, content settings, cookies, site data, extensions, and themes. However, it will not erase your bookmarks, browser history, or saved passwords.
To perform a browser reset, head to:
Menu (3 dots) > Settings > Reset settings > Restore settings to their original defaults
See the below image:
Reset Settings
Just click the option. Next, you will see a confirmation screen. Here, click on the Reset settings button. See the following image:
Reset Settings confirmation. Use with caution
Disclaimer
Technology is always changing and rarely is there static tech for smartphones and desktops. Thus, the contents of this post are only valid at the time of writing. Blog posts older than six months may have directions incompatible with your device or OS. Hopefully, older post content will continue to work as advertised. Thank you for reading TechSavvy.Life for Technology at Work For You.
Quote For the Day
“While we’re all very dependent on technology, it doesn’t always work.
Bill Gates
Tweet Info
That’s it. Please feel free to share this post! One way to share is via Twitter.
Just click the Tweet icon below. This will launch Twitter where you click its icon to post the Tweet.
Checkout TechSavvy.Life for blog posts on smartphones, PCs, and Macs! You may email us at contact@techsavvy.life for comments or questions.
Please feel free to leave a comment. I would love to hear from you. Do you have a computer or smart device tech question? I will do my best to answer your inquiry. Just send an email to contact@techsavvy.life. Please mention the device, app, and version you are using. To help us out, you can send screenshots of your data related to your question.
Author’s E-Book
You can access the e-book from a Kindle device, the Kindle App for the desktop or smartphone, which is a free app.
The author’s Vietnam eBook on the Battle for Tra Bong Vietnam: Events and Aftermath
Open the Settings app, tap Safari, and toggle Block Pop-ups to OFF. This allows pop-ups in Safari on your iPhone. You can also allow pop-ups in other browsers like Google Chrome. Open your browser app’s Settings to find this option.
Summary: Open the Settings app, tap Safari, and toggle Block Pop-ups to OFF. This allows pop-ups in Safari on your iPhone. You can also allow pop-ups in other browsers like Google Chrome. Open your browser app’s Settings to find this option.
This is for the Safari and Chrome. Screenshots are from iPhone 14 Pro running iOS 16+
Copyright Scott Adams, Inc./Distributed by Universal Uclick for UFS
Allow Pop-Ups in Safari
To allow sites to open pop-up windows in your Safari browser, first, open the Settings app on your iPhone.
Next, in Settings, scroll down and tap Safari. Refer to the below image:
Accessing Safari
Now, on the Safari page, scroll down and toggle Block Pop-Ups to OFF.
Tip: To turn on Safari’s pop-up blocker in the future, re-enable the Block Pop-Ups option.
See the below image:
Toggle OFF to disable pop-ups
Allow Pop-Ups in Chrome
To enable pop-up windows in Chrome, first, launch the browser on your iPhone.
Next, when Chrome launches, in the bottom right-hand corner, tap the three-dot Menu and choose Settings. See the following image:
Accessing Chrome Settings
Now, in Settings, scroll down and tap Content Settings. Refer to the below image:
Accessing Content Settings
Next, tap Block Pop-Ups. See the below image:
Accessing Block Pop-ups
Now, toggle Block Pop-Ups to OFF. Then, in the top right-hand corner, tap Done.
Tip: To re-enable pop-ups in Google Chrome in the future, activate the Block Pop-Ups option.
See the following image:
Toggle OFF to disable pop-ups and tap Done
Disclaimer
Technology is always changing, and rarely is their static tech for smartphones and desktops. Thus, the contents of this post are only valid at the time of writing. Blog posts older than six months may have directions incompatible with your device or OS. Hopefully, older post content will continue to work as advertised. Thank you for reading TechSavvy.Life for Technology at Work For You.
Quote For the Day
We refuse to turn off our computers, turn off our phone, log off Facebook, and just sit in silence because in those moments we might actually have to face up to who we really are.
Jefferson Bethke
Tweet Info
That’s it. Please feel free to share this post! One way to share is via Twitter.
Just click the Tweet icon below. This will launch Twitter where you click its icon to post the Tweet.
Checkout TechSavvy.Life for blog posts on smartphones, PCs, and Macs! You may email us at contact@techsavvy.life for comments or questions.
Please feel free to leave a comment. I would love to hear from you. Do you have a computer or smart device tech question? I will do my best to answer your inquiry. Just send an email to contact@techsavvy.life. Please mention the device, app, and version you are using. To help us out, you can send screenshots of your data related to your question.
Author’s E-Book
You can access the e-book from a Kindle device, the Kindle App for the desktop or smartphone, which is a free app.
The author’s Vietnam eBook on the Battle for Tra Bong Vietnam: Events and Aftermath