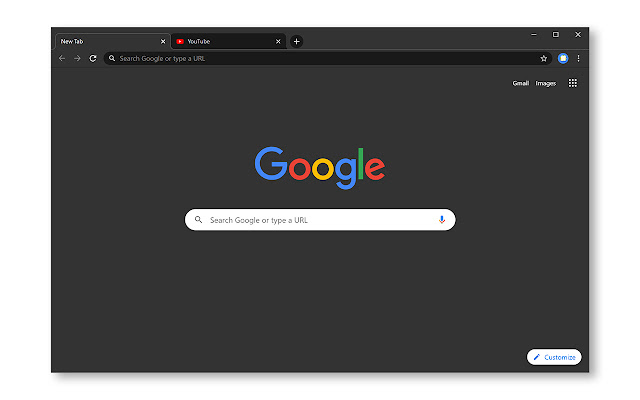
How to Enable Google Chrome Dark Mode

Google Chrome has had a built-in dark theme like Mozilla Firefox and Microsoft Edge since Chrome 74. You can even apply a dark theme to every web page you visit using third-party themes or an extension.

RAYMOND OGLESBY @RaymondOglesby2
January 26, 2023

Google Chrome has had a built-in dark theme like Mozilla Firefox and Microsoft Edge since Chrome 74. You can even apply a dark theme to every web page you visit using third-party themes or an extension. Let’s explore this dark mode feature.

This is for devices running Windows 11 or 10. Screenshots are from Windows 10

Dilbert and Robot
Copyright Scott Adams, Inc./Distributed by Universal Uclick for UFS

Chrome offers a built-in dark mode on Windows 11 and Windows 10. It even makes all of Chrome’s context menus dark, too.

Dark Mode for Windows 11

First, open the Settings app and navigate to:

Personalization > Color

Next, click the drop-down menu to the right of Choose Your Mode and select Dark. Refer to the below image:

Dark Mode 1
Setting Dark Mode for Windows 11

Next, close out the Settings app and launch Google Chrome. Unless you have manually set Chrome’s theme, it will match your system.

Dark Mode for Windows 10

First, head to:

Settings > Personalization > Colors

and select Dark under Choose your default app mode. See the below image:

Dark Mode 2
Setting Dark Mode for Windows 10

Apply a Dark Theme

Chrome supports user-created themes, which you can download from the Chrome Web Store. To give Chrome a dark interface, all you have to do is install a dark theme. Google even provides a helpful collection of editor-selected dark themes. This will give your Chrome browser a dark mode on Windows 7, Linux, Chrome OS, and any operating system without a native dark theme.

Note! Google now offers some official Chrome browser themes, including a “Just Black” dark mode theme. You may want to give that a try.

We recommend Morpheon Dark, which is the most popular dark theme in the Store. Unlike some other dark themes, it provides a decent amount of contrast between your active tab, which is a bit lighter, and your inactive tabs, which are darker.

This theme turns darkens the Tab Bar, Title Bar, Toolbar, and New Tab page. That’s all you can theme in Chrome. You can not make Chrome’s Context Menus or Settings page dark, for example. See the following image:

Dark Mode 3
Apply Morpheon Dark Mode

If you ever want to switch back to Chrome’s default theme you can. Head to:

Menu > Settings

Look for the Themes option under Appearance and then click Reset to Default. Refer to the below image:

Reset to the default theme
Disclaimer

Technology is always changing, and rarely is their static tech for smartphones and desktops. Thus, the contents of this post are only valid at the time of writing. Blog posts older than six months may have directions incompatible with your device or OS. Hopefully, older post content will continue to work as advertised. Thank you for reading TechSavvy.Life for Technology at Work For You.

Quote For the Day

Even the technology that promises to unite us, divides us. Each of us is now electronically connected to the globe, and yet we feel utterly alone.

Dan Brown

Tweet Info

You are finished. Please feel free to share this post! One way to share is via Twitter.

Just click the Tweet icon below. This will launch Twitter where you click its icon to post the Tweet.

Checkout TechSavvy.Life for blog posts on smartphones, PCs, and Macs! You may email us at contact@techsavvy.life for comments or questions.

I Would Like to Hear From You

Please feel free to leave a comment. I would love to hear from you. Do you have a computer or smart device tech question? I will do my best to answer your inquiry. Just send an email to contact@techsavvy.life. Please mention the device, app, and version you are using. To help us out, you can send screenshots of your data related to your question.

Author’s E-Book

You can access the e-book from a Kindle device, the Kindle App for the desktop or smartphone, which is a free app.

The author’s Vietnam eBook on the Battle for Tra Bong Vietnam: Events and Aftermath

What’s the Difference Between Google Wallet and Pay

Google has confusing named products, and that might be most apparent with Google Wallet and Google Pay. These two apps have taken a convoluted path to get where they are today. So, which one should you be using?

RAYMOND OGLESBY @RaymondOglesby2
December 15, 2022

Google has confusing named products, and that might be most apparent with Google Wallet and Google Pay. These two apps have taken a convoluted path to get where they are today. So, which one should you be using?

This is for diPhone and Android. Screenshots are from iPhone XR running iOS 16+

Dilbert and Rumor
Copyright Scott Adams, Inc./Distributed by Universal Uclick for UFS

Both Google Wallet and Pay have seen some pretty drastic revamps over the years. Their purposes have changed a lot and confused many people in the process. Let’s see what these products have to offer.

Some History

You may be surprised to learn that the original version of Google Wallet was introduced way back in 2011. The service was primarily for sending money to people and there was a physical Google Wallet credit card as well.

The Google Wallet card allowed people to pay for things in physical and online stores with the funds in their accounts. This was before mobile payments with tap-to-pay were widely supported. The Wallet card was a very clever solution.

Eventually, tap-to-pay gained enough traction that Google launched Android Pay in 2015. It maintained Google Wallet and Android Pay separately until 2018 when the two were combined into a single service called Google Pay. The Wallet card was discontinued in 2016.

Then, in 2020, Google Pay got a massive overhaul with a bunch of new features. All of Google’s mobile payment services were under one umbrella… for a while. In the summer of 2022, the service was split in two, with the Google Wallet branding making a return.

That’s where things stand as of September 2022. Google Pay and Google Wallet exist as two separate products; sometimes. More on that later.

Google Wallet

Google Wallet can most easily be summed up by its name; it’s a digital wallet. You can add credit cards, debit cards, loyalty cards, transportation passes, event tickets, vaccine cards, and gift cards.

Basically, Google Wallet is for paying for things online and in physical stores with tap-to-pay. It features a very simple interface that shows your cards, tickets, and passes. Google Wallet is only available for Android since the iPhone does not allow non-Apple apps for tap-to-pay.

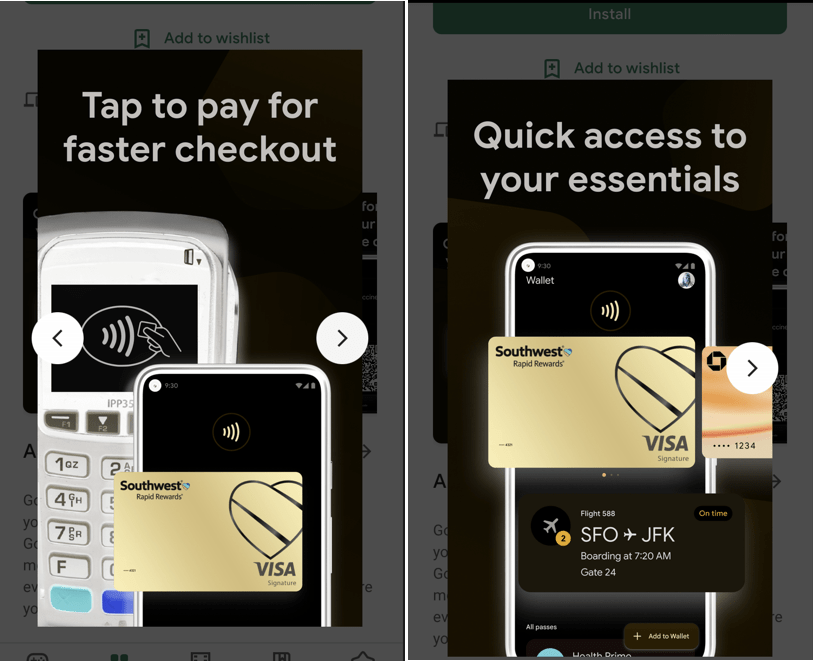
Google Wallet can generally be used with any card reader that has an Apple Wallet, Google Pay, or the contactless tap-to-pay icon. For online purchases, look for the Google Pay or Google Wallet buttons at checkout. It will take some time for the Wallet branding to replace Google Pay. Refer to the below image:

Google 4-5
Google Wallet

Google Pay

Google Pay received a massive overhaul in 2020, and it’s pretty much the same experience now. The tap-to-pay functionality is still present in Google Pay, but that’s not the only thing it can do.

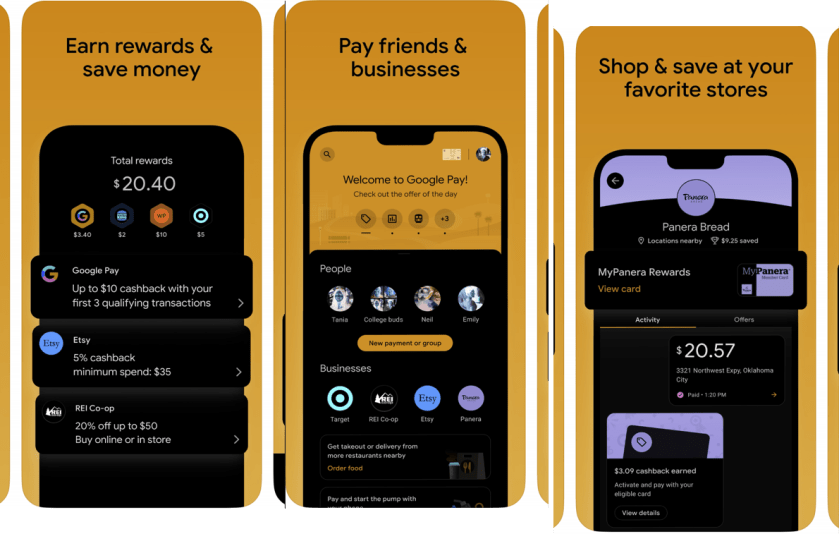
The Google Pay app has peer-to-peer payments, shopping deals, cashback offers, and a full-blown banking experience with personal finance insights. You can think of Pay as a combination of services similar to Venmo, PayPal, RetailMeNot, and Mint.

Unlike Google Wallet, Google Pay is available on both Android and iPhone. The tap-to-pay functionality does not work on the iPhone, but the other features do. It’s a feature-packed app that tries to do a lot of things. In fact, it might be too much for some people, which is why Google Wallet exists. See the below image:

Google 1-3
Google Pay

Which App to Use?

Depending on where you live, you may not even need to decide which app to use. Google Pay and Google Wallet only exist side-by-side in the U.S. and Singapore. In every other country, Google Wallet entirely replaced Google Pay, and India does not have Wallet at all (as of September 2022).

Google Pay can do everything Google Wallet can do, but Google Wallet can not do everything Google Pay can do. If you are in a country that has both, you can choose between the full experience (Pay) or just mobile payments (Wallet). There’s no reason to have both.

Use Google Pay if you want peer-to-peer payments, deals, rewards, or personal finance tools. If you only care about mobile payments, Google Wallet is a much more streamlined experience for that. The choice is even simpler for iPhone users; Google Pay is the only option.

In closing, Google Wallet is for mobile payments, Google Pay is for mobile payments, and more. In the author’s opinion, it’s still too complicated.

-Courtesy of other tech blog posts

Quote For the Day

Books don’t need batteries.

Nadine Gordimer

Tweet Info

That’s it. Please feel free to share this post! One way to share is via Twitter.

Just click the Tweet icon below. This will launch Twitter where you click its icon to post the Tweet.

Checkout TechSavvy.Life for blog posts on smartphones, PCs, and Macs! You may email us at contact@techsavvy.life for comments or questions.

I Would Like to Hear From You

Please feel free to leave a comment. I would love to hear from you. Do you have a computer or smart device tech question? I will do my best to answer your inquiry. Just send an email to contact@techsavvy.life. Please mention the device, app, and version you are using. To help us out, you can send screenshots of your data related to your question.

Author’s E-Book

You can access the e-book from a Kindle device, the Kindle App for the desktop or smartphone, which is a free app.
The author’s Vietnam eBook on the Battle for Tra Bong Vietnam: Events and Aftermath

How to Turn Off the Prompt “Sign In With Google”

Some websites show you a “Sign in with Google” prompt to help you quickly sign in to that website. If you would like to avoid this prompt, there’s an easy way to disable it from your Google account’s Settings menu

RAYMOND OGLESBY @RaymondOglesby2
April 7, 2022

Some websites show you a “Sign in with Google” prompt to help you quickly sign in to that website. If you would like to avoid this prompt, there’s an easy way to disable it from your Google account’s Settings menu. Let’s see how this is done.

This is for devices using Google. Screenshots are from Windows 10

Dilbert and Experiment
Copyright Scott Adams, Inc./Distributed by Universal Uclick for UFS

The “Sign in with Google” prompt is tied to your Google account and not to a particular web browser. This means that you will need to disable the prompt in your account to prevent it from appearing across all your web browsers, including both desktop and mobile browsers.

First, open your Google My Account site in a web browser on your Windows, Mac, or Linux computer. Then, log in to your Google account if you have not already done so.

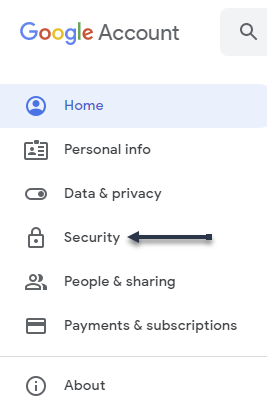
Next, when the site loads, first, select Security in the left sidebar. Refer to the below image:

Signin Google 1
Selecting Security option

Now, on the Security page, scroll down to the Signing in to other sites section. Here, click the Signing in with Google option. See the below image:

Signin Google 2
Selecting Google sign in

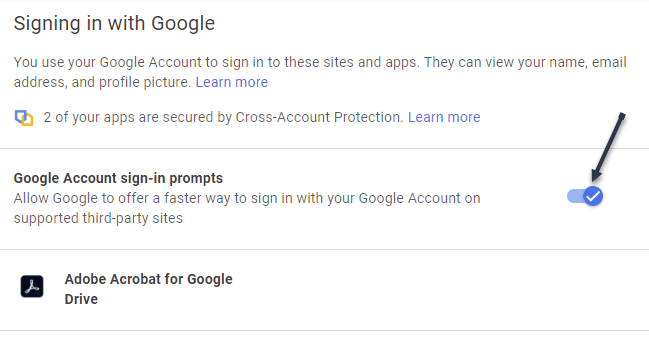
On the next page, under the Signing in with Google section, toggle OFF the Google Account sign-in prompts. See the following image:

Signin Google 3
Disable Google sign in

Now, you will see an Updated message in the lower left-hand corner of your browser telling you that your settings are saved. Refer to the below image:

Signin Google 4
Your updated change notification

Note: If you are logged in to multiple Google accounts in your web browser, repeat the above process for each account to get rid of the Sign in with Google prompt.

If you want to reverse this action, simply repeat the above steps and toggle ON the Google Account sign-in prompts.

From now on, you will not see the Sign in with Google prompt on any website.

Quote For The Day

Time can be an ally or an enemy. What it becomes depends entirely upon you, your goals, and your determination to use every available minute.

Zig Ziglar

That’s it. Please feel free to share this post! One way to share is via Twitter.

Just click the Tweet icon below. This will launch Twitter where you click its icon to post the Tweet.

Check out TechSavvy.Life for blog posts on smartphones, PCs, and Macs! You may email us at contact@techsavvy.life for comments or questions.

I Would Like to Hear From You

Please feel free to leave a comment. I would love to hear from you. Do you have a computer or smart device tech question? I will do my best to answer your inquiry. Just send an email to contact@techsavvy.life. Please mention the device, app, and version you are using. To help us out, you can send screenshots of your data related to your question.

Author’s E-book

You can access the e-book from a Kindle device, the Kindle App for the desktop or smartphone, which is a free app.
The author’s Vietnam eBook on the Battle for Tra Bong Vietnam: Events and Aftermath

How to Use Incognito Mode in Google Search on iPhone and iPad

Incognito Mode is a common feature in web browsers that allows you to use the web somewhat anonymously. On an iPhone or iPad, if you are using the Google app as a web browser instead of Safari or Chrome, you can browse in Incognito.

RAYMOND OGLESBY @RaymondOglesby2
October 6, 2021

Incognito Mode is a common feature in web browsers that allows you to use the web somewhat anonymously. On an iPhone or iPad, if you are using the Google app as a web browser instead of Safari or Chrome, you can browse in Incognito.

The Google app for the iPhone and iPad offers an all-in-one experience. All of the searching and browsing results happens within the app. It’s essentially a mini-browser of its own but you may not want your activity recorded. Let’s setup this feature.

This is for iPhone and iPad

Dilbert and Tails
Copyright Scott Adams, Inc./Distributed by Universal Uclick for UFS

First, open the Google app on your iPhone or iPad. Use Apple’s Spotlight Search (your first screen) to locate the app if you can not find it on your Home page or App Library. Refer to below image:

Search 1
Accessing Google app

Next, tap your Profile icon in the top right-hand corner. See below image:

Search 2
Accessing your Profile

Now, select Turn on Incognito from the drop-down menu. See following image:

Search 3
Enabling Incognito

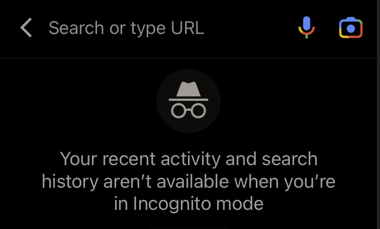
Next, you will see a screen saying you are in Incognito Mode . You can now do searches and browse the Internet without the activity being saved to your account. Refer to below image:

Search 4
In Incognito Mode

To reset Incognito Mode, return to the Google App’s home page and tap the Turn Off button. See below image:

Search 5
Turn off Incognito Mode

And that’s it. Just like Incognito Mode in a browser, your search and browsing history will not be saved to your account. This is a nice little trick to know if you find yourself using the Google app like a browser a lot.

Quote For the Day

Don’t think. Thinking is the enemy of creativity. It’s self-conscious, and anything self-conscious is lousy. You can’t try to do things. You simply must do things.

Ray Bradbury

Please feel free to share this post! One way to share is via Twitter.

Just click the Tweet icon below. This will launch Twitter where you click its icon to post the Tweet.

Check out TechSavvy.Life blog posts on smartphones, PCs, and Macs! You may email us at contact@techsavvy.life for comments or questions.

I Would Like to Hear From You

Please feel free to leave a comment. I would love hearing from you. Do you have a computer or smart device tech question? I will do my best to answer your inquiry. Just send an email to contact@techsavvy.life. Please mention the device, app and version that you are using. To help us out, you can send screenshots of your data related to your question.

The author’s Vietnam eBook on the Battle for Tra Bong Vietnam: Events and Aftermath

How to Create a Link for Selected Text in Chrome

As of Google Chrome version 90 and higher, you can create a link to selected text on a web page. When clicked, this link takes you to the page and highlights the selected text.

As of Google Chrome version 90 and higher, you can create a link to selected text on a web page. When clicked, this link takes you to the page and highlights the selected text. Let’s explore how to create such links.

This is for devices running Chrome 90 and higher. Screenshots are from Windows 10 PC

Dilbert and Problems
Copyright Scott Adams, Inc./Distributed by Universal Uclick for UFS

Enable the Feature

For some of us, Chrome’s Copy Link to Text feature is enabled by default, for others, it’s not. If this is your case, you will have to manually enable it on Chrome’s experimental flags page.

First, open Google Chrome on your computer. In the address bar of any window, type:

chrome://flags

and press Enter. Refer to below image:

Enabling Chrome flags

Now, on the Experiments tab that opens, click the search box at the top and type this:

Copy Link To Text

See below image:

Setting up the feature

Next, in the search results, click the drop-down menu beside Copy Link To Text and select Enabled. See following image:

Enabling the feature

Now, Chrome will ask you to restart the browser so that the change can take effect. Click Relaunch in bottom left-hand corner. Refer to below image:

Restart Chrome

After Chrome restarts, the feature will now be enabled.

Create the Link

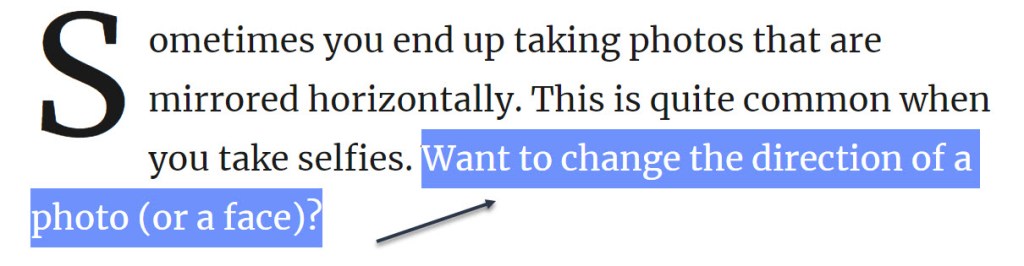
To use the Copy Link to Text feature, first, open a site and select the text that you want to copy a link for using your mouse or keyboard. See below image:

Highlight the link

Next, right-click the highlighted text and select Copy Link to Highlight from the menu. See following image:

Copy highlighted link

Now, Chrome will copy the link for your selected text to your clipboard. You can now share this link via social media, send it in an email, paste it in a text editor, or use any other method. Refer to below image for sending the link via email:

Paste the link in an email

When the recipient clicks the link, they will be taken directly to the page with the previously selected passage highlighted. See below image:

Once the above email link is clicked, you will see the highlighted text in the original document

It’s a very handy feature.. Repeat as often as you like.

Quote For the Day

Hard work spotlights the character of people: some turn up their sleeves, some turn up their noses, and some don’t turn up at all.

Sam Ewing

You are finished. Please feel free to share this post! One way to share is via Twitter.

Just click the Tweet icon below. This will launch Twitter where you click its icon to post the Tweet.

Check out TechSavvy.Life for blog posts on smartphones, PCs, and Macs! You may email us at contact@techsavvy.life for comments or questions.

I Would Like to Hear From You

Please feel free to leave a comment. I would love hearing from you. Do you have a computer or smart device tech question? I will do my best to answer your inquiry. Just send an email to contact@techsavvy.life. Please mention the device, app and version that you are using. To help us out, you can send screenshots of your data related to your question.

The author’s Vietnam eBook on the Battle for Tra Bong: Events and Aftermath

How to Use Safety Check in Google Chrome

Google Chrome offers a tool that lets you perform a checkup to secure your web browsing.

Google Chrome offers a tool that lets you perform a checkup to secure your web browsing. Let’s explore this feature.

This is for devices running Google Chrome. Screenshots are from Windows 10 PC

Dilbert and Keyboard
Copyright Scott Adams, Inc./Distributed by Universal Uclick for UFS

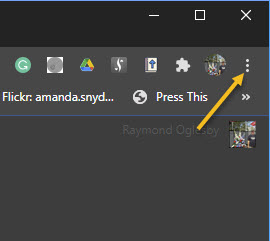
First, launch the Chrome web browser on your Windows 10, Mac, Chrome OS, or Linux computer and click the three-dot (hamburger icon) located in the top-right corner. Refer to below image:

Selecting the hamburger icon

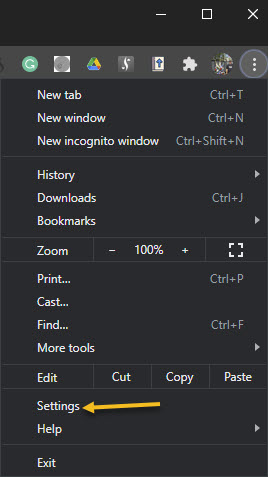
Next, click on Settings from the drop-down menu. See below image:

Selecting the Settings option

Now, scroll down to find the Safety Check section and click the Check Now option. See following image:

Selecting the Check Now option

Next, Chrome will kick off the Safety Check test. Depending on how much browsing data you have, this can take anywhere from a few seconds to a couple of minutes. When finished, just click the Review option by any listing. Refer to below image:

Selecting the Review button

In this process, Chrome scans a total of four core modules to look for any malicious code. It will make sure that the browser app is on the most recent version for protection against the latest internet viruses and that all of your installed third-party extensions are harmless. It will also check whether any of your saved passwords have been compromised in a data breach and that Safe Browsing, a setting that warns you against suspicious sites, is enabled.

Once the Safety Check is complete, Chrome will pull up shortcuts for anything that may need your immediate attention, such as reviewing compromised credentials.

After running Safety Check on my PC, it found comprised passwords. See below image where we are displaying three of them:

Viewing Comprised Passwords

After taking the recommended steps, you can also run the Safety Check again to ensure that your new security settings are active.

There’s another feature you can use by switching on Enhanced Safe Browsing, an advanced mode that allows Google to assess your browsing for potential threats and suggest privacy-focused improvements. However, we do not recommend using this option because you are choosing to share a copy of your browsing data with Google.

You are finished. Please feel free to share this post! One way to share is via Twitter.

Just click the Tweet icon below. This will launch Twitter where you click its icon to post the Tweet.

Check out TechSavvy.Life for blog posts on smartphones, PCs, and Macs! You may email us at contact@techsavvy.life for comments or questions.

I Would Like to Hear From You

Please feel free to leave a comment. I would love hearing from you. Do you have a computer or smart device tech question? I will do my best to answer your inquiry. Just send an email to contact@techsavvy.life. Please mention the device, app and version that you are using. To help us out, you can send screenshots of your data related to your question.

The author’s Vietnam eBook on the Battle for Tra Bong: Events and Aftermath

How to Access Two-Factor Authentication for Major Apps

Two-Factor authentication (2FA) adds an extra security layer to your accounts across the internet. 2FA means your accounts require information beyond user name and password to confirm you are who you say you are before you can get into the accounts. Let’s explore how to access 2FA.

Two-Factor authentication (2FA) adds an extra security layer to your accounts across the internet. 2FA means your accounts require information beyond user name and password to confirm you are who you say you are before you can get into the accounts. Let’s explore how to access 2FA.

This is for iPhone, iPad, PCs and Macs. Screenshots are from Windows 10 and iPhone XR

Dilbert and Zoom
Copyright Scott Adams, Inc./Distributed by Universal Uclick for UFS

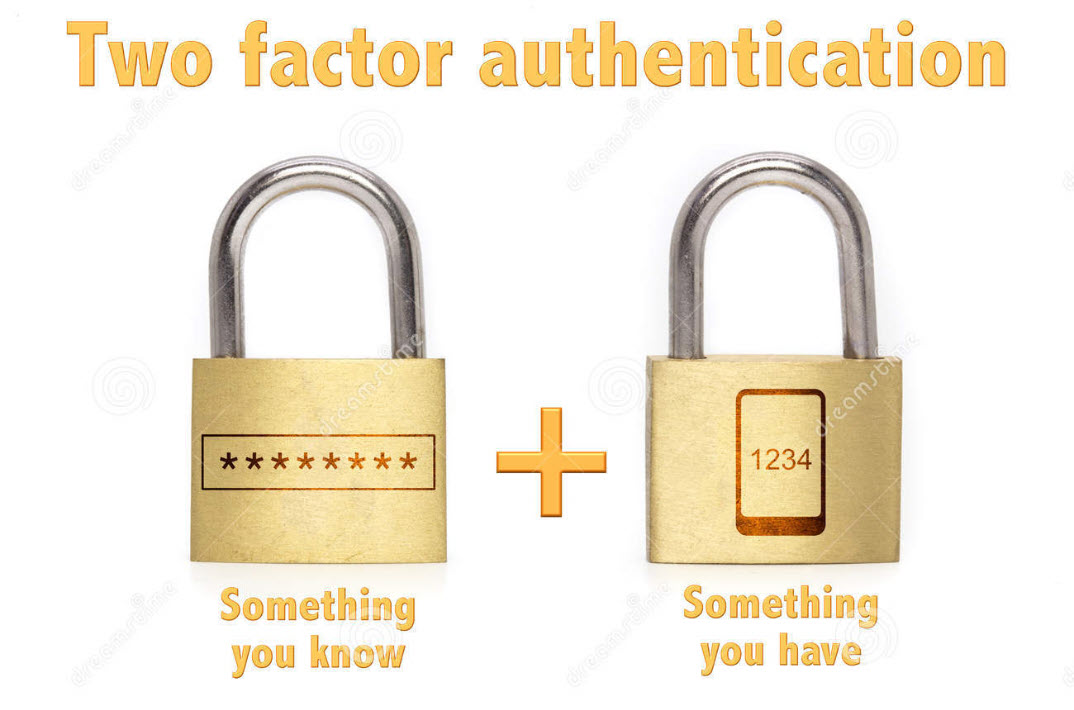
The “second factor” comes in after you enter your username and password, which are considered to be the “first factor.” 2FA can be used to confirm your identity by asking for an extra piece of information. The additional information can be:

  • Something you know, like an additional passcode.
  • Something you have, like your phone to receive a one time authorization code.
  • Something you are, like a fingerprint or voice print. This is also called biometric security.

The idea is to provide another piece of information a hacker would not have, making it harder for the bad guy to break into your account.

The following is not an exhaustive list of services with 2FA ability, but we cover the major services everyone tends to use, and walk you through how to access. We will cover Amazon, Apple, Facebook, Google, Instagram, LinkedIn, Microsoft, and Twitter. Activate 2FA on all of these and you will be more secure. Once you have found their 2FA screens you can can set it up for each app.
Amazon

First, launch Amazon.com on the desktop and login in to your account. Next, click the Menu icon in upper left-hand corner. Now, scroll down the drop-down menu to Your Account option.

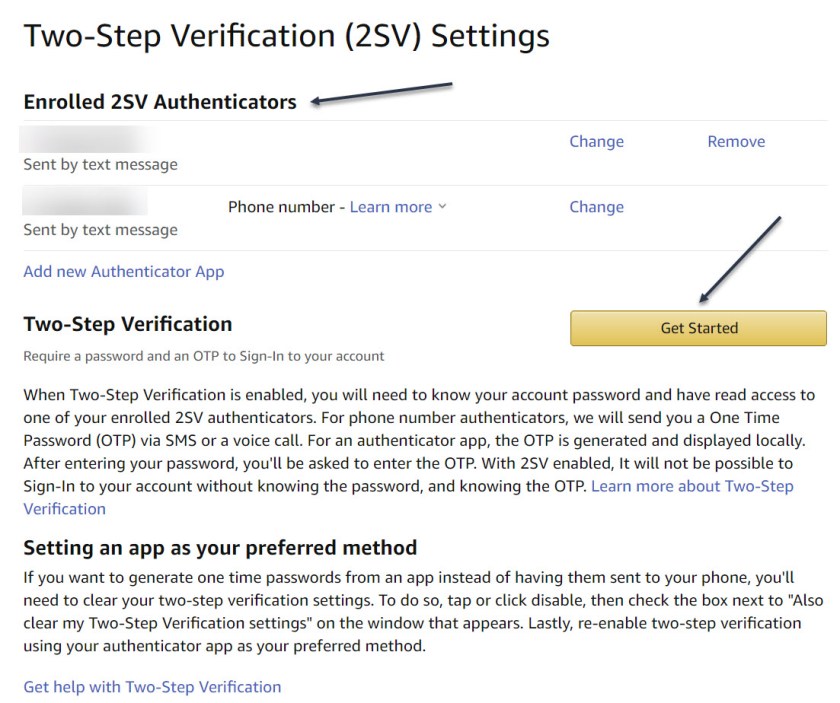
Next, click on the Login & Security big button. Now, on the next page, click Edit next to Two-Step Verification (2SV) Settings. The preferred method is an authentication app (scan the QR code); phone number(s) are the backup method. Refer to below image where I already have 2SV based on my phone number (which is dimmed out):

2FA 1
Amazon 2SV

If you think your account has been comprised, go back to Login & Security and click the Edit button next to Secure Your Account.

Apple

Following are the steps on how to access 2FA for Apple using either iOS or macOS.

On iOS go to:

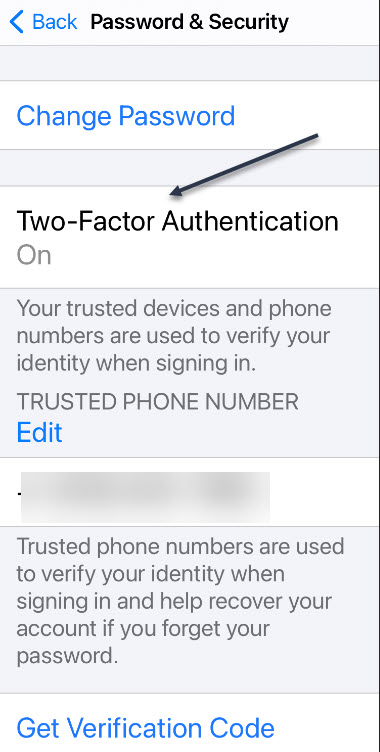
Settings > [your name at the top] > Password & Security > Turn on Two-Factor Authentication.

On macOS go to:

System Preferences > iCloud, then sign in, click Account Details > Security > Turn on Two-Factor Authentication.

Note! once Apple 2FA is activated for two weeks, you can not turn it off. “Certain features in the latest versions of iOS and macOS require this extra level of security, which is designed to protect your information,” according to Apple. See below image for iOS:

2FA 2
Apple 2FA

Facebook

First, login to Facebook on your desktop. Next, click the Down arrow in upper right-hand corner. Now, from the drop-down menu that appears, click on the Settings & Privacy option. On the next screen, click the Privacy & Checkup option. From there, click on the topic How to keep your account secure. Under this topic, you can access 2FA for Facebook. See following image where 2FA is On with a backup method of sending a text message to a phone number.

2FA 3
Facebook 2FA

Related

How to Perform a Privacy Checkup on Facebook

Google

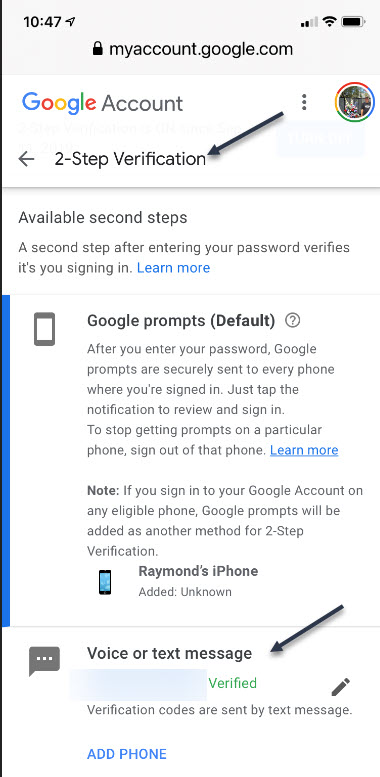
First, sign in to your Google account on your smart device. Next, at the top of the screen, locate the Security tab and tap it. Now, scroll down and tap the 2- Step Verification option. You can continuing scrolling to see more ways to verify you. Refer to below image where my 2SV is already turned On and I am using the backup method of Voice or text message:

2FA 4
Google 2SV

Google calls its system 2SV . It’s all about identifying you via phone. When you enter a password to access your Google account for almost any service, if 2SV is on, there are multiple options to get that second step. First among them now: the Google Prompt. You simply add your smartphone to your account, make sure the Google search app is on the phone, and at login, you can go to the phone and simply acknowledge with a tap that you are the one signing in.

Instagram

First, launch Instagram on your smart device. Next, go to your Profile in lower right-hand corner, then tap the menu (the hamburger icon) on the top-right. Tap Settings > Security > Two-Factor Authentication. There you can choose how you would like to get your authentication code by tapping the Get Started button. See below image:

2FA 5
Instagram 2FA

Linkedin

Business social network Linkedin makes it easy to set up verification, either by SMS texts or authentication app.

First, launch Linkedin on you smart device, then go to your Profile at upper left-hand screen. Next, go to Settings > Sign in & Security > Account > Two-step verification to activate it or deactivate. See following image:

2FA 6
Linkedin 2SV

Microsoft

First sign into your Microsoft account on your smart device. Now, tap your Profile. Next, scroll down and tap Security. 2FA is the second option, tap on it. Once again, tap Two -step verification > Manage. Microsoft will suggest you get app passwords as needed for older service or devices (like Xbox 360); go in later to generate one as needed. Refer to below image:

2FA 7
Microsoft 2SV

Twitter

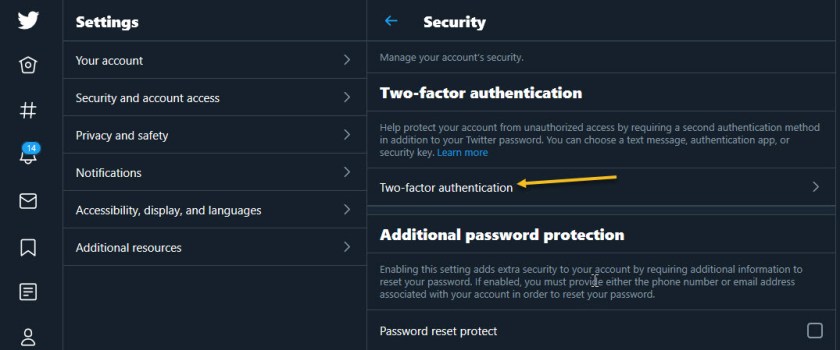
First, to activate Login Verification on Twitter.com on the desktop, login to Twitter, Click the More menu on the left (the three dots) and select Security & Account Access > Security > Two-Factor Authentication. See following image:

2FA 8
Twitter 2FA

Quote For the Day

Technology is a useful servant but a dangerous master.

Christian Louis Lange

That’s it. With 2FA activated on these apps you are more secure. Please feel free to share this post! One way to share is via Twitter.

Just click the Tweet icon below. This will launch Twitter where you click its icon to post the Tweet.

Check out TechSavvy.Life for blog posts on smartphones, PCs, and Macs! You may email us at contact@techsavvy.life for comments or questions.

I Would Like to Hear From You

Please feel free to leave a comment. I would love hearing from you. Do you have a computer or smart device tech question? I will do my best to answer your inquiry. Just send an email to contact@techsavvy.life. Please mention the device, app and version that you are using. To help us out, you can send screenshots of your data related to your question.

The author’s Vietnam eBook on the Battle for Tra Bong: Events and Aftermath

How to Use Spell Check Everywhere on Chrome

We have all been there; looking up a word on Google just to find out how it’s spelled. No matter the typos, Google usually knows what you want to type. Thankfully, Google allows you to use its spell-check feature everywhere in your Chrome web browser.

We have all been there; looking up a word on Google just to find out how it’s spelled. No matter the typos, Google usually knows what you want to type. Thankfully, Google allows you to use its spell-check feature everywhere in your Chrome web browser.

Called the Enhanced spell check, this setting allows you to access Google’s more advanced spell check whenever you type something on the Internet.

But as is the case with most Google services, there is a privacy cost to this. Turning on Enhanced spell check in Chrome also means agreeing to send everything you type on the web to Google’s server. So enable it at your own risk. But, you can also enable Basic spell check without sending data to Google. Lets explore how to do this.

This is for PCs, Macs, Chrome OS, or Linux running Chrome

Dilbert and Package
dCopyright Scott Adams, Inc./Distributed by Universal Uclick for UFS

First, open your Google Chrome browser. Next, click the three-dot hamburger icon located in the top right-hand corner. Refer to below image:

Spell Check 1
Accessing the menu hamburger icon

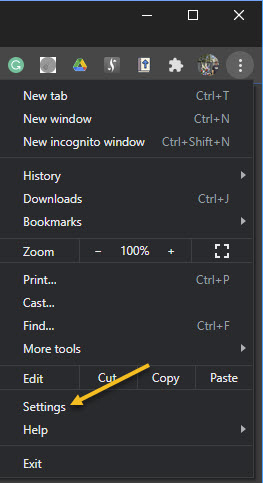
Now, from the drop-down menu that appears, select Settings. See below image:

Spell Check 2
Accessing Settings

Alternatively, you can press the Cmd+Comma keyboard shortcut on a Mac or Alt+E on a Windows PC to access the Settings option.

Next, in the sidebar, click Advanced to reveal the advanced menu. Now, choose Languages from the list. See following image:

Spell Check 3
Accessing Languages under the Advanced section

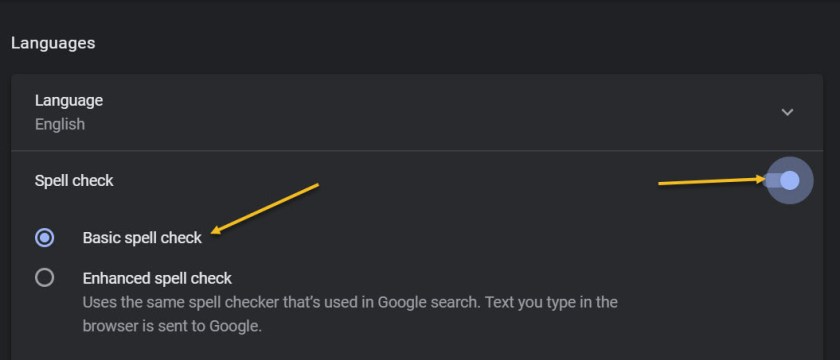
Under the Spell check section, toggle the radio button in front of the Basic spell check option to turn it On. If you want enhanced spell checking, toggle the radio button in front of the Enhanced spell check to turn it On. Keep in mind, the enhanced option means you are sending your browser activity to Google. Refer to below image:

Spell Check 4
Enabling Basic spell check option

At the time of writing, Enhanced spell check is not available for Google Chrome’s Android and iPhone clients.

In case you are still not satisfied with your Chrome’s spell check, you can give a third party Chrome extension called Grammarly, a try.

Quote for the Day

The number one benefit of information technology is that it empowers people to do what they want to do. It lets people be creative. It lets people be productive. It lets people learn things they didn’t think they could learn before, and so in a sense it is all about potential.

Steve Ballmer, Microsoft

That’s it. Please feel free to share this post! One way to share is via Twitter.

Just click the Tweet icon below. This will launch Twitter where you click its icon to post the Tweet.

Check out TechSavvy.Life for blog posts on smartphones, PCs, and Macs! You may email us at contact@techsavvy.life for comments or questions.

The author’s Vietnam eBook on the Battle for Tra Bong: Events and Aftermath

How to Insert a YouTube Video Into Word

There might be times when it would be helpful to add a YouTube video to a Microsoft Word document. It can help you get your point across or help with training. Inserting the YouTube video directly into the document makes it easier to watch it. Word allows you to include the video right inside the document. Then the reader does not need to click a link to the video and launch a separate browser instance.

There might be times when it would be helpful to add a YouTube video to a Microsoft Word document. It can help you get your point across or help with training. Inserting the YouTube video directly into the document makes it easier to watch it. Word allows you to include the video right inside the document. Then the reader does not need to click a link to the video and launch a separate browser instance. Let’s explore how this is done.

This is for Word. Screenshots are from Word in Office 365 and Chrome using Windows 10

Copyright Scott Adams, Inc./Distributed by Universal Uclick for UFS

If you follow my example, I will be using a YouTube video from the 2008 Winner in a Poland ballroom dance competition on BBC One. I have been ballroom dancing for 15 years and this is one of the best ballroom dance videos I have found. As of this writing, the video has been viewed over 3.9 million times. I hope you enjoy the video and this post.

Copy YouTube Video URL

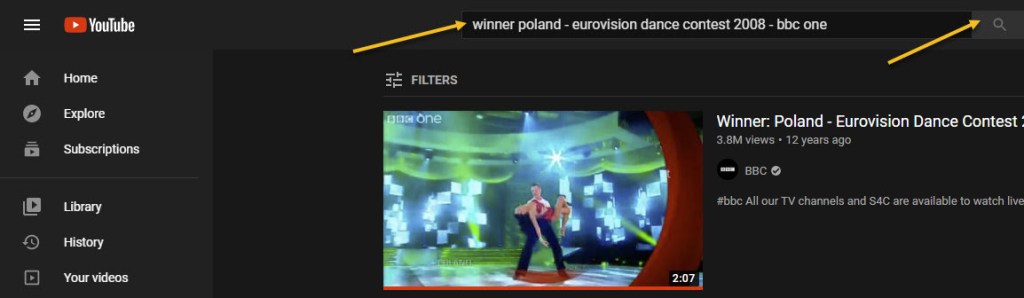
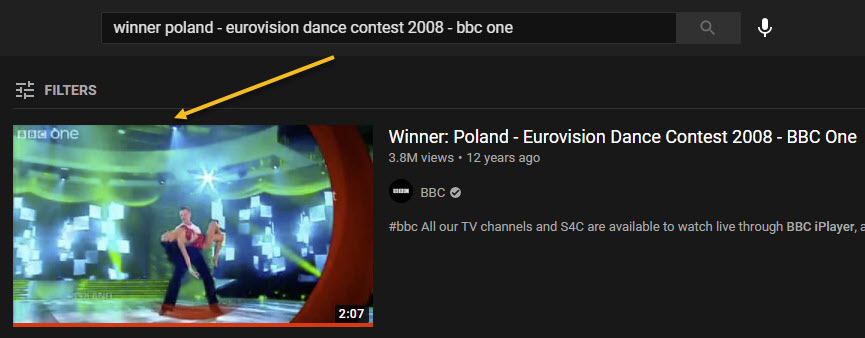
To insert a YouTube video into your Word document, open your browser of choice (I am using Chrome) and go to the YouTube website. Now, search for a YouTube video that you want to use by typing the name of the video in the search bar. Next, click the search button or simply press Enter. Refer to below image:

Entering your YouTube video name

Next, select the video from the search results by clicking it. See below image:

Accessing your YouTube video

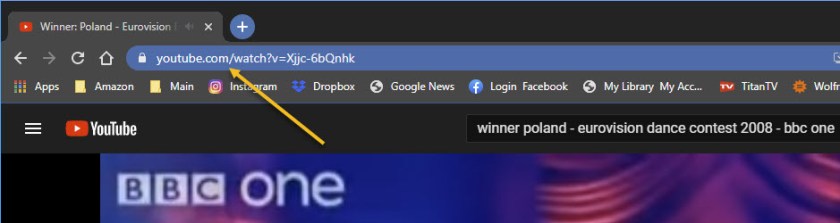
Now, highlight the video’s URL in the browser’s address bar. Right-click and then select Copy from the context menu. (This is the easiest option). See following image:

YouTube 3
Copy the URL of your YouTube video

Copy YouTube Embed Code

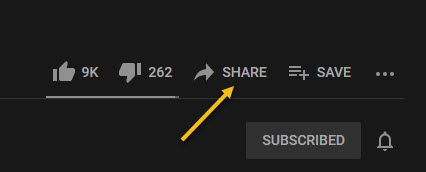
Alternately, to get the embed code, click Share under the video. Refer to below image:

YouTube 4
Accessing your YouTube video Share option

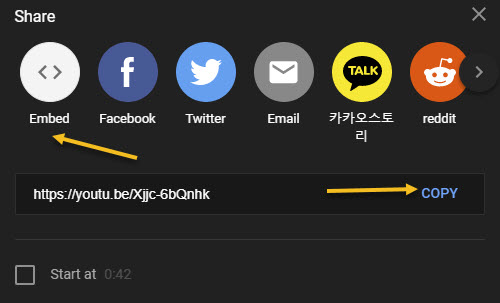
Next, in the Share window, select Embed. See below image:

YouTube 5
Selecting your YouTube video Embed option

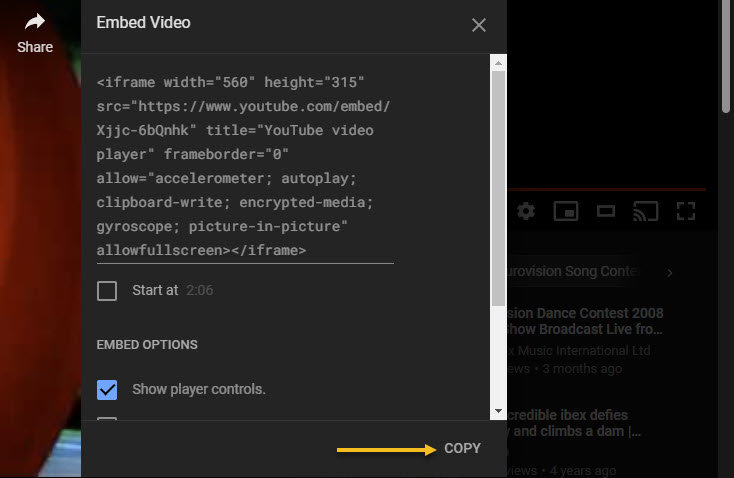
Now, the Embed Video window will appear. Click Copy to copy the code to your clipboard. Optionally, if you want to start the video from a specific time, check the box next to Start At and enter the desired time. See following image:

YouTube 6
Copy your YouTube video Embed code

Insert URL or Embed Code

With the URL or embed code copied to your clipboard, open Word. Next, place your pointer where you want to insert your video.

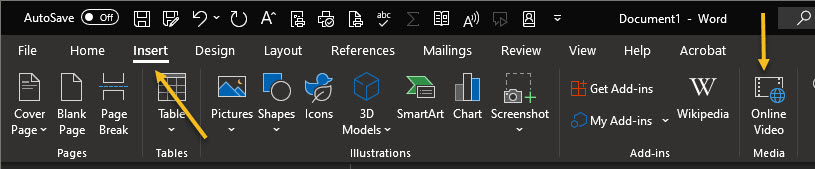
Now, from the top toolbar, click the Insert tab, then select Online Video in the Media group. Refer to below image:

YouTube 7
Selecting the Inset option for Online Video

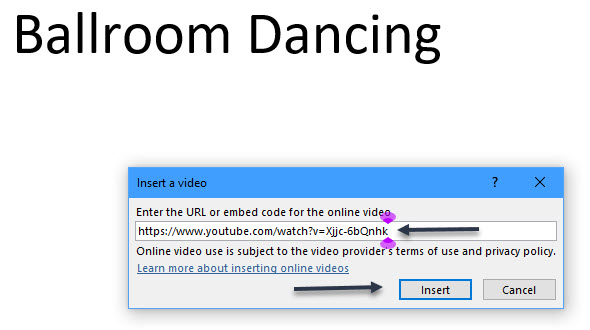
The Insert a Video dialog box will appear. Next, paste (Ctrl+V or right-click > Paste) the URL or embed code in the text box, then click Insert. See below image where I used the URL:

YouTube 8
Copy/Paste the URL of your YouTube video

The video will now be inserted into the Word document. Clicking the play button will make the video pop out in the foreground while the background is dimmed. Press the Play button again to start. To pause, just click the video.

Your YouTube Video in Word

All of the normal video controls you would find on YouTube are also available for the video inserted into your Word document. See following image on how the video is displayed in Word:

YouTube 9
Your YouTube video inside of a Word document

Quote For the Day

Everybody gets so much information all day long that they lose their common sense.”

Gertrude Stein

That’s it. Please feel free to share this post! One way to share is via Twitter.

Just click the Tweet icon below. This will launch Twitter where you click its icon to post the Tweet.

Check out TechSavvy.Life for blog posts on smartphones, PCs, and Macs! You may email us at contact@techsavvy.life for comments or questions.

I Would Like to Hear From You

Please feel free to leave a comment. I would love hearing from you. Do you have a computer or smart device tech question? I will do my best to answer your inquiry. Just send an email to contact@techsavvy.life. Please mention the device, app and version that you are using. To help us out, you can send screenshots of your data related to your question.

The author’s Vietnam eBook on the Battle for Tra Bong: Events and Aftermath

How to Turn a Website Into a Windows 10 App

You can use Google Chrome or Microsoft Edge to convert a website into an app. Although it works for Window 8 or 7, we are using Windows 10 for creating this blog post. This lets you use your sites as if they were normal apps.
You can use Google Chrome or Microsoft Edge to convert a website into an app. Although it works for Window 8 or 7, we are using Windows 10 for creating this blog post. This lets you use your sites as if they were normal apps.
This is for devices running Windows 10, and Google Chrome or Microsoft Edge

Dilbert and Crisis
Copyright Scott Adams, Inc./Distributed by Universal Uclick for UFS

How Website Apps Work

Your website looks and works exactly the same in your app as it does in your web browser. The only difference you will see is that there will not be any browser elements in your app window, such as the bookmarks bar, address bar, and other toolbar elements.

If you use Chrome, the website app will be using Chrome in the background. If you use Edge, the browser app will use Microsoft Edge. However, normal browser elements are stripped off so that you get the actual app-like experience. These web apps get their own separate windows, taskbar icons, and desktop shortcuts.

Turn a Website Into an App Using Chrome

You can use Chrome’s main menu to turn any website into a Windows app.

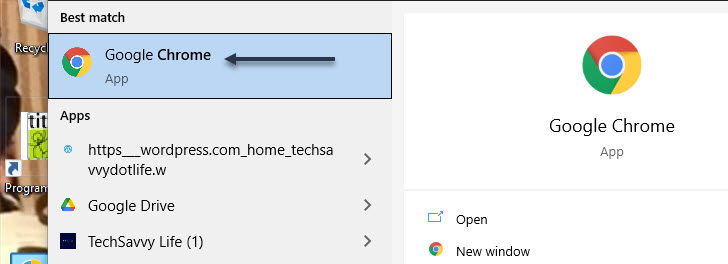
First, open the Start menu. Next, enter “Google Chrome” in the Cortana search box at bottom left-hand corner. Now, click the browser in the results at top left-hand corner. Refer to below image:

App 1
Selecting Chrome

Next, open any website that you want to turn into an app. Navigate to the specific web page that you want your app to start with.

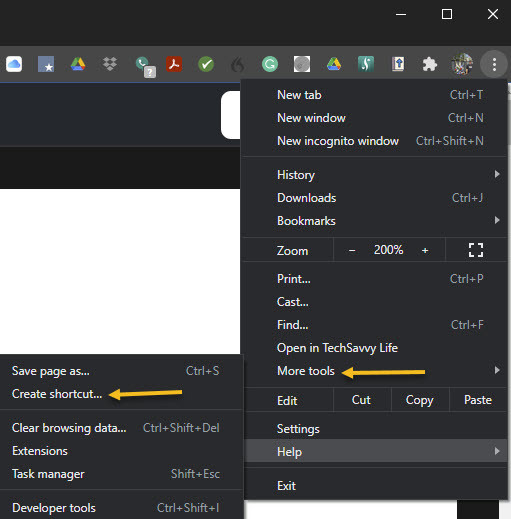
When the site has loaded, click its hamburger menu button (the three dots) in the top-right corner of the window and select:

More Tools > Create Shortcut

See below image:

App 2
Create a shortcut

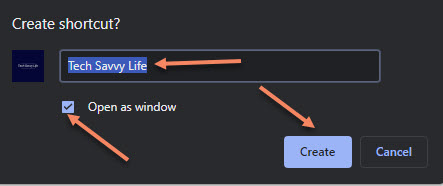
A prompt will appear asking for your new app name. Enter a name for your new app, enable the Open as window checkbox, and click Create. See following image:

App 3
Name the shortcut

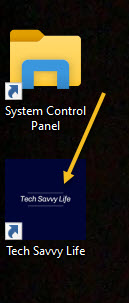
A shortcut will be placed on your desktop. You can launch your app from this desktop shortcut. Refer to below image:

App 4
Your desktop shortcut

Also, Chrome will create the app for your site and add it to the Start menu. You can now search and launch your app using your PC’s Start menu. See below image:

App 5
Use the Start menu to launch your Chrome app

Turn a Website Into an App Using Edge

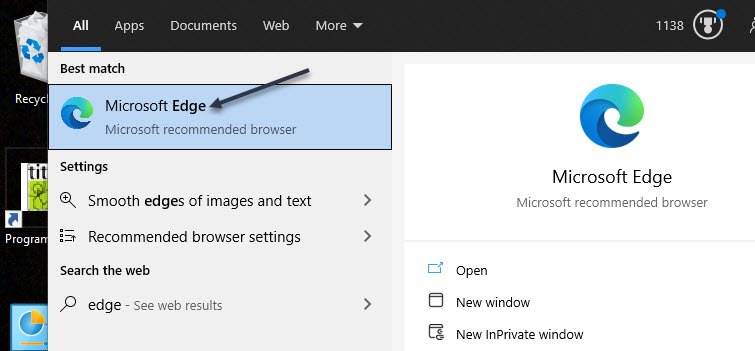
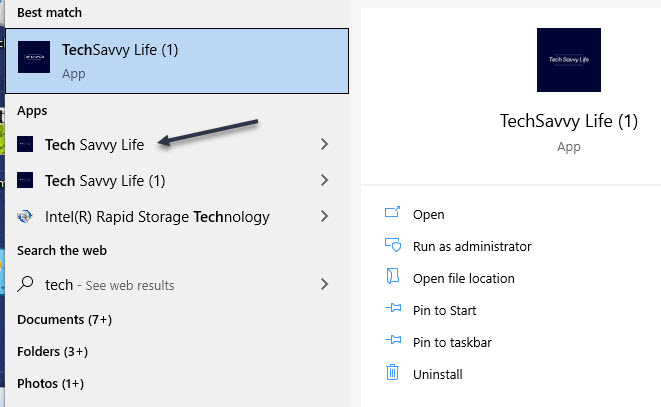
You can also use Microsoft Edge to make a website into an app. This creates the exact same kind of app that Chrome does. First, open the Start menu. Next, enter “Microsoft Edge” in the Cortana search box at bottom left-hand corner. Now, click the browser in the results at top left-hand corner. See following image:

App 6
Selecting Edge

Navigate to the website that you want to make an app for, then navigate to the specific page that you want to use for the app.

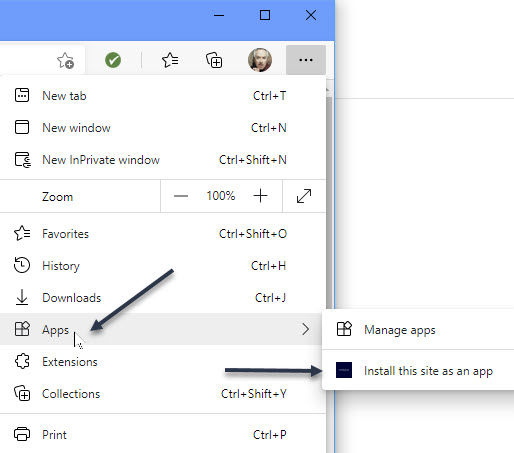
Now, click the menu hamburger button (the three dots) in the top-right corner of the window and select:

Apps > Install this site as an app

Refer to below image:

App 7
Select to install as an app

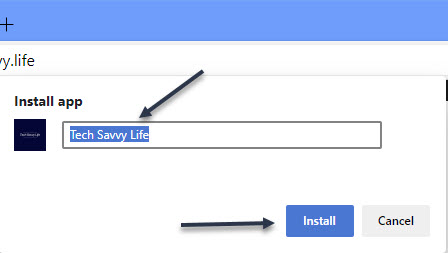
Type a name for your new app, then click Install. See below image:

App 8
Name the shortcut

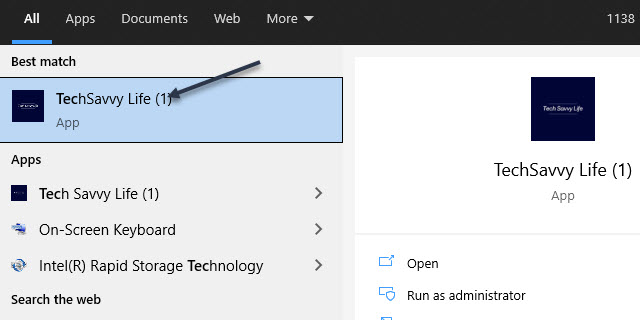
You can now launch your newly created app from the Start menu. See following image where TechSavvy.Life (1) is the Chrome version, TechSavvy.Life is the Edge version:

App 9
Use the Start menu to launch your Edge app

Create a Desktop Shortcut for Your Apps

Your website apps will have their own shortcuts in your Start menu’s All Apps list. You can also create a desktop shortcut for your apps in order to quickly access them on your PC’s desktop, if you like.

If you used Chrome to make your apps, your desktop shortcuts are already created. But if you used Microsoft Edge, you will need to manually add shortcuts to your desktop.

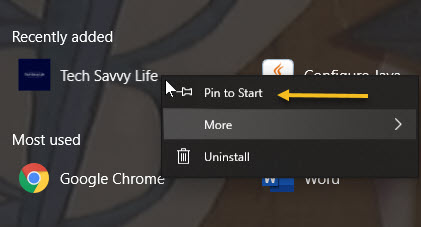
To do this, open the Start menu and search for your newly created app. Right-click your app and select Pin to Start.

You need to do this because Windows does not let you directly make a desktop shortcut for this kind of app in Edge. Refer to below image:

App 10
Pin to Start menu in Edge

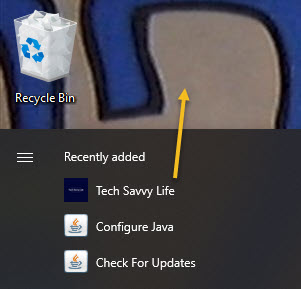
Open the Start menu again, and you will see your app on the right. Drag it over to your desktop and a desktop shortcut for it will be created. See below image:

App 11
Drag the Edge app to your desktop

Create a Taskbar Shortcut for Your Apps

You can also make a taskbar shortcut for your website apps.

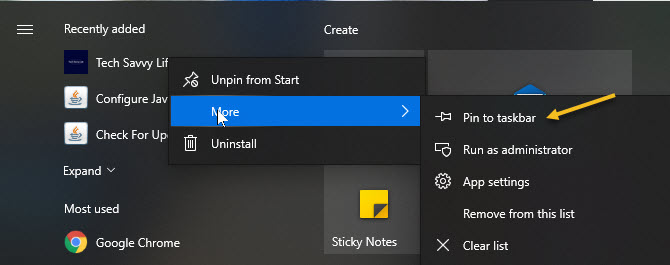
To do this, open the Start menu again, search for your app or find your desktop shortcut, right-click your app, click More, and select Pin to taskbar. See following image:

App 12
Pin to Taskbar

Assign an Icon

By default, Windows uses your website’s favicon as the icon for your app. You can change this icon if you want to give a little makeover to your new app.

You can use an icon file from your computer or one of Windows 10’s built-in icons for your new app.

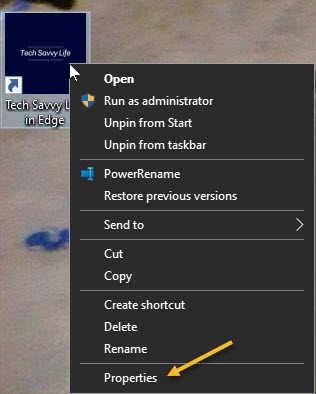
To change your app’s icon, right-click your app shortcut on your desktop and select Properties. Refer to below image:

App 13
Access Propetties

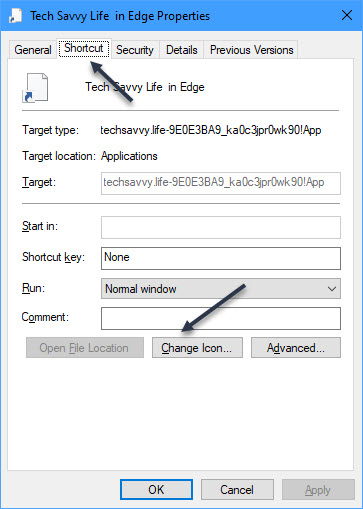
In the Properties box, click Shortcut at the top, and then click Change Icon. See below image:

App 14
Select change the icon button

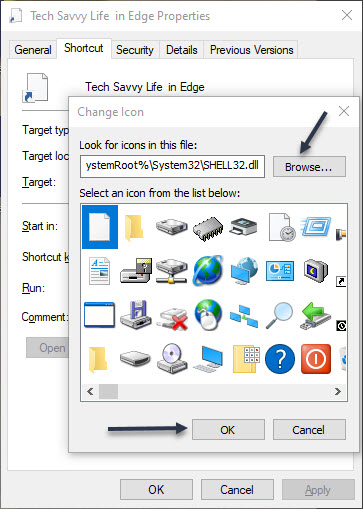
Click Browse in the window that opens and select the icon that you want to use for your app.

If you want to use one of Windows 10’s stock icons, browse to:

C:\Windows\System32 folder

and double-click the imageres.dll file in this folder.

You will see a list of Windows 10’s built-in icons. Select the one that you want to use and click OK. Even though this file is for 32-bit operating system, it will work on a 64-bit system. See following image:

App 15
Browse or use Windows 10 stock icons

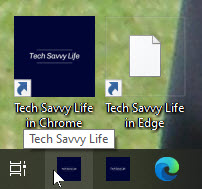
To save your settings, click Apply and then select OK. Refer to below image for my final desktop and taskbar shortcuts:

App 16
Your finished icons on desktop and taskbar

Quote For the Day

“The first rule of any technology used in a business is that automation applied to an efficient operation will magnify the efficiency. The second is that automation applied to an inefficient operation will magnify the inefficiency”.

Bill Gates

You are finished with turning a website into a Windows 10 app. Please feel free to share this post! One way to share is via Twitter.

Just click the Tweet icon below. This will launch Twitter where you click its icon to post the Tweet.

Check out TechSavvy.Life for blog posts on smartphones, PCs, and Macs! You may contact us at contact@techsavvy.life for comments or questions.

I Would Like to Hear From You

Please feel free to leave a comment. I would love hearing from you. Do you have a computer or smart device tech question? I will do my best to answer your inquiry. Just send an email to contact@techsavvy.life. Please mention the device, app and version that you are using. To help us out, you can send screenshots of your data related to your question.

The author’s Vietnam eBook on the Battle for Tra Bong: Events and Aftermath