Have you ever wanted to share your iPhone contacts with your Windows 10 PC? I have wanted to do this for a year. It used to work but my PC went “south” last year. I finally did some research and came up with this post for you to implement. You can share your smart device contacts through Apple’s iCloud service. To use this service, your contacts must be synced with iCloud. So, lets get started.
This is for iPhone or iPad and Windows 10 operating system
- Open the Settings app on your iPhone. Its usually located on your home screen. Your screen should look similar to the following image:
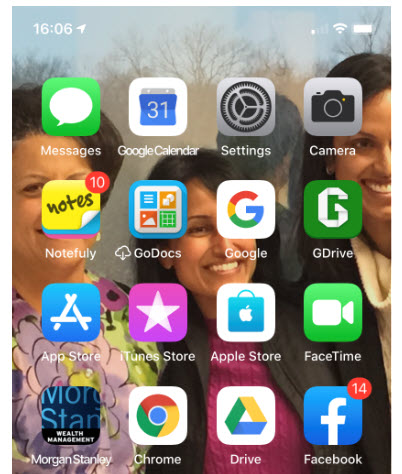
- Tap your name at the top of the screen. See following screenshot:

Syncing Contacts
- Tap iCloud
- Verify that your Contacts is being synced. Either the toggle switch will be green or you will see iCloud storage being used like the below image. If not, tap the toggle button to enable the process and sync your contacts.

- On your Windows 10 PC, log in to iCloud website with your Apple ID and Password
- Click on the Contacts applet. See following screenshot:

Selecting/Exporting Contacts
- Select a Contact from your list. See the following image for my selection of Chris Dow:

- Click the small gear icon at the bottom left corner
- Select Export vCard. Refer to following screenshot:

You can select more than one contact by selecting a single name and using the “Shift” key to select the last contact. There is an option to Create Group at the bottom right for your multiple contact selection.
Note! It is best to export just one contact. Although you can select multiple contacts, only one contact data (the first one selected) is exported, especially for Outlook.
By default, the exported VCF file is placed in your PC Downloads folder.
- Open your File Explore and find the VCF file. Refer to following image:

Using Your VCF File
- Right click on the VCF file and select Open
- Select where you want to install your contact(s). You have several choices, like Outlook, the People app and Windows Contacts
- Select your choice and click OK
Your choice will open for your review.
- For Outlook, click the Save & Close option to complete the export. See following screen::

That’s it. You are done.
Enable iCloud Contacts Sharing
BUT WAIT, I want to share all my Contacts via iCloud to my Windows 10 PC, not just a few. You can use iCloud for Windows to synchronize your contacts and other data between your iOS device and Outlook. Lets get started.
This works with the following variations of Outlook:
Outlook for Office 365, Outlook 2019, Outlook 2016, Outlook 2013 and Outlook 2010
- Download and install iCloud for Windows.
- After installation, launch the iCloud app and sign in with your Apple ID and Password. Your screen should look like the below image:
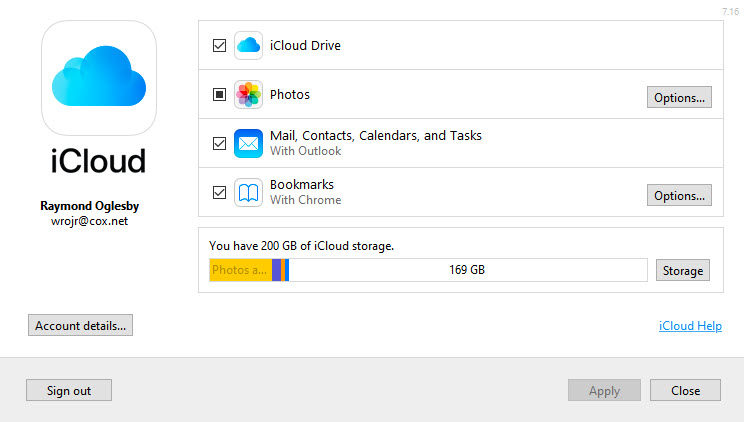
- Select the option to sync Mail, Contacts, Calendars, and Tasks. You can select other options to sync from this screen.
- Click Apply
- Click Close
Once the setup has finished, launch Outlook. Your iCloud email, contacts and calendars should now be synchronizing with Outlook.
- To verify, in Outlook, open a new email. In the Address Book drop down box, select iCloud like the image below:

- You should see ALL your iCloud contacts
- Close Outlook
If you are experiencing problems please click here for Apple help.
I Would Like to Hear from You
Please feel free to leave a comment. I would love hearing from you. Do you have a computer tech question? I will do my best to answer your inquiry. Please mention the app and version that you are using. To help me out, you can send screenshots of your data related to your question.