How to Insert an Animated GIF Into Word

Adding an animated GIF GIF to your Word document is useful if you want to convey a message, demonstrate an activity, capture the audience’s attention, or just add some flair.

Adding an animated GIF to your Word document is useful if you want to convey a message, demonstrate an activity, capture the audience’s attention, or just add some flair. Let’s explore how this is done.

This is for devices running Windows 10 and Word. Screenshots are from Word in Office 365

Dilbert and Geek
Copyright Scott Adams, Inc./Distributed by Universal Uclick for UFS

Microsoft Word lets you insert animated GIFs stored on your computer’s hard drive. The process for inserting a GIF in a Word document is no different than inserting a photo. Unfortunately, this only works in Microsoft Word for Windows 10. If you are a Mac user, you can still insert a GIF, but it will not be animated.

First, launch Word and place the cursor in the document’s location where you want the GIF to appear. Now, in the Illustrations group of the Insert tab, click Pictures. Next, choose This Device from the drop-down menu. Refer to below image:

GIF 1
Selecting where to find a GIF

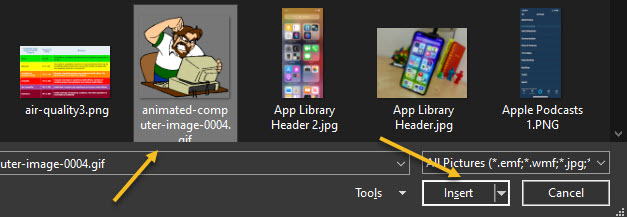
Now, the File Explorer will open. Next, locate and select the GIF you want to insert, then click Insert. See below image:

GIF 3
Selecting a GiF to insert

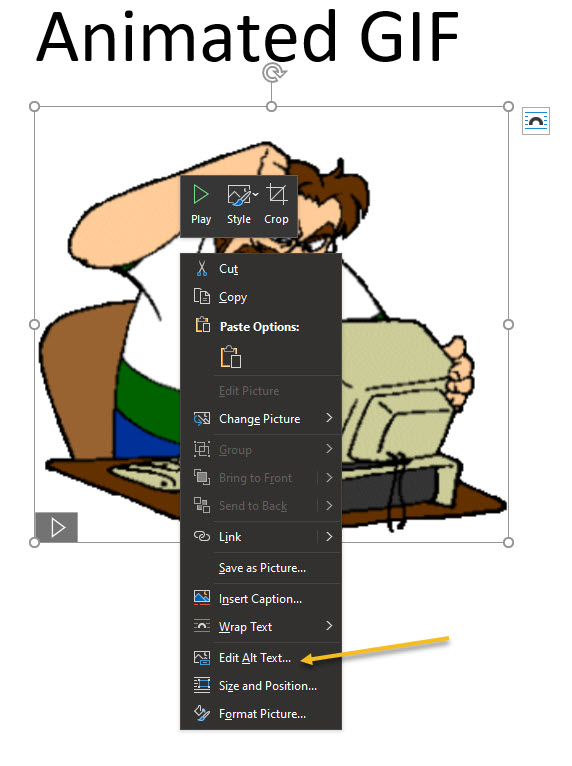
The GiF will appear in your Word document. If you want to pause the Animation, click the pause icon in the bottom-left corner of the image. See following image:

GIF 6
Your GIF inserted into Word

To add alt text, right-click the GIF and then select Edit Alt Text from the context menu. Refer to below image:

GIF 4
Selecting the Edit Alt Text option

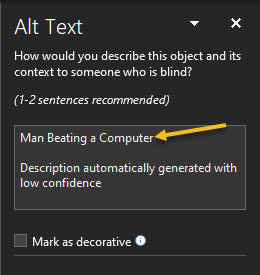
The Alt Text pane will appear to the right of the window. Type the desired alt text in the text box. See below image:

GIF 5
Entering your Alt Text

You have now learned how to insert an animated GIF into your Microsoft Word document. Congratulations!

Quote For the Day

If you are not sitting at the table, you are on the menu.

Jenny Boyer, MD, President of Tulsa County Medical Association

That’s it. Please feel free to share this post! One way to share is via Twitter.

Just click the Tweet icon below. This will launch Twitter where you click its icon to post the Tweet.

Check out TechSavvy.Life for blog posts on smartphones, PCs, and Macs! You may email us at contact@techsavvy.life for comments or questions.

I Would Like to Hear From You

Please feel free to leave a comment. I would love hearing from you. Do you have a computer or smart device tech question? I will do my best to answer your inquiry. Just send an email to contact@techsavvy.life. Please mention the device, app and version that you are using. To help us out, you can send screenshots of your data related to your question.

The author’s Vietnam eBook on the Battle for Tra Bong: Events and Aftermath
Advertisement

How to Tweet a Live Photo as a GIF

Starting with the iPhone 6s series, taking a Live Photo is on your device. This tip applies to iPhone and iPad.

This is for iPhone, iPad and Mac or similar devices.\

How to Take a Live Photo

  1. Open the Camera app.
  2. Make sure that your Camera is set to photo mode and that Live Photo is turned on. When it’s on, you see the Live Photo button (3 concentric circles icon) highlighted at the top of your Camera.
  3. Hold your device still
  4. Tap the shutter button

Live Photo is on by default. If you want to take a still image, tap the Live Photo button to turn off Live Photo. You can preserve your Camera settings so that Live Photo is always on or off. Go to Settings > Camera > Preserve Settings.

Tweet Your Live Photo as a GIF

  1. Open your Twitter app
  2. In the bottom right hand corner, tap on the Compose button. Its icon features a feather encased in a blue circle.
  3. Locate and tap on your Live Photo in the quick-access image bar. You should see the Live icon overlayed on the thumbnail. If you are unable to find the Live Photo, select the Gallery button and then tap on your desired image.
  4. With the Live Photo loaded into the Tweet preview, tap on the “GIF” button found in the lower left hand corner. The Live Photo will be converted into a GIF and will play. You can select the Play button that appears when it stops to see the animation again.
  5. Type a brief message to go along with your GIF and tap the Tweet button.

That’s it. You are done.

How to find and play your Live Photos

  1. Open the Photos app
  2. Go to the Photos tab
  3. Tap the Live Photo
  4. Firmly press the screen and hold

Also, you can Edit or add Effects to your Live Photo by tapping the appropriate option.

What if you want to transform a Live Photo to a static photo?

Instructions are for iOS 13:

  1. Open your Photos app
  2. Select the Live Photo
  3. Tap Edit
  4. Tap the Live Photo icon at bottom of the screen from the available actions
  5. Tap the Live Photo icon at the top of the screen so that it is not enabled
  6. Tap Done

Now, if you press hard on the photo, you won’t see any movement. You can always restore a Live Photo that you’ve edited by following those steps and tapping the icon to highlight it.

I Would Like to Hear from You

Please feel free to leave a comment. I would love hearing from you. Do you have a computer tech question? I will do my best to answer your inquiry. Please mention the app and version that you are using. To help me out, you can send screenshots of your data related to your question.

%d bloggers like this: