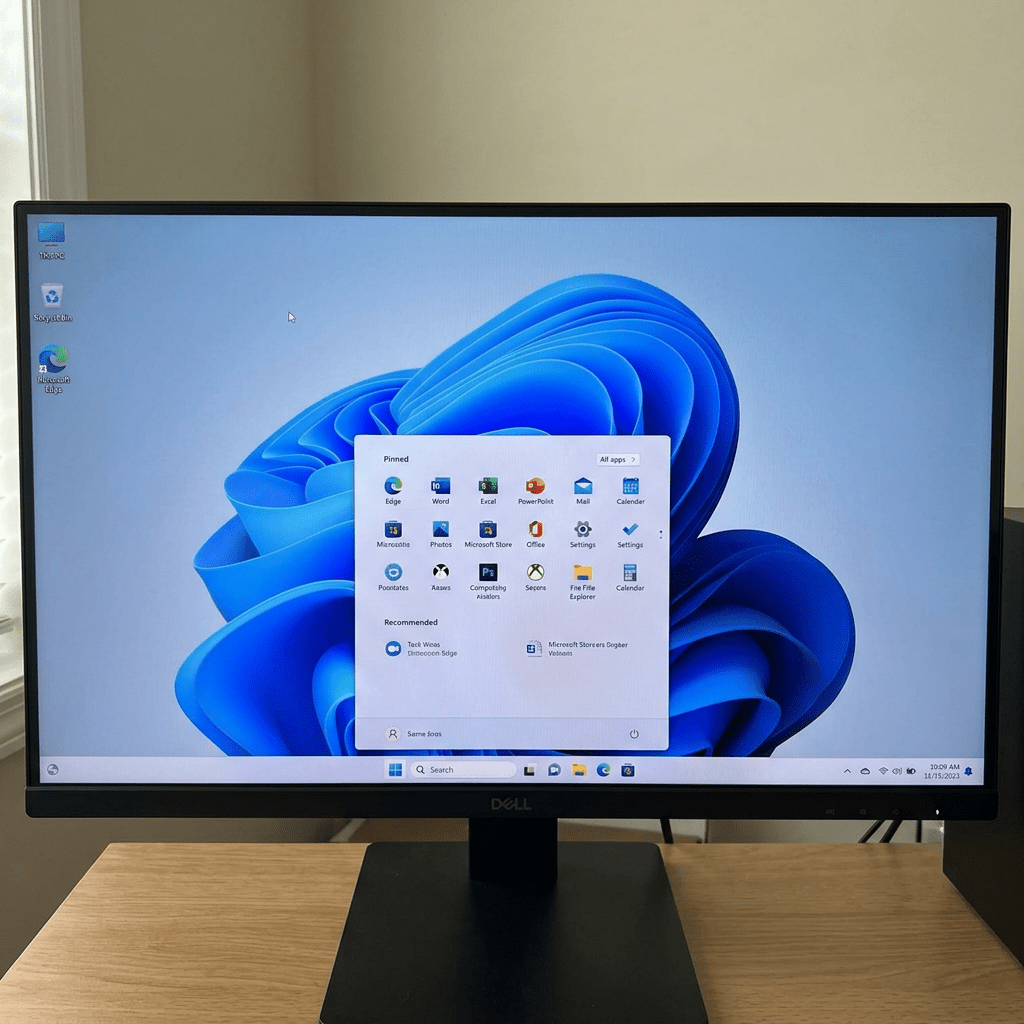
Tips to Tweak the Windows 11 Start Menu

The article discusses customizing the Start menu in Windows 11, addressing criticism of its design. It provides tips for removing the recommended apps section, pinning and unpinning applications, organizing icons into folders, and realigning the Start button. Overall, it emphasizes enhancing user experience through personalization.

RAYMOND OGLESBY @RaymondOglesby2
August 18, 2026 – 5 minutes read time

Change can be hard. If the Windows 11 aesthetic has you pining for the glory days of Windows 10, fear not. You can tweak Microsoft’s new Start menu.

Since its inception, the redesigned Start menu in Windows 11 has been a divisive feature. Though it probably has its fans, many people have given the interface a thumbs down. If you are one of the Start menu critics, you can do more than just complain about it. The new Start menu may not be as friendly or as customizable as the one in Windows 10, but there are ways to make it look and work the way you want

  • Customize the Start menu to your preference.
  • Make your apps easier to find and your interface less cluttered.

This tip was performed on a desktop running Windows 11 Pro, version 25H2.

Initially, the Windows 11 Start menu was fairly bare-bones and limited. People complained about the recommended apps section only showing what Microsoft wanted you to see. If you wanted to view all your apps, it forced you to open a separate window. Even Microsoft realized that the menu needed some repair work, so Windows 11 version 25H2 has fixed a few things.

All your apps are now viewable from the same menu, and you are able to rid yourself of the Recommended apps section entirely. Additionally, the menu can display a pane for your smartphone, allowing you to access your latest phone calls and texts. It’s an improvement, but there’s more you can do to make the Start menu work for you.

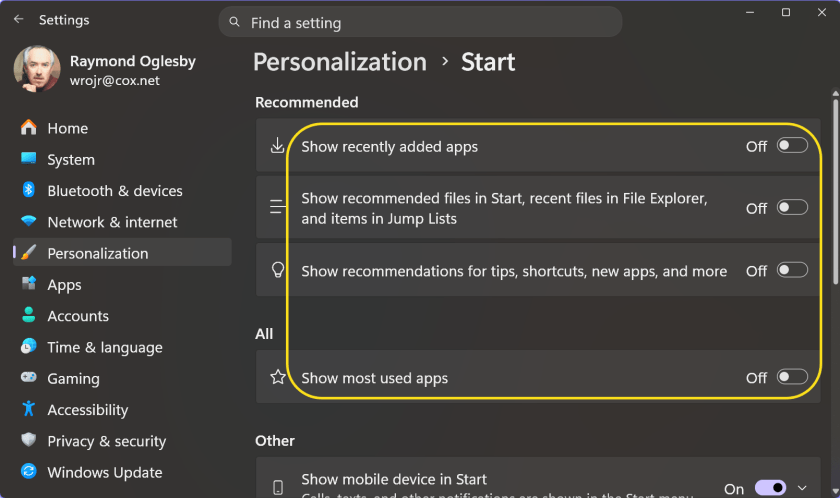
\The Recommended section displays recently added and opened apps and files. Don’t want it or need it? With the newest Start menu, you can easily remove this section completely. Just go to Settings > Personalization > Start and then turn off Show recommended files in Start, recent files in File Explorer, and items in Jump Lists and Show recommendations for tips, shortcuts, new apps, and more. Refer to the image below:
Start 1
The Recommended options that you may turn off

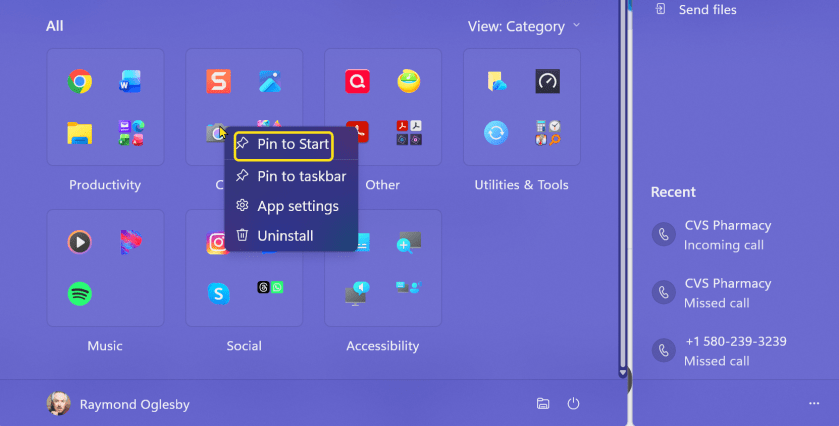
You can customize the Start menu by adding and removing apps. To add an app to your Start menu for easy access, click All, then find the app you want to add, right-click on it, and select Pin to Start. To remove an app from the Start menu, right-click on its icon and select Unpin from Start. The icon is removed from the Start menu but remains in the All section. See the image below:
Start 2
Pin/Unpin apps to Start page

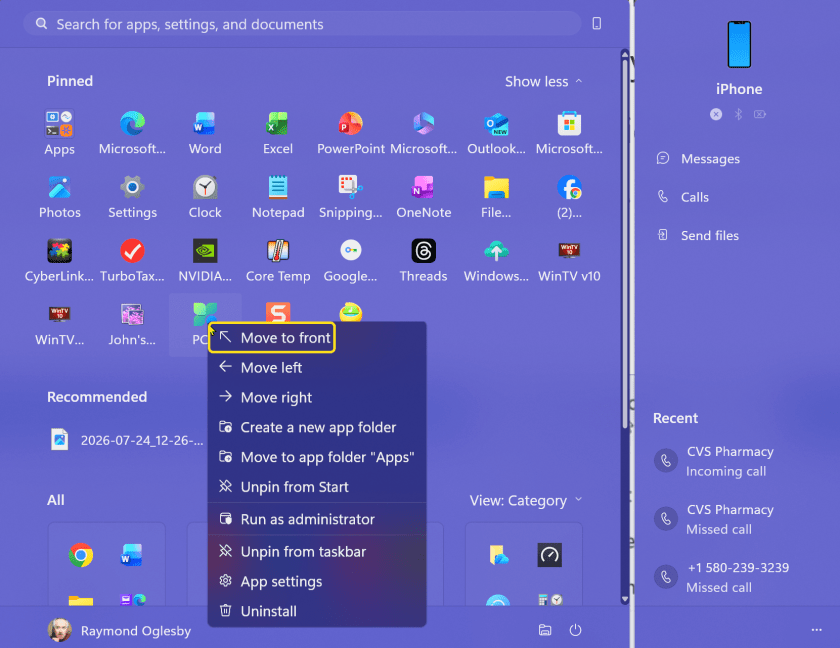
You can move the icons in the Start menu to better position them according to your preferences. For example, you may want to move the apps you use most frequently to the top of the menu and those you use less frequently to the bottom. To move an app to the top, right-click on it and select Move to front. You can also tell an app to move to the left or right. Additionally, you can drag and drop the icon into place. See the following image:
Start 3
Move icons on Start page

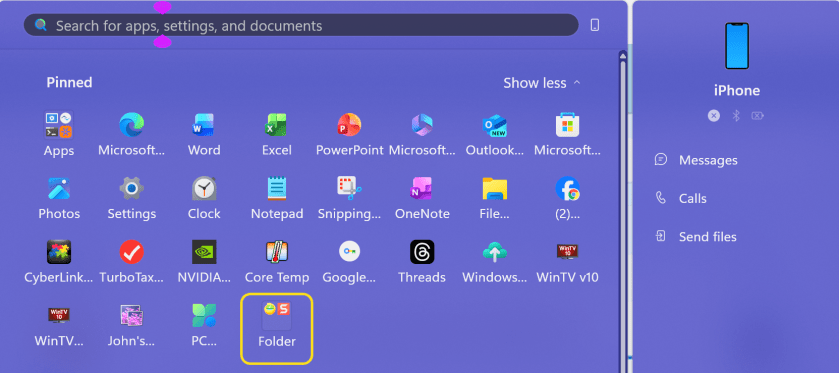
You can further organize your Start menu icons by placing them into folders. To create a folder, drag and drop one icon on top of another. The two icons are then placed into a folder. It is named Folder automatically, but you can click the folder and then the name field to change it. You can then add other apps by dragging them onto the icon. Refer to the image below:
Start 4
Create folders on Start page

You can add or remove folders at the bottom of the Start menu next to the Power button. This gives you easy access to Settings, File Explorer, Documents, Downloads, and more right from the Start menu. To set this up, head to Settings > Personalization > Start and click Folders. Turn on the switch for any folder you wish to see next to the Power icon in the menu. See the image below:
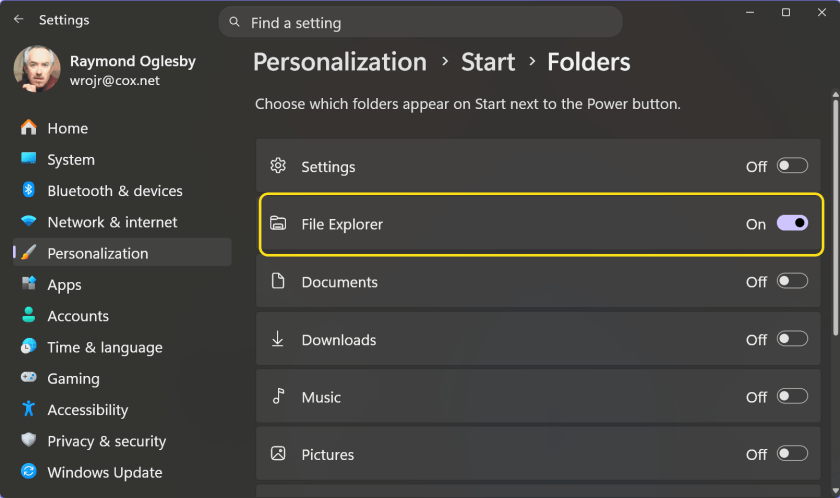
Start 5
Add/Remove folders next to Power button

The Start button is centered on the taskbar in Windows 11, unlike its usual spot in the bottom-left corner. If you prefer its traditional position, you can move the entire taskbar to the left. Go to Settings > Personalization > Taskbar and select the Taskbar behaviors option. Use the Taskbar alignment dropdown menu to change the icons from Center to Left. See the following image:
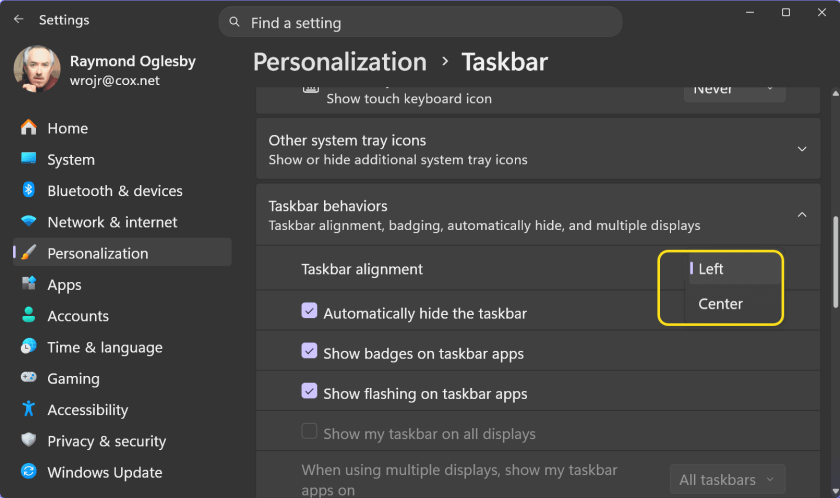
Start 6
Realign Start button

Technology is constantly evolving, and smartphone and desktop tech rarely remains static. Therefore, the information in this post is only accurate as of the date it was written. Blog posts that are older than six months may contain instructions that are no longer compatible with your device or operating system. We hope that the content from previous posts continues to function as intended. Thank you for reading TechSavvy.Life, where technology works for you.

Technology presumes there’s just one right way to do things and there never is.

– Robert M. Pirsig

That’s it. Please feel free to share this post! One way to share is via Twitter.

Just click the Tweet icon below. This will launch Twitter where you click its icon to post the Tweet.

Checkout TechSavvy.Life for blog posts on smartphones, PCs, and Macs! You may email us at contact@techsavvy.life for comments or questions.

Author’s eBook

The author’s Vietnam eBook, “Battle for Tra Bong Vietnam: Events and Aftermath”, is available on Kindle devices and the Kindle App for desktop, laptop, and smartphone. The apps are free.

The author’s Vietnam eBook on the Battle for Tra Bong Vietnam: Events and Aftermath

How to Set a Custom Color for Start Menu in Windows 10

Out of the box, the Start menu includes a default layout with elements and settings that usually fit most people. However, if you want to make it more functional and personal, the experience available on Windows 10 is highly customizable.

On Windows 10, the Start menu is an essential component, as it is the experience you use every day to find apps, settings, and files.

Out of the box, the Start menu includes a default layout with elements and settings that usually fit most people. However, if you want to make it more functional and personal, the experience available on Windows 10 is highly customizable.

Starting with the October 2020 update, Windows 10 now defaults to a light theme that takes away accent colors from your Start menu and Taskbar. If you would like to select a custom color for your Start menu, there is an easy way to pick it in Settings. Let’s explore how to do this.

This is for devices running Windows 10

Dilbert and Words
Copyright Scott Adams, Inc./Distributed by Universal Uclick for UFS

Selecting Colors Settings

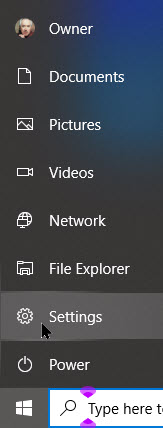
First, launch Settings by pressing Windows+I keys or by opening the Start menu and clicking the gear icon on the left. Refer to below image:

Start 1
Accessing Settings

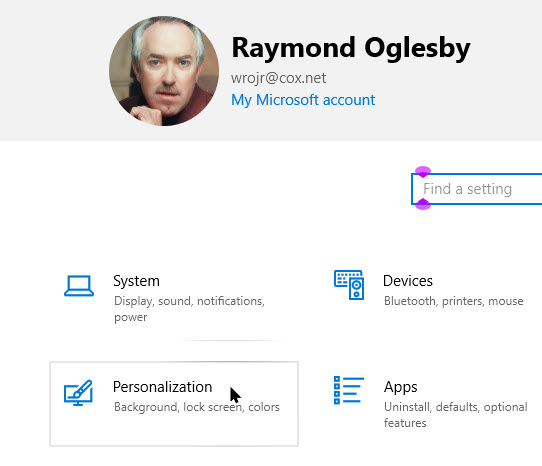
In Settings, click the Personalization option. See below image:

Start 2
Accessing Personalization option

Now, in its settings, click the Colors option. See following image:

Start 3
Accessing Colors option

Selecting your Colors

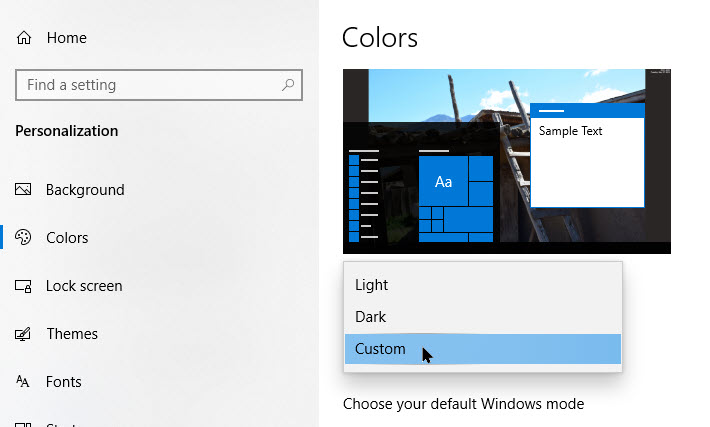
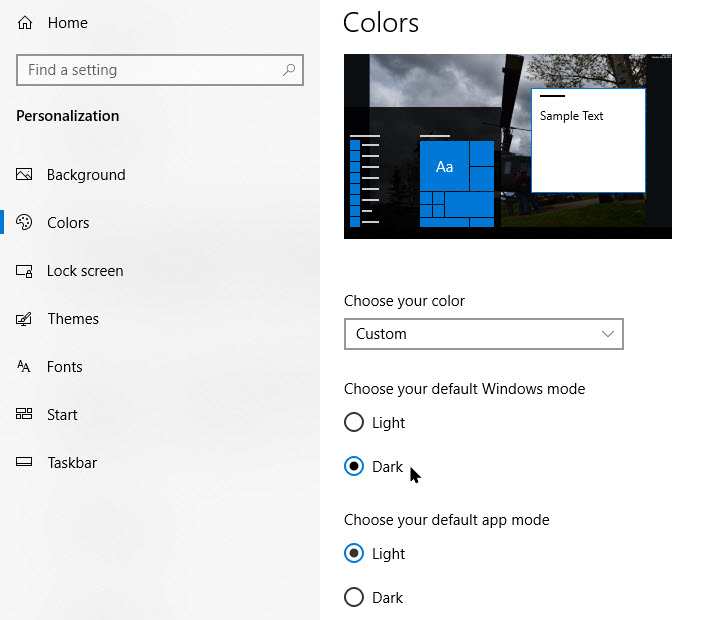
Next, in the Colors settings, locate the Choose your color drop-down menu. In this menu, select Custom. Refer to below image:

Start 4
Selecting Custom color option from drop-down

Now, two new choices will appear. Under Choose your default Windows mode, select Dark. This Dark mode is required for colorizing of your Start menu.

Now, under Choose your default app mode, select one of two options, Light or Dark, whichever one you would like the best. See below image:

Start 5
Selecting Dark mode

Selecting your Accent Color

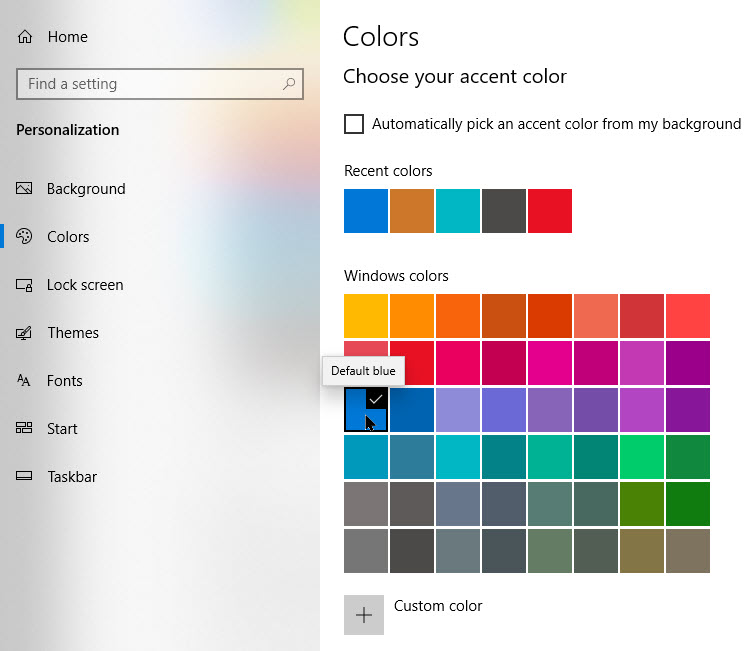
Next, scroll down the Colors page and locate the Choose your accent color section.

If you want the color to automatically match your desktop background image, checkmark Automatically pick an accent color from my background. Otherwise, click a color in the grid that you would like to use for your Start menu and Taskbar. You can also pick a custom color by clicking the Custom color button below the grid. See following image:

Start 6
Selecting your accent color

Now, locate the Show accent color on the following surfaces section and checkmark Start, taskbar, and action center.

Note! If this option is greyed out, make sure you select Dark as your default Windows mode above. It won’t work in Light mode. Refer to below image:

Start 7
Selecting your accent color on surfaces

Your New Look

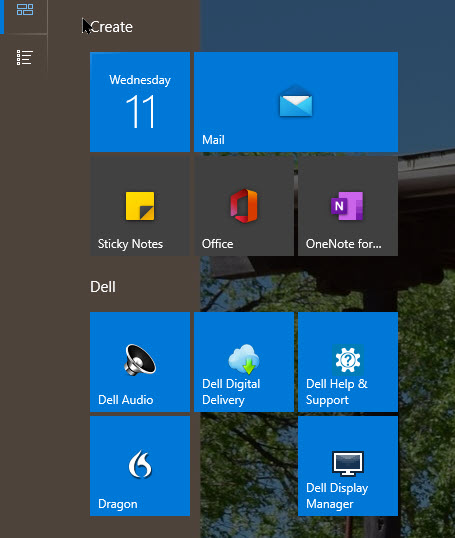
The next time you open your Start menu, you will see that it has changed to the accent color you selected. See below image:

Start 8
Your new Start colorized icons

If you ever want to switch back to the standard Windows 10 theme, open

Settings > Personalization > Colors

and select Light in the Choose your color drop-down menu.

That’s it. Please feel free to share this post! One way to share is via Twitter.

Just click the Tweet icon below. This will launch Twitter where you click its icon to post the Tweet.

Check out TechSavvy.Life for blog posts on smartphones, PCs, and Macs! Feel free to email us at contact@techsavvy.life.

I Would Like to Hear From You

Please feel free to leave a comment. I would love hearing from you. Do you have a computer or smart device tech question? I will do my best to answer your inquiry. Just send an email to contact@techsavvy.life. Please mention the device, app and version that you are using. To help us out, you can send screenshots of your data related to your question.

The author’s Vietnam eBook on the Battle for Tra Bong: Events and Aftermath

How to Access Full Screen Startup in Windows 10

While in desktop mode, Windows 10 allows you to use the Start menu in a full-screen mode or in a way that only covers part of the screen.

While in desktop mode, Windows 10 allows you to use the Start menu in a full-screen mode or in a way that only covers part of the screen. Lets explore how to do this.

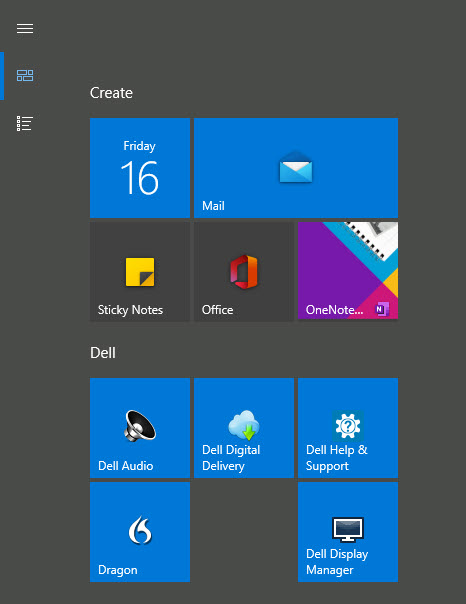
Depending on how you have your Start menu configured, a full-screen Start menu covers the entire screen (but not the Taskbar), and you can change between a “pinned tiles” view and an “all apps” view using the buttons in the upper-left corner.

In either view, you will see a screen full of shortcuts that you click on to launch an application. Refer to below image for a partial view of my desktop:

Start 1
Partial Desktop screen

To configure whether you see the full-screen Start menu in desktop mode or not, we need to make a change in Windows Settings.

This is for devices running Windows 10 operating system

Dilbert and Training
Copyright Scott Adams, Inc./Distributed by Universal Uclick for UFS

First, click the Start menu, select the Gear icon on the bottom left, then click Settings, or press the Windows+I keys to open Settings. See below image:

Start 2
Accessing Settings

Now, click on Personalization. See following image:

Start 3
Access Personalization

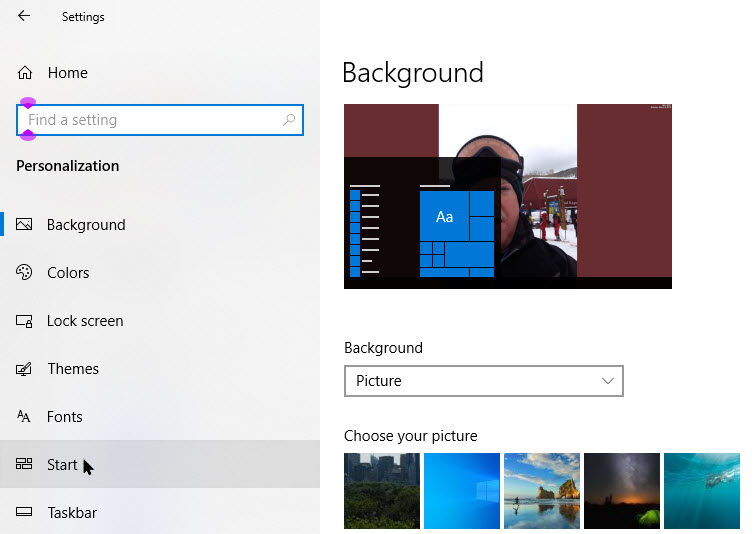
Next, select Start from the sidebar to open the its settings. Refer to below image:

Start 4
Accessing Start option

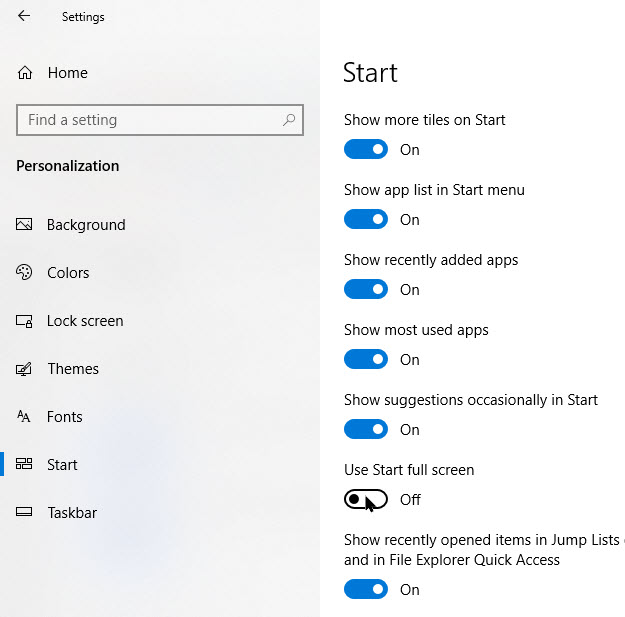
In Start menu settings, scroll down to the switch labeled Use Start Full Screen. If you would like to use the Start menu full screen in desktop mode, set this switch to On. If you do not want Start to cover the entire screen when you open it in desktop mode, set this switch to Off. See below image:

Start 5
Disabling Start Full Screen

Note! If your PC is in tablet mode, it will always show a full-screen Start menu.

You do not have to use a full-screen Start menu to get more room for shortcuts. If you would like to use a larger Start menu without having it occupy the full screen, you can easily resize the Start menu by clicking and dragging its edges.

Also, you can add a few more tiles by enabling the switch labeled Show more tiles located at the top of Start menu settings. Refer to above image.

You arte finished. Please feel free to share this post! One way to share is via Twitter.

Just click the Tweet icon below. This will launch Twitter where you click its icon to post the Tweet.

Check out TechSavvy.Life for blog posts on smartphones, PCs, and Macs! Feel free to email us at contact@techsavvy.life.

I Would Like to Hear From You

Please feel free to leave a comment. I would love hearing from you. Do you have a computer or smart device tech question? I will do my best to answer your inquiry. Just send an email to contact@techsavvy.life. Please mention the device, app and version that you are using. To help us out, you can send screenshots of your data related to your question.

The author’s Vietnam eBook on the Battle for Tra Bong: Events and Aftermath