A cybersecurity firm has identified 17 malicious browser extensions, including “Google Translate in Right Click,” which collectively garnered over 840,000 downloads. Mozilla and Microsoft have removed these from their stores, but users must uninstall them manually. The extensions pose risks across several popular web browsers.
RAYMOND OGLESBY @RaymondOglesby2 February 17, 2026 –3 minutes read time
Overview
The most popular malicious extension, dubbed Google Translate in Right Click, was downloaded more than 500,000 times from app stores. Another, Translate Selected Text with Google, racked up almost 160,000 downloads.
If you have been using browser extensions to download YouTube videos or images from Pinterest, translate text in real time, check Amazon price histories, or even enhance colors, you might have some uninstalling to do.
Cybersecurity firm LayerX has uncovered 17 malicious browser extensions that were downloaded more than 840,000 times in total, with some remaining active in the wild for up to five years. Instances were recorded across Firefox, Google Chrome, and Microsoft Edge browsers.
Mozilla and Microsoft have removed all of the extensions from their official stores at the time of writing. However, if you have already installed one, you will need to uninstall it manually.
Extensions to Remove
Here is the list of extensions you should remove:
Google Translate in Right Click
Translate Selected Text with Google
One Key Translate
Translate Selected Text with Right Click
Cool Cursor
Screenshot Clipper
Ads Block Ultimate
Convert Everything
Amazon Price History
RSS Feed
Color Enhancer
Floating Player – PiP Mode
YouTube Download
, Instagram Downloader
Save Image to Pinterest on Right Click
Full Page Screenshot
Youtube Download
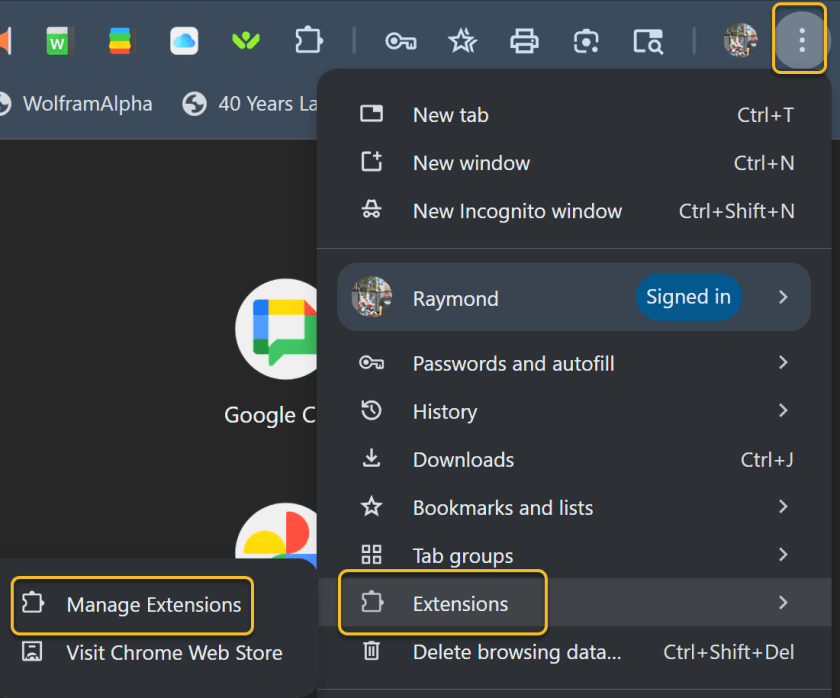
Removing Chrome Extensions
If you want to view all your extensions in Chrome, click the three-dot icon in the upper right, move to More tools, and select Extensions. Alternatively, click the Extensions button on the toolbar and select Manage extensions. This will take you to a page where you can manage all your installed extensions. Refer to the image below:
Accessing Manage Extensions option
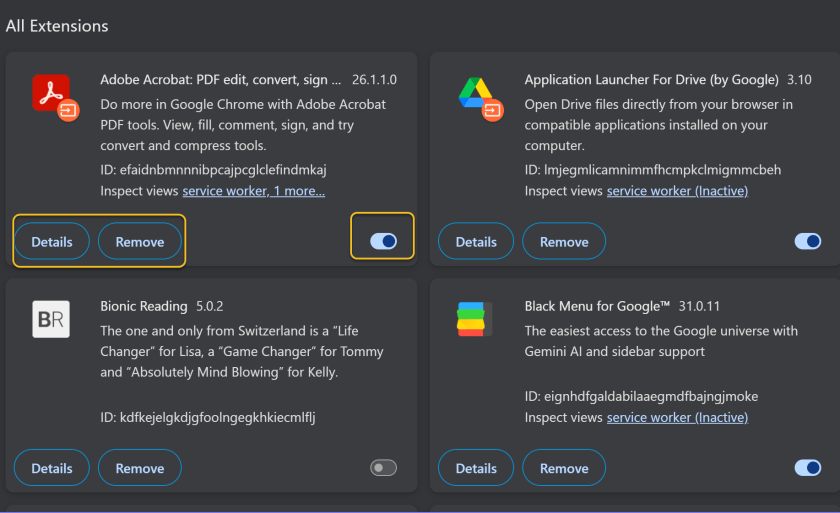
You can click Details to view information on a specific extension. If you turn off an extension switch, this will temporarily disable it. Otherwise, click Remove to uninstall the extension completely. See the image below:
Disable, Remove, or view Details for an Extension
Disclaimer
Technology is constantly evolving, and smartphone and desktop tech rarely remains static. Therefore, the information in this post is only accurate as of the date it was written. Blog posts that are older than six months may contain instructions that are no longer compatible with your device or operating system. We hope that the content from previous posts continues to function as intended. Thank you for reading TechSavvy.Life, where technology works for you.
Quote For the Day
Technology is a gift of God. After the gift of life it is perhaps the greatest of God’s gifts. It is the motherof civilizations, of arts and of sciences.
– Freeman Dyson
(X) Twitter Info
That’s it. Please feel free to share this post! One way to share is via Twitter.
Just click the Tweet icon below. This will launch Twitter where you click its icon to post the Tweet.
Checkout TechSavvy.Life for blog posts on smartphones, PCs, and Macs! You may email us at contact@techsavvy.life for comments or questions.
We value your feedback! Was this post helpful? Please share your comments with us. If you have a tech question related to your computer or smart device, feel free to reach out. Just send an email to contact@techsavvy.life, and be sure to include the device, app, and version you are using. To assist us further, you can also attach screenshots related to your inquiry.
The author’s Vietnam eBook, “Battle for Tra Bong Vietnam: Events and Aftermath,” can be accessed on a Kindle device or the Kindle App for a desktop, laptop, or smartphone. The apps are free.
The author’s Vietnam eBook on the Battle for Tra Bong Vietnam: Events and Aftermath
The article discusses the resurgence of National Public Data, a site previously infamous for leaking millions of Social Security numbers. It offers users the ability to search personal information and opt out of data display. Caution is advised regarding online privacy, as data security on the web remains a significant concern.
RAYMOND OGLESBY @RaymondOglesby2 September 2, 2025 – 8 minutes read time
Note! Although we recommend you use this tip, we are NOT responsible for what happens to your data. Also, remember there is no such thing as “privacy” on the web. If major USA companies get hacked, so will you. But this tip will help protect your data.
Overview
National Public Data is back with new owners, joining the ranks of other creepy, people-finding services. The website, infamous for its role in leaking millions of Social Security numbers in 2024, has returned with the ability to look up anyone’s personal information.
The site shut down in December amid a wave of lawsuits against parent company Jericho Picturesafter a breach exposed an estimated 272 million unique SSNs and 600 million phone numbers. Since then, the site has been relatively dormant. But recently, we spotted it springing back to life with a new interface.
It looks like the domain has changed hands:. In a page about last year’s breach, the site’s new owners write: “Important Notice: Jericho Pictures, Inc., the Florida company that suffered a major data breach in 2024, no longer operates this site. We have zero affiliation with them. We are keeping this page, originally posted by Jericho Pictures, Inc., intact so its history remains traceable.”
Why You Will Like This Tip
Protect your privacy from others or companies
View and/or remove your personal data from pubic searches
Be in control of your data
System Requirements
This tip was performed on a Dell XPS desktop running Windows 11 Pro. Screenshots are from the latest update for the Google Chrome browser.
Your Profile On National Public Data Website
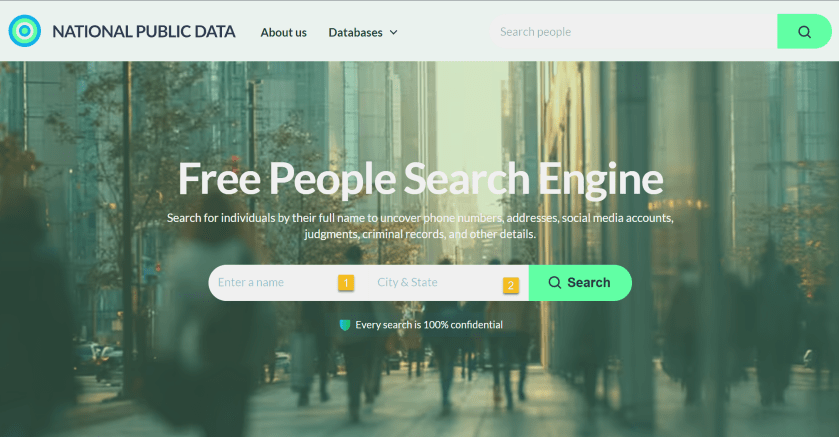
First, it’s relatively easy to look up anybody’s information using their website. Click here to access their interface. Refer to the image below:
National Public Data website
The site does not explain who the new owners are, but a domain lookup shows that it’s registered to Florida-based “Perfect Privacy,” (what an oxymoron), a brand name associated with a VPN service. However, Perfect Privacy VPN has no affiliation with National Public Data.
The new site functions as a “free people search engine,” which might alarm the public since National Public Data housed a huge trove of sensitive data on Americans.
It is unclear where the site is getting its data. But the new National Public Data says: “We collect the data you find on our people search engine from publicly available sources, including federal, state, and local government agencies, social media pages, property ownership databases, and other reliable platforms. After the data is in our hands, we verify and filter it to make sure it is indeed accurate and up-to-date.”
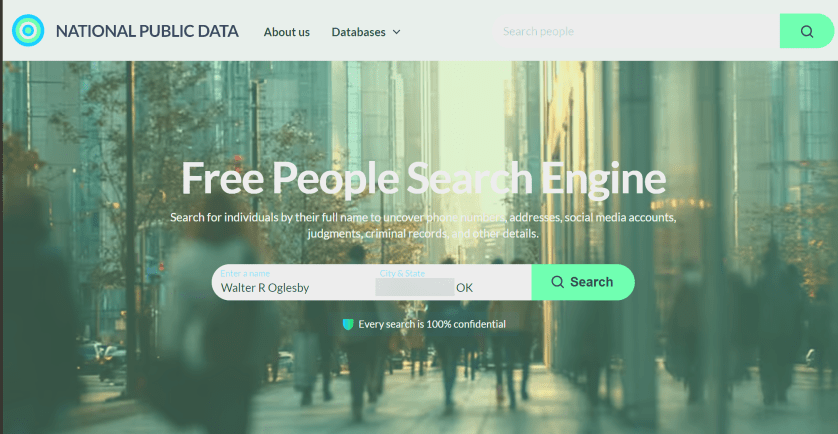
Next, key in your full name, City/State. Both fields are autofill. As you enter the information, it pops up with matching criteria. Then tap the Search button. The search is extremely FAST. I tried both of my names and got the same results.
My wife used the site in her genealogy research to find a distant cousin’s phone number and contacted him. See the image below:
Enter your data
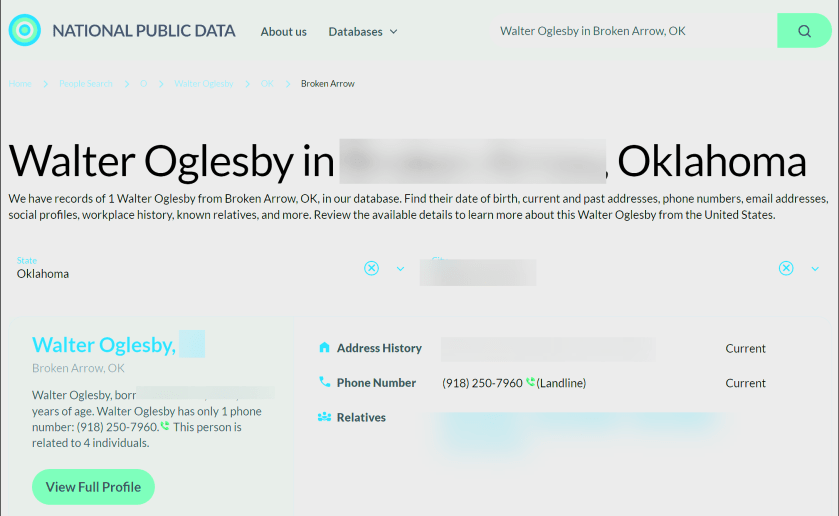
Now, your basic profile information will be displayed. We have redacted specific fields for privacy. We noted that the basic profile information was correct except for the landline phone number, which we no longer have. When I clicked on my relatives, the data was incorrect. To view more information, click the View Full Profile button. See the following image for basic details about myself:
Your basic profile data
Still, what makes the site disturbing is how you can freely look up people’s data, including neighbors, and sometimes find accurate addresses, phone numbers, and dates of birth, along with a person’s relatives. None of the data is behind a paywall. That said, the new site is not much different from other people-finding services, which serve up similar data for free.
The new National Public Data adds: “On our people search website, you can find pretty much anything you need, from someone’s contact info, location, age, and birthday to workplace, relatives, and criminal records. No need to sift through different web pages.” It does not reveal your SSN.
Next, the data it reveals is a lot. Refer to the image below about the data it finds:
Listing of what the website searches
Opt-Out From National Piblic Data Site
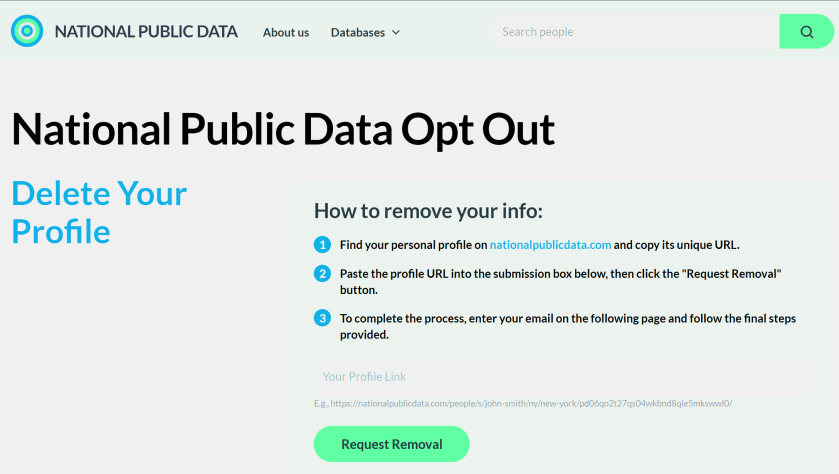
Now, the new National Public Data site has an opt-out form to delete your profile data. However, many users are likely unaware of such an option, enabling these types of sites to continue trafficking their information. See the image below:
Opt-Out form
Remember, proactively managing your online privacy and staying informed about potential data breaches are crucial steps in protecting your personal information.
Drop the URL into the Your Profile Link field and click Request Removal
Enter an email address, and the site will send you a message and ask you to click to confirm deletion. You need a separate email address for each profile you want to delete.
We tried the opt-out function, and the site appears to remove our data immediately. Some commenters say they have not received the confirmation email. Check your Spam folder and make sure you are dropping the full URL for your profile into the Link box, not just the search results page.
Atlas Privacy Website
Sites such asAtlas Privacy have emerged to help people remove their data from the open web and people-finding services. Note: we did not try their service.
Atlas Privacy focuses on removing your personal information from data broker websites and other online sources, NOT your own website. They help you regain control of your data by removing it from places where it’s being collected and shared without your consent.
They scan over 150 sites to remove your information and help protect your privacy by removing your name, age, address, phone number, and other personal details from these sources. Atlas Privacy does not have its own list of websites it searches, but rather, it targets specific data brokers and people finder sites.
Unlike the National Public Data, you must create an account to use their service. There are both free and paid services.
After you have removed your data, recheck to see if it’s actually deleted!
Note! Remember you are responsible for your own data. Acting proactivity by removing your data allows you to be in control.
Want to Recover Your Dara (Why Would You)
National Public Data
If your data has been removed from Natural Public Data sources, it is generally not possible to get it back in the same way it was stored. Once data is deleted, it is often permanently removed from the system or archived in a way that is not easily accessible. However, the possibility of data restoration depends on the specific circumstances of the removal and d the policies of the data provider.
Atlas Privacy
If your data has been removed from Atlas Privacy, in some cases, you may be able to restore data that has been removed.
Sources: National Public Data, Perfect Privacy, Jericho pictures, Microsoft, PCMag, Atlas Prvacy, Meta
Disclaimer
Technology is constantly evolving, and smartphone and desktop tech rarely remains static. Therefore, the information in this post is only accurate as of the date it was written. Blog posts that are older than six months may contain instructions that are no longer compatible with your device or operating system. We hope that the content from previous posts continues to function as intended. Thank you for reading TechSavvy.Life, where technology works for you.
Quote For the Day
“The art challenges the technology, and the technology inspires the art.”
– John Lasseter, Co-founder of Pixar
(X) Twitter Info
That’s it. Please feel free to share this post! One way to share is via Twitter.
Just click the Tweet icon below. This will launch Twitter where you click its icon to post the Tweet.
Checkout TechSavvy.Life for blog posts on smartphones, PCs, and Macs! You may email us at contact@techsavvy.life for comments or questions.
We value your feedback! Was this post helpful? Please share your comments with us. If you have a tech question related to your computer or smart device, feel free to reach out. Just send an email to contact@techsavvy.life, and be sure to include the device, app, and version you are using. To assist us further, you can also attach screenshots related to your inquiry.
The author’s Vietnam eBook on the “Battle for Tra Bong Vietnam: Events and Aftermath” can be accessed from a Kindle device or the Kindle App for a desktop or smartphone. The apps are free.
The author’s Vietnam eBook on the Battle for Tra Bong Vietnam: Events and Aftermath
Apple has disabled Advanced Data Protection (ADP) for iCloud in the UK due to government demands for law enforcement access. This compromises data security, as backdoor access could be exploited. In contrast, ADP offers end-to-end encryption unavailable to Apple, ensuring only users can access their data. Users outside the UK retain this protection.
Insert dRAYMOND OGLESBY @RaymondOglesby2 April 1, 2025 – 6 minutes read time
Overview
Recently. Apple took the unusual step of turning off its highest level of iCloud encryption, Advanced Data Protection (ADP) for customers in the UK. The British government has reportedly demanded that Apple provide a method for law enforcement to access encrypted data as part of criminal investigations. But that creates a serious security problem, because this type of backdoor access can also be exploited by criminals or untrustworthy governments.
Why You Will like This Tip
Have the best encryption for your Apple devices.
Prevent hackers from accessing and viewing your data.
System Requirements
See below for the Apple software versions. These screenshots were captured using iOS 18.3.2 on iPhone 14 Pro.
Click here to learn how to update your iPhone to the latest iOS version.
United Kingdom vs United States
For people in the UK, ADP can no longer be enabled. If you are currently using ADP, you will need to turn off the feature at a future date.
If you are outside the UK and concerned about who can see your data, ADP adds an extra layer of security by making it unreadable even by Apple. If ADP is disabled, your data could be at risk because it can still be unlocked by Apple, a legal request or a data breach.
Let’s explore how to turn Advanced Data Protection on, and how it differs from the default iCloud encryption methods.
How Does ADP Work
The key difference between ADP and how Apple encrypts data by default is how accessible your information is when stored on Apple’s servers.
In what Apple calls standard data protection, information sent between points, such as files stored on iCloud Drive and iCloud backups of your devices, is encrypted and transmitted securely. If someone intercepts that data between the two points, they will see only gibberish.
That data remains encrypted when it’s stored on Apple’s servers, so you can access it from other devices, for instance. However, Apple can still access the encryption keys to unscramble and read the data; and provide it to law enforcement following a legal request.
By contrast, when you enable Advanced Data Protection for iCloud, the data is end-to-end encrypted, meaning only your trusted devices possess the encryption keys to read it. The information remains encrypted on the servers, and not even Apple can access its contents. (Not all iCloud data can be end-to-end encrypted. Apple breaks out-which types of information, such as iCloud Mail messages, that remain covered by standard data protection even when ADP is turned on.)
The UK’s Investigatory Powers Act, the “Snooperd’s Charter”, makes that inaccessibility illegal, which is why Apple is turning the feature off for UK customers.
Some services are end-to-end encrypted regardless due to the sensitivity of the data, such as passwords, information stored in the Health app and payment information.
Setup Your Account for ADP
Note! Setting up ADP applies to all devices in your Apple account.
To set up ADP on your account, first make sure you have met all the prerequisites for the feature:
Your Apple Account must use two-factor authentication.
You must have a recovery method set up in case you lose access to your account. That can be a 28-character Recovery Key or a person you have designated as a Trusted Contact.
Every device connected with your Apple Account must be able to run at least
iOS 16.2, iPadOS 16.2, MacOS 13.1
WatchOS 9.2
TVOS 16.2
HomePod 16.0
For Windows computers, make sure iCloud for Windows is at version 14.1 or later.
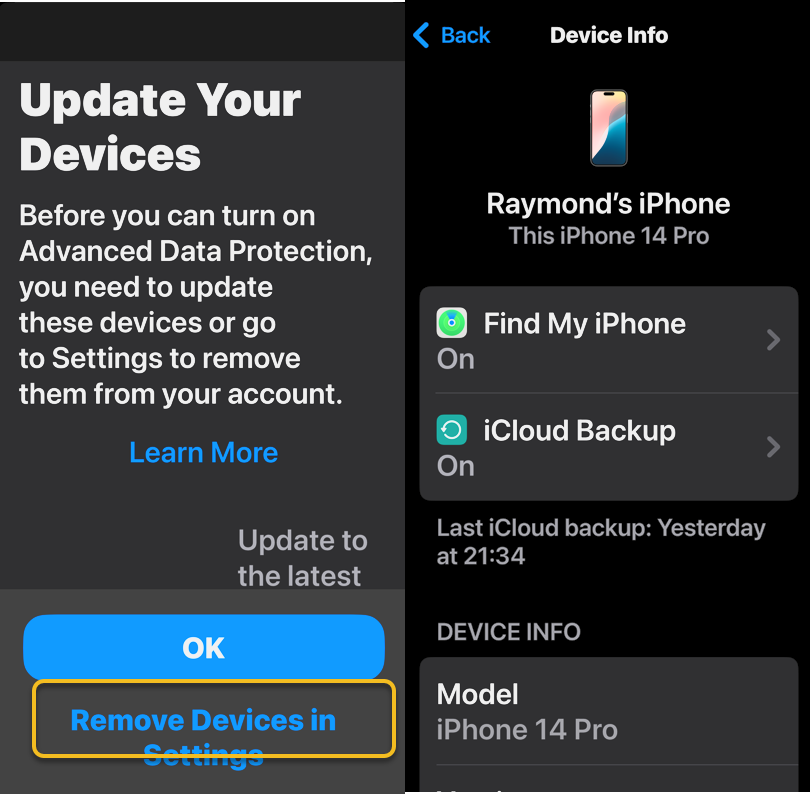
If any of your devices do not qualify, you will be warned during the ADP setup process. If any of those are too old or you no longer have access to them, head to:
Settings > Remove Devices and delete them from your list.
Refer to the below image:
Update your Devices
How to Setup
To turn on ADP on an iPhone, iPad or Mac do the following:
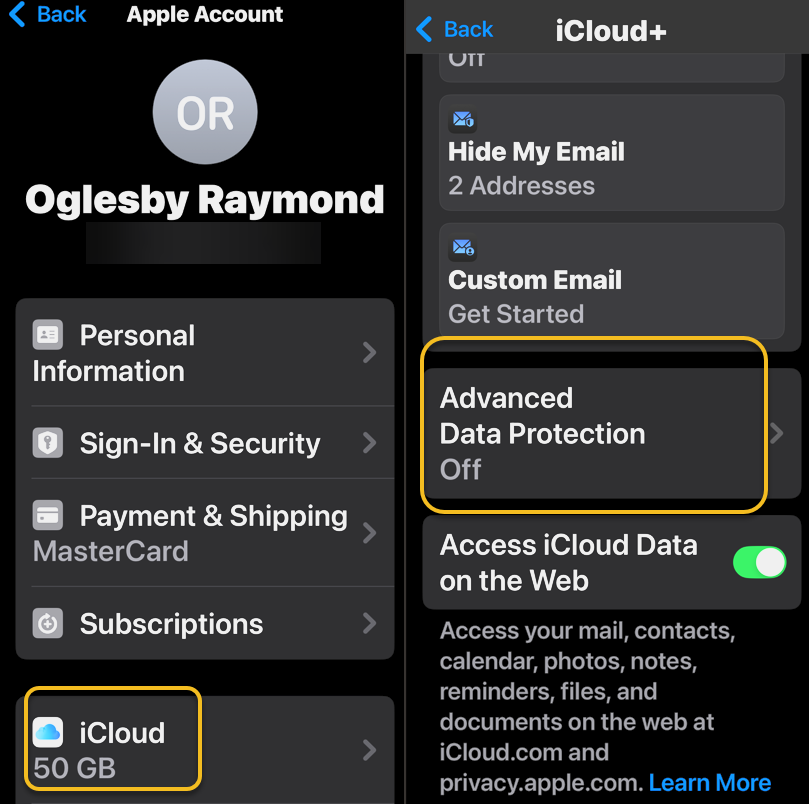
1. Go to Settings > [Your Name] > iCloud. On a Mac, open System Settings > [Your Name] > iCloud.
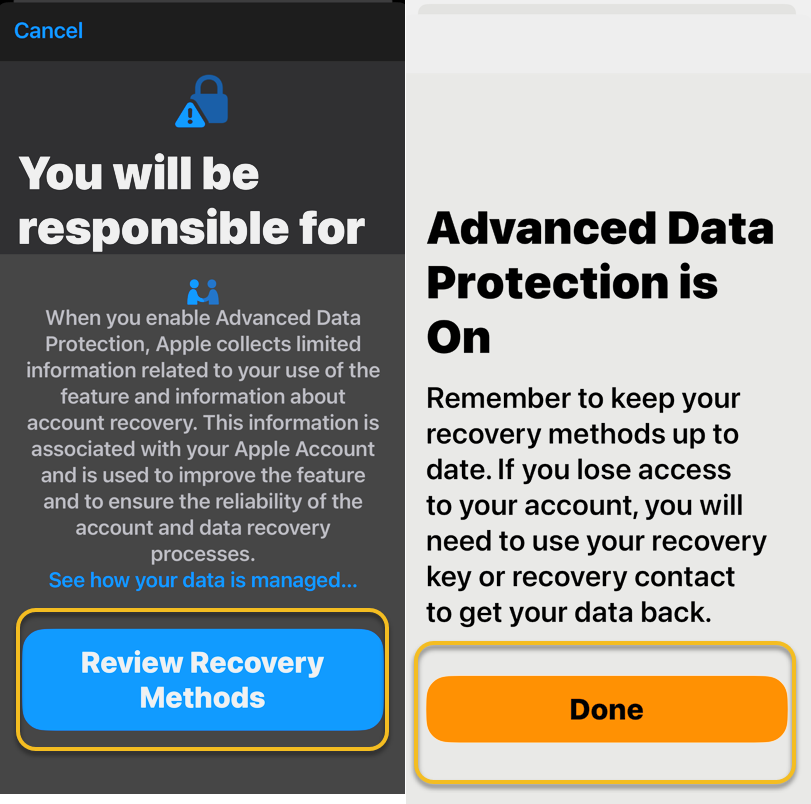
2. Scroll down to Advanced Data Protection, which likely says Off, and tap that to enable. This will take some time, and the screen will appear to be unresponsive; Just be patient. Later, if you want to disable ADP, repeat the above steps and select the Turn Off button.
See the below image:
Turn on ADP
3, If there are any of the aforementioned impediments to setting up ADP, such as needing to update other devices on your account, you will review them on the next screen.
4. In the following screen, tap Review Recovery Options. You need to have a Recovery Key, Recovery Contact or both to ensure that you can get your data if you lose access to your iCloud account.
5. Enter your device’s passcode to finish.
See the following image:
ADP is Enables
Activating ADP on one device means it’s on for all of your devices using the same Apple account, so you only need to set it up once.
Disclaimer
Technology is constantly evolving, and smartphone and desktop tech rarely remains static. Therefore, the information in this post is only accurate as of the date it was written. Blog posts that are older than six months may contain instructions that are no longer compatible with your device or operating system. We hope that the content from previous posts continues to function as intended. Thank you for reading TechSavvy.Life, where technology works for you.
Quote For the Day
. “Imagination is more important than knowledge. For knowledge is limited, whereas imagination embraces the entire world, stimulating progress, giving birth to evolution.”
-Albert Einstein
X (Twitter) info
That’s it. Please feel free to share this post! One way to share is via Twitter.
Just click the Tweet icon below. This will launch Twitter where you click its icon to post the Tweet.
Checkout TechSavvy.Life for blog posts on smartphones, PCs, and Macs! You may email us at contact@techsavvy.life for comments or questions.
We value your feedback! Was this post helpful? Please share your comments with us. If you have a tech question related to your computer or smart device, feel free to reach out. Just send an email to contact@techsavvy.life, and be sure to include the device, app, and version you are using. To assist us further, you can also attach screenshots related to your inquiry.
The author’s Vietnam eBook on the “Battle for Tra Bong Vietnam: Events and Aftermath” can be accessed from a Kindle device or the Kindle App for a desktop or smartphone. The apps are free.
The author’s Vietnam eBook on the Battle for Tra Bong Vietnam: Events and Aftermath
The article emphasizes the importance of a web browser, specifically Google Chrome, in daily online activities. It provides four methods to enhance its performance: updating Chrome, clearing the cache, upgrading security settings, and managing performance settings like using Memory Saver. These steps aim to ensure a smoother browsing experience.
RAYMOND OGLESBY @RaymondOglesby2 March 11, 2025 – 6 minutes read time
Overview
In many ways, your web browser is as important as, if not more so than, your computer’s operating system. Think about it: Nearly everything you do, from writing emails and posting on social media to editing documents and streaming videos, can happen inside a browser. So when Chrome starts feeling sluggish, it can affect your whole online experience, professionally and personally. Do not get bogged down by your browser. Here are four ways to speed it up.
System Requirements
This tip works on devices running Google Chrome. Screenshots are from Windows 11 Pro running Chrome Version 134.0.6998.36 (Official Build) (64-bit).
1) Update Google Chrome
Each new version of Chrome contains fresh features, security fixes, and performance improvements. So, it’s possible that updating to the latest version may help your speed woes. Even if it does not, it will keep you safer from online threats. When a new version is available, Chrome automatically updates in the background, when you close and re-open the browser.
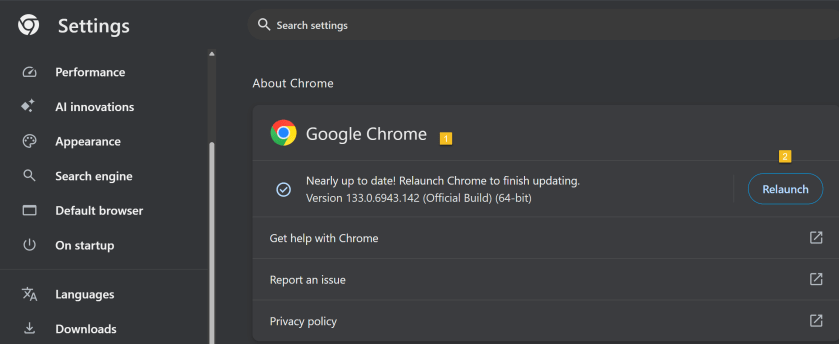
First, open Chrome and click the Menu icon (the 3 dots) in the upper right. From the Menu, click the Settings option. Next, on the left side, scroll down to the bottom and click on the About Chrome option.
If Chrome is not up-to-date, Chrome will automatically download. Now, click the Relaunch button to update Chrome and reopen the browser. Your Chrome browser is now up-to-date. Refer to the below image:
Updating Google Chrome
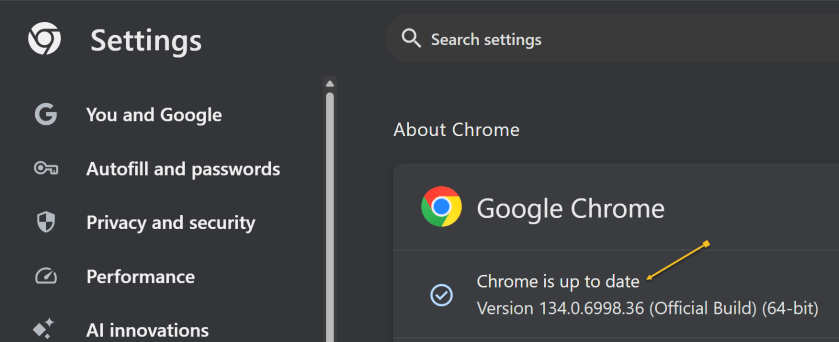
To check which version of Chrome you are running, repeat the above. Chrome will show the version and indicate it is up-to-date. See the below image:
Google Chrome up to date
2) Clear Google Cache
To clear your cache in Google Chrome, you clear your browsing data. This will clear your cache, cookies, and other browsing history.
Clearing your cache can fix problems with loading or formatting on websites.
In the Chrome browser:
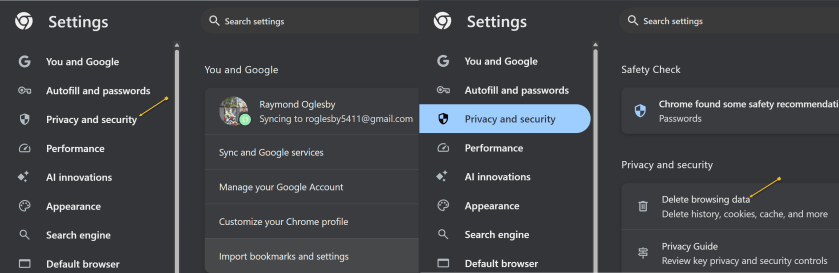
Open Chrome and click the Menu icon (the 3 dots) in the upper right.
From the Menu, click the Settings option.
On the left side, click Privacy and security option.
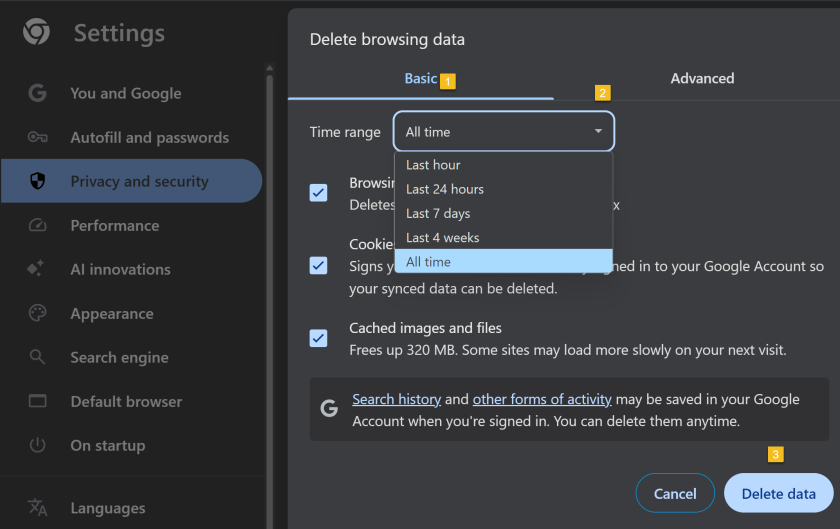
Under the Privacy and security section click the Delete browsing data button. See the following image:
Accessing Privacy and security options
A new dialogue box will open.
Click the Basic menu option.
Select the period to delete from in the Time range drop down menu (To clear all cached data and cookies, select All time, this is recommended).
Ensure check boxes for Browsing history. Cookies and other site data and Cached images and files are ticked.
Click on Delete data and wait for that dialogue box to exit.
Close all open Chrome tabs.
Restart Chrome.
Refer to the below image:
Selecting what data and when to delete
3) Upgrade Chrome Security
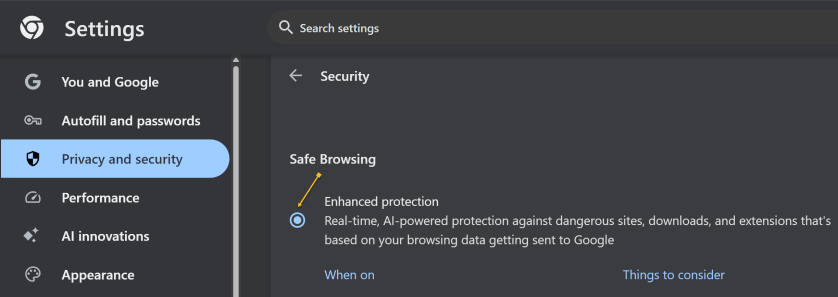
Once upon a time, Google developed the Chrome Cleanup Tool, an application that helps find and remove unwanted software (UwS), toolbars, and other automatically installed extensions that antivirus probes may miss from Windows devices. These types of programs can slow down your browser, so checking it for unwanted add-ons every so often is a must.
Unfortunately, the program was shut down in 2023. However, Google says users will remain “automatically protected” by its Safe Browsing features in Chrome. For extra protection, navigate to:
Settings >Privacy and security > Security, > Enhanced Protection
And enable which offers “real-time, AI-powered protection against dangerous sites, downloads, and extensions that’s based on your browsing data getting sent to Google.” See the below image:
Enable Enhanced protection
4) Manage Performance Settings
There are two types of people in the world: Those who open just a few tabs at a time, then close them, and those who hoard tabs like they have never heard of bookmarking. If you are the latter, it’s a safe bet what’s causing your slowdown, and you should take action. Not sure which tabs to close? Hover over a tab, and the pop-up preview shows how much memory it’s taking up.
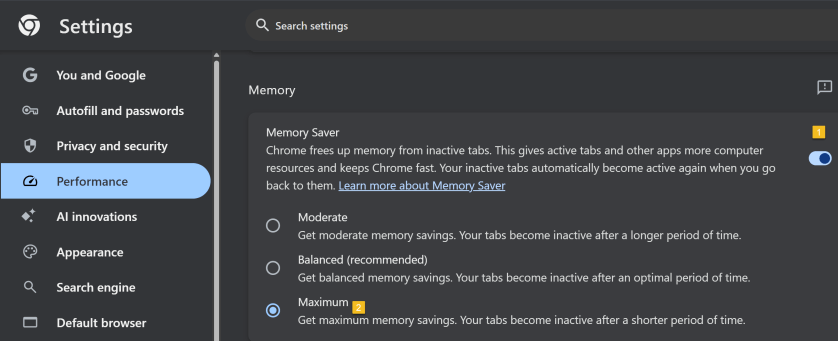
For something more automatic, Google introduced Memory Saver mode in 2022. This feature frees up resources from unused tabs in order to improve performance on tabs that are in use. While this feature should be enabled by default, you can open:
Settings > Performance > Memory Saver
and set to Maximum so tabs become inactive sooner. See the following image:
Setting Memory Saver to Maximum
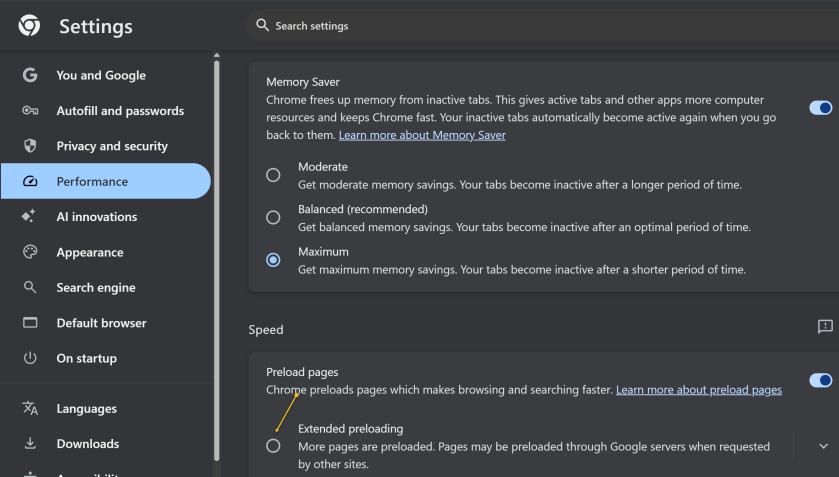
While you are here, go one further and scroll down to the Speed section. Make sure Preload pagesis enabled so websites and search results load faster. For an extra boost, enable Extended preloading for an even faster experience, though Google will be able to see what sites are being preloaded for you. Refer to the below image:
Enable Preload and Extended preloading
Disclaimer
Technology is constantly evolving, and smartphone and desktop tech rarely remains static. Therefore, the information in this post is only accurate as of the date it was written. Blog posts that are older than six months may contain instructions that are no longer compatible with your device or operating system. We hope that the content from previous posts continues to function as intended. Thank you for reading TechSavvy.Life, where technology works for you.
Quote For the Day
“Technology is nothing. What’s important is that you have faith in people, that they’re basically good and smart, and if you give them tools, they’ll do wonderful things with them.”
-Steve Jobs
X (Twitter)
You are finished. Please feel free to share this post! One way to share is via Twitter.
Just click the Tweet icon below. This will launch Twitter where you click its icon to post the Tweet.
Checkout TechSavvy.Life for blog posts on smartphones, PCs, and Macs! You may email us at contact@techsavvy.life for comments or questions.
We value your feedback! Was this post helpful? Please share your comments with us. If you have a tech question related to your computer or smart device, feel free to reach out. Just send an email to contact@techsavvy.life, and be sure to include the device, app, and version you are using. To assist us further, you can also attach screenshots related to your inquiry.
The author’s Vietnam eBook on the “Battle for Tra Bong Vietnam: Events and Aftermath” can be accessed from a Kindle device or the Kindle App for a desktop or smartphone. The apps are free.
The author’s Vietnam eBook on the Battle for Tra Bong Vietnam: Events and Aftermath
The post warns about the risks of overheating computers, which can harm performance and lifespan. It suggests monitoring CPU temperatures using the BIOS or third-party software like Core Temp. Tips for reducing heat include cleaning dust, adjusting fan settings, and ensuring proper CPU cooler contact. Regular checks are advisable for maintaining optimal performance.
RAYMOND OGLESBY @RaymondOglesby2 January 14, 2025 – 8 minutes read time
Overview
If your computer gets too hot, its performance will suffer and the CPU could get damaged.
Just as you do not want your phone to get too hot, an overheating computer is no joke. If your CPU goes over a certain temperature, it will start throttling performance in an effort to reduce excess heat. If your internal components get too hot for too long, it can decrease the lifespan of your PC, not to mention burn your thighs if you are using your laptop on bare legs, which, by the way, is not a good idea.
Unfortunately, most PCs do not have user-facing temperature-monitoring tools, so you can not easily check how hot your computer is getting at any given time. If you want to see how hot your computer is running, you will need to download some extra software. Let’s explore what you need to check your machine’s internal temperature.
Why You Will Like This Tip
Ability to monitor the CPU core(s) temperature.
Keep your PC running at peak performance with a cool CPU temperature.
System Requirements
Windows 7 or above with 32 or 64 bit OS.
Screenshots are from Dell XPS 8960 running Windows 11 Pro.
How to Monitor CPU Temperature in Windows
Use the BIOS Screen
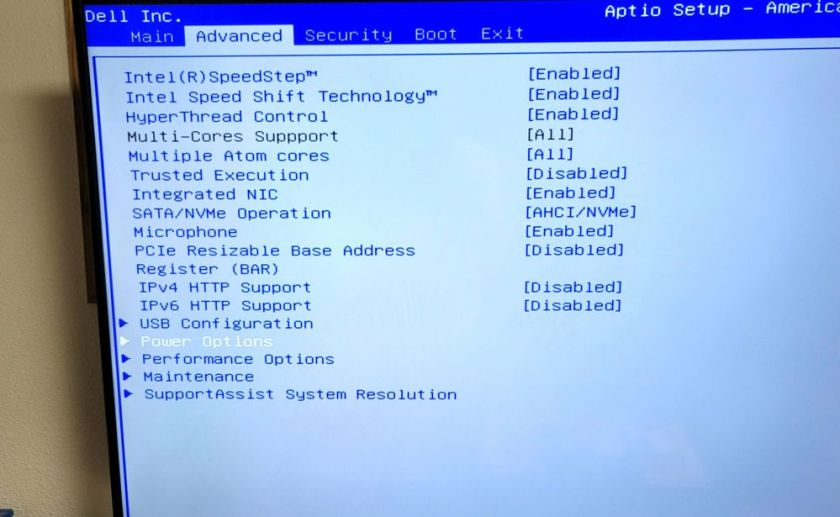
Do not want to install third-party software? The only way to observe your PC’s internal temperature is from the BIOS screen. To access this menu, restart your computer and hit a button on the keyboard that will disrupt the normal boot process (it can be Delete, Esc, or Enter; it will say on the screen). Or Google your machine for the button to press to view its BIOS screen upon a restart. For our Dell XPS 8960 desktop, it is the F2 key.
Every BIOS screen is different, so we cannot tell you where to look for your specific manufacturer, but the machine’s internal temperature should be displayed on the main screen. Some may even show CPU and motherboard temperatures separately. Refer to the below image:
the BIOS screen
The CPU temperature is not displayed on our Dell XPS 8960 desktop, so we need to use a third-party app.
Use Core Temp App
Unfortunately, this is no way to consistently monitor your PC temperature, so you will want to use third-party software instead.
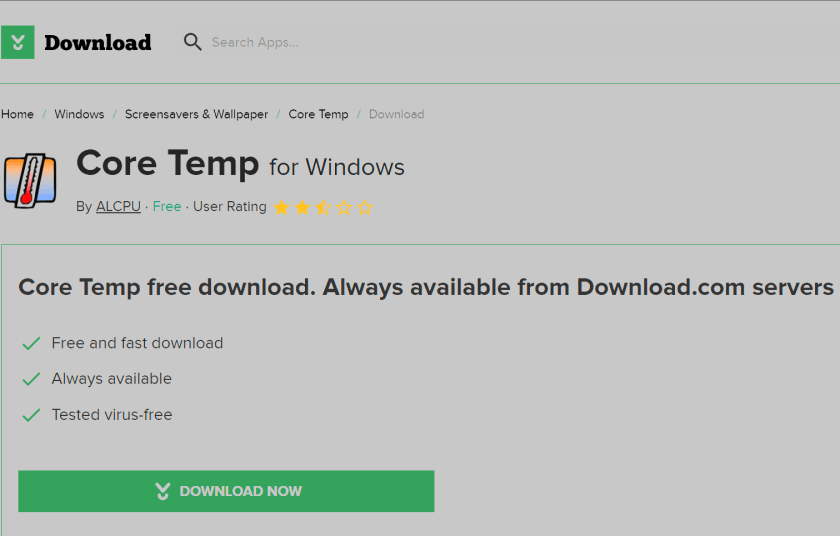
There are dozens of temperature-monitoring programs out there, but we recommend Core Temp for Windows for most users.
Note! We are downloading the app from the CNET website. We recommend only using this website. The CNET webpage will point to the ALCPU page, the app’s owner. Click the download button on the left of your screen. See the below image:
The Core Temp main webpage has too many download buttons to choose from is the reason for using CNET. Some of their download buttons will download blotware, browser extensions, etc., that you do not need.
Also, when installing the app, consider the install options as they want to install a game.
Download Core Temp app
The app provides plenty of information without being as overwhelming as more thorough utilities, and it comes as an installer and EXE file. Plus, it allows you to monitor your temperature from the Windows taskbar, which is great if you want to keep an eye on it over time.
Our Dell XPS 8960 desktop has an Intel i9 processor with 24 cores. See the following image:
Running Core Temp app
The top portion of the window lists your CPU, its current load, and a few other technical tidbits. The real meat is at the bottom, where it says Temperature Readings. You will see the current temperature in the left column, alongside the lowest and highest recorded temperatures since you last launched it. If you are using an AMD CPU, you will probably have one value here, while Intel CPUs will likely have one reading per CPU core; just watch the hottest core to keep things simple.
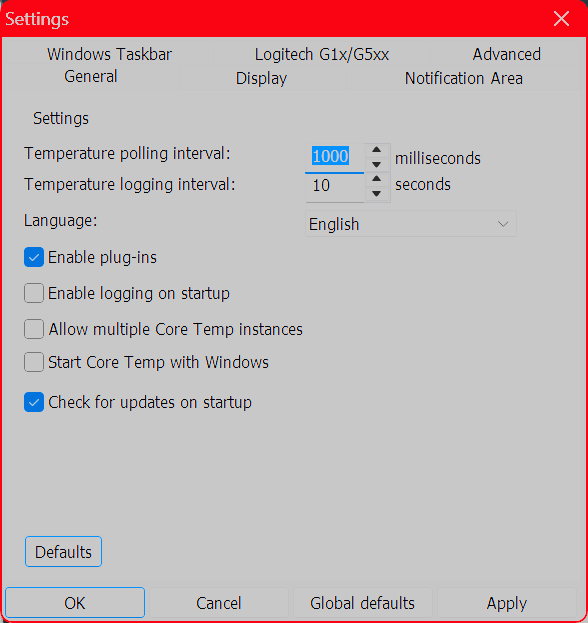
We highly recommend heading to:
Options > Settings
and playing with the options available here, especially those under the Notification Area tab, which will let you view your CPU temperature in the taskbar. We personally recommend selecting Highest Temperature here, then clicking the system tray’s arrow and dragging Core Temp’s icon to the taskbar to keep it visible at all times. You can also enable Core Temp to start with Windows. Refer to the below image:
Use Other Third Party Apps for Windows
HWINFO – Provides detailed reporting on chipsets, graphics cards, and processors for AMD and Intel families. It can also help detect overheating, performance loss, and overload.
If your CPU gets too hot, it will reduce performance to try and reduce the temperature; meaning whatever you are doing at the time will probably run slower. It will also keep your fans spinning at high speeds—meaning lots of noise; and could permanently damage your CPU, fan, or battery.
“Normal” temperatures, though, can vary wildly depending on the CPU type of computer. A thin and light ultraportable laptop that crams a powerful CPU into a small space with little airflow, for example, will likely get hotter than a desktop PC with a low-power CPU, even when performing the same tasks. And a CPU running at 70 degrees is likely to be just as effective as a CPU running at 40 degrees in that given moment.
That said, your CPU does have a maximum threshold; a specific temperature it will try to avoid going over. This is known as the maximum temperature junction or TJ Max. It varies from CPU to CPU, but for most chips, it lies somewhere between 95° C and 105° C. (Our Dell XPS 8960 TJ Max temperature is 100 degrees). So if your computer is regularly hitting that temperature, it’s probably throttling itself (and, if it cannot decrease the temperature, it may even shut itself off to prevent overheating.)
Lower CPU Temperature
If you regularly experience that kind of heat, you have a few options. First, open up your computer, either by removing the side panel on a desktop or unscrewing the bottom case on a laptop, and blow out any dust bunnies with an air blower or Blaster. This should help improve airflow and reduce temperatures. You can also adjust your CPU’s fan behavior, allowing it to run at higher speeds more often.
If you have a desktop, you may even want to reseat the CPU cooler to make sure it’s making good contact with the CPU, and if your computer is rather old, some new thermal paste could help lower temperatures as well. If you have a thin laptop known for overheating, though, these tips may only take you so far; and you will just have to deal with the excess heat. The next time you buy a laptop, be sure to read through reviews that include heat and fan noise before you commit.Spacer
Disclaimer
Technology is constantly evolving, and smartphone and desktop tech rarely remains static. Therefore, the information in this post is only accurate as of the date it was written. Blog posts that are older than six months may contain instructions that are no longer compatible with your device or operating system. We hope that the content from previous posts continues to function as intended. Thank you for reading TechSavvy.Life, where technology works for you.
Quote For the Day
“Technology made large populations possible; large populations now make technology indispensable.”
– Joseph Krutch
X (Twitter) Info
That’s it. Please feel free to share this post! One way to share is via Twitter.
Just click the Tweet icon below. This will launch Twitter where you click its icon to post the Tweet.
Checkout TechSavvy.Life for blog posts on smartphones, PCs, and Macs! You may email us at contact@techsavvy.life for comments or questions.
We value your feedback! Was this post helpful? Please share your comments with us. If you have a tech question related to your computer or smart device, feel free to reach out. Just send an email to contact@techsavvy.life, and be sure to include the device, app, and version you are using. To assist us further, you can also attach screenshots related to your inquiry.
The author’s Vietnam eBook on the “Battle for Tra Bong Vietnam: Events and Aftermath” can be accessed from a Kindle device or the Kindle App for a desktop or smartphone. The apps are free.
The author’s Vietnam eBook on the Battle for Tra Bong Vietnam: Events and Aftermath
At the top of our shortlist of outstanding apps is Everything. This app has been around for a long time but we have recently discovered the Windows app.
This is for Windows XP through Windows 11. Screenshots are from Windows 10
At the top of our shortlist of outstanding apps is Everything. This app has been around for a long time but we have recently discovered the Windows app. It’s now an integral part of our Windows apps.
What is Everything
Everything is a Windows freeware file search application created by programmer David Carpenter in 2008.
The single most notable thing about Everything is the speed.
If you have ever used Windows file search (File Explorer)or even some third-party file search tools, the most memorable thing about the experience is how long it takes.
Even after all these years, Windows file search is agonizingly slow. Truly, it’s agony. In an age of inexpensive SSDs with instant booting and instant program loading, waiting thirty seconds for Windows to grind through a search feels like torture. It does not matter if you are still using Windows 7 or upgraded to Windows 11, Windows search has never been speedy.
Everything sidesteps the shortcomings of the Windows file search by doing something that was novel when the application was first released and remains novel; it taps right into the file table at the file system level for lightning-fast search.
How fast is it? It’s so fast that if you create a new file, by the time you open up the Everything search box a moment later, the file is instantly in the index. It’s unlikely you could create the file and get to the search box fast enough to beat the nearly instantaneous addition of the entry into the Everything index.
The only downside to Everything is that it works off the file table and the file names and does not index the contents of the files. If you need a tool that will look deep into documents and help you find key phrases, this tool is not it. But if you are just trying to find where, exactly, you put your tax returns from five years ago, it’s almost magical in its speed and efficiency.
Why Is It Indispensable
We have a huge number of files, across a huge number of folders and drives. But as long as we name files and folders sensibly as they come in, it does not matter where they end up. They could be on the C drive, the G drive (portable external drive), or even buried in a network drive hosted somewhere (you can enable network drive search in the Everything settings).
No matter where the files are, you can find them if you member even a fraction of the folder or file name. Old taxes, work forms, Photoshop projects, comic books you hoarded five years ago, you name it. If you want it, you can churn it up to the surface with a few keywords.
For example, I need to find old tax returns to answer questions from the IRS about depreciation. That made me say, “Didn’t I squirrel those returns somewhere?” and sure enough, I did. I might have forgotten where they were, but Everything did not. Refer to the below image:
Everything displaying tax returns
You do not need wildcards for your search. Everything search implies wildcard searches; the app will find all files/folders that include your search criteria. In the menu bar, select Search to view more options. See the below image:
Accessing the Search options
It instantly scanned hundreds of thousands of files and folders on my computer and the attached drives to find exactly what I wanted.
If you can remember anything about the file; part of the name, the file extension, the root directory it might be deeply buried in; you can dig it up with a few keystrokes.
Even on my laptops, where the files are definitely not stacked terabytes deep, I still install Everything, I certainly do not want to be stuck waiting for Windows search to sift through the files at a slow pace.
it’s freeware. So Download it. The website name has an odd name, Voidtools, but this is the download page.
Take Notice
If you need to download this app or any other on a desktop or laptop, always download it from the manufacturer. Another safe bet is to download from a store like Apple Store or Microsoft Store.
Never download from these websites:
FileHorse Softonic CNET Download 82 Softlay Dealnews Windowsinside Us7p Files10 Soft112 UpdateStar Techno360 ColorMango MajorGeeks FileHonor FilesWin iGeeksBlog Neowin Linenseapps Business Wire SoftwareKeep TechShout Windows Latest’ Wondershare Slant iMobie BitsDuJour Softfree.eu Uptodown FreeProSoftz TechWhoop Tickcoupon CrackDJ AbbasPC Giev Away of the Day GroovyPost TechGeek365 TechMoran Digital Connect Mag Malavida …. and 16 more
The above websites should be banned. If you download from any other site besides the manufacturer or a store, expect viruses and malware to appear. If this happens, immediately Shutdown and/or Restart your PC and run a virus scan.
As a test, I downloaded it from File Horse. I got popups from Google Chrome saying my PC has been hacked followed by a full webpage saying my PC is corrupted. I got rid of the messages. but I had more problems. The FtleHorse website gave the site access to everything on my PC. I had to manually go through Google Privacy and Security Settings to block each access.
I recommend only using Voidtools website for downloading. Then feel the speed of searching, Everything, on your computer instantly.
Disclaimer
Technology is always changing and rarely is there static tech for smartphones and desktops. Thus, the contents of this post are only valid at the time of writing. Blog posts older than six months may have directions incompatible with your device or OS. Hopefully, older post content will continue to work as advertised. Thank you for reading TechSavvy.Life for Technology at Work For You.
Quote For the Day
The most intractable problem today is not pollution or technology or war; but the lack of belief that the future is very much in the hands of the individual.
Margaret Mead
Tweet Info
You are finished. Please feel free to share this post! One way to share is via Twitter.
Just click the Tweet icon below. This will launch Twitter where you click its icon to post the Tweet.
Checkout TechSavvy.Life for blog posts on smartphones, PCs, and Macs! You may email us at contact@techsavvy.life for comments or questions.
Please feel free to leave a comment. I would love to hear from you. Do you have a computer or smart device tech question? I will do my best to answer your inquiry. Just send an email to contact@techsavvy.life. Please mention the device, app, and version you are using. To help us out, you can send screenshots of your data related to your question.
Author’s E-Book
You can access the e-book from a Kindle device, the Kindle App for the desktop or smartphone, which is a free app.
The author’s Vietnam eBook on the Battle for Tra Bong Vietnam: Events and Aftermath
Using Google Photos‘ slideshow feature, you can have all or specific album photos play one after another automatically. You can make this slideshow on both your desktop and your mobile device.
This is for the desktop and smartphones. Screenshots are from Windows 10 and iPhone 14 Pro running iOS 16+
Using Google Photos‘ slideshow feature, you can have all or specific album photos play one after another automatically. You can make this slideshow on both your desktop and your mobile device. Let’s explore how this is done.
On Your Desktop
To create a slideshow on your desktop computer, first, open a web browser and launch the Google Photos site. Sign in to your account on the site if you have not already.
Next, once you see your photos, if you want to include all your photos in the slideshow, then click the first photo on the main screen to open it in full screen.
Now, once the photo opens in full screen, at the top-right corner, click the three dots (the Menuicon). Refer to the below image:
Selecting the Menu icon
Next, in the menu that opens, click Slideshow. See the below image:
Selecting the Slideshow option
Now, your browser will go full screen and your slideshow will start playing. Sit back, relax, and enjoy recollecting your memories with your photos.
Next, you can stop the slideshow at any time by pressing the Esc key on your keyboard. See the following image:
Exiting the Slideshow
Now, if you would like to make a slideshow using photos from a specific album, then access that album on Google Photos. On the album page, in the top-right corner, click the three dots (the Menu icon). Refer to the below image:
Selecting the Menu icon
Next, from the three dots (the Menu icon), select Slideshow to start playing your photos. You can close the slideshow by pressing the Esc key. See the below image:
Selecting the Slideshow option
On Your Mobile
To play your photos slideshow on your phone, first, launch the Google Photos app on your phone.
Next, to include all your photos in the slideshow, then tap the first photo on the main screen.
Now, when your photo opens in full screen, in the top-right corner, tap the three dots (the Menu icon). See the following image:
Selecting the Menu icon
Next, from the three dots (the Menu icon), select Slideshow to start playing your photos. Refer to the below image:
Selecting the Slideshow option
Now, Google Photos will start playing a slideshow for all your photos. If you would like to stop this slideshow, tap anywhere on the screen then tap Done in the top-left corner. See the below image:
Exiting the Slideshow
To create a slideshow using photos from a particular album, first, tap Library and choose your photo album. Select the first photo in the album, then in the top-right corner, tap the three dots (the Menu icon). See the following image:
Selecting the Menu icon
Next, in the menu that opens, tap Slideshow. Refer to the below image:
Selecting the Slideshow option
Now, your slideshow containing photos only from the selected album will play. If you would like to stop this slideshow, tap anywhere on the screen then tap Done in the top-left corner. See the below image:
Exiting the Slideshow
Disclaimer
Technology is always changing; there is rarely static tech for smartphones and desktops. Thus, the contents of this post are only valid at the time of writing. Blog posts older than six months may have directions incompatible with your device or OS. Hopefully, older post content will continue to work as advertised. Thank you for reading TechSavvy.Life for Technology at Work For You.
Quote for the Day
My view is that if your philosophy is not unsettled daily then you are blind to all the universe has to offer.
Neil deGrasse Tyson
Tweet Info
That’s it. Please feel free to share this post! One way to share is via Twitter.
Just click the Tweet icon below. This will launch Twitter where you click its icon to post the Tweet.
Checkout TechSavvy.Life for blog posts on smartphones, PCs, and Macs! You may email us at contact@techsavvy.life for comments or questions.
We are all constantly absorbing information online. Bionic Reading is an approach to reading that can help you read faster, retain more information, and boost your productivity in your favorite web browser, like Chrome.
This is for desktops using Chromeor other browsers. Screenshots are from Windows 10
We are all constantly absorbing information online. Bionic Reading is an approach to reading that can help you read faster, retain more information, and boost your productivity in your favorite web browser, like Chrome.
Bionic Reading Explained
Bionic reading is amethod of reading that combines traditional reading with technology-assistedtools. This helps readers increase their reading speed, improve their comprehension and retention, and ultimately become more productive in their reading activities.
Was the above paragraph easier and quicker to read? If you said yes, then you have just experienced some of the benefits of Bionic Reading. Now, imagine that but for a whole article, essay, or book.
Your brain does not always read every letter of every word. It only intakes enough information for you to understand a word, and then it moves on to the next one. The bolding of the first half of each word lets your mind fast-track through paragraphs.
The bolding aspect is the most notable factor in Bionic Reading, but there’s more as well. A lot of apps and extensions also remove colors from images and change white or black backgrounds to gray. These changes help your eyes focus on the text.
Why Use Bionic Reading
Using Bionic Reading in Chrome, or any other web browser, can offer several benefits.
It can help you read faster and more efficiently, which allows you to cover more material in less time.
Bionic Reading can also help you retain more information by training your brain to focus on the most important parts of any text.
As a result of the two above-mentioned benefits, it can improve your productivity by allowing you to process information more effectively. This can be particularly useful in academic or work-related settings.
Bionic Reading in any browser can be a valuable tool for anyone looking to optimize their online reading experience.
Think of Bionic Reading as akin to Speed Reading but they are different in their approach. Speed Reading is the process of rapidly recognizing and absorbing phrases or sentences on a page all at once, rather than identifying individual words.
How Bionic Reading Helps You
Bionic Reading helps you read faster and more efficiently with techniques including skimming, scanning, chunking, and altering images to be easier on the eye. Refer to the below image:
Bionic Reading example from Chrome Web Store
For example, when you skim a text, you quickly glance through it to get a general idea of the content without reading every word. Similarly, when you scan a text, you search for specific keywords or phrases that are relevant to your reading goals.
By using these techniques, you can save time and energy. Bionic Reading tools like web browser extensions or apps can help automate some of these techniques.
Bionic Reading Trains Your Brain to Retain Information
By using Bionic Reading, you can begin to retain more information by training your brain to focus on the most crucial parts of any text, such as key concepts, arguments, or evidence.
Through using techniques like skimming or scanning (as mentioned above), you can quickly identify the main points of the text and decide what information is relevant to your reading goals. In turn, this uses less mental energy.
By consistently applying these techniques, you can train your brain to become more efficient at processing and retaining information. Studying, researching, and editing your own work can become easier as a result.
Bionic Reading Improves Your Productivity
Before we go into how Bionic Reading increases your productivity, you need a frame of reference for how your productivity can suffer through everyday means.
Using your eyes takes up about 50% of your brain power. That’s more than any of your other senses. We, as humans, heavily rely on our vision for pretty much everything we do.
As your brain becomes able to retain more information, you will need to re-read the same text less often.
Reading faster and more efficiently drastically cuts down on the stress your eyes and brain suffer while researching, writing, and doing similar work, especially when you are mentally digesting new information.
To summarize, by improving your reading efficiency and training your brain to better retain information, your productivity should increase.
At the top of a Chrome window, click the Menu icon (the 3 dots) to open the Menu. Now, click More Tools > Extensions to view the extension. See the following image:
Bionic Reading Chrome extension
After installing it, you can manage the Bionic Reading extension through the Extensions menu at the top-right of your window (click the little jigsaw piece icon). Refer to the below image:
Activate Bionic Reading
You are now ready to begin using the Bionic Reading extension! When you want to activate it on any given webpage, all you need to do is click the jigsaw piece icon at the top-right of your window and then click the Bionic Reading icon. To turn Bionic Reading off, do the same thing again. See the below image:
Bionic Reading example
Everything is removed from the web page but the text. That’s all there is to it! Start saving your energy for tougher tasks by letting Bionic Reading do the heavy visual lifting.
Disclaimer
Technology is always changing and rarely is there static tech for smartphones and desktops. Thus, the contents of this post are only valid at the time of writing. Blog posts older than six months may have directions incompatible with your device or OS. Hopefully, older post content will continue to work as advertised. Thank you for reading TechSavvy.Life for Technology at Work For You.
Quote For the Day
I would like to die on Mars. Just not on impact.
Elon Musk
Tweet Info
That’s it. Please feel free to share this post! One way to share is via Twitter.
Just click the Tweet icon below. This will launch Twitter where you click its icon to post the Tweet.
Checkout TechSavvy.Life for blog posts on smartphones, PCs, and Macs! You may email us at contact@techsavvy.life for comments or questions.
Please feel free to leave a comment. I would love to hear from you. Do you have a computer or smart device tech question? I will do my best to answer your inquiry. Just send an email to contact@techsavvy.life. Please mention the device, app, and version you are using. To help us out, you can send screenshots of your data related to your question.
Author’s E-Book
You can access the e-book from a Kindle device, the Kindle App for the desktop or smartphone, which is a free app.
The author’s Vietnam eBook on the Battle for Tra Bong Vietnam: Events and Aftermath
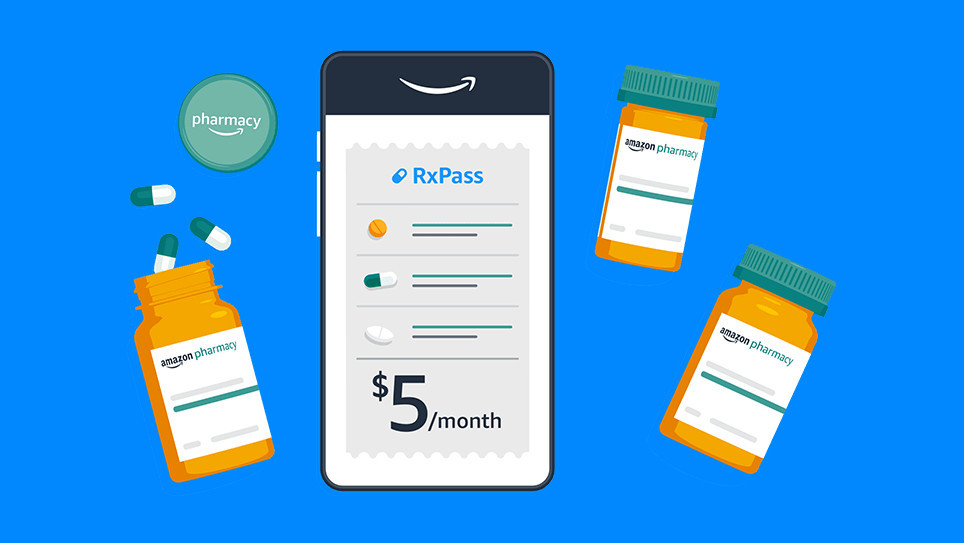
Hot on the heels of shutting down the AmazonSmile charity platform, a new add-on to Amazon Prime has been revealed. It aims to fill prescriptions for generic medications for one low monthly price.
Hot on the heels of shutting down the AmazonSmile charity platform, a new add-on to Amazon Prime has been revealed. It aims to fill prescriptions for generic medications for one low monthly price.
This is for devices using Amazon
Amazon already runs a pharmacy through its online store, bolstered by the purchase of PillPack in 2018, but now the company is going a step further. Instead of buying each drug individually, Amazon is launching an optional subscription called RxPass, priced at $5 per month in the United States. No health insurance is required, but most (if not all) of the medications are controlled substances that require a prescription from a doctor.
RxPass does not cover every drug Amazon sells, but it does provide access to “commonly prescribed generic medications that treat more than 80 common health conditions.” There’s a full list on the RxPass website (scroll down to see the list), which includes anti-inflammatory drugs like Piroxicam and Naproxen, nine medications for high blood pressure and cardiac dysrhythmias, and even some drugs for treating Parkinson’s disease.
The new subscription could potentially save some people a lot of money, but there is a darker side to RxPass. CNN reports the subscription is almost certainly a loss leader for Amazon, meaning it’s intended to maintain subscriptions to Amazon Prime rather than be self-sustaining. You are probably going to be less likely to cancel Amazon Prime on the next price hike if it’s responsible for your access to critical medication, and Amazon’s FAQ page says canceling Prime will also cancel RxPass.
Disclaimer
Technology is always changing, and rarely is there static tech for smartphones and desktops. Thus, the contents of this post are only valid at the time of writing. Blog posts older than six months may have directions incompatible with your device or OS. Hopefully, older post content will continue to work as advertised. Thank you for reading TechSavvy.Life for Technology at Work For You.
Quote For the Day
We live in a society exquisitely dependent on science and technology, in which hardly anyone knows anything about science and technology.
Carl Sagan
Tweet Info
That’s it. Please feel free to share this post! One way to share is via Twitter.
Just click the Tweet icon below. This will launch Twitter where you click its icon to post the Tweet.
Checkout TechSavvy.Life for blog posts on smartphones, PCs, and Macs! You may email us at contact@techsavvy.life for comments or questions.
Please feel free to leave a comment. I would love to hear from you. Do you have a computer or smart device tech question? I will do my best to answer your inquiry. Just send an email to contact@techsavvy.life. Please mention the device, app, and version you are using. To help us out, you can send screenshots of your data related to your question.
Author’s E-Book
You can access the e-book from a Kindle device, the Kindle App for the desktop or smartphone, which is a free app.
The author’s Vietnam eBook on the Battle for Tra Bong Vietnam: Events and Aftermath
Google’s Image Search results are sometimes so impressive that you want to save some of those images to your device. If you have found yourself in this situation, let’s explore how to download those images from your search results.
This is for mobile and desktop devices. Screenshots are from Windows 10 and iPhone 14 Pro running iOS 16+
Copyright Scott Adams, Inc./Distributed by Universal Uclick for UFS
Save Images On Desktop
To download an image on a desktop, you just pick your image, click an option, and your image is saved to your computer.
First, launch your favorite web browser on your computer and open Google Image Search. There, find the image you want to save to your machine. Refer to the below image:
Search Google Images
Next, on the search results page, access the image that you want to download. See the below image:
Find an image
Now, right-click your image, and from the menu that opens, choose to Save image as. See the following image:
Check the option to save your image
Next, your browser will open your computer’s standard Save As window. Here, select a folder to save your image in, type your image name in the File Name field, then click Save. Refer to the below image:
Save your image
Now, you have successfully downloaded your favorite image from your Image Search results. If you are not sure exactly where the image file went, check your Downloads folder from File Explorer.
If your downloaded file is of low resolution, then try downloading that image directly from the source site. To do that, on the Image Search results page, click the link, beneath the image, and not the image, to be taken to the image site. There, right-click the image and choose Save image as.
Download Images On Mobile
On your mobile phone, you can download images from Google’s Image Search results using Google Chrome, Apple Safari, or Microsoft Edge. Mozilla Firefox does not offer the option to save images.
To start, first, open your web browser (we are using Safari) and launch Google Image Search or type into the search box “images.google.com”. Find the image you would like to save to your phone.
Next, on the search results page, tap the image to download. See the below image:
Tap an image you want to download
Now, on your image full-screen page, tap and hold the image. See the following image:
Press and hold your image
Next, on iPhone or iPad, from the menu that opens in Safari, tap Save to Photos. Refer to the below image:
Select the option to save your image
Your iPhone will download and save the image on your local storage or in our example using Safari, your Photos app. See the below image:
Your saved image
Disclaimer
Technology is always changing and rarely is static for smartphones and desktops. Thus, the contents of this post are only valid at the time of writing. Blog posts older than six months may have directions incompatible with your device or OS. Hopefully, older post content will continue to work as advertised. Thank you for reading TechSavvy.Life for Technology at Work For You.
Quote For the Day
The technology you use impresses no one. The experience you create with it is everything.
Sean Cerety
Tweet Info
You are finished. Please feel free to share this post! One way to share is via Twitter.
Just click the Tweet icon below. This will launch Twitter where you click its icon to post the Tweet.
Checkout TechSavvy.Life for blog posts on smartphones, PCs, and Macs! You may email us at contact@techsavvy.life for comments or questions.
Please feel free to leave a comment. I would love to hear from you. Do you have a computer or smart device tech question? I will do my best to answer your inquiry. Just send an email to contact@techsavvy.life. Please mention the device, app, and version you are using. To help us out, you can send screenshots of your data related to your question.
Author’s E-Book
You can access the e-book from a Kindle device, the Kindle App for the desktop or smartphone, which is a free app.
The author’s Vietnam eBook on the Battle for Tra Bong Vietnam: Events and Aftermath