

Windows 10 can automatically free up disk space by getting rid of files and content that you don’t need by the Storage Sense feature. Whenever you are low on disk space, if enabled, Storage Sense will intelligently run and delete temporary files and applications no longer needed. Let’s explore how to do this.
This is for the Windows 10 operating system

Check out TechSavvy.Life for their blog posts on smartphone apps, PCs. and Macs!
Tweet
Set Storage Sense
First, launch Settings by clicking the Start button, then click the Gear icon on the left side of your screen. Also you can press the Windows+I keys to open Settings. Next, click the System icon, then click Storage. Refer to below image:
At the top of Storage options, click the toggle to the On position. Next, under the toggle, click Configure Storage Sense or run it now blue ink. See below image:
In the Storage Sense options, let’s examine a few different settings. First, is the frequency of when Storage Sense runs You set this option from a drop-down menu labeled Run Storage Sense. You can set it to run Every day, week or month; or whenever disk space is low (the default). Just click the menu and select the option that works best for you. See following image:
Set Options
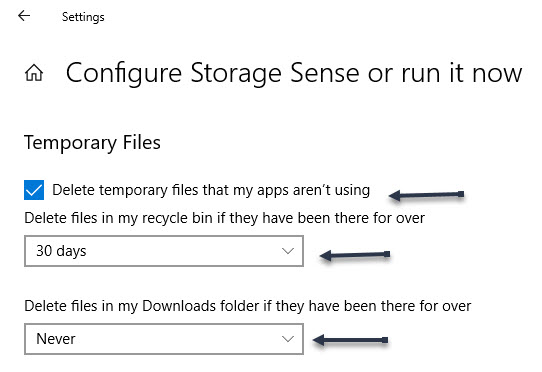
Under the Temporary Files section, the first option we want to enable is Delete temporary files that my apps aren’t using.
The second option is a drop-down menu labeled Delete files in my Recycle Bin if they have been there for over with selections of Never, 1 day, 14 days, 30 days, or 60 days. Select an option to your liking.
Finally, the third option is labeled Delete files in my downloads folder if they have been there for over and make your selection from the drop-down menu (default is Never). Automatically deleting files in your Downloads folder may not always be a great idea. However, if you don’t keep important files in the folder you can set a period of Never, 1 day, 14 days, 30 days or 60 days. In the example below we are enabling the first option, setting the second option to 30 days and the third option to Never. Refer to below image:
Setting OneDrive
Another feature of Windows 10 is OneDrive which lets you access all the files saved in your OneDrive cloud, with File Explorer, regardless of whether they are downloaded or not on your PC. However, if you work with many of those files locally they can quickly add up and eat up space. If you want, you can configure Storage Sense to automatically mark the OneDrive files that you haven’t opened for a specified amount of time as online-only. That means that those files are still kept in your OneDrive cloud and are still accessible from File Explorer, but they no longer occupy space on your PC.
Under the Locally available cloud content heading there are two options. From the iCloud Drive option, chose an entry from thedrop-down menu. You can choose whethere Content will become online-only if not opened for more than Never, 1 day, 14 days, 30 days, or 60 days. Simply, repeat the above for the second option, iCloud Photos. However, note that this setting is available in Storage Sense only if the location of your OneDrive folder is on your C: drive, where Windows 10 is installed. See below image:

Clear Space Now
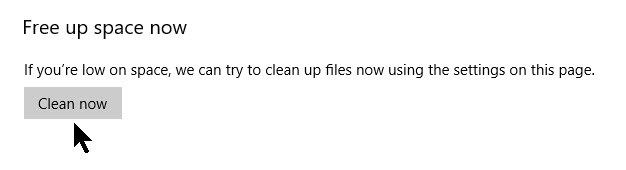
Finally, under the heading, Free up space now section is a Clear Now button. If you need to clean your Windows 10 C: drive urgently, click or tap this button. That runs Storage Sense immediately, without waiting for its schedule. See following image:
Once you are finished, simply close Settings.
Related
Note! Coming soon if not available.
How to Set a Schedule to Empty the Recycle Bin
Storage Sense Contents Removal
Once activated, Storage Sense will intelligently run whenever your device is low on storage space or according to your schedule.
Storage Sense looks for and removes files such as, but not limited to:
- Temporary setup files
- Old indexed content
- System cache files
- Internet cache files
- Device driver packages
- System downloaded program files
- Dated system log files
- System error memory dump files
- System error minidump files
- Temporary system files
- Dated Windows update temporary files
If you have turned on the removal of old files in your Downloads folder, these will be removed as well according to your time interval setting.
The fact that Windows 10 includes an option to clean your disk and recover free space automatically is a good thing. It can prove quite useful, especially for users who struggle with limited space on their Windows 10 computers and devices. As a end note, remember that Storage Sence can be very aggressive in removing files.
That’s it. If you didn’t already use it, try Storage Sense and let us know what you think about this feature and/or TechSavvy.Life in the Comments or click to Tweet below.
I have found TechSavvy.Life blog posts extremely helpful. Check them out for posts on smart phone apps, Macs and PCs!
Tweet
I Would Like to Hear From You
Please feel free to leave a comment. I would love hearing from you. Do you have a computer or smart device tech question? I will do my best to answer your inquiry. Please mention the device, app and version that you are using. To help us out, you can send screenshots of your data related to your question.
