How to View the Private Info Your iPhone Apps Are Accessing

While using apps on your iPhone, these apps are often busy behind the scenes, using sensors and contacting internet domains without your knowledge. With iOS 15.2 or later, you can see a detailed report of these activities with the App Privacy Report.

RAYMOND OGLESBY @RaymondOglesby2
January 12, 2022

While using apps on your iPhone, these apps are often busy behind the scenes, using sensors and contacting internet domains without your knowledge. With iOS 15.2 or later, you can see a detailed report of these activities with the App Privacy Report. Let’s find out.

This is for the iPhone running iOS 15.2 or higher

Dilbert and Feature
Copyright Scott Adams, Inc./Distributed by Universal Uclick for UFS

First, open Settings by tapping the grey gear icon. Refer to the below image:

Info 1
Accessing Settings

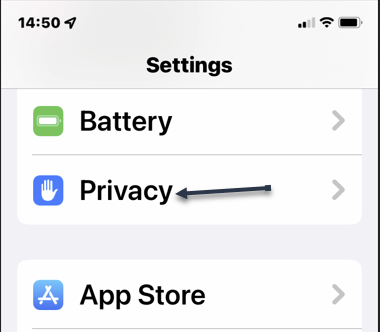
Next, on the Settings screen, tap Privacy. See the below image:
Info 2

Accessing Privacy option

Now, in the Privacy settings, scroll down to the very bottom and tap App Privacy Report. See the following image:

Info 3
Accessing App Privacy Report option

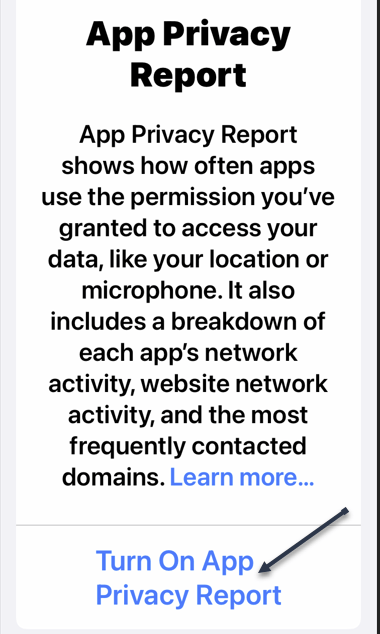
If you have not enabled Record App Activity, tap Turn On App Privacy Report link. Refer to the below image:
Info 4
Enabling App Privacy Report

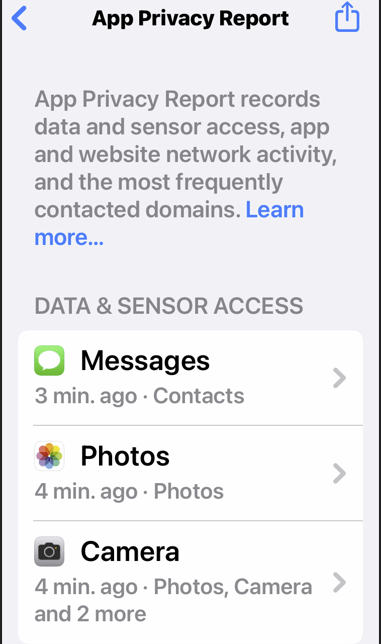
If you just enabled App Privacy Report, you will need to use your iPhone for a few days and let the App Privacy Report feature gather data. After that time (or if you have been using the Record App Activity feature in earlier versions of iOS 15), you will see a detailed report about Data & Sensor Access, App Network Activity, Website Network Activity, and Most Contacted Domains. Here’s what each section means:

  • Data & Sensor Access: This shows how many times an app accessed your iPhone’s sensors (and when), such as camera, location, contacts, screen recording, media library, photo library, or microphone.
  • App Network Activity: This shows how many internet domains an app has contacted and when each contact took place. It includes domains contacted directly by the app and those referenced by content within the app, such as websites that might pull in content from other domains.
  • Website Network Activity: This section shows the internet domains that have been contacted by websites you visited through a web browser within an app.
  • Most Contacted Domains: This shows a ranking of the internet domains that have been contacted the most by your apps. On the internal App Privacy Report details page in iOS 15.2 or higher, Apple notes that high-ranking domains on this list might be used by multiple apps to build a profile of you across different apps or services.

See the below image:
Info 5
Your report

Next, at any time, you can tap any entry on the list to see more details. Tap Show All at the bottom of each privacy report section to get a complete list. See the following image:

Info 6
Accessing Show All option

App Privacy Report Can Be a Risk

Enabling App Privacy Report on your iPhone will keep a detailed record of your internet activities on your iPhone (that is stored on your device). If you allow another person to access your iPhone, they can get a very detailed look at what you have been doing with your iPhone on the

Settings > Privacy > App Privacy

report page. If that’s the case, you might want to make sure that App Privacy Report is disabled.

Turn Off App Privacy Report

To disable App Privacy Report, navigate to

Settings > Privacy > App Privacy

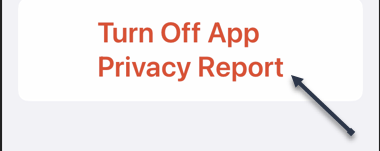
then scroll down to the bottom of the page and tap Turn Off App Privacy Report. Refer to the below image:
Info 7
Disabling App Privacy Report

After that, click OK in the pop-up message, and all existing privacy report activity will be deleted.

If your iPhone is locked down and never shared, App Privacy Report is a great tool to keep an eye on what apps have been doing behind the scenes.

Quote For the Day

Fear may come true that which one is afraid of.

Viktor E Frankl

You are finished. Please feel free to share this post! One way to share is via Twitter.

Just click the Tweet icon below. This will launch Twitter where you click its icon to post the Tweet.

Checkout TechSavvy.Life blog posts on smartphones, PCs, and Macs! You may email us at contact@techsavvy.life for comments or questions.

I Would Like to Hear From You

Please feel free to leave a comment. I would love to hear from you. Do you have a computer or smart device tech question? I will do my best to answer your inquiry. Just send an email to contact@techsavvy.life. Please mention the device, app, and version you are using. To help us out, you can send screenshots of your data related to your question.

Author’s E-book

You can access the e-book from a Kindle device, the Kindle App for the desktop or smartphone, which is a free app.

The author’s Vietnam eBook on the Battle for Tra Bong Vietnam: Events and Aftermath

How to Bulk Delete Emails in Gmail

Want to wipe your Gmail inbox clean? Using Gmail’s bulk delete option, you can delete all emails from your Gmail account at once in just a few clicks.

RAYMOND OGLESBY @RaymondOglesby2
January 11, 2022

Want to wipe your Gmail inbox clean? Using Gmail’s bulk delete option, you can delete all emails from your Gmail account at once in just a few clicks.

If you use the Gmail app on an iPhone, iPad, or Android phone, you can not delete all emails at once on your device. This means you will have to rely on the Gmail site to purge your inbox. Let’s explore how this is done.

This is for Windows, Mac, Linux, and Chromebook using Gmail

Dilbert and Dumb
Copyright Scott Adams, Inc./Distributed by Universal Uclick for UFS

Deleting all your emails does not delete your Gmail account. You can still send and receive emails after you have deleted all your existing emails.

First, open a web browser on your Windows, Mac, Linux, or Chromebook computer and access the Gmail site. Log in to your Gmail account on the site if not already logged in.

Next, in the sidebar on the left, click All Mail. If you do not see this option, click More to reveal the option. Refer to the below image:

Gmail 1
Accessing All Mail option

Now, in the pane on the right, you will see all your Gmail emails, including your archived emails. To delete these emails, you will have to first select all these emails. This is done by clicking the Select option (a square icon) at the top of the Gmail interface. See the below image:

Gmail 2
Selecting up to 50 emails

Once check-marked, up to the default (50) emails will be highlighted for deletion.

Next, to select the emails that are not on this page, at the top of the emails list, click the Select all X conversations in All Mail, where “X” is the number of emails in the All Mail folder. See the following image:

Gmail 3
Selecting to delete all emails

Now, all your emails are now selected. To start deleting them, at the top of the Gmail interface, click the Delete option (the trash icon). Refer to the below image:

Gmail 4
Delete all emails

Next, you will see a Confirm bulk action pop-up message. Here, click OK. See the below image:

Gmail 5
Confirming the deletion

Now, Gmail will start deleting and moving your emails to the Trash folder. To remove your emails for good, you will have to empty the Trash. To do so, in Gmail’s left sidebar, click the Trash folder. See the following image:

Gmail 6
Selecting your Trash emails

In the pane on the right, at the top, click Empty Trash now. Refer to the below image:

Gmail 7
Selecting to empty your Trash emails

Next, in the Confirm deleting messages pop-up message that opens, click OK. See the below image:

Gmail 8
Confirm the deletion

You will receive a cute message from Google about how their servers “feel”. (By the way, servers have no “feelings”). See the following image:

Gmail 10
The servers are “feeling unloved”

Now, all your emails except for the ones in the Spam folder are now deleted.

Next, to clear the spam emails, in Gmail’s left sidebar, click Spam. Then, in the pane on the right, click Delete all spam messages now. Refer to the below image:

Gmail 9
Deleting Spam emails

Quote For the Day

If a window of opportunity appears, don’t pull down the shade.

Tom Peters

That’s it. Please feel free to share this post! One way to share is via Twitter.

Just click the Tweet icon below. This will launch Twitter where you click its icon to post the Tweet.

Check out TechSavvy.Life for blog posts on smartphones, PCs, and Macs! You may email us at contact@techsavvy.life for comments or questions.

I Would Like to Hear From You

Please feel free to leave a comment. I would love to hear from you. Do you have a computer or smart device tech question? I will do my best to answer your inquiry. Just send an email to contact@techsavvy.life. Please mention the device, app, and version you are using. To help us out, you can send screenshots of your data related to your question.

Author’s E-book

You can access the e-book from a Kindle device, the Kindle App for the desktop or smartphone, which is a free app.

The author’s Vietnam eBook on the Battle for Tra Bong Vietnam: Events and Aftermath

How to Use Chrome’s Reader Mode

Most web browsers have a built-in Reader Mode that converts web pages into a more reader-friendly view. Strangely, Google Chrome does not have this feature; unless you know how to find it.

RAYMOND OGLESBY @RaymondOglesby2
January 6, 2022

Most web browsers have a built-in Reader Mode that converts web pages into a more reader-friendly view. Strangely, Google Chrome does not have this feature; unless you know how to find it. Let’s explore this hidden feature.

This is for desktop devices using Google Chrome

Dilbert and Employee
Copyright Scott Adams, Inc./Distributed by Universal Uclick for UFS

Google Chrome has included a hidden Reader Mode since all the way back to version 75. However, it’s never been upgraded to a stable, standard feature. Even Microsoft Edge, which is also based on Chromium, has a Reader Mode.

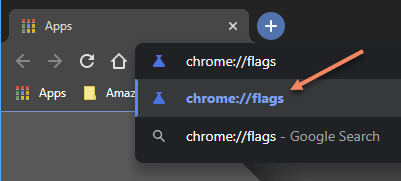
First, we will need to enable a Chrome feature flag. Open the Chrome browser on your computer and type:

chrome://flags

in the address bar, then click Enter. Refer to the below image:

Reader 1
Accessing Chrome flags

Next, search for Reader Mode in the text box at the top and enable the flag titled Enable Reader Mode. See the below image:

Reader 2
Enabling Reader Mode

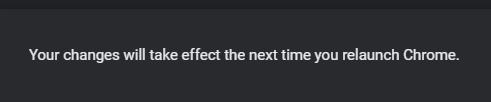
Now, after enabling the flag, see the Relaunch text at the bottom of the screen and restart Chrome to apply the change. See the following image:

Reader 3
Relaunch Chrome message

Next, when you visit a webpage that has a lot of text, you will see a little book icon on the right side of the address bar. Click it to switch to Reader Mode.

You can also click:

Menu > Enter Reader Mode

to activate it. Refer to the below image:

Reader 4
Activate Reader Mode

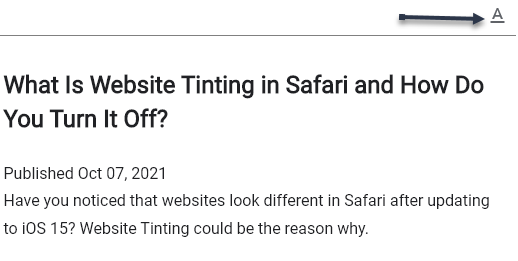
Now, you are looking at a much simpler, less cluttered view of the webpage. Images still appear, but ads and a few other items are removed. To adjust the view, click the A icon in the top right. See the below image:

Reader 5
Selecting the A icon to see more options

Next, you can change the font, text size, and background color. See the following image:

Reader 6
Your options

That’s all there is to it! You can now minimize distractions while reading long articles in Chrome. It’s strange that Google has kept this a hidden feature for years, but now you know how to enable it yourself.

Quote For the Day

If you carefully consider what you want to be said of you in the funeral experience, you will find your definition of success.

Stephen Covey

That’s it. Please feel free to share this post! One way to share is via Twitter.

Just click the Tweet icon below. This will launch Twitter where you click its icon to post the Tweet.

Checkout TechSavvy.Life for blog posts on smartphones, PCs, and Macs! You may email us at contact@techsavvy.life for comments or questions.

I Would Like to Hear From You

Please feel free to leave a comment. I would love to hear from you. Do you have a computer or smart device tech question? I will do my best to answer your inquiry. Just send an email to contact@techsavvy.life. Please mention the device, app, and version you are using. To help us out, you can send screenshots of your data related to your question.

Author’s E-book

You can access the e-book from a Kindle device, the Kindle App for the desktop or smartphone, which is a free app.

The author’s Vietnam eBook on the Battle for Tra Bong Vietnam: Events and Aftermath

How to Create an Instagram Photo Post From a PC or Mac

Instagram is primarily used on smartphones, but you can also use it in a desktop browser on Windows or Mac. For years that meant only viewing your feed and messages, but it can also be used to upload photos too.

RAYMOND OGLESBY @RaymondOglesby2
January 5, 2022

Instagram is primarily used on smartphones, but you can also use it in a desktop browser on Windows or Mac. For years that meant only viewing your feed and messages, but it can also be used to upload photos too.

As of October of 2021, Instagram added the long-awaited ability to post to Instagram from the website. You get nearly all of the same filters and editing tools that you can find in the iPhone and Android app, too. Let’s explore how this is done.

This is for Windows, PC, Mac, Linux, and Chromebook using Instagram

Dilbert and Mars
Copyright Scott Adams, Inc./Distributed by Universal Uclick for UFS

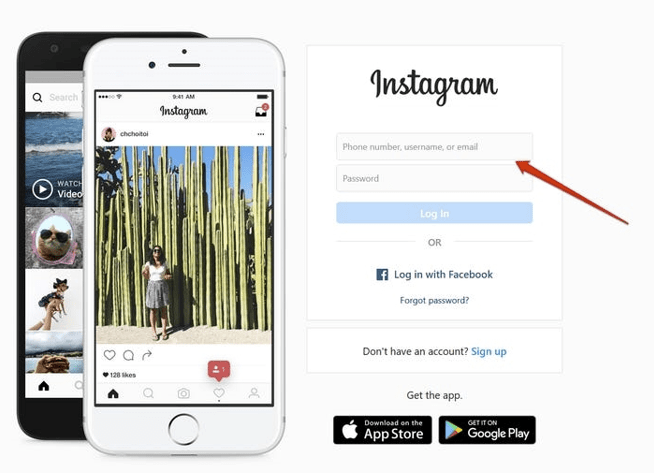
First, head on over to Instagram.com in a web browser such as Google Chrome or Safari. Sign in with your Instagram account if you are not already signed in. Refer to the below image:

Instagram 1
Signing in to your Instagram account

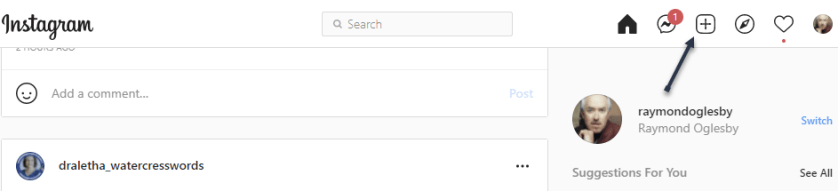
Next, click the plus “+” icon in the upper right-hand corner. See the below image:

Instagram 2
Selecting to add a photo

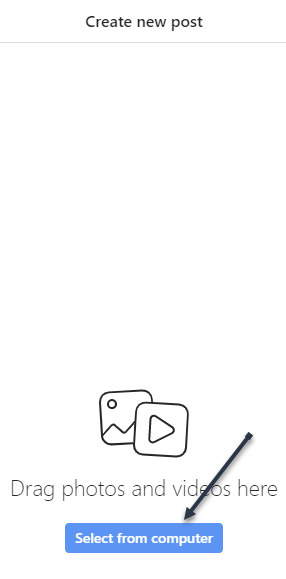
Now, click Select From Computer and choose a photo from the file manager. See the following image:

Instagram 3
Selecting a photo from your device

Next, there are a couple of options where you can adjust the Aspect Ratio, Zoom in on the photo, or Add more photos to create a slideshow. In our example, we made no adjustments. Click Next when the photo is ready. Refer to the below image:

Instagram 4
Optionally adjust your photo

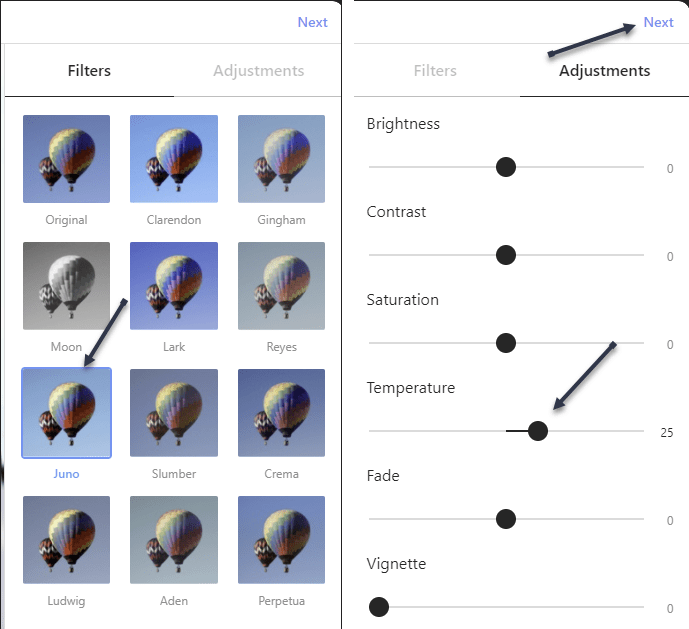
Now, you can choose a Filter or make some other adjustments to the photo. Click Next when the photo looks good. In our example, we set the Filter to Juno and increased the Temperature setting. See the below image:

Instagram 5
Optional adjustments you can make

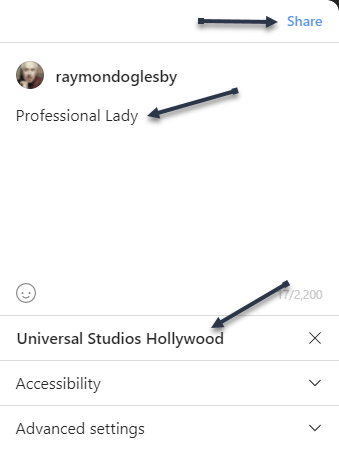
Next, write a Caption in the text box, add a Location if desired, and click Share. See the following image:

Instagram 6
Setting a caption and location

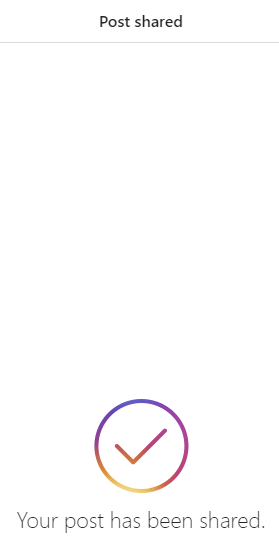
Now, you will be given a message about successfully sharing your Instagram post. Refer to the below image:

Instagram 7
Post shared message

Your photo post will now be displayed on your Instagram account. Notice the warmer color and background from the original above. See the below image:

Instagram 8
Your photo post on Instagram

You can now post photos to your Instagram feed right from your Windows PC, Mac, Linux, or Chrome OS computer. This is especially useful for uploading photos that you have transferred onto your computer,

Quote For the Day

If we keep doing what we’re doing, we’re going to keep getting what we’re getting.

Stephen Covey

You are finished. Personally, I like this feature since I have most of my photos on my computer. Please feel free to share this post! One way to share is via Twitter.

Just click the Tweet icon below. This will launch Twitter where you click its icon to post the Tweet.

Check out TechSavvy.Life for blog posts on smartphones, PCs, and Macs! You may email us at contact@techsavvy.life for comments or questions.

I Would Like to Hear From You

Please feel free to leave a comment. I would love to hear from you. Do you have a computer or smart device tech question? I will do my best to answer your inquiry. Just send an email to contact@techsavvy.life. Please mention the device, app, and version you are using. To help us out, you can send screenshots of your data related to your question.

Author’s E-book

You can access the e-book from a Kindle device, the Kindle App for the desktop or smartphone, which is a free app.

The author’s Vietnam eBook on the Battle for Tra Bong Vietnam: Events and Aftermath

How to Automatically Add Google Photos to an Album

Photo albums make it easy to keep everything organized, but that usually does not happen by itself. Google Photos can add photos to albums for you, making it even easier.

RAYMOND OGLESBY @RaymondOglesby2
January 4, 2022

Photo albums make it easy to keep everything organized, but that usually does not happen by itself. Google Photos can add photos to albums for you, making it even easier. Let’s explore this feature.

This is for iPhone, iPad, and Android using Google Photos

Dilbert and Phone
Copyright Scott Adams, Inc./Distributed by Universal Uclick for UFS

This feature is called Live Albums. It ties in with Google Photos’ ability to automatically detect people and pets in photos. That means you can have any photo of a person, multiple people, or pets automatically added to an album.

First, open Google Photos on your iPhone, iPad, or Android device and go to the Library tab. Refer to the below image:

Album 1

Accessing the Google Photos Library

Next, select an existing album or tap New Album (our choice). See the below image:

Album 2
Selecting to add an album

Now, if you create a new album, give it a title, and then tap Select People & Pets. See the following image:

Album 3
Giving the album a title and accessing the option to add people or pets

Next, you will be greeted with a list of people and pets that Google has identified in your photos. Select all that you want to automatically add to the album and tap Confirm. Refer to the below image:

Album 4
Selecting the people to add to your album

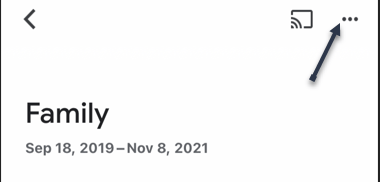
Now, for existing albums, tap the three-dot menu icon. See the below image:

Album 5
Accessing the menu option for an existing album

Next, in the menu pop-up screen, select Options. See the following image:

Album 6
Selecting Options

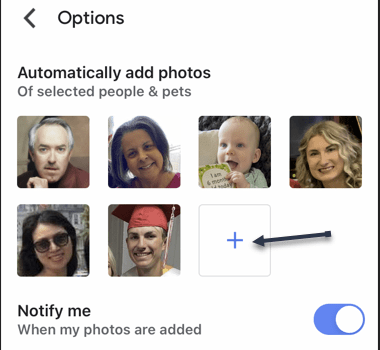
Now, tap the plus “+” button under Automatically Add Photos. Refer to the below image:

Album 7
Adding a new person or pet for your album

That’s all there is to it! Google Photos will immediately add old photos of the people or pets to the album. From this point forward, any new photos will also be automatically added.

Quote For the Day

We think coding should be required in every school because it’s as important as any kind of second language.

Tim Cook

You are finished. Please feel free to share this post! One way to share is via Twitter.

Just click the Tweet icon below. This will launch Twitter where you click its icon to post the Tweet.

Check out TechSavvy.Life for blog posts on smartphones, PCs, and Macs! You may email us at contact@techsavvy.life for comments or questions.

I Would Like to Hear From You

Please feel free to leave a comment. I would love to hear from you. Do you have a computer or smart device tech question? I will do my best to answer your inquiry. Just send an email to contact@techsavvy.life. Please mention the device, app, and version you are using. To help us out, you can send screenshots of your data related to your question.

Author’s E-book

You can access the e-book from a Kindle device, the Kindle App for the desktop or smartphone, which is a free app.

The author’s Vietnam eBook on the Battle for Tra Bong Vietnam: Events and Aftermath

How to Create a QR Code in Google Chrome

With Google Chrome’s built-in QR code option on your desktop, you can make QR codes for any sites and web pages you visit in the browser. When others scan them, they will be taken to the site.

RAYMOND OGLESBY @RaymondOglesby2
December 23, 2021

With Google Chrome’s built-in QR code option on your desktop, you can make QR codes for any sites and web pages you visit in the browser. When others scan them, they will be taken to the site. Let’s explore how this is done.

This is for Windows, Mac, Linux, or Chromebook running Chrome

Dilbert and Interface
Copyright Scott Adams, Inc./Distributed by Universal Uclick for UFS

There are many reasons to generate QR codes for websites. The main reason is to add a QR code to your documents, spreadsheets, presentations, emails, and more. Chrome lets you save the QR codes as images, so you can basically use them anywhere you want.

Since Chrome has a built-in QR code generator, you do not have to install any third-party extensions to get the job done.

First, launch Chrome on your Windows, Mac, Linux, or Chromebook computer. Then access the website you want to turn into a QR code.

At the top of Chrome, click the address bar to reveal the QR code option. Refer to the below image:

qr code 1
Selecting the website

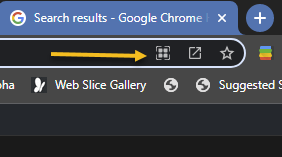
Next, in the far right of the address bar, you will now see various icons. Click the Create QR Code For This Page icon (which is a partial square icon with four small squares). If the icon is missing, click the Zoom icon and click Reset. See the below image:

qr code 2
Selecting the QR icon

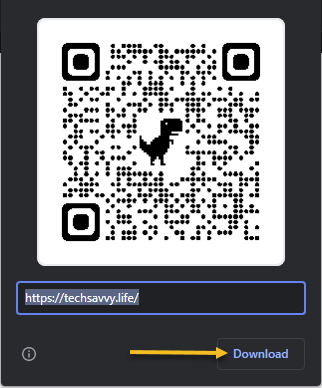
Now, Chrome will open a Scan QR Code pop-up with your generated QR code in it. You can now scan this QR code from your iPhone or Android phone. See the following image:

qr code 3
Your generated QR code

Next, to save this QR code as an image to your computer, at the bottom-right-hand corner of the Scan QR Code pop-up window, click Download. Refer to the below image:

qr code 4
Selecting to Download the QR code

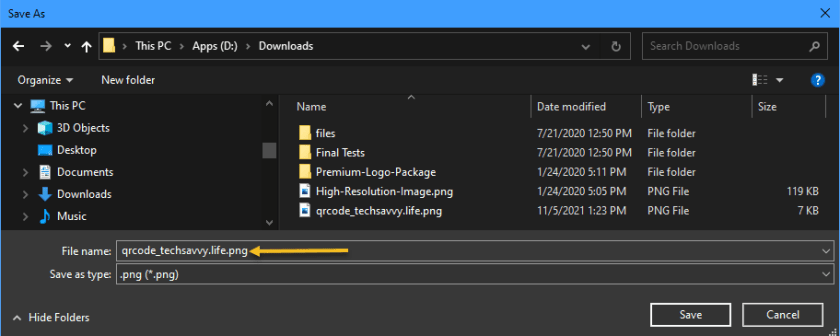
Now, you will see your computer’s standard Save As window. Select a folder to save your QR code image in, type a name for the image, and click Save. See the below image:

qr code 5
Saving the QR code

And that’s all there is to making QR codes in Chrome on the desktop. A nice feature of Chrome.

Quote For the Day

Risk comes from not knowing what you’re doing.

Warren Buffett

You are finished. Please feel free to share this post! One way to share is via Twitter.

Just click the Tweet icon below. This will launch Twitter where you click its icon to post the Tweet.

Check out TechSavvy.Life for blog posts on smartphones, PCs, and Macs! You may email us at contact@techsavvy.life for comments or questions.

I Would Like to Hear From You

Please feel free to leave a comment. I would love to hear from you. Do you have a computer or smart device tech question? I will do my best to answer your inquiry. Just send an email to contact@techsavvy.life. Please mention the device, app, and version you are using. To help us out, you can send screenshots of your data related to your question.

The author’s Vietnam eBook on the Battle for Tra Bong Vietnam: Events and Aftermath

How to Use Apple Notes in a Browser

Apple Notes syncs between devices for anyone with an Apple ID, which is required to use devices like the iPhone, iPad, and Mac computers. Unfortunately, there’s no native app for Windows or Android users, but the web version can make a suitable substitute.

RAYMOND OGLESBY @RaymondOglesby2
December 22, 2021

Apple Notes syncs between devices for anyone with an Apple ID, which is required to use devices like the iPhone, iPad, and Mac computers. Unfortunately, there’s no native app for Windows or Android users, but the web version can make a suitable substitute. Let’s explore how to use Apple Notes on the web.

This is for devices using Notes on iCloud

Dilbert and Time
Copyright Scott Adams, Inc./Distributed by Universal Uclick for UFS

Turn on iCloud Sync for Notes

If you use Apple Notes on an Apple device, first ensure you have iCloud sync enabled so that new notes and changes are pushed to all of your devices. This should be enabled by default, but it’s a good idea to check.

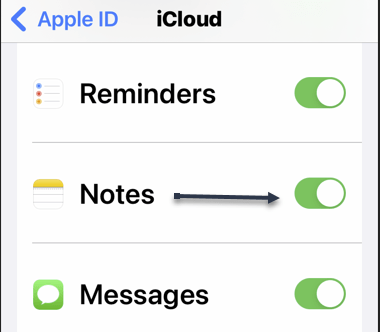
First, on an iPhone or iPad, you can do this under:

Settings > [Your Name] > iCloud

and enabling the Apple Notes setting. Refer to the below image:

Notes 1
Enabling iCloud Notes sync

On a Mac, this can be turned on under:

System Preferences > Apple ID

and checkmark the Notes setting.

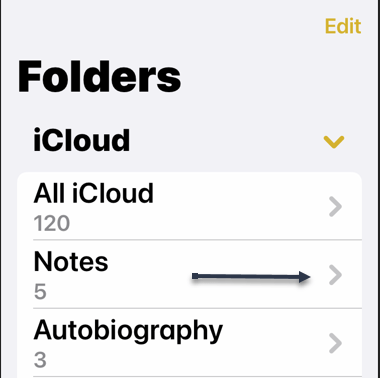
When making notes, make sure that you are placing them in your iCloud folders since it’s possible to have offline folders too that are device-specific. See the below image:

Notes 2
Ensuring Notes are under iCloud

Once enabled, new notes will be placed in iCloud by default.

Access Notes in a Browser via iCloud

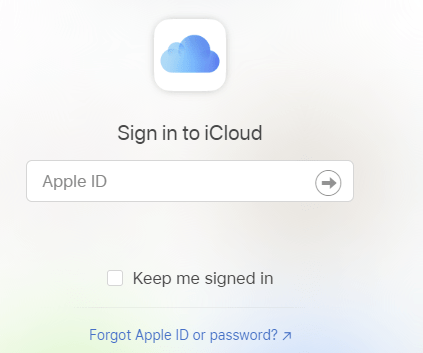
Next, with your Mac, iPhone, and iPad now syncing Apple Notes to iCloud, you can access them using a web browser by heading to iCloud.com and logging in with your Apple ID. See the following image:

Notes 3
Signing in to iCloud.com

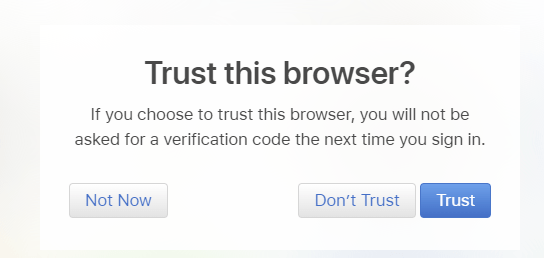
Now, you may need to pass a two-factor authentication check, so make sure you choose to Trust this computer if you want to log in faster in the future. You should only trust personal computers and smartphones that you own, and never trust a computer or device that you share with others. Refer to the below image:

Notes 4
Trusting your device

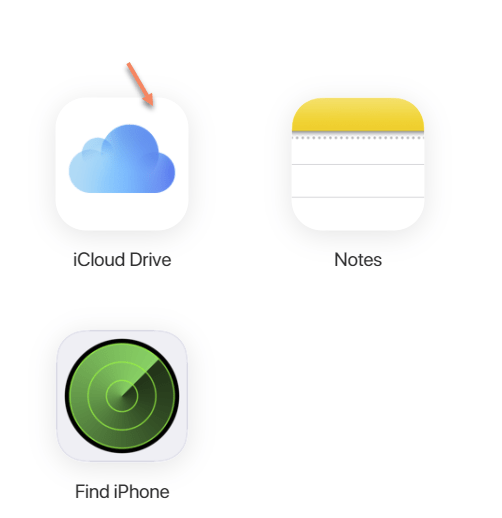
Next, once you are in, click on Notes to see a web-based version of the Apple Notes app. You can use this to access and edit existing notes, create new ones, and share with other iCloud users. See the below image:

Notes 5
Selecting iCloud Notes on the web

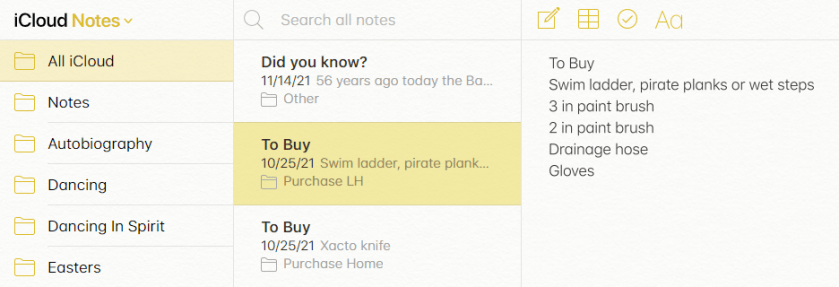
While you can access locked notes by entering your Apple ID password, you can not apply a lock to existing or new notes. See the following image for a listing of your Notes:

Notes 6
Listing of your iCloud Notes

Turn iCloud Into an App on Windows or Android

Now, you can keep Apple Notes open in its own pinned tab, but it may be more convenient to turn the web app into an application or shortcut you can run from your Start menu or Android home screen.

  • Windows users can do this using Chrome or Edge, pin it to your Taskbar, and apply a custom icon if you like. You will need to log in from time to time, but as long as you Trust your browser when entering the two-factor authentication code this process will not be quite as tedious.
  • Android users can also do this using Chrome, which places a shortcut on your home screen.

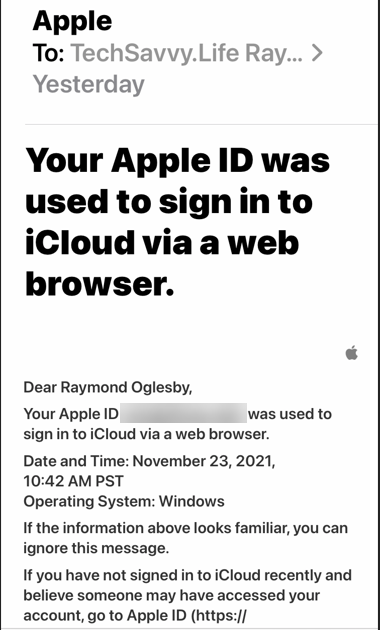
Next, you will receive a message about signing in to iCloud from a browser. Refer to the below image:

Notes 7
Apple message

Apple Notes is just one service you can take advantage of using a browser thanks to iCloud’s web interface.

Quote For the Day

Every time you think the problem is ‘out there,’ that very thought is the problem.

Stephen Covey

You are finished. Please feel free to share this post! One way to share is via Twitter.

Just click the Tweet icon below. This will launch Twitter where you click its icon to post the Tweet.

Checkout TechSavvy.Life for blog posts on smartphones, PCs, and Macs! You may email us at contact@techsavvy.life for comments or questions.

I Would Like to Hear From You

Please feel free to leave a comment. I would love to hear from you. Do you have a computer or smart device tech question? I will do my best to answer your inquiry. Just send an email to contact@techsavvy.life. Please mention the device, app, and version you are using. To help us out, you can send screenshots of your data related to your question.

The author’s Vietnam eBook on the Battle for Tra Bong Vietnam: Events and Aftermath

How to Check Your Amazon Gift Card Balance

Not sure if you have sufficient funds to buy that item on Amazon? If so, it’s easy to check your gift card balance on both the Amazon website and the Amazon mobile app, as well as the history of cards you have redeemed. Let’s find out.

RAYMOND OGLESBY @RaymondOglesby2
December 21, 2021

Not sure if you have sufficient funds to buy that item on Amazon? If so, it’s easy to check your gift card balance on both the Amazon website and the Amazon mobile app, as well as the history of cards you have redeemed. Let’s find out.

This is for devices using Amazon

Dilbert and CEO
Copyright Scott Adams, Inc./Distributed by Universal Uclick for UFS

Use the Amazon Website

If you are on a Windows, Mac, Linux, or Chromebook computer, use the official Amazon website to see the available gift card balance in your account.

First, open a web browser on your computer and launch the Amazon site. Sign in to your account on the site.

Next, in Amazon’s top-right corner, hover your mouse over the Account & Lists menu to see an expanded menu. Refer to the below image:

Gift Card 1
Accessing Account & Lists menu option

Now, in the expanded menu, under Your Account, click Account. See the below image:

Gift Card 2
Accessing Your Account

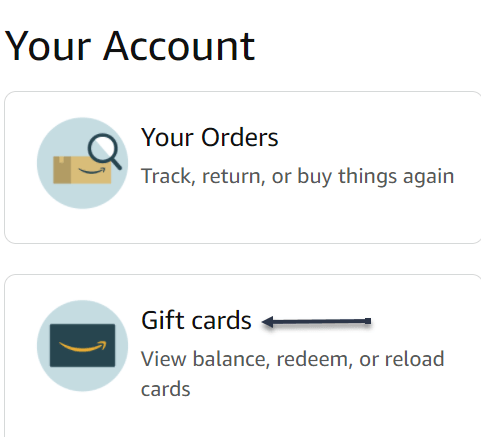
Next, on the Your Account page that opens, click Gift cards. See the following image:

Gift Card 3
Accessing your Gift cards

Now, on the page that opens, right next to Your Gift Card Balance, you will see the gift card balance currently available in your account. Refer to the below image:

Gift Card 4
Viewing your Gift Card balance

Note! You can redeem a gift card by clicking the Redeem a Gift Card button, entering the key, and clicking Apply to your balance button.

If you would like to view the values of gift cards that you have redeemed in your account, scroll down the page to see that information. See the following image:

Gift Card 5
Viewing your Gift Card history

Use the Amazon Mobile App

If you are on an iPhone, iPad, or Android phone, use the Amazon mobile app to check your gift card balance.

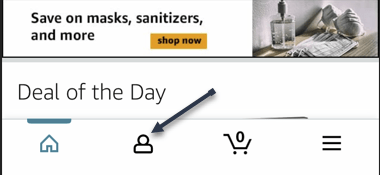
First, launch the Amazon app on your phone. Sign in to your account if you have not already. Then, at the bottom of the app, tap the user icon. Refer to the below image:

Gift Card 6
Accessing the User icon

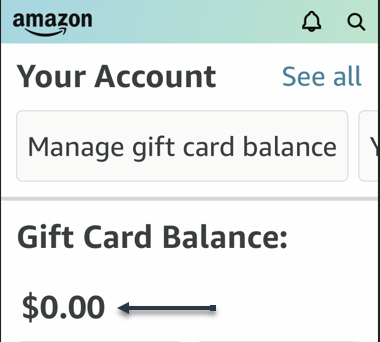
Next, on the account page that opens, scroll down to the Gift Card Balance section. Here, you will see the gift card balance available to use in your Amazon account. See the below image:

Gift Card 7
Viewing your Gift Card Balance

Now, to view the gift cards that you have added to your account so far, then next to Gift Card Balance, tap the Manage option. See the following image:

Gift Card 8
Accessing to Manage your Gift Card

Note! You can redeem a gift card by clicking the Redeem Gift Card button, entering the key, and taping Apply to your balance button.

Next, scroll down the page to the Your Balance activity section. Here, you will see all your redeemed gift cards along with their values. Refer to the below image:

Gift Card 9
Your Gift Card history

And that’s how you know if your gift card balance can buy a certain item on Amazon.

Quote For the Day

Faith is trust in ultimate meaning.

Viktor E Frankl

That’s it. Please feel free to share this post! One way to share is via Twitter.

Just click the Tweet icon below. This will launch Twitter where you click its icon to post the Tweet.

Checkout TechSavvy.LIfe blog posts on smartphones, PCs, and Macs! You may email us at contact@techsavvy.life for comments or questions.

I Would Like to Hear From You

Please feel free to leave a comment. I would love to hear from you. Do you have a computer or smart device tech question? I will do my best to answer your inquiry. Just send an email to contact@techsavvy.life. Please mention the device, app, and version you are using. To help us out, you can send screenshots of your data related to your question.

The author’s Vietnam eBook on the Battle for Tra Bong Vietnam: Events and Aftermath

How to Obtain a Link to a Photo or Video on Instagram

If you would like to share an Instagram photo or video outside the platform, you will have to get that item’s shareable link.

RAYMOND OGLESBY @RaymondOglesby2
December 16, 2021

If you would like to share an Instagram photo or video outside the platform, you will have to get that item’s shareable link. Let’s explore how to get these links from your Instagram account, on either desktop or mobile.

Note! You can not get links to photos or videos that are in a private Instagram account. For these accounts, Instagram does not offer the option to get a link.

This is for devices running Instagram

Dilbert and Security
Copyright Scott Adams, Inc./Distributed by Universal Uclick for UFS

The instructions to get a link to a photo or video on Instagram are the same for all Instagram-supported devices, including Windows, Mac, Linux, and Chromebook computers, as well as iPhones and Android smartphones.

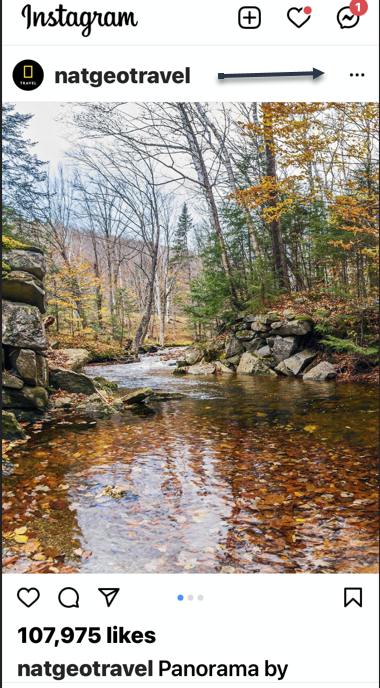
First, open Instagram and find the photo or video for which you want to get a shareable link. At the top-right corner of that item, click or tap the three dots Menu. Refer to the below image:

Link 1
Accessing the Menu

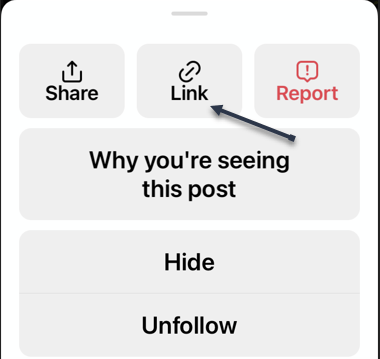
Next, choose Link on an iPhone or Copy Link on other devices. See the below image:

Link 2
Accessing the Link icon

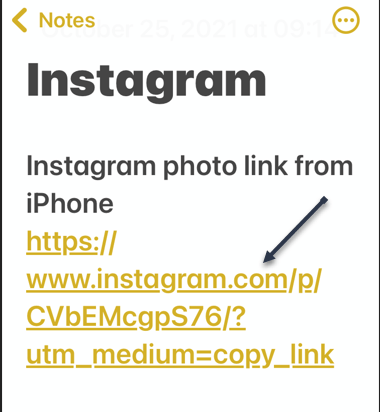
Now, the link to your selected photo or video on Instagram will be copied to your device’s clipboard. Use the Paste option in any text field on your device to view your link. In our example, we pasted the link to the iPhone Notes app.

Your shareable Instagram link should look something like the following image:

Link 3
Your Instagram link

You may now send this link to your friends and family. They can click or tap it to access the photo or video on Instagram.
Quote For the Day

The system is that there is no system. That doesn’t mean we don’t have process. Apple is a very disciplined company, and we have great processes. But that’s not what it’s about. Process makes you more efficient.

Steve Jobs

That was easy. Please feel free to share this post! One way to share is via Twitter.

Just click the Tweet icon below. This will launch Twitter where you click its icon to post the Tweet.

Check out TechSavvy.Life for blog posts on smartphones, PCs, and Macs! You may email us at contact@techsavvy.life for comments or questions.

I Would Like to Hear From You

Please feel free to leave a comment. I would love hearing from you. Do you have a computer or smart device tech question? I will do my best to answer your inquiry. Just send an email to contact@techsavvy.life. Please mention the device, app, and version you are using. To help us out, you can send screenshots of your data related to your question.

The author’s Vietnam eBook on the Battle for Tra Bong Vietnam: Events and Aftermath

How to Delete Specific History from Safari

It’s not always convenient to delete your entire history, but you can instead choose to delete specific websites from your history (and the data they leave behind on your device).

RAYMOND OGLESBY @RaymondOglesby2
December 15, 2021

It’s not always convenient to delete your entire history, but you can instead choose to delete specific websites from your history (and the data they leave behind on your device). Let’s explore how this is done.

This is for the iPhone and iPad using Safari

Dilbert and Covid
Copyright Scott Adams, Inc./Distributed by Universal Uclick for UFS

How to Remove Websites History

Safari will record any websites you visit unless you use Private Browsing. Once a website is in your history it will appear in the URL bar when you start typing a related term. There are all sorts of reasons you may want to prune specific websites, and it’s easy to do so.

First, open Safari and tap on the Bookmarks icon at the bottom of the screen that resembles an open book. Refer to the below image:

History 1
Accessing Bookmarks

Next, a pop-up will appear with three tabs for your Bookmarks, Reading List, and History. Tap on the Clock icon to view your history. See the below image:

History 2
Accessing the Clock

Now, you can now swipe left on any entry in your history and tap Delete to remove it for good. See the following image:

History 3
Selecting a website to delete

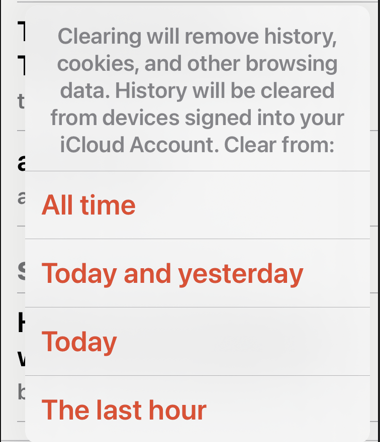
Rather than scrolling through your entire history of visited websites, you can also search for specific terms or URLs using the on-screen search box. If you tap the Clear button at the bottom right-hand corner, you can remove website history based on a timeframe, like All time, Today and yesterday, Today, and The last hour. Refer to the below image:

History 4
Selecting to remove websites based on a timeframe

But that’s not the only evidence a website may have left behind on your device.

How to Delete Website Data

Websites leave all sorts of data on your device including cached images and cookies. If you want to remove all signs of a website, it’s important to remove website data as well.

First, launch:

Settings > Safari > Advanced > Website Data

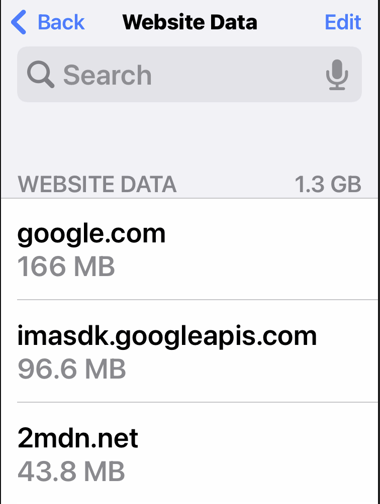
This menu may take a little while to load as Safari fetches a full list of website data and estimates how much storage each entry takes up on your device. See the below image:

History 5
Your website data

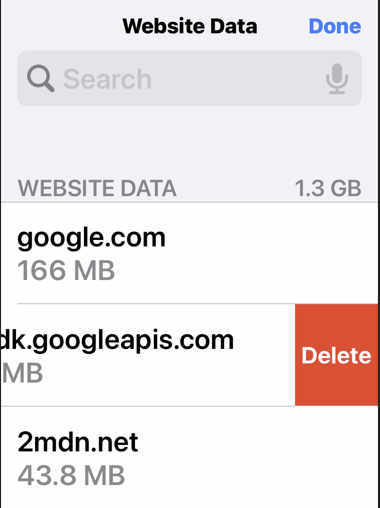
Next, you can now follow the same procedure as above by swiping left on any websites you would like to remove and tapping the Delete button that appears. See the following image:

History 6
Selecting to delete website data

Now, you can also search for specific websites using the search bar at the top of the screen, or nuke everything using the Remove All Website Data button at the bottom of the list. Refer to the below image:

History 7
Selecting to remove all website data

Note! If you do remove website data (or wipe everything), there may be some drawbacks like having to log in again or having your shopping cart emptied.

Private Browsing Mode

You can use Private Browsing mode in Safari at any point to visit a website without it being recorded to your device. To do so, tap on the tab icon in the lower right corner of the screen followed by the number of tabs you have open at the bottom of the screen. From here tap Private to switch for a private browsing session. See the below image:

History 8
Entering Private mode

Note! All tabs in your private browsing session will remain open until you close them, so make sure you close anything that may compromise your privacy.

Quote For the Day

I’m excited about Augmented Reality because unlike Virtual Reality, which closes the world out, AR allows individuals to be present in the world but hopefully allows an improvement on what’s happening presently.

Tim Cook

You are finished. Please feel free to share this post! One way to share is via Twitter.

Just click the Tweet icon below. This will launch Twitter where you click its icon to post the Tweet.

Check out TechSavvy.Life for blog posts on smartphones, PCs, and Macs! You may email us at contact@techsavvy.life for comments or questions.

I Would Like to Hear From You

Please feel free to leave a comment. I would love to hear from you. Do you have a computer or smart device tech question? I will do my best to answer your inquiry. Just send an email to contact@techsavvy.life. Please mention the device, app, and version you are using. To help us out, you can send screenshots of your data related to your question.

The author’s Vietnam eBook on the Battle for Tra Bong Vietnam: Events and Aftermath