How to Crop Photos on iPhone and iPad

The stock Photos app for iOS and iPadOS comes with a built-in editing tool that can let you automatically resize a pic. Besides, you can also get rid of the unwanted parts manually to ensure there is no blemish. You do not need any photo editing apps to rotate, crop, or straighten your photos. 

RAYMOND OGLESBY @RaymondOglesby2
September 22, 2021

There could be all sorts of reasons why you would like to crop photos on your iPhone and iPad. Maybe you are not pleased with the actual size of the image or want to make it perfectly fit a frame.

The stock Photos app for iOS and iPadOS comes with a built-in editing tool that can let you automatically resize a photo. Besides, you can also get rid of the unwanted parts manually to ensure there is no blemish. You do not need any photo editing apps to rotate, crop, or straighten your photos.

However, the best part is that you can go back to the original size just in case the end result does not turn out as expected. Let’s see how this is done.

This is for the iPhone and iPad

Dilbert and Genes
Copyright Scott Adams, Inc./Distributed by Universal Uclick for UFS

Crop Your Photo

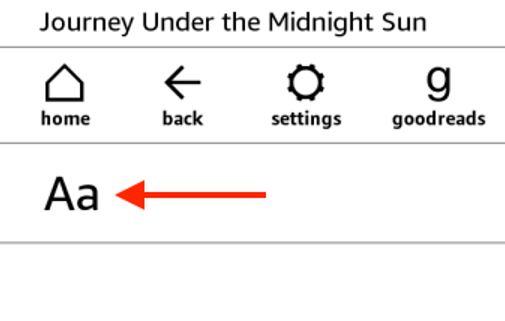
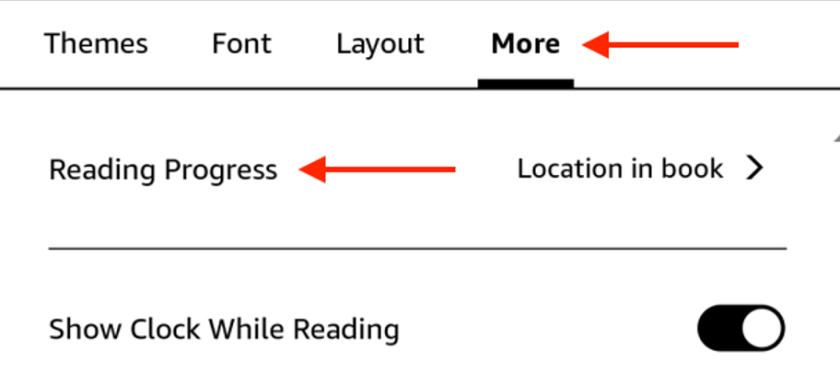
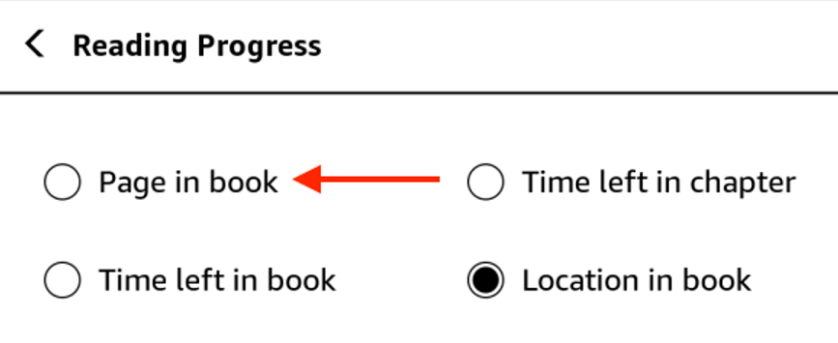
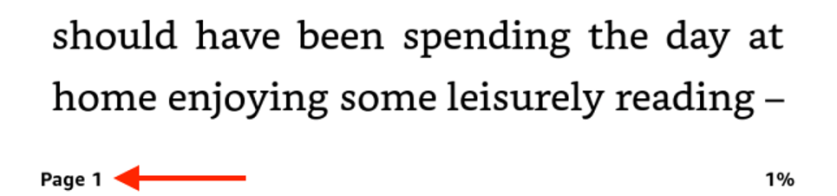
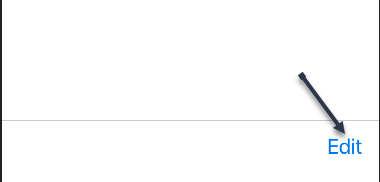
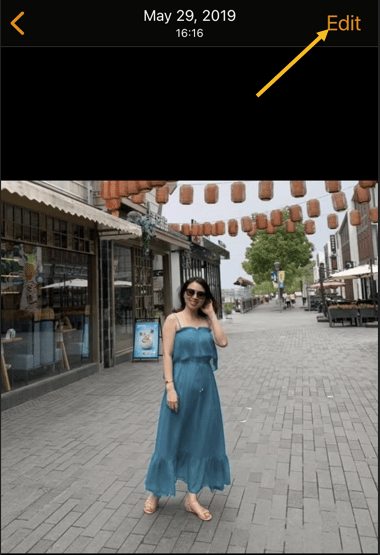
First, open the Photos app on your iPhone or iPad and navigate to the photo that you want to crop. In the top right-hand corner, tap the Edit button. Refer to below image:

Crop 1
Selecting to Edit a photo

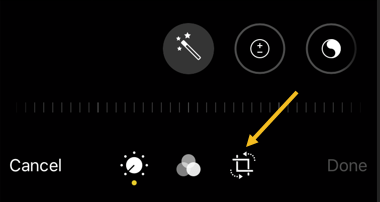
Now, in the photo editing view, you will see the bottom toolbar. Tap the Crop button which looks like a box with arrows around it. See below image:

Crop 2
Selecting the Crop button

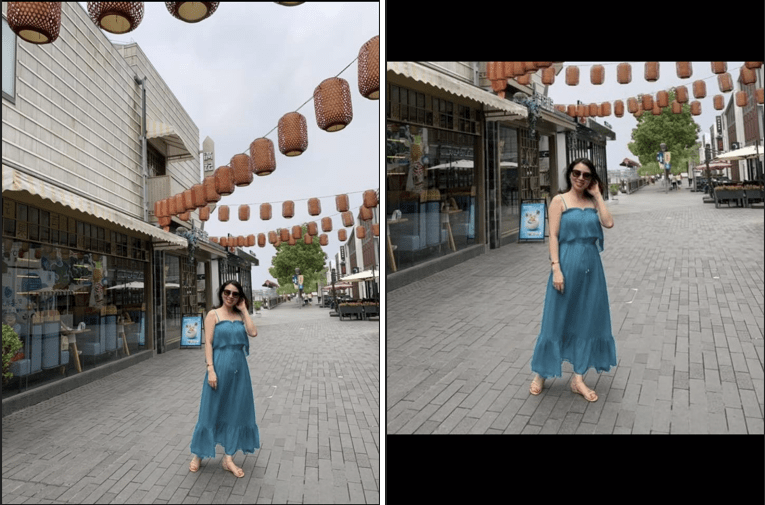
Next, you will see the image surrounded by a white frame. Swipe in from any edge to crop the image. You can do this from all corners. Just, lift your finger to see the cropped image. See following image:

Crop 3
Cropping a photo

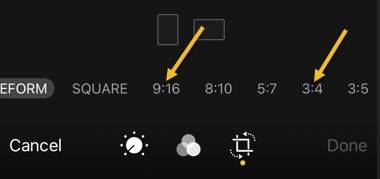
Now, you can also crop the image using a specific aspect ratio if you need the photo to be a perfect square. Tap the Aspect Ratio button in the top toolbar which looks like overlapping boxes. Refer to below image:

Crop 4
Selecting the Aspect Ratio button to crop a photo

Next, you can choose the Aspect Ratio (such as “4:3” or “16:9”) or switch between the Portrait and Landscape formats.

Even after selecting the Aspect Ratio, you can continue to crop the image. The difference is that now, the Aspect Ratio will be locked. If you do not want to use the Aspect Ratio feature, choose the Original option. See below image:

Crop 5
Selecting an Aspect Ratio

Now, if you are satisfied with the crop dimensions, tap the Done button in the bottom toolbar on iPhone. See following image:

Crop 6
Selecting the Done button

Your photo will be cropped, and the result displayed on the screen. Refer to below image:

Crop 7
Original on left, cropped on right

Do not forget that you can share the photo with your friends using the Share button in the bottom toolbar which looks like a box with an arrow coming out of it. See below image:

Crop 8
Selecting the Share icon

Undo Your Crop

All edits in the Photos app are non-destructive. This means that you can revert any photo to its original state.

First, open the photo in the Photos app. Tap the Edit button in the top right-hand corner. See following image:

Crop 9
Selecting the Edit button

Now, in the bottom right-hand corner on iPhone, tap the Revert button. Refer to below image:

Crop 10
Selecting the Revert button

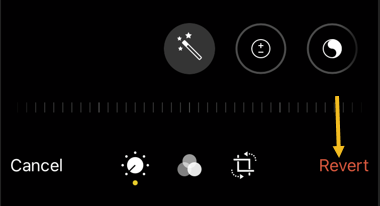
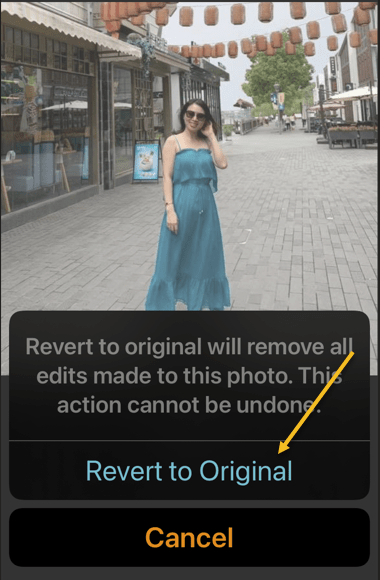
Next, in the pop-up, choose the Revert to Original option. See below image:

Crop 11
Revert your photo back to the original

Now, your photo will be back to its original form!

Quote For the Day

We are cups, constantly and quietly being filled. The trick is, knowing how to tip ourselves over and let the beautiful stuff out.

Ray Bradbury

And that’s it. Please feel free to share this post! One way to share is via Twitter.

\Just click the Tweet icon below. This will launch Twitter where you click its icon to post the Tweet.

Check out TechSavvy.Life for blog posts on smartphones, PCs, and Macs! You may email us at contact@techsavvy.life for comments or questions.

I Would Like to Hear From You

Please feel free to leave a comment. I would love hearing from you. Do you have a computer or smart device tech question? I will do my best to answer your inquiry. Just send an email to contact@techsavvy.life. Please mention the device, app and version that you are using. To help us out, you can send screenshots of your data related to your question.

The author’s Vietnam eBook on the Battle for Tra Bong Vietnam: Events and Aftermath

How to Check if Chrome 93 is Installed

Google Chrome 93 is officially here. There is plenty to be excited about. For example, with Chrome 93, progressive web apps (PWAs) feel a lot more like native desktop apps, as clicking on a link can open an associated web app. There’s also improved multi-screen support for web apps, making this an update web app users will love.

RAYMOND OGLESBY @RaymondOglesby2
JSeptember 21, 2021

Google Chrome 93 is officially here. There is plenty to be excited about. For example, with Chrome 93, progressive web apps (PWAs) feel a lot more like native desktop apps, as clicking on a link can open an associated web app. There’s also improved multi-screen support for web apps, making this an update web app users will love. Let’s explore how to install Chrome 93.

This is for Windows, Android, Mac, iPhone, and iPad

Dilbert and Stats
Copyright Scott Adams, Inc./Distributed by Universal Uclick for UFS

Some new features are related to recently closed tabs, a Material You theme for Android 12, a new Google Search UI on Android, the ability to sync Two-Factor OTP codes across devices (a true game-changer), the ability to use note-taking apps right from the browser, a new context menu on iPhone, and so much more.

Chrome 93 will now also show Google Drive documents on the New Tab page. The suggested documents will appear in a card underneath the Search Bar, allowing you to easily access recently edited Google Docs or Sheets.

First, you can check for an update by going to the three-dot menu hamburger icon on the top-right of Chrome. Next, click Help followed by About Google Chrome. Refer to below image:

Chrome 93 1
Selecting the About option

Now, the Chrome Settings window open. If Chrome is outdated, it will automatically download and install the latest version. See below image:

Chrome 93 2
Your Chrome version

Now, close Chrome and restart the app.

If you are on iPhone or Android, update the app as you would for any other application.

Quote For the Day

The most remarkable discovery in all of astronomy is that the stars are made of atoms of the same kind as those on the earth.

Richard P Feynman

You are finished. Please feel free to share this post! One way to share is via Twitter.

Just click the Tweet icon below. This will launch Twitter where you click its icon to post the Tweet.

Check out TechSavvy.Life for blog posts on smartphones, PCs, and Macs. You may email us at contact@techsavvy.life for comments or questions.

I Would Like to Hear From You

Please feel free to leave a comment. I would love hearing from you. Do you have a computer or smart device tech question? I will do my best to answer your inquiry. Just send an email to contact@techsavvy.life. Please mention the device, app and version that you are using. To help us out, you can send screenshots of your data related to your question.

The author’s Vietnam eBook on the Battle for Tra Bong Vietnam: Events and Aftermath

Celebrate 300 Posts Giveaway

We are giving away one (1) $50.00 Amazon Gift Card to one of our followers in celebration of 300 blog posts. Its simple to enter. Just send an email to:

We are giving away one (1) $50.00 Amazon Gift Card to one of our followers in celebration of 300 blog posts. It’s simple to enter. Just send an email to:

wrojr@cox.net

with a Subject line of:

300 Posts Giveaway

and in the body text, enter:

I would like to enter the 300 blog posts giveaway.

My follower name is __________. (Optional)

Your email must be received by midnight September 23, 2021. The winner will be announced and notified in a random drawing on September 24, 2021. Only one entry per follower. Tell your friends and relatives to start following TechSavvy.Life.

That’s it. Thank you for being a follower and hope you enjoy the blog posts.

How to See Amazon Kindle Book Page Numbers

When you read paperback and hardcover books, you use page numbers for tracking progress and for discussing parts of the book. But, by default, Amazon Kindle only shows you your location in the book.

RAYMOND OGLESBY @RaymondOglesby2
September 16, 2021

When you read paperback and hardcover books, you use page numbers for tracking progress and for discussing parts of the book. But, by default, Amazon Kindle only shows you your location in the book. Let’s find out how to see it’s page numbers.

This is for the Kindle

Dilbert and Engineers
Copyright Scott Adams, Inc./Distributed by Universal Uclick for UFS

If a Kindle book has a Print Length section on its Amazon page, it means you will be able to see real page numbers as you move through the book. Refer to below image:

Book 1
Viewing Print Length

Once enabled, page numbers will be visible in the bottom left-hand corner of the reading screen (replacing the Location or Reading Progress).

First, navigate to the Your Library section in the Kindle e-book reader. See below image:

Book 2
Selecting an e-book

Next, tap a book to start reading. See following image:

Book 3
Tap a book to read

Now, tap in the top part of the screen to reveal the toolbar. Refer to below image:

Book 4
Reveal the toolbar

Next, select the “Aa” button. See below image:

Book 5
Tap the text option

Now, tap the More tab and select the Reading Progress option. See following image:

Book 6
Tap More and Reading Progress options

Next, select the Page in Book option. If this option is blacked out, it means that real page numbers will not be available for this book on Kindle. Refer to below image:

Book 7
Select Page in book option

Now, go back to the reading view. In the bottom left -hand corner of your screen, you will now see the page number. See below image:

Book 8

View the page number

You can quickly cycle through all the Reading Progress options (Page in Book, Time Left in Chapter, Time Left in Book, Location in Book, and Note) by tapping the text in the bottom left-hand corner of your screen. See following image:

Book 9
View the Reading Progress options

Quote For the Day

You can’t try to do things; you simply must do them.

Ray Bradbury

That’s it. Please feel free to share this post! One way to share is via Twitter.

Just click the Tweet icon below. This will launch Twitter where you click its icon to post the Tweet.

Check out TechSavvy.Life blog posts on smartphones, PCs, and Macs! You may email us at contact@techsavvy.life for comments or questions.

I Would Like to Hear From You

Please feel free to leave a comment. I would love hearing from you. Do you have a computer or smart device tech question? I will do my best to answer your inquiry. Just send an email to contact@techsavvy.life. Please mention the device, app and version that you are using. To help us out, you can send screenshots of your data related to your question.

The author’s Vietnam eBook on the Battle for Tra Bong Vietnam: Events and Aftermath

How to Add a Web Page to Chrome’s Reading List for iPhone and iPad

The Reading List is a similar concept to bookmarks but intended for reading material that you find online. At the time of this writing, it’s available in Chrome on the desktop (Windows, Mac, and Linux) and for iPhone and iPad. The feature is not available on Android.

RAYMOND OGLESBY @RaymondOglesby2
September 15, 2021

The Reading List is a similar concept to bookmarks but intended for reading material that you find online. At the time of this writing, it’s available in Chrome on the desktop (Windows, Mac, and Linux) and for iPhone and iPad. The feature is not available on Android. For this blog post, we will explore this feature for the iPhone and iPad.

This is for the iPhone and iPad using Google Chrome

Dilbert and Promotion
Copyright Scott Adams, Inc./Distributed by Universal Uclick for UFS

Chrome for iPhone and iPad has two different ways to add web pages to your Reading List. It can either be done from Chrome or from another app.

Method 1 – Within Chrome

First, find a page to save for later, and then tap the Share icon in the address bar. Refer to below image:

Reading 1
Accessing the Share icon

Next, select Read Later from the menu. See below image:

Reading 2
Selecting Read Later option

That’s it! The page is now in your Reading List.

Method 2 – Use an App

The second method allows you to add things to the list from outside of Chrome. Now, find a news article or story that you would like to read later in any app. In our example, we are using Apple News. Next, find the Share icon in the app and tap it. See following image:

Reading 3
Accessing the Share icon

Now, find Chrome in the app row and select it. If you do not see Chrome, tap the three-dot More menu. Refer to below image:

Reading 4
Finding the Chrome app

Now, find Chrome from the app list and tap it. See below image:

Reading 5
Selecting Chrome app

Next, from the Chrome menu, tap Read Later. See following image:

Reading 6
Selecting Read Later option

To access the Reading List on your iPhone or iPad, first, open Chrome and tap the three-dot Menu icon at the bottom. Refer to below image:

Reading 7
Accessing the Menu icon

Next, select Reading List from the menu. You will notice a number that indicates unread pages. See below image:

Reading 8
Accessing Reading List option

Now, the Reading List will open with Unread pages at the top and Pages You’ve Read at the bottom. Pages marked with a green check are ready to read offline. See following image:

Reading 9
Your Reading List

Next, tap Edit in the bottom corner to manage the list. Refer to below image:

Reading 10
Selecting to Edit your Reading List

From here, you can select pages and delete or mark them as read. See below image:

Reading 11
Selecting Delete or Mark as Read option

The Reading List is a nice, simple alternative to apps that provide similar services. It all happens right inside of Chrome without any additional software.

Quote For the Day

We’ve gotta reinvest in space travel. We should’ve never left the moon.

Ray Bradbury

That’s it. Please feel free to share this post! One way to share is via Twitter.

Just click the Tweet icon below. This will launch Twitter where you click its icon to post the Tweet.

Check out TechSavvy.Life for blog posts on smartphones, PCs, and Macs. You may email us at contact@techsavvy.life for comments or questions.

I Would Like to Hear From You

Please feel free to leave a comment. I would love hearing from you. Do you have a computer or smart device tech question? I will do my best to answer your inquiry. Just send an email to contact@techsavvy.life. Please mention the device, app and version that you are using. To help us out, you can send screenshots of your data related to your question.

The author’s Vietnam eBook on the Battle for Tra Bong Vietnam: Events and Aftermath

How to Turn Off Mouse Acceleration in Windows 10

If your cursor keeps overshooting your target on your Windows 10 desktop, the culprit might be a feature known as Mouse Acceleration. Disabling it might increase your pointer accuracy, letting you land right on point every time.

RAYMOND OGLESBY @RaymondOglesby2
September 14, 2021

If your cursor keeps overshooting your target on your Windows 10 desktop, the culprit might be a feature known as Mouse Acceleration. Disabling it might increase your pointer accuracy, letting you land right on point every time.

This is for devices running Windows 10

Dilbert and Praying
Copyright Scott Adams, Inc./Distributed by Universal Uclick for UFS

What is Mouse Acceleration

Mouse Acceleration in Windows 10 is a feature that increases the distance and speed at which your cursor moves across the screen in response to the speed with which you move your physical mouse.

With Mouse Acceleration enabled, if you were to quickly move your physical mouse three inches, your cursor could travel from one side of the screen to the other. However, if you were to move your mouse the exact same distance, only much slower, your cursor might only make it halfway across the screen.

This feature is enabled on Windows 10 devices by default, and the goal is to enhance the precision of your cursor. For many, it has the exact opposite effect; especially for gamers. If you find this to be the case for you, you can disable it.

Turn Off the Feature

First, in the Cortana search box (next to the Windows logo key), type Mouse and click Mouse settings from the search results in upper left-hand corner. Refer to below image:

Mouse 1
Selecting Mouse settings

Next, find the Related settings group to the right of the Mouse settings window (or the bottom if your window size is small). Now, click Additional mouse options. See below image:

Mouse 2
Selecting more mouse options

Next, in the Mouse Properties window, click the Pointer Options tab. See following image:

Mouse 3
Selecting Pointer Options tab

Now, under the Motion group, uncheck Enhance pointer precision, and then click Apply. Refer to below image:

Mouse 4
Turn off pointer precision

Now close the Mouse Properties window and exit Settings. Your mouse acceleration is now disabled.

This should help you more accurately land on your targets. But if you are a gamer and you are still having problems, you may want to read up on “mouse DPI and polling rates” and invest in a mouse that’s designed for gaming.

Quote For the Day

There are worse crimes than burning books. One of them is not reading them.

Ray Bradbury

That’s it. Please feel free to share this post! One way to share is via Twitter.

Just click the Tweet icon below. This will launch Twitter where you click its icon to post the Tweet.

Check out TechSavvy.Life for blog posts on smartphones, PCs, and Macs! You may email us at contact@techsavvy.life for comments or questions.

I Would Like to Hear From You

Please feel free to leave a comment. I would love hearing from you. Do you have a computer or smart device tech question? I will do my best to answer your inquiry. Just send an email to contact@techsavvy.life. Please mention the device, app and version that you are using. To help us out, you can send screenshots of your data related to your question.

The author’s Vietnam eBook on the Battle for Tra Bong Vietnam: Events and Aftermath

Celebrate 300 Posts Giveaway

We are giving away one (1) $50.00 Amazon Gift Card to one of our followers in celebration of 300 blog posts. Its simple to enter. Just send an email to:

We are giving away one (1) $50.00 Amazon Gift Card to one of our followers in celebration of 300 blog posts. It’s simple to enter. Just send an email to:

wrojr@cox.net

with a Subject line of:

300 Posts Giveaway

and in the body text, enter:

I would like to enter the 300 blog posts giveaway.

My follower name is __________. (Optional)

Your email must be received by midnight September 23, 2021. The winner will be announced and notified in a random drawing on September 24, 2021. Only one entry per follower. Tell your friends and relatives to start following TechSavvy.Life.

That’s it. Thank you for being a follower and hope you enjoy the blog posts.

How to Create a People Graph in Excel

If you take advantage of Excel’s charts for helpful visual displays of your data, check out the People Graph option to create a simple depiction of the number of people or items you have logged in your spreadsheet.

RAYMOND OGLESBY @RaymondOglesby2
September 9, 2021

If you take advantage of Excel’s charts for helpful visual displays of your data, check out the People Graph option to create a simple depiction of the number of people or items you have logged in your spreadsheet.

This is for devices running Excel. Screenshots are from Excel for Office 365 and Windows 10.

Dilbert and Lunch
Copyright Scott Adams, Inc./Distributed by Universal Uclick for UFS

You can display things like the number of visitors to your website, downloads of your app, sign-ups for your event, calls to your support center, and much more.

Add People Graph Add-In

People Graph is an Add-In developed by Microsoft, and there’s already a button for it in your Excel ribbon. But before you can use it, you will have to trust the add-in to install it. First, open the Insert tab in Excel and look for the Add-ins group. Click the button for People Graph. Refer to below image:

Graph 1
Select the Add-In

Next, You will see a pop-up window with a link to See Details. This takes you to the Add-In on the Office Store, where you can read an overview, reviews, and other details. Click Trust this add-in to get started. See below image:

Graph 2
Trust the Add-In option

Now, once the add-in is installed in Excel, you can click the button on the Insert tab to use the feature.

Insert a People Graph

Whenever you hit the People Graph button in the ribbon, you will see a sample graph. First. click the Data icon that looks like a small grid. See following image:

Graph 3
Select the People Graph button

Optionally, you can enter your graph Title before selecting your data, or you can just head back to this spot to add the title later. Next, click Select your data, and then drag through the cells that you want to use. Currently, you must use two columns of data, but you can have multiple rows. Refer to below image:

Graph 4
Select your data

Now, click Create on the People Graph screen. See below image:

Graph 5
Create the People Graph

Customize Your People Graph

First, click the gear icon to open the Settings. You can then move through the three settings for type, theme, and shape. See following image;

Graph 6
Select the Settings gear icon

You can currently pick from three graph types. Each has a slightly different layout and appearance. Now, click Type, and then choose one on the right side. Refer to below image:

Graph 7
Select your Type of graph

Next, you can select a Theme that changes the background and colors of your graph. Click Theme, and choose one of the seven options. See below image:

Graph 8
Select your theme for the graph

Finally, you can use a different Shape. So if your data is better represented by a Shape other than people, you can choose the best fit. Now, click Shape and pick from the 16 options. See following image:

Graph 9
Select the Shape of your graph

Next, you can select and drag your People Graph wherever you want it on your spreadsheet. And if you edit the data on which the graph is based, Excel will update the graph automatically. Refer to below image:

Graph 10
Your final result

Other Options

On the top right of your People Graph, you will see an arrow (Windows) or an Info icon (Mac). When you click, you will see several actions .Choose Reload to refresh the graph, Delete to remove it, and Select to select the graph if you want to move it. You also have options to Get Support, Attach Debugger, and view the Security info. See below image:

Graph 11
Select Other Options

If you are looking for a simple way to visually display data, especially if it includes a number of people like customers, clients, or contacts, try out the People Graph in Microsoft Excel.

Quote For the Day

If you don’t like what you’re doing, then don’t do it

Ray Bradbury

That’s it. Please feel free to share this post! One way to share is via Twitter.

Just click the Tweet icon below. This will launch Twitter where you click its icon to post the Tweet.

Check out TechSavvy.Life for blog posts on smartphones, PCs, and Macs! You may email us at contact@techsavvy.life for comments or questions.

I Would Like to Hear From You

Please feel free to leave a comment. I would love hearing from you. Do you have a computer or smart device tech question? I will do my best to answer your inquiry. Just send an email to contact@techsavvy.life. Please mention the device, app and version that you are using. To help us out, you can send screenshots of your data related to your question.

The author’s Vietnam eBook on the Battle for Tra Bong Vietnam: Events and Aftermath