I am Raymond Oglesby, an Information Technology (IT) specialist with 30 years in the field. I have taught Microsoft Applications and troubleshot computers in 15 countries and many States. My career was focused on mainframes and desktops from application development to implementation. I have written hundreds of programs for various architectures. I decided to start a blog to share my knowledge and experiences with you. I plan on updating this blog at least twice a week about smart phone apps to Windows.
Please feel free to leave a Comment or Tweet. I would love to hear from you. Do you have a computer tech question? I will do my best to answer your inquiry. Please mention the app and version that you are using. To help me out, you can send screenshots of your data related to your question.
We are giving away one (1) $50.00 Amazon Gift Card to one of our followers in celebration of 300 blog posts. Its simple to enter. Just send an email to:
We are giving away one (1) $50.00 Amazon Gift Card to one of our followers in celebration of 300 blog posts. It’s simple to enter. Just send an email to:
wrojr@cox.net
with a Subject line of:
300 Posts Giveaway
and in the body text, enter:
I would like to enter the 300 blog posts giveaway.
My follower name is __________. (Optional)
Your email must be received by midnight September 23, 2021. The winner will be announced and notified in a random drawing on September 24, 2021. Only one entry per follower. Tell your friends and relatives to start following TechSavvy.Life.
That’s it. Thank you for being a follower and hope you enjoy the blog posts.
When you read paperback and hardcover books, you use page numbers for tracking progress and for discussing parts of the book. But, by default, Amazon Kindle only shows you your location in the book.
When you read paperback and hardcover books, you use page numbers for tracking progress and for discussing parts of the book. But, by default, Amazon Kindle only shows you your location in the book. Let’s find out how to see it’s page numbers.
This is for the Kindle
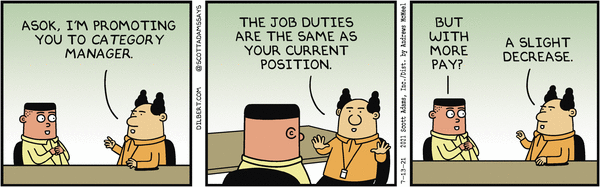
Copyright Scott Adams, Inc./Distributed by Universal Uclick for UFS
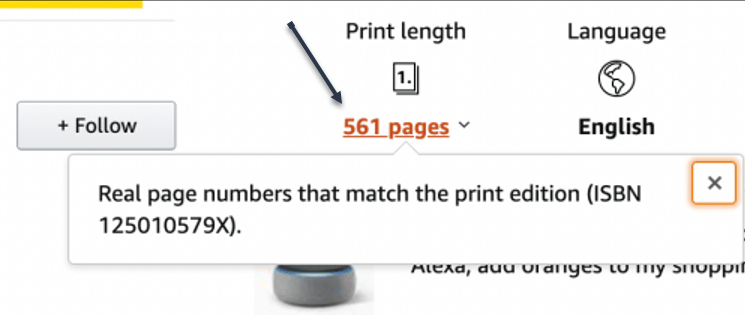
If a Kindle book has a Print Length section on its Amazon page, it means you will be able to see real page numbers as you move through the book. Refer to below image:
Viewing Print Length
Once enabled, page numbers will be visible in the bottom left-hand corner of the reading screen (replacing the Location or Reading Progress).
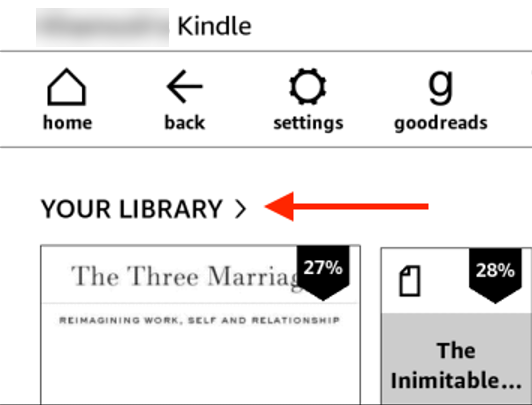
First, navigate to the Your Library section in the Kindle e-book reader. See below image:
Selecting an e-book
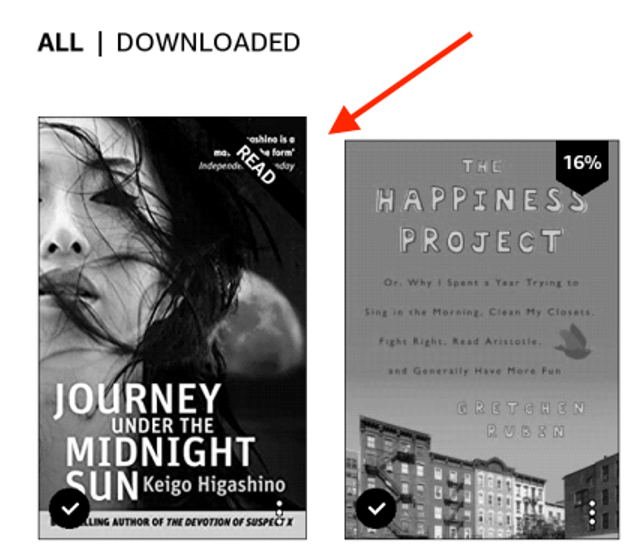
Next, tap a book to start reading. See following image:
Tap a book to read
Now, tap in the top part of the screen to reveal the toolbar. Refer to below image:
Reveal the toolbar
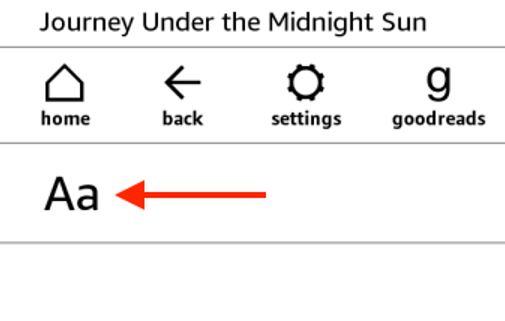
Next, select the “Aa” button. See below image:
Tap the text option
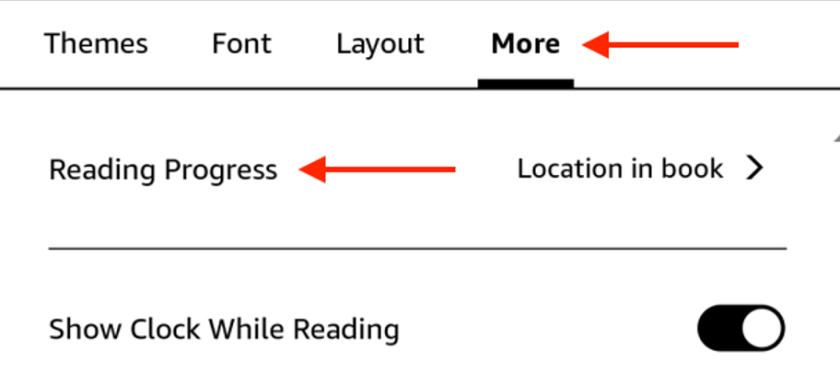
Now, tap the More tab and select the Reading Progress option. See following image:
Tap More and Reading Progress options
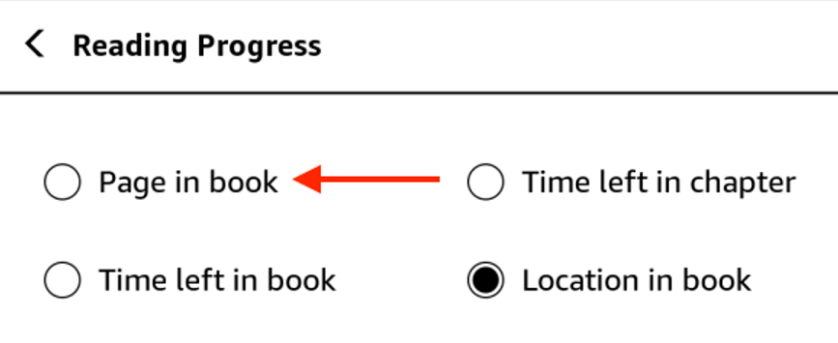
Next, select the Page in Book option. If this option is blacked out, it means that real page numbers will not be available for this book on Kindle. Refer to below image:
Select Page in book option
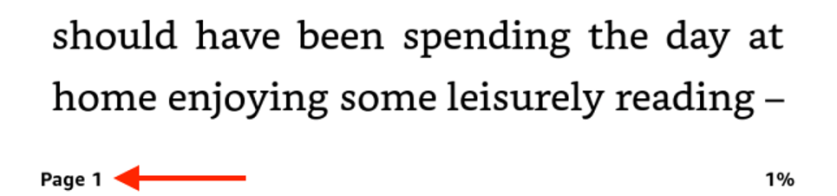
Now, go back to the reading view. In the bottom left -hand corner of your screen, you will now see the page number. See below image:
View the page number
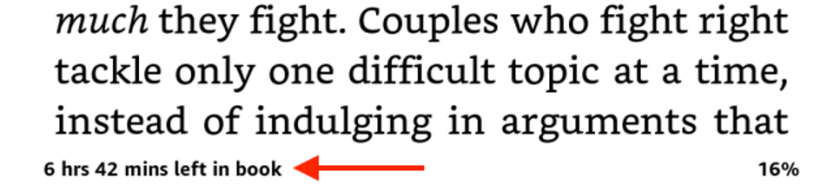
You can quickly cycle through all the Reading Progress options (Page in Book, Time Left in Chapter, Time Left in Book, Location in Book, and Note) by tapping the text in the bottom left-hand corner of your screen. See following image:
View the Reading Progress options
Quote For the Day
You can’t try to do things; you simply must do them.
Ray Bradbury
That’s it. Please feel free to share this post! One way to share is via Twitter.
Just click the Tweet icon below. This will launch Twitter where you click its icon to post the Tweet.
Check out TechSavvy.Life blog posts on smartphones, PCs, and Macs! You may email us at contact@techsavvy.life for comments or questions.
Please feel free to leave a comment. I would love hearing from you. Do you have a computer or smart device tech question? I will do my best to answer your inquiry. Just send an email to contact@techsavvy.life. Please mention the device, app and version that you are using. To help us out, you can send screenshots of your data related to your question.
The author’s Vietnam eBook on the Battle for Tra Bong Vietnam: Events and Aftermath
The Reading List is a similar concept to bookmarks but intended for reading material that you find online. At the time of this writing, it’s available in Chrome on the desktop (Windows, Mac, and Linux) and for iPhone and iPad. The feature is not available on Android.
The Reading List is a similar concept to bookmarks but intended for reading material that you find online. At the time of this writing, it’s available in Chrome on the desktop (Windows, Mac, and Linux) and for iPhone and iPad. The feature is not available on Android. For this blog post, we will explore this feature for the iPhone and iPad.
This is for the iPhone and iPad using Google Chrome
Copyright Scott Adams, Inc./Distributed by Universal Uclick for UFS
Chrome for iPhone and iPad has two different ways to add web pages to your Reading List. It can either be done from Chrome or from another app.
Method 1 – Within Chrome
First, find a page to save for later, and then tap the Share icon in the address bar. Refer to below image:
Accessing the Share icon
Next, select Read Later from the menu. See below image:
Selecting Read Later option
That’s it! The page is now in your Reading List.
Method 2 – Use an App
The second method allows you to add things to the list from outside of Chrome. Now, find a news article or story that you would like to read later in any app. In our example, we are using Apple News. Next, find the Share icon in the app and tap it. See following image:
Accessing the Share icon
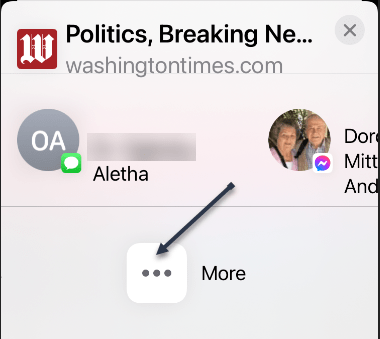
Now, find Chrome in the app row and select it. If you do not see Chrome, tap the three-dot More menu. Refer to below image:
Finding the Chrome app
Now, find Chrome from the app list and tap it. See below image:
Selecting Chrome app
Next, from the Chrome menu, tap Read Later. See following image:
Selecting Read Later option
To access the Reading List on your iPhone or iPad, first, open Chrome and tap the three-dot Menu icon at the bottom. Refer to below image:
Accessing the Menu icon
Next, select Reading List from the menu. You will notice a number that indicates unread pages. See below image:
Accessing Reading List option
Now, the Reading List will open with Unread pages at the top and Pages You’ve Read at the bottom. Pages marked with a green check are ready to read offline. See following image:
Your Reading List
Next, tap Edit in the bottom corner to manage the list. Refer to below image:
Selecting to Edit your Reading List
From here, you can select pages and delete or mark them as read. See below image:
Selecting Delete or Mark as Read option
The Reading List is a nice, simple alternative to apps that provide similar services. It all happens right inside of Chrome without any additional software.
Quote For the Day
We’ve gotta reinvest in space travel. We should’ve never left the moon.
Ray Bradbury
That’s it. Please feel free to share this post! One way to share is via Twitter.
Just click the Tweet icon below. This will launch Twitter where you click its icon to post the Tweet.
Check out TechSavvy.Life for blog posts on smartphones, PCs, and Macs. You may email us at contact@techsavvy.life for comments or questions.
Please feel free to leave a comment. I would love hearing from you. Do you have a computer or smart device tech question? I will do my best to answer your inquiry. Just send an email to contact@techsavvy.life. Please mention the device, app and version that you are using. To help us out, you can send screenshots of your data related to your question.
The author’s Vietnam eBook on the Battle for Tra Bong Vietnam: Events and Aftermath
If your cursor keeps overshooting your target on your Windows 10 desktop, the culprit might be a feature known as Mouse Acceleration. Disabling it might increase your pointer accuracy, letting you land right on point every time.
If your cursor keeps overshooting your target on your Windows 10 desktop, the culprit might be a feature known as Mouse Acceleration. Disabling it might increase your pointer accuracy, letting you land right on point every time.
This is for devices running Windows 10
Copyright Scott Adams, Inc./Distributed by Universal Uclick for UFS
What is Mouse Acceleration
Mouse Acceleration in Windows 10 is a feature that increases the distance and speed at which your cursor moves across the screen in response to the speed with which you move your physical mouse.
With Mouse Acceleration enabled, if you were to quickly move your physical mouse three inches, your cursor could travel from one side of the screen to the other. However, if you were to move your mouse the exact same distance, only much slower, your cursor might only make it halfway across the screen.
This feature is enabled on Windows 10 devices by default, and the goal is to enhance the precision of your cursor. For many, it has the exact opposite effect; especially for gamers. If you find this to be the case for you, you can disable it.
Turn Off the Feature
First, in the Cortana search box (next to the Windows logo key), type Mouse and click Mouse settings from the search results in upper left-hand corner. Refer to below image:
Selecting Mouse settings
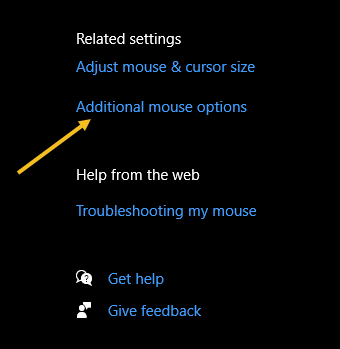
Next, find the Related settings group to the right of the Mouse settings window (or the bottom if your window size is small). Now, click Additional mouse options. See below image:
Selecting more mouse options
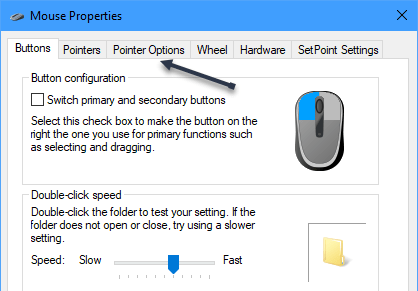
Next, in the Mouse Properties window, click the Pointer Options tab. See following image:
Selecting Pointer Options tab
Now, under the Motion group, uncheck Enhance pointer precision, and then click Apply. Refer to below image:
Turn off pointer precision
Now close the Mouse Properties window and exit Settings. Your mouse acceleration is now disabled.
This should help you more accurately land on your targets. But if you are a gamer and you are still having problems, you may want to read up on “mouse DPI and polling rates” and invest in a mouse that’s designed for gaming.
Quote For the Day
There are worse crimes than burning books. One of them is not reading them.
Ray Bradbury
That’s it. Please feel free to share this post! One way to share is via Twitter.
Just click the Tweet icon below. This will launch Twitter where you click its icon to post the Tweet.
Check out TechSavvy.Life for blog posts on smartphones, PCs, and Macs! You may email us at contact@techsavvy.life for comments or questions.
Please feel free to leave a comment. I would love hearing from you. Do you have a computer or smart device tech question? I will do my best to answer your inquiry. Just send an email to contact@techsavvy.life. Please mention the device, app and version that you are using. To help us out, you can send screenshots of your data related to your question.
The author’s Vietnam eBook on the Battle for Tra Bong Vietnam: Events and Aftermath
We are giving away one (1) $50.00 Amazon Gift Card to one of our followers in celebration of 300 blog posts. Its simple to enter. Just send an email to:
We are giving away one (1) $50.00 Amazon Gift Card to one of our followers in celebration of 300 blog posts. It’s simple to enter. Just send an email to:
wrojr@cox.net
with a Subject line of:
300 Posts Giveaway
and in the body text, enter:
I would like to enter the 300 blog posts giveaway.
My follower name is __________. (Optional)
Your email must be received by midnight September 23, 2021. The winner will be announced and notified in a random drawing on September 24, 2021. Only one entry per follower. Tell your friends and relatives to start following TechSavvy.Life.
That’s it. Thank you for being a follower and hope you enjoy the blog posts.
If you take advantage of Excel’s charts for helpful visual displays of your data, check out the People Graph option to create a simple depiction of the number of people or items you have logged in your spreadsheet.
If you take advantage of Excel’s charts for helpful visual displays of your data, check out the People Graph option to create a simple depiction of the number of people or items you have logged in your spreadsheet.
This is for devices running Excel. Screenshots are from Excel for Office 365 and Windows 10.
Copyright Scott Adams, Inc./Distributed by Universal Uclick for UFS
You can display things like the number of visitors to your website, downloads of your app, sign-ups for your event, calls to your support center, and much more.
Add People Graph Add-In
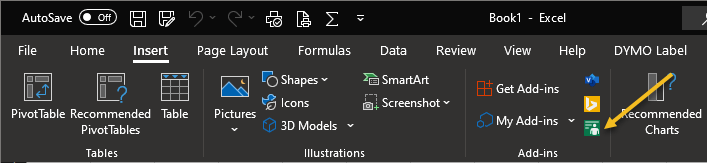
People Graph is an Add-In developed by Microsoft, and there’s already a button for it in your Excel ribbon. But before you can use it, you will have to trust the add-in to install it. First, open the Insert tab in Excel and look for the Add-ins group. Click the button for People Graph. Refer to below image:
Select the Add-In
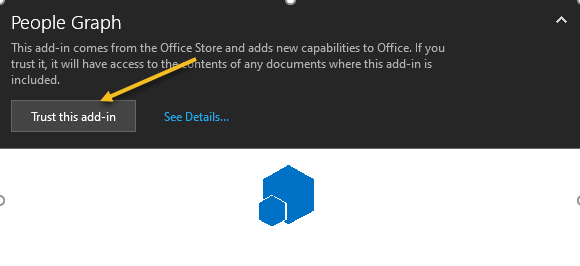
Next, You will see a pop-up window with a link to See Details. This takes you to the Add-In on the Office Store, where you can read an overview, reviews, and other details. Click Trust this add-in to get started. See below image:
Trust the Add-In option
Now, once the add-in is installed in Excel, you can click the button on the Insert tab to use the feature.
Insert a People Graph
Whenever you hit the People Graph button in the ribbon, you will see a sample graph. First. click the Data icon that looks like a small grid. See following image:
Select the People Graph button
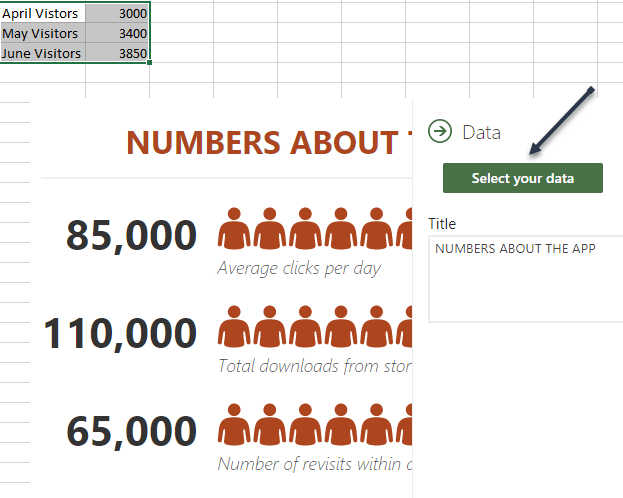
Optionally, you can enter your graph Title before selecting your data, or you can just head back to this spot to add the title later. Next, click Select your data, and then drag through the cells that you want to use. Currently, you must use two columns of data, but you can have multiple rows. Refer to below image:
Select your data
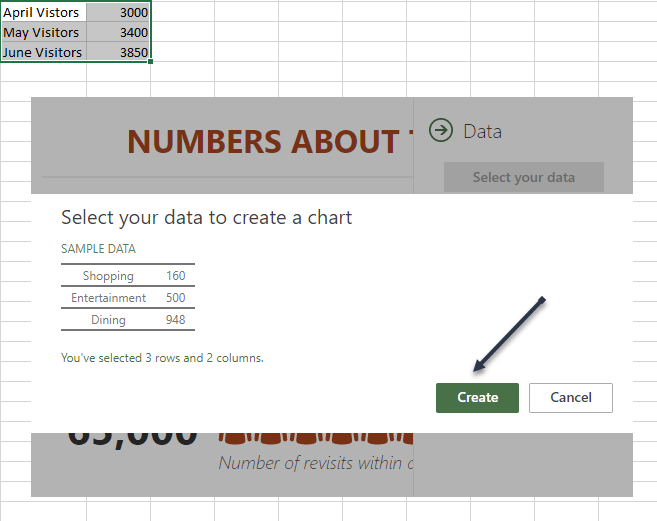
Now, click Create on the People Graph screen. See below image:
Create the People Graph
Customize Your PeopleGraph
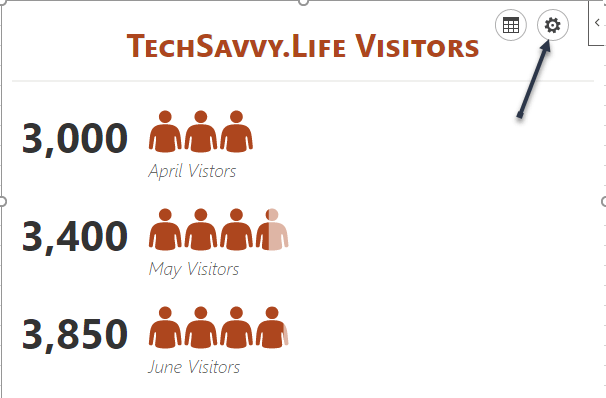
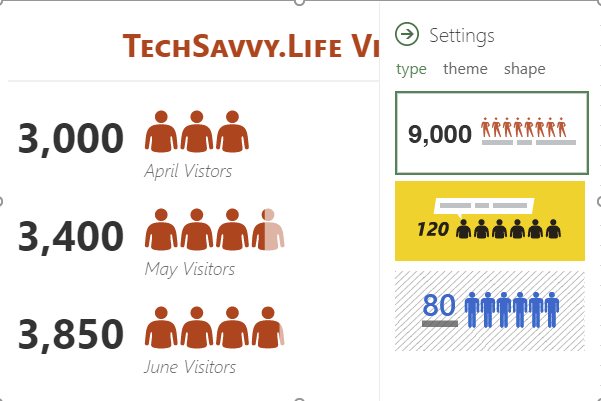
First, click the gear icon to open the Settings. You can then move through the three settings for type, theme, and shape. See following image;
Select the Settings gear icon
You can currently pick from three graph types. Each has a slightly different layout and appearance. Now, click Type, and then choose one on the right side. Refer to below image:
Select your Type of graph
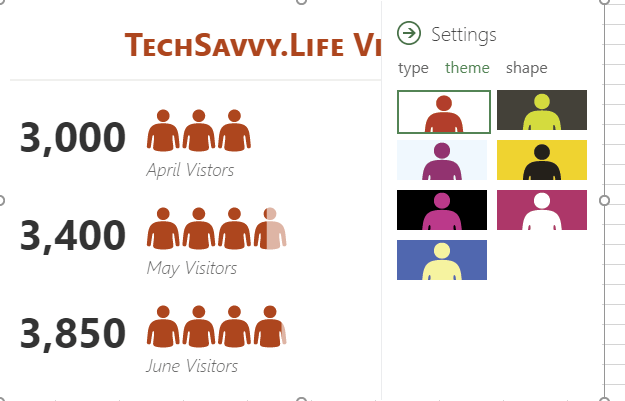
Next, you can select a Theme that changes the background and colors of your graph. Click Theme, and choose one of the seven options. See below image:
Select your theme for the graph
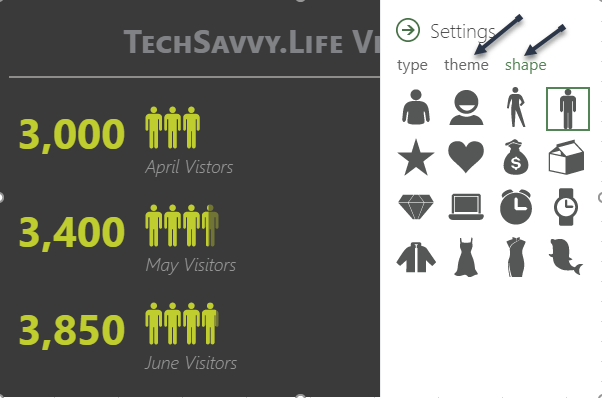
Finally, you can use a different Shape. So if your data is better represented by a Shape other than people, you can choose the best fit. Now, click Shape and pick from the 16 options. See following image:
Select the Shape of your graph
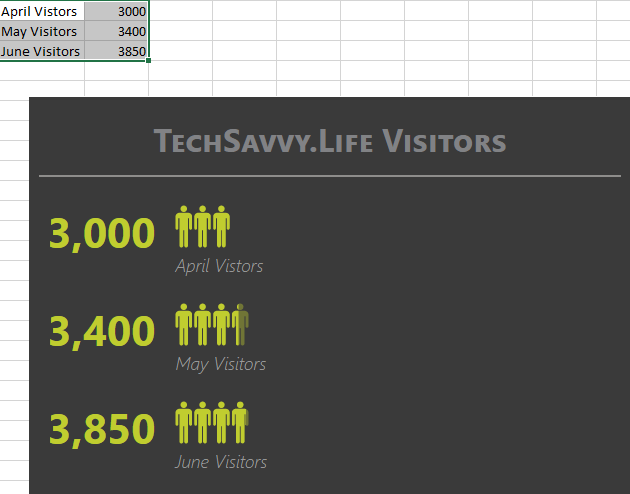
Next, you can select and drag your People Graph wherever you want it on your spreadsheet. And if you edit the data on which the graph is based, Excel will update the graph automatically. Refer to below image:
Your final result
Other Options
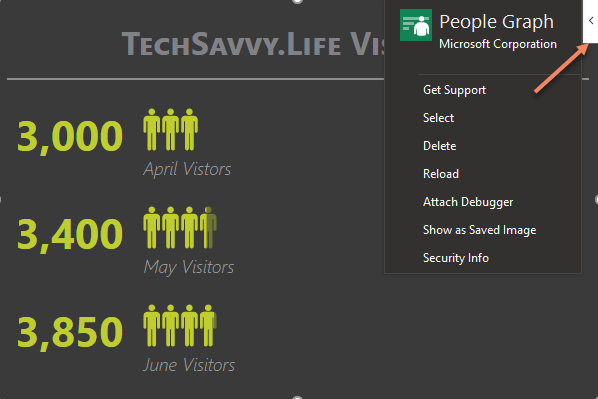
On the top right of your People Graph, you will see an arrow (Windows) or an Info icon (Mac). When you click, you will see several actions .Choose Reload to refresh the graph, Delete to remove it, and Select to select the graph if you want to move it. You also have options to Get Support, Attach Debugger, and view the Security info. See below image:
Select Other Options
If you are looking for a simple way to visually display data, especially if it includes a number of people like customers, clients, or contacts, try out the People Graph in Microsoft Excel.
Quote For the Day
If you don’t like what you’re doing, then don’t do it
Ray Bradbury
That’s it. Please feel free to share this post! One way to share is via Twitter.
Just click the Tweet icon below. This will launch Twitter where you click its icon to post the Tweet.
Check out TechSavvy.Life for blog posts on smartphones, PCs, and Macs! You may email us at contact@techsavvy.life for comments or questions.
Please feel free to leave a comment. I would love hearing from you. Do you have a computer or smart device tech question? I will do my best to answer your inquiry. Just send an email to contact@techsavvy.life. Please mention the device, app and version that you are using. To help us out, you can send screenshots of your data related to your question.
The author’s Vietnam eBook on the Battle for Tra Bong Vietnam: Events and Aftermath
iPhones are awesome communication devices. So it makes sense that you would want to put the people you talk to the front and center.
Surprisingly, Apple does not make it clear that it’s even possible to do this. The functionality is buried in the powerful Shortcuts app. Let’s explore how this is done.
This is for the iPhone and iPad
Copyright Scott Adams, Inc./Distributed by Universal Uclick for UFS
There are basically two different actions that can be associated with contact Shortcuts. You can have the Shortcut give you the option of how you want to contact the person; Message, Call, FaceTime; or it can jump straight into one of those. We will be covering the first option.
Create the Shortcut
First, open the Shortcuts app on your iPhone or iPad. Refer to below image:
Accessing your Shortcuts app
Next, go to All Shortcuts See below image:
Find All Shortcuts
Now, switch to the Gallery tab in the bottom bar. See following image:
Open the Gallery of Shortcuts
Add the Contact
Next, do a search for Contact, and select the Contact on Home Screen shortcut. Refer to below image:
Search for a contact
Now, tap the Add Shortcut button. See below image:
Add contact Shortcut
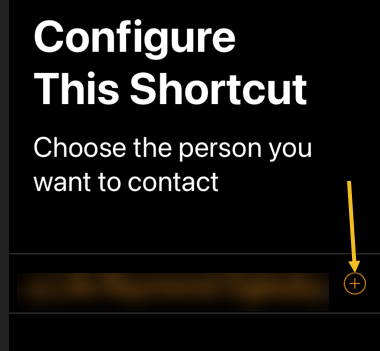
On the next screen is where you will select a person for the Shortcut. Tap the “+” button. See following image.
Selecting to add a contact
Now, find the person you want to use for the Shortcut in your contacts list. Refer to below image:
Locate a contact
Next, tap Done to finish. See below image:
Finish the setup
View the Newly Added Shortcut
Now, go back to the My Shortcuts tab, and you will see the newly added Shortcut. Touch and hold to bring up some options. See following image:
View your Shortcut
Next, select Details from the menu. Refer to below image:
Accessing Details for the Shortcut
Add to Home Screen and Customize
Now, select Add to Home Screen. See below image:
Add contact Shortcut to your Home screend
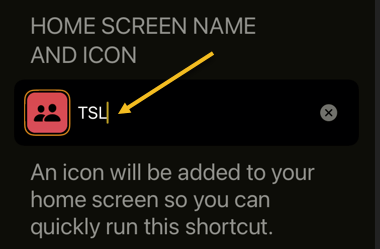
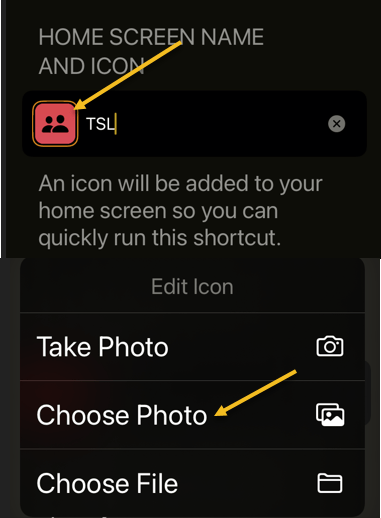
Next, tap the text to enter the name that you would see under the icon on the Home screen. See following image:
Label the Shortcut icon
Now, select the icon to choose a photo for it or the other two options. Refer to below image:
Select a photo for the contact
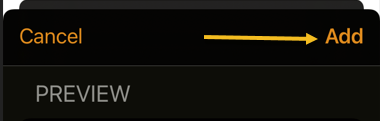
Next, once you are done customizing the icon, tap Add in the top right-hand corner. See below image:
Finish customizing
Now, the icon will be added to your Home screen. When you tap it, a menu with communication choices will appear. Simply do this for all of your favorite people! See following image:
Your Shortcut in action
Quote For the Day
It doesn’t matter how beautiful your theory is, it doesn’t matter how smart you are. If it doesn’t agree with experiment, it’s wrong.
Richard P Feynman
Pretty nifty feature. It’s like having a person on speed dial. Please feel free to share this post! One way to share is via Twitter.
Just click the Tweet icon below. This will launch Twitter where you click its icon to post the Tweet.
Check out TechSavvy.Life for blog posts on smartphones, PCs, and Macs! You may email us at contact@techsavvy.life for comments or questions.
Please feel free to leave a comment. I would love hearing from you. Do you have a computer or smart device tech question? I will do my best to answer your inquiry. Just send an email to contact@techsavvy.life. Please mention the device, app and version that you are using. To help us out, you can send screenshots of your data related to your question.
The author’s Vietnam eBook on the Battle for Tra Bong Vietnam: Events and Aftermath
It is possible to add videos to a PowerPoint Kiosk or self-running presentation. You have been able to do this for years but it’s become a lot easier in recent versions of Office. Making the video work within a self-running presentation takes a little extra trickery. L
It is possible to add videos to a PowerPoint Kiosk or self-running presentation. You have been able to do this for years but it’s become a lot easier in recent versions of Office. Making the video work within a self-running presentation takes a little extra trickery. Let’s explore how to do this.
This is for devices running PowerPoint
Copyright Scott Adams, Inc./Distributed by Universal Uclick for UFS
Here are the steps:
Go to the presentation and add a blank slide where you want the video to go.
Insert the video onto the slide from Insert | Video.
Make any changes you want to the video; trimming, effects, fades , and so on.
Ensure that Video Tools | Playback | Video Options | Start is set to Automatically. Refer to below image:
Set the Playback to automatically
Using the slider below the video, note the running time of the video.
Switch to the Transitions tab. Under Timing | Advance Slide | After set the duration to the same (our video is 41 seconds) or a little more than the video playback time. See below image:
Set the timing for the video
With those settings the video will automatically play when the slide appears and will advance to the next slide when the video ends. If the video slide gets ‘stuck’ set the Advance Slide duration to match the video playing time.
Quote For The Day
The saddest aspect of life right now is that science gathers knowledge faster than society gathers wisdom
Isaac Asimov
That was easy. Please feel free to share this post! One way to share is via Twitter.
Just click the Tweet icon below. This will launch Twitter where you click its icon to post the Tweet.
Check out TechSavvy.Life for blog posts on smartphones, PCs, and Macs! You may email us at contact@techsavvy.life for comments or questions.
Please feel free to leave a comment. I would love hearing from you. Do you have a computer or smart device tech question? I will do my best to answer your inquiry. Just send an email to contact@techsavvy.life. Please mention the device, app and version that you are using. To help us out, you can send screenshots of your data related to your question.
The author’s Vietnam eBook on the Battle for Tra Bong: Events and Aftermath