How to Add Videos to PowerPoint Kiosk Mode

It is possible to add videos to a PowerPoint Kiosk or self-running presentation. You have been able to do this for years but it’s become a lot easier in recent versions of Office. Making the video work within a self-running presentation takes a little extra trickery. L

RAYMOND OGLESBY @RaymondOglesby2
September 7, 2021

It is possible to add videos to a PowerPoint Kiosk or self-running presentation. You have been able to do this for years but it’s become a lot easier in recent versions of Office. Making the video work within a self-running presentation takes a little extra trickery. Let’s explore how to do this.

This is for devices running PowerPoint

Dilbert and Woke
Copyright Scott Adams, Inc./Distributed by Universal Uclick for UFS

Here are the steps:

  • Go to the presentation and add a blank slide where you want the video to go.
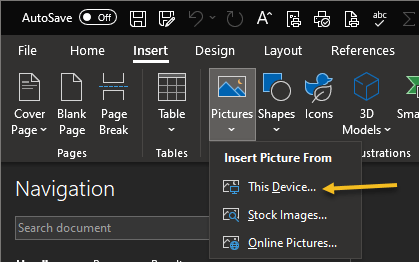
  • Insert the video onto the slide from Insert | Video.
  • Make any changes you want to the video; trimming, effects, fades , and so on.
  • Ensure that Video Tools | Playback | Video Options | Start is set to Automatically. Refer to below image:
PP 1
Set the Playback to automatically
  • Using the slider below the video, note the running time of the video.
  • Switch to the Transitions tab. Under Timing | Advance Slide | After set the duration to the same (our video is 41 seconds) or a little more than the video playback time. See below image:
PP 2
Set the timing for the video

With those settings the video will automatically play when the slide appears and will advance to the next slide when the video ends. If the video slide gets ‘stuck’ set the Advance Slide duration to match the video playing time.

Quote For The Day

The saddest aspect of life right now is that science gathers knowledge faster than society gathers wisdom

Isaac Asimov

That was easy. Please feel free to share this post! One way to share is via Twitter.

Just click the Tweet icon below. This will launch Twitter where you click its icon to post the Tweet.

Check out TechSavvy.Life for blog posts on smartphones, PCs, and Macs! You may email us at contact@techsavvy.life for comments or questions.

I Would Like to Hear From You

Please feel free to leave a comment. I would love hearing from you. Do you have a computer or smart device tech question? I will do my best to answer your inquiry. Just send an email to contact@techsavvy.life. Please mention the device, app and version that you are using. To help us out, you can send screenshots of your data related to your question.

The author’s Vietnam eBook on the Battle for Tra Bong: Events and Aftermath

Celebrate 300 Posts Giveaway

We are giving away one (1) $50.00 Amazon Gift Card to one of our followers in celebration of 300 blog posts. Its simple to enter. Just send an email to:

We are giving away one (1) $50.00 Amazon Gift Card to one of our followers in celebration of 300 blog posts. It’s simple to enter. Just send an email to:

wrojr@cox.net

with a Subject line of:

300 Posts Giveaway

and in the body text, enter:

I would like to enter the 300 blog posts giveaway.

My follower name is __________. (Optional)

Your email must be received by midnight September 23, 2021. The winner will be announced and notified in a random drawing on September 24, 2021. Only one entry per follower. Tell your friends and relatives to start following TechSavvy.Life.

That’s it. Thank you for being a follower and hope you enjoy the blog posts.

How to Save Office Default Save Location in Windows 10

Saving documents from the Microsoft 365 suite is a simple process. As you do, your Word, Excel, and PowerPoint files are saved to the default location of your choosing. If you wish to change this location, you can do so.

RAYMOND OGLESBY @RaymondOglesby2
September 2, 2021

Saving documents from the Microsoft 365 suite is a simple process. As you do, your Word, Excel, and PowerPoint files are saved to the default location of your choosing. If you wish to change this location, you can do so. Let’s explore how this is done.

This is for Windows and Office 365

Dilbert and Decision
Copyright Scott Adams, Inc./Distributed by Universal Uclick for UFS

Microsoft’s recommendation is to save files to your OneDrive location. However, you might want to save all of your Microsoft 365 files to your local drive. By default, Office will use your Documents folder when you save files on your PC.

Thankfully, you do not have to change the saved location every time manually. Instead, you can set a new default. Better still, if you make the change in one Microsoft 365 app, the change carries over to every other one.

Make Your PC the Default Save Location

First, open an Office application, like Word, and click File > Options. (The Options is found in lower left-hand pane). Refer to below image:

Office 1
Selecting Options

Next, the Word Options window will appear. Click the Save tab in the left-hand pane. See below image:

Office 2
Selecting Save option

Now, under the Save Documents section, check the box next to Save to computer by default and click Browse. This will launch File Explorer for you to choose a location. See following image:

Office 3
Set default location

Next. click the OK button in the bottom-right corner of the window to apply the change. Refer to below image:

Office 4
Apply your change

Now, check your default save file location and click OK. Your Word option screen will close. The next time you save an Office file, your computer will be the default save location to the drive or folder you have chosen. (Note! I did not change the default location. This is for demonstration purposes only). See below image:

Office 5
Check default location and save

Quote For the Day

People who think they know everything are a great annoyance to those of us who do.

Isaac Asimov

That’s it. Please feel free to share this post! One way to share is via Twitter.

Just click the Tweet icon below. This will launch Twitter where you click its icon to post the Tweet.

Check out TechSavvy.Life for blog posts on smartphones, PCs, and Macs! You may email us at contact@techsavvy.life for comments or questions.

I Would Like to Hear From You

Please feel free to leave a comment. I would love hearing from you. Do you have a computer or smart device tech question? I will do my best to answer your inquiry. Just send an email to contact@techsavvy.life. Please mention the device, app and version that you are using. To help us out, you can send screenshots of your data related to your question.

The author’s Vietnam eBook on the Battle for Tra Bong: Events and Aftermath

How to Listen to Background Sounds on iPhone

One of the upgrades to Accessibility in iOS and iPadOS 15 is a new Background Sounds feature that plays relaxing audio tracks to help you stay calm and focused, and to block out background distractions.

RAYMOND OGLESBY @RaymondOglesby2
September 1, 2021

One of the upgrades to Accessibility in iOS and iPadOS 15 is a new Background Sounds feature that plays relaxing audio tracks to help you stay calm and focused, and to block out background distractions.

This is for iPhone and iPad

Dilbert and Healing
Copyright Scott Adams, Inc./Distributed by Universal Uclick for UFS

What Are Background Sounds

Background Sounds are like having a sound machine from your bedroom in your iPhone and iPad. The sounds can also be played over Bluetooth to external devices.

With thenew Background Sounds feature, you can play balanced, bright, and dark noise, as well as ocean, rain, and stream sounds to help you concentrate and relax when using your iPhone or iPad.

The feature may negate the need to purchase or subscribe to third-party background noise apps. Its not a dedicated app, but rather hidden away inside your device’s Accessibility settings.

It’s worth noting that at the current time, there is no way to load your own background sound. Note as well that they do not have a time limit. They will only turn off when you disable them. This is a glaring omission by Microsoft. I would like to turn on sound at night as I fall asleep and have it automatically turn off at a certain time. Anyway. let’s explore how to use this feature.

Background Sounds in Accessibility

Apple sees Background Sounds as a way to diversify its array of accessibility features by being more inclusive.

The company says in its official announcement of the feature that it targets “support of neurodiversity” and aims to mitigate “distracting, discomforting, or overwhelming” everyday noises. In other words, the feature can help you focus and relax during the day and mitigate distracting sounds that are bothering you.

That being said, the feature has the ability to appeal to many different people, so it’s interesting that Apple decided to stick with the accessibility angle instead of a more generalized approach.

Enable Background Sounds

First, open the Settings app. Refer to below image:

Sounds 1
Accessing Settings app

Next, scroll down and tap Accessibility. See below image:

Sounds 2
Accessing Accessibility option

Now, under the Hearing section, tap Audio/Visual. See following image:

Sounds 3
Accessing Audio/Visual option

Next, tap Background Sounds. Refer to below image:

Sounds 4
Accessing Background Sounds option

Now, you can toggle Background Sounds On and Off and choose which sound you would like. You can also adjust the volume of the sound as it plays over other media. If you do not want the background sound to play while, for example, listening to music, uncheck Use When Media Is Playing. See below image.

Sounds 5
Selecting your sound

You are ready to listen to relaxing, distraction-free sound from your iPhone or iPad. If you want other particular sounds, consider trying out a third-party white noise app.

Quote For the Day

It’s not going to do any good to land on Mars if we’re stupid.

Ray Bradbury

That’s it. Please feel free to share this post! One way to share is via Twitter.

Just click the Tweet icon below. This will launch Twitter where you click its icon to post the Tweet.

Check out TechSavvy.Life for blog posts on smartphones, PCs, and Macs. You may email us at contact@techsavvy.life for comments or questions.

I Would Like to Hear From You

Please feel free to leave a comment. I would love hearing from you. Do you have a computer or smart device tech question? I will do my best to answer your inquiry. Just send an email to contact@techsavvy.life. Please mention the device, app and version that you are using. To help us out, you can send screenshots of your data related to your question.

The author’s Vietnam eBook on the Battle for Tra Bong Vietnam: Events and Aftermath

How to Find Out What Kindle Model You Have

Over the past 14 years, Amazon has released a lot of slightly different Kindles. If you are wondering whether you have a Paperwhite 3, a Paperwhite 4, an original Kindle, or something else, we will show you how to fine the model.

RAYMOND OGLESBY @RaymondOglesby2
August 31, 2021

Over the past 14 years, Amazon has released a lot of slightly different Kindles. If you are wondering whether you have a Paperwhite 3, a Paperwhite 4, an original Kindle, or something else, we will show you how to fine the model. Let’s explore how this is done in two different ways; on the Kindle, and by your Amazon account.

This is for the Kindle

Dilbert and Alice
Copyright Scott Adams, Inc./Distributed by Universal Uclick for UFS

Use Your Amazon Account

:First, log in to your Amazon account through a web browser and click here to your Manage Devices page. You can also use the Amazon menu system to get there. Go to

Account & Lists > Content & Devices > Devices

Refer to below image:

Kindle 1
Your Kindle Device(s)

Next, click on a Kindle. Now, click the blue link of your Kindle that you want to find the serial number of. See below image

Kindle 2
Your Kindle Device name

In the Device Summary screen, you will see it next to Serial Number. Each model has its own unique set of prefixes. (The prefix is the set of letters at the beginning of the serial number.). See following image:

Kindle 3
Your Kindle Device Summary

You are looking for the first block of characters. You can see G000T6 in our example, which corresponds to a Kindle Paperwhite 4 (You will be able to compare your prefix in the table at the end).

Note! While the Type is listed as Kindle Paperwhite (10th Generation), we still need the serial number prefix in order to tell which specific model it is.

Use Your Kindle Device

First, to check the serial number on the device itself, go to your Kindle’s home page and tap the three dots hamburger icon in the top right to open the menu. Refer to below image:

Kindle 4
Accessing your Kindle menu

Next, tap Settings in the menu. See below image:

Kindle 5
Accessing your Kindle Settings

Now, on the Settings screen, tap Device Options. See following image:

Kindle 6
Accessing your Kindle Device Options

Next, tap Device Info. Refer to below image:

Kindle 7
Accessing your Kindle Device Info

Now, next to Serial Number, you will see the serial number of the Kindle. See below image:

Kindle 8
Your Kindle Device Info

Note! If you have an older Kindle (or are using an old version of the Kindle software), the menus might look a little different. You are still looking for Device Info.

How to Tell Which Kindle You Have

Once you have your serial number, you can compare its prefix to the options below. This will tell you exactly which device you have. Here’s a table summarizing the various models.

Model NameSerial Number Prefix(es)
Kindle Oasis 3 (10th Generation)G000WL, G000WM, G000WP, G000WN, G000WQ, G0011L
Kindle Basic 3 Kids Edition (10th Generation)G090VB
Kindle Basic 3 (10th Generation)G090WF, G090WH, G0910L
Kindle Paperwhite 4 (10th Generation)G000PP, G8S0PP, G00102, G0016T, G8S16T, G0016U, G0016V, G8S16V, G000T6, G8S0T6, G0016Q, G00103, G0016R, G0016S, G000T1, G000T2, G000T3
Kindle Oasis 2 (9th Generation)G000P8, G000SA, G000P1, G000S1, G000S2
Kindle Basic 2 (8th Generation)G000KA, G000K9
Kindle Oasis (8th Generation)G0B0GC, G0B0GD, G0B0GR, G0B0GU, G0B0GT
Kindle Paperwhite 3 (7th Generation)G090G1, G090KB, G090LK, G090G2, G090G4, G090G5, G090G6, G090G7, G090KC, G090KE, G090KF, G090LL
Kindle Voyage (7th Generation)B013, 9013, B054, 9054, B053, 9053, B02A, B052, 9052
Kindle Basic (7th Generation)B0C6, 90C6, B0DD, 90DD
Kindle Paperwhite 2 (6th Generation)B0D4, 90D4, B05A, 905A, B017, 9017, B0D5, 90D5B0D6, 90D6, B0D7, 90D7, B0D8, 90D8, B0F2, 90F2, B060, 9060, B062, 9062, B05F, 905F, B061, 9061
Kindle Paperwhite (5th Generation)B024, B01B, B020, B01C, B01D, B01F
Kindle 5 (5th Generation)B012
Kindle 4 (4th Generation)B00E, B023, 9023
Kindle Touch (4th Generation)B011, B00F, B010
Kindle Keyboard (3rd Generation)B008, B006, B00A
Kindle DX (2nd Generation)B004, B005, B009
Kindle 2 (2nd Generation)B002, B003
Kindle (1st Generation)B001, B101
Table of Kindle Models

Info on Paperwhite 4 (our example)

The Kindle Paperwhite 4 (2018) is waterproof and has a touch screen with adjustable light. There are three models:

  • An 8GB version with Wi-Fi (G000PP, G8S0PP, G00102, G0016T, G8S16T, G0016U, G0016V, G8S16V).
  • A 32GB version with Wi-Fi (G000T6, G8S0T6, G0016Q, G00103, G0016R, G0016S).
  • A 32GB version with Wi-Fi and Cellular (G000T1, G000T2, G000T3).

It was available in black, sage, plum, and twilight blue.

Quote For the Day

If you wish to make an apple pie from scratch, you must first invent the universe.

Carl Sagan

You are finished. Please feel free to share this post! One way to share is via Twitter.

Just click the Tweet icon below. This will launch Twitter where you click its icon to post the Tweet.

Check out TechSavvy.Life for blog posts on smartphones, PCs, and Macs! You may email us at contact@techsavvy.life for comments or questions.

I Would Like to Hear From You

Please feel free to leave a comment. I would love hearing from you. Do you have a computer or smart device tech question? I will do my best to answer your inquiry. Just send an email to contact@techsavvy.life. Please mention the device, app and version that you are using. To help us out, you can send screenshots of your data related to your question.

The author’s Vietnam eBook on the Battle for Tra Bong: Events and Aftermath

How to Highlight Blank or Error Cells in Excel

Spotting things in a spreadsheet can be much quicker when you nightlight them. With conditional formatting in Microsoft Excel, you can make finding blank cells or formula errors easier.

RAYMOND OGLESBY @RaymondOglesby2
August 26, 2021

Spotting things in a spreadsheet can be much quicker when you highlight them. With conditional formatting in Microsoft Excel, you can make finding blank cells or formula errors easier. Let’s explore how this feature works.

This is for devices running Microsoft Excel

Dilbert and Yoga
Copyright Scott Adams, Inc./Distributed by Universal Uclick for UFS

Highlight Blank Cells

When you have a spreadsheet full of data that you expect to fill every cell, you can easily overlook cells that are left empty.

First, open the sheet and select the cells where you want to apply the formatting. Next, go to the Home tab and click Conditional Formatting in the Styles group of the Ribbon. Now, choose New Rule. Refer to below image:

Excel 1
Select New Rule option

Next, in the New Formatting Rule window that appears, click Format only cells that contain under Select a Rule Type at the top. See below image:

Excel 2
Select a Rule Type option

Now, at the bottom, pick Blanks in the Format only cells with drop-down box. Next, click Format to the lower right of the preview to select how to format the blank cells. See following image:

Excel 3
Select Format Cells with blanks

Now, in the Format Cells window, use the tabs at the top for Font, Border, and Fill to choose your formatting. Click OK. For our example, we are using Fill to color our blank cells bright yellow. Refer to below image:

Excel 4
Select choose a Fill color

You will be back on the New Formatting Rule window, where you will see a preview of the formatting for blank cells. If you are happy with it, click OK to apply the conditional formatting. See below image:

Excel 5
Save your changes

You should then see any empty cells in the range that you selected highlighted with the formatting that you picked. See following image:

Excel 6
Your final result

Highlight Error Cells

Even though Microsoft Excel does a decent job of of pointing errors out to you, they might not be noticeable if you have a large sheet to scroll through. To make sure that you see the errors quickly, conditional formatting is the way to go.

You will actually follow the same process that you used in the previous section to highlight blanks, but with one difference.

First, switch to the Home tab, click Conditional Formatting, and then choose New Rule. Refer to below image:

Excel 7
Select New Rule option

Next, in the New Formatting Rule window, pick Format only cells that contain at the top. But this time, pick Errors in the Format only cells with drop-down box at the bottom. Now, click Format to choose the formatting. See below image:

Excel 8
Select Format for errors

For this example, adjust the Font options to make the cells with errors bold and red. Click OK. After you pick the formatting, click OK again to apply the rule. See following image:

Excel 9
Select formatting for errors

Now, those errors will be very visible! Refer to below image:

Excel 10
Your final result

Quote For the Day

The true delight is in the finding out rather than in the knowing

Isaac Asimov

You are finished. Please feel free to share this post! One way to share is via Twitter.

Just click the Tweet icon below. This will launch Twitter where you click its icon to post the Tweet.

Check out TechSavvy.Life for blog posts on smartphones, PCs, and Macs! You may email us at contact@techsavvy.life for comments or questions.

I Would Like to Hear From You

Please feel free to leave a comment. I would love hearing from you. Do you have a computer or smart device tech question? I will do my best to answer your inquiry. Just send an email to contact@techsavvy.life. Please mention the device, app and version that you are using. To help us out, you can send screenshots of your data related to your question.

The author’s Vietnam eBook on the Battle for Tra Bong: Events and Aftermath

How to View Your Most Used Apps on iPhone

A big part of your daily time is spent using your iPhone. Whether you want to understand your app usage, change your lifestyle, or just know which apps you need to cut down on, its helpful to know about your most used apps.

RAYMOND OGLESBY @RaymondOglesby2
August 25, 2021

A big part of your daily time is spent using your iPhone. Whether you want to understand your app usage, change your lifestyle, or just know which apps you need to cut down on, its helpful to know about your most used apps. Let’s explore this feature, called Screen Time.

This is for the iPhone

Dilbert and Story
Copyright Scott Adams, Inc./Distributed by Universal Uclick for UFS

Enable Screen Time

Before you can find out which apps you use the most on your iPhone, you will need to turn on a free feature built into iOS called Screen Time. This feature helps you keep track of how you use your iPhone. It can also help you put limits on your app usage if you would like, although that’s optional.

First, open the Settings app, and then tap the Screen Time option. Refer to below image:

Apps 1
Accessing Screen Time option

Next, tap Turn on Screen Time and tap This is My iPhone or This is My Child’s iPhone. See below image:

Apps 2
Enable Screen Time

Now, you will see a Screen Time summary page with no data, but we will fix that problem. Note! Each time you enable Screen Time, you data is removed.

Check Screen Time Again

The catch with using Screen Time is that it needs to be enabled to start gathering data about which apps you use the most. If you just turned it on, you will not have a most-used app list to look at.

So, now that Screen Time has been enabled, use your iPhone as you normally would. After a while, you can check back in with Screen Time and see some statistics.

Next, open the Settings app and tap Screen Time again. See following image:

Apps 1
Accessing Screen Time option

Now, on the Screen Time summary page, you will see a chart that shows your average daily activity. Just under that chart, tap See All Activity. Refer to below image:

Apps 4
Selecting to See All Activity

Next, choose whether you want to see your most used apps over the period of a day, week, month, or year at the top of the screen. See below image:

Apps 5
Selecting your time period

Now, scroll down to the Most Used section, and you will see a list of apps sorted by which you used the most over the selected time period, with your most used apps listed at the top. Tap an app to see more details. See following image:

Apps 6
Selecting an app to view its details

Add a Limit

Next, while on the detailed-view screen, if you want to set a time limit to prevent you from using the app too much, scroll down and tap Add Limit. Refer to below image:

Apps 7
Selecting Add a Limit to control how much time you spend using the app

Now, you will see a screen where you can set a time limit for the app in hours or minutes. When you’re done, tap Add. See below image:

Apps 8
Setting the time limit

From now on, whenever your time is up, you will see an alert pop up, reminding you not to use the app anymore.

Quote For the Day

True terror is to wake up one morning and discover that your high school class is running the country.

Kurt Vonnegut

That’s it. Please feel free to share this post! One way to share is via Twitter.

Just click the Tweet icon below. This will launch Twitter where you click its icon to post the Tweet.

Check out TechSavvy.Life for blog posts on smartphones, PCs, and Macs! You may email us at contact@techsavvy.life for comments or questions.

I Would Like to Hear From You

Please feel free to leave a comment. I would love hearing from you. Do you have a computer or smart device tech question? I will do my best to answer your inquiry. Just send an email to contact@techsavvy.life. Please mention the device, app and version that you are using. To help us out, you can send screenshots of your data related to your question.

The author’s Vietnam eBook on the Battle for Tra Bong: Events and Aftermath

How to Freely Move Pictures in Word

Whenever you insert a graphic into a document, it is inserted “in line with text” by default. This treats the object as if it were text, moving it around the page as text is inserted. You can enable text wrapping on an object to move it around freely, forcing the text to move around to accommodate it.

RAYMOND OGLESBY @RaymondOglesby2
August 24, 2021

Whenever you insert a graphic into a document, it is inserted “in line with text” by default. This treats the object as if it were text, moving it around the page as text is inserted. You can enable text wrapping on an object to move it around freely, forcing the text to move around to accommodate it. Let’s explore this feature.

This is for devices running Word

Dilbert and Budget
Copyright Scott Adams, Inc./Distributed by Universal Uclick for UFS

Make Single Picture Moveable

First, open Microsoft Word on your Windows or Mac computer. On Word’s first screen, select Blank document to create a new document. Refer to below image:

Word 1
Open a blank Word document

Now, in Word’s editing window, click the Insert tab at the top. See below image:

Word 2
Click the Insert tab

Next, under the Illustrations section, click

Pictures > This Device

This lets you add a picture from your computer. See following image:

Word 3
Click This Device to locate a picture on your computer

Now, using your File Explorer, navigate to your picture. Double-click the picture to add it to your Word document. Refer to below image:

Word 4
Find a picture on File Explorer

Next, on Word’s editing screen, right-click the image that you just added and select

Wrap Text > In Front of Text

from the menu. See below image:

Word 5
Locate picture in Front of Text

Your picture is now freely movable. Drag and drop it anywhere you want in your document. See following image:

Word 6
The final result

Make All Pictures Moveable

If you would like to make all of your future pictures freely move in your Word documents, you can modify an option in Word’s Settings menu.

First, launch Microsoft Word on your Windows or Mac computer. Now, on Word’s main screen in the lower-left corner, click Options.

Note! If you are on Word’s document editing screen, instead, click File at the top to see Options.

Refer to below image:

Word 7
Select Options

Next, select Advanced in the sidebar on the left. See below image:

Word 8
Select Advanced

Now, scroll down the right pane to the Cut, copy, and paste section. Locate the Insert/paste picture as option and click the drop-down menu next to it. See following image:

Word 9
Locate drop down menu

Next, select In front of text option in the drop-down menu. Refer to below image:

Word 10
Select In front of text option

Now, click OK at the bottom of the Options window to save your changes and close the window. See below image:

Word 11
Save your changes and exit

From now on, Word will allow you to freely move pictures on top of text in your documents.

You might be thinking about spacing around your text. As is, with the picture being in front of your text, your text is hidden. One way to fix this is using the option Through or Top and bottom of the picture instead of choosing In front of text.

Quote For the Day

Science fiction is any idea that occurs in the head and doesn’t exist yet, but soon will, and will change everything for everybody, and nothing will ever be the same again. As soon as you have an idea that changes some small part of the world you are writing science fiction. It is always the art of the possible, never the impossible.

Ray Bradbury

You are finished on making pictures moveable in Word. Please feel free to share this post! One way to share is via Twitter.

Just click the Tweet icon below. This will launch Twitter where you click its icon to post the Tweet.

Checkout TechSavvy.Life for blog posts on smartphones, PCs, and Macs! You may email us at contact@techsavvy.life for comments or questions.

I Would Like to Hear From You

Please feel free to leave a comment. I would love hearing from you. Do you have a computer or smart device tech question? I will do my best to answer your inquiry. Just send an email to contact@techsavvy.life. Please mention the device, app and version that you are using. To help us out, you can send screenshots of your data related to your question.

The author’s Vietnam eBook on the Battle for Tra Bong: Events and Aftermath

How to Download PDFs Instead of Viewing Them Using Chrome

When you click a PDF link in Chrome, the browser opens the PDF in a preview window. If you do not want this, you can change its default behavior.

RAYMOND OGLESBY @RaymondOglesby2
August 19, 2021

When you click a PDF link in Chrome, the browser opens the PDF in a preview window. If you do not want this, you can change its default behavior.

The Chrome browser has a built-in option to change this default setting. You can instruct Chrome to automatically download the PDF file without opening it in a preview window.

Instead, Chrome will prompt you to save your PDFs. Let’s explore how to set this feature in Google Chrome.

This is for devices running Google Chrome

Dilbert and Jesus
Copyright Scott Adams, Inc./Distributed by Universal Uclick for UFS

First, open Google Chrome on your computer. Next, click the Chrome menu (three dots hamburger icon) in the top right-hand corner of your window. Now, select Settings. Refer to below image:

PDF 1
Accessing Settings

Next, in Chrome settings, click Privacy and security in the left sidebar. Click Site Settings on the right. See below image:

PDF 2
Accessing Site Settings

Now, scroll down in Site Settings and click Additional content settings at the very bottom of your screen. See following image:

PDF 3

Accessing additional content

Next, in the expanded menu, select PDF documents on the left. Refer to below image:

PDF 4
Accessing PDF documents

Now, toggle ON the Download PDF files instead of automatically opening them in Chrome option. Refer to below image:

PDF 5
Enable download of PDF documents instead of preview

Chrome will now display the standard save prompt for PDFs.

Quote For the Day

But the fact that some geniuses were laughed at does not imply that all who are laughed at are geniuses. They laughed at Columbus, they laughed at Fulton, they laughed at the Wright Brothers. But they also laughed at Bozo the Clown.

Carl Sagan

You are finished. Please feel free to share this post! One way to share is via Twitter.

Just click the Tweet icon below. This will launch Twitter where you click its icon to post the Tweet.

Check out TechSavvy.Life for blog posts on smartphones, PCs, and Macs! You may email us at contact@techsavvy.life for comments or questions.

I Would Like to Hear From You

Please feel free to leave a comment. I would love hearing from you. Do you have a computer or smart device tech question? I will do my best to answer your inquiry. Just send an email to contact@techsavvy.life. Please mention the device, app and version that you are using. To help us out, you can send screenshots of your data related to your question.

The author’s Vietnam eBook on the Battle for Tra Bong: Events and Aftermath