I am Raymond Oglesby, an Information Technology (IT) specialist with 30 years in the field. I have taught Microsoft Applications and troubleshot computers in 15 countries and many States. My career was focused on mainframes and desktops from application development to implementation. I have written hundreds of programs for various architectures. I decided to start a blog to share my knowledge and experiences with you. I plan on updating this blog at least twice a week about smart phone apps to Windows.
Please feel free to leave a Comment or Tweet. I would love to hear from you. Do you have a computer tech question? I will do my best to answer your inquiry. Please mention the app and version that you are using. To help me out, you can send screenshots of your data related to your question.
At times you would like to “grab” a copy of a web page in Google Chrome without printing it out on paper. This is not obvious but easily to do on various devices.
At times you would like to “grab” a copy of a web page in Google Chrome without printing it out on paper. This is not obvious but easily to do on various devices.
This is for Windows 10 PCs, Macs and other devices that support Google Chrome
Copyright Scott Adams, Inc./Distributed by Universal Uclick for UFS
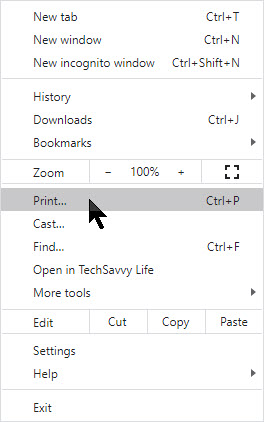
First, open Chrome and navigate to a web page you would like to save as a PDF. In the upper right hand corner, click on the hamburger icon (the one with three dots). Refer to below image:
The Hamburger icon
In the pop-up menu, select Print. See below image:
The Chrome Print option
The Print window will open. From here, select Destination, then click on Save as PDF. See following image:
Chrome’s Save as PDF option
Use the Pages option to save certain pages (for example, only the first page like in my example or a range of pages). If you would like to change the orientation of the PDF file from portrait (the default) to landscape, click on the Layout option.
When you are done with your options, click on the Save button at the bottom of the page. Refer to below image:
Chrome’s Save your changes option
The Save As dialog box will open. Enter the path where you want to save your PDF file and rename the file, if necessary. Click Save to save your file. See following image:
Chrome’s Save the PDF file
Your web page(s) will be saved as a PDF file in the location you have chosen.
It’s possible to save documents to PDF files other than Chrome. Whether its a Window 10 or a Mac computer, print-to-PDF functionally will be similar.
Please feel free to leave a comment. I would love hearing from you. Do you have a computer or smart device tech question? I will do my best to answer your inquiry. Please mention the device, app and version that you are using. To help us out, you can send screenshots of your data related to your question.
The author’s Vietnam eBook on the Battle for Tra Bong: Events and Aftermath
Outlook lets you add an expiration date to email you send or receive. Once the expiration date has passed the email will be displayed with different formatting, a strikethrough, and you can use Outlook’s built-in tools to manage expired email automatically.
Outlook lets you add an expiration date to email you send or receive. Once the expiration date has passed the email will be displayed with different formatting, a strikethrough, and you can use Outlook’s built-in tools to manage expired email automatically.
This is for Microsoft Outlook 2010 and later. Screenshots are from Microsoft 365 Outlook
Copyright Scott Adams, Inc./Distributed by Universal Uclick for UFS
To add an expiration date to an email you’re sending, you need to open the Properties window for the email.
Open Outlook and compose a message. Then click on Options. Next, in the More Options Group click on Message Options. The Propeties window will be displayed. Now, in the Delivery Options Group, checkmark Expires after and set the Date and Time you wish for the email to expire. Refer to below image:
Settring Expire Date for a sent email
Outlook has a formatting rule for expired emails. This rule can be found under the Conditional Formatting dialog. The dialog box is displayed from the View tab, then select View Settings. Next, select Conditional Formatting option. The email that has expired has a grey font and the text has a strikethrough. See below image:
Setting Expire date formatting
This formatting rule will be applied to the receiptents’s Outlook as well as other web apps, like GMail. Now, click OK twice to close the dialog boxes.
For demonstration purposes, I am backdating the email to show the strikethrough formatting when I open the email. Now, close the Properties window and send the email. You will get a prompt saying the Expire Date has passed if backdating or if the date has actually passed, just click Yes. It can still be opened but the strikethrough gives a visual indication that the email is no longer relevant. See following image:
The sent email with formatting
Set an Expire Date for All Messages You Send
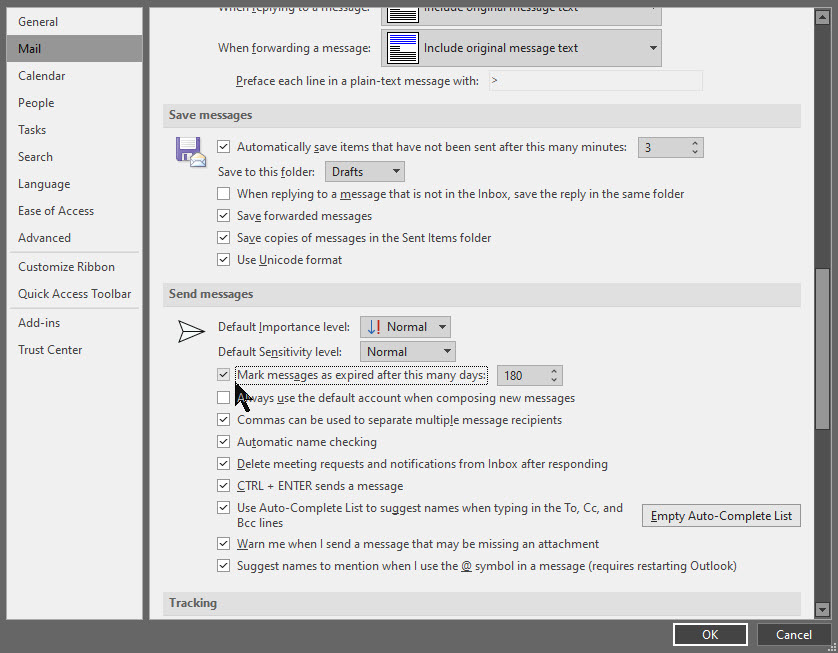
You can setup Outlook to automatically add an expiration date of some number of days after the message is sent.
Double-click to open the message. Next, click on File then Options. Next, click on the Mail tab. Under the Send Messages Group, checkmark Mark messages as expired after this many days and set the days you wish for the email to expire. Click OK to save your change. Refer to below image:
Setting the Expire Date for all emails you send
Delete An Expired Email
To delete an expired email. Just select the strikethrough emails and click the Delete icon in the ribbon or press the Del key. You could also show the expired emails by adding a column to a folder that shows the expiration date.
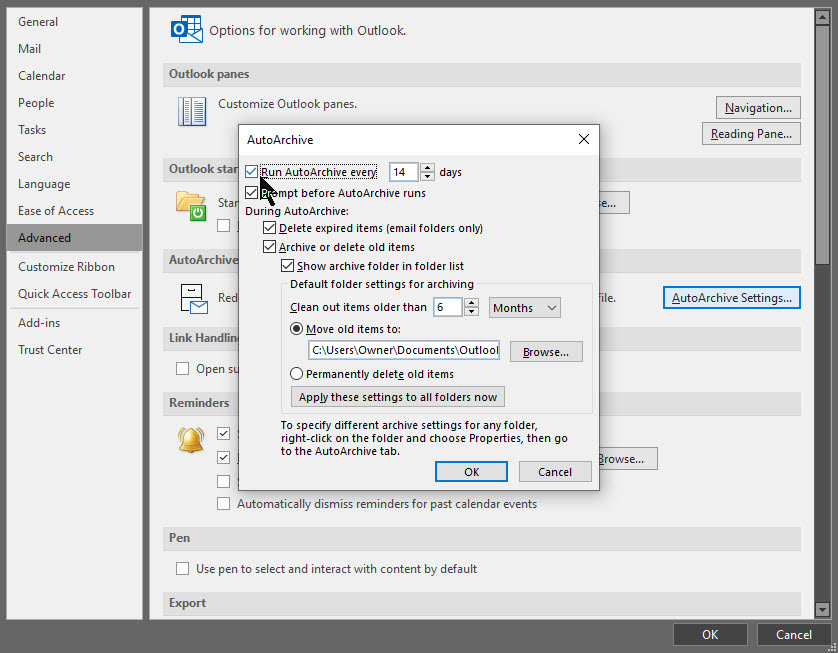
If you have turned on Outlook auto archive feature, then you can delete emails automatically based on expire date.
Open the AutoArchives window by File > Options > Advanced. Select the option AutoArchive Settings. Checkmark the option Run AutoArchive every 14 days (the default). Select OK twice to save your change. See following image:
Setting the AutoArchive feature
When this option is enabled, emails will be deleted or moved (depending on other settings) when the date has passed.
Set an Expire Date for Received Email
You can set an expiration date for a message you have received.
Double-click to open the message. You can not set an expiration date from the Reading Pane.
Select File then Properties. Under Delivery Options, checkmark the box Expires after amd se;ect a date and time for your message to expire. Then, click Close and the Save icon in the upper left hand corner of your message or click File > Save to save your change. Refer to below image:
Setting Expire Date for received email
I have found TechSavvy.Life blog posts extremely helpful. Check them out for posts on smart phone apps, Macs and PCs!
Please feel free to leave a comment. I would love hearing from you. Do you have a computer or smart device tech question? I will do my best to answer your inquiry. Please mention the device, app and version that you are using. To help us out, you can send screenshots of your data related to your question.
The author’s Vietnam eBook on the Battle for Tra Bong: Events and Aftermath
We are going to explore how to print to PDF while on the go, do custom printing options like labels and manage existing print jobs through AirPrint right on your iOS 13+ devices.
We are going to explore how to print to PDF while on the go, do custom printing options like labels and manage existing print jobs through AirPrint right on your iOS 13+ devices. iOS 13+ has a very robust printing subsystem that can allow you to export PDFs and more.
In this blog post, we’ll delve into how to print custom items like labels. We’ll also see how to print to PDF instead of paper and how to manage printer jobs and viewing ink supply levels.
iOS 13+ can handily help in this situation, and it works in any app that supports printing or sharing. We will be using Safari browser in our examples.
This is for Apple devices supporting iOS 13+
Copyright Scott Adams, Inc./Distributed by Universal Uclick for UFS
To print to PDF using any app that supports printing:
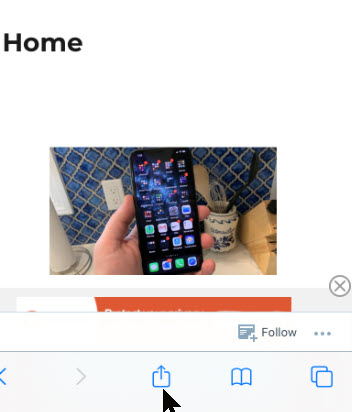
Select the Share(or Print) button in the app. When browsing in Safari, just tap the Share button in the bottom toolbar. Refer to below image:
The Share ibutton
Next, scroll down and tap Print. See below image:
The Print option
Using two fingers, pinch your fingers apart as if zooming on the Print Preview. This will generate a PDF and show a new view. Refer to below image:
Print Preview
In this Print Preview PDF view, tap the Share button in upper right-hand corner. See following image:
The Share button
Select your choice to save the PDF to Files, send as an iMessage or an email. Refer to below image:
The Save to Files option
Sharing a PDF from Print Preview is easy and works on all apps where printing is supported.
Printing Labels
For now, the only way to print labels for contacts is through third-party apps. This feature has been built-into Macs for years.
If you are using Avery Labels for printing contact sheets, there are two apps worth mentioning. Click on the links below to download from the AppleApp Store.
Both of these apps have numerous features. You can print multiple contacts or a single contact on a sheet, select templates from Avery and others, add a graphic to your labels, design your label, manually adjust alignment, and much more.
Managing Your Print Jobs and Ink Levels
You can check the ink or toner levels to ensure you have plenty for your print project. Once you have spooled a print job, you can monitor its status or cancel it.
Check Your Ink Levels
With iOS and iPadOS you are able to view your ink or toner levels without a computer. This is easily to do.
Select the Share (or Print) button in the app. Refer to image one above.
Next, scroll down and tap Print. Refer to image two above.
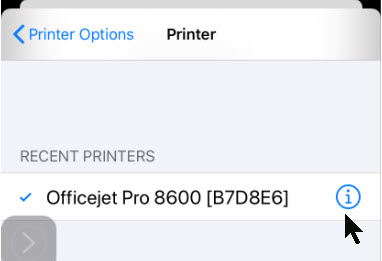
Now, tap the right hand arrow beside an available printer name. See following image:
Selecting your printer
Select the “i” with an enclosed circle button beside the available printer name. Refer to below image:
Your selected printer
If there is no printer listed, you do not have a wireless printer and/or lack support for the AirPrint feature; you may skip this section. Nearly all modern day printers support AirPrint.
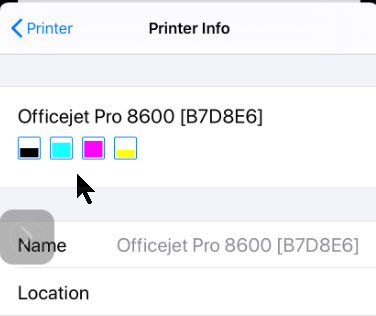
You will now be viewing the Printer Info which contains ink levels, name and location (if supplied by the printer or printer server). See following image:
Your printer ink levels
Viewing ink or toner levels can be done from the iOS or iPadOSPrint Setup dialog in any app that supports it.
Manage Print Jobs
When you print with AirPrint, you are able to manage your print jobs. Once a print job has been started, you can look at the status of the job and/or cancel the job. This can be done by opening the App Switcher (double-tap the Home button if you have one). For Face ID devices, swipe up partially on the screen, hold, then release.
You’ll see the printer job app at the top of the screen. Just tap it to see the print details like how many pages are being printed and which page is active in the queue. Tap the Cancel Printing button to stop any active print jobs. See below image:
An active print job
If the print queue is empty,, you will receive a message about no print jobs. Refer to below image:
No active print jobs
When printing in IOS or iPadOS, a new app will appear in the App Switcher for non-Face ID and Face ID devices to manage print jobs.
I have found TechSavvy.Life blog posts extremely helpful. Check them out for posts on smart phone apps, Macs and PCs!
Please feel free to leave a comment. I would love hearing from you. Do you have a computer or smart device tech question? I will do my best to answer your inquiry. Please mention the device, app and version that you are using. To help us out, you can send screenshots of your data related to your question.
The author’s Vietnam eBook on the Battle for Tra Bong: Events and Aftermath
Is your desktop or laptop unresponsive or sloooow? Tired of your PC crashing? Do you find yourself taking your PC to a geek repair shop to fix problems? Are you having your hard drive reformatted twice or more a year? There is a better way to resolve your PC erratic behavior. Let’s explore two free applications you can run at least monthly for a smooth running PC.
Is your desktop or laptop unresponsive or sloooow? Tired of your PC crashing? Do you find yourself taking your PC to a geek repair shop to fix problems? Are you having your hard drive reformatted twice or more a year? There is a better way to resolve your PC erratic behavior. Let’s explore two free applications you can run at least monthly for a smooth running PC.
This is for the PC and similar devices
Copyright Scott Adams, Inc./Distributed by Universal Uclick for UFS
To clean up your PC cache, junk and temporary files, “lost” files, tracea of data, left over files after uninstalling programs and much more, you have a choice of two programs.
You may download, install and run either or both programs. I have successfully used both programs on branded and unbranded PCs in several countries and States.
CCLeaner – click her to download Durig the download, it is best to decline any third party installs such as browsers or other applications from CCleaner; we only want to download the program.. The install will place a shortcut on your desktop and an icon in your System Tray.
AND/OR
Wise Disk Cleaner – click here to download Durig the download, it is best to decline any third party installs such as browsers or other applications from Wise Disk Cleaner; we only want to download the program.. The install will place a shortcut on your desktop..
After downloading either or both free programs, install and run. It’s best to close any open programs before installing and running.
The paid version of CCLeaner has automatic scheduling. You can setup either program to run automatically through Windows Task Scheduler. Just follow the below blog post instructions substituting ccleaner<version number>.exe and wdcfree.<version number>.exe for the executable file name.
Second Application
Are you letting your PC run all the time? I recommend you not do this. Just like your car, your PC needs a rest. You probably don’t leave your car running all night, neither should your PC be running all night. By turning it off, your PC and it’s operating system is reset and given a fresh start.
Simply follow the below blog post on how to schedule a nightly automatic shutdown and restart of your PC.
Please feel free to leave a comment. I would love hearing from you. Do you have a computer or smart device tech question? I will do my best to answer your inquiry. Please mention the device, app and version that you are using. To help us out, you can send screenshots of your data related to your question.
The author’s Vietnam eBook on the Battle for Tra Bong: Events and Aftermath
The Windows 10 Assessment Tool (WinSAT) tests the components of your computer (CPU, GPU, RAM, etc.) then measures their performance. But it can only be accessed from a Command Prompt or a PowerShell instance, and both must be opened with administrative rights.
The Windows 10 Assessment Tool (WinSAT) tests the components of your computer (CPU, GPU, RAM, etc.) then measures their performance. But it can only be accessed from a Command Prompt or a PowerShell instance, and both must be opened with administrative rights.
This post shows you how to access and use the Windows 10 Assessment Tool to measure your computer’s performance.
This is for Windows 10 operating system
Copyright Scott Adams, Inc./Distributed by Universal Uclick for UFS
For this example, we will use PowerShell, but the process is similar for the Command Prompt. Right-click the Start Menu button on the Windows 10 desktop and select Windows PowerShell (Admin). If the option is missing, in the Cortana search bar, enter cmd, then click Run as administrator in the upper right of the screen. Refer to below image for the Powershell option:
Starting PowerShell
At the prompt, type in winsat formal. See following image:
The formal parameter
The system will run through an extensive series of tests. This may take a few minutes. When finished, it will display the measurements. See below image:
Results of the running the formal parameter
The formal parameter runs a full test of all your computer’s components and saves the results in an XML file located in this folder:
Windows/Performance/Winsat/DataStore
If you have an XML file editor, you can view the file and see your computer’s performance, however, there are user friendly alternatives.
At the PowerShell (Admin) prompt, type in one of these commands:
get-wmiobject -class win32_winsat
or
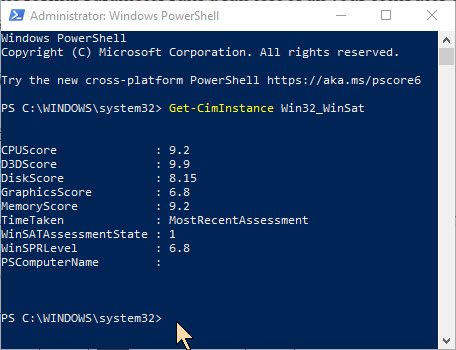
Get-CimInstance Win32_WinSat
Refer to below images for running both parameters:
Results of running the wmiobject parameterResults of running the cimInstancr parameter
The first command gives you a few more details about the testing, while the second command condenses the measurements down to a minimum of information. In my example, the overall performance of my Dell desktop is limited by my graphics card. Overall, for a 5 year old desktop, my scores are still impressive.
The maximum score for any component test is 9.9.
WinSAT Parameters
You may opt to run specific tests on specific components by modifying the winsat command with parameters. Here is a list of the standard command parameters (most important are the cpu, mem, disk and media parameters), which will display measurements using default configurations:
winsat -?–displays the help.
winsat formal–runs the full assessment.
winsat dwmformal–runs only the Desktop Windows Manager assessment which generates the graphics score.
winsat cpuformal–runs only the CPU assessment to generate the processor score.
winsat memformal–runs only the memory assessment to generate the memory (RAM) score.
winsat graphicsformal–runs the graphics assessment to generate the gaming graphics score.
winsat diskformal–runs the disk assessment to generate the primary hard disk score.
winsat cpu–tests the processor.
winsat mem–tests the memory.
winsat disk–tests connected storage devices.
winsat d3d–assesses the Direct 3D application abilities.
winsat media–tests media capabilities.
winsat mfmedia–Windows Media Foundation assessment.
winsat features–runs the features assessment.
winsat dwm–runs the Desktop Windows Manager assessment.
Because the Windows 10 Assessment Tool produces XML files containing performance scores and measurements, APIs and scripting tools like PowerShell can be used to display and process data points.
Developers can use such tools to customize testing parameters and search for ways to improve performance. You should keep in mind that the Windows 10 Assessment Tool is not the only way to measure your computer’s performance. Other benchmarking measures will provide more detail, particularly when measuring graphical capabilities.
UserBenchmark Tool is a utility that will test your PC and compare the results to other users with the same components. You can quickly size up your PC, identify hardware problems and explore the best upgrades. Click here to download the software. After running, just Close the dialog. The results are displayed in a web page. See below image on completing the benchmarks on my PC:
The results of running UserBenchmark. After closing, the results are displayed in a web page.
Click to tweet if you find TechSavvy.Life blog posts extremely helpful. Check them out for posts on smart phone apps, Macs and PCs!
Please feel free to leave a comment. I would love hearing from you. Do you have a computer or smart device tech question? I will do my best to answer your inquiry. Please mention the device, app and version that you are using. To help us out, you can send screenshots of your data related to your question.
The author’s Vietnam eBook on the Battle for Tra Bong: Events and Aftermath
Maybe you’d like to checkout a website without leaving a record of it on your iPhone or iPad. Safari includes a Private Browsing Mode that allows you to do this.
Maybe you’d like to checkout a website without leaving a record of it on your iPhone or iPad. Safari includes a Private Browsing Mode that allows you to do this. Lets explore this Safari feature.
While using Private Browsing Mode on your iPhone or iPad, Safari will not save your browsing history, AutoFill form information, cookie changes and recent searches when you close each Private Browsing window. We will cover this later, but its important to note that you must close each window of your private browsing session.
Private Browsing Mode does not protect your browsing history from the host of your network (such as your business or school), your ISP or websites that might use your IP address to track you.
This is for iPhone and iPad using Safari web browser
Copyright Scott Adams, Inc./Distributed by Universal Uclick for UFS
First, open Safari. You should see a toolbar at bottom of the screen, if not, tap to reveal the toolbar.
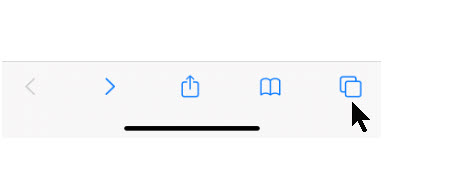
Next, tap the New Window icon in lower right hand corner. Refer to below image:
The Safari New Window icon
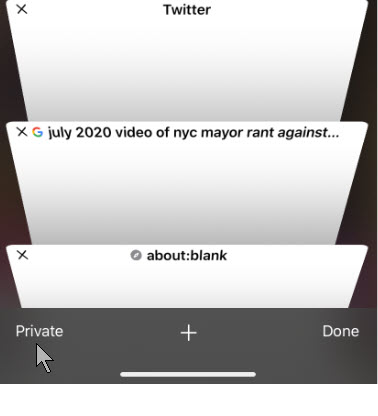
Your screen will display your open browser windows. Now, tap the Private button in lower left-hand corner. See below image:
The Safari Private button
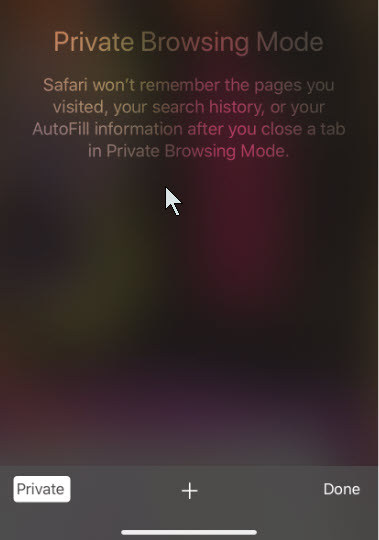
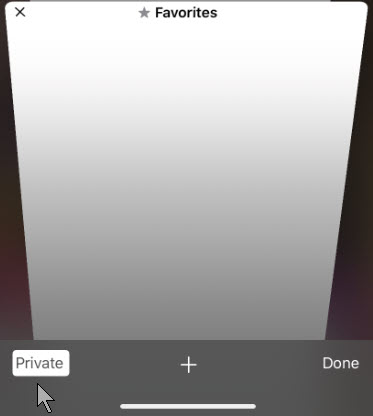
Your Private Browsing Mode is now setup. At the bottom of the screen, tap the plus “+” button to open a Private window. Note! You will not see the below screen again as long as your device is logged in, you will just go in or our of Private Browsing Mode. See following image:
To enter Private Browsing Mode., tap the plus button
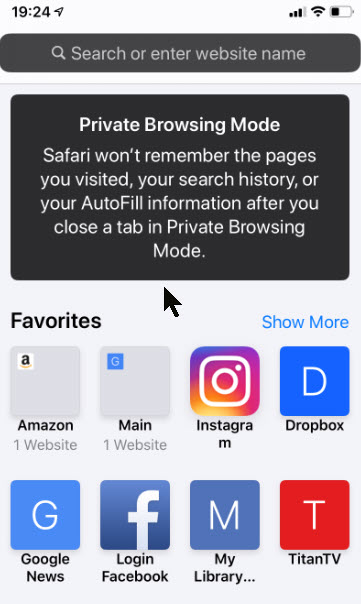
From here, you can type in an address or tap on a Favorites. In Private mode, you can use Safari as usual but it won’t track you locally. See below image:
Your Private Mode Browsing Mode entry screen
Exit Private Browsing Mode
First, you need close each Private window you opened by clicking the “X” in upper left-hand corner.
Now, to exit Private Browsing Mode, tap the New Window icon, then tap the Private button in lower-left hand corner. The Private button will be in reverse color. You will be switched to non-Private Mode Browsing. Refer to below image:
Exiting Private Browsing Mode
I have found TechSavvy.Life blog posts extremely helpful. Check them out for posts on smart phone apps, Macs and PCs!
Please feel free to leave a comment. I would love hearing from you. Do you have a computer or smart device tech question? I will do my best to answer your inquiry. Please mention the device, app and version that you are using. To help us out, you can send screenshots of your data related to your question.
The author’s Vietnam eBook on the Battle for Tra Bong: Events and Aftermath
Oops! You just sent a Google Gmail message that you did not want to send. You realize for one reason or another that the message has a mistake or that it shouldn’t have been sent at all. Using Gmail, you have a small window of time in which to undo your mistake.
Oops! You just sent a Google Gmail message that you did not want to send. You realize for one reason or another that the message has a mistake or that it shouldn’t have been sent at all. Using Gmail, you have a small window of time in which to undo your mistake.
By default, Gmail only gives you a 5 second delay in which to recall an email after you hit the Send button. If this is too short, you’ll need to extend the length of time Gmail will keep emails pending before it sends them. Once an email(s) are sent, you are unable to recall them.
This is for Windows 10 PCs, Macs and other devices that support Google Gmail
Copyright Scott Adams, Inc./Distributed by Universal Uclick for UFS
Unfortunately, you can’t change the length of this cancellation period in the Gmail app. You’ll need to do this in the Settings menu of Web based Gmail using your Windows 10 PC or Mac.
First, open Gmail using your browser and click Settings (the gear icon) in upper right-hand corner. Next, click the See all settings option. Refer to below image:
Open Web based Gmail Settings
In the General tab, you’ll see an option for Undo Send with a default 5 seconds delay. You can change this to periods of 10, 20, and 30 seconds from the drop-down list. It is recommended you set a 30 second delay. See below image:
Setting the Cancellation Period in Web based Gmail Settings
Scroll way down till you see the Save Changes button at the bottom of the screen. Press this button to save your change. The Settings window will then close.
The cancellation period you’ve selected will be applied to your Google account across all your devices.
How to Recall a Web Email in Gmail
If you want to recall a message sent by a Web based Gmail, you’ll need to do so within the cancellation period that applies to your account. This period begins from the moment you press the Send button. If you followed my recommendation, you have 30 seconds.
To recall an email, press the Undo button that appears in the black Message Sent pop-up. It is visible in the bottom-left corner of the Web based Gmail window. See following image:
Undo your email in Web based Gmail
This is your only chance to recall the email. If you miss it, or you click the “X” button to close the pop-up, you won’t be able to recall it. Once the cancellation period has passed, the Undo button will disappear and the email will be sent.
How to Recall a Mobile Device Email in Gmail
The process for recalling a mobile device email is similar to using the Web based Gmail. Your cancellation period you setup above for your Google account applies.
Go ahead an send an email using the Gmail app. A black pop-up box will appear at the bottom of your screen, telling you that the email has been sent.
The Undo button will appear on the right-hand side of this pop-up. If you want to stop the email, tap this button within the cancellation period or 30 seconds if following my recommendation. Refer to below image:
Undo your email using Gmail app
Pressing Undo will recall the email, returning you to the Compose draft screen in the Gmail app. At this point, you can then make changes to your email, save it as a draft or delete it.
Please feel free to leave a comment. I would love hearing from you. Do you have a computer or smart device tech question? I will do my best to answer your inquiry. Please mention the device, app and version that you are using. To help us out, you can send screenshots of your data related to your question.
The author’s Vietnam eBook on the Battle for Tra Bong: Events and Aftermath
Oops! You just sent a Microsoft Outlook message that you did not want to send. You realize for one reason or another that the message has a mistake or that it shouldn’t have been sent at all. You can fix your mistake by recalling the message. Using the recall feature, under the right conditions, your email is deleted without the recipient ever seeing the message. You can also send the recipient a replacement email with the correct information.
Oops! You just sent a Microsoft Outlook message that you did not want to send. You realize for one reason or another that the message has a mistake or that it shouldn’t have been sent at all. You can fix your mistake by recalling the message. Using the recall feature, under the right conditions, your email is deleted without the recipient ever seeing the message. You can also send the recipient a replacement email with the correct information.
For a message to be recalled, both you and the recipient must have a Microsoft 365 Business Account or Microsoft Exchange email account in the same organization. The email must not not have been read by the recipient.
However, even if you and the recipient use different email accounts, the recall feature is useful. Though the initial email won’t be deleted, the recipient receives a follow-up message indicating that you want to recall the previous email. That tells them that your initial one is incorrect for some reason. You should then follow-up your initial email and recall message with another email that contains the right information or corrects the initial one.
To summarize, three emails are involved. The initial email with incorrect information, the recall message email, then the follow-up email with the correct information.
This is for Windows 10 PCs, Macs and other devices that support Microsoft Outlook
Copyright Scott Adams, Inc./Distributed by Universal Uclick for UFS
Let’s send an email. Open Outlook, start new email and address to a recipient, then send the email. Refer to below image:
Initial Outlook email
Now, let’s say you notice an error in your email and want to recall it. In our example, the vacation dates are incorrect.
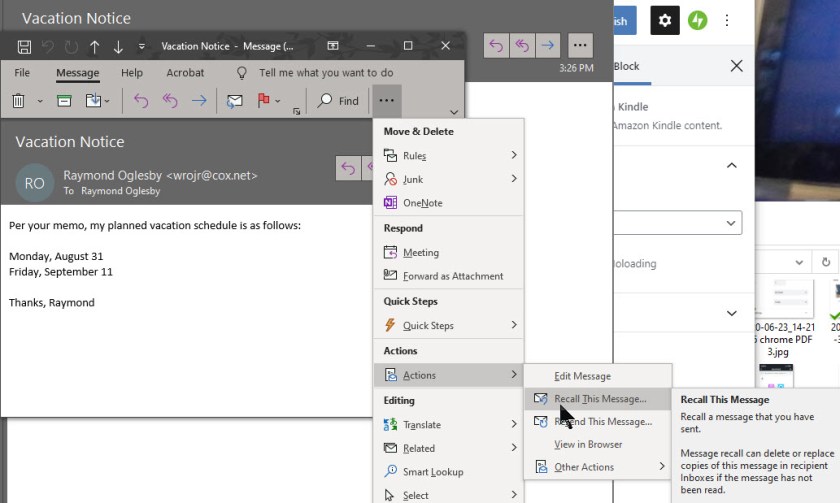
Open the email from your Sent Items folder. Select the Actions icon and click the option Recall This Message. See following image:
Recall initial Outlook email
The Recall This Message window opens to offer two options. Choosing Delete unread copies of this message tries to remove the message with no follow-up. Choosing Delete unread copies and replace with a new message provides the opportunity to send a follow-up message with the correct information. To learn of the recall’s success, ensure the box is checked for Tell me if the recall succeeds or fails for each recipient then click OK. Refer to below image:
Options for recalling initial Outlook email
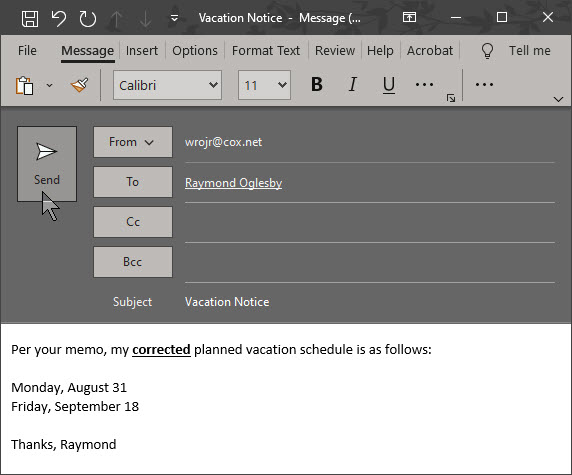
If you chose the option to replace with a new message, a new email appears with the text from the initial email. You can fix any errors and send a corrected replacement message or a follow-up email with the corrected information. In my example, the recall message failed because I had already read the message. See following image:
Recall of initial Outlook email failed because recipent (me) had read the message
If you and the recipient use the same Microsoft 365 Business or Exchange, then the initial email should be deleted automatically. If so, you will receive an email saying the recall was successful for that recipient.
If you and the recipient use different email accounts, the initial emails remains in that person’s inbox. A follow-up email arrives that tells the recipient you would like to recall the message. You then have to rely on the recipient to delete or ignore the initial message. At this point, a third email could be sent with the corrected information. Refer to below image:
Please feel free to leave a comment. I would love hearing from you. Do you have a computer or smart device tech question? I will do my best to answer your inquiry. Please mention the device, app and version that you are using. To help us out, you can send screenshots of your data related to your question.
The author’s Vietnam eBook on the Battle for Tra Bong: Events and Aftermath
Want to checkout your iPhone or Android with diagnostics? Maybe you are wanting to sell the device and need to see if the device is working properly. Or you just wish to checkout the performance of your device. Whatever the reason, let’s explore a couple of apps from Apple’s or Google’s App Store.
Want to checkout your iPhone or Android with diagnostics? Maybe you are wanting to sell the device and need to see if the device is working properly. Or you just wish to checkout the performance of your device. Whatever the reason, let’s explore a couple of apps from Apple’s or Google’s App Store.
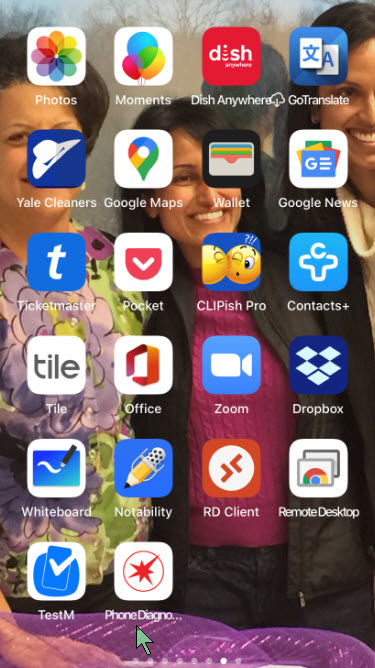
The apps are TestM and Phone Diagnostics. Both apps are free but come with ads. You can remove the ads for Phone Diagnostics for a small fee. The apps run similar diagnostic tests for touch screen, audio, video, camera, microphone, sensors and other components on your phone.
After you have installed these apps, their associated icons will appear on your Home screen (see left bottom corner) like the image below:
The installed Diagnostic apps
This is for the iOS and Android devices. Screenshots are for the iPhone
Copyright Scott Adams, Inc./Distributed by Universal Uclick for UFS
Designed for iOS and Android, the free TestM app can run diagnostics on your phone’s touch screen, sound, camera, sensors, network connectivity and other hardware.
The app gives you full control over the tests you want to run. Opt for a quick test to check three key features: touch screen, earpiece audio and high-frequently audio; or commit to a full test to check out all supported features. Otherwise, you can test just one specific feature, like the accelerometer, Bluetooth connectivity, camera flash and Face ID on an iPhone.
Most of the tests are interactive. The touch-screen test asks you to draw on the screen, the microphone test asks you to speak, the audio test prompts you to tap the numbers you hear and the camera test requests that you pose for a picture. One of the nifty tests is the Internet Speed Test to measure your phone’s upload and download speed.
After you’ve completed your testing, TestM compiles a report that reveals the key stats of your phone along with the outcome of the tests you ran. Each individual feature tested receives a green checkmark for good or a red checkmark for bad.
Any features that flunk can be re-tested from the report screen. You can share the report with someone else via email, messaging, or another app or service. TestM can even generate a list of local repair shops that might be able to fix whatever hardware ailment is affecting your phone. Refer to below image:
The TestM app Home screen
Phone Diagnostics for iPhone
Available for the iPhone, the Phone Diagnostics app offers a range of tests you can run one after the other. The app can check your touch screen, multi-touch capabilities, camera, flash, speaker, microphone, Wi-Fi, cellular access, sensors and other components. Just tap the button for the test you wish to run. Alternatively, tap the Play button in the middle of the screen to run all the tests one after the other. Unlike TestM, you can remove ads by paying a small fee.
The multi-touch test asks you to place three fingers on the screen. The camera test snaps photos using the front and rear cameras, while the video record test shoots a quick video using the rear camera. The motion test asks you to move your phone around, and the GPS test verifies your location on a map.
The app doesn’t generate any reports or results, but each successful test paints its button in green, while a failed or interrupted test appears in red. The app also attempts to steer you to a repair shop should your iPhone need to be fixed. See below image:
The Phone Diagnostics app Home screen
I have found TechSavvy.Life blog posts extremely helpful. Check them out for posts on smart phone apps, Macs and PCs!
Please feel free to leave a comment. I would love hearing from you. Do you have a computer or smart device tech question? I will do my best to answer your inquiry. Please mention the device, app and version that you are using. To help us out, you can send screenshots of your data related to your question.
The author’s Vietnam eBook on the Battle for Tra Bong: Events and Aftermath
In Windows 10, sometimes thumbnail icons display improperly. This can be easily fixed by deleting the thumbnail cache files.
In Windows 10, sometimes thumbnail icons display improperly. This can be easily fixed by deleting the thumbnail cache files. Let’s explore how to do this.
This is for Windows 10 operating system
Copyright Scott Adams, Inc./Distributed by Universal Uclick for UFS
By default, instead of using generic icons for documents, Windows 10 creates small pictures of image or document contents called thumbnails. These tiny images are stored in a special file called the thumbnail cache. By using this file, Windows does not have to recreate thumbnail images every time you open a folder.
If you are seeing incorrect thumbnails, it’s likely that the thumbnails stored in the cache for those particular files have been corrupted or are missing. This could be due to a bug in Windows or perhaps an intermittent hardware problem.
In that case, the best course of action is to delete your thumbnail cache and allow Windows to recreate the faulty thumbnails the next time you restart your machine.
Clear the Thumbnail Cache
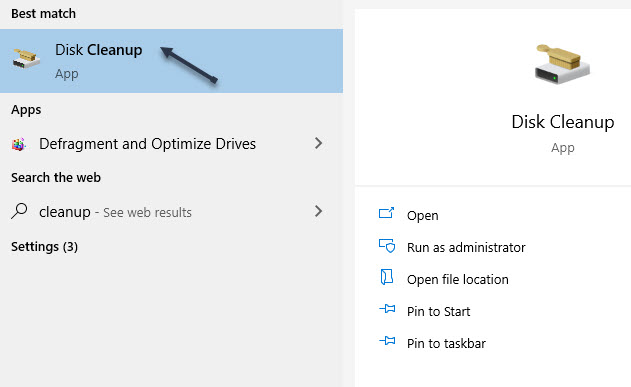
First, open the Start menu and in the Cortana search bar, type Disk Cleanup. Click on the Disk Cleanup app that appears in the upper left hand corner. See below image:
Accessomg Disk Cleanup app
In the Disk Cleanup window, locate the Files to Delete list. Uncheck all items except for Thumbmails. With Thumbnails checked, click OK to remove the thumbnail cache file. Refer to below image:
Checkmark the Thumbnails option
A pop-up dialog box will ask, Are you sure you want to permanently delete these files? Just click Delete Files. See following image:
Are you sure you want to delete prompt
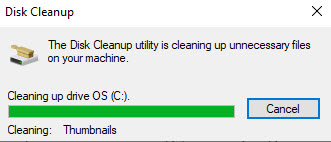
Another pop-up will appear, this time showing you the progress of deleting your Windows thumbnails. Refer to below image:
Progress of Disk Cleanup
After the thumbnail cache files have been deleted, restart your computer. Now, open File Explorer or look at the Desktop to see if this has fixed your problem. Hopefully, the thumbnails have been recreated and are now correct. If not, you may want to follow the guidelines below.
Disable Thumbnails
This is only recommended if the above guidelines fails to fix the problem.
Open the Start menu and type in File Explorer Options in the Cortana search bar. Next, click on the associated Control Panel app in the upper left hand corner. Refer to below image:
Accessing File Explorer Options app
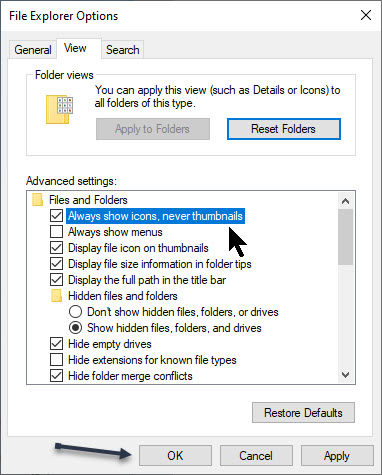
In the File Explorer Options window, click on the View tab. Then, in the Advanced Settings section, checkmark the option Always show icons, never thumbnails. Next, click OK to save your change. See below image:
Setting the Icons instead of Thumbnails option
Now, close the File Explorer Options window and restart your machine. Windows will now only display standard icons for documents instead of thumbnails
If you find TechSavvy.Life blog posts extremely helpful check them out for posts on smart phone apps, Macs and PCs!
Please feel free to leave a comment. I would love hearing from you. Do you have a computer or smart device tech question? I will do my best to answer your inquiry. Please mention the device, app and version that you are using. To help us out, you can send screenshots of your data related to your question.
The author’s Vietnam eBook on the Battle for Tra Bong: Events and Aftermath