This post provides a guide on rearranging albums in Apple’s Photos app on iPhone and iPad. Users can sort albums by Date Modified, Name, or Custom Order, and utilize the drag-and-drop method for moving albums. The instructions are applicable for iOS 18.5 and emphasize a precise drag method for successful rearrangement.
IRAYMOND OGLESBY @RaymondOglesby2 July 15, 2025 – 3 minutes read time
Overview
Want to learn how to rearrange albums on an iPhone or iPad in Apple’s Photos app? When you make a photo album on your iPhone, the Photos app automatically sorts in the Albums tab when it was created.
You can rearrange albums on iPhone in two different ways. Let’s explore how to rearrange your albums in the Photos app.
Why You Will Like This Tip
Learn how to rearrange albums in Photos on your iPhone or iPad using the drag and drop method.
Learn how to sort albums on iPhone by Date Modified, Name, or Custom Order.
Learn how to move albums around on iPhone so you can find your albums quickly and easily.
System Requirements
This tip was performed in iPhone 14 Pro running iOS 18.5.
Click here to learn how to update your iPhone to the latest iOS version.
How to Reorder Photo Albums
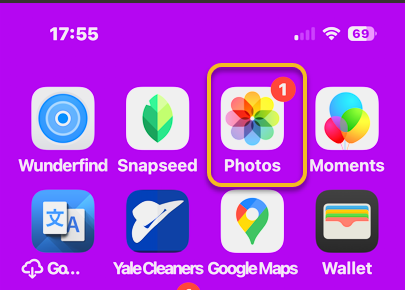
First, ipen the Photos app. Refer to the image below:
Selecting the Photos app
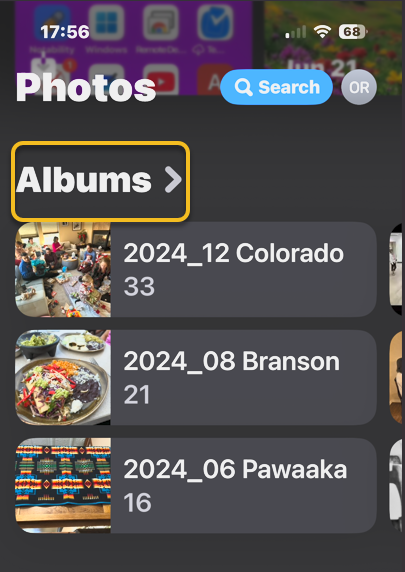
Next, scroll down and tap Albums. See the image below:
Selecting Albums
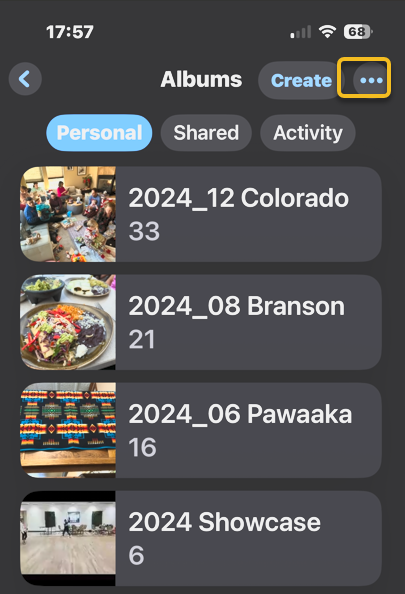
Now, tap the More icon. See the following image:
Selecting the More icon
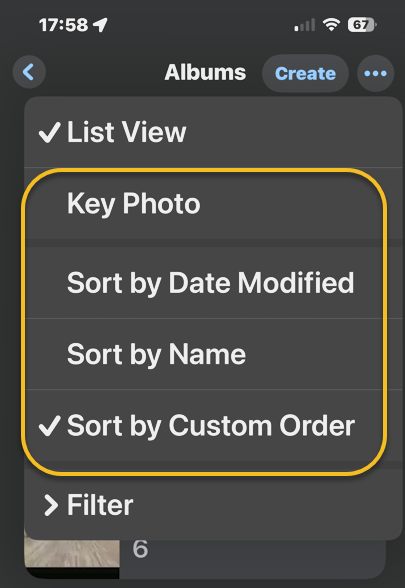
Next, tap a photo album sorting option. Refer to the image below:
Accessing the sort options
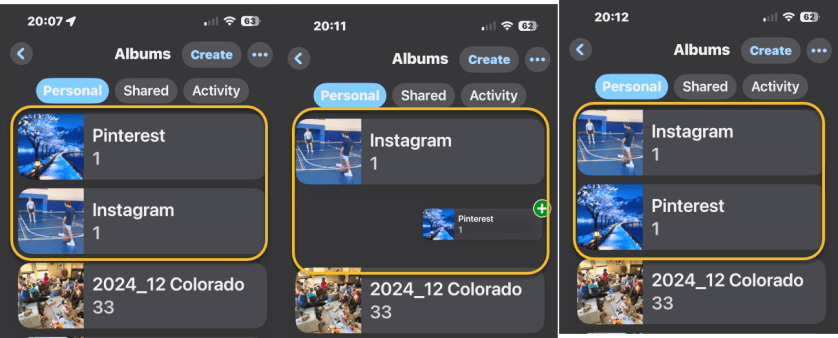
Now, back in Albums, you can also touch and hold the center of a photo album you want to move, then drag it to a new place. Release your finger to drop the album in its new location.
Note! Make sure you drag down or up and to the right. Dragging the album straight up or down will not work. In our example, we are moving the Pinterest album below the Instagram album. See the image below:
Moving the Pinterest album below the Instagram album
When you are done, close the Photos app, and you are finished rearranging albums on your iPhone or iPad.
Now you know how to reorder albums on iPhone and iPad!
Disclaimer
Technology is constantly evolving, and smartphone and desktop tech rarely remains static. Therefore, the information in this post is only accurate as of the date it was written. Blog posts that are older than six months may contain instructions that are no longer compatible with your device or operating system. We hope that the content from previous posts continues to function as intended. Thank you for reading TechSavvy.Life, where technology works for you.
Quote For the Day
“If you think technology can solve your security problems, then you don’t understand the problems and you don’t understand the technology.”
– Bruce Schneier, Security Technologist
(X) Twitter Info
That’s it. Please feel free to share this post! One way to share is via Twitter.
Just click the Tweet icon below. This will launch Twitter where you click its icon to post the Tweet.
Checkout TechSavvy.Life for blog posts on smartphones, PCs, and Macs! You may email us at contact@techsavvy.life for comments or questions.
We value your feedback! Was this post helpful? Please share your comments with us. If you have a tech question related to your computer or smart device, feel free to reach out. Just send an email to contact@techsavvy.life, and be sure to include the device, app, and version you are using. To assist us further, you can also attach screenshots related to your inquiry.
The author’s Vietnam eBook on the “Battle for Tra Bong Vietnam: Events and Aftermath” can be accessed from a Kindle device or the Kindle App for a desktop or smartphone. The apps are free.
The author’s Vietnam eBook on the Battle for Tra Bong Vietnam: Events and Aftermath
Apple prioritizes user privacy on iPhones and iPads, featuring an App Privacy Report that details how apps utilize personal data and device features. Users can easily access this report through the Settings app to monitor data access, app interactions, and website visits, enhancing understanding of app behavior and privacy.
RAYMOND OGLESBY @RaymondOglesby2 July 1, 2025 – 4 minutes read time
Overview
Apple takes privacy very seriously when it comes to its products. The iPhone and iPad are no exception, and both include an App Privacy Report. The iOS App Privacy Report shows you how certain apps have been using your data and accessing certain device features.
Accessing the App Privacy Report on an iPhone or iPad is surprisingly easy. The amount of data it reveals is outstanding. Let’s explore this feature.
Why You Will Like This Tip
Check your app privacy report to see what type of data your apps have been accessing.
Use your app privacy report to see which apps or websites are the most intrusive.
System Requirements
This tip was performed on an iPhone 14 Pro running iOS 18.5.
Click here to learn how to update your iPhone to the latest iOS version.
Seeing Your Privacy Report
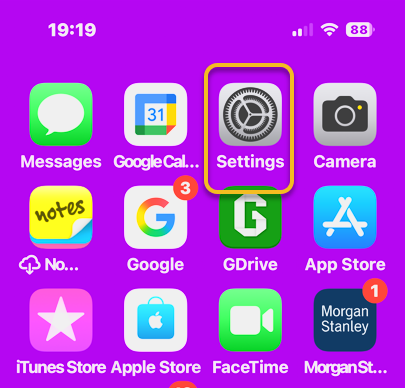
First, open the Settings app. Refer to the image below:
Selecting the Settings app
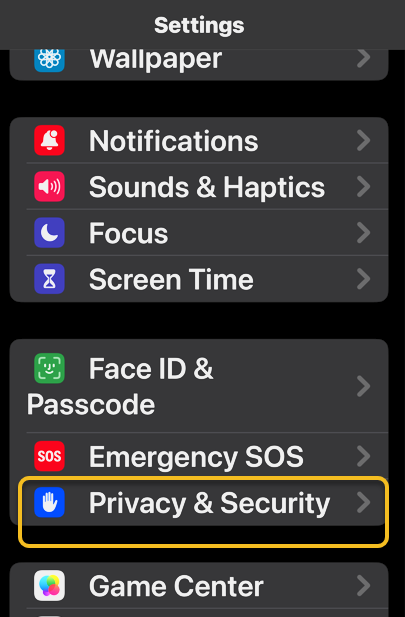
Next, tap Privacy & Security.option.See the image below:
Selecting the Privacy & Security option
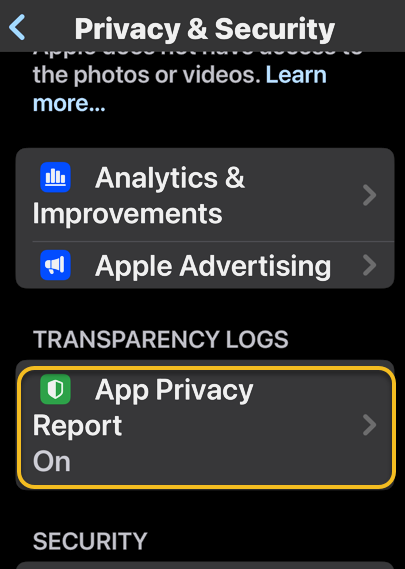
Now, scroll down and tap App Privacy Report. See the following image:
Selecting the App Privacy Report option
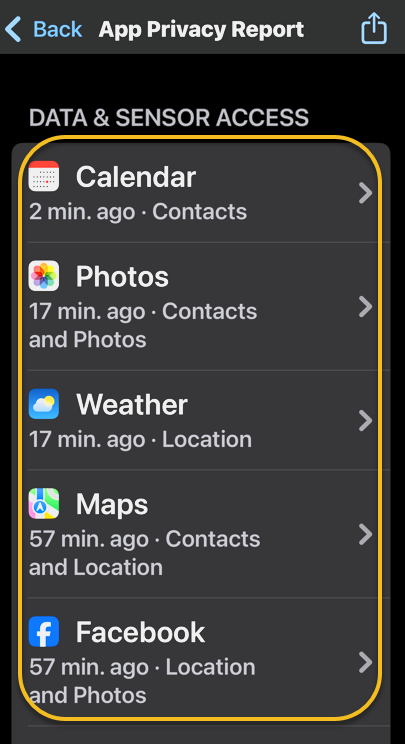
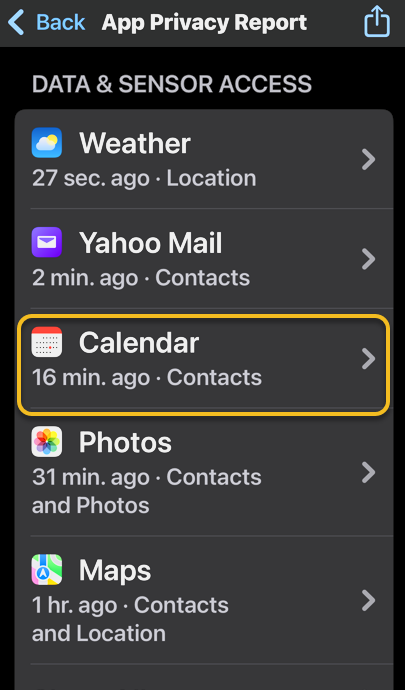
Next, if this is the first time you have accessed this screen, you might see an option to turn on App Privacy Report. If you already have this feature turned on, you will see a list of apps that have accessed your data or sensors in the past week. Refer to the image below:
Your Data & Sensor Access
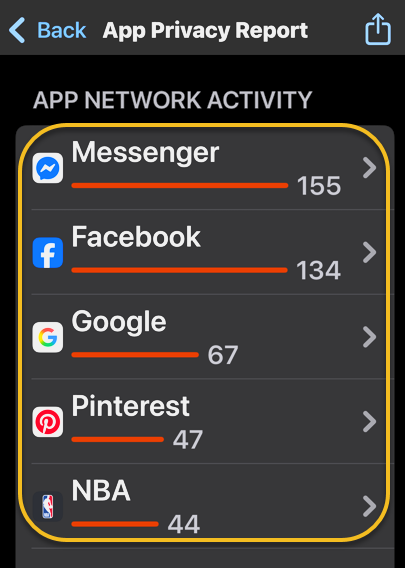
Now, under that section, there is App Network Activity. These are apps that have contacted domains in the last week. See the image below:
Your App Network Activity
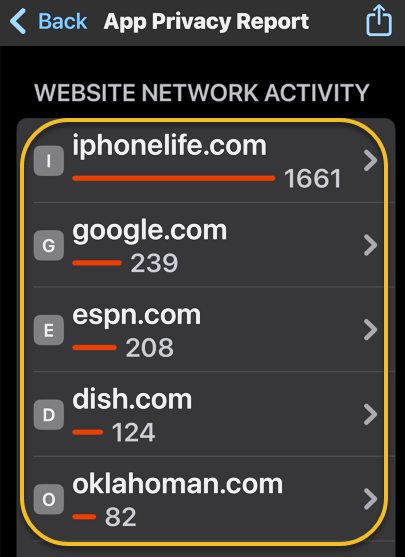
Next is Website Network Activity. These are websites that you have visited in the last week, including your most contacted domains. See the following image:
Your Website Network Activity
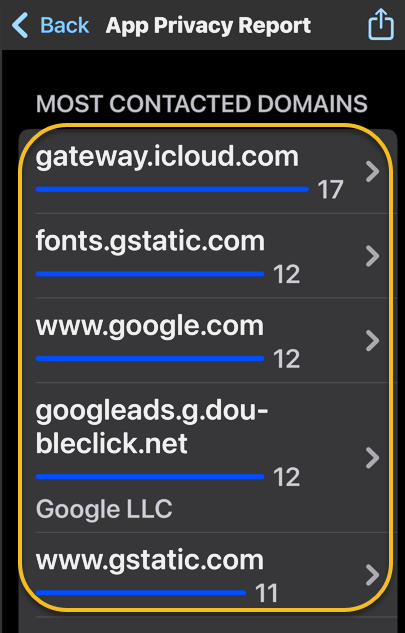
Next is Most Contacted Domains, all of which were contacted by one or more apps or websites in the past seven days. Refer to the image below:
Your Most Contacted Domains
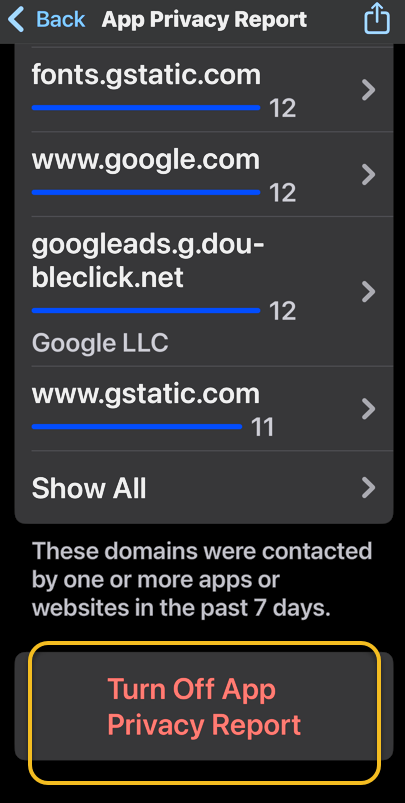
Now, at the bottom is an option to Turn Off App Privacy Report. See the image below:
Selecting the Turn Off App Privacy Report option
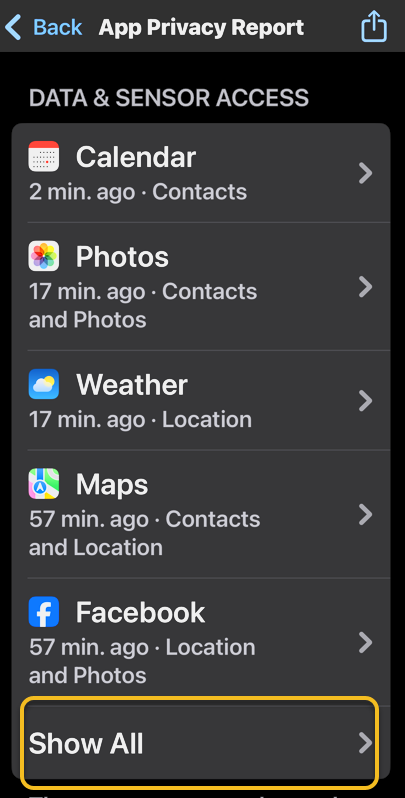
Next, under any section, you can tap Show All to see more apps, websites, domains, etc. See the following image:
Selecting to Show All
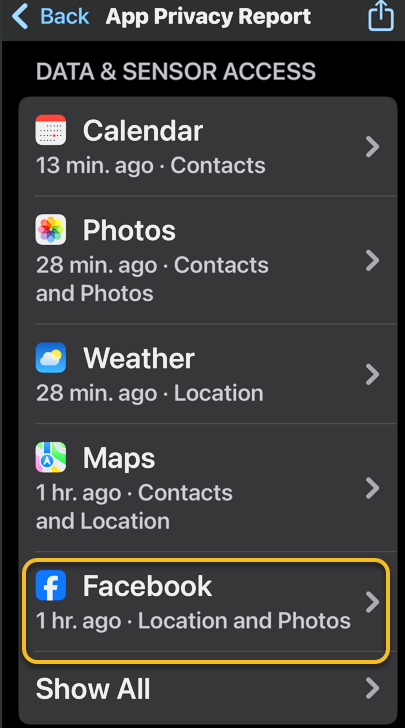
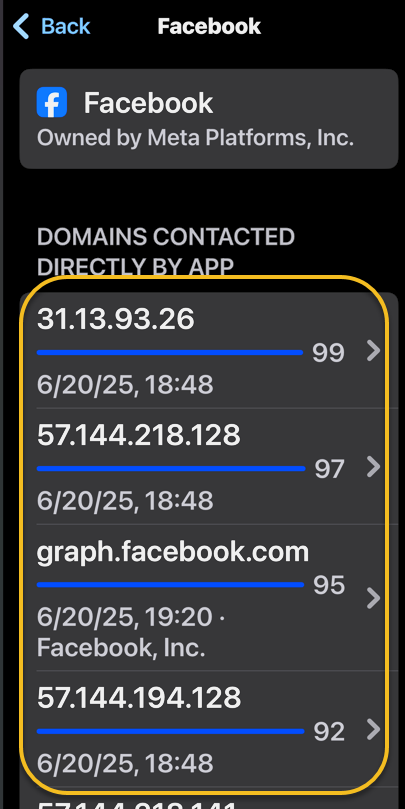
Now, you can also tap any app or domain in any section to see additional information about it. For example, we selected Facebook. Refer to the image below:
Selecting Facebook access
Next, you will see a list of the domains this app has contacted. If you were to tap a domain rather than an app in the previous step, you would see a list of apps that have contacted that domain. See the image below:
Your Domains contacted by Facebook
Now, if you tap an app under Data & Sensor Access list, you can see exactly what kind of data that app is collecting. See the following image:
Selecting the Calendar app
For example, we can see that the Calendar app accessed my contacts 16 minutes ago. Refer to the image below:
Your Contacts last accessed
That’s the iPadOS and iOS App Privacy Report. You can access this report on your iPhone or iPad at any time and get the most up-to-date data.
Disclaimer
Technology is constantly evolving, and smartphone and desktop tech rarely remains static. Therefore, the information in this post is only accurate as of the date it was written. Blog posts that are older than six months may contain instructions that are no longer compatible with your device or operating system. We hope that the content from previous posts continues to function as intended. Thank you for reading TechSavvy.Life, where technology works for you.
Quote For the Day
“The rise of powerful AI will be either the best or the worst thing ever to happen to humanity.”
– Stephen Hawking, Theoretical Physicist
((X) Twitter Info
That’s it. Please feel free to share this post! One way to share is via Twitter.
Just click the Tweet icon below. This will launch Twitter where you click its icon to post the Tweet.
Checkout TechSavvy.Life for blog posts on smartphones, PCs, and Macs! You may email us at contact@techsavvy.life for comments or questions.
We value your feedback! Was this post helpful? Please share your comments with us. If you have a tech question related to your computer or smart device, feel free to reach out. Just send an email to contact@techsavvy.life, and be sure to include the device, app, and version you are using. To assist us further, you can also attach screenshots related to your inquiry.
The author’s Vietnam eBook on the “Battle for Tra Bong Vietnam: Events and Aftermath” can be accessed from a Kindle device or the Kindle App for a desktop or smartphone. The apps are free.
The author’s Vietnam eBook on the Battle for Tra Bong Vietnam: Events and Aftermath
The Notes app on Apple devices sorts notes by default based on the most recent update. However, users can change settings to organize notes alphabetically by title or first line. This enhances note accessibility and organization. The guide also addresses setting defaults for new notes.
RAYMOND OGLESBY @RaymondOglesby2 June 3, 2025– 3 minutes read time
Overview
Can you alphabetize in Notes? Yes! By default, the Notes app sorts your notes by most recently updated. Even if you created a note years ago, if you edit that note, it will appear at the top of the list afterward.
But you can easily sort your notes alphabetically by changing your Settings. Your notes will then be sorted according to either the title or first line (if the note does not have a title). Let explore how to sort Apple Notes alphabetically on iPhone or iPad.
Why You Will Like This Tip
Alphabetize notes by note titles or the beginning of your note, instead of by date created or last edited.
Alphabetize notes on iPhone and iPad to make your notes more organized and easier to find.
System Requirements
This tip was performed on an iPhone 14 Pro running iOS 18.5.
Click here to learn how to update your iPhone to the latest iOS version.
Sorting Notes Alphabetically
First, open the Settings app. Refer to below image:
Selecting Settings
Next, scroll down and tap Apps. See the image below:
Selecting Apps
Now, rap Notes. See the following image:
Selecting Notes
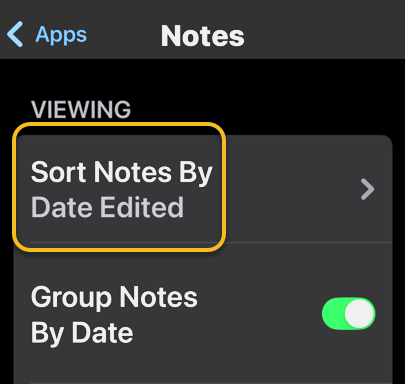
Next, tap Sort Notes By: Refer to image below:
Selecting the Sort Notes By option
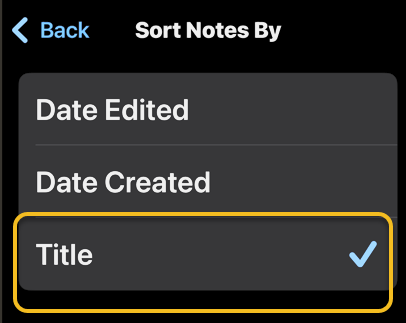
Now, tap Title. See the image below:
Selecting the Title option
Choosing Title will sort your Notes alphabetically. You can also select Date Created if you would rather have all your notes sorted by the day each was started.
Setting Defaults
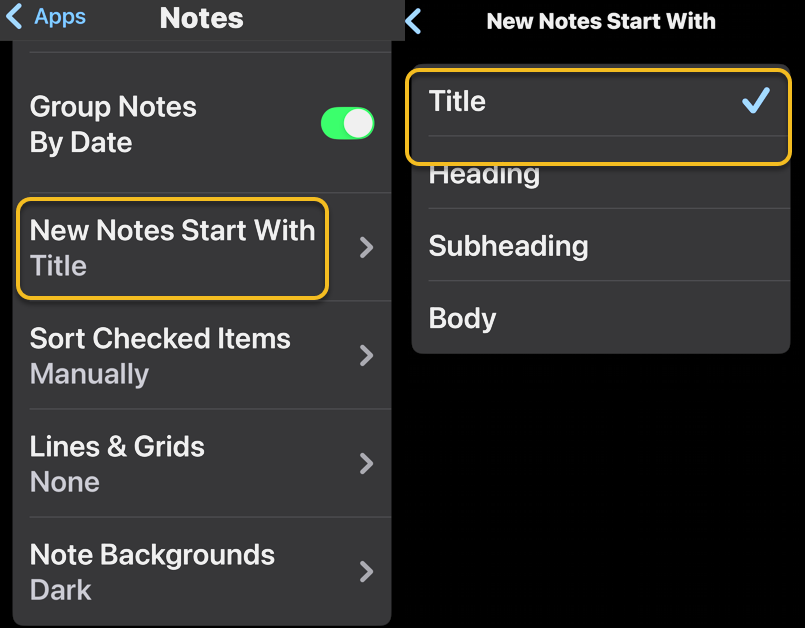
You may want to set a couple of defaults. One is to set the Title as the default heading for a New Note. See the following image:
Selecting the New Notes Start With Title option
If you prefer a New Note with lines or grids, you can choose from various styles. Refer to the image below:
Selecting a Style for a New Note
Disclaimer
Technology is constantly evolving, and smartphone and desktop tech rarely remains static. Therefore, the information in this post is only accurate as of the date it was written. Blog posts that are older than six months may contain instructions that are no longer compatible with your device or operating system. We hope that the content from previous posts continues to function as intended. Thank you for reading TechSavvy.Life, where technology works for you.
Quote For the Day
“Technology is not just a tool. It can give learners a voice that they may not have had before.”
― George Couros
(X) Twitter Infio
You are finished. Please feel free to share this post! One way to share is via Twitter.
Just click the Tweet icon below. This will launch Twitter where you click its icon to post the Tweet.
Checkout TechSavvy.Life for blog posts on smartphones, PCs, and Macs! You may email us at contact@techsavvy.life for comments or questions.
We value your feedback! Was this post helpful? Please share your comments with us. If you have a tech question related to your computer or smart device, feel free to reach out. Just send an email to contact@techsavvy.life, and be sure to include the device, app, and version you are using. To assist us further, you can also attach screenshots related to your inquiry.
The author’s Vietnam eBook on the “Battle for Tra Bong Vietnam: Events and Aftermath” can be accessed from a Kindle device or the Kindle App for a desktop or smartphone. The apps are free.
The author’s Vietnam eBook on the Battle for Tra Bong Vietnam: Events and Aftermath
Apple has disabled Advanced Data Protection (ADP) for iCloud in the UK due to government demands for law enforcement access. This compromises data security, as backdoor access could be exploited. In contrast, ADP offers end-to-end encryption unavailable to Apple, ensuring only users can access their data. Users outside the UK retain this protection.
Insert dRAYMOND OGLESBY @RaymondOglesby2 April 1, 2025 – 6 minutes read time
Overview
Recently. Apple took the unusual step of turning off its highest level of iCloud encryption, Advanced Data Protection (ADP) for customers in the UK. The British government has reportedly demanded that Apple provide a method for law enforcement to access encrypted data as part of criminal investigations. But that creates a serious security problem, because this type of backdoor access can also be exploited by criminals or untrustworthy governments.
Why You Will like This Tip
Have the best encryption for your Apple devices.
Prevent hackers from accessing and viewing your data.
System Requirements
See below for the Apple software versions. These screenshots were captured using iOS 18.3.2 on iPhone 14 Pro.
Click here to learn how to update your iPhone to the latest iOS version.
United Kingdom vs United States
For people in the UK, ADP can no longer be enabled. If you are currently using ADP, you will need to turn off the feature at a future date.
If you are outside the UK and concerned about who can see your data, ADP adds an extra layer of security by making it unreadable even by Apple. If ADP is disabled, your data could be at risk because it can still be unlocked by Apple, a legal request or a data breach.
Let’s explore how to turn Advanced Data Protection on, and how it differs from the default iCloud encryption methods.
How Does ADP Work
The key difference between ADP and how Apple encrypts data by default is how accessible your information is when stored on Apple’s servers.
In what Apple calls standard data protection, information sent between points, such as files stored on iCloud Drive and iCloud backups of your devices, is encrypted and transmitted securely. If someone intercepts that data between the two points, they will see only gibberish.
That data remains encrypted when it’s stored on Apple’s servers, so you can access it from other devices, for instance. However, Apple can still access the encryption keys to unscramble and read the data; and provide it to law enforcement following a legal request.
By contrast, when you enable Advanced Data Protection for iCloud, the data is end-to-end encrypted, meaning only your trusted devices possess the encryption keys to read it. The information remains encrypted on the servers, and not even Apple can access its contents. (Not all iCloud data can be end-to-end encrypted. Apple breaks out-which types of information, such as iCloud Mail messages, that remain covered by standard data protection even when ADP is turned on.)
The UK’s Investigatory Powers Act, the “Snooperd’s Charter”, makes that inaccessibility illegal, which is why Apple is turning the feature off for UK customers.
Some services are end-to-end encrypted regardless due to the sensitivity of the data, such as passwords, information stored in the Health app and payment information.
Setup Your Account for ADP
Note! Setting up ADP applies to all devices in your Apple account.
To set up ADP on your account, first make sure you have met all the prerequisites for the feature:
Your Apple Account must use two-factor authentication.
You must have a recovery method set up in case you lose access to your account. That can be a 28-character Recovery Key or a person you have designated as a Trusted Contact.
Every device connected with your Apple Account must be able to run at least
iOS 16.2, iPadOS 16.2, MacOS 13.1
WatchOS 9.2
TVOS 16.2
HomePod 16.0
For Windows computers, make sure iCloud for Windows is at version 14.1 or later.
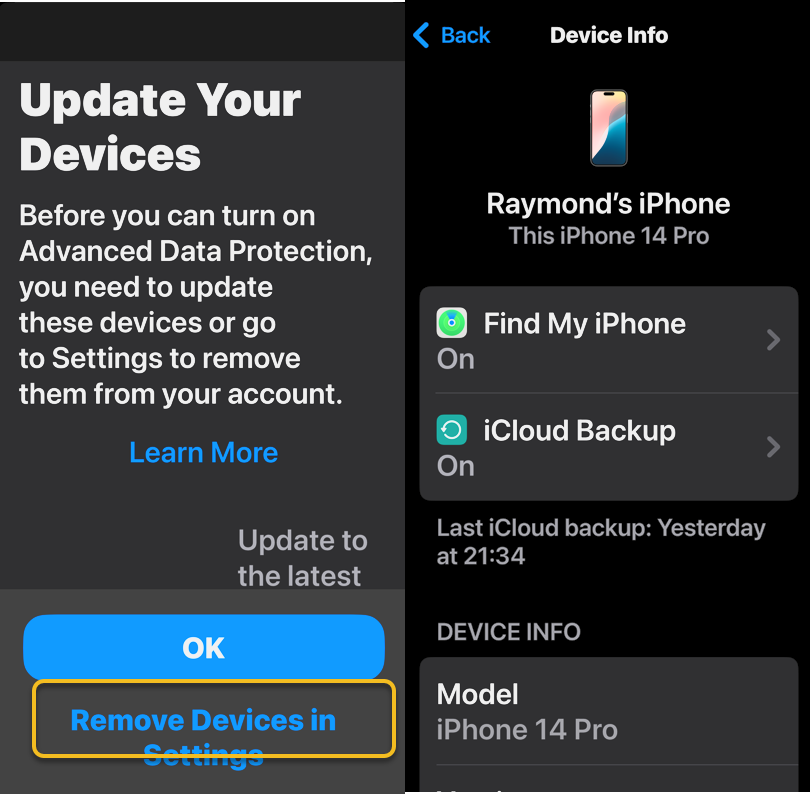
If any of your devices do not qualify, you will be warned during the ADP setup process. If any of those are too old or you no longer have access to them, head to:
Settings > Remove Devices and delete them from your list.
Refer to the below image:
Update your Devices
How to Setup
To turn on ADP on an iPhone, iPad or Mac do the following:
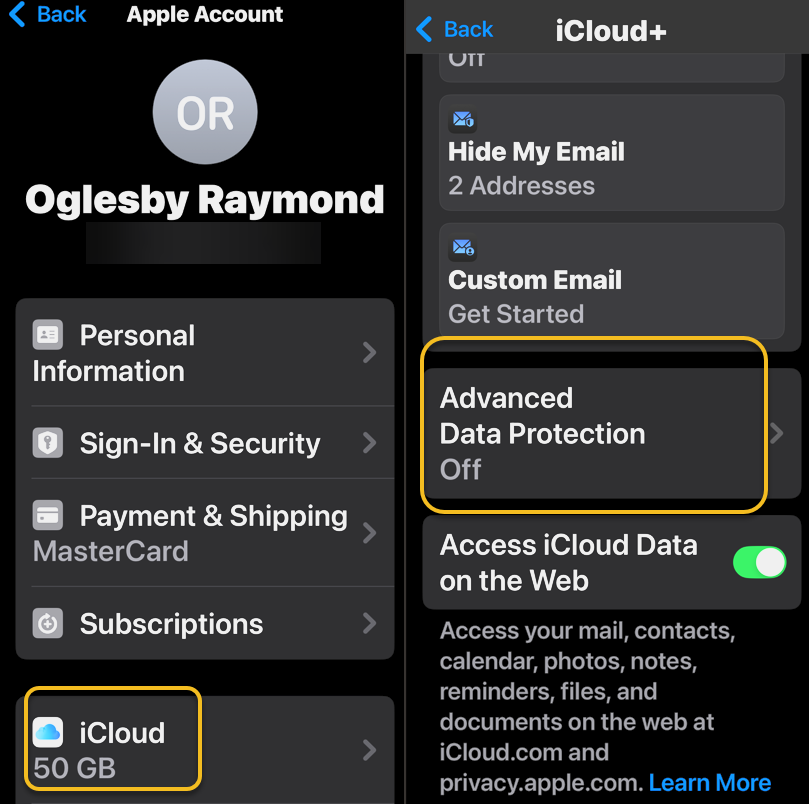
1. Go to Settings > [Your Name] > iCloud. On a Mac, open System Settings > [Your Name] > iCloud.
2. Scroll down to Advanced Data Protection, which likely says Off, and tap that to enable. This will take some time, and the screen will appear to be unresponsive; Just be patient. Later, if you want to disable ADP, repeat the above steps and select the Turn Off button.
See the below image:
Turn on ADP
3, If there are any of the aforementioned impediments to setting up ADP, such as needing to update other devices on your account, you will review them on the next screen.
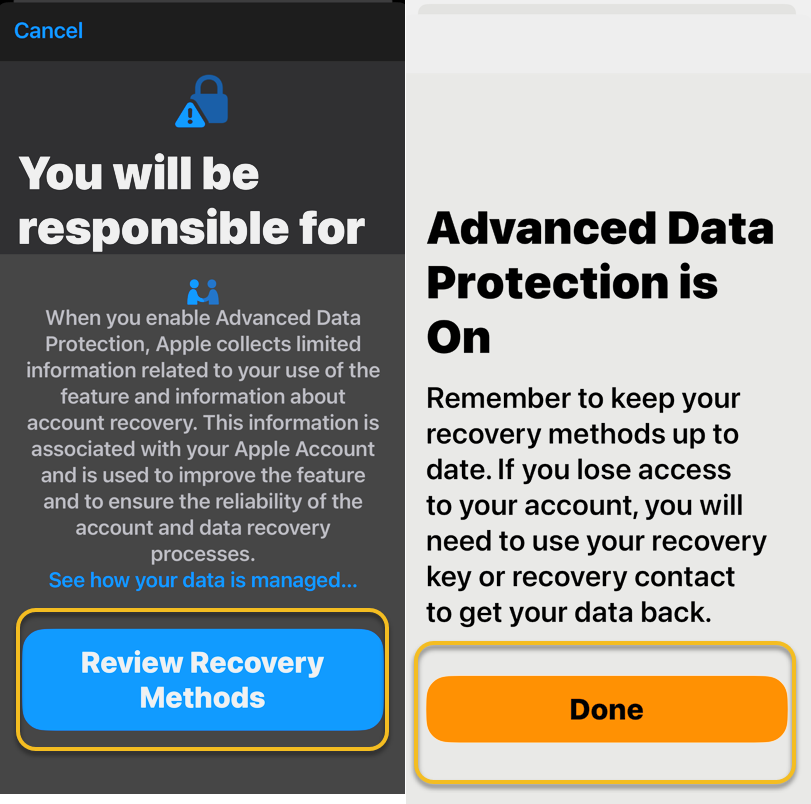
4. In the following screen, tap Review Recovery Options. You need to have a Recovery Key, Recovery Contact or both to ensure that you can get your data if you lose access to your iCloud account.
5. Enter your device’s passcode to finish.
See the following image:
ADP is Enables
Activating ADP on one device means it’s on for all of your devices using the same Apple account, so you only need to set it up once.
Disclaimer
Technology is constantly evolving, and smartphone and desktop tech rarely remains static. Therefore, the information in this post is only accurate as of the date it was written. Blog posts that are older than six months may contain instructions that are no longer compatible with your device or operating system. We hope that the content from previous posts continues to function as intended. Thank you for reading TechSavvy.Life, where technology works for you.
Quote For the Day
. “Imagination is more important than knowledge. For knowledge is limited, whereas imagination embraces the entire world, stimulating progress, giving birth to evolution.”
-Albert Einstein
X (Twitter) info
That’s it. Please feel free to share this post! One way to share is via Twitter.
Just click the Tweet icon below. This will launch Twitter where you click its icon to post the Tweet.
Checkout TechSavvy.Life for blog posts on smartphones, PCs, and Macs! You may email us at contact@techsavvy.life for comments or questions.
We value your feedback! Was this post helpful? Please share your comments with us. If you have a tech question related to your computer or smart device, feel free to reach out. Just send an email to contact@techsavvy.life, and be sure to include the device, app, and version you are using. To assist us further, you can also attach screenshots related to your inquiry.
The author’s Vietnam eBook on the “Battle for Tra Bong Vietnam: Events and Aftermath” can be accessed from a Kindle device or the Kindle App for a desktop or smartphone. The apps are free.
The author’s Vietnam eBook on the Battle for Tra Bong Vietnam: Events and Aftermath
Apple has introduced the Time to Leave feature for iOS 18, which alerts users when it’s time to depart for calendar events. By enabling Location Services and adjusting settings in the Calendar app, users receive timely notifications that include traffic conditions, ensuring they arrive on time to their destinations.
RAYMOND OGLESBY @RaymondOglesby2 February 11, 2025 – 3 minutes read time
Overview
Have you ever wished your iPad or iPhone would not only remind you of calendar events but also give a calendar alert when it’s time to depart? Well, now you can. Apple has just introduced the new Time to Leave feature, which automatically calculates when you need to leave your current location so you can arrive at your destination on time. Let’s explore how to use the Time to Leave feature.
Why You Will Like This Tip:
Get notified when it’s time to get in your car and head to your appointment or meet-up.
With built-in drive time reminders, you need never be late again!
System Requirements
The steps below will only work on an iPhone updated to iOS 18. The screenshots are from iPhone 14 Pro running iOS 18.3.
Click here to learn how to update your iPhone to the latest iOS version.
You will also need to be sure Location Services is enabled. Head to:
Settings > Privacy & Security > Location Services
and turn the toggle to the ON position.
Setup and Use Time to Leave Feature
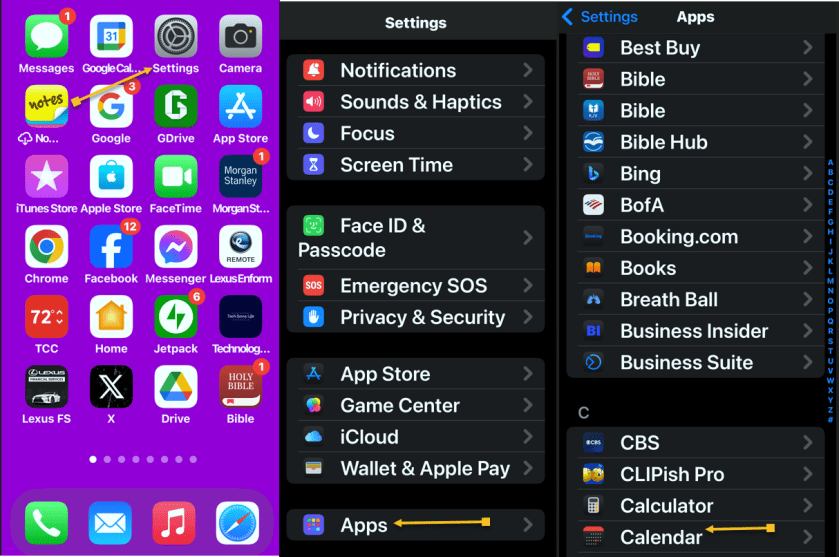
First, navigate to:
Settings > Apps > Calendar
Refer to the below image:
Open the Calendar app
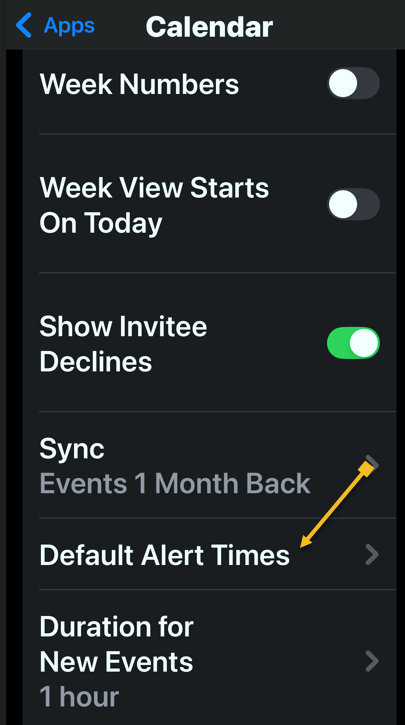
Next, tap the Default Alert Times option. See the below image:
Select the Default Alert Times option
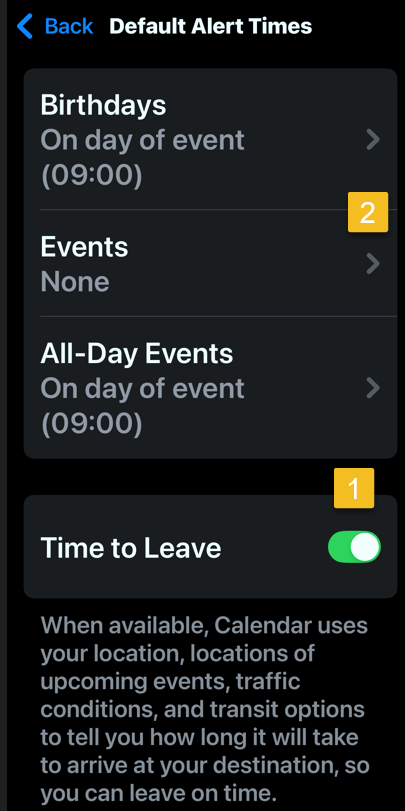
Now, toggle Time to Leave to the ON position.
Note! the Event must be set to None for this feature to work!
See the following image:
Enable Time to Leave toggle
Next, open the Calendar app. Refer to the below image:
Open the Calendar app
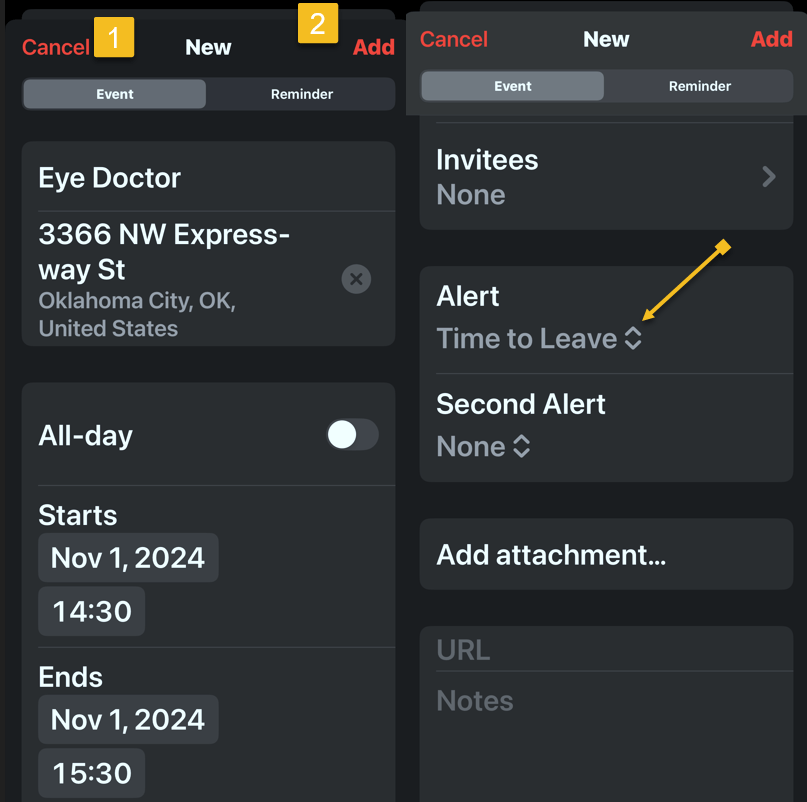
Now, create a calendar event as you normally would, then tap the Add icon. You will see that your Time to Leave alert has been automatically added to the event. See the below image:
Create a calendar event
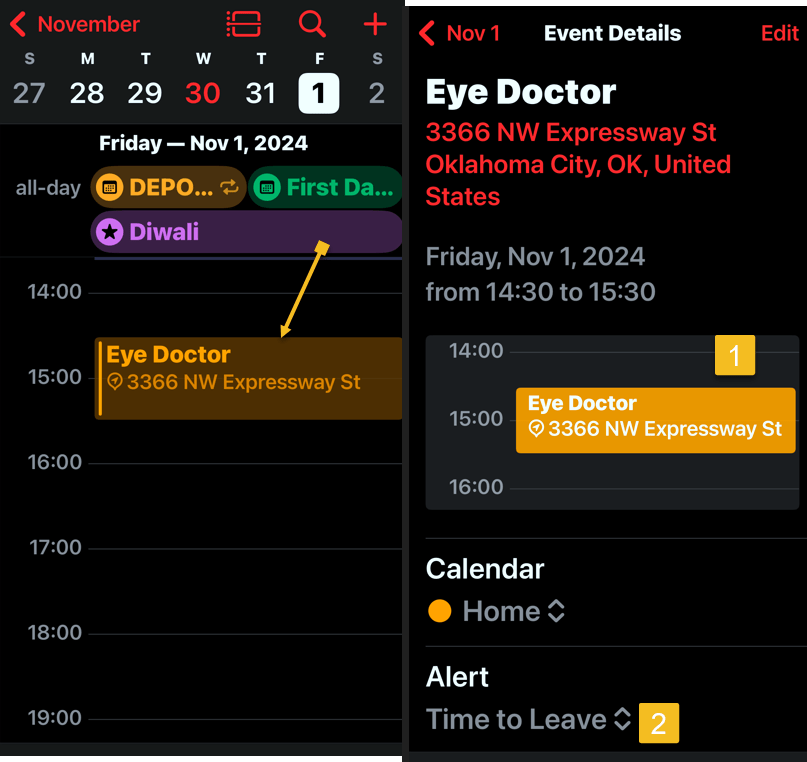
Next, open your Calendar and find your event. Tap the event to see its details. Notice the Time to Leave alert. See the following image:
Time to Leave details
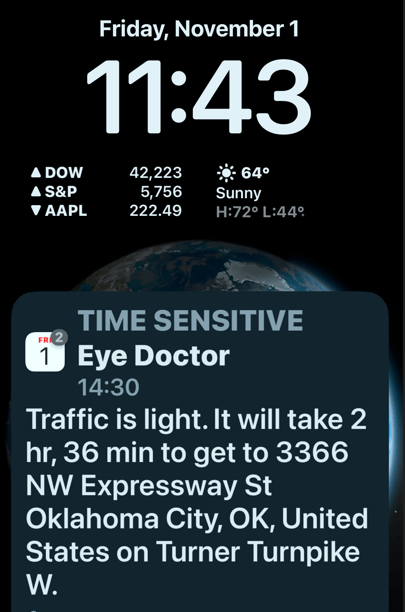
At the designated time, you will receive a Notification about the event that includes traffic conditions and travel time to reach your destination. Refer to the below image:
Your Time to Leave notification
Now you know how to enable and use Time to Leave alerts in your iPad and iPhone Calendar settings
Disclaimer
Technology is always changing. Rarely is there static tech for smartphones and desktops. Thus, the contents of this post are only valid at the time of writing. Blog posts older than six months may have directions incompatible with your device or OS. Hopefully, older post content will continue to work as advertised. Thank you for reading TechSavvy.Life for Technology at Work For You.
Quote For the Day
The great myth of our times is that technology is communication.
Libby Larsen
X (Twitter) Info
That’s it. Please feel free to share this post! One way to share is via Twitter.
Just click the Tweet icon below. This will launch Twitter where you click its icon to post the Tweet.
Checkout TechSavvy.Life for blog posts on smartphones, PCs, and Macs! You may email us at contact@techsavvy.life for comments or questions.
Was this post helpful? We would love to hear your comments. Do you have a computer or smart device tech question? I will do my best to answer your inquiry. Just send an email to contact@techsavvy.life. Please mention the device, app, and version you are using. To help us, you can send screenshots of the data related to your question.
The author’s Vietnam eBook on the “Battle for Tra Bong Vietnam: Events and Aftermath” can be accessed from a Kindle device or the Kindle App for a desktop or smartphone. The apps are free.
The Control Center on iOS 18 and iPadOS 18 simplifies access to frequently used features by allowing customization and multiple screens. Users can manage Wi-Fi, Bluetooth, volume, and more, enhancing organization. By arranging controls and adding shortcuts, users can optimize their experience, making navigation more efficient and personalized.
RAYMOND OGLESBY @RaymondOglesby2 December 3, 2024 – 6 minutes read time
Overview
For quick access to frequently used apps and settings, Control Center is just a swipe or click away. And with iOS 18 and iPadOS 18, it’s even easier to customize and use.
Navigating the settings on your iPhone, iPad, and Mac can be difficult. That’s where the Control Center comes in, providing quick access to a variety of features that might otherwise be hidden within the device’s menus. From the Control Center, you can easily adjust settings for Wi-Fi, Bluetooth, and AirDrop, as well as control brightness and volume. It also allows you to manage Focus mode, access music controls, switch to dark mode, and enable screen mirroring. Additionally, you can customize the Control Center by adding or removing features as needed.
For many years, the Control Center on your iPhone and iPad was restricted to a single screen. If you wanted to change the controls, you had to navigate into the settings of your device. However, with the introduction of iOS 18 and iPadOS 18, you can now set up multiple screens and customize them directly within the Control Center. Let’s explore how to personalize the updated Control Center.
Why You Will Like This Tip
Organize the Control Center so that your most frequently used controls are easily accessible at the front.
Maintain a tidy and organized Control Center..
System Requirements
This tip is for iPhones running iOS 18 or later. The screenshots are from iPhone 14 Pro running iOS 18+.
Click here to learn how to update your iPhone to the latest iOS version.
Customize the Control Center
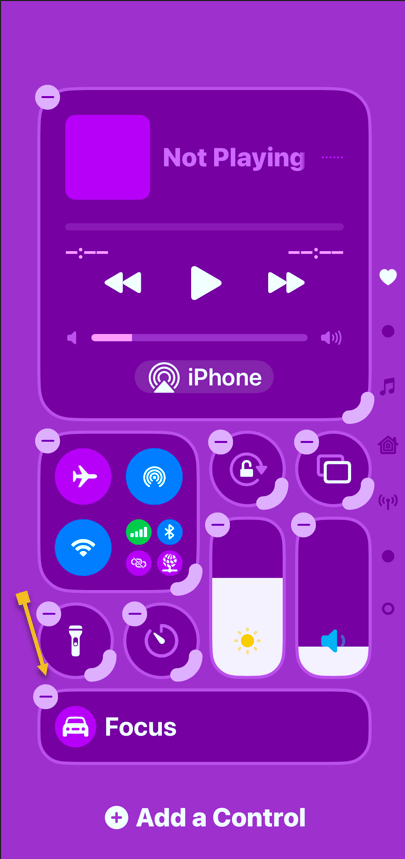
First, swipe down from the upper right edge to open the Control Center. Refer to the below image:
Swiping down to access Control Center
Next, rap and hold in an empty area. See the below image:
Taping any empty area
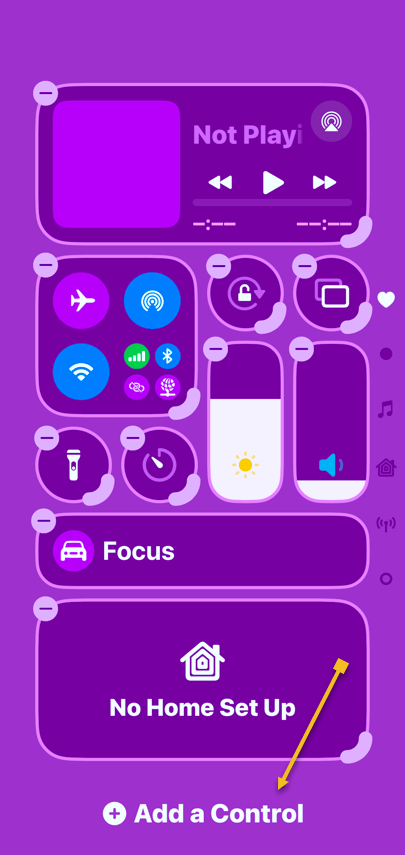
Now, the controls will have minus symbols next to them, indicating that you are in Edit mode. Tap Add a Control to get started. See the following image:
Selecting Add a Control button
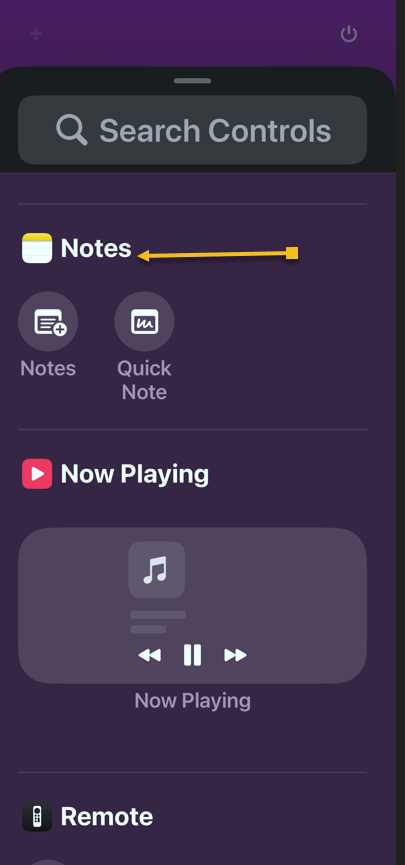
Next, find a control you want easy access to and tap on it to add it to the Control Center. Refer to the below image:
Selecting to add the Notes app
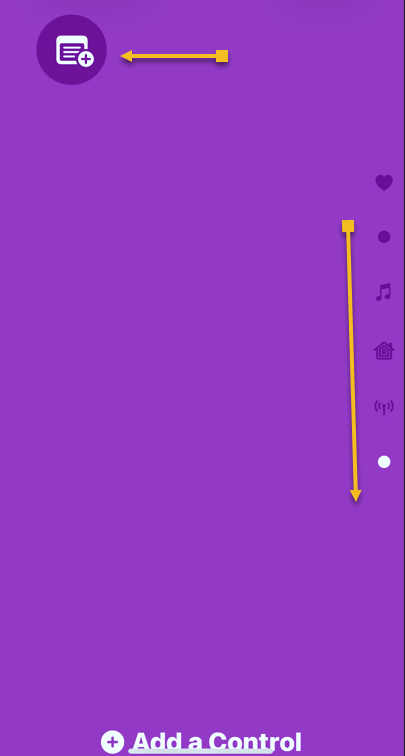
Now, if your first page becomes too full, a second page will be automatically created. You can swipe up and down to navigate between the Control Center pages. Each page is indicated by a dot on the far right side of the screen. Please note that we have a total of six pages. See the image below:
Notes app has been added
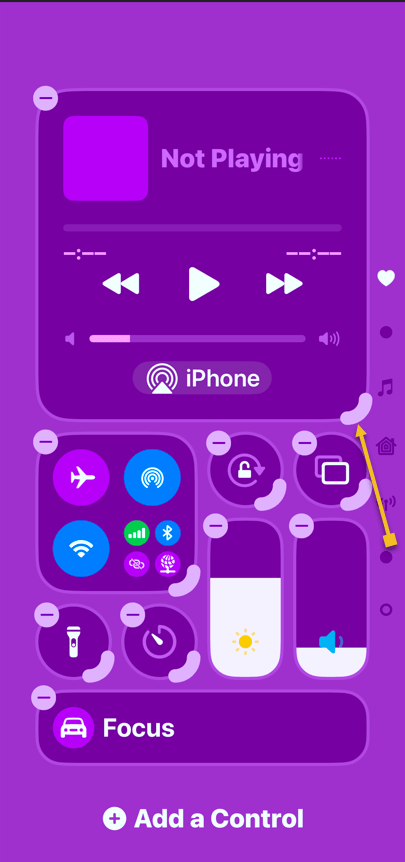
Next, to change the size of a control, tap and drag the corner. Keep in mind that some controls only have one size. See the following image:
Selecting Playback control to resize
Now, view your resized Playback control. Refer to the below image:
Playback control has been resized
Next, to remove a control, simply tap the minus symbol next to it. See the below image:
Selecting to remove the Focus control
Now, you can place controls anywhere without worrying about order. Our Control Center has been rearranged from six pages to only three pages, as indicated by the dots on the right side. See the following image:
Final Control Center
FAQ
Why does my iPhone say SOS in the top right corner?
If your iPhone cannot connect to a cellular network or Wi-Fi, it may display ‘SOS’ in the top right corner. This indicates that your device can only make emergency calls.
What does 5GUC mean?
5GUC stands for 5G Ultra Capacity. This is T-Mobile’s higher frequency 5G network. Other cellular providers have similar higher frequency networks with different names.
What are the icons on the top right of iPhone?
At the top of your iPhone screen, you will typically see the strength of your cellular network represented by bars. To the right of this, there will be an indicator showing 4G, LTE, 5G, or a similar symbol if you are connected to a cellular network. If you are connected to Wi-Fi, you will see a Wi-Fi symbol instead. Finally, you will also find the battery indicator for your iPhone.
What do the iPhone signal symbols mean?
The signal symbols indicate whether you are using cellular data or Wi-Fi, as well as the strength of the wireless connection.
Summary
That’s how to customize the Control Center on your iPhone. We recommend placing your most-used controls on the first page.
Disclaimer
Technology is constantly evolving, and smartphone and desktop tech rarely remains static. Therefore, the information in this post is only accurate as of the date it was written. Blog posts that are older than six months may contain instructions that are no longer compatible with your device or operating system. We hope that the content from previous posts continues to function as intended. Thank you for reading TechSavvy.Life, where technology works for you.
Quote For the Day
“The march of science and technology does not imply growing intellectual complexity in the lives of most people. It often means the opposite.”
– Thomas Sowell
(X) Twitter Info
You are finished with a revised Control Center. Please feel free to share this post! One way to share is via Twitter.
Just click the Tweet icon below. This will launch Twitter where you click its icon to post the Tweet.
Checkout TechSavvy.Life for blog posts on smartphones, PCs, and Macs! You may email us at contact@techsavvy.life for comments or questions.
We value your feedback! Was this post helpful? Please share your comments with us. If you have a tech question related to your computer or smart device, feel free to reach out. Just send an email to contact@techsavvy.life, and be sure to include the device, app, and version you are using. To assist us further, you can also attach screenshots related to your inquiry.
The author’s Vietnam eBook on the “Battle for Tra Bong Vietnam: Events and Aftermath” can be accessed from a Kindle device or the Kindle App for a desktop or smartphone. The apps are free.
The author’s Vietnam eBook on the Battle for Tra Bong Vietnam: Events and Aftermath
The post explains how to enable the text-to-speech feature on iPhones or iPads, allowing users to listen to content like web pages or ebooks while multitasking. It details the setup process through the Accessibility settings and provides tips on adjusting voice options and speaking rates for an enhanced listening experience.
If you find it more convenient to listen to some text on your iPhone or iPad rather than read it, you can easily enable that capability. You might, for example, want your device to read a web page, ebook, or another document while you perform household chores.
RAYMOND OGLESBY @RaymondOglesby2 November 19, 2024 – 5 minutes read time
Overview
Apple ensured that the iPhone came with a broad array of built-in accessibility features so anyone can use it. Text-to-speech is just one of these accessibility options. Let’s explore how to set up and use text-to-speech.
Why You Will Like This Tip
Listen to web articles or books when you are busy with other tasks.
Have your iPhone or iPad read to you if you have difficulty seeing the screen well.
System Requirements
This tip works on iPhones running iOS 16 or newer. Screenshots are from iPhone 14 Pri running iOS 18+
Click here to learn how to update your iPhone to the latest iOS version.
How to Setup
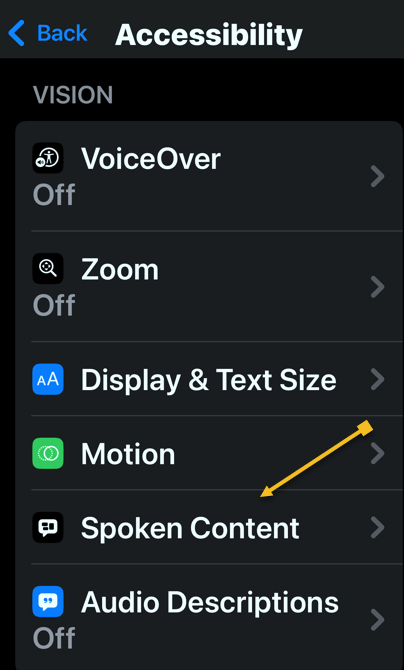
First, open the Settings app, and tap Accessibility. Refer to the below image:
Selecting the Accessibility option
Next, tap Spoken Content. See the below image:
Selecting the Spoken Content option
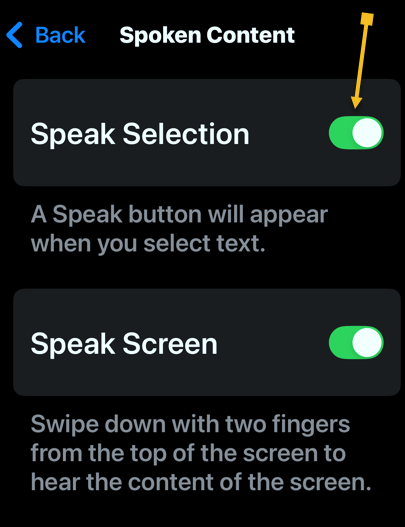
Now, tap the toggle next to Speak Selection to enable or disable it. See the following image:
Enabling the Speak Selection toggle
Tap the Highlight Content option to highlight each word as it is spoken (this is optional). Refer to the below image:
Selecting the Highlight Content option
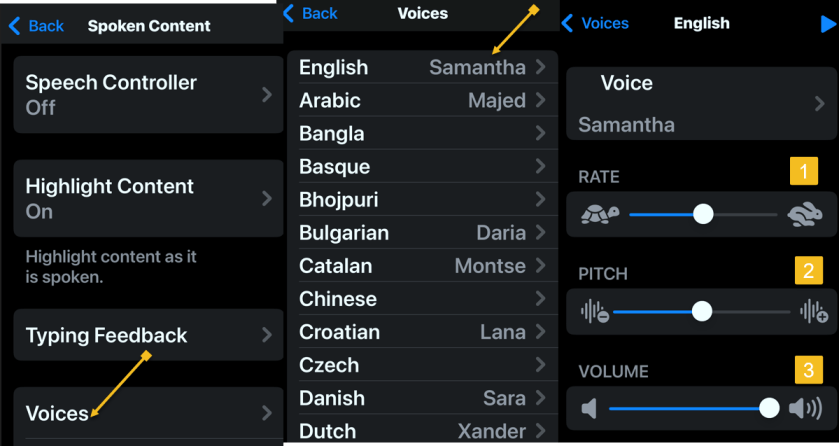
Next, you can tap Voices to choose a different computer-generated voice. See the below image:
Selecting a Voice and its options
Now, you can also select your Default Language. (Ours is set to Current Locale which is English). See the following image:
Selecting the Default Language
If you change your Default Language, you can turn the toggle next to Detect Languages to Off. This will let your iPhone read in other languages instead of translating in your default language. Refer to the below image:
Enabling the Detect Languages toggle
The Speaking Rate slider allows you to adjust how fast or slow the text-to-speech voice reads. See the below image:
Setting the Speaking Rate slider
Next, you can add Pronunciations, if the text-to-speech voice is not pronouncing something correctly. See the following image:
Adding Pronunciations
How to Use
To use text-to-speech, tap and hold some text to highlight it or use the Select or Select All option. Refer to the below image:
Highlighting text to read aloud
Now, tap the Speak option, and your iPhone will read the text aloud. See the below image:
Selecting the Speak option to read the highlighted text
Next, to stop your iPhone from reading the text, tap the highlighted text, then tap the Pause option. See the following image:
Selecting Pause option
Summary
You can use text-to-speech to have your iPhone or iPad read aloud to you if you have trouble reading everything on your screen, or while doing chores, cooking, or going for a walk.
Disclaimer
Technology is always changing. Rarely is there static tech for smartphones and desktops. Thus, the contents of this post are only valid at the time of writing. Blog posts older than six months may have directions incompatible with your device or OS. Hopefully, older post content will continue to work as advertised. Thank you for reading TechSavvy.Life for Technology at Work For You.
Quote For the Day
“Proverbs are all very fine when there’s nothing to worry you, but when you’re in real trouble, they’re not a bit of help.”
L.M. Montegomery
(X) Twitter Info
Congratulations, you are finished. Please feel free to share this post! One way to share is via Twitter.
Just click the Tweet icon below. This will launch Twitter where you click its icon to post the Tweet.
Checkout TechSavvy.Life for blog posts on smartphones, PCs, and Macs! You may email us at contact@techsavvy.life for comments or questions.
Was this post helpful? We would love to hear your comments. Do you have a computer or smart device tech question? I will do my best to answer your inquiry. Just send an email to contact@techsavvy.life. Please mention the device, app, and version you are using. To help us, you can send screenshots of the data related to your question.
The author’s Vietnam eBook on the “Battle for Tra Bong Vietnam: Events and Aftermath” can be accessed from a Kindle device or the Kindle App for a desktop or smartphone. The apps are free.
This post provides tips for handling AI-generated summaries in Google search results. It explains how to disable these overviews using specific search modifiers.
RAYMOND OGLESBY @RaymondOglesby2 July 23, 2024 – 3 minutes read time
This is for devices running Google or Bing. Screenshots are from Windows 10 desktop
Get the Latest Desktop Google Update
Open Google, click the 3-dot menu icon (upper right corner), then click the Settings option. If Google is outdated, it will automatically update.
Why You Will Like This Tip
View your Google or Bing search results without an AI-generated summary.
Narrow your search results to what you just want to preview.
Overview
We rely on Google every day to provide us information. But what happens when our source of knowledge becomes messy and unreliable? AI Overviews utilize Google’s Gemini AI to provide an answer to your query right on the search page; no need to click.
Using the AI Modifier
Still in its infancy, this feature occasionally surfaces incorrect information, so some web surfers look to disable it entirely. There are a few ways to make an AI Overview go away, but no method is as simple as tricking Google itself into getting rid of it. Google uses search modifiers, named operators, which help narrow search results. Here are a few examples:
Use quotations (” “) to search for the exact phrase
Add site: to search a single website
Search for a certain type of file with filetype:
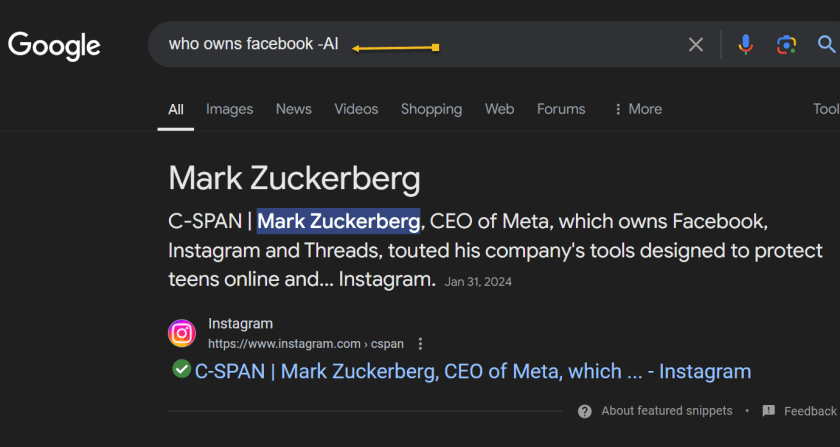
Exclude terms with a minus (-) symbol. The minus symbol stands for NOT.
If we ask “who owns Facebook” an AI-generated summary will be displayed. Refer to the below image:
With AI-generated summary
And if you add the term -AI at the end of the query, an overview is not generated. It’s a very simple solution to the AI Overview problem that can be quickly repeated on subsequent queries without needing multiple steps. See the below image:
Without AI-generated summary
However, it’s worth noting that this does not work because of the -AI modifier. On subsequent tests, we found that putting pretty much anything in there (Ex: -i, –sports, -farm) also did the same thing.
Summary
So, no, Google did not add a secret AI kill switch to its search engine. Instead, AI Overviews are likely only available under certain conditions, and by using a search modifier, you circumvent those parameters. Still, it’s an easy way to game the system until we get an easier way to disable these overlays.
Disclaimer
Technology is always changing. Rarely is there static tech for smartphones and desktops. Thus, the contents of this post are only valid at the time of writing. Blog posts older than six months may have directions incompatible with your device or OS. Hopefully, older post content will continue to work as advertised. Thank you for reading TechSavvy.Life for Technology at Work For You.
Quote For the Day
“Real gs move in silence like lasagna.”
Lil Wayne
X (Twitter) Info
That was easy. Please feel free to share this post! One way to share is via Twitter.
Just click the Tweet icon below. This will launch Twitter where you click its icon to post the Tweet.
Checkout TechSavvy.Life for blog posts on smartphones, PCs, and Macs! You may email us at contact@techsavvy.life for comments or questions.
Was this post helpful? We would love to hear your comments. Do you have a computer or smart device tech question? I will do my best to answer your inquiry. Just send an email to contact@techsavvy.life. Please mention the device, app, and version you are using. To help us, you can send screenshots of the data related to your question.
The author’s Vietnam eBook on the “Battle for Tra Bong Vietnam: Events and Aftermath” can be accessed from a Kindle device or the Kindle App for a desktop or smartphone. The apps are free.
The author’s Vietnam eBook on the Battle for Tra Bong Vietnam: Events and Aftermath
Social media feeds are controlled by algorithms that track user interactions to serve content. Although helpful, they can misinterpret preferences. To regain control, users can reset their watch history on YouTube, adjust settings on Facebook and Instagram, and modify interests on LinkedIn and Twitter, or even create new accounts for a fresh start.
RAYMOND OGLESBY @RaymondOglesby2 October 15, 2024 – 9 minutes read time
This is for devices using Social Media. Screenshots are from iPhone 14 Pro running iOS 17.6.1
Click here to learn how to update your iPhone to the latest iOS version.
Overview
Almost everything you see in your social media feeds today is governed by algorithms. Think of them as the digital rules and intelligence that social media companies use to deliver a steady stream of interesting content to your eyes. They are invisible conductors that note everything you like, click, or comment on and use that information to serve up more content you likely engage with.
Algorithms are far from perfect, though. Sometimes, they pick up on the wrong signals and stuff your feed with things you do not care about. If you find yourself increasingly uninterested in the posts you see in your feed, it’s often possible to reset those algorithms. Doing it correctly can completely change what your social networks show when you log in.
Let’s explore how to take back control of your social media.
YouTube
YouTube feeds you content based on what you watch, search for, and subscribe to. As YouTube says on some pages (accessible below), “Keeping your history makes YouTube more personal.” But familiarity can breed contempt.
First, reset your Watch History. On the mobile app:
Tap your name > Cog icon> Settings > Manage All History
Refer to the below image:
Manage YouTube history
From here, you have a few options. You likely have Auto-Delete (Off) set up; click that, and you can tell YouTube to delete the tracked history of anything older than 36, 18, or 3 months. The shorter the time frame, the bigger the reset to your suggestions will be.
Alternatively, click where it says DELETE with a down arrow to access a menu to delete what you have seen today, in a custom range of time, or everything for all time. That final one is the nuclear option. Your suggestions will be totally fresh.
While here, click the Saving Your YouTube History link to change what YouTube saves. You may not want it to save searches because you may look for some wacky stuff. Or set it to turn off any YouTube history saving whatsoever. Scroll down the page to YouTube Customize Your Feed Feedback and click Delete to get rid of videos you specifically picked for your home feed in the past.
(On the desktop, click your avatar at the upper right and select Your Data in YouTube. Scroll down to YouTube Watch History and toggle the On button to Off so your history storage is paused. Click Manage your YouTube Watch History to access the menus as mentioned above, like Auto-Delete).
Clicking “NotInterested” under select videos can also impact the algorithm.
For a genuinely full reset, unsubscribe to every YouTube channel you follow.
On mobile, click Subscriptions at the bottom, then click All at the top, and you will see the full list. Click the bell icon to the right of each for a menu that includes Unsubscribe. (On Desktop, use Subscriptions> Manage to get to the list with the menus.)
Facebook
Facebook’s main display is called the Feed. It features updates, photos, videos, and more from people, Pages, and groups you follow. posts based on what it believes you will like.
Thankfully, there are plenty of ways to adjust the FacebookFeed. Click your avatar profile pic at the upper right on the desktop and go to
Settings and Privacy > Feed
You will see options here to manage your favorites (people/groups you want to see the most), unfollows (people you do not want to dump, but do not want to see as much of), snoozes (people you want to temporarily unfollow), and reconnect (it lets you turn off unfollows). See the below image:
Manage Facebook feed
You can also opt to avoid looking at Facebook’s main page. Go right to Feeds (via the left-hand navigation), and then you can view only the Favorites, Friends, Groups, or Pages you want to see.
As you use Facebook daily, be sure to perform hides, snoozes, and unfollows on posts as you encounter them to “train” the algorithm and steer it toward the kinds of content you actually want to see.
You also can and should go into Facebook Ad Preferences and change things so you can impact the advertising in your Feed. You can also do this with ads as they pop up. Click the X to hide an ad immediately, or use the three-dot menu to hide or report it. You can also limit advertising topics you see by going to:
Settings & Privacy > Settings > Account Center > Ad Preferences > Customize ads
then click “See All” next to Ad Topics.
You can use Page Moderation to block certain words or phrases so they do not appear, at least in the comments. Go to:
Settings > Followers and Public Content > Hide comments containing specific words
You choose the list of words to block.
Since everything you see on Facebook is tied entirely to who you friend and follow, a complete reset would require you to unfriend everyone. Starting a new profile is more manageable. This is also pretty easy; click your profile pic to see a button that says See all profiles. In the following menu, it shows + Create new profile or Page. A personal profile is just for individuals, but you can make a new one to get a fresh, clean feed. A page is more for a business or organization, that multiple people can control. No matter what you create, you can easily switch back and forth between the profiles/pages. See the following image:
Create Facebook profile
Instagram
Instagram is part of Meta, just like Facebook, so many of the same rules we listed above apply. For example, the Ad Preferences/Ad Topics are similar. Access them by clicking:
Menu > Settings > Account Center > Ad Preferences.
Again, there’s no direct way to reset the algorithm, but you can manipulate things by clicking the three-dot menu on posts to set the person as an unfollow or to add to favorites. Click into the account of someone you see, and on the following menu, you can add a person as Close Friend, Favorite, Mute (Posts and/or Stories), Restrict (which limits interaction without a complete block), or Unfollow.
Under Settings, you will find Muted accounts, Blocked accounts, Close Friends, and other lists you can change as desired.
The best reset is to open a new account. You can do that by logging out of Instagram and creating a new user profile. After that, log in to either account, go to:
Settings > Account Center > Accounts > Add Account
and log into the second one. You can link the two accounts (or even a Facebook account) and switch between them. Remember, if you follow all the same people on the new account, it will look like the previous one.
X (Twitter)
Twitter gives you so little control over your feed that if you want to reset the type of content that the platform serves you, your best bet is to start a totally new account. If that’s a bit too drastic for you, try to adjust your existing feed by going to
Settings & Privacy > Privacy and Safety > Content You See
This will let you uncheck topics and interests the service believes you are into. Sadly, you can not uncheck them all at once. Also, under Privacy and Safety, scroll down to Ads Preferences, and uncheck all that.
When using the service, click the 3-dot ellipsis menu on any ads you do not like to block them. Same with anyone you follow that you have lost interest in. If you want to really get rid of everyone you follow to start fresh, go to Following and click the Following button (it will turn to a red Unfollow) next to every name to unfollow; this will take a while if there are a lot of them. If you do not want to do it manually, there’s a Chrome extension called X (Twitter) Mass Unfollow.
LinkedIn
Microsoft’s social network for businesspeople (or those looking for work) does a pretty good job of just showing you the people you follow, but likes to sneak in a few ads based on what it thinks you like. Under your profile, pick:
Settings & Privacy > Advertising Data > Interests and traits
uncheck anything you are not into. Or turn them all off, but of course, then your ads are less relevant. In fact, go through all the “Data collected on LinkedIn” and “Third-party data” entries. If you turn them all off, you will get a totally new feed, albeit probably irrelevant.
Source: Social Media platforms
Disclaimer
Technology is always changing. Rarely is there static tech for smartphones and desktops. Thus, the contents of this post are only valid at the time of writing. Blog posts older than six months may have directions incompatible with your device or OS. Hopefully, older post content will continue to work as advertised. Thank you for reading TechSavvy.Life for Technology at Work For You.
Quote For the Day
“Proverbs are all very fine when there’s nothing to worry you, but when you’re in real trouble, they’re not a bit of help.”
LM Montgomery
X (Twitter) Info
That’s it. Please feel free to share this post! One way to share is via Twitter.
Just click the Tweet icon below. This will launch Twitter where you click its icon to post the Tweet.
Checkout TechSavvy.Life for blog posts on smartphones, PCs, and Macs! You may email us at contact@techsavvy.life for comments or questions.
Was this post helpful? We would love to hear your comments. Do you have a computer or smart device tech question? I will do my best to answer your inquiry. Just send an email to contact@techsavvy.life. Please mention the device, app, and version you are using. To help us, you can send screenshots of the data related to your question.
The author’s Vietnam eBook on the “Battle for Tra Bong Vietnam: Events and Aftermath” can be accessed from a Kindle device or the Kindle App for a desktop or smartphone. The apps are free.
The author’s Vietnam eBook on the Battle for Tra Bong Vietnam: Events and Aftermath
The post discusses the accessibility features on iPhone and iPad, emphasizing their importance for users with visual or audio impairments. It provides a detailed guide on enabling Accessibility Shortcut and Back Tap gestures, highlighting various options such as AssistiveTouch, Color Filters, and Voice Control.
RAYMOND OGLESBY @RaymondOglesby2 August 20, 2024 – 7 minutes read time
This is for iPhone and iPad. Screenshots are from iPhone 14 Pro running iOS 17+
Accessibility is always important since it makes devices easier for those with visual or audio impairments. Apple always does a great job with accessibility, and you will find plenty of accessibility options on your iPhone or iPad to make life easier. Perhaps you need to have more sound on one side of your favorite headphones, or you just need to make text easier to read. No matter what you need, iOS 17 and iPadOS 17 are very inclusive, so you will not feel left behind. And to make it even easier to access your favorite accessibility tools, there is the Accessibility Shortcut on your favorite iPhone or iPad.
How to Enable
Launch the Settings app on your iPhone or iPad.
Tap on Accessibility.
Tap on Accessibility Shortcut; it’s all the way to the bottom. Refer to the below image:
Selecting Accessibility Shortcut option
Tap the action you would like to perform when you triple-click the Home or Side button so that a blue checkmark appears next to it. You can assign multiple functions to the shortcut.
If you want to reorder the options, just drag and drop. Tap and hold the handle on the right side of each option to move it.
Triple-click your Home button (Touch ID devices) or Side button (Face ID devices) to perform the action you have assigned to the shortcut.
If you have assigned multiple options, simply choose the action you want to perform from the menu. See the below image:
Assigning multiple shortcuts and reordering them
Here’s a brief description of the options you have and what they are:
AssistiveTouch: Adds the ability to access many common hardware buttons and gesture controls with single taps; a useful feature for those with motor impairments.
Background Sounds: A new feature in iOS 15, Background Sounds lets you play soothing white noise to help you concentrate. Using the Accessibility Shortcut toggles your selected sound. First, you need to set up your Background Sounds.
Classic Invert Colors: A great option for anyone with a visual impairment such as color blindness. All colors across iOS will be inverted.
Color Filters: Changes the color layout of the screen for those with color blindness.
Full Keyboard Access: This allows you to navigate the iOS interface without using touch input. A physical keyboard is required to use this feature.
Increase Contrast: This will increase the contrast of visual elements on the screen, making it easier to see and read text.
Left/Right Balance: This turns on your custom audio balance setting if you have one set up. For example, if you want more sound on the left or right side of your earbuds or headphones, you will want to adjust that audio balance. Turning this off will go back to the default setting.
Magnifier: Triggers a camera-style viewfinder with sharp zoom controls so you can see small text. You will need the Magnifier enabled to have this option available.
People Detection: With People Detection, your iPhone 12 or iPhone 13 uses Machine Learning with the LiDAR scanner to determine if an object in the camera is a person. You will receive audio feedback to help you determine how far away or close a person is to you.
Reduce Motion: This turns on the Reduce Motion setting, which reduces motion in the user interface, including the parallax with app icons. This can also help conserve some battery power.
Reduce Transparency: This reduces the transparency used in apps and websites, including blurred backgrounds. Having this on improves the legibility of text.
Reduce White Point: Reduces the intensity of bright colors for those with sensitivities or color blindness.
Smart Invert Colors: Same as Classic Invert Colors, except it does not change photos, media, and some apps.
Switch Control: This lets you use external switches, or the screen itself, as a switch for motor accessibility.
Voice Control: This lets you speak commands to your iPhone or iPad.
VoiceOver: Allows your iPhone or iPad to speak to you when enabled. Commonly used by folks with visual impairments.
Zoom: Allows you to zoom your content for better visibility. You can then use two and three-finger gestures to tap and pan around.
Guided Access: This keeps the iPhone in a single app and allows you to control which features are available. You need the Guided Access feature enabled before it is available as an Accessibility Shortcut option.
Once you have made your selection for the Accessibility Shortcut on iPhone and iPad, you can simply triple-click the Home button or the Side button on iPhones and iPads with Face ID from anywhere, not just from Settings, and your iPhone or iPad will enable the function you have selected. To disable it, just triple-click the button again. If multiple functions are assigned, tap the option you want to use.
Back Tap
iOS 14 added a new Back Tap gesture. With the Back Tap, you can double-tap or even triple-tap the back of your iPhone for quicker access to some commonly used actions, such as accessing the Notification Center or Control Center. You can also use the Back Tap gesture to launch Shortcuts that you have created, opening up a whole new world of possibilities.
Launch Settings on your iPhone or iPad.
Tap Accessibility.
Tap Touch. See the following image
Selecting the Touch option
Tap Back Tap at the bottom.
Tap Double Tap or Triple Tap to choose an action. Refer to the below image:
Selecting Back Tap options
Select an action for your chosen Back Tap. Options include the Accessibility Shortcut that we just created, or you can choose from System, Accessibility, Scroll Gestures, or your own Shortcuts actions. See the below image:
Selecting Double and TripleTtap functions.
Quick Access
As you can see, having an Accessibility Shortcut and Back Tap gestures can make your life easier. It adds another layer of customization to your device, and you do not need to fiddle around in the settings every time to get to certain accessibility actions. Even if you are not visually or hearing impaired, these accessibility features are handy for everyone.
Disclaimer
Technology is always changing. Rarely is there static tech for smartphones and desktops. Thus, the contents of this post are only valid at the time of writing. Blog posts older than six months may have directions incompatible with your device or OS. Hopefully, older post content will continue to work as advertised. Thank you for reading TechSavvy.Life for Technology at Work For You.
Quote For the Day
“Real work is completed in silence and strikes a chord in the minds of only a very few.”
CG Jung
X (Tweeter) Info
That’s it. Please feel free to share this post! One way to share is via Twitter.
Just click the Tweet icon below. This will launch Twitter where you click its icon to post the Tweet.
Checkout TechSavvy.Life for blog posts on smartphones, PCs, and Macs! You may email us at contact@techsavvy.life for comments or questions.
Was this post helpful? We would love to hear your comments. Do you have a computer or smart device tech question? I will do my best to answer your inquiry. Just send an email to contact@techsavvy.life. Please mention the device, app, and version you are using. To help us out, you can send screenshots of the data related to your question.
The author’s Vietnam eBook on the “Battle for Tra Bong Vietnam: Events and Aftermath” can be accessed from a Kindle device or the Kindle App for a desktop or smartphone. The apps are free.
The author’s Vietnam eBook on the Battle for Tra Bong Vietnam: Events and Aftermath