RAYMOND OGLESBY @RaymondOglesby2
October 6, 2021
Incognito Mode is a common feature in web browsers that allows you to use the web somewhat anonymously. On an iPhone or iPad, if you are using the Google app as a web browser instead of Safari or Chrome, you can browse in Incognito.
The Google app for the iPhone and iPad offers an all-in-one experience. All of the searching and browsing results happens within the app. It’s essentially a mini-browser of its own but you may not want your activity recorded. Let’s setup this feature.
This is for iPhone and iPad

First, open the Google app on your iPhone or iPad. Use Apple’s Spotlight Search (your first screen) to locate the app if you can not find it on your Home page or App Library. Refer to below image:

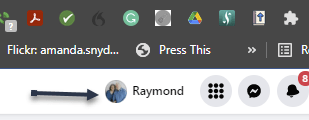
Next, tap your Profile icon in the top right-hand corner. See below image:

Now, select Turn on Incognito from the drop-down menu. See following image:

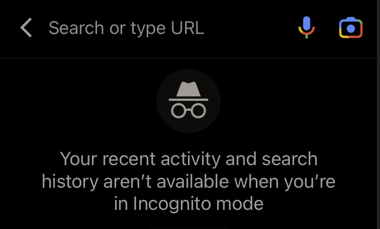
Next, you will see a screen saying you are in Incognito Mode . You can now do searches and browse the Internet without the activity being saved to your account. Refer to below image:
To reset Incognito Mode, return to the Google App’s home page and tap the Turn Off button. See below image:

And that’s it. Just like Incognito Mode in a browser, your search and browsing history will not be saved to your account. This is a nice little trick to know if you find yourself using the Google app like a browser a lot.
Quote For the Day
Don’t think. Thinking is the enemy of creativity. It’s self-conscious, and anything self-conscious is lousy. You can’t try to do things. You simply must do things.
Ray Bradbury
Please feel free to share this post! One way to share is via Twitter.
Just click the Tweet icon below. This will launch Twitter where you click its icon to post the Tweet.
Check out TechSavvy.Life blog posts on smartphones, PCs, and Macs! You may email us at contact@techsavvy.life for comments or questions.
Tweet
I Would Like to Hear From You
Please feel free to leave a comment. I would love hearing from you. Do you have a computer or smart device tech question? I will do my best to answer your inquiry. Just send an email to contact@techsavvy.life. Please mention the device, app and version that you are using. To help us out, you can send screenshots of your data related to your question.