We have all been there; looking up a word on Google just to find out how it’s spelled. No matter the typos, Google usually knows what you want to type. Thankfully, Google allows you to use its spell-check feature everywhere in your Chrome web browser.
We have all been there; looking up a word on Google just to find out how it’s spelled. No matter the typos, Google usually knows what you want to type. Thankfully, Google allows you to use its spell-check feature everywhere in your Chrome web browser.
Called the Enhanced spell check, this setting allows you to access Google’s more advanced spell check whenever you type something on the Internet.
But as is the case with most Google services, there is a privacy cost to this. Turning on Enhanced spell check in Chrome also means agreeing to send everything you type on the web to Google’s server. So enable it at your own risk. But, you can also enable Basic spell check without sending data to Google. Lets explore how to do this.
This is for PCs, Macs, Chrome OS, or Linux running Chrome
dCopyright Scott Adams, Inc./Distributed by Universal Uclick for UFS
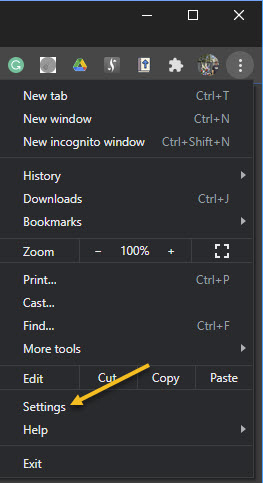
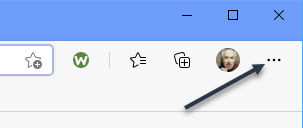
First, open your Google Chrome browser. Next, click the three-dot hamburger icon located in the top right-hand corner. Refer to below image:
Accessing the menu hamburger icon
Now, from the drop-down menu that appears, select Settings. See below image:
Accessing Settings
Alternatively, you can press the Cmd+Comma keyboard shortcut on a Mac or Alt+E on a Windows PC to access the Settings option.
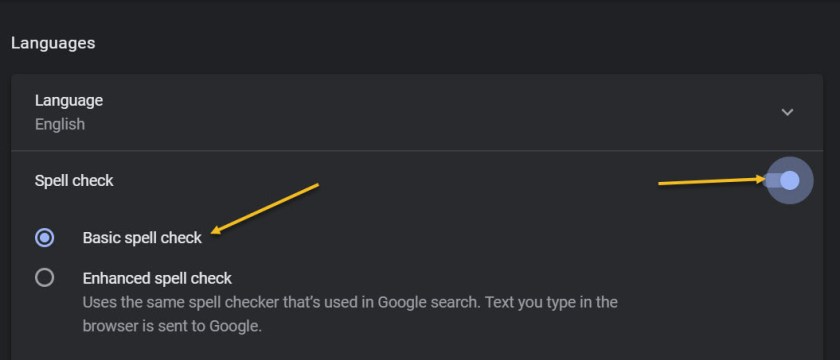
Next, in the sidebar, click Advanced to reveal the advanced menu. Now, choose Languages from the list. See following image:
Accessing Languages under the Advanced section
Under the Spell check section, toggle the radio button in front of the Basic spell check option to turn it On. If you want enhanced spell checking, toggle the radio button in front of the Enhanced spell check to turn it On. Keep in mind, the enhanced option means you are sending your browser activity to Google. Refer to below image:
Enabling Basic spell check option
At the time of writing, Enhanced spell check is not available for Google Chrome’s Android and iPhone clients.
The number one benefit of information technology is that it empowers people to do what they want to do. It lets people be creative. It lets people be productive. It lets people learn things they didn’t think they could learn before, and so in a sense it is all about potential.
Steve Ballmer, Microsoft
That’s it. Please feel free to share this post! One way to share is via Twitter.
Just click the Tweet icon below. This will launch Twitter where you click its icon to post the Tweet.
Check out TechSavvy.Life for blog posts on smartphones, PCs, and Macs! You may email us at contact@techsavvy.life for comments or questions.
Peeking at the URL of a link that you are about to open is a good way to make sure the URL is what you expect and not a trick by the website.
Peeking at the URL of a link that you are about to open is a good way to make sure the URL is what you expect and not a trick by the website. Let’s explore how to preview Safari links for iPhone, iPad and Mac.
This is for iPhone, iPad, and Mac using Safari
Copyright Scott Adams, Inc./Distributed by Universal Uclick for UFS
How to Preview Safari Links on a Mac
Popular desktop web browsers have featured URL status bars for decades. But Safari for Mac does not enable one by default. If you want to quickly check the URL of a link, you can do so by enabling the status bar.
First, open the Safari app on your Mac. Click the View section in the menu bar and choose the Show Status Bar option. Refer to below image:
Enabling Status Bar option
Now, with this enabled, when you hover over any link, you will see its full URL address in the status bar in the bottom-left corner of the page. See below image:
Displaying URL address
If you ever want to disable this link preview, click:
View > Hide Status Bar
in the menu bar at the top of the screen.
How to Preview Safari Links on iPhone and iPad
Unlike the Mac, Safari on iPhone and iPad does not have a status bar. But it does let you peek into the page that you want to open. You can tap and hold any link to load the page in a pop-up preview window. If you do not like the full preview, you can switch to only viewing the URL (Like Safari on Mac).
First, open a page in Safari on your iPhone or iPad. Next, tap and hold any link on the page. See following image:
Accessing a link
Note! For this feature to work, you need to be running iOS 13, iPadOS 13, or higher. You will see a thumbnail preview of the page pop-up. To preview the URL instead, tap the Hide Preview button located at the top of the pop-up window. Refer to below image:
Accessing Hide Preview option
The thumbnail will disappear and you will see the URL listed in the box. If it looks safe and you want to open the page from this pop-up, tap the Open button in the menu list. See below image:
Open the link
If you want to get the thumbnail peek back, just tap and hold a link again and select Tap to show preview at the top of the pop-up window.
Keeping an eye on URLs is one way that browsing with more knowledge will help you avoid web-based scams and keep you safer on the web.
Quote For the Day
Common sense and a sense of humor are the same thing, moving at different speeds. A sense of humor is just common sense, dancing.
Clive James
That’s it. Please feel free to share this post! One way to share is via Twitter.
Just click the Tweet icon below. This will launch Twitter where you click its icon to post the Tweet.
Check out TechSavvy.Life for blog posts on smartphones, PCs, and Macs! You may email us at contact@techsavvy.life for comments or questions.
Please feel free to leave a comment. I would love hearing from you. Do you have a computer or smart device tech question? I will do my best to answer your inquiry. Just send an email to contact@techsavvy.life. Please mention the device, app and version that you are using. To help us out, you can send screenshots of your data related to your question.
The author’s Vietnam eBook on the Battle for Tra Bong: Events and Aftermath
As tracking goes, Safari keeping your recent browsing history is less about privacy and more about just being useful. It’s your history that means Safari remembers where to go to when you choose forward and back within a site, for instance.
As tracking goes, Safari seeing your recent browsing history is less about privacy and more about just being useful. It’s your history that means Safari remembers where to go to when you choose forward and back within a site, for instance.
While it’s possible to completely wipe your History in Settings, you can also erase only more recent history if you would like. Let’s explore this feature.
This is for the iPhone and iPad. Screenshots are from iPhone
Copyright Scott Adams, Inc./Distributed by Universal Uclick for UFS
Clear Recent History
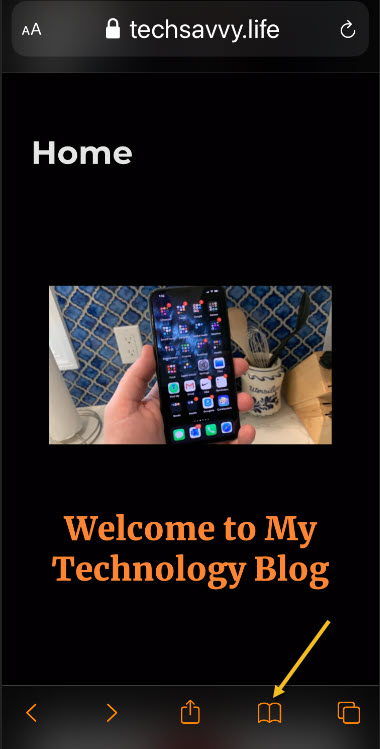
First, open Safari on your iPhone or iPad. Tap the Bookmarks button. On the iPad, you will find it in the upper-left corner of the screen beside the address bar. On an iPhone, it’s at the bottom of the screen. Refer to below image:
Accessing Bookmarks button
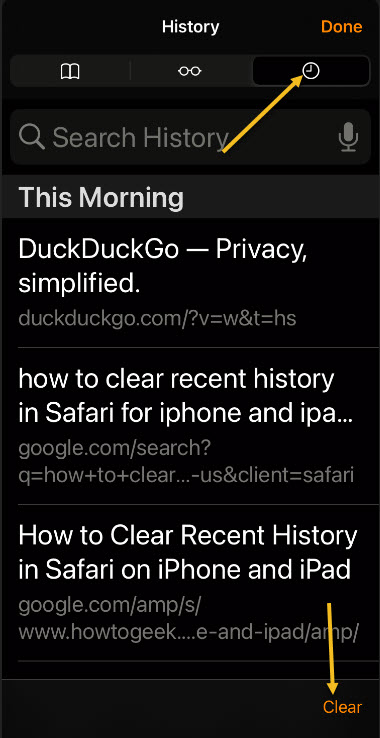
Next, in the pop-up that appears, tap the History tab (which looks like a clock face), and then tap the Clear button. See below image:
Accessing History tab
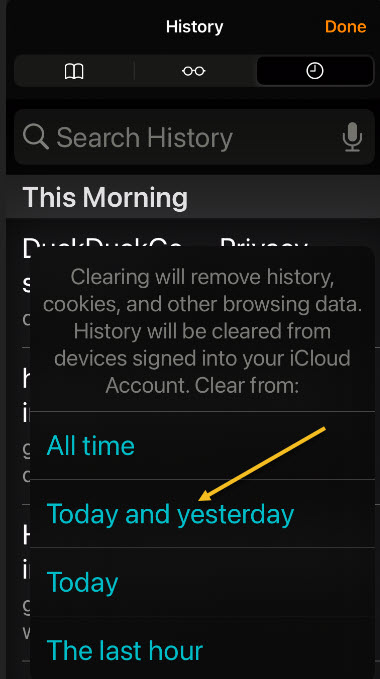
Now, after you tap Clear, another pop-up will give you another choice. You can select All time, Today and yesterday, Today, or The last hour.
Choosing one of these options will remove your browsing history, cookies, and other browsing data from the point you select until now. For example, if you click Today, all the browsing history from sites you visited today will disappear, but everything earlier than that will remain on the list.
Next, tap the option you would prefer (or you can tap outside the pop-up box to cancel). See following image:
Selecting an option for deletion of Recent history
If you made a selection from the pop-up list, your browsing history will be cleared accordingly. Now, tap the Done button in upper right-hand corner to exit.
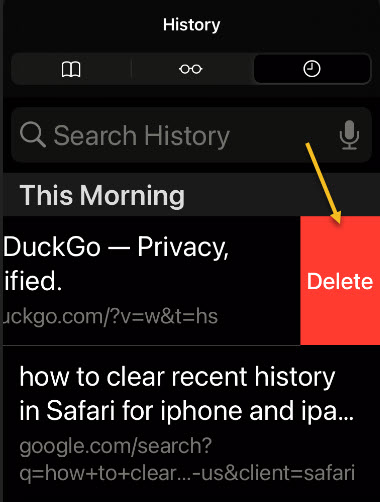
Erase a Single Entry
Also, you can delete individual entries by swiping to the left on them with your finger. When a red Delete button appears on the right, tap it. Refer to below image:
Selecting to delete a single Recent history item
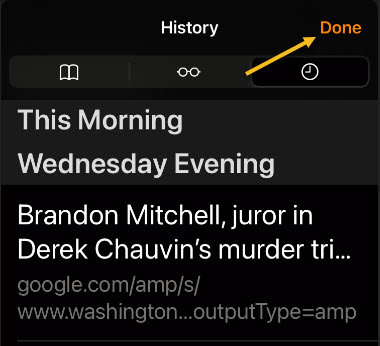
When you are finished deleting single entries, tap the Done button in upper right-hand corner. See below image:
Exiting the History tab
Using this method, only the single entry you just swiped will be erased. This can be a easy way of erasing certain history items without having to clear everything at once.
Quote For the Day
Everybody gets so much information all day long that they lose their common sense.
Gertrude Stein
That’s it. Please feel free to share this post! One way to share is via Twitter.
Just click the Tweet icon below. This will launch Twitter where you click its icon to post the Tweet.
Check out TechSavvy.Life blog posts on smartphones, PCs, and Macs! You may email us at contact@techsavvy.life for comments or questions.
Please feel free to leave a comment. I would love hearing from you. Do you have a computer or smart device tech question? I will do my best to answer your inquiry. Just send an email to contact@techsavvy.life. Please mention the device, app and version that you are using. To help us out, you can send screenshots of your data related to your question.
The author’s Vietnam eBook on the Battle for Tra Bong: Events and Aftermath
The Privacy Checkup tool allows you to determine how much or how little information you reveal, and to whom.
Facebook has tons of privacy checks that it would take three or more blog posts to cover the topic. In this post we are going to tackle two topics. The Privacy Checkup is tedious and laborious, plus, there are way too many checks. In our opinion, Facebook is a giant bureaucracy, too big for its own good Regardless, you may be surprised at the kinds and amount of information you are sharing, I know I was. Just take the time to discover what you are sharing using Facebook’s Privacy Checkup tool.
The Privacy Checkup tool allows you to determine how much or how little information you reveal, and to whom. Let’s explore this Facebook tool.
This is for devices running Facebook. Screenshots are from Windows 10
Copyright Scott Adams, Inc./Distributed by Universal Uclick for UFS
Start Privacy Checkup
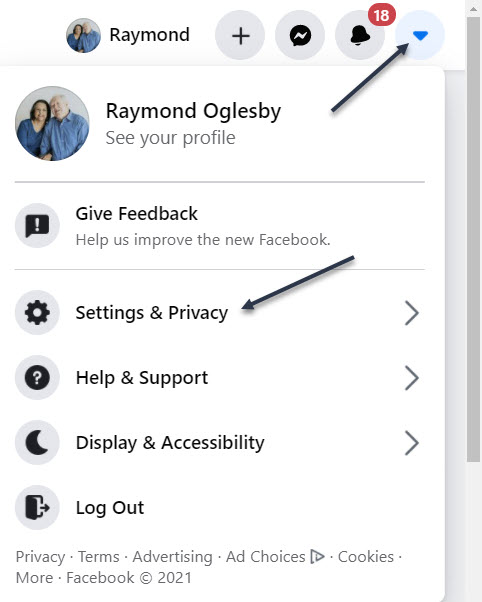
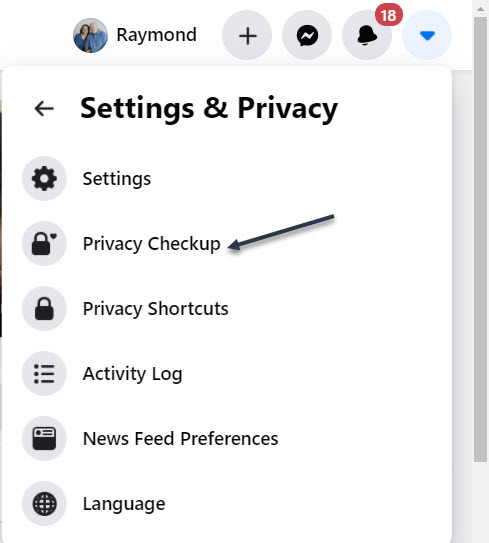
To run the latest version of Facebook’s Privacy Checkup tool, first, launch Facebook. Next, click the down arrow icon in the upper right-hand corner, then click on Settings& Privacy. Refer to below image:
Accessing Settings & Privacy
Now, select Privacy Checkup. See below image:
Accessing Privacy Checkup tool
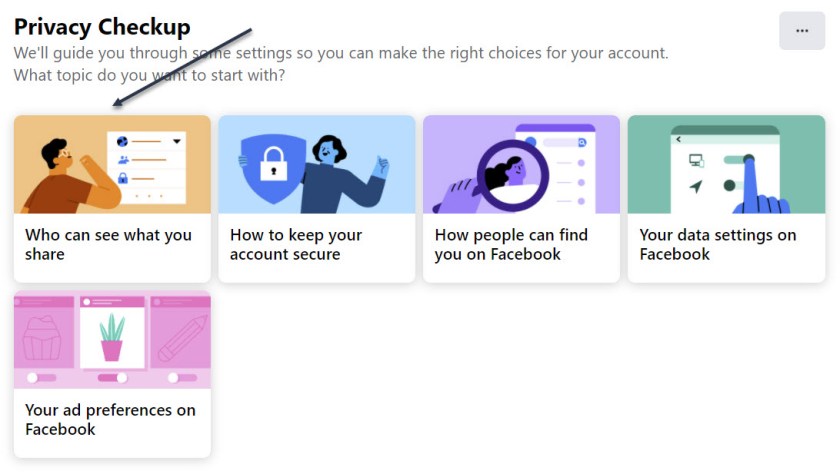
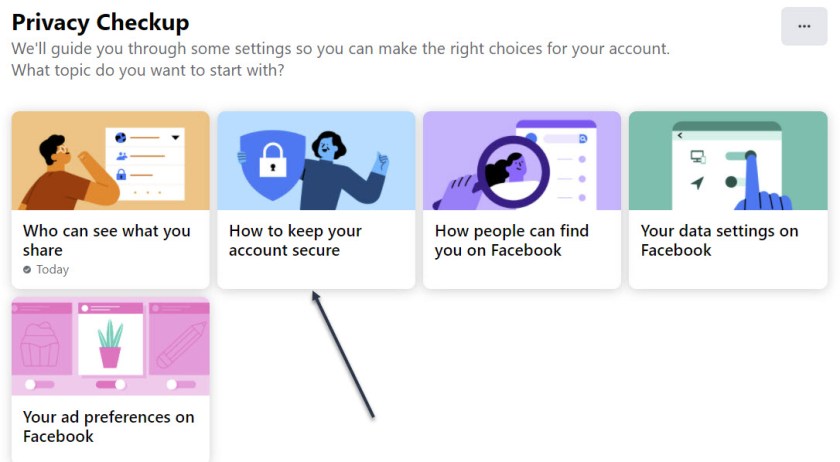
Choose the First Topic
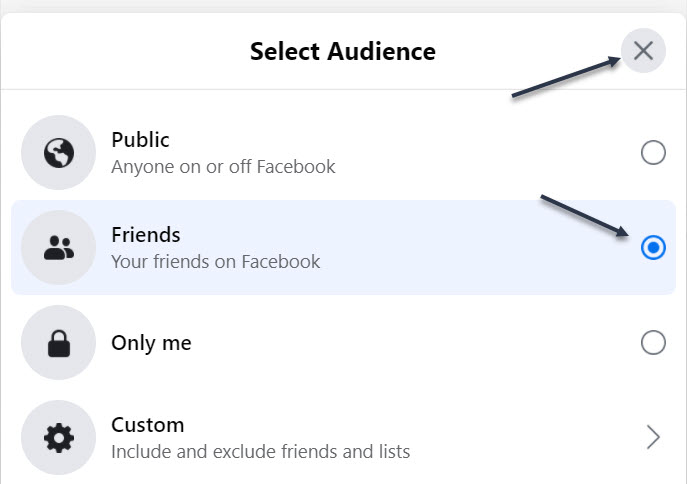
Next, in the Privacy Checkup window, click the first topic, Who can see what you share. See following image:
Selecting the first topic
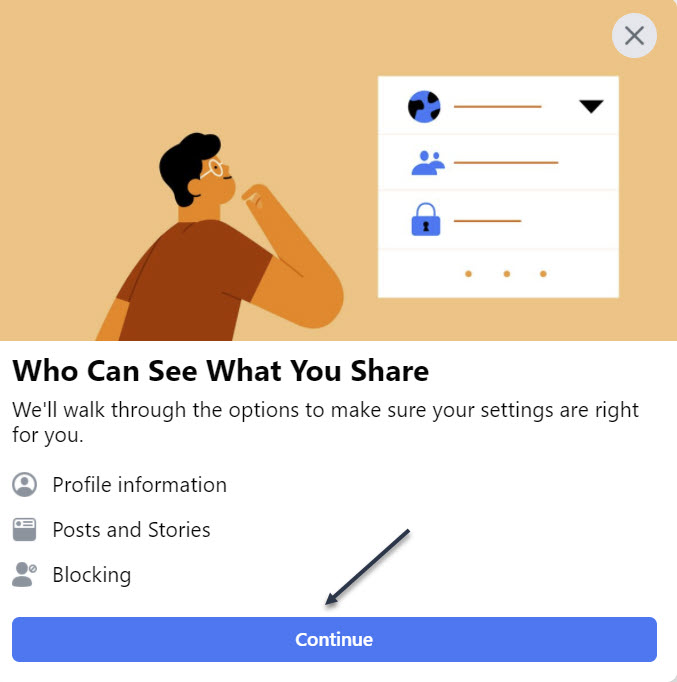
Now, click Continue. Refer to below image:
Verbiage about the topic, continue to next screen
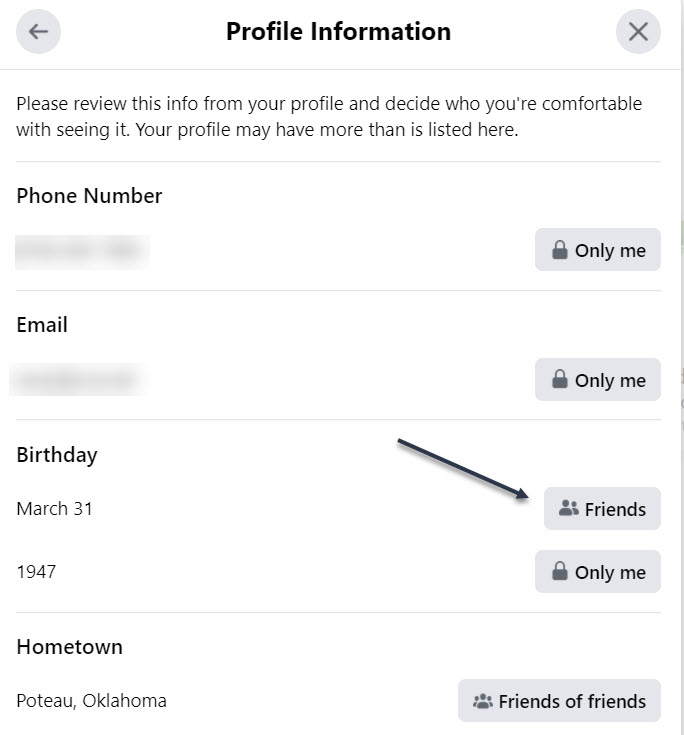
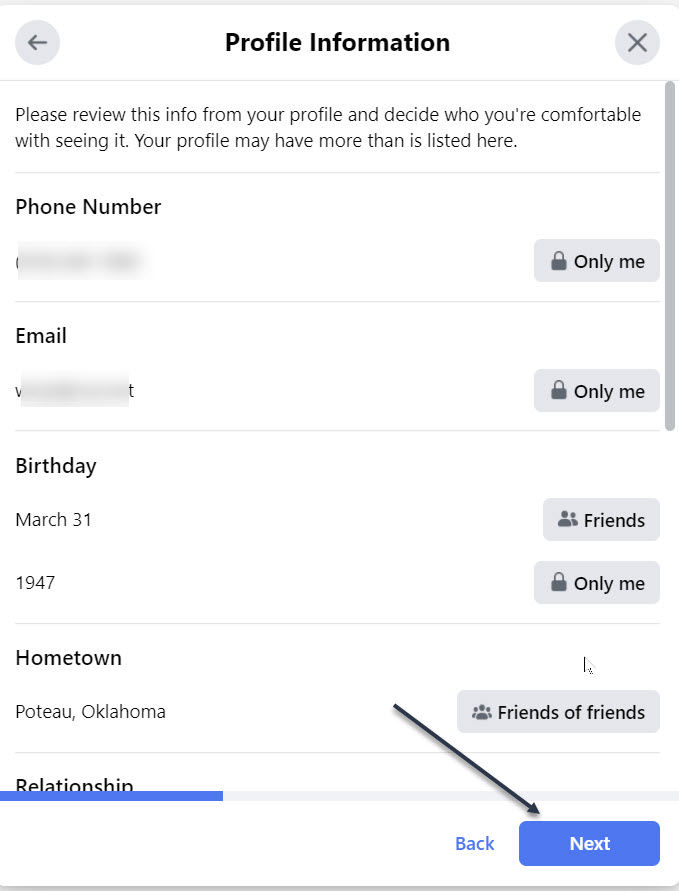
Your Profile Information
Next, at the Profile Information window, review the settings for your phone number, email addresses, and birthday. Click the button next to each one, and choose whether to change it to Public, Friends, Only Me, or a specific Facebook list. See below image:
What and who sees your Profile Information
I changed my Birthday to Friends (it was already Friends, I kept it the same). To exit, click the “X” in upper right-hand corner. See following image:
Changing who sees your Birthday
You probably want this information to remain private or only visible to friends or a specific group. When done, click Next. Refer to below image:
Continue to the next screen
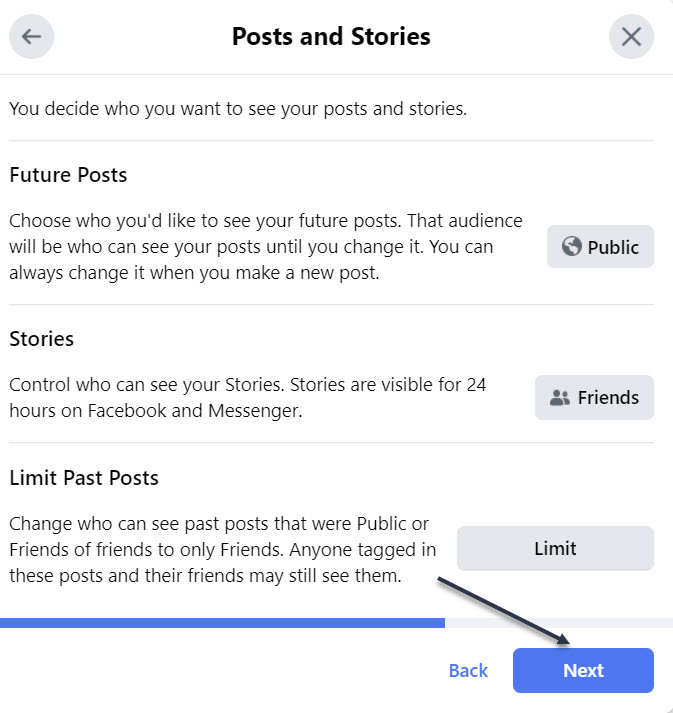
Your Posts
Now, at the Posts window, set the option for who should see future posts. You would likely want to set this to Friends. The Limit Past Posts option changes past posts that were seen by the Public or Friends of Friends to only Friends. Click Next to continue. See below image:
Who sees your Posts, continue to next screen
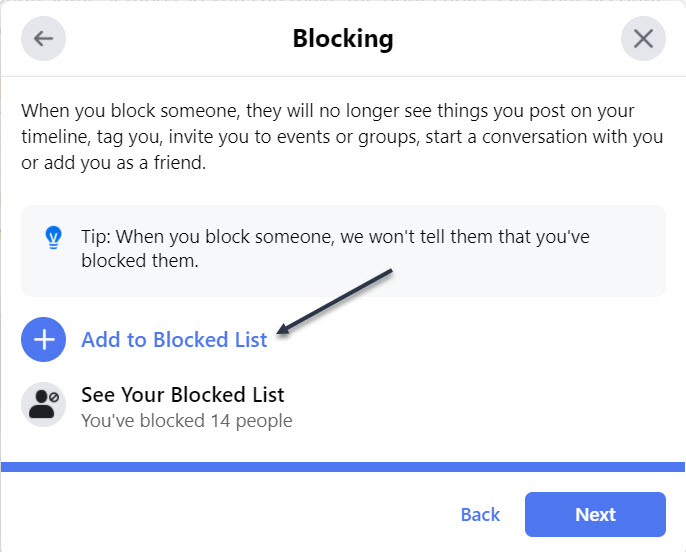
Your Blocked People
Next, at the Block screen, you can block specific people from seeing things you post, starting conversations with you, or trying to add you as a friend. To do this, click Add to Blocked list link. See following image:
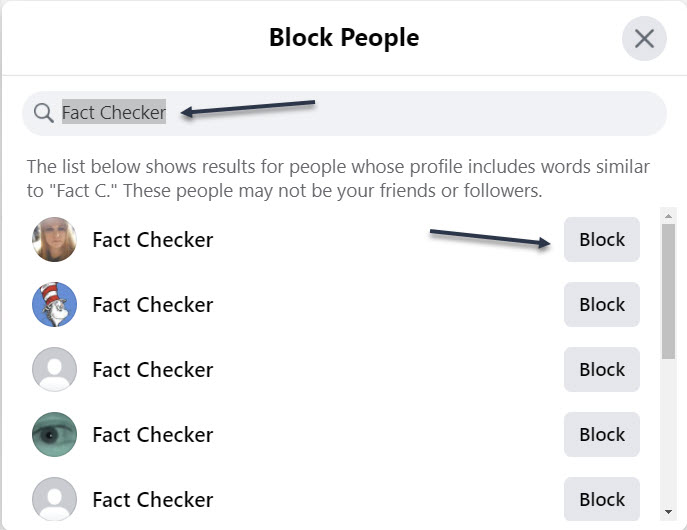
Now, type the name of the person or account you wish to block. From the list of suggestions, click the Block button for the correct person, then click Next. Refer to below image:
Entering a name to block
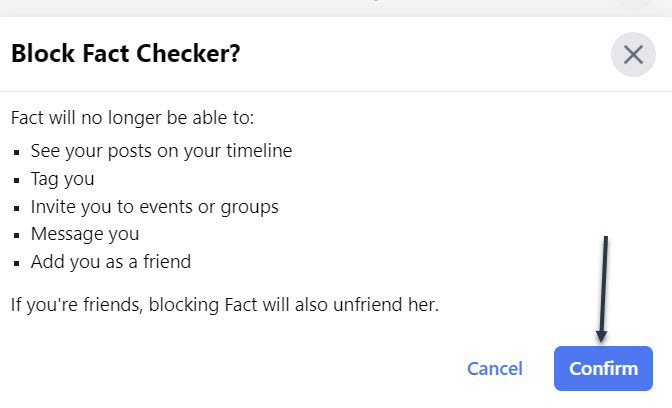
Next, click Confirm to block the person and continue. See below image:
Confirming a blocked person
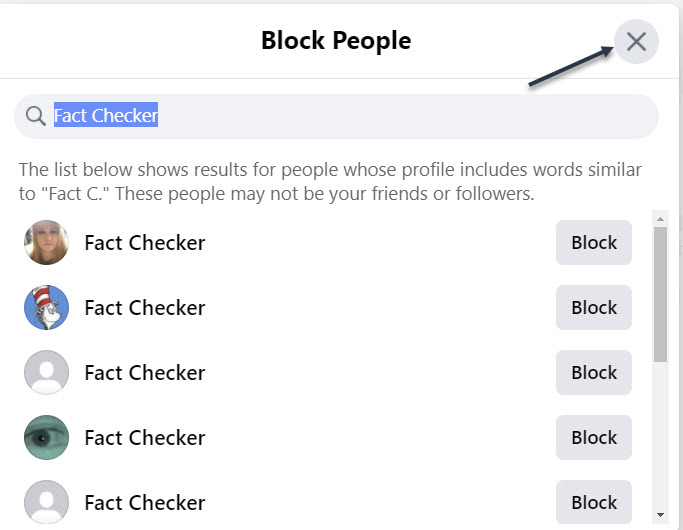
Now, you will be taken back to the Block screen. You may select another person to block. When finished, click the “X” in upper right-hand corner. See following image:
Exiting the blocked persons screen
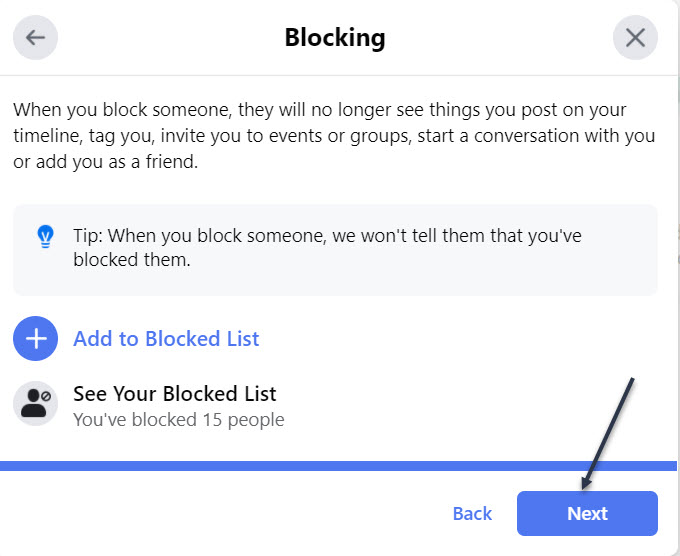
Next, to continue, click Next. Refer to below image:
Continue to the next screen
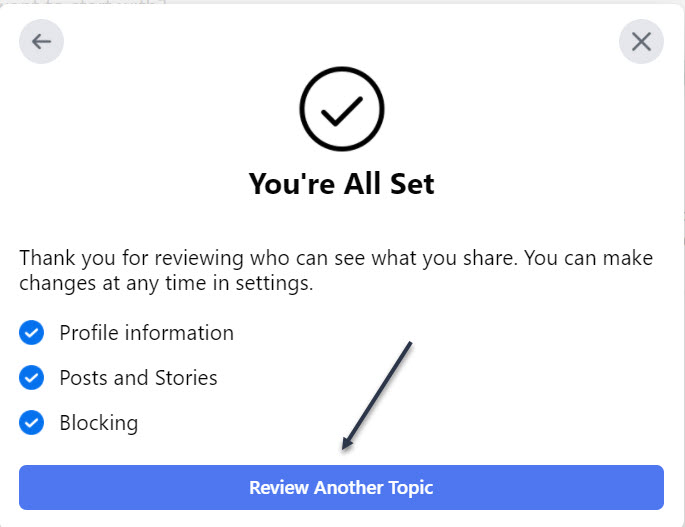
You Are Finished With First Topic
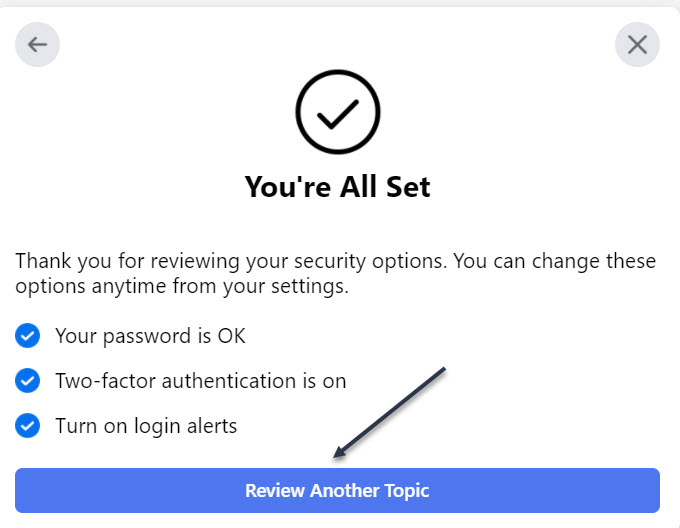
Now, the You’re All Set window will open indicating you are finished with the topic. To continue, click the Review Another Topic button. See below image:
You have finished this topic screen
Choose Your Second Topic
Next, select How to keep your account secure. See following image:
Select the second topic
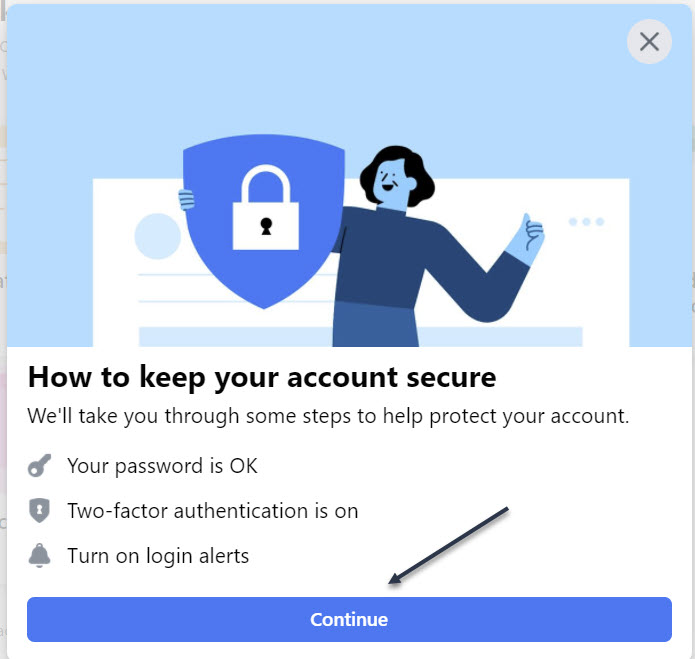
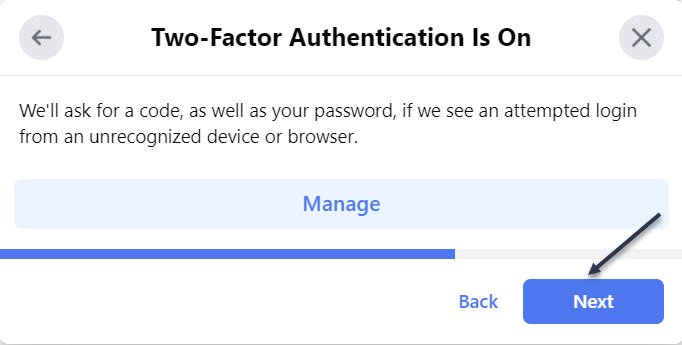
Note! My Password is OK and Two-factor authentication is on. Now, click Continue. Refer to below image:
Verbiage about the topic, continue to next screen
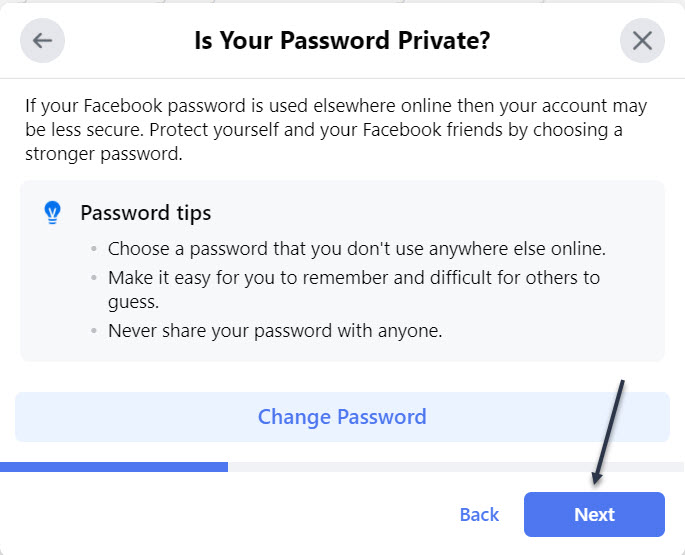
Check Your Password
Next, at the window for Is Your Password Private, click Change Password if you are concerned that it was compromised or you want to change it to something more secure then click Next. See below image:
Manage your password, continue to next screen
Check Your Two-Factor Authentication
If Two-factor authentication is off, click the Get Started button to add Two-Factor authentication to protect your Facebook account. You want to do this. Just, follow the steps to set this up. Now, click Next to continue. See following image:
Manage Two-Factor Authentication, continue to next screen
Check Your Alerts
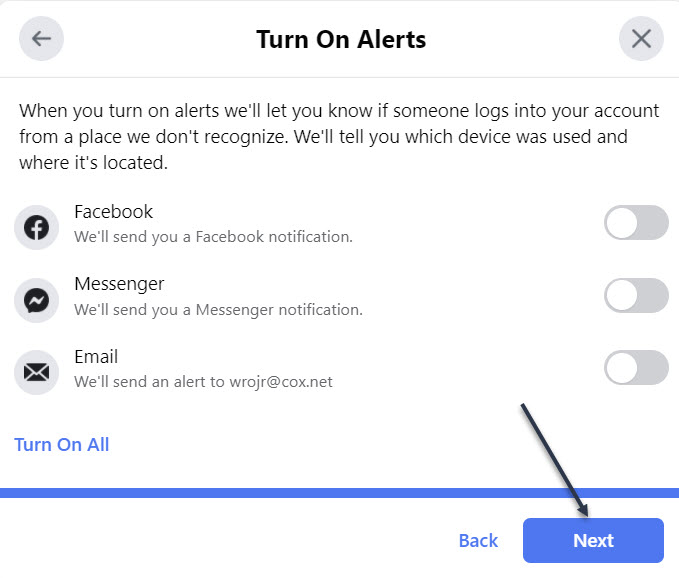
Next, at the window for Turn On Alerts, turn on the switch for any alerts you wish to receive if you or someone else signs into your Facebook account from a new or different location, then click Next. Refer to below image:
Enable/Disable Alerts, continue to next screen
You Are Finished With Second Topic
Now, the You’re All Set window will open indicating you are finished with the topic. To continue, click the Review Another Topic button. See below image:
You have finished this topic
You may continue to one or more of the next three topics and follow its directions.
Quote For the Day
“Technology is a useful servant but a dangerous master”.
Christian Lous Lange
That’s it. You now have controlled your Privacy settings in Facebook. Please feel free to share this post! One way to share is via Twitter.
Just click the Tweet icon below. This will launch Twitter where you click its icon to post the Tweet.
Check out TechSavvy.Life for blog posts on smartphones, PCs, and Macs! You may email us at contact@techsavvy.life for comments or questions.
Please feel free to leave a comment. I would love hearing from you. Do you have a computer or smart device tech question? I will do my best to answer your inquiry. Just send an email to contact@techsavvy.life. Please mention the device, app and version that you are using. To help us out, you can send screenshots of your data related to your question.
The author’s Vietnam eBook on the Battle for Tra Bong: Events and Aftermath
AssistiveTouch is an Accessibility option. This feature allows you a one tap access to “canned” shortcuts. You no longer have to swipe through pages or visit your first or last page for certain options.
AssistiveTouch is an Accessibility option. This feature allows you a one tap access to “canned” shortcuts. You no longer have to swipe through pages or visit your first or last page for certain options. Let’s explore how to enable and use this feature.
This is for the iPhone and iPad
Copyright Scott Adams, Inc./Distributed by Universal Uclick for UFS
To use AssistiveTouch you need to enable the feature. First, launch Settings. Refer to below image:
Accessing Settings
In Settings, locate and tap Accessibility. See below image:
Accessing Accessibility option
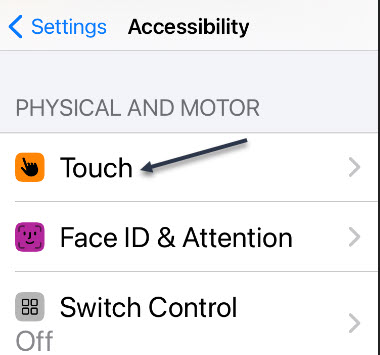
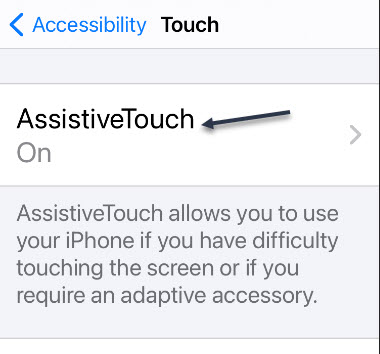
Now, in Accessibility, tap Touch. See following image:
Accessing Touch option
In Touch settings, tap AssistiveTouch. Refer to below image where the option is already turned On:
Accessing AssistiveTouch option
In AssistiveTouch, tap the toggle to turn it On. See below image:
Enabling AssistiveTouch option
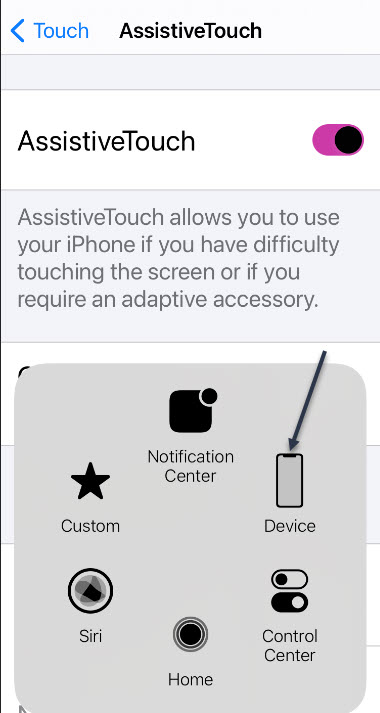
When you flip the toggle beside AssistiveTouch, a special button (that resembles a rounded gray rectangle with a white circle in the middle) will appear near the edge of the screen. (This button does not appear in a screenshot). It will be translucent until pressed. You can drag it around the edge of the screen with your finger to reposition it. Next, exit Settings.
Now, locate and tap the button to preview the main AssistiveTouch screen. From here, lets tap the Device button. See following image:
Accessing Device button
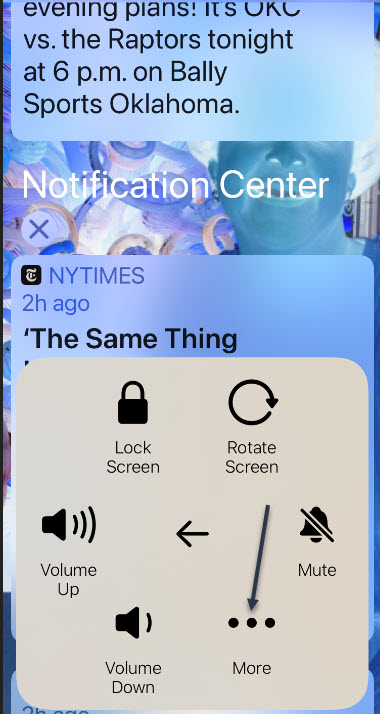
To access other shortcuts, tap the 3-dot menu button. Refer to below image:
First set of shortcuts under the Device option
Now, you will see the last screen under the Device button. See below image:
Second set of shortcuts under the Device option
Next, just tap an empty space in the shortcuts screen to go back, or tap the Back Arrow in the center until the AssistiveTouch screen disappears.
Quote For the Day
For a successful technology, reality must take precedence over public relations, for Nature cannot be fooled.
Richard P Feynman
You are finished. Please feel free to share this post! One way to share is via Twitter.
Just click the Tweet icon below. This will launch Twitter where you click its icon to post the Tweet.
Check out TechSavvy.Life for blog posts on smartphones, PCs, and Macs! You may email us at contact@techsavvy.life for comments or questions.
Please feel free to leave a comment. I would love hearing from you. Do you have a computer or smart device tech question? I will do my best to answer your inquiry. Just send an email to contact@techsavvy.life. Please mention the device, app and version that you are using. To help us out, you can send screenshots of your data related to your question.
The author’s Vietnam eBook on the Battle for Tra Bong: Events and Aftermath
The photo editor on the iPhone and iPad comes with a built-in tool for flipping photos horizontally (sideways). But if you want to flip photos vertically (upside down), you will need to use a free third-party app like Photoshop Express.
Sometimes you end up taking photos that are mirrored horizontally. This is quite common when you take selfies. Want to change the direction of a photo (or a face)?
The photo editor on the iPhone and iPad comes with a built-in tool for flipping photos horizontally (sideways). But if you want to flip photos vertically (upside down), you will need to use a free third-party app like Photoshop Express. Let’s explore how to flip photos using Photoshop Express since it has more features.
This is for the iPhone and iPad using Photoshop Express
Copyright Scott Adams, Inc./Distributed by Universal Uclick for UFS
This app is a feature-rich photo editing tool on your iPhone or iPad. In some ways, you can think of it as the mobile version of the Photoshop app. While many of its pro features are hidden behind a subscription, you can use the free version to make simple edits.
One of the features available on the free version is the ability to flip images both vertically and horizontally.
First, download the free app from the Apple Store iCloud service. Now, open the app and give it permission to access your photos. Next, from the Home tab, tap the Edit section button. Refer to below image:
Accessing Edit section
Here, choose the photo that you want to edit. See below image:
Selecting a Photo
From the photo editing view, go to the Crop button and tap it. See following image:
Accessing the Crop button
From here, choose the Rotate option. Refer to below image:
Accessing the Rotate option
Now, swipe left on the bottom toolbar to see the different flip options. See below image:
Accessing the flip options
Next, you can flip the photo as you please. See following image for the flipped photo:
The photo flipped
Once you are done, tap the Share button from the top toolbar. Refer to below image:
Accessing the Share button
Here, tap the Camera Roll button. The final flipped photo will be exported and saved to your Photos app. See below image where I saved the original:
Selecting to export and save the photo to the Camera Roll
Your original photo is left intact.
Quote For the Day
The only way to discover the limits of the possible is to go beyond them into the impossible.
Arthur C Clarke
You are finished. Please feel free to share this post! One way to share is via Twitter.
Just click the Tweet icon below. This will launch Twitter where you click its icon to post the Tweet.
Check out TechSavvy.Life for blog posts on smartphones, PCs, and Macs! You may email us at contact@techsavvy.life for comments or questions.
Please feel free to leave a comment. I would love hearing from you. Do you have a computer or smart device tech question? I will do my best to answer your inquiry. Just send an email to contact@techsavvy.life. Please mention the device, app and version that you are using. To help us out, you can send screenshots of your data related to your question.
The author’s Vietnam eBook on the Battle for Tra Bong: Events and Aftermath
If you are big on security (or keeping a secret), you might not want the Edge browser to keep a permanent record of the sites you browse. If that’s the case, you can use a setting in Edge to automatically erase your data every time you quit the program.
If you are big on security (or keeping a secret), you might not want the Edge browser to keep a permanent record of the sites you browse. If that’s the case, you can use a setting in Edge to automatically erase your data every time you quit the program.
This is for PCs and Macs running Microsoft Edge. Screen shots are from Windows 10
Copyright Scott Adams, Inc./Distributed by Universal Uclick for UFS
It lets you delete everything at once on Windows 10 PCs and Macs. You get an almost fresh browser every time you open it to browse the internet. It is handy when you browse only internet banking sites and some other private sites to do something specific.
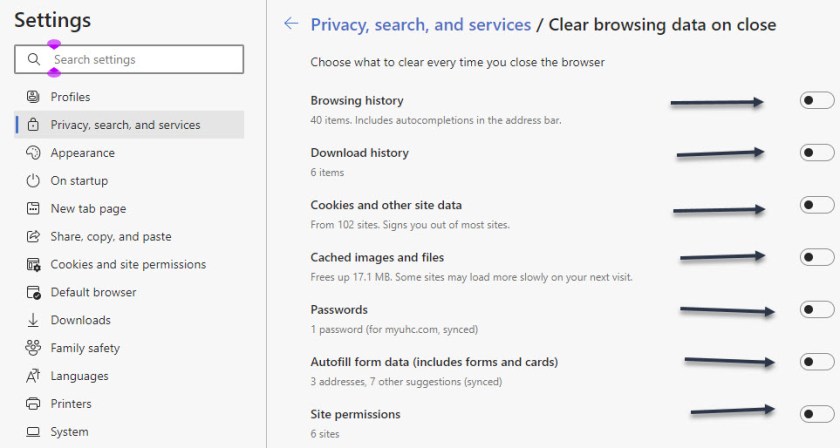
You can clear the following sets of data:
browsing history
download history
cookies and other site data
cached images and files
passwords
autofill form data
site permissions
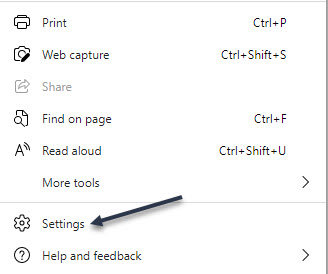
To setup this feature, first, open your Edge browser. Now, click the three-dot hamburger menu icon from the toolbar. Refer to below image:
Accessing the toolbar menu button
Next, from the drop-down menu, choose the Settings option. See below image:
Accessing Settings
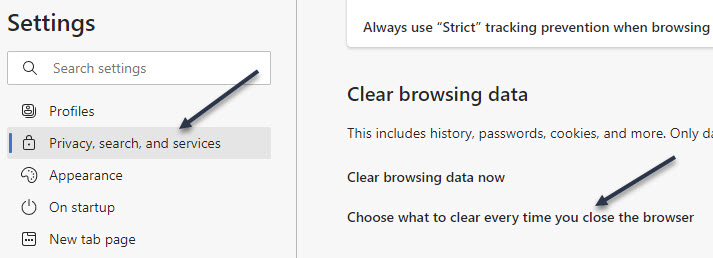
Now, locate the Privacy, search, and services section from the sidebar. Next, from the Clear browsing data section, click the Choose what to clear every time you close the browser option. See following image:
Accessing clear browsing data for Edge
Now, you will see a list of data that you can clear when closing your browser. Click the toggle next to each data type that you want to clear. Refer to below image:
Enabling or disabling what to clear when closing Edge
That’s it. You have set up and started the automatic clearing process. The next time you close the Microsoft Edge browser and start it up again, the designated data will be cleared.
Quote For the Day
“The Internet is so big, so powerful and pointless that for some people it is a complete substitute for life”.
Andrew Brown
Please feel free to share this post! One way to share is via Twitter.
Just click the Tweet icon below. This will launch Twitter where you click its icon to post the Tweet.
Check out TechSavvy.Life for blog posts on smartphones, PCs, and Macs! You may email us at contact@techsavvy.life for comments or questions.
Please feel free to leave a comment. I would love hearing from you. Do you have a computer or smart device tech question? I will do my best to answer your inquiry. Just send an email to contact@techsavvy.life. Please mention the device, app and version that you are using. To help us out, you can send screenshots of your data related to your question.
The author’s Vietnam eBook on the Battle for Tra Bong: Events and Aftermath
When you are browsing the web using Safari on your iPhone or iPad, sometimes it can be difficult to read small fonts on the screen. On the other hand, you might find a site that has huge fonts and it makes things equally difficult to read. If you are using Safari on your iPhone or iPad, here’s how to make the text size on a website larger or smaller.
When you are browsing the web using Safari on your iPhone or iPad, sometimes it can be difficult to read small fonts on the screen. On the other hand, you might find a site that has huge fonts and it makes things equally difficult to read. If you are using Safari on your iPhone or iPad, here’s how to make the text size on a website larger or smaller.
This is for iPhone and iPad running iOS 13+
Copyright Scott Adams, Inc./Distributed by Universal Uclick for UFS
You can use Safari’s built-in text zoom feature. This feature only changes the text size of the web page. It keeps everything else as it is. The images and other UI elements will stay the same. Once you have changed the text size of a website, Safari will remember it the next time you open the page.
First, open the Safari browser on your iPhone or iPad and visit the web page where you want to increase or decrease the text size.
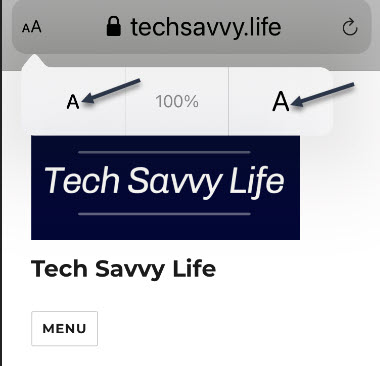
Next, tap the “aA” button on the top left-hand side. Refer to below image:
Selecting Text Size button
Now, tap the “a” button to reduce the text size, or tap the “A” button to increase the text size. See below image:
Decrease or increase Text Size
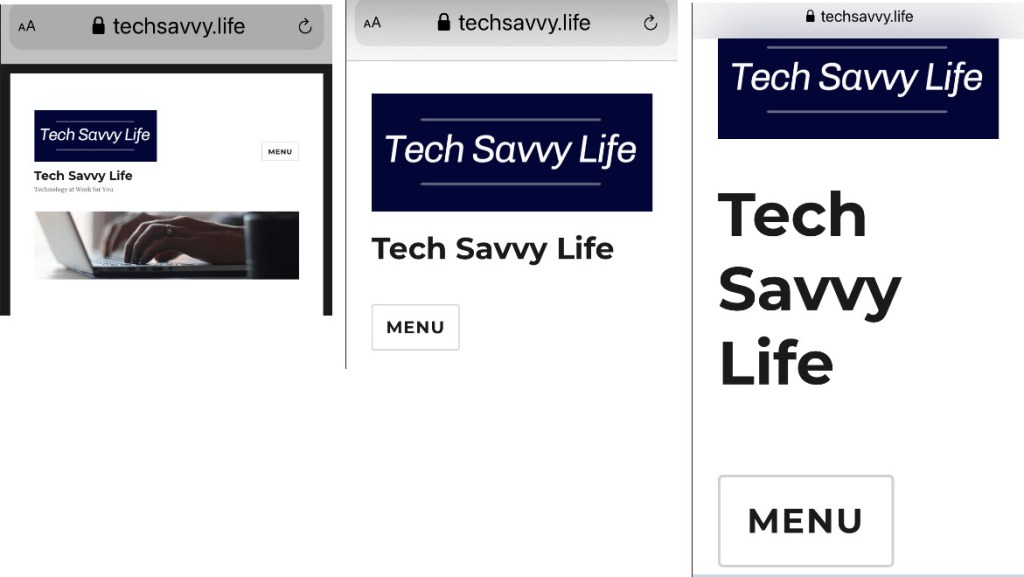
The default text zoom is set as 100%. You can reduce the text size to 50% or take it up all the way to 300%. See following image where the screen is displayed at 50%, 150%, and 300%:
Display of 50%, 150%, 300%
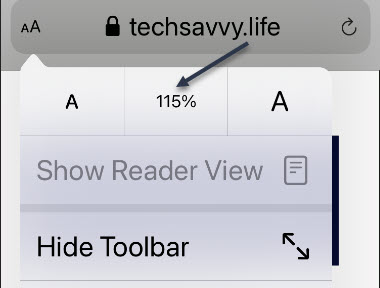
If you want to quickly reset the text size to the default, simply tap the percentage value in the middle. Refer to below image:
Reset Text Size
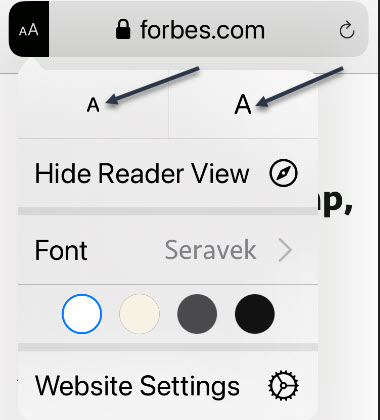
Safari’s text zoom feature works in the Reader Mode as well. If you would like to read a long article without the site elements in larger text size, we recommend that you use Reader View.
Now, after loading the page, tap and hold the “aA” button to enable the Reader View.
Note! Not all websites support Reader View.
See below image:
Enabling Reader View
Next, tap the “aA” button again. From here, you can increase or decrease the text size. See following image:
Set Text Size in Reader View
Quote For the Day
One machine can do the work of fifty ordinary men. No machine can do the work of one extraordinary man.
Elbert Hubbard
That’s it. Please feel free to share this post! One way to share is via Twitter.
Just click the Tweet icon below. This will launch Twitter where you click its icon to post the Tweet.
Check out TechSavvy.Life for blog posts on smartphones, PCs, and Macs! You may email us at contact@techsavvy.life for comments or questions.
Please feel free to leave a comment. I would love hearing from you. Do you have a computer or smart device tech question? I will do my best to answer your inquiry. Just send an email to contact@techsavvy.life. Please mention the device, app and version that you are using. To help us out, you can send screenshots of your data related to your question.
The author’s Vietnam eBook on the Battle for Tra Bong: Events and Aftermath
While changing your browser’s font may not be a pressing issue, sometimes it is fun to make a change. We going to explore how to change the default fonts in Google Chrome.
While changing your browser’s font may not be a pressing issue, sometimes it is fun to make a change. We going to explore how to change the default fonts in Google Chrome.
This is for devices running Google Chrome
Copyright Scott Adams, Inc./Distributed by Universal Uclick for UFS
Changing Chrome’s Fonts
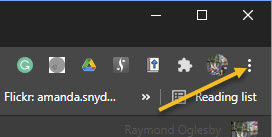
In order to change the fonts in Google Chrome, you will need to access your Customize Fonts section. First, open your Chrome browser. Next, click on the three 3-dot (hamburger icon) in the upper right-hand corner. Refer to below image:
Accessing your Chrome menu
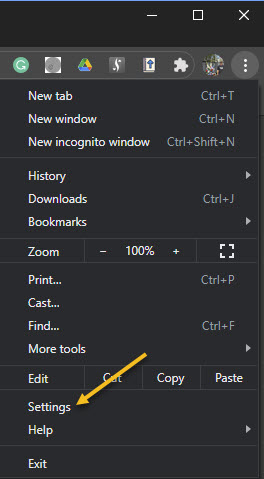
Now, click on Settings. See below image:
Accessing Settings
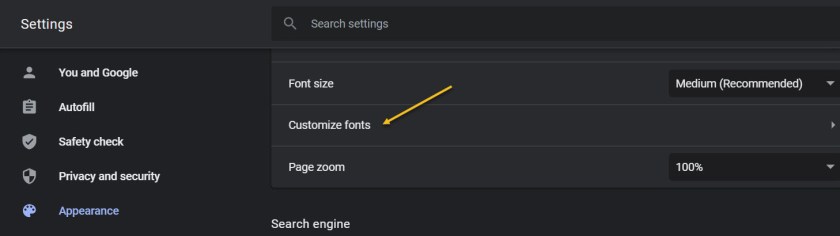
Next, click on the Appearance tab in the sidebar. Now, scroll down until you get to the Customize Fonts section and click on it. See following image:
Accessing your customize fonts section from the Appearance tab
Now, you can change all your font settings. Just click on each drop-down box and select a font from the listing. It is recommended you write down the default fonts in case you want to revert to the original ones. Refer to below image:
Accessing the drop-down boxes to change your fonts
When finished, exit Settings and restart your Chrome browser for the changes to take effect.
Quote for the Day
If future generations are to remember us more with gratitude than sorrow, we must achieve more than just the miracles of technology. We must also leave them a glimpse of the world as it was created, not just as it looked when we got through with it.
Lyndon B. Johnson, Former President of the United States of America
That’s it. Please feel free to share this post! One way to share is via Twitter.
Just click the Tweet icon below. This will launch Twitter where you click its icon to post the Tweet.
Check out TechSavvy.Life for blog posts on smartphones, PCs, and Macs! You may email us at contact@techsavvy.life for comments or questions.
Please feel free to leave a comment. I would love hearing from you. Do you have a computer or smart device tech question? I will do my best to answer your inquiry. Just send an email to contact@techsavvy.life. Please mention the device, app and version that you are using. To help us out, you can send screenshots of your data related to your question.
The author’s Vietnam eBook on the Battle for Tra Bong: Events and Aftermath
The advantage of the Microsoft Office suite is that all the programs in the collection work quite well together. An example is the ability to link or embed a Microsoft PowerPoint slides into a Microsoft Word document.
The advantage of the Microsoft Office suite is that all the programs in the collection work quite well together. An example is the ability to link or embed a Microsoft PowerPoint slides into a Microsoft Word document. Lets explore how this is done.
This is for devices running PowerPoint and Word
Copyright Scott Adams, Inc./Distributed by Universal Uclick for UFS
Linking vs. Embedding Explained
If you link or embed a PowerPoint slide in a Word document, the goal is always the same; to provide an external reference that complements the content of the document. However, there are subtle differences between linking and embedding that you should be aware of.
The difference between linking and embedding an object is how the object’s data is stored and how the object’s content is updated. Since data is stored differently between the two methods, the content update process will also be different.
If you link an object, then that link simply sends the reader to the location of the source object when clicked. The file itself does not actually store any data from the linked object to the file. This is advantageous if the object you are linking to is large in size and you need to reduce the size of your Word document. The downside is that if the location of the linked object changes, the link in your Word document will break.
If you embed an object, then you do not need to worry about whether the location of the object changes, as it becomes part of the document itself. That is, Word stores the object data in the actual Word file. The good news is that you do not have to worry about broken links in your document. The downside is that when the object is updated, those updates are not reflected in your embedded object, because there is no link connecting it to the source. Also, you will need to consider that the file size increases with embedded objects.
Link or Embed a PowerPoint Slide into a Word Document
First, open the PowerPoint project that contains the slide you want to link or embed. Now, select the desired slide by clicking its preview thumbnail. Refer to below image:
Selecting a PowerPoint slide
Next, copy the slide to your clipboard by using the Ctrl+c (Cmd+c on Mac) keyboard shortcut, or by right-clicking the slide and selecting Copy from the context menu. See below image:
Selecting the Copy option
Now, open your Word documentyou would like to link or embed the slide to. In the Clipboard group of the Home tab, click the down arrow under Paste. See following image:
Selecting the Paste option
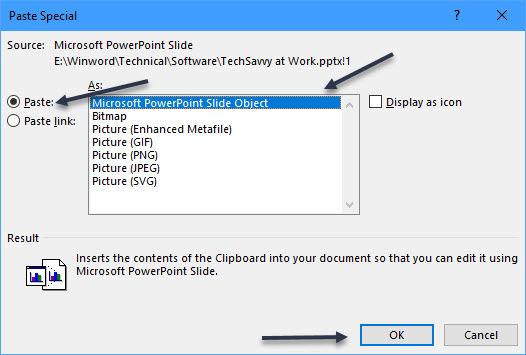
In the drop-down menu, click Paste Special. Refer to below image:
Selecting the Paste Special option from drop-down list
The Paste Special window will appear. If you have copied the PowerPoint slide to your clipboard, you will see a Microsoft PowerPoint Slide Object option in the box under As. Next, click it to select the option. If you do not see this option, repeat the above steps. You may not have copied the slide to your Clipboard.
To embed the slide, click the bubble icon next to Paste.
To link the slide, click the bubble icon next to Paste Link.
Now, select OK to insert the linked or embedded object. See below image:
Selecting the Paste option to embed the PowerPoint slide
Your final Word document should look like the following image:
Your Word document with the PowerPoint slide embedded
The Microsoft PowerPoint slide is now linked or embedded into your Microsoft Word document.
That was easy. You are now finished. Please feel free to share this post! One way to share is via Twitter.
Just click the Tweet icon below. This will launch Twitter where you click its icon to post the Tweet.
Check out TechSavvy.Life for blog posts on smartphones, PCs, and Macs! You may email us at contact@techsavvy.life for comments or questions.
Please feel free to leave a comment. I would love hearing from you. Do you have a computer or smart device tech question? I will do my best to answer your inquiry. Just send an email to contact@techsavvy.life. Please mention the device, app and version that you are using. To help us out, you can send screenshots of your data related to your question.
The author’s Vietnam eBook on the Battle for Tra Bong: Events and Aftermath