If you do not want Google Chrome to remember your activity, you can browse the web privately in Incognito mode.
If you do not want Google Chrome to remember your activity, you can browse the web privately in Incognito mode.
It is easy to quickly open an Incognito window using a keyboard shortcut. Lets explore how to do this.
This is devices running Google Chrome
Copyright Scott Adams, Inc./Distributed by Universal Uclick for UFS
First, open Chrome. Next, with any Chrome browser window open, press the following keyboard combination to open a new Incognito window:
Windows, Linux, or Chrome OS: Press Ctrl + Shift + N.
Mac: Press ⌘ + Shift + N.
After pressing the keyboard shortcut, a special Incognito window will open. If you want to block third-party cookies, just toggle the switch to On, the default setting. Refer to below image:
Your Incognito window
Whenever you are in Incognito mode, you will be able to tell because the Chrome browser window’s toolbar will have a darker color scheme and there will be a small Incognito icon beside the address bar in the toolbar. See below image:
The icon and text telling you are in Incognito mode
You can switch between Incognito windows and regular Chrome windows. You will only browse in private when you are using an Incognito window.
While browsing within an Incognito window, Chrome will not locally store your browsing history, site data, cookies, or saved form data once you close the Incognito window. However, downloaded files and bookmarks will be saved unless you manually remove them.
At any time, you can press Ctrl+T (or ⌘ + T on Mac) to open a new tab within the Incognito window, and browsing activity within that tab will be locally private as well.
Remember that Incognito mode is not perfect, and it does not protect you from those who might view your activity on the web remotely, such as your employer, school, ISP, or the websites you visit. It is only to prevent local snooping of your browsing history.
If you see a number next to the Incognito text at the top right, you have more than one Incognito window open. See following image:
Your number of Incognito windows open
When you are ready to stop private browsing, you will need to close the Incognito window(s). To do so using a keyboard shortcut:
Windows, Linux, or Chrome OS: Press Alt + F4
Mac: Press ⌘ + Shift + W
Or you can just click the “X” in the corner of the window with your mouse.
That’s it. Please feel free to share this post! One way to share is via Twitter, as mentioned below.
I hope you have found this post helpful. If so, click the Tweet icon below. This will launch Twitter where you click its icon to post the Tweet.
Check out TechSavvy.Life for blog posts on smartphones, PCs, and Macs! You may email us at contact@techsavvy.life for comments or questions.
Please feel free to leave a comment. I would love hearing from you. Do you have a computer or smart device tech question? I will do my best to answer your inquiry. Just send an email to contact@techsavvy.life. Please mention the device, app and version that you are using. To help us out, you can send screenshots of your data related to your question.
The author’s Vietnam eBook on the Battle for Tra Bong: Events and Aftermath
Google collects and remembers “tons” of information about your activity, including your web, search, YouTube, and location history. Google auto-deletes for new users after 18 months but it will remember history forever if you previously enabled this feature with the default options.
Google collects and remembers “tons” of information about your activity, including your web, search, YouTube, and location history. Google auto-deletes for new users after 18 months but it will remember history forever if you previously enabled this feature with the default options.
As an existing user, you have four options in making Google delete your data; after 36 months, 18 months, 3 months, or stop activity collection entirely. The options are buried in Google Settings.
This is for devices running Google. Screenshots are from iPhone XR
Copyright Scott Adams, Inc./Distributed by Universal Uclick for UFS
Note! Google uses this history to personalize your experience, including your web search results and recommendations. Deleting it will make your Google experience less “personalized.”
Let’s explore how to set up this auto-delete function..
Control Web and App Activity
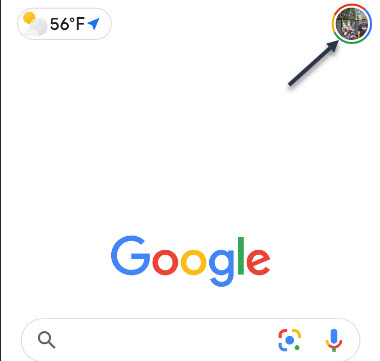
First, launch Google and tap your profile photo. Refer to below image:
Launch Google
Now, tap the Google Account settingsoption See below image:
Accessing Google Account option
Next, scroll down to Privacy & personalization section and tap Manage your data & personalization. See following image:
Accessing your data and personalization link
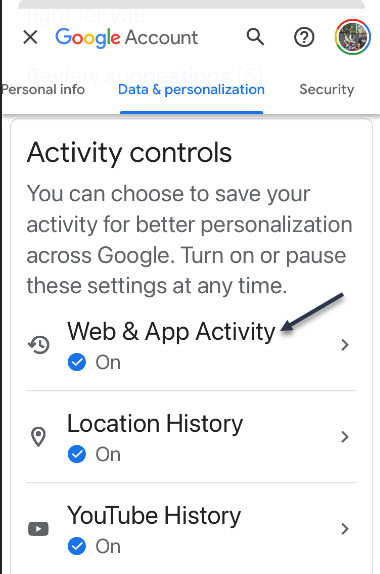
Now, scroll down to Activity controls section. Here, tap the Web & App Activity option. Refer to below image:
Accessing your Web & App Activity section
Next, toggle to On the Web & App Activity toggle. Next, tap the Auto-delete (Off) switch to turn in On. See below image:
Enabling Auto-delete by its link
Now, select one of four options. See following image where I selected Auto -delete activity older than 18 months and tap the Next button:
Selecting one of four options for Auto-delete
A Confirmation screen will be displayed. Just tap the Confirm button in lower right-hand corner. Refer to below image:
Confirming your selection
Now, you will see a Preference saved dialog box. Just tap GotIt text in lower right-hand corner. See below image:
Saving your preference
Control Location and YouTube Activity
Next, go back to Activity controls section and repeat above steps for Location History and YouTube History.
Let’s say you Search, read articles, watch videos, or see photos on ‘drones’. Google will send out ad links for ‘drones’, this is called ‘ad personalization’. Through these sponsored ads is one way Google makes money. You can turn off these ads but at the expense of a ‘depersonalization experience’.
Control Ad Personalization
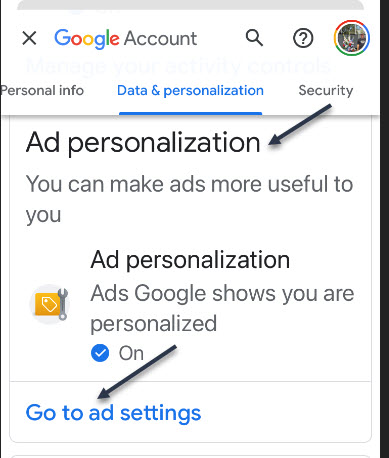
Now, go back to Activity controls and scroll down a little till you see the Ad personalization section and tap the Go to ad settings link. See following image:
Selecting your ad settings link
Next, toggle the Ad personalization switch to ON. Refer to below image:
Enabling your Ad personalization
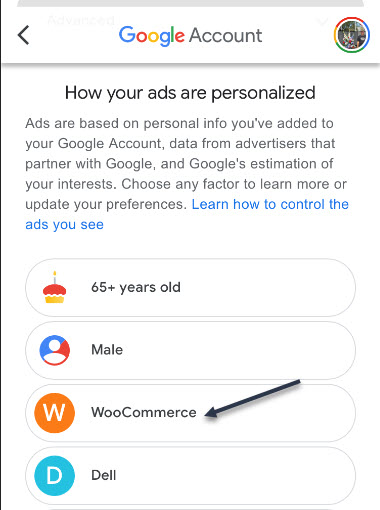
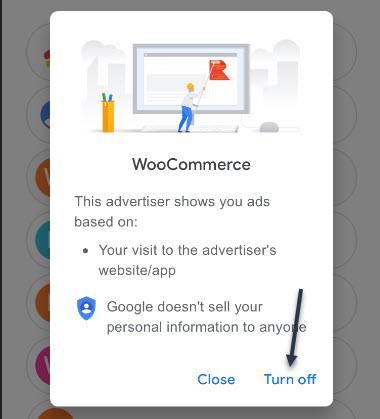
Here you will see a listing of companies/others who are using ad personalization. See below image where I selected WooCommerce:
Selecting a targeted ad
Now, you will be presented a dialog box to Turnoff or Close. Next, tap the Turn off button to no longer see this company/others targeted ads. See following image:
Turning off your targeted ad
Now, a confirmation dialog box appears where you have to tap the Turn off button again. Google makes you go through ‘hoops’ to reduce their ads. Refer to below image:
Your confirmation for turning off the targeted ad
Really, Turn Off Ads?
Google is making you go through a myriad of selections. Notice the text that states turning off your selected ad will stay off for at least 90 days. Your selected ad will stay off for this period, then guess what, the ad comes back! Google wants to make money off these ads; they do not want you to turn them off. See above image.
That’s it. Please feel free to share this post! One way to share is via Twitter.
Just click the Tweet icon below. This will launch Twitter where you click its icon to post the Tweet.
Check out TechSavvy.Life for blog posts on smartphones, PCs, and Macs! You may email us at contact@techsavvy.life for comments or questions.
Please feel free to leave a comment. I would love hearing from you. Do you have a computer or smart device tech question? I will do my best to answer your inquiry. Just send an email to contact@techsavvy.life. Please mention the device, app and version that you are using. To help us out, you can send screenshots of your data related to your question.
The author’s Vietnam eBook on the Battle for Tra Bong: Events and Aftermath
Google is making it even easier to work with Microsoft Office files, with the company now allowing you to directly edit attached Office files in Gmail as well as Google Docs, Sheets and Slides. It’s available to all Gmail users, free and paid accounts. No more document conversion hassles, at long last!
Google is making it even easier to work with Microsoft Office files, with the company now allowing you to directly edit attached Office files in Gmail as well as Google Docs, Sheets and Slides. It’s available to all Gmail users, free and paid accounts. No more document conversion hassles, at long last!
This is for devices using Google Gmail
Copyright Scott Adams, Inc./Distributed by Universal Uclick for UFS
Google Editing Explained
Previously, documents had to be imported into Google Drive in order to edit or modify them; while emailed attachments were only able to be viewed.
The new workflow, however, streamlines that process considerably. Now, you can directly open and edit an Office file using the Google Docs editor just by clicking on it; just like you would a native Google Docs. But the new editing function does not convert Office files into Google Docs, instead preserving the original file format.
Gmail will allow you to respond to the original email and include the now-updated file (still in an Office file format) without first requiring you to download and re-attach the updated file.
This means you can now edit your Word, Excel and PowerPoint files without ever leaving Gmail.
For example, when you receive a Word document as an email attachment, you can open it and start editing in Docs with a single click while still preserving the Word file format.
With the new change, Microsoft Office attachments will have a new “edit” option and when edits are complete, there will be a new option to share the document via email.
Remove a Chrome Extension
First, you must remove an Extension (if installed) from Google Chrome.
Sign into your managed Google Account.
In a Chrome browser, click More.
Scroll down to More tools.
Click Extensions.
Find the Office Editing for Docs, Sheets. & Slides extension and click Remove.
Once you have removed the Extension you can use the Office editing feature.
Directly Edit Office Attachments
Any incoming email with a Microsoft Office document appears in the Inbox list with icons, preview pane, and the name of the document attachment. Refer to below image:
Accessing the email with attached Office files
Clicking one of those panes opens a pop-up windows with various options. At top right there is a download button; use that to save a copy for opening in Word, Excel or PowerPoint on your computer. Now, click on the Edit icon to edit your file. See below image where we are selecting the Word file to edit:
Selecting the Edit for a Word file
Hover your mouse over each attachment to see some options:
Download – save to your computer
Save to Google Drive
Edit with Google Docs – opens a new browser window ready to edit.
After Google Editing
Once you have edited the attachment, there are various options for sharing the revised document. Look under the File menu. See following image for the Email option:
Your Email option
Now, checkout your various options to save the document. Refer to below image for the Download options:
Your Download options
Google Editing of Office Files
Word docx files can be edited directly with Google Docs, look for the .DOCX icon at top left. See below image:
Edit a Word document
Excel xlsx files can be edited directly with Google Sheets look for the .XLSX icon at top left. See following image:
Edit an Excel file
PowerPoint .pptx files can be edited directly with Google Slides, look for the .PPTX icon at top left. Refer to below image:
Edit a PowerPoint file
Note! There may be compatibility problems between Excel and Sheets or PowerPoint and Slides.
You are finished. Please feel free to share this post! One way to share is via Twitter.
Just click the Tweet icon below. This will launch Twitter where you click its icon to post the Tweet.
Check out TechSavvy.Life for blog posts on smartphones, PCs, and Macs! You may contact us at contact@techsavvy.life for comments or questions.
Please feel free to leave a comment. I would love hearing from you. Do you have a computer or smart device tech question? I will do my best to answer your inquiry. Just send an email to contact@techsavvy.life. Please mention the device, app and version that you are using. To help us out, you can send screenshots of your data related to your question.
The author’s Vietnam eBook on the Battle for Tra Bong: Events and Aftermath
You can change your time zone and create events with certain time zones. This helps if you will be traveling when the event happens, or if you are creating events for people in different time zones.
You can change your time zone and create events with certain time zones. This helps if you will be traveling when the event happens, or if you are creating events for people in different time zones.
Time might be constant, but your time zone does not have to be. You can set a one-off time zone to an event, or set primary and secondary (desktop version only) time zones for an entire calendar or account.
This is for Android, iPhone, and iPad running Google Calendar
Copyright Scott Adams, Inc./Distributed by Universal Uclick for UFS
How Your Calendar Uses Time Zones
According to Google:
For Events; When you create an event, you will see it in your local time zone. It will also show up in the local time zones for anyone you invite, even if they are in a different time zone.
For Reminders: Reminders always show up at the same hour regardless of time zone. For example, a daily 9 AM MT reminder becomes a 9 AM ET reminder if you travel from Denver to New York.
For Tasks: Tasks adapt to the new time zone if the Calendar’s time zone is changed after a task is created. For example, a 9 AM MT task changes to an 11 AM ET task if you travel from Denver to New York.
Confused, I am. Why not make all these options the same? I do not know why Google treats each option differently. Lets explore how to set a Google Calendar time zone.
Change Your Time Zone for One Event
You can change the time zone for a new or existing event in the Google Calendar app on Android, iPhone, and iPad.
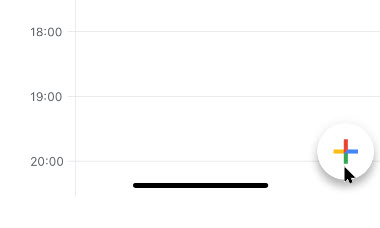
To create a new event, click the Add button in the bottom-right corner and select the type of event you wish to create. Refer to below image:
Add an Event
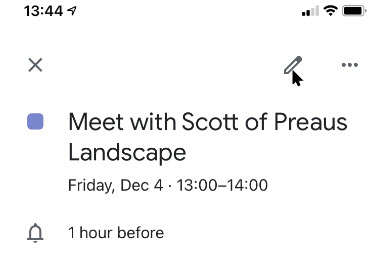
To edit an existing event, tap on that event in your calendar view and then tap the Edit Event button. See below image:
Edit an Event
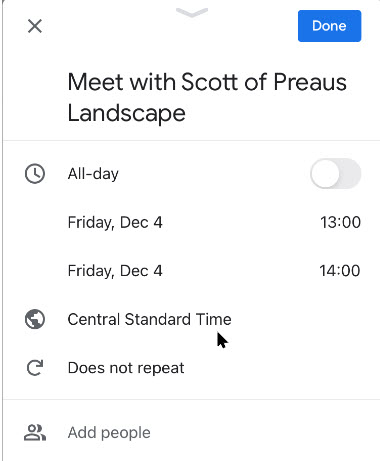
Next, in the event details menu, tap the current time zone. (Note!. You may have to tap More options to see the time zone). See following image:
The current time zone for the Event
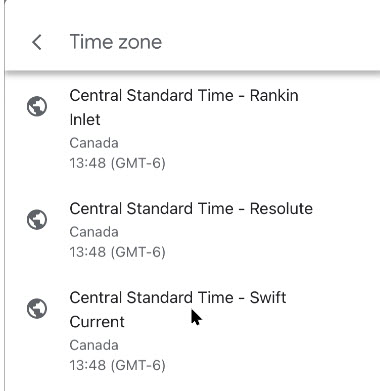
In the next menu, search for a country or specific time zone. Next, tap one of the results to select it as the new time zone. (Note! I kept the Event in CST). Refer to below image:
Selecting a time zone for the Event
The time zone for the event will be added immediately after selecting it from the Search menu.
Confirm the rest of the event details are correct. Now, tap the Save button in the top-right corner to save the Event with the new time zone details. See below image:
Save your changes
Change Your Time Zone Settings for All Events
When you travel to a different time zone, you can see your calendar in the local time. This can be confusing. The time zone is updated depending on if you are creating an event, reminder, or task. To keep your event times in your local time, I recommend not to create events, reminders, or tasks while in a different time zone, espicially if you are only going to be away from home a short while; wait till you get back to your local time zone to create them.
To change this setting:
Launch the Google Calendar app.
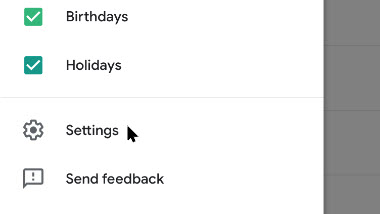
Next, tap the Menu hamburger icon in top left of your screen. See following image:
Acccess the Menu
Now, swipe down and tap the Settings option. Refer to below image:
Access Settings
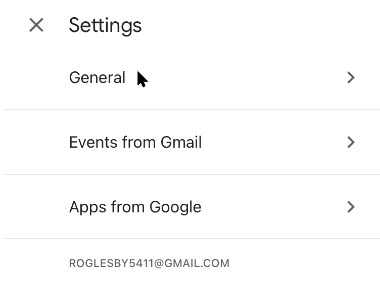
Next, tap the General option. See below image:
Access the General option
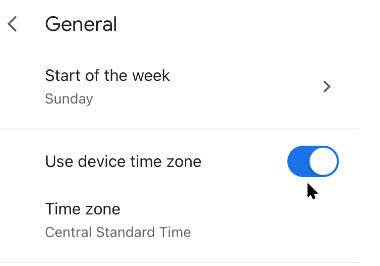
Now, tap Use device time zone on or off. If On, your device will update automatically as you travel. See following image:
Selecting Use device time zone toggle
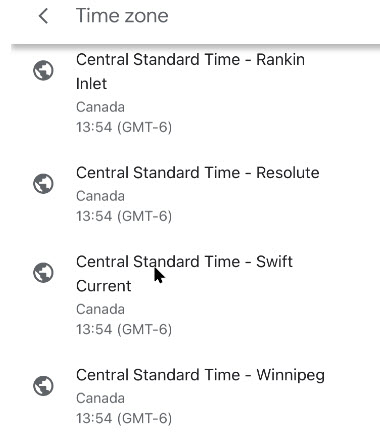
If Off, you can select a new time zone from the drop down menu. (Note! I kept the Events in CST). Refer to below image:
=Select a time zone for all Events
The new time zone for Google Calendar on your device will be applied automatically. Any entries in your Google Calendar will now be displayed in this new time zone on your mobile device. As I mentioned previously, this can be confusing, at least to me it is, so make sure what time zone you want to create events, teminders, or tasks. Now, tap back and exit Settings.
You are finished. Now you know how to see time zones in Google Calendar for events, remindars, or tasks. Please feel free to share this post! One way to share is via Twitter, as mentioned below.
Just click the Tweet icon below. This will launch Twitter where you click its icon to post the Tweet.
Check out TechSavvy.Life for blog posts on smartphones, PCs, and Macs! You may email us at contact@techsavvy.life for comments or questions.
Please feel free to leave a comment. I would love hearing from you. Do you have a computer or smart device tech question? I will do my best to answer your inquiry. Just send an email to contact@techsavvy.life. Please mention the device, app and version that you are using. To help us out, you can send screenshots of your data related to your question.
The author’s Vietnam eBook on the Battle for Tra Bong: Events and Aftermath
If you do not want Google Chrome to remember your activity, you can browse the web privately in Incognito mode.
If you do not want Google Chrome to remember your activity, you can browse the web privately in Incognito mode.
It is easy to quickly open an Incognito window using a keyboard shortcut. Lets explore how to do this.
This is devices running Google Chrome
Copyright Scott Adams, Inc./Distributed by Universal Uclick for UFS
First, open Chrome. Next, with any Chrome browser window open, press the following keyboard combination to open a new Incognito window:
Windows, Linux, or Chrome OS: Press Ctrl + Shift + N.
Mac: Press ⌘ + Shift + N.
After pressing the keyboard shortcut, a special Incognito window will open. If you want to block third-party cookies, just toggle the switch to On, the default setting. Refer to below image:
The Incognito window
Whenever you are in Incognito mode, you will be able to tell because the Chrome browser window’s toolbar will have a darker color scheme and there will be a small Incognito icon beside the address bar in the toolbar. See below image:
The icon and text telling you are in Incognito mode
You can switch between Incognito windows and regular Chrome windows. You will only browse in private when you are using an Incognito window.
While browsing within an Incognito window, Chrome will not locally store your browsing history, site data, cookies, or saved form data once you close the Incognito window. However, downloaded files and bookmarks will be saved unless you manually remove them.
At any time, you can press Ctrl+T (or ⌘ + T on Mac) to open a new tab within the Incognito window, and browsing activity within that tab will be locally private as well.
Remember that Incognito mode is not perfect, and it does not protect you from those who might view your activity on the web remotely, such as your employer, school, ISP, or the websites you visit. It is only to prevent local snooping of your browsing history.
If you see a number next to the Incognito text at the top right, you have more than one Incognito window open. See following image:
The number of Incognito windows open
When you are ready to stop private browsing, you will need to close the Incognito window(s). To do so using a keyboard shortcut:
Windows, Linux, or Chrome OS: Press Alt + F4
Mac: Press ⌘ + Shift + W
Or you can just click the “X” in the corner of the window with your mouse.
That’s it. Please feel free to share this post! One way to share is via Twitter, as mentioned below.
I hope you have found this post helpful. If so, click the Tweet icon below. This will launch Twitter where you click its icon to post the Tweet.
Check out TechSavvy.Life for blog posts on smartphones, PCs, and Macs! You may email us at contact@techsavvy.life for comments or questions.
Please feel free to leave a comment. I would love hearing from you. Do you have a computer or smart device tech question? I will do my best to answer your inquiry. Just send an email to contact@techsavvy.life. Please mention the device, app and version that you are using. To help us out, you can send screenshots of your data related to your question.
The author’s Vietnam eBook on the Battle for Tra Bong: Events and Aftermath
Apple released a software update for iPhones and iPads in their operating system that includes a built-in music recognition icon that can help you quickly identify a song that is playing.
Apple released a software update for iPhones and iPads in their operating system that includes a built-in music recognition app that can help you quickly identify a song that is playing.
It is one way Apple is using Shazam, which it acquired in 2018. Since it is built-in, you don’t need to have the Shazam app installed for this to work. All you do is add a button to the Control Center menu and then, when you hear a song you like and want to know who the artist is, you just tap the button.
This is for iPhone and iPad
Copyright Scott Adams, Inc./Distributed by Universal Uclick for UFS
Setting Up Music Recognition
We need to check your software updates, enable Siri, and download/install the Shamaz app.
First, let’s check your software updates. Head to
Settings > General > SoftwareUpdate
for the iOS or iPadOS 14.2 update (or higher) and update if necessary.
Next, head to the Apple Store to download/install the Shazam app.
Here.is how the feature works. When you tell your iPhone to listen for a song, it uses its microphone to record the audio around you. That audio data is uploaded to a server and analyzed, matching it to a known song in a database.
Listen by Siri
Let’s examine another built-in feature that does not require the lastest software update; Siri. To enable Siri, go to
Settings > Siri & Search
and toggle on Listen for Hey Siri. You may also want to enable Press Side Button for Siri. Refer to below image:
Enabling Siri
You can ask Siri what song is playing by saying something like “What’s that song?” or “What’s playing?”.
To activate Siri, long-press the Power button. Say “What’s that song?”. If you have Hey Siri set up, you can also say “Hey Siri, what’s that song?” without pressing any buttons.
Siri will pop up and say something like “Let me listen” or “Naming that tune.” Be sure your iPhone can hear the music properly. If you are in a noisy location or someone is talking loudly over the music, it might not hear the song well enough. If you have a problem, try moving your iPhone closer to the sound source playing the music, reducing noise in the area, or turning the volume up on the speaker playing the song. See below image where Siri is listening for a song:
Listening by Siri
If your device hears the song well enough, it will show you the song. If not, you will receive a message like “I can’t seem to recognize this song”.
Listen by Shazam in Control Center
As of the iOS and iPadOS 14.2 update, there is now a quick Control Center button you can use to start identifying a song. However, it is not enabled by default. Why; I do not know. Why does Apple want to hide this feature? But that is the reason for this post; to show you how to setup and use the Shazam built-in app.
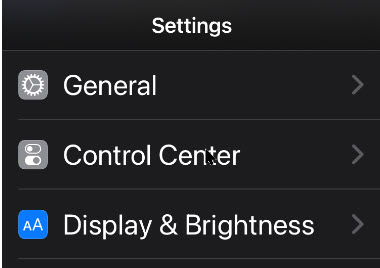
First, head to Settings (the gear icon). See following image:
Accessing Settings
Next, scroll down to Control Center. Refer to below image:
Accessing Control Center option
Now, scroll down and tap the plus (+) sign to the left of the Music Recognition button to add the feature to the Control Center. If you do not see this option on the Settings screen, you have not updated your iPhone or iPad to 14.2 or higher yet. See below image:
Enabling Music Recognition in Control Center
You can then drag it up or down in the list to rearrange the Control Center layout.
With the button added, you can now swipe down from the top-right corner of your device screen to open the Control Center. (On an older iPhone without a notch, you will have to swipe up from the bottom of the screen instead.)
Now, tap the button with the Shazam logo. The button will light up and pulse while it listens to the audio around you. Ensure your iPhone can hear the audio source properly. See following image:
Listening by Shazam in Control Center
When the process is complete (it can take 10-15 seconds), you will see a “Music Recognition” notification banner showing you what song is playing. This notification appears along with all your other apps’ notifications in your notification center. If it can not identify a song in that period of time, you will see a notification saying a song was not detected.
Listen by the Shazam App
If you want more features, you will need a separate music recognition app on your device. The integrated music recognition features rely on Shazam, the music recognition app Apple purchased.
Shazam still has an app for your device that you can install, and it has more features. For example, the Shazam app supports Autp Shazam. In this mode, Shazma will stay in the background on your iPhone or iPad, listen to everything around you, and store a history of songs it’s heard. For example, let’s say you are at a party or ballroom dance competition and you love the playlist. You can enable Auto Shazma mode and your phone or tablet will automatically remember all the songs that was played. You can even keep using other apps on your device while Shazma listens.
To use this feature, install the Shazma app as mentioned in the beginning of this post. Now, launch it, and long-press the big Shazma button, to enable Auto Shazma mode. Refer to below image:
Listening by Shazam app
Listen by Google
Although, not an Apple product, here is another music recognition method.
If a song you are trying to identify is trapped in your head and all you can remember is the song’s melody, there is still something you can do. With the Google app, you can hum or whistle a song’s tune to identify it.
Launch Google Search
Tap the microphone icon
Tap the Search A Song button
Now, start humming or whistling the song you are trying to identify. If Google can find similar matches, the results will appear labeled with match percentages. Tap More Results to see more possible matches. If Google does not find a match, you will receive a message saying so.
That’s it. Please feel free to share this post! One way to share is via Twitter, as mentioned below.
Just click the Tweet icon below to launch Twitter where you click its icon to post the Tweet.
Check out TechSavvy.Life for blog posts on smartphones, PCs, and Macs! You may email us at contact@techsavvy.life for comments or questions.
Please feel free to leave a comment. I would love hearing from you. Do you have a computer or smart device tech question? I will do my best to answer your inquiry. Just send an email to contact@techsavvy.life. Please mention the device, app and version that you are using. To help us out, you can send screenshots of your data related to your question.
The author’s Vietnam eBook on the Battle for Tra Bong: Events and Aftermath
Gmail allows you to change the name that is associated with your email address. Your display name and your email address will show up when you send an email from your Gmail account.
Gmail allows you to change the name that is associated with your email address. Your display name and your email address will show up when you send an email from your Gmail account.
Your Google username is what pops up whenever you send someone an email. It is how people identify you, and how they know that it is okay to open those messages, even if your email address does not include your full name or another way of identifying who you are.
Keep in mind that changing your username is not the same as changing your email address; you would need to create a new account for that.
Before diving in, keep in mind that this action is not yet supported on mobile devices like Android, iPhone, or iPad. This can only be done on your desktop/laptop browser and you have to be logged into your Gmail account to get started.
This is for the PC
Copyright Scott Adams, Inc./Distributed by Universal Uclick for UFS
Setting Menus
To change the name on your Gmail account, first, log in to your account through mail.google.com on your desktop/laptop browser. Note! You may already be logged in, if so, you can just launch Gmail.
Now, click the gear icon to open the Settings menu. Refer to below image:
Accessing Gmail Settings
Next, select See All Settings link at the top of the drop-down menu. See below image:
Accessing See All Settings link
You will now be in the General tab of Gmail’s Settings menu. Now, click the Accounts and Import tab. See following image:
Selecting the Accounts and Import tab
Your Display Name
Notice in the Send Mail As section, you will see your email address and the display name associated with your address. Author’s Note! Email addresses have been grayed out for privacy purposes.
Next, click the Edit Info button to change your display name. Refer to below image:
Selecting Edit Info button
A new window will appear. Here, you can change your display name by clicking the bubble next to the text box and then typing the new display name in that text box.
Now, click Save Changes to apply your change. See below image:
Changing your display name
Your Changed Display Name
Now, you will see your newly entered display name next to the Send Mail As section in Gmail’s Settings menu. See following image:
Showing your new display name
Final Notes
The next time you send an email, your new display name will be shown to the recipient.
While Google allows you to change your display name, you can not actually change your username (which is different than your display name) or your email address. As mentioned previously, if you really need a new email address, you can always create another Google account. Also, you can migrate your data from your “old” account to the newly created one.
You are finished. Please feel free to share this post! One way to share is via Twitter, as mentioned below.
I hope you have found this post helpful. If so, click the Tweet icon below. This will launch Twitter where you click its icon to post the Tweet.
Check out TechSavvy.Life blog posts about smart phone apps, PCs, and Macs! You may email us at contact@techsavvy.life for comments or questions.
Please feel free to leave a comment. I would love hearing from you. Do you have a computer or smart device tech question? I will do my best to answer your inquiry. Just send an email to contact@techsavvy.life. Please mention the device, app and version that you are using. To help us out, you can send screenshots of your data related to your question.
The author’s Vietnam eBook on the Battle for Tra Bong: Events and Aftermath
Need to clear your Google Chrome browsing data? Your browsing data is stored in a “cache” and at times, may cause a problem with the actual data stored on a website. By clearing your browsing data, you are starting with a “fresh cache” to avoid inconsistencies.
Need to clear your Google Chrome browsing data? Your browsing data is stored in a “cache” and at times, may cause a problem with the actual data stored on a website. By clearing your browsing data, you are starting with a “fresh cache” to avoid inconsistencies.
This is for PCs, Macs, iPhone and iPad
Copyright Scott Adams, Inc./Distributed by Universal Uclick for UFS
FIRST, before doing any of the following, launch your Google Chrome app. For the iPhone or iPad
Open an article or your account and tap the the hamburger icon (the 3 dots) in lower right-hand corner.
Tap History. (It may be labeled MoreHistory). Also, you can view more of your history at historygoogle.com
At the bottom, tap Clear Browsing Data.
Check Browsing history. It may be checked by default.
Uncheck any other items you don’t want to delete.
Tap Clear Browsing Data. Tap Clear Browsing Data again or Cancel if you do not want to proceed.
At the top right, tap Done, then tap Done again.
Refer to below image:
Clearing Chrome browsing data on an iPhone or iPad
For Windows, Mac, or Linux
Press Cntl+Shift+Delete keys for Windows or Linux. Press Command+Shift+Backspace for a Mac. The backspace key is labeled “Delete”.
Uncheck any items you don’t want to delete.
Press Clear data button in lower right.
Hit Enter or Return key.
See below image:
Clearing Chrome browsing data for Windows, Mac, or Linux
IMPORTANT: Be sure and close/quit your browser and restart it after clearing your browsing data.
Your browsing history will be cleared to the level you have chosen. You may repeat the above process to clear any unchecked items.
That’s it. Please feel free to share this post! One way to share is via Twitter, as mentioned below.
I hope you have found this post helpful. If so, click the Tweet icon below. This will launch Twitter where you click its icon to post the Tweet.
Check out TechSavvy.Life for blog posts on smartphones, PCs, and Macs! You may email us at contact@techsavvy.life for comments or questions.
Please feel free to leave a comment. I would love hearing from you. Do you have a computer or smart device tech question? I will do my best to answer your inquiry. Just send an email to contact@techsavvy.life. Please mention the device, app and version that you are using. To help us out, you can send screenshots of your data related to your question.
The author’s Vietnam eBook on the Battle for Tra Bong: Events and Aftermath
The iPhone has been out for over a decade, and for most of that time, Apple has only allowed one browser to be the default. Safari, the one they built; till iOS 14 and higher, has been the only supported browser.
The iPhone has been out for over a decade, and for most of that time, Apple has only allowed one browser to be the default. Safari, the one they built; till iOS 14 and higher, has been the only supported browser.
This means that Google Chrome fans can finally set the app as their default, and use it for all their browsing.
As long as your device is running the latest version of the operating system, this setting should be available to you.
You can change the default browser in the Settings app. First, though, make sure you have downloaded the latest version of Chrome from the App Store and opened it at least once.
This is for iPhone and iPad
Copyright Scott Adams, Inc./Distributed by Universal Uclick for UFS
First, launch your Settings app (the gear icon). Refer to below image:
Accessing Settings
Next, scroll way down to the Chrome section and tap on it. See below image:
Selecting Chrome app settings
Now, tap the Default Browser App option. See following image:
Selecting Default Browser App option
You will see a list of installed browsers. Tap the Chrome app to place a checkmark by it. Refer to below image:
Selecting Chrome as the default browser
To ensure your setting, tap the Back text button. You may now exit Settings.
That’s all you need to do! Chrome is now your default browser on your iPhone and/or iPad.
You may still see Safari if an app uses this browser by default. If this happens, you can simply tap the associated browser icon to reopen the page in Chrome.
If you want to revert back to Safari or choose another browser, navigate back to the Default Browser App section in the Chrome or Safari settings.
You are done. Please feel free to share this post! One way to share is via Twitter, as mentioned below.
I hope you have found this post helpful. If so, click the Tweet icon below. This will launch Twitter where you click its icon to post the Tweet.
Check out TechSavvy.Life for blog posts on smartphones, PCs, and Macs! You may email us at contact@techsavvy.life for comments or questions
Please feel free to leave a comment. I would love hearing from you. Do you have a computer or smart device tech question? I will do my best to answer your inquiry. Just send an email to contact@techsavvy.life. Please mention the device, app and version that you are using. To help us out, you can send screenshots of your data related to your question.
The author’s Vietnam eBook on the Battle for Tra Bong: Events and Aftermath
October is designated as National Cybersecurity Awareness Month with this event marking the 17th year that we in the cybersecurity community promote increased awareness on cybersecurity and privacy issues.
October is designated as National Cybersecurity Awareness Month with this event marking the 17th year that we in the cybersecurity community promote increased awareness on cybersecurity and privacy issues. After 17 years, you might think that we should be winding down; that we don’t have much left to say on this subject. The truth is the exact opposite. Every year more and more of our daily lives and services move to the digital world. Last year my family began doing most of our grocery shopping online and now this year due to the global events of 2020, most families, including ours, moved our children’s school online. Increased cybersecurity awareness it seems is needed now more than ever.
Password Security
For this month, I wanted to share with you some thoughts and advice about passwords. You have probably read a lot of advice on passwords in the past like “make them long and unguessable”, “use a password manager”, or “don’t use the same password on more than one website”. All this advice is great, and I still recommend you do all of these steps. Most browsers have a built-in password manager that’s pretty good, easy to setup, and will even sync your passwords between your phone and computer if you use the same browser. However, the truth is that passwords by themselves are not enough to keep you fully safe on the Internet. I view password like a VCR or 8-track player. Old technology for the past that can’t keep up with today’s 4K, blue ray, and streaming Internet. Passwords provide a very minimal level of protection, but they need some help.
Multi-Factor Security
The good news is that help is already here, you just have to setup it up or turn it on. We call this additional level of security, Multi-Factor or just MFA for short. You also may see it called “Two-Factor” Authentication. You have probably already been exposed to it at your job or place of business, but it simply means using an additional level of security beyond a password. This might be a text message with a one-time code, an automated phone call, or a smart phone application. There are many different types of MFA setups. Personally, I use the smart phone version anywhere I can as I always have my phone handy.
So the question is where should you be using MFA. The easy answer is everywhere! Any place or website you use a password to login you should look and see if that website has MFA. Its usually tucked away in the account setting. You might be surprised when you find out that almost every important website you use today have some form of MFA features. Facebook, Google, Microsoft, Twitter, Amazon, Paypal, Ebay, most email providers, any financial websites, etc. They all support MFA and I highly recommend you turn it on. Especially if the website has your credit card or gift cards stored or any place you make an online purchase.
Turing on MFA takes a little extra work but it makes a big difference in online safely. Criminals and hackers may be able to guess your password, but it’s much harder for them to also steal your phone.
A Big Thank You
Thanks to Michael for being our guest and creating this blog post.
I have found TechSavvy.Life blog posts extremely helpful. Check them out for posts on smart phone apps, Macs and PCs!
Please feel free to leave a comment. I would love hearing from you. Do you have a computer or smart device tech question? I will do my best to answer your inquiry. Please mention the device, app and version that you are using. To help us out, you can send screenshots of your data related to your question.
The author’s Vietnam eBook on the Battle for Tra Bong: Events and Aftermath