If you’re having trouble comfortably reading text that is either too small or too big on a website in Google Chrome, there’s a quick way to change it. Let’s explore how to do this.
Chrome includes a feature called Zoom that allows you to quickly make text and images bigger or smaller on any website. You can zoom a web page from anywhere between 25% and 500% of its usual size.
When you navigate away from a page, Chrome will remember your zoom level for that website when you come back to it.
This is for devices using Google Chrome

Check out TechSavvy.Life for similar blog posts!
Tweet
First, open Chrome on your devuce,.
Method 1: Using Keyboard Shortcuts
- Press Ctrl and + (plus) to zoom in
- Press Ctrl and – (minus) to zoom out
- Press Ctrl and 0 (zero) to return to the default size, normally 100%
Method 2: Using the Mouse
Press and hold the Ctrl key and rotate the scroll wheel on your mouse. Depending on which direction you spin the wheel, the text will become larger or smaller.
Method 3: Using the Menu
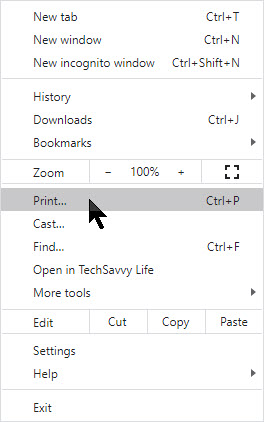
Select the Hamburger icon (the one with 3 dots) in the top-right of the Chrome web browser. Refer to below image:

In the Zoom section, select the + (plus) button to increase the size of text and images. Select the – (minus) button to decrease the size of text and images. See below image:

Press the Esc key to hide the menu.
Reset Zoom
One way is to use any of the zoom methods listed above to set the zoom level to 100%.
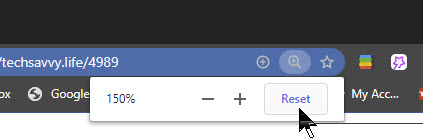
Another way is to select the magnifying glass icon in the address bar (this will only appear if you are zoomed to a level other than 100%), then select Reset. If you dont see the magnifying glass (normally due to numerous icons), just press and hold the Ctrl key while pressing the + (plus) or – (minus) key or mouse scroll. See following image;
Set a Custom Default
You can customise the default zoom level used by the Google Chrome browser. This way, text and images will always appear larger or smaller whenever you use the browser. To do so:
Select the Hamburger icon (the one with 3 dots) in the top-right of the Chrome web browser. Refer to below image:
Select Settings from the menu. See below image;

In the search box at the top of the Settings page, type “page zoom”. See following image:

Under the Appearance options, select the drop-down menu for Page zoom and choose a new default zoom level. Refer to below image:

That’s it. Now you can make your Chrome browsing easier on your eyes.
I have found TechSavvy.Life blog posts extremely helpful. Check them out for posts on smart phone apps, Macs and PCs!
Tweet
I Would Like to Hear From You
Please feel free to leave a comment. I would love hearing from you. Do you have a computer or smart device tech question? I will do my best to answer your inquiry. Please mention the device, app and version that you are using. To help us out, you can send screenshots of your data related to your question.