Features like Google account’s password and bookmark sync, extension support, cross-device migration, etc., make Chrome the number one choice over competitors. Chrome is the most installed web browser used today.
Features like Google account’s password and bookmark sync, extension support, cross-device migration, etc., make Chrome the number one choice over competitors. Chrome is the most installed web browser used today. Let’s explore how to set Chrome as your default browser.
This is for Windows 10 and iPhone/iPad running Chrome
Copyright Scott Adams, Inc./Distributed by Universal Uclick for UFS
Before we go any further, you need to have the Google Chrome browser installed on your computer or iPhone/iPad. You can download the Chrome app from the app or play store for your iPhone/iPad or from Google’s website if you are using a desktop or laptop.
Set Chrome as Default Browser on Windows 10
First, open System settings by pressing Windows key+I, and then click on Apps. Refer to below image:
Selecting Apps from Settings
Next, from the pane on the left side, click Default Apps. See below image:
Selecting Default Apps
Now, locate the Web Browser section, click on your current default browser, and then scroll through the list and select Google Chrome. See following image where Google Chrome is already my default browser:
Setting Chrome as default web browser
Next, close Settings. Chrome is now your default web browser.
Set Chrome as Default Browser on iPhone/iPad
If you are running iOS 14 and iPadOS 14 or higher, Apple made it possible to change the default web browser on iPhone/iPad.
First, locate your Settings app on your iPhone/iPad and tap it. Use Apple’s built-in Spotlight Search (your first screen) to quickly find the app if you can not locate it on your Home screen. Refer to below image:
Accessing Settings
Next, scroll down and select the Chromeapp. See below image:
Selecting Chrome
Now, select the Default Browser App from the menu. If the setting has not been changed before, it will list Safari as the default. See following image:
Selecting Default Browser app
Next, choose Chrome from the list of installed web browser apps. Refer to below image:
Setting Chrome as default web browser
Now, close Settings. The next time you click on a link in any app installed on your iPhone/iPad, it will automatically open Chrome.
Quote For the Day
I was born not knowing and have had only a little time to change that here and there.
Richard Feynman
And that’s it. Please feel free to share this post! One way to share is via Twitter.
Just click the Tweet icon below. This will launch Twitter where you click its icon to post the Tweet.
Checkout TechSavvy.Life for blog posts on smartphones, PCs, and Macs! You may email us at contact@techsavvy.life for comments or questions.
Please feel free to leave a comment. I would love hearing from you. Do you have a computer or smart device tech question? I will do my best to answer your inquiry. Just send an email to contact@techsavvy.life. Please mention the device, app and version that you are using. To help us out, you can send screenshots of your data related to your question.
The author’s Vietnam eBook on the Battle for Tra Bong Vietnam: Events and Aftermath
Apple’s iPhone and iPad takes photos in the HEIF image format by default. These photos have the HEIC file extension. Windows 10 can view HEIC files in just a few clicks; or you can convert them to standard JPEGs and view them anywhere.
Apple’s iPhone and iPad takes photos in the HEIF image format by default. These photos have the HEIC file extension. Windows 10 can view HEIC files in just a few clicks; or you can convert them to standard JPEGs and view them anywhere. Let’s explore how this is done.
This is for devices running Windows 10, iPhone, and iPad
Copyright Scott Adams, Inc./Distributed by Universal Uclick for UFS
What is HEIC
HEIC is the name that Apple gave to its container for the HEIF (High Efficiency Image File) image format and is based on the HEVC (High Efficiency Video Compression) video format.
What it means for you are high-quality images that take up less storage space thanks to a more modern compression method.
You can disable HEIC on the iPhone, but since its introduction in iOS 11, it has become Apple’s default photo storage format.
How to View HEIC Files
On modern versions of Windows 10, you can install support for HEIC image files.
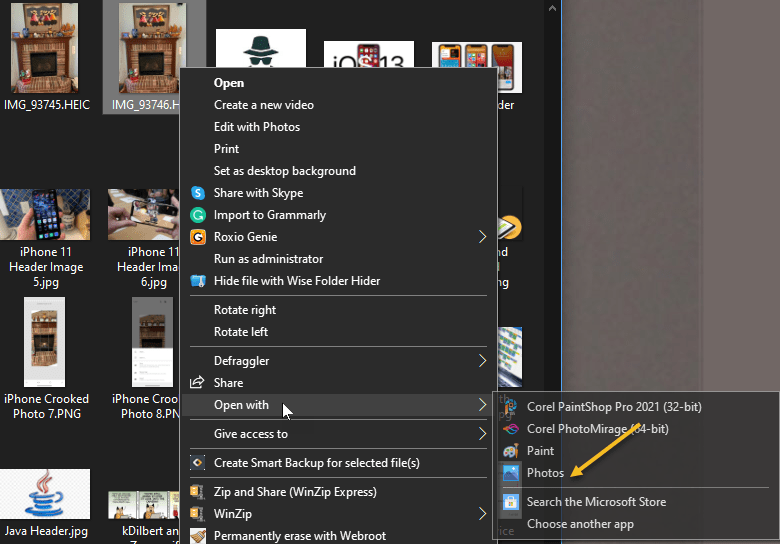
First, locate an HEIC file in File Explorer on your computer and double-click it. If you are asked which application you want to open it in, select Photos.
Note! If the HEIC file does not open in the Photos app, right-click the HEIC file and select
Open With > Photos
Refer to below image:
Selecting how to open HEIC photos
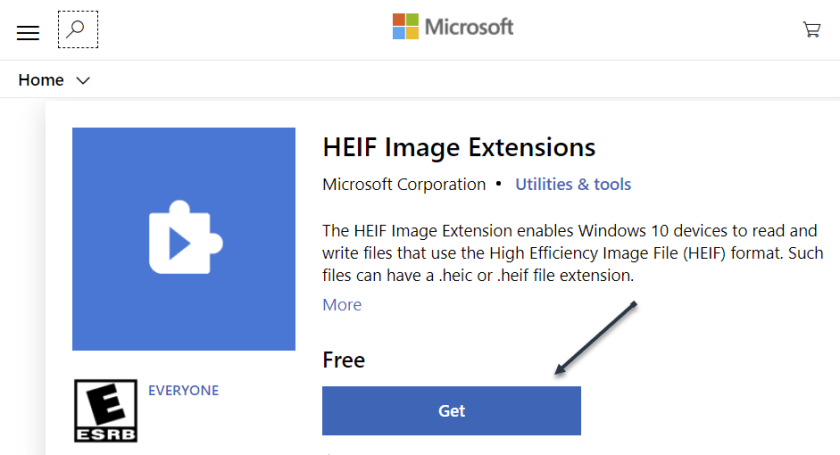
The Photos app will tell you that the HEIF Image Extension is required to display this file. Click the Download and install it now link to get it from the Microsoft Store. It’s a free download. If you do not see this requirement screen, do a Google search and install the extension. See below image:
Google search for HEIF extension
If Windows asks Did you mean to switch apps?, select Yes.
This will open the HEIF Image Extensions page in the Microsoft Store app. Click the Install or Get button to download support for HEIC image files (which use the HEIF format.) See following image:
Get or Install the HEIF extension
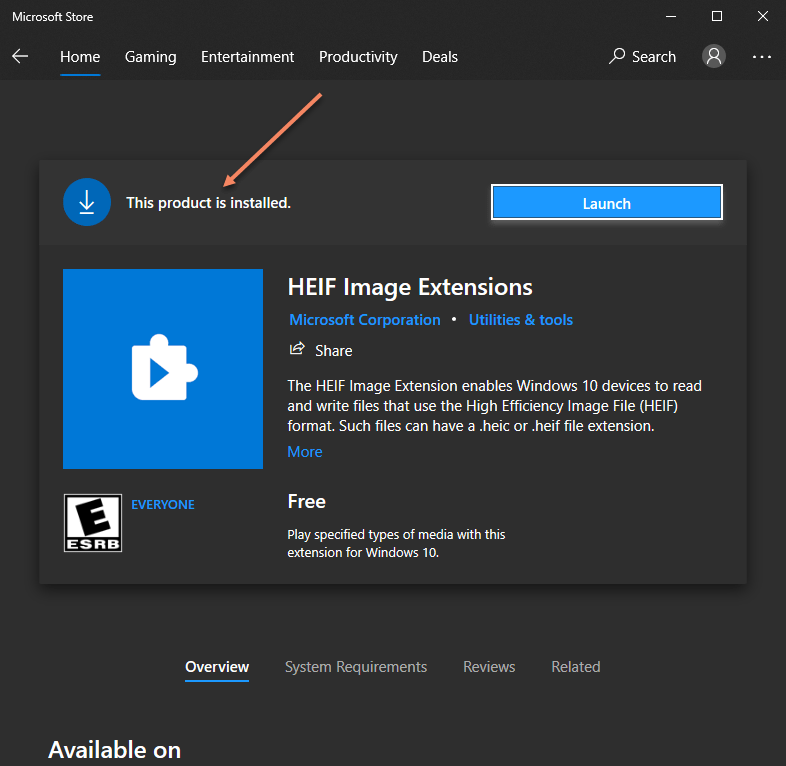
On the next screen, if the extension is already installed, you are set. If not, the Launch button will display Install instead. Just click to install the extension. Refer to below image:
Status of the extension
Now, when you open an HEIC image in the Photos app, you will be able to view it like you would any other image file, like a JPEG, PNG, GIF, or BMP. See below image:
HEIC photo
Windows 10’s File Explorer will automatically generate and display thumbnails for your HEIC image files, too. See following image:
Thumbnails of HEIC photos in File Explorer
Convert HEIC to JPEG
To quickly and easily convert HEIC files to standard JPEG images on Windows, we recommend you download and install CopyTrans HEIC for Windows.
This tool installs full support for HEIC images in Windows, so it’s particularly useful on Windows 7 and older versions of Windows 10 that do not have integrated support in the Photos app. It adds support for HEIC images to the classic Windows Photo Viewer.
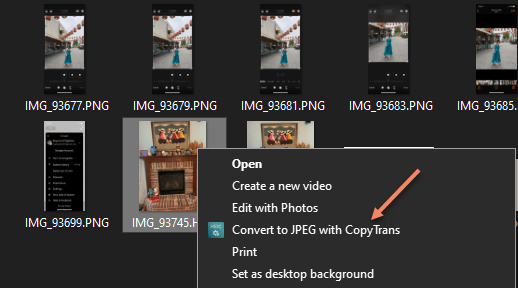
CopyTrans HEIC also allows you to right-click an HEIC file in File Explorer and select Convert to JPEG to easily convert it to a JPEG file. Select the option and you will get a JPEG version of the image automatically placed in the same folder as the original HEIC file.
JPEG files are more widely supported, so this will help you use the HEIC file in applications that support JPEG images but not HEIC files. Refer to below image:
Selecting to convert HEIC to JPEG
Change the Default
If you find dealing with HEIC files inconvenient, you can also configure your iPhone to always take photos in JPEG format.
Go to
Settings > Camera > Formats > (and checkmark) Most Compatible
instead of High Efficiency. See below image:
changing the default on iPhone
However, HEIC offers higher image quality in smaller file sizes. It’s a more modern image format, and we recommend sticking with it if the applications you use support it.
Quote For the Day
When you’re older you want to learn from other people.
Ray Bradbury
That’s it. Please feel free to share this post! One way to share is via Twitter.
Just click the Tweet icon below. This will launch Twitter where you click its icon to post the Tweet.
Checkout TechSavvy.Life for blog posts on smartphones, PCs, and Macs! You may email us at contact@techsavvy.life for comments or questions.
Please feel free to leave a comment. I would love hearing from you. Do you have a computer or smart device tech question? I will do my best to answer your inquiry. Just send an email to contact@techsavvy.life. Please mention the device, app and version that you are using. To help us out, you can send screenshots of your data related to your question.
The author’s Vietnam eBook on the Battle for Tra Bong Vietnam: Events and Aftermath
Adding your signature into a Microsoft Word document is a way to put your own stamp on it and make it look official and professional. Let’s explore how this is done.
This is for devices running Word. We are using Word for Microsoft 365 on Windows 10.
Copyright Scott Adams, Inc./Distributed by Universal Uclick for UFS
There are several ways to add your signature to a Word document. You can add a signature line for a post-print signature, or insert your own handwritten signature as a picture.
Add a Signature Line
A Signature Line provides you, or somebody else, with a location to sign a printed document. If you are planning on printing your Word document, adding a Signature Line is probably the easiest way.
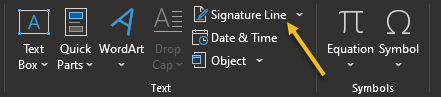
First, open a Word document. In the Text section, click
Insert > Signature Line
Refer to below image:
Selecting Signature Line option
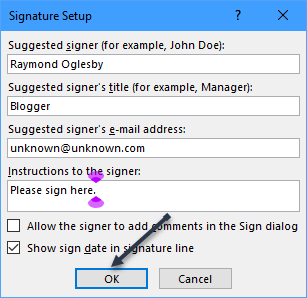
Next, in the Signature Setup box that appears, fill out your signature details. You can include the name, title, and email address of the signer. This can be you or somebody else.
You can also provide instructions for the signer. Once you are ready, click OK to insert your Signature Line. See below image:
Setting up Signature details
Now, once you have confirmed your signature options, a Signature Line is inserted with a cross and a line to signify where to sign. See following image:
Your Signature Line
You can now drag-and-drop this into an appropriate position within your Word document. The document can then be signed at this position after printing.
Add a Picture Signature
If you would prefer to use your handwritten signature, you can take a picture or scan a copy of it and upload it to your computer. You can then insert a picture of your signature into the Word document.
First, place your cursor where you want to locate the signature, preferably just below the Signature Line box.
To insert the image into your document, click
Insert > Pictures > This Device
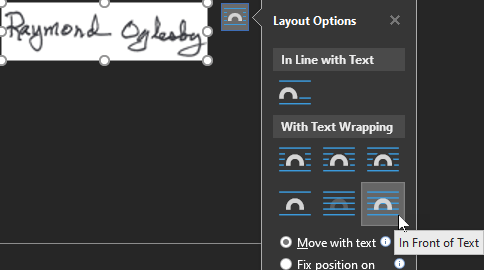
Your File Explorer will open for you to choose your signature image, then click Insert. Highlight your Signature Line box, and click the Layout Options icon. From here, choose the Layout Option, In Front of Text.
Selecting In Front of Text for Layout Option
Next, drag-and-drop your signature picture onto the Signature Line. See below image:
Your final result
Optionally, following the above steps, you could add a photo below or to the side of your Signature Line box.
Quote For the Day
People are always asking for the latest developments in the unification of this theory with that theory, and they don’t give us a chance to tell them anything about one of the theories that we know pretty well. They always want to know things that we don’t know.
Richard P Feynman
That’s it. You now know how to add a signature into a Word document. Please feel free to share this post! One way to share is via Twitter.
Just click the Tweet icon below. This will launch Twitter where you click its icon to post the Tweet.
Check out TechSavvy.Life for blog posts on smartphones, PCs, and Macs! You may email us at contact@techsavvy.life for comments or questions.
Please feel free to leave a comment. I would love hearing from you. Do you have a computer or smart device tech question? I will do my best to answer your inquiry. Just send an email to contact@techsavvy.life. Please mention the device, app and version that you are using. To help us out, you can send screenshots of your data related to your question.
The author’s Vietnam eBook on the Battle for Tra Bong Vietnam: Events and Aftermath
Based on reading other blog posts and websites, we recommend you wait to upgrade. Microsoft even seems to be reluctant about this upgrade. Why else would they offer a 10 day rollback to Windows 10? One thing it does is allow you to try out the upgrade.
Based on reading other blog posts and websites, we recommend you wait to upgrade. Microsoft even seems to be reluctant about this upgrade. Why else would they offer a 10 day rollback to Windows 10? One thing it does is allow you to try out the upgrade.
Windows 11 arrived on October 5, 2021. Unlike the big Windows 10 upgrade offer that felt impossible to avoid, Microsoft is recommending many PC owners not to upgrade.
This is for devices running Windows 10 and 11
Copyright Scott Adams, Inc./Distributed by Universal Uclick for UFS
How the Upgrade Will Work
Windows 11 will be a free upgrade for PCs running Windows 10, just as Windows 10 was a free upgrade for PCs running Windows 7 and Windows 8.
However, this time, Windows 11 is not designed for all those PCs. Windows 11 officially supports only very recent hardware. In addition to requiring TPM 2.0 and UFFI with Secure Boot, Windows 11 only supports certain recent CPUs.
Specifically, PCs with Intel processors must have an Intel 8th generation or newer processor. AMD PCs must be running at least AMD Zen 2. ARM PCs must have Qualcomm 7 or 8 Series hardware.
Microsoft refuses to explain exactly why only certain CPUs are supported.
Can your PC Run Windows 11
Not sure what hardware your PC has and whether it will support Windows 11? Microsoft offers an official PC Health Check app (yes the app is back) that will tell you whether your PC can officially run Windows 11. If not, the PC Health Check will tell you what the problem is. First, to check on your PC, download the PC Health Check app and scroll down to the bottom, then click on the download button. Refer to below image:
Download PC Health Check
Next, after the download, click on the .msi file to install. Once installed, click the big blue Check now button. See below image:
Run the PC Health Check
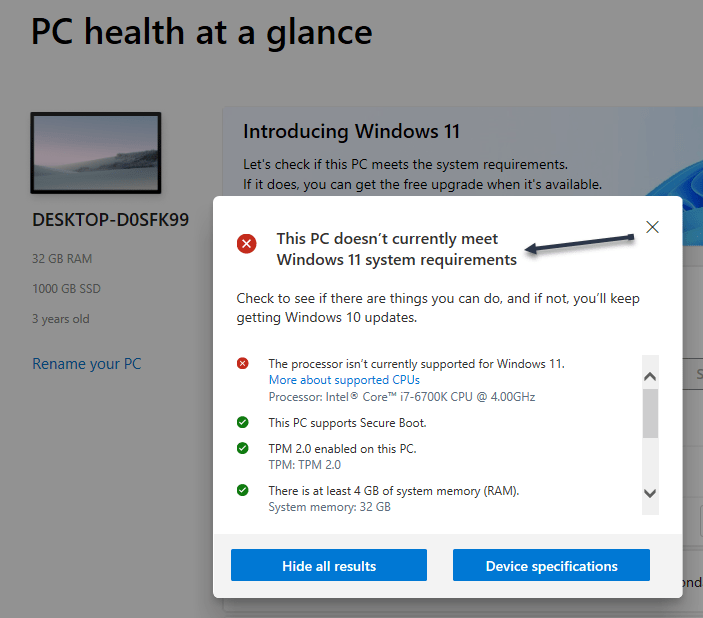
Now, the app will tell you whether your PC can officially run Windows 11. See following image:
A possible result in running the PC Health Check
However, the tool will not tell you the full story. Even if your PC can run Windows 11, you might not want to upgrade yet. And, even if your PC does not officially support Windows 11, you can upgrade anyway.
If Your PC Does Supports the Upgrade
Next, if Windows 11 officially supports your PC and you are not too worried about any missing options or potential bugs, feel free to upgrade. Refer to below image:
Your PC supports Windows 11
For example, Windows 11’s Taskbar is missing some features that were found in Windows 10’s. Windows 11’s Taskbar is glued to the bottom of your screen, and you can not drag and drop files and other items to Taskbar icons, as you could on Windows 10.
If Your PC Does Not Support the Upgrade
Now, if Windows 11 does not officially support your PC, you have a more difficult decision to make. Microsoft recommends against installing Windows 11 on computers that have older CPUs it does not officially support. We would also recommend against installing Windows 11 on these PCs.
Sure, it may work, but you may encounter bugs; and Microsoft says it will not guarantee security updates will be available in the future. After all, Windows 10 will be officially supported until late 2025.
So that’s our official recommendation: Do not do it, particularly if you use your PC for work or other critical tasks and you just need it to work. See below image where the processor is outdated:
Your PC does not support Windows 11
However, if you really want to get your hands on Windows 11 on a PC that is not officially supported, feel free to install the upgrade anyway. Just know what you are getting into. That’s why Microsoft makes you agree to a waiver full of legalese before you install Windows 11 on such a PC.
Try It For 10 Days
Next, if you are on the fence about Windows 11, you can give it a try. For the first 10 days after you upgrade, you will have the option to downgrade back to Windows 10.
It will be at;
Settings > System > Recovery > Go Back
under Recovery options. If the option is grayed out, it’s no longer available. See following image:
Revert back to Windows 10 within 10 days
After 10 days, the option to downgrade will silently vanish as Windows 11 will delete your old Windows 10 files from your system drive to free up space.
You can still downgrade a PC running Windows 11 back to Windows 10. However, you will have to perform a full reinstall of Windows 10, so you will have to reinstall all your applications and set everything up from scratch.
Quote For the Day
Design is a funny word. Some people think design means how it looks. But of course, if you dig deeper, it’s really how it works.
Steve Jobs
That’s it. Please feel free to share this post! One way to share is via Twitter.
Just click the Tweet icon below. This will launch Twitter where you click its icon to post the Tweet.
Check out TechSavvy.Life for blog posts on smartphones, PCs, or Macs! You may email us at techsavvy.life for comments or questions.
Please feel free to leave a comment. I would love hearing from you. Do you have a computer or smart device tech question? I will do my best to answer your inquiry. Just send an email to contact@techsavvy.life. Please mention the device, app, and version you are using. To help us out, you can send screenshots of your data related to your question.
The author’s Vietnam eBook on the Battle for Tra Bong Vietnam: Events and Aftermath
Finding your PowerShell version helps you know what PowerShell features you have access to. By using a PowerShell command we can reveal its version number.
Finding your PowerShell version helps you know what PowerShell features you have access to. By using a PowerShell command we can reveal its version number. Let’s explore this simple feature.
This is for devices running Windows 10
Copyright Scott Adams, Inc./Distributed by Universal Uclick for UFS
Find Your Version
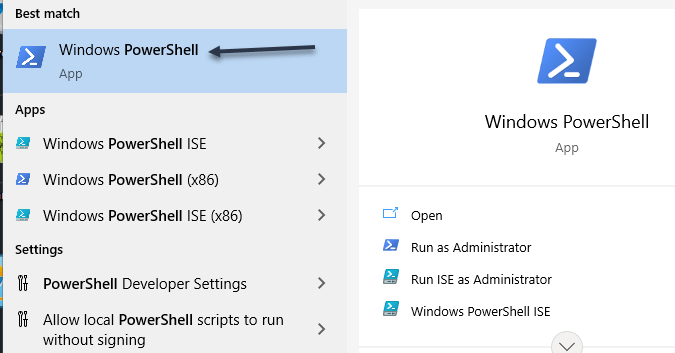
First, open the Start menu. In the Cortana search box, enter Windows PowerShell, and click the search results in upper left-hand corner. Refer to below image:
Accessing PowerShell
Now, in the PowerShell window that opens, type the following command and press Enter:
$PSVersionTable
See below image:
Entering the command
The PowerShell command will display various numbers. The first value that says PSVersion is your PowerShell version. See following image:
Displaying your version number
You may now close the PowerShell window.
PowerShell Updates
Windows 10 updates the built-in PowerShell tool when you install system updates. This means you should keep your device up-to-date to ensure that you are always running the latest version of PowerShell.
Also, know that PowerShell 7 is different from the version that’s usually installed on Windows 10 PCs. To install this version, either download the installer file or run a command from PowerShell.
Quote For the Day
The universe is not required to be in perfect harmony with human ambition.
Carl Sagan
That’s it. Please feel free to share this post! One way to share is via Twitter.
Just click the Tweet icon below. This will launch Twitter where you click its icon to post the Tweet.
Check out TechSavvy.Life for blog posts on smartphones, PCs, and Macs! You may email us at contact@techsavvy.life for comments or questions.
Please feel free to leave a comment. I would love hearing from you. Do you have a computer or smart device tech question? I will do my best to answer your inquiry. Just send an email to contact@techsavvy.life. Please mention the device, app and version that you are using. To help us out, you can send screenshots of your data related to your question.
The author’s Vietnam eBook on the Battle for Tra Bong: Events and Aftermath
What does it mean to pin a post on Facebook? A pinned post is a status update that you manually select to stay at the top of your page’s timeline, meaning it will not slip down as you continue to add other posts to your page.
What does it mean to pin a post on Facebook? A pinned post is a status update that you manually select to stay at the top of your page’s timeline, meaning it will not slip down as you continue to add other posts to your page. Let’s explore how to do this.
This is for devices running Facebook
Copyright Scott Adams, Inc./Distributed by Universal Uclick for UFS
You can only have one post pinned to your profile at a time. If you try to pin a second post, that second post gets pinned and the first post gets unpinned.
Pin to Your Profile
First, launch a web browser on your computer and access the Facebook site. Next, log in to your account and in the top right-hand corner of the site, click your profile icon. Refer to below image:
Accessing your Profile
Now, on your profile page that opens, find the post you want to pin. At the top right-hand corner of the post, click the three dots menu. See below image:
Selecting the 3 dots menu
Next, from the three-dots menu, select Pin post. See following image:
Selecting to Pin your post
And immediately, Facebook will pin the selected post to the top of your profile page. Scroll up your profile and your pinned post will appear there. Refer to below image:
Your pinned post
To unpin a pinned post, from the top right-hand corner of the pinned post, select the three dots menu and click Unpin post in the menu. See below image:
Selecting to Unpin your post
Facebook will remove the post from the top of your profile page. It will continue to appear at its original location in your profile, though. Now, refresh the page or exit Facebook.
In addition to your personal profile, you can pin a post to your Facebook page, too.
First, access your page and find a post to pin. (Note! I am doing this on my business page using my iPhone). Next, at the top right-hand corner of the post, click the three dots menu. See following image:
Selecting the 3 dots menu
Now, from the three-dots menu, select Pin to Top. Refer to below image:
Selecting to Pin your post
Next, Facebook will add your selected post to the top of the page.
To remove the post from the top of the page, from the top right-hand corner of the post, click the three dots menu. Next, from the menu that opens, select “Unpin from Top. See below image:
Selecting to Unpin your post
Quote For the Day
You can’t just ask customers what they want and then try to give that to them. By the time you get it built, they’ll want something new.
Steve Jobs
That’s it. You now know how to pin/unpin a Facebook post. Please feel free to share this post! One way to share is via Twitter.
Just click the Tweet icon below. This will launch Twitter where you click its icon to post the Tweet.
Check out TechSavvy.Life for blog posts on smartphones, PCs, and Macs! You may email us at contact@techsavvy.life for comments or questions.
Please feel free to leave a comment. I would love hearing from you. Do you have a computer or smart device tech question? I will do my best to answer your inquiry. Just send an email to contact@techsavvy.life. Please mention the device, app and version that you are using. To help us out, you can send screenshots of your data related to your question.
The author’s Vietnam eBook on the Battle for Tra Bong Vietnam: Events and Aftermath
When it comes time to turn off a Windows 10 PC, you might not know the best way to do it. But there’s more than one way to shut down your computer, and we will show you seven different methods that do the trick.
When it comes time to turn off a Windows 10 PC, you might not know the best way to do it. But there’s more than one way to shut down your computer, and we will show you seven different methods that do the trick.
This is for Windows 10 devices
Copyright Scott Adams, Inc./Distributed by Universal Uclick for UFS
If your PC is “stuck”, one of these methods should do the trick. I have a shutdown/restart process on this PC that runs every night at 10 pm. I find this very helpful in clearing out the cache and other files so that I have a “clean” PC every morning. Also, by doing this, your PC will perform better. We do not advise keeping your device running all the time. Its best to turn it off or shutdown/restart your PC ever so often. Let’s explore seven ways to turn off your PC.
Method 1 – Use the Power Button
Perhaps the easiest way to turn off your Windows PC is by pressing the power button. Years ago, you always had to shut down Windows within the software itself before flipping your PC’s power switch so that you did not lose any data. These days, PC power buttons are wired to send a signal to the operating system to begin a shutdown process when you push it. (Note! It is recommend that you hold down the button only for a few seconds to avoid shutdown problems). The button can also be configured to put your PC to sleep.
The only catch is that the power button on many laptops do not usually shut down the machine. Instead, it often puts the laptop to sleep or turns off the display. If that’s the case, you might be better off using a shutdown method as listed below. Refer to below image:
Push this button, resembles HAL in 2001 A Space Odyssey
Method 2 – Use Login Power Icon
On your Windows 10 login screen, click the power icon in lower right-hand corner. Next, click the Shut down option.
Method 3 – Use the Start Menu Icon
First, click the Start button, which is the Windows logo button in the left-hand corner of your screen.
Next, in the Start menu that pops up, select the Power icon in the left side of the menu. Next, click Shut down in the small secondary menu that appears. After a moment, all apps will close, and the PC will power off. See below image:
Accessing Start Menu icon
Method 4 – Use Right-Click On Start Menu
You can also shut down your device from a hidden menu if you right-click the Start menu or press Windows+X on your keyboard.
After the menu is loaded, select Shut down or Sign out. Now, choose the Shut down option from the sub-menu. See following image:
Using Right-Click on Start Menu
Method 5 – Use Ctrl-Alt-Del Keyboard Shortcut
If you press Ctrl+Alt+Delete on your keyboard, a special screen will appear that allows you to launch the Task Manager, Switch user, and more. You can turn off your PC from here, too. Like in Method 2, in the lower-right corner of the screen, click the Power icon and select Shut down in the menu. Refer to below image:
Using Ctrl-Alt-Del shortcut
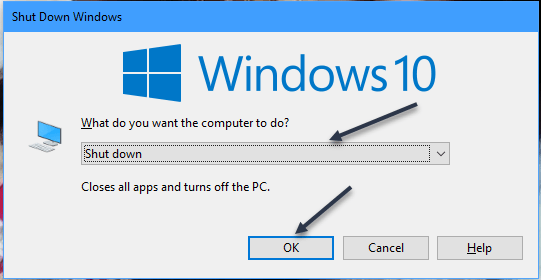
Method 6 – Use Alt-F4 Keyboard Shortcut
In Windows, this shortcut usually closes the currently active window. But if you click the de3sktop (or minimize all windows) and press Alt+F4, a special Shut Down Windows box will appear. In the drop-down menu, select Shut down (although it’s usually selected by default), and then click OK. Your PC will shut down after that. See below image:
Using Alt-F4 shortcut
Method 7 – Use the Command Prompt
If you prefer to do things from the Command Prompt, you can shut down from there as well. First, open the Start menu and type Command in the Cortana search box, and then hit Enter. In the search results at upper-right hand corner, click on Command Prompt. With the prompt open, type
shutdown /s
at the prompt and press Enter. You will see a warning pop-up that lets you know that Windows is about to shut down. After a minute, Windows will shut down fully and your PC will power off. See following image:
Using Command Prompt
Quote For the Dquote
I do not fear computers. I fear the lack of them.
Isaac Asimov
Now you know some ways to shut down your PC. Please feel free to share this post! One way to share is via Twitter.
Just click the Tweet icon below. This will launch Twitter where you click its icon to post the Tweet.
Check out TechSavvy.Life for blog posts on smartphones, PCs, and Macs! You may email us at contact@techsavvy.life for comments or questions.
Please feel free to leave a comment. I would love hearing from you. Do you have a computer or smart device tech question? I will do my best to answer your inquiry. Just send an email to contact@techsavvy.life. Please mention the device, app and version that you are using. To help us out, you can send screenshots of your data related to your question.
The author’s Vietnam eBook on the Battle for Tra Bong: Events and Aftermath
Sooner or later, you will need the Developer Tab in Word, Excel, PowerPoint, or Outlook. Even if you know nothing about programming, there are buttons on the Developer tab that are necessary for some of the clever features in Office.
Sooner or later, you will need the Developer Tab in Word, Excel, PowerPoint, or Outlook. Even if you know nothing about programming, there are buttons on the Developer tab that are necessary for some of the clever features in Office.
The Developer tab is not displayed by default, but you can add it to the ribbon in a few easy steps.
This is for devices running Microsoft Office
Copyright Scott Adams, Inc./Distributed by Universal Uclick for UFS
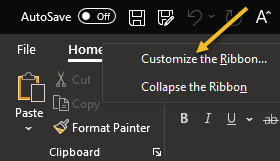
First, open an Office app, like Word, and any document. Now, right-click within any Tab in the Ribbon and select Customize the Ribbon. Refer to below image:
Select Customize the Ribbon option
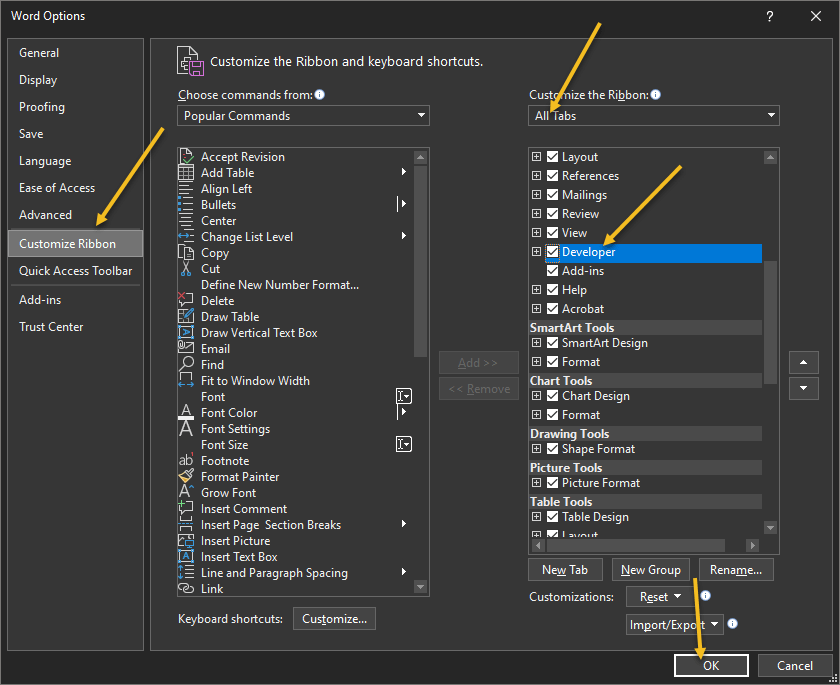
Next, in the right-hand side, select All Tabs from the drop down menu and simply checkmark the Developer tab box. Now, select OK to enable the Developer tab. See below image:
Enable the Developer tab
Next, exit your Office app, restart the app and load your document. You will see the Developer tab in your ribbon. Just click the tab to view its options. See following image:
Your Developer tab
Quote For the Day
‘Fahrenheit 451’ postulates a lot of things I didn’t want to have happen.
Ray Bradbury
That was easy. Please feel free to share this post! One way to share is via Twitter.
Just click the Tweet icon below. This will launch Twitter where you click its icon to post the Tweet.
Check out TechSavvy.Life for blog posts on smartphones, PCs, and Macs! You may email us at contact@techsavvy.life for comments or questions.
Please feel free to leave a comment. I would love hearing from you. Do you have a computer or smart device tech question? I will do my best to answer your inquiry. Just send an email to contact@techsavvy.life. Please mention the device, app and version that you are using. To help us out, you can send screenshots of your data related to your question.
The author’s Vietnam eBook on the Battle for Tra Bong Vietnam: Events and Aftermath
The Power User Menu is available by default (you do not have to download it) in Windows 10, Windows 8.1, or Windows 8 as a pop-up menu with shortcuts to management, configuration, and other “power user” Windows tools.
The Power User Menu is available by default (you do not have to download it) in Windows 10, Windows 8.1, or Windows 8 as a pop-up menu with shortcuts to management, configuration, and other “power user” Windows tools.
It’s also referred to as the Win+X Menu.
This is for devices running Windows 10
Copyright Scott Adams, Inc./Distributed by Universal Uclick for UFS
What’s in the Power User Menu
The Power User Menu is, at its most basic, a context menu that provides quick access to some of Windows 10’s more advanced or frequently accessed features.
Here’s a list of what’s on the Power User Menu by default, along with a shortcut key that you can use to launch that program from the menu. With the Power User Menu already open, just hit one of those keys to immediately open that shortcut. (Note! According to your configuration, all of these options may not be listed.)
Apps and Features (F): Opens Apps & Features in the Settings app.
Mobility Center: Opens Windows Mobility Center, a place in which to quickly adjust certain audio, visual, and battery settings.
Power Options (B): Opens Power & Sleep in the Settings app.
Event Viewer (O): Opens Event Viewer, which shows a log of app and system messages.
System (V): Shows the system information of your machine in the Settings app.
Device Manager (M): Opens Device Manager, which lets you configure and/or troubleshoot your PC hardware.
Network Connections (W): Opens your network status information in the Settings app.
Disk Management (K): Opens Disk Management, which allows you to manage your disks and drives.
Computer Management (G): Opens Computer Management, a feature that contains admin tools like Event Viewer and Disk Management.
Windows PowerShell (i): Launches PowerShell.
Windows PowerShell Admin (A): Launches PowerShell as an admin.
Task Manager (T): Opens Task Manager, which displays resource usage and process statistics.
Settings (N): Opens the Windows Settings app.
File Explorer (E): Opens File Explorer.
Search (S): Opens Windows Search and places the cursor in the Search bar.
Run (R): Opens Run, a feature that lets you open folders and run programs with commands.
Shut Down or Sign Out: (First, press U, and then press i to Sign Out, S to Sleep, U to Shut Down, or R to Restart).
Desktop (D): Minimizes everything.
Open the Power Menu
There are two equally simple ways to access the Power User Menu. If you are a fan of keyboard shortcuts, then press Win+X The Power User Menu will open. Another way is by just right-clicking the Start menu in the bottom-left-hand corner of your desktop. The Power User Menu will then open. Refer to below image:
The Power User Menu
How to Customize the Menu
One of the easiest ways to remove, reorder, rename, or add items to Power User Menu, is to use a graphical program that can do it for you.
The favorite is Win+X Menu Editor, which lets you add your own programs to the menu as well as Control Panel shortcuts, Administrative Tools items, and other shutdown options like Hibernation and Switch User. It’s also just a click away to restore all the defaults and get the regular Power User Menu back. The problem with this app is its preinstalled software requirements. The Editor wants you to install WinZip and WinZip Driver Updater. The WinZip app has a trial version (21 days), the Updater does not offer a trial version. To me, these requirements are a major downside to installing the Editor unless the apps are already installed.
Quote For the Day
You’re unlikely to discover something new without a lot of practice on old stuff, but further, you should get a heck of a lot of fun out of working out funny relations and interesting things.
Richard P Feynman
That’s it. Now you know what the Power User Menu is and how to access it. Please feel free to share this post! One way to share is via Twitter.
Just click the Tweet icon below. This will launch Twitter where you click its icon to post the Tweet.
Check out TechSavvy.Life for blog posts on smartphones, PCs, and Macs! You may email us at contact@techsavvy.life for comments or questions.
Please feel free to leave a comment. I would love hearing from you. Do you have a computer or smart device tech question? I will do my best to answer your inquiry. Just send an email to contact@techsavvy.life. Please mention the device, app and version that you are using. To help us out, you can send screenshots of your data related to your question.
The author’s Vietnam eBook on the Battle for Tra Bong Vietnam: Events and Aftermath
Google Chrome 93 is officially here. There is plenty to be excited about. For example, with Chrome 93, progressive web apps (PWAs) feel a lot more like native desktop apps, as clicking on a link can open an associated web app. There’s also improved multi-screen support for web apps, making this an update web app users will love.
Google Chrome 93 is officially here. There is plenty to be excited about. For example, with Chrome 93, progressive web apps (PWAs) feel a lot more like native desktop apps, as clicking on a link can open an associated web app. There’s also improved multi-screen support for web apps, making this an update web app users will love. Let’s explore how to install Chrome 93.
This is for Windows, Android, Mac, iPhone, and iPad
Copyright Scott Adams, Inc./Distributed by Universal Uclick for UFS
Some new features are related to recently closed tabs, a Material You theme for Android 12, a new Google Search UI on Android, the ability to sync Two-Factor OTP codes across devices (a true game-changer), the ability to use note-taking apps right from the browser, a new context menu on iPhone, and so much more.
Chrome 93 will now also show Google Drive documents on the New Tab page. The suggested documents will appear in a card underneath the Search Bar, allowing you to easily access recently edited Google Docs or Sheets.
First, you can check for an update by going to the three-dot menu hamburger icon on the top-right of Chrome. Next, click Help followed by About Google Chrome. Refer to below image:
Selecting the About option
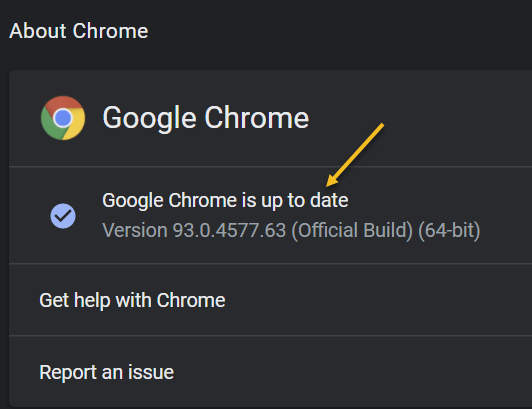
Now, the Chrome Settings window open. If Chrome is outdated, it will automatically download and install the latest version. See below image:
Your Chrome version
Now, close Chrome and restart the app.
If you are on iPhone or Android, update the app as you would for any other application.
Quote For the Day
The most remarkable discovery in all of astronomy is that the stars are made of atoms of the same kind as those on the earth.
Richard P Feynman
You are finished. Please feel free to share this post! One way to share is via Twitter.
Just click the Tweet icon below. This will launch Twitter where you click its icon to post the Tweet.
Check out TechSavvy.Life for blog posts on smartphones, PCs, and Macs. You may email us at contact@techsavvy.life for comments or questions.
Please feel free to leave a comment. I would love hearing from you. Do you have a computer or smart device tech question? I will do my best to answer your inquiry. Just send an email to contact@techsavvy.life. Please mention the device, app and version that you are using. To help us out, you can send screenshots of your data related to your question.
The author’s Vietnam eBook on the Battle for Tra Bong Vietnam: Events and Aftermath