Some websites show you a “Sign in with Google” prompt to help you quickly sign in to that website. If you would like to avoid this prompt, there’s an easy way to disable it from your Google account’s Settings menu
Some websites show you a “Sign in with Google” prompt to help you quickly sign in to that website. If you would like to avoid this prompt, there’s an easy way to disable it from your Google account’s Settings menu. Let’s see how this is done.
This is for devices using Google. Screenshots are from Windows 10
Copyright Scott Adams, Inc./Distributed by Universal Uclick for UFS
The “Sign in with Google” prompt is tied to your Google account and not to a particular web browser. This means that you will need to disable the prompt in your account to prevent it from appearing across all your web browsers, including both desktop and mobile browsers.
First, open your Google My Account site in a web browser on your Windows, Mac, or Linux computer. Then, log in to your Google account if you have not already done so.
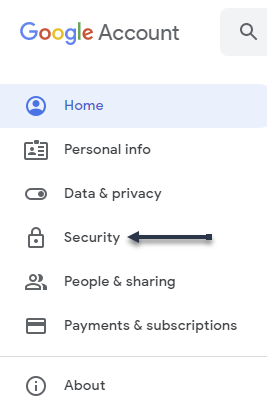
Next, when the site loads, first, select Security in the left sidebar. Refer to the below image:
Selecting Security option
Now, on the Security page, scroll down to the Signing in to other sites section. Here, click the Signing in with Google option. See the below image:
Selecting Google sign in
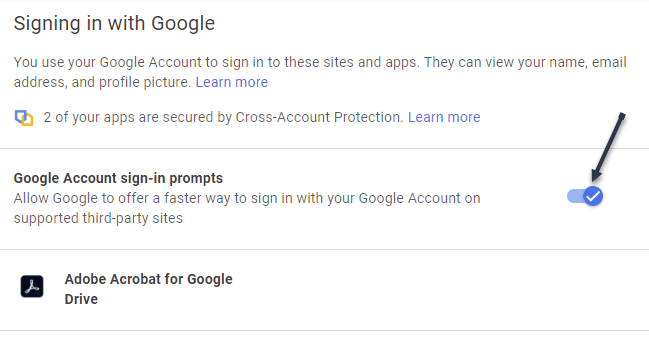
On the next page, under the Signing in with Google section, toggle OFF the Google Account sign-in prompts. See the following image:
Disable Google sign in
Now, you will see an Updated message in the lower left-hand corner of your browser telling you that your settings are saved. Refer to the below image:
Your updated change notification
Note: If you are logged in to multiple Google accounts in your web browser, repeat the above process for each account to get rid of the Sign in with Google prompt.
If you want to reverse this action, simply repeat the above steps and toggle ON the Google Account sign-in prompts.
From now on, you will not see the Sign in with Google prompt on any website.
Quote For The Day
Time can be an ally or an enemy. What it becomes depends entirely upon you, your goals, and your determination to use every available minute.
Zig Ziglar
That’s it. Please feel free to share this post! One way to share is via Twitter.
Just click the Tweet icon below. This will launch Twitter where you click its icon to post the Tweet.
Check out TechSavvy.Life for blog posts on smartphones, PCs, and Macs! You may email us at contact@techsavvy.life for comments or questions.
Please feel free to leave a comment. I would love to hear from you. Do you have a computer or smart device tech question? I will do my best to answer your inquiry. Just send an email to contact@techsavvy.life. Please mention the device, app, and version you are using. To help us out, you can send screenshots of your data related to your question.
Author’s E-book
You can access the e-book from a Kindle device, the Kindle App for the desktop or smartphone, which is a free app.
The author’s Vietnam eBook on the Battle for Tra Bong Vietnam: Events and Aftermath
Windows 10 lets you increase the mouse cursor’s size and change its color as well as changed the text indicator.. Want a black mouse cursor instead? You can choose that. Want a huge yellow inverted cursor that’s easier to see? You can choose that, too. Want the cursor indicator that you can see? In our example, we will create a Scheme of yellow inverted size three cursor and a blue text indicator with a thickness of three.
Windows 10 lets you increase the mouse cursor’s size and change its color as well as changed the text indicator. Want a black mouse cursor instead? You can choose that. Want a huge yellow inverted cursor that’s easier to see? You can choose that, too. Want the cursor indicator that you can see? In our example, we will create a Scheme of yellow inverted size three cursor and a blue text indicator with a thickness of three. Let’s explore how this is done.
This is for devices running Windows 10
Copyright Scott Adams, Inc./Distributed by Universal Uclick for UFS
Change the Mouse Settings
First, open Mouse Settings. In the Cortana search box at the lower left-hand corner, type in “mouse settings“. From the results, in the upper left-hand corner, click the Mouse settings result. The Mouse window will then open.
Next, in this window, you can adjust:
Cursor speed – move the slider from slow to fast
Mouse wheel scroll – select Multiple lines at a time
Lines to scroll – as you move the slider, hover on it to see the number to scroll
Scroll inactive windows – to enable, switch the toggle to ON
Refer to the below image:
Adjust the mouse options
When finished, click Adjust mouse & cursor size in the upper right-hand corner. Now, on the window that opens, you can adjust:
Pointer size – change the size from small to large
Pointer color – change the color by clicking the second and fourth tile. A color picker will appear for you to choose a color
Set touch feedback – change touch feedback toggle to ON
See the below image:
Adjust the mouse pointer options
Change the Text Indicator
Next, in the pane on the left, select the Text cursor option. See the following image:
Select the Text cursor option
Now, on the menu that opens, you can adjust:
Text cursor indicator – toggle the switch to ON
Text cursor size – from small to large
Text cursor indicator color – select a color from the tiles
Text cursor thickness – as you move the slider, hover on it to see the number for thickness
When finished, navigate back to the Mouse settings window. In the find a setting box in the upper left-hand corner, type in “mouse” and choose Mouse settings option.
Next, on the window that opens, select Additional mouse options in the upper right-hand corner. Refer to the below image:
Select Additional mouse options
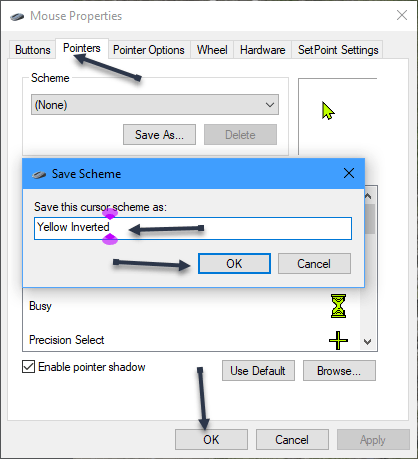
Now, the Mouse Properties window will open. Select the Pointers tab. Then label the Scheme by clicking the drop-down box and type in a name, click OK. When finished, click OK at the bottom. See the below image:
Adjust the Mouse properties
In our example, we have created a Scheme of yellow inverted size three cursor and a blue text indicator with a thickness of three.
Quote For the Day
Yesterday ended last night. Today is a brand-new day.
Zig Ziglar
That’s it. If you ever want to tweak your mouse cursor again, just come back here. Please feel free to share this post! One way to share is via Twitter.
I hope you have found this post helpful. If so, click the Tweet icon below. This will launch Twitter where you click its icon to post the Tweet.
Check out TechSavvy.Life for blog posts on smartphones, PCs, and Macs! You may email us at contact@techsavvy.life for comments or questions.
Please feel free to leave a comment. I would love to hear from you. Do you have a computer or smart device tech question? I will do my best to answer your inquiry. Just send an email to contact@techsavvy.life. Please mention the device, app, and version you are using. To help us out, you can send screenshots of your data related to your question.
Author’s E-book
You can access the e-book from a Kindle device, the Kindle App for the desktop or smartphone, which is a free app.
The author’s Vietnam eBook on the Battle for Tra Bong Vietnam: Events and Aftermath
Have you come across an interesting Facebook page that you think your friends would like? If so, invite your friends to like that page so they all see the page’s content in their news feed.
Have you come across an interesting Facebook page that you think your friends would like? If so, invite your friends to like that page so they all see the page’s content in their news feed. Here’s how to do this on desktop and mobile.
This is for the desktop and mobile using Facebook. Images are from Windows 10 and iPhone XR
Copyright Scott Adams, Inc./Distributed by Universal Uclick for UFS
You can only invite your friends to like a Facebook page. If you want to invite someone who is not your friend, you will have to add them as a friend first. Later, if your friends do not Like a page, they can remove their like from the page to stop seeing the page’s content in their feed.
Invite Friends on Desktop
On a desktop computer, like Windows, Mac, Linux, or Chromebook, use the Facebook website to send out page like invitations.
First, open a web browser on your computer and launch Facebook. On the site, access the page to which you want to invite people.
Once you see the page, in the tab list beneath the page name, click the three dots menu icon (at the far right). Refer to the below image:
Accessing the menu
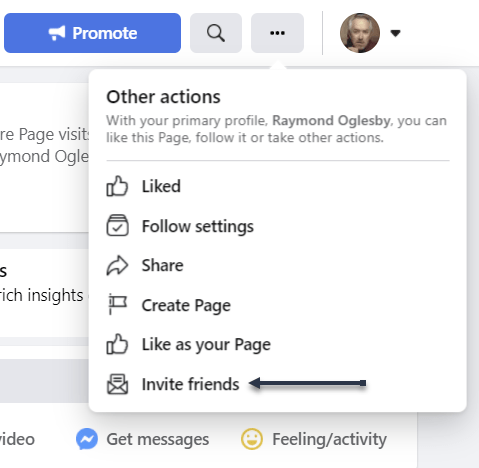
Next, in the menu that opens, click Invite Friends. See the below image:
Selecting Invite Friends option
Now, you will see an Invite Your Friends window, where you will choose your friend(s) to send an invitation to.
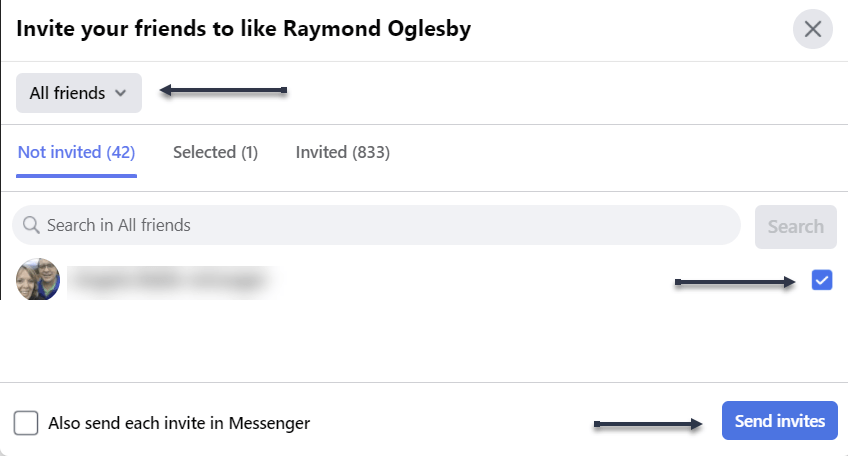
Next, to ensure all your friends are listed, at the top of this window, click the drop-down menu and choose All Friends. Then, from the list that opens, select the people to invite to like the page. In the window’s bottom right-hand corner, click Send Invites. See the following image:
Select your friends and send invites
Tip: To let Facebook also send invites via Messenger, then in the window’s bottom left-hand corner, enable the Also send each invite in Messenger option.
Now, Facebook will send a notification to your selected friends asking them to like your page. They can then either accept or decline your invite for the page Like. Refer to the below image:
Your invites are sent
Invite Friends on Mobile
If you are on an iPhone, iPad, or Android phone, use the Facebook app to send invitations to like a page.
First, launch the Facebook app on your phone. In the app, open the page to which you want to invite people.
Next, on the page screen, beneath the page name, tap the three dots menu icon. See the below image:
Accessing the menu
Now, scroll down and click Invite Friends. See the following image:
Selecting Invite Friends
Next, an Invite Friends screen will open. Here, select the friends you would like to invite. Then, at the bottom, tap Send Invites. Refer to the below image:
Select your friends and send invites
Now, your selected friend(s) will receive an invitation to like your Facebook page. See the below image:
Your invites are sent
And that’s how you let your friends know about pages that exist on Facebook.
Quote For the Day
Positive thinking will let you do everything better than negative thinking will.
Zig Ziglar
You are finished. Please feel free to share this post! One way to share is via Twitter.
Just click the Tweet icon below. This will launch Twitter where you click its icon to post the Tweet.
Check out TechSavvy.Life for blog posts on smartphones, PCs, and Macs! You may email us at contact@techsavvy.life for comments or questions.
Please feel free to leave a comment. I would love to hear from you. Do you have a computer or smart device tech question? I will do my best to answer your inquiry. Just send an email to contact@techsavvy.life. Please mention the device, app, and version you are using. To help us out, you can send screenshots of your data related to your question.
Author’s E-book
You can access the e-book from a Kindle device, the Kindle App for the desktop or smartphone, which is a free app.
The author’s Vietnam eBook on the Battle for Tra Bong Vietnam: Events and Aftermath
In four major browsers; Chrome, Edge, Firefox, and Safari; on Windows, Mac, and Linux, you can easily drag and drop a shortcut link to a website straight to your desktop.
In four major browsers; Chrome, Edge, Firefox, and Safari; on Windows, Mac, and Linux, you can easily drag and drop a shortcut link to a website straight to your desktop. Let’s see how easily this is done.
This is for PCs, Macs, and web browsers. Screenshots are from Windows 10
Copyright Scott Adams, Inc./Distributed by Universal Uclick for UFS
Create Shortcut Using Chrome, Edge, and Firefox
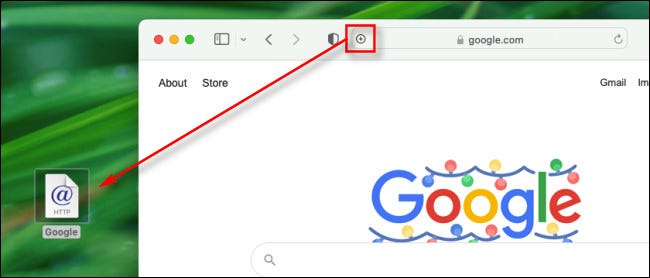
To create a desktop web shortcut, first open a Chrome, Edge, or Firefox browser window and navigate to the site you want to create a shortcut from. In the address bar at the top of the window, click and drag the Padlock icon (located to the left of the address) out of the browser window, or drag and drop the URL address onto your desktop. Refer to the below image:
Drag to create a shortcut on the desktop
Next, as soon as you click and drag, you will see the title or address of the website besides your pointer. When you are hovering over the desktop, release your mouse button, and a shortcut icon will be created. To use the shortcut, double-click it at any time, and the site will open in your default browser.
This shortcut does not have to stay on your desktop either; you can move it to any folder on your PC.
Create Shortcut Using Safari on Mac
To make a desktop web shortcut on a Mac, first, open a Safari browser window and navigate to the site you want to create a shortcut to.
Next, in that window, hover your mouse cursor over the address bar at the top of the window, and a small Plus (“+”) icon will appear on the far left side. Click and drag the Plus icon onto your desktop and release your mouse or trackpad button. A shortcut icon will appear. See the below image:
Drag to create a shortcut on Mac
Now, you can double-click the shortcut icon, and your default browser app will open and automatically load the website stored in the link.
By the way, this is not the only drag-and-drop trick you can do with browsers. Most browsers also allow you to drag tabs between open windows of the same browser.
Please feel free to leave a comment. I would love to hear from you. Do you have a computer or smart device tech question? I will do my best to answer your inquiry. Just send an email to contact@techsavvy.life. Please mention the device, app, and version you are using. To help us out, you can send screenshots of your data related to your question.
Author’s E-book
You can access the e-book from a Kindle device, the Kindle App for the desktop or smartphone, which is a free app.
The author’s Vietnam eBook on the Battle for Tra Bong Vietnam: Events and Aftermath
Your LinkedIn profile‘s web address (URL) is customizable, which means you can set it to whatever you want. Let’s see how to change your profile URL on LinkedIn on a desktop and mobile.
This is for devices using LinkedIn. Screenshots are from Windows 10 and iPhone XR
Copyright Scott Adams, Inc./Distributed by Universal Uclick for UFS
When you change your URL, it will always start with the following:
www.linkedin.com/in/
After the in/is where your custom URL will appear. The new URL must have a minimum of 3 and a maximum of 300 characters. You can not use spaces, symbols, or special characters in your URL.
You will likely want to change it to your name in some fashion. Keep in mind, though, that your profile URL is not case-sensitive, which means both “RaymondOglesby” and “raymondoglesby” are the same.
While changing the URL, also keep in mind that you can only do this five times in a six months period.
Change on the Desktop
On a Windows, Mac, Linux, or Chromebook computer, use the LinkedIn site to customize your profile URL.
First, launch a web browser on your computer and open LinkedIn. Sign in to your account, if not already.
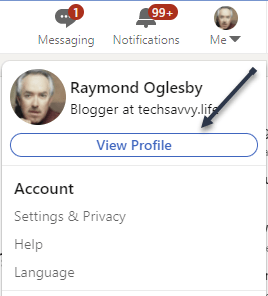
Next, in LinkedIn’s top right-hand corner, click:
Me > View Profile
Refer to the below image:
Accessing View Profile
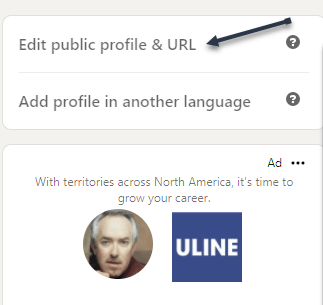
Now, on the right sidebar, at the top, click Edit public profile & URL. See the below image:
Accessing your Profile URL
Next, at the top of the right sidebar, in the Edit your custom URL section, click Edit (the pencil icon). See the following image:
Edit your Profile URL
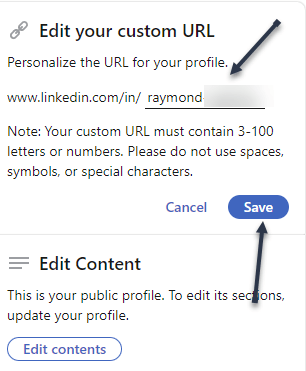
Your profile URL is now editable. Next, clear the existing URL, type in a new URL of your choice, then click Save. Refer to the below image:
Changing your Profile URL and Save
And your LinkedIn profile URL has been successfully changed. Compared to changing your profile URL on a mobile device, this method is much easier. People will now need to use the new URL to access your profile. Be sure to update your other social media with your new link.
If you would like to revert back to the previous URL, you can do so using the above steps.
Change on Mobile
On your iPhone, iPad, or Android phone, use the LinkedIn app to change your Linkedin web address.
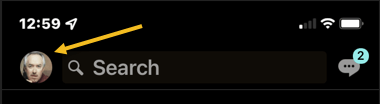
First, launch the LinkedIn app on your phone. In the app’s top left-hand corner, tap your profile icon. See the below image:
Accessing your Profile icon
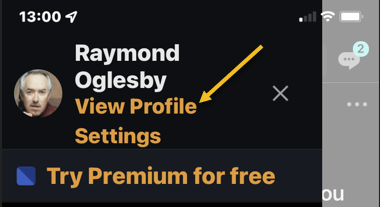
Next, in the menu that opens, at the top, tap View Profile. See the following image:
Accessing View Profile
Now, your profile page will open. Next to your profile image, tap the Edit (the pencil icon). Refer to the below image:
Accessing Edit
Next, your profile page will open. Scroll down the page to the Contact info section, then tap Edit contact info. See the below image:
Accessing Edit contact info link
Now, in the Edit contact info section, tap your current profile URL. See the following image:
Accessing your current Profile link
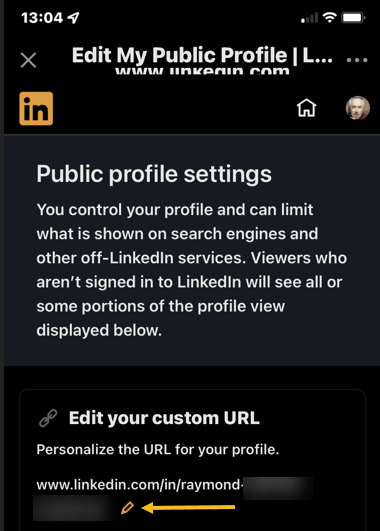
Next, in the Edit My Public Profile section, tap the Edit (the pencil icon) below Edit your custom URL
Accessing to Edit your Profile URL
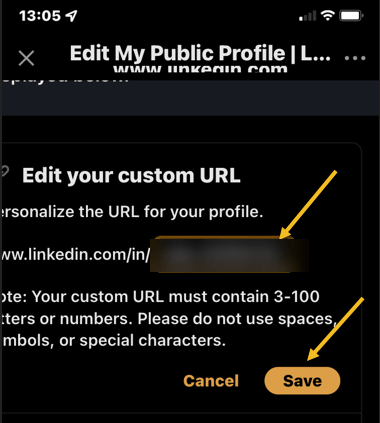
Your profile URL is now editable. Now, clear the existing URL, type in a new URL of your choice, then click Save. Refer to the below image:
Changing your Profile URL and Save
And that’s all. Your LinkedIn profile URL is now changed.
Quote For the Day
Move fast and break things. Unless you are breaking stuff, you are not moving fast enough.
Mark Zuckerberg
That’s it. Please feel free to share this post! One way to share is via Twitter.
Just click the Tweet icon below. This will launch Twitter where you click its icon to post the Tweet.
Check out TechSavvy.Life for blog posts on smartphones, PCs, and Macs! You may email us at contact@techsavvy.life for comments or questions.
Please feel free to leave a comment. I would love to hear from you. Do you have a computer or smart device tech question? I will do my best to answer your inquiry. Just send an email to contact@techsavvy.life. Please mention the device, app, and version you are using. To help us out, you can send screenshots of your data related to your question.
Author’s E-book
You can access the e-book from a Kindle device, the Kindle App for the desktop or smartphone, which is a free app.
The author’s Vietnam eBook on the Battle for Tra Bong Vietnam: Events and Aftermath
Google Search’s Dark Theme looks great, but it’s not for everyone. If you would prefer performing your searches on a light theme, here’s how to turn off/on Dark Theme on Google Search on desktop and mobile.
Google Search’s Dark Theme looks great, but it’s not for everyone. If you would prefer performing your searches on a light theme, here’s how to turn off/on Dark Theme on Google Search on desktop and mobile.
This is for devices using Google Search. Screenshots are from Windows 10 and iPhone XR
Copyright Scott Adams, Inc./Distributed by Universal Uclick for UFS
Turn Off on Desktop
To disable Google Search’s Dark theme on your Windows, Mac, Linux, or Chromebook computer, first, launch your web browser and access the Google site.
Next, in the bottom-right-hand corner of the Google site, click Settings. Refer to the below image:
Accessing Settings
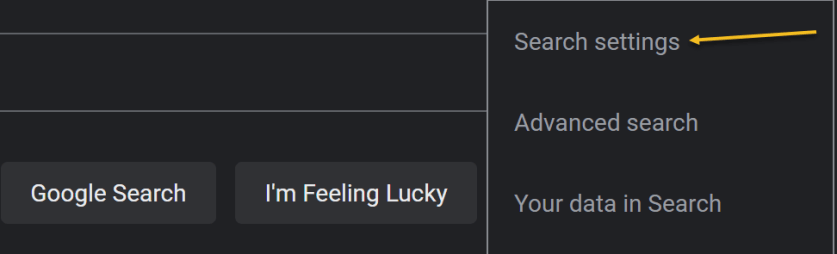
Now, in the menu that opens, select Search Settings. See the below image:
Selecting Search settings option
Next, on the Search Settings page, in the left sidebar, click Appearance. See the following image:
Selecting Appearance option
Now, in the Appearance section on the right, enable the Light theme option. This disables the Dark theme and enables the Light theme. Simply do the opposite to re-enable the Dark theme.
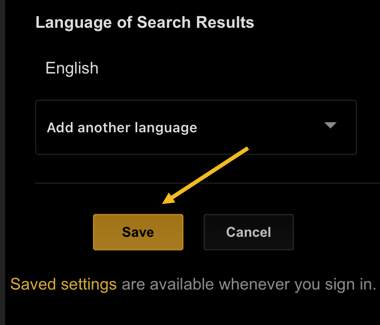
Next, to save your settings, at the bottom of the Appearance section, click Save. Refer to the below image:
Save your change
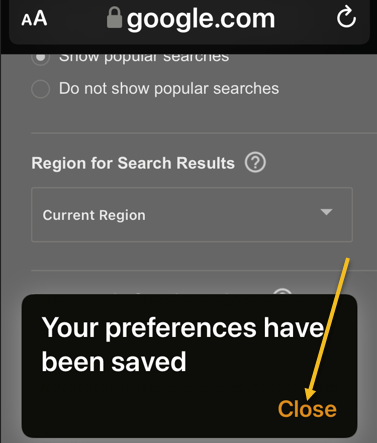
Now, you will see a Your preferences have been saved prompt. Click OK. See the below image:
Confirm your change
Next, your Google Search will be displayed in the Light theme. See the following image:
Your Light theme
Turn Off on Mobile
To deactivate Dark theme on Google Search on your iPhone, iPad, or Android phone, first, launch your web browser and open the Google site.
Next, in Google’s top left-hand corner, tap the Hamburger menu (the three horizontal lines). Refer to the below image:
Selecting the menu
Next, from the menu that opens, select Settings. See the below image:
Accessing Settings
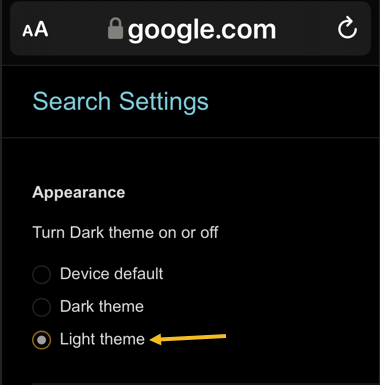
Now, on the Search Settings page, in the Appearance section, enable the Light theme option. See the following image:
Selecting Light theme
Now, to save your changes, scroll the Search Settings page to the bottom. and tap Save. Refer to the below image:
Save your change
Next, in the Your preferences have been saved prompt, tap Close. See the below image:
Close the dialog
And your favorite search engine is now back to Light theme. Simply do the opposite to re-enable the Dark theme.
Now, your Google Search will be displayed in the Light theme. See the following image:
Your Light theme
Quote For the Day
When you combine ignorance and leverage, you get some pretty interesting results.
Warren Buffett
You are finished. Please feel free to share this post! One way to share is via Twitter.
Just click the Tweet icon below. This will launch Twitter where you click its icon to post the Tweet.
Check out TechSavvy.Life for blog posts on smartphones, PCs, and Macs! You may email us at contact@techsavvy.life for comments or questions.
Please feel free to leave a comment. I would love to hear from you. Do you have a computer or smart device tech question? I will do my best to answer your inquiry. Just send an email to contact@techsavvy.life. Please mention the device, app, and version you are using. To help us out, you can send screenshots of your data related to your question.
Author’s E-book
You can access the e-book from a Kindle device, the Kindle App for the desktop or smartphone, which is a free app.
The author’s Vietnam eBook on the Battle for Tra Bong Vietnam: Events and Aftermath
If you want even more flair with your Microsoft Word drop cap letters, why not take advantage of the Microsoft online images. Let’s explore how this is done.
This is for devices using Microsoft Word
Copyright Scott Adams, Inc./Distributed by Universal Uclick for UFS
First, open Word and click where you want a drop cap letter to appear and navigate to
Insert | Pictures | Online Pictures
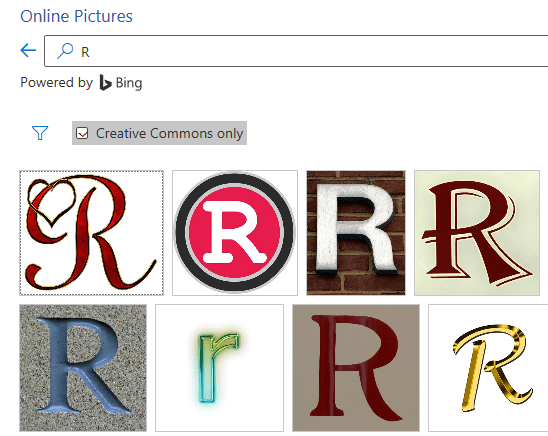
Next, you will see the Online Pictures box. Search for the letter you want to use (e.g. type “R” into the Search for box and hit Enter). Simply select your image and click Insert. Refer to the below image:
The letter “R” Drop Caps
The letter may appear very large or very small within your document, so resize it if necessary.
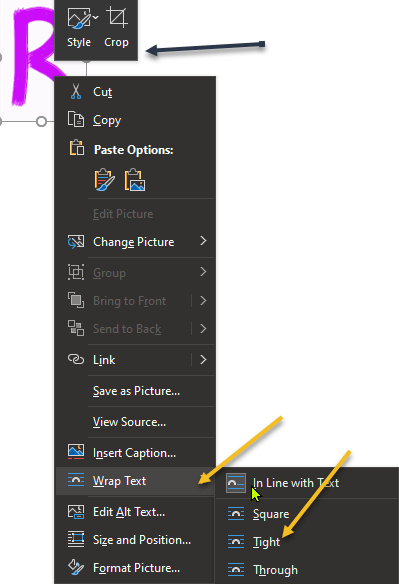
Now, right-click the image of your letter to format it. For example, Crop the image slightly, setting Wrap Text to ‘tight’ or ‘square’. See the below image:
Selecting omg options for the Drop Cap
Next, you will see your drop cap in your Word document. See the following image:
Your finished Drop Cap
Quote For the Day
The key is not to prioritize what’s on your schedule, but to schedule your priorities.
Stephen Covey
That was easy. Please feel free to share this post! One way to share is via Twitter.
Just click the Tweet icon below. This will launch Twitter where you click its icon to post the Tweet.
Check out TechSavvy.Life for blog posts on smartphones, PCs, and Macs! You may email us at contact@techsavvy.life for comments or questions.
Please feel free to leave a comment. I would love to hear from you. Do you have a computer or smart device tech question? I will do my best to answer your inquiry. Just send an email to contact@techsavvy.life. Please mention the device, app, and version you are using. To help us out, you can send screenshots of your data related to your question.
The author’s Vietnam eBook on the Battle for Tra Bong Vietnam: Events and Aftermath
Got a JPG/PNG image file you need to convert to PDF? You can use Windows 10 or 11’s built-in PDF Printer to make a PDF out of your JPG/PNG images.
Got a JPG/PNG image file you need to convert to PDF? You can use Windows 10 or 11’s built-in PDF Printer to make a PDF out of your JPG/PNG images. Let’s explore this nifty feature.
This is for devices running Windows 10 or 11
Copyright Scott Adams, Inc./Distributed by Universal Uclick for UFS
How the Conversion Works
Both Windows 10 and 11 have a virtual PDF Printer. When you print something from an app with this printer, the printer turns that file into a PDF file. You can then save the resulting PDF file anywhere on your computer.
You will use this virtual printer to turn your JPG/PNG image into a PDF file. After saving it, you can email it, upload it to the cloud, or print a physical copy.
Convert the Image
The steps to convert JPG/PNG to PDF on both Windows 10 and 11 are pretty much the same.
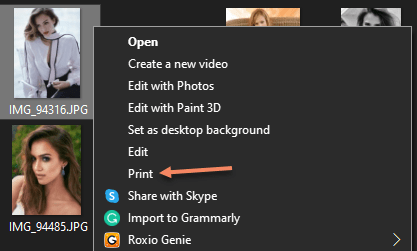
First, open the folder where your JPG/PNG image is in a File Explorer window. If you are on Windows 10, right-click the image and select Print. If you are on Windows 11, right-click the image and choose
Show More Options > Print.
Refer to the below image:
Selecting the Print option
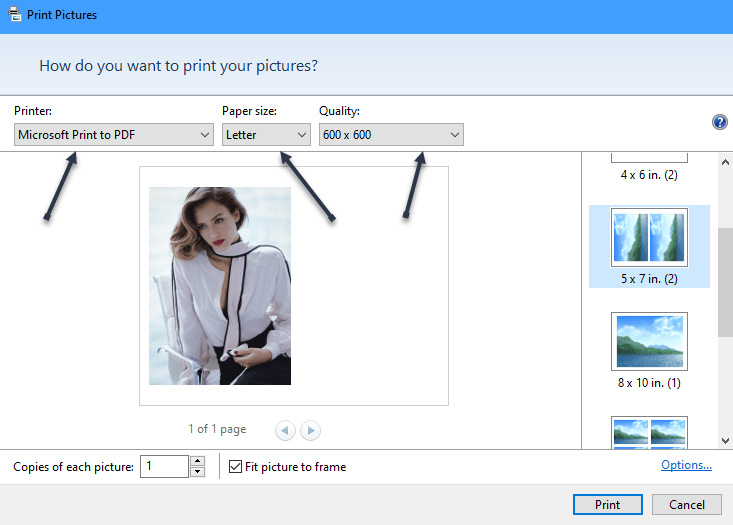
Next, a Print Pictures window will open. In this window, select the virtual PDF Printer by clicking the Printer drop-down menu and choosing Microsoft Print to PDF. Specify the paper size by clicking the Paper Size drop-down menu and selecting an option. To change the quality of the output PDF file, click the Quality drop-down menu and select an option. See the below image:
Setting the Print Pictures options
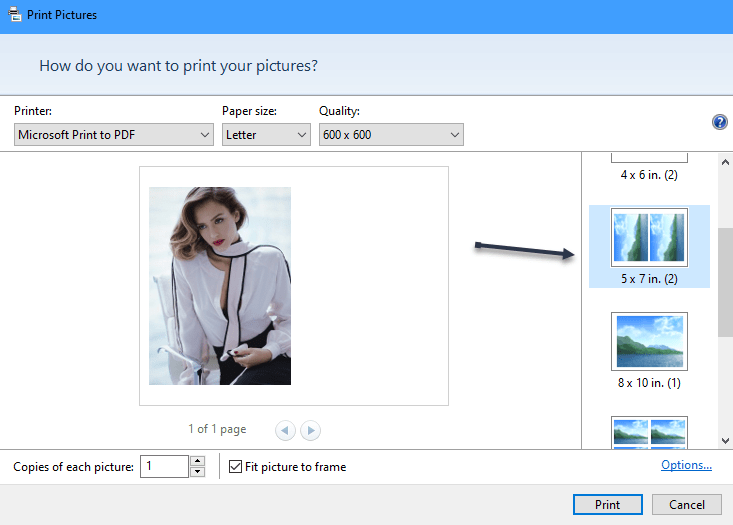
Now, on the Print Pictures window’s right sidebar, you have options to change how your JPG/PNG image appears in the PDF. Click an option in this sidebar to view its preview on the left. See the following image:
Selecting the Layout
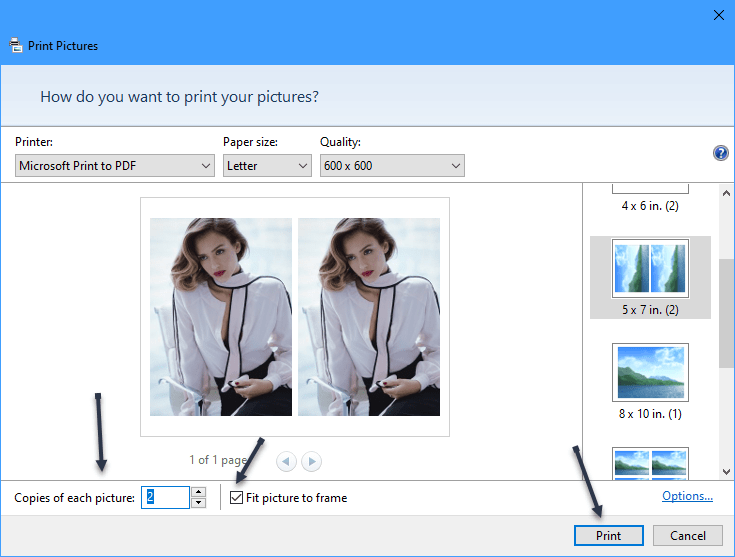
Next, at the bottom of the window, specify how many pages you want in your PDF using the Copies of Each option. To make your photo fit the PDF, enable the Fit Picture to Frame option. Click Print to start making your PDF file. Refer to the below image:
Selecting other p[topms
Now, Windows will open a Save Print Output As window. Here, select the folder to save your PDF file. Click the File name field and type a name for your PDF. Then click Save. See the below image:
Selecting a location and file name
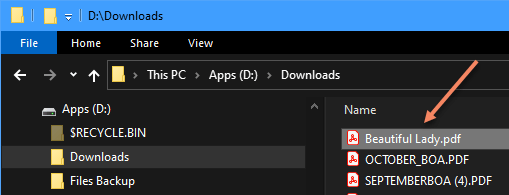
Next, to access your newly created PDF, open the folder where you saved it, and you will see the PDF version of your JPG/PNG image there, ending in “.pdf”. See the following image:
Locating your saved PDF file
Now, click or double-click the file to open. Refer to the below image for our final PDF file of Beautiful Lady:
Your PDF file
That’s all there is to converting JPG/PNG to PDF using the built-in option on Windows 10 and 11.
Quote For the Day
Listen with your eyes for feelings.
Stephen Covey
That’s it. Please feel free to share this post! One way to share is via Twitter.
Just click the Tweet icon below. This will launch Twitter where you click its icon to post the Tweet.
Check out TechSavvy.Life for blog posts on smartphones, PCs, and Macs! You may email us at contact@techsavvy.life for comments or questions.
Please feel free to leave a comment. I would love to hear from you. Do you have a computer or smart device tech question? I will do my best to answer your inquiry. Just send an email to contact@techsavvy.life. Please mention the device, app, and version you are using. To help us out, you can send screenshots of your data related to your question.
The author’s Vietnam eBook on the Battle for Tra Bong Vietnam: Events and Aftermath
Want to change your cover image or add one to your Twitter account? If you have not inserted an image, you will see a blue blank area at top of your account.
Want to change your cover image or add one to your Twitter account? If you have not inserted an image, you will see a blue blank area at top of your account. Let’s explore how to add a cover image.
This is for devices using Twitter. Screenshots are from iPhone XR.
Copyright Scott Adams, Inc./Distributed by Universal Uclick for UFS
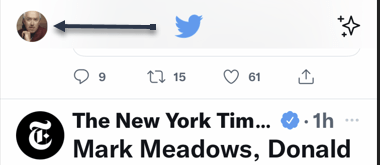
First, log in to Twitter, if not already logged in, and open Twitter. Here, tap your Profile icon. Refer to the below image:
Selecting your Profile icon
Next, in the pop-up window that opens, tap on Profile. See the below image:
Selecting the Profile option
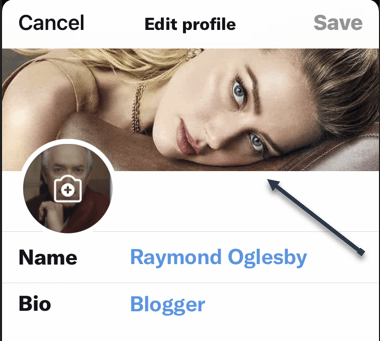
Now, in the upper right-hand corner, tap the Edit profile link. See the following image:
Selecting Edit Profile link
Next, tap on the top of your screen or on an existing image to open your Photos. (On the desktop, click the Camera icon in the image area). Depending on your Twitter settings, you may not see any images. If so, tap on Manage to change your settings or the plus “+” sign to open your photos. Refer to the below image:
Selected image from Photos
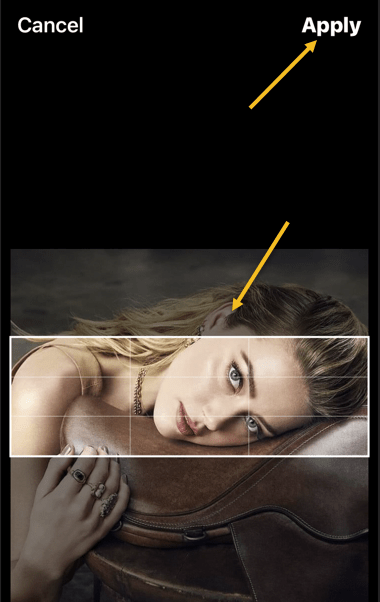
Now, position your image to your liking. Then in the upper right-hand corner, tap Apply. See the below image:
Position your image and Apply
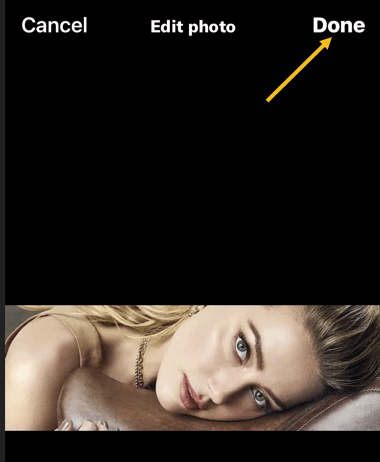
Next, in the upper right-hand corner, tap Done. See the following image:
Finish your change
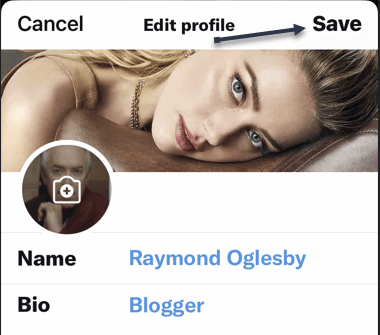
Now, tap Save in the upper right-hand corner. Refer to the below image:
Save your change
Instantly, your saved image is now your cover photo. See the below image:
Your finished image
Quote For the Day
We become what we repeatedly do.
Stephen Covey
That’s it. Please feel free to share this post! One way to share is via Twitter.
Just click the Tweet icon below. This will launch Twitter where you click its icon to post the Tweet.
Checkout TechSavvy.Life for blog posts on smartphones, PCs, and Macs! You may email us at contact@techsavvy.life for comments or questions.
Please feel free to leave a comment. I would love to hear from you. Do you have a computer or smart device tech question? I will do my best to answer your inquiry. Just send an email to contact@techsavvy.life. Please mention the device, app, and version you are using. To help us out, you can send screenshots of your data related to your question.
The author’s Vietnam eBook on the Battle for Tra Bong Vietnam: Events and Aftermath
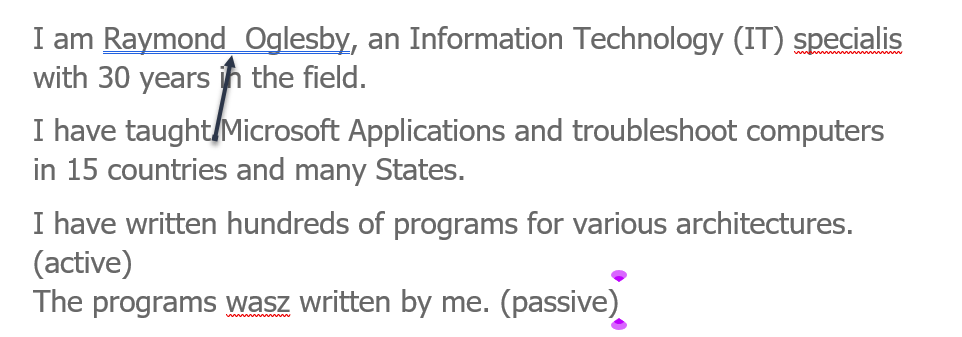
You may already be familiar with Microsoft Word’s built-in spelling and grammar checker, flagging incorrect spelling, and (sometimes) bad grammar. If you are reviewing a document that’s riddled with errors, you can use these keyboard shortcuts to speed up the process.
RAYMOND OGLESBY @RaymondOglesby2 January 20, 2022 Updated: January 21, 2022
You may already be familiar with Microsoft Word’s built-in spelling and grammar checker, flagging incorrect spelling, and (sometimes) bad grammar. If you are reviewing a document that’s riddled with errors, you can use these keyboard shortcuts to speed up the process. Let’s explore using these shortcuts.
This is for devices using Microsoft Word
Copyright Scott Adams, Inc./Distributed by Universal Uclick for UFS
What the Checker Can and Can Not Do
Word’s spelling and grammar checker is enabled by default. When a word is misspelled, Word flags it with a wavy, red underline. When there’s incorrect grammar or formatting, Word flags it with two blue underlines. Refer to the below image:
Spelling and Grammar example
In the above example, Word detected two spaces between “Raymond” and “Oglesby,” so it flagged it as a grammar issue. It also detected “specialist” was misspelled as “specialis,” so it flagged that as a spelling error.
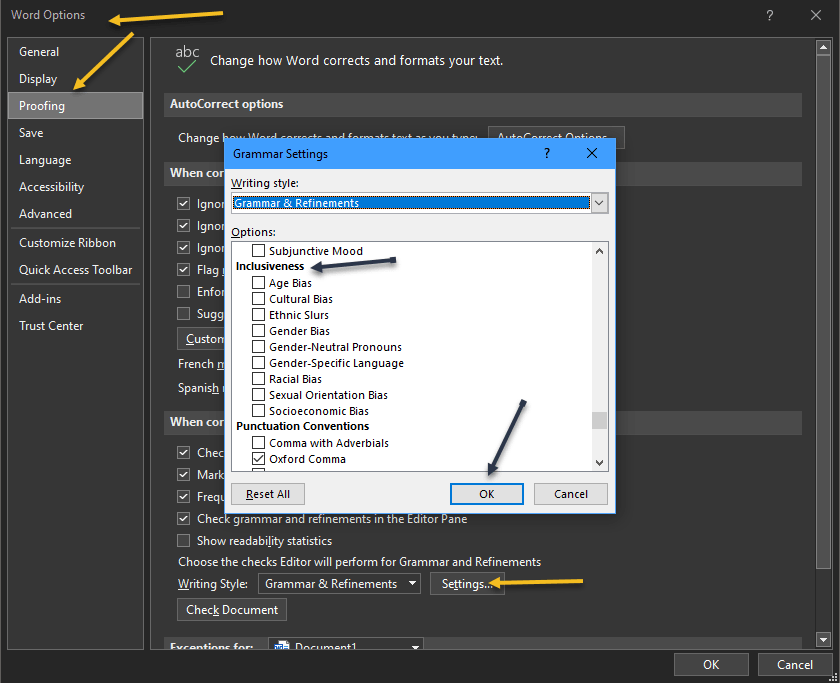
These are the basics that Word checks for by default. However, you can make Word’s spelling and grammar checker work harder by enabling some additional features in its Settings menu. Head to:
File > Options > Proofing > Settings
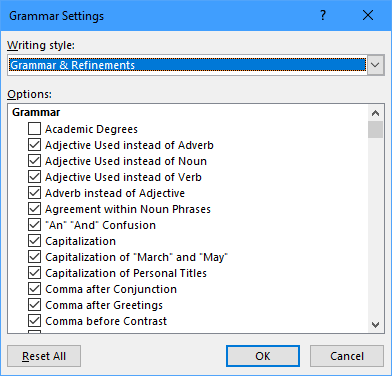
For example, you can have Word check for passive voice, split infinitives, superfluous expressions, and so on. See the below image:
Grammar Settings
If you scroll down, you can check for more grammar options, such as Inclusiveness:
More Grammar settings
You can also do things like, exclude specific words from the checker, check for inclusive language, ignore URLs, and much more.
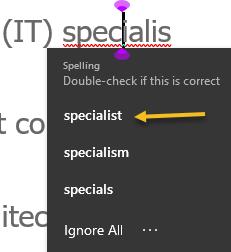
So what can Word’s spelling and grammar checker not do? As comprehensive as it may seem, it often fails when it comes to noticing the incorrect usage of a properly spelled word. For example, “troubleshoot.” See the following image:
Grammar error
In this case, Word failed to catch the incorrect usage of “troubleshoot,” it should be “troubleshot.” That said, you can count on Word to detect a lot of issues in a document, but you can not rely on it 100%. As a matter of good practice, always re-review your document before sending it out.
Using the Keyboard Shortcut
In Word, you can use the Alt+F7 shortcut to jump straight to the first error behind where the cursor currently is in the document. So, if you want to start with the first error, you will need to place your cursor at the beginning of the document, or in front of the first error. Refer to the below image:
Spelling error
When you press Alt+F7, Word highlights the spelling or grammar error and gives you the option to either correct or ignore the issue. Press the up or down arrow keys to highlight the desired option, and then press Enter to select it.
Note! you can only highlight spelling and grammar suggestions with your arrow keys. If you want to ignore the suggestion, you must click that option with your mouse. See the below image:
Highlight the Spelling error
Spelling errors generally have more suggested corrections to choose from. See the following image:
Correction for the Spelling error
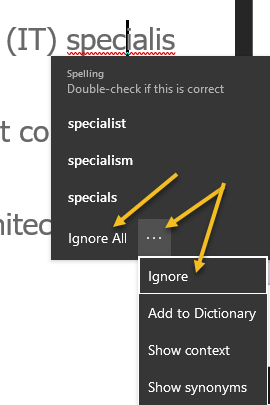
You can also ignore the spelling error, just as you would with the grammar error. The only difference is, with spelling, you can choose to:
Ignore every instance of that same error
Ignore just the specific error (even if it also exists elsewhere in the document)
Refer to the below image:
Ignore the Spelling error
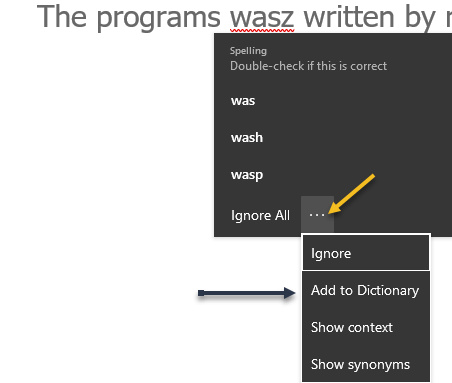
In addition, you can also add that word to the dictionary. When you do this, Word will no longer flag the word as an error. This is useful if the word happens to be a part of an in-house style guide or something similar.
Click the three dots to the right of Ignore All and then click Add to Dictionary from the drop-down menu. See the below image:
Add to the Dictionary
When you are ready to move on to the next error, just press Alt+F7 again. Continue doing this until all of the issues within the document have been checked.
Word’s grammar and spell checker is very useful for reviewing the content within a document, but it can be quite distracting when it’s throwing back errors while you are writing. If it’s too distracting for you, you can turn it off as you type.
Quote For the Day
Synergy is what happens when one plus one equals ten or a hundred or even a thousand! It’s the profound result when two or more respectful human beings determine to go beyond their preconceived ideas to meet a great challenge.
Stephen Covey
That’s it. Please feel free to share this post! One way to share is via Twitter.
Just click the Tweet icon below. This will launch Twitter where you click its icon to post the Tweet.
Check out TechSavvy.Life blog posts for smartphones, PCs, and Macs! You may emails us at contact@techsavvy.life for comments or questions.
Please feel free to leave a comment. I would love to hear from you. Do you have a computer or smart device tech question? I will do my best to answer your inquiry. Just send an email to contact@techsavvy.life. Please mention the device, app, and version you are using. To help us out, you can send screenshots of your data related to your question.
Author’s E-book
You can access the e-book from a Kindle device, the Kindle App for the desktop or smartphone, which is a free app.
The author’s Vietnam eBook on the Battle for Tra Bong Vietnam: Events and Aftermath