A cybersecurity firm has identified 17 malicious browser extensions, including “Google Translate in Right Click,” which collectively garnered over 840,000 downloads. Mozilla and Microsoft have removed these from their stores, but users must uninstall them manually. The extensions pose risks across several popular web browsers.
RAYMOND OGLESBY @RaymondOglesby2 February 17, 2026 –3 minutes read time
Overview
The most popular malicious extension, dubbed Google Translate in Right Click, was downloaded more than 500,000 times from app stores. Another, Translate Selected Text with Google, racked up almost 160,000 downloads.
If you have been using browser extensions to download YouTube videos or images from Pinterest, translate text in real time, check Amazon price histories, or even enhance colors, you might have some uninstalling to do.
Cybersecurity firm LayerX has uncovered 17 malicious browser extensions that were downloaded more than 840,000 times in total, with some remaining active in the wild for up to five years. Instances were recorded across Firefox, Google Chrome, and Microsoft Edge browsers.
Mozilla and Microsoft have removed all of the extensions from their official stores at the time of writing. However, if you have already installed one, you will need to uninstall it manually.
Extensions to Remove
Here is the list of extensions you should remove:
Google Translate in Right Click
Translate Selected Text with Google
One Key Translate
Translate Selected Text with Right Click
Cool Cursor
Screenshot Clipper
Ads Block Ultimate
Convert Everything
Amazon Price History
RSS Feed
Color Enhancer
Floating Player – PiP Mode
YouTube Download
, Instagram Downloader
Save Image to Pinterest on Right Click
Full Page Screenshot
Youtube Download
Removing Chrome Extensions
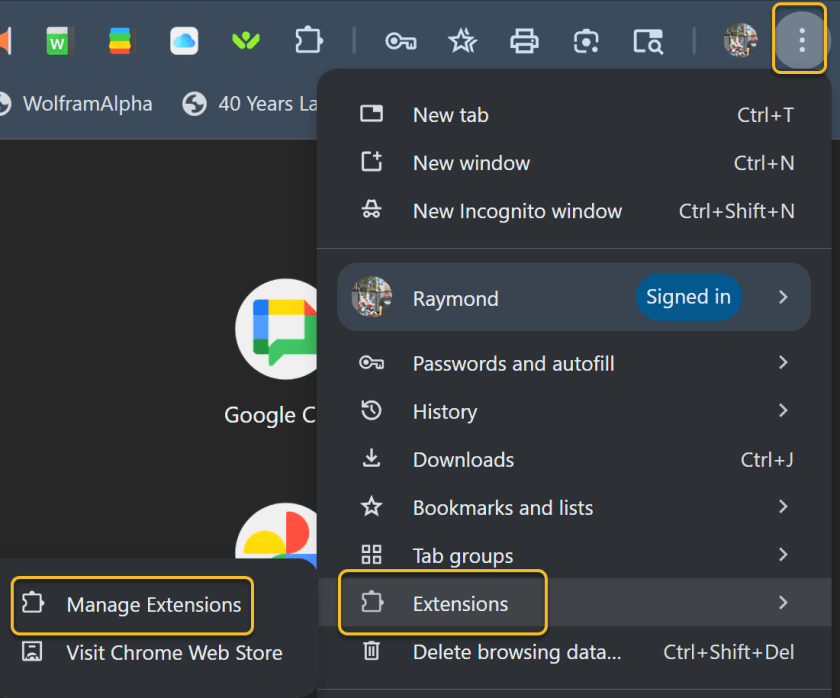
If you want to view all your extensions in Chrome, click the three-dot icon in the upper right, move to More tools, and select Extensions. Alternatively, click the Extensions button on the toolbar and select Manage extensions. This will take you to a page where you can manage all your installed extensions. Refer to the image below:
Accessing Manage Extensions option
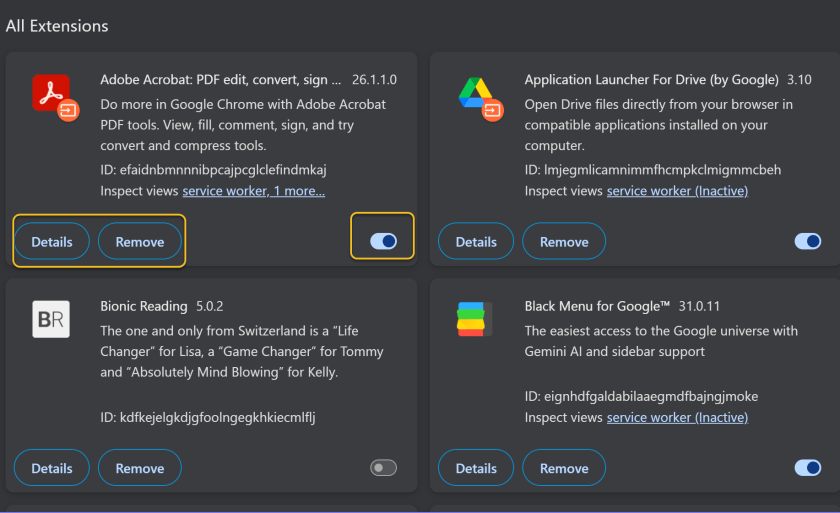
You can click Details to view information on a specific extension. If you turn off an extension switch, this will temporarily disable it. Otherwise, click Remove to uninstall the extension completely. See the image below:
Disable, Remove, or view Details for an Extension
Disclaimer
Technology is constantly evolving, and smartphone and desktop tech rarely remains static. Therefore, the information in this post is only accurate as of the date it was written. Blog posts that are older than six months may contain instructions that are no longer compatible with your device or operating system. We hope that the content from previous posts continues to function as intended. Thank you for reading TechSavvy.Life, where technology works for you.
Quote For the Day
Technology is a gift of God. After the gift of life it is perhaps the greatest of God’s gifts. It is the motherof civilizations, of arts and of sciences.
– Freeman Dyson
(X) Twitter Info
That’s it. Please feel free to share this post! One way to share is via Twitter.
Just click the Tweet icon below. This will launch Twitter where you click its icon to post the Tweet.
Checkout TechSavvy.Life for blog posts on smartphones, PCs, and Macs! You may email us at contact@techsavvy.life for comments or questions.
We value your feedback! Was this post helpful? Please share your comments with us. If you have a tech question related to your computer or smart device, feel free to reach out. Just send an email to contact@techsavvy.life, and be sure to include the device, app, and version you are using. To assist us further, you can also attach screenshots related to your inquiry.
The author’s Vietnam eBook, “Battle for Tra Bong Vietnam: Events and Aftermath,” can be accessed on a Kindle device or the Kindle App for a desktop, laptop, or smartphone. The apps are free.
The author’s Vietnam eBook on the Battle for Tra Bong Vietnam: Events and Aftermath
The article discusses the resurgence of National Public Data, a site previously infamous for leaking millions of Social Security numbers. It offers users the ability to search personal information and opt out of data display. Caution is advised regarding online privacy, as data security on the web remains a significant concern.
RAYMOND OGLESBY @RaymondOglesby2 September 2, 2025 – 8 minutes read time
Note! Although we recommend you use this tip, we are NOT responsible for what happens to your data. Also, remember there is no such thing as “privacy” on the web. If major USA companies get hacked, so will you. But this tip will help protect your data.
Overview
National Public Data is back with new owners, joining the ranks of other creepy, people-finding services. The website, infamous for its role in leaking millions of Social Security numbers in 2024, has returned with the ability to look up anyone’s personal information.
The site shut down in December amid a wave of lawsuits against parent company Jericho Picturesafter a breach exposed an estimated 272 million unique SSNs and 600 million phone numbers. Since then, the site has been relatively dormant. But recently, we spotted it springing back to life with a new interface.
It looks like the domain has changed hands:. In a page about last year’s breach, the site’s new owners write: “Important Notice: Jericho Pictures, Inc., the Florida company that suffered a major data breach in 2024, no longer operates this site. We have zero affiliation with them. We are keeping this page, originally posted by Jericho Pictures, Inc., intact so its history remains traceable.”
Why You Will Like This Tip
Protect your privacy from others or companies
View and/or remove your personal data from pubic searches
Be in control of your data
System Requirements
This tip was performed on a Dell XPS desktop running Windows 11 Pro. Screenshots are from the latest update for the Google Chrome browser.
Your Profile On National Public Data Website
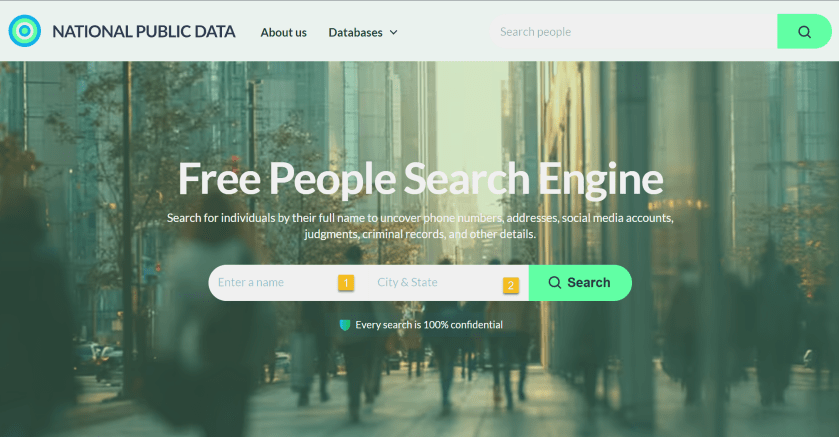
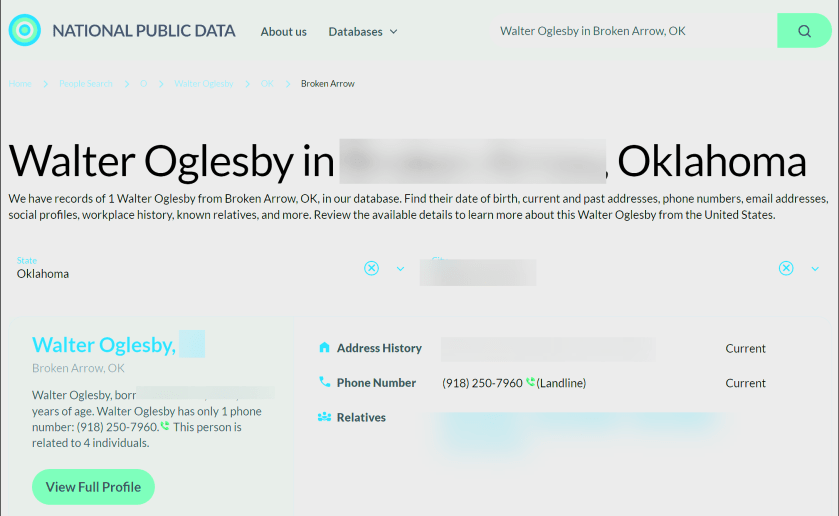
First, it’s relatively easy to look up anybody’s information using their website. Click here to access their interface. Refer to the image below:
National Public Data website
The site does not explain who the new owners are, but a domain lookup shows that it’s registered to Florida-based “Perfect Privacy,” (what an oxymoron), a brand name associated with a VPN service. However, Perfect Privacy VPN has no affiliation with National Public Data.
The new site functions as a “free people search engine,” which might alarm the public since National Public Data housed a huge trove of sensitive data on Americans.
It is unclear where the site is getting its data. But the new National Public Data says: “We collect the data you find on our people search engine from publicly available sources, including federal, state, and local government agencies, social media pages, property ownership databases, and other reliable platforms. After the data is in our hands, we verify and filter it to make sure it is indeed accurate and up-to-date.”
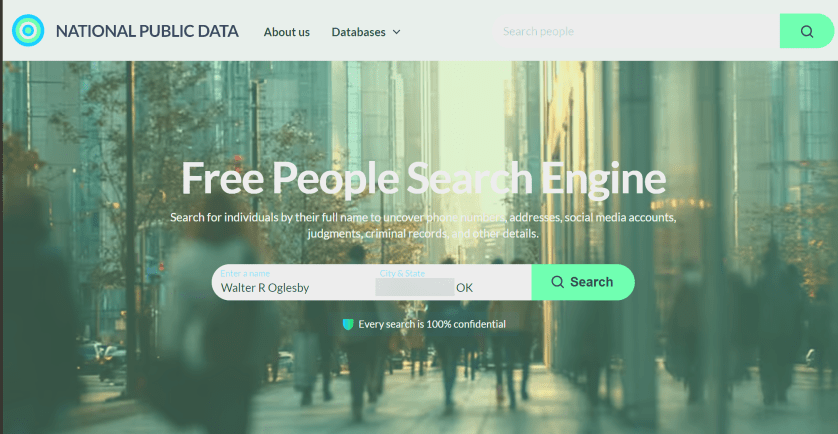
Next, key in your full name, City/State. Both fields are autofill. As you enter the information, it pops up with matching criteria. Then tap the Search button. The search is extremely FAST. I tried both of my names and got the same results.
My wife used the site in her genealogy research to find a distant cousin’s phone number and contacted him. See the image below:
Enter your data
Now, your basic profile information will be displayed. We have redacted specific fields for privacy. We noted that the basic profile information was correct except for the landline phone number, which we no longer have. When I clicked on my relatives, the data was incorrect. To view more information, click the View Full Profile button. See the following image for basic details about myself:
Your basic profile data
Still, what makes the site disturbing is how you can freely look up people’s data, including neighbors, and sometimes find accurate addresses, phone numbers, and dates of birth, along with a person’s relatives. None of the data is behind a paywall. That said, the new site is not much different from other people-finding services, which serve up similar data for free.
The new National Public Data adds: “On our people search website, you can find pretty much anything you need, from someone’s contact info, location, age, and birthday to workplace, relatives, and criminal records. No need to sift through different web pages.” It does not reveal your SSN.
Next, the data it reveals is a lot. Refer to the image below about the data it finds:
Listing of what the website searches
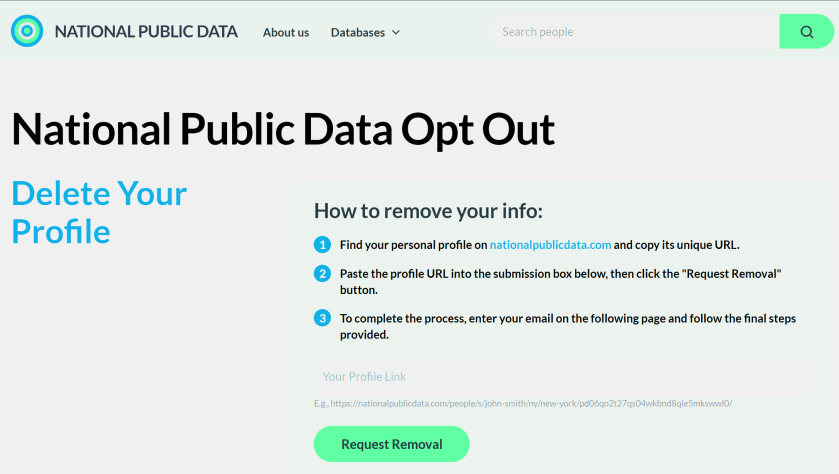
Opt-Out From National Piblic Data Site
Now, the new National Public Data site has an opt-out form to delete your profile data. However, many users are likely unaware of such an option, enabling these types of sites to continue trafficking their information. See the image below:
Opt-Out form
Remember, proactively managing your online privacy and staying informed about potential data breaches are crucial steps in protecting your personal information.
Drop the URL into the Your Profile Link field and click Request Removal
Enter an email address, and the site will send you a message and ask you to click to confirm deletion. You need a separate email address for each profile you want to delete.
We tried the opt-out function, and the site appears to remove our data immediately. Some commenters say they have not received the confirmation email. Check your Spam folder and make sure you are dropping the full URL for your profile into the Link box, not just the search results page.
Atlas Privacy Website
Sites such asAtlas Privacy have emerged to help people remove their data from the open web and people-finding services. Note: we did not try their service.
Atlas Privacy focuses on removing your personal information from data broker websites and other online sources, NOT your own website. They help you regain control of your data by removing it from places where it’s being collected and shared without your consent.
They scan over 150 sites to remove your information and help protect your privacy by removing your name, age, address, phone number, and other personal details from these sources. Atlas Privacy does not have its own list of websites it searches, but rather, it targets specific data brokers and people finder sites.
Unlike the National Public Data, you must create an account to use their service. There are both free and paid services.
After you have removed your data, recheck to see if it’s actually deleted!
Note! Remember you are responsible for your own data. Acting proactivity by removing your data allows you to be in control.
Want to Recover Your Dara (Why Would You)
National Public Data
If your data has been removed from Natural Public Data sources, it is generally not possible to get it back in the same way it was stored. Once data is deleted, it is often permanently removed from the system or archived in a way that is not easily accessible. However, the possibility of data restoration depends on the specific circumstances of the removal and d the policies of the data provider.
Atlas Privacy
If your data has been removed from Atlas Privacy, in some cases, you may be able to restore data that has been removed.
Sources: National Public Data, Perfect Privacy, Jericho pictures, Microsoft, PCMag, Atlas Prvacy, Meta
Disclaimer
Technology is constantly evolving, and smartphone and desktop tech rarely remains static. Therefore, the information in this post is only accurate as of the date it was written. Blog posts that are older than six months may contain instructions that are no longer compatible with your device or operating system. We hope that the content from previous posts continues to function as intended. Thank you for reading TechSavvy.Life, where technology works for you.
Quote For the Day
“The art challenges the technology, and the technology inspires the art.”
– John Lasseter, Co-founder of Pixar
(X) Twitter Info
That’s it. Please feel free to share this post! One way to share is via Twitter.
Just click the Tweet icon below. This will launch Twitter where you click its icon to post the Tweet.
Checkout TechSavvy.Life for blog posts on smartphones, PCs, and Macs! You may email us at contact@techsavvy.life for comments or questions.
We value your feedback! Was this post helpful? Please share your comments with us. If you have a tech question related to your computer or smart device, feel free to reach out. Just send an email to contact@techsavvy.life, and be sure to include the device, app, and version you are using. To assist us further, you can also attach screenshots related to your inquiry.
The author’s Vietnam eBook on the “Battle for Tra Bong Vietnam: Events and Aftermath” can be accessed from a Kindle device or the Kindle App for a desktop or smartphone. The apps are free.
The author’s Vietnam eBook on the Battle for Tra Bong Vietnam: Events and Aftermath
The post provides a step-by-step guide on how to change the default web browser on an iPhone from Safari to a preferred alternative, such as Chrome. It includes tips, system requirements, and FAQs regarding browser functionalities, catering to users seeking to customize their browsing experience on Apple devices.
RAYMOND OGLESBY @RaymondOglesby2 May 27, 2025 – 3 minutes read time
Overview
On Apple devices, Safari is the default browser. However, many people prefer to use other browsers, such as Chrome, instead of Safari. Fortunately, you can easily change the default web browser on your iPhone to your preferred one. Here’s how to change the default browser on an iPhone.
Why You Will Like This Tip
Easily change default browser from Safari.
You have different preferences than Apple’s standard browser.
System Requirements
This tip was performed in iPhone 14 Pro running iOS 18.5
Click here to learn how to update your iPhone to the latest iOS version.
Change Your Default Browser
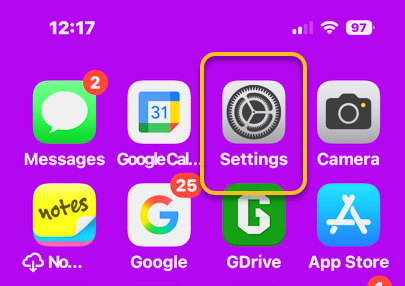
First, open the Settings app. Refer to the image below:
Selecting Settings
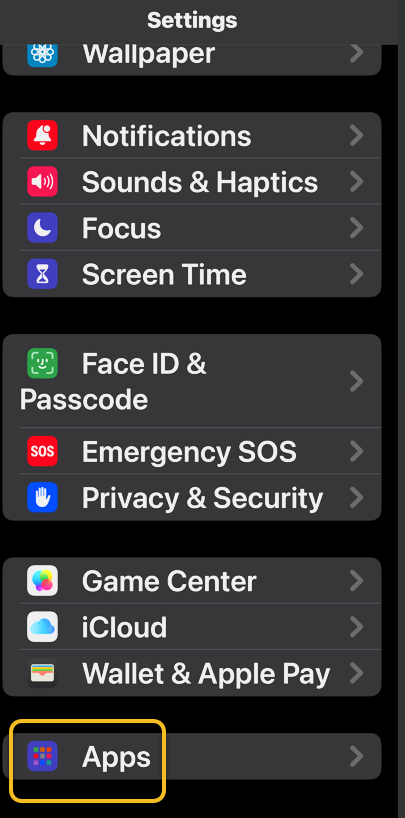
Next, tap Apps. See the image below:
Selecting Apps
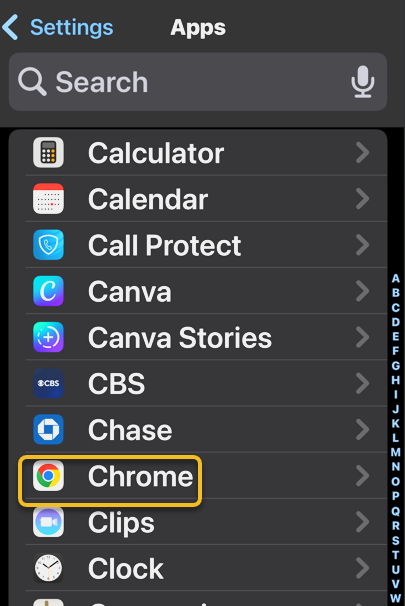
Now, scroll down to the app list to find your preferred browser, such as Chrome, and tap it. See the following image:
Selecting preferred browser
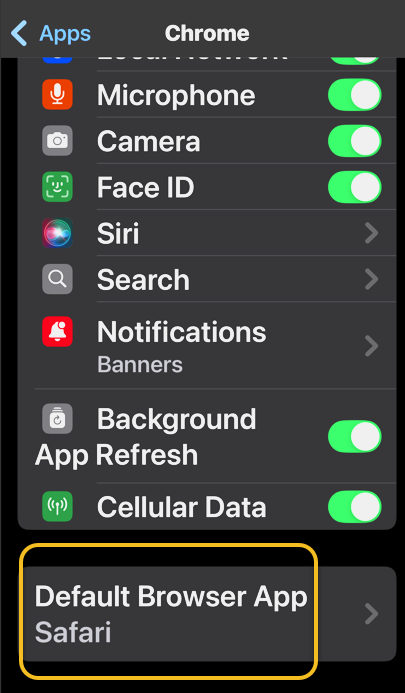
Next, tap Default Browser App. Refer to the image below:
Selecting Defsult Briwser App option
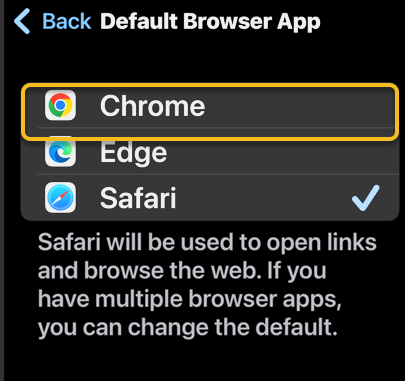
Now, tap whichever browser you would like to use as your default browser. See the image below:
Selecting a browser
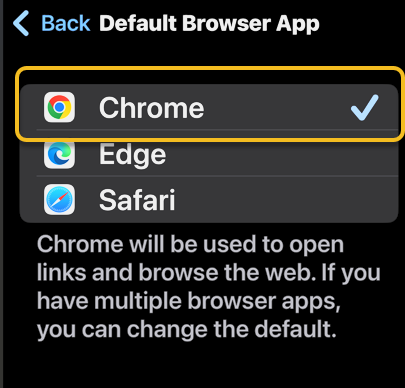
Next, when you haveselected your new default browser, you will see a blue check mark next to it. See the following image:
Your preferred browser selected
Now that you know how to change the default browser on your iPhone, you can easily open links in your preferred web browser, whether it’s Safari, Chrome, Edge, or another browser.
FAQ
How do I clear my Safari history on my iPhone? To clear your Safari history on an iPhone, tap the Bookmark icon, then the History tab, then choose which parts of your Safari history you want to delete.
How do I make Safari the default browser again? Follow the same steps above and select Safari from Apps. Alternatively, if you uninstall the browser app that is set as default, your iPhone will automatically switch back to Safari.
What do I do if Safari is not working on my iPhone? If Safari is not working on your iPhone, make sure you have a strong Wi-Fi or cellular connection. Additionally, verify that Screen Time limits are not enabled.
Disclaimer
Technology is constantly evolving, and smartphone and desktop tech rarely remains static. Therefore, the information in this post is only accurate as of the date it was written. Blog posts that are older than six months may contain instructions that are no longer compatible with your device or operating system. We hope that the content from previous posts continues to function as intended. Thank you for reading TechSavvy.Life, where technology works for you.
Quote For the Day
“Technology means you can now do amazing things easily, but you can’t easily do them legally.”
― Lawrence Lessig
(X) Twitter Info
That’s it. Please feel free to share this post! One way to share is via Twitter.
Just click the Tweet icon below. This will launch Twitter where you click its icon to post the Tweet.
Checkout TechSavvy.Life for blog posts on smartphones, PCs, and Macs! You may email us at contact@techsavvy.life for comments or questions.
We value your feedback! Was this post helpful? Please share your comments with us. If you have a tech question related to your computer or smart device, feel free to reach out. Just send an email to contact@techsavvy.life, and be sure to include the device, app, and version you are using. To assist us further, you can also attach screenshots related to your inquiry.
The author’s Vietnam eBook on the “Battle for Tra Bong Vietnam: Events and Aftermath” can be accessed from a Kindle device or the Kindle App for a desktop or smartphone. The apps are free.
The author’s Vietnam eBook on the Battle for Tra Bong Vietnam: Events and Aftermath
The article emphasizes the importance of a web browser, specifically Google Chrome, in daily online activities. It provides four methods to enhance its performance: updating Chrome, clearing the cache, upgrading security settings, and managing performance settings like using Memory Saver. These steps aim to ensure a smoother browsing experience.
RAYMOND OGLESBY @RaymondOglesby2 March 11, 2025 – 6 minutes read time
Overview
In many ways, your web browser is as important as, if not more so than, your computer’s operating system. Think about it: Nearly everything you do, from writing emails and posting on social media to editing documents and streaming videos, can happen inside a browser. So when Chrome starts feeling sluggish, it can affect your whole online experience, professionally and personally. Do not get bogged down by your browser. Here are four ways to speed it up.
System Requirements
This tip works on devices running Google Chrome. Screenshots are from Windows 11 Pro running Chrome Version 134.0.6998.36 (Official Build) (64-bit).
1) Update Google Chrome
Each new version of Chrome contains fresh features, security fixes, and performance improvements. So, it’s possible that updating to the latest version may help your speed woes. Even if it does not, it will keep you safer from online threats. When a new version is available, Chrome automatically updates in the background, when you close and re-open the browser.
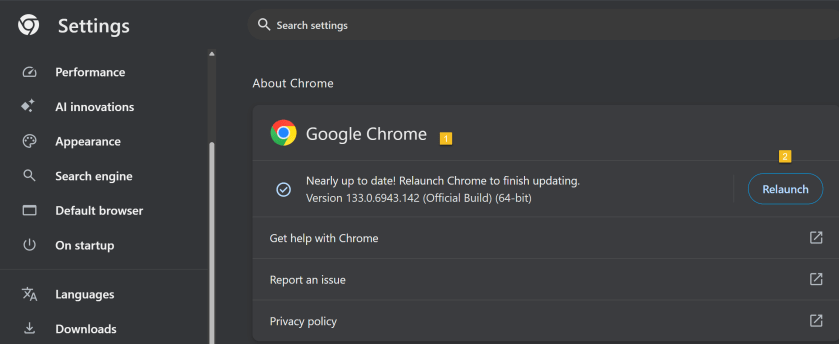
First, open Chrome and click the Menu icon (the 3 dots) in the upper right. From the Menu, click the Settings option. Next, on the left side, scroll down to the bottom and click on the About Chrome option.
If Chrome is not up-to-date, Chrome will automatically download. Now, click the Relaunch button to update Chrome and reopen the browser. Your Chrome browser is now up-to-date. Refer to the below image:
Updating Google Chrome
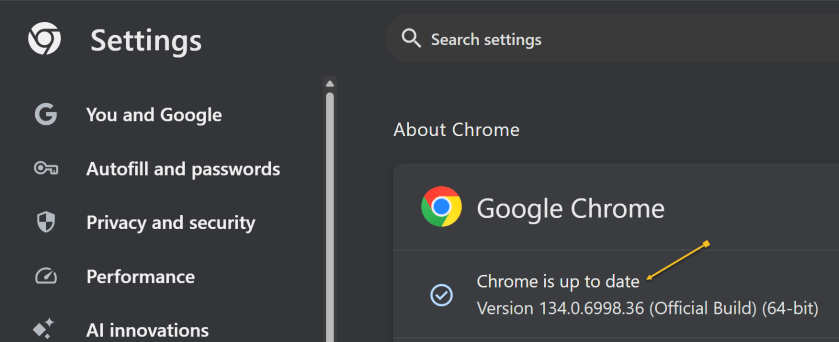
To check which version of Chrome you are running, repeat the above. Chrome will show the version and indicate it is up-to-date. See the below image:
Google Chrome up to date
2) Clear Google Cache
To clear your cache in Google Chrome, you clear your browsing data. This will clear your cache, cookies, and other browsing history.
Clearing your cache can fix problems with loading or formatting on websites.
In the Chrome browser:
Open Chrome and click the Menu icon (the 3 dots) in the upper right.
From the Menu, click the Settings option.
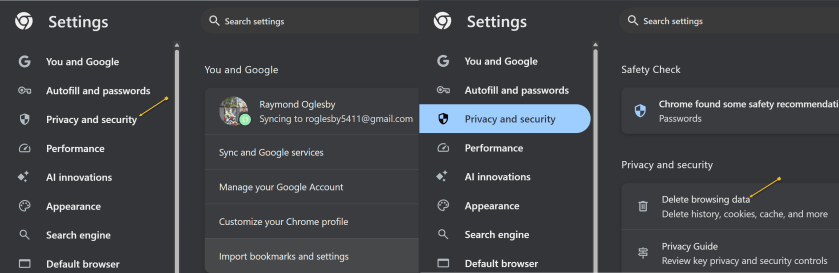
On the left side, click Privacy and security option.
Under the Privacy and security section click the Delete browsing data button. See the following image:
Accessing Privacy and security options
A new dialogue box will open.
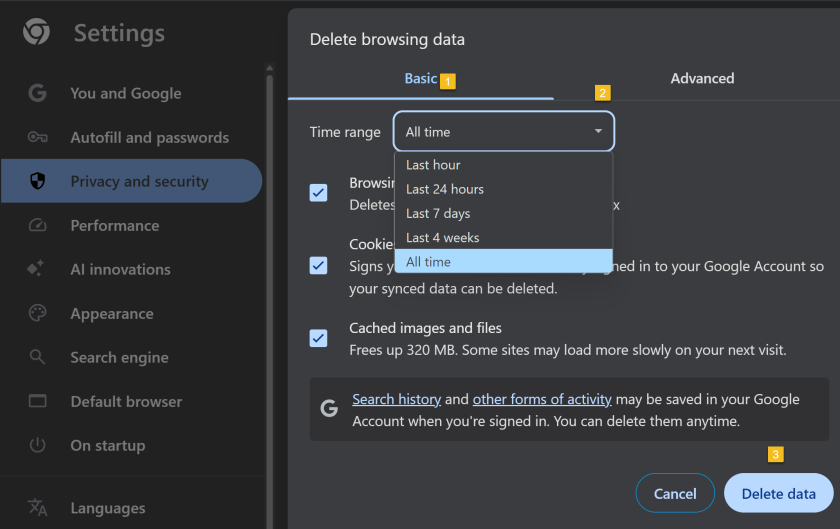
Click the Basic menu option.
Select the period to delete from in the Time range drop down menu (To clear all cached data and cookies, select All time, this is recommended).
Ensure check boxes for Browsing history. Cookies and other site data and Cached images and files are ticked.
Click on Delete data and wait for that dialogue box to exit.
Close all open Chrome tabs.
Restart Chrome.
Refer to the below image:
Selecting what data and when to delete
3) Upgrade Chrome Security
Once upon a time, Google developed the Chrome Cleanup Tool, an application that helps find and remove unwanted software (UwS), toolbars, and other automatically installed extensions that antivirus probes may miss from Windows devices. These types of programs can slow down your browser, so checking it for unwanted add-ons every so often is a must.
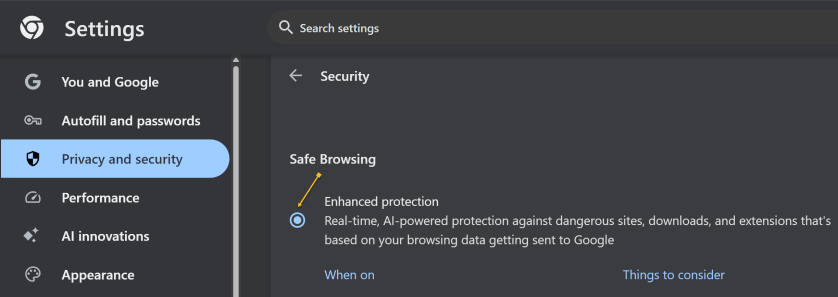
Unfortunately, the program was shut down in 2023. However, Google says users will remain “automatically protected” by its Safe Browsing features in Chrome. For extra protection, navigate to:
Settings >Privacy and security > Security, > Enhanced Protection
And enable which offers “real-time, AI-powered protection against dangerous sites, downloads, and extensions that’s based on your browsing data getting sent to Google.” See the below image:
Enable Enhanced protection
4) Manage Performance Settings
There are two types of people in the world: Those who open just a few tabs at a time, then close them, and those who hoard tabs like they have never heard of bookmarking. If you are the latter, it’s a safe bet what’s causing your slowdown, and you should take action. Not sure which tabs to close? Hover over a tab, and the pop-up preview shows how much memory it’s taking up.
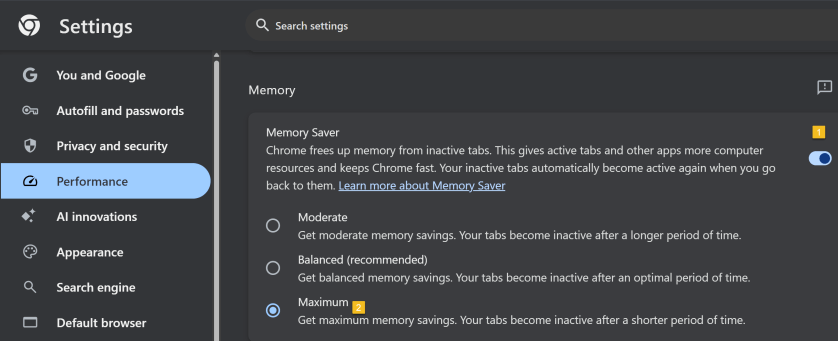
For something more automatic, Google introduced Memory Saver mode in 2022. This feature frees up resources from unused tabs in order to improve performance on tabs that are in use. While this feature should be enabled by default, you can open:
Settings > Performance > Memory Saver
and set to Maximum so tabs become inactive sooner. See the following image:
Setting Memory Saver to Maximum
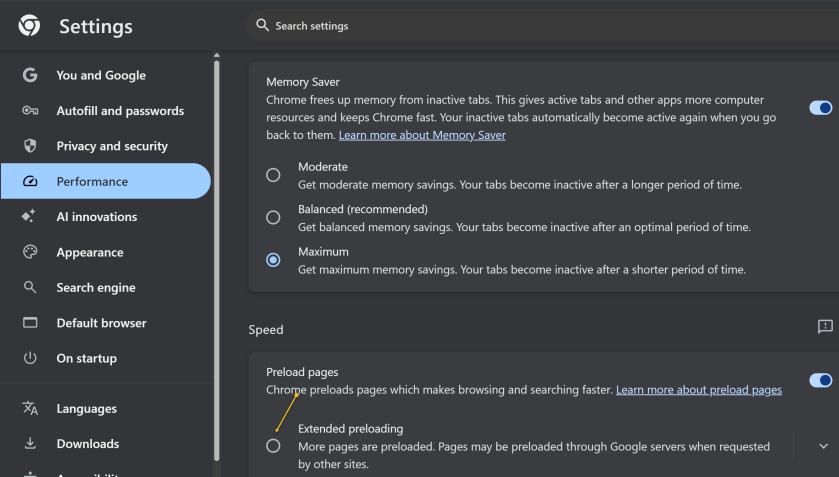
While you are here, go one further and scroll down to the Speed section. Make sure Preload pagesis enabled so websites and search results load faster. For an extra boost, enable Extended preloading for an even faster experience, though Google will be able to see what sites are being preloaded for you. Refer to the below image:
Enable Preload and Extended preloading
Disclaimer
Technology is constantly evolving, and smartphone and desktop tech rarely remains static. Therefore, the information in this post is only accurate as of the date it was written. Blog posts that are older than six months may contain instructions that are no longer compatible with your device or operating system. We hope that the content from previous posts continues to function as intended. Thank you for reading TechSavvy.Life, where technology works for you.
Quote For the Day
“Technology is nothing. What’s important is that you have faith in people, that they’re basically good and smart, and if you give them tools, they’ll do wonderful things with them.”
-Steve Jobs
X (Twitter)
You are finished. Please feel free to share this post! One way to share is via Twitter.
Just click the Tweet icon below. This will launch Twitter where you click its icon to post the Tweet.
Checkout TechSavvy.Life for blog posts on smartphones, PCs, and Macs! You may email us at contact@techsavvy.life for comments or questions.
We value your feedback! Was this post helpful? Please share your comments with us. If you have a tech question related to your computer or smart device, feel free to reach out. Just send an email to contact@techsavvy.life, and be sure to include the device, app, and version you are using. To assist us further, you can also attach screenshots related to your inquiry.
The author’s Vietnam eBook on the “Battle for Tra Bong Vietnam: Events and Aftermath” can be accessed from a Kindle device or the Kindle App for a desktop or smartphone. The apps are free.
The author’s Vietnam eBook on the Battle for Tra Bong Vietnam: Events and Aftermath
This post discusses how to identify legitimate calls and avoid scammers, addressing phone verification, spoofed numbers, and web searching. It provides options like reverse phone lookup websites and tools like WhoCallsMe, Spy Dialer, PeopleFinders, and USPhoneBook. It also suggests utilizing mobile carrier solutions, reporting to the FTC, and the National Do Not Call Registry to combat spam calls.
This is for any browser on a desktop, laptop, or smartphone. Screenshots are from Google Chrome on Windows 10
The phone rings and it’s a number you do not recognize. Or perhaps an unknown number shows up in your missed calls. You are curious but do not want to pick up or call back if it’s a telemarketer or scammer. Instead of playing robocall roulette let’s explore five ways to see who is calling before you engage.
Legit Verses Scam Calls
You may have noticed that America has a problem with scam calls. Scammers took $10 billion from unsuspecting victims in 2023, and it’s hard to see the problem going away anytime soon. If you get a call, there are a few ways to tell if it’s legit or not.
What does the phone say? When a call comes in, look for a displayed number and location. If your phone is not showing any information and says something like Unknown, chances are there’s a scammer on the other end. Anyone can hide their number, but it’s best to let this one go to voicemail and call back if it’s someone you know. If the phone says Scam Likely, it’s typically correct; just ignore the call.
Look for verification. Carriers have started verifying phone numbers when you receive a call. Google’s phone app also adds a badge on incoming calls that can be attached to a business. Unfortunately, this does not verify every call from a legitimate business or weed out legitimate businesses that use robocalls.
Watch out for spoofed numbers. Have you ever gotten a call from what looks to be your own phone number, only it’s a few numbers off? Do not pick those calls up; scammers like to spoof phone numbers and trick you into picking up. They think you are more likely to pick up if the call is from your area code or someone you know.
Note! We recommend ou not click or tap on any icon off the main screen. These buttons launch web sites that may introduce malware or be blocked by your browser security. Also, any screen that has flashing items, immediately exit the screen.
If you click or tap on a button that starts a scanning process for addresses,emails, public information, criminal records, etc., the process will take several minutes. On the desktop, you can stop the process by hitting Cntl-Alt-Del keys, then select Task Manger. Next, right=-click on your browser entry and select End Task. Your browser will exit stopping the scanning process.
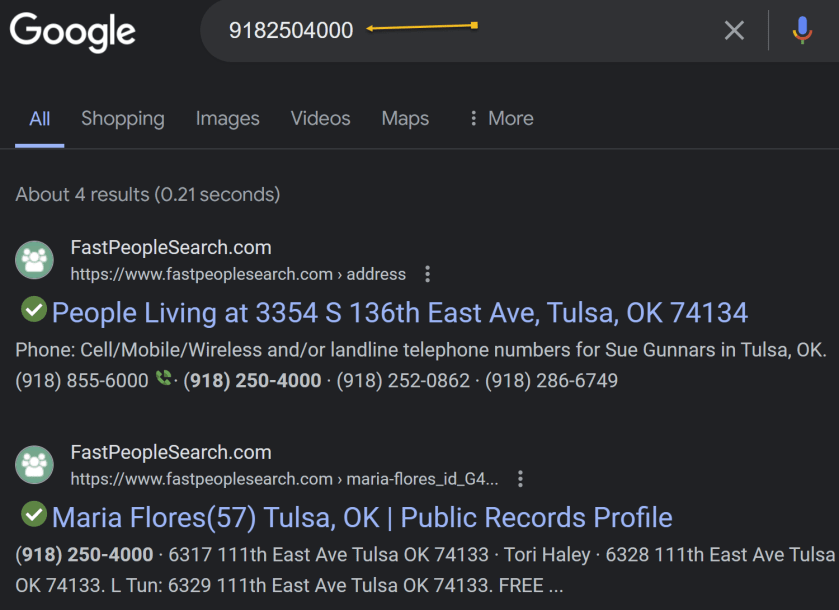
Search the Web
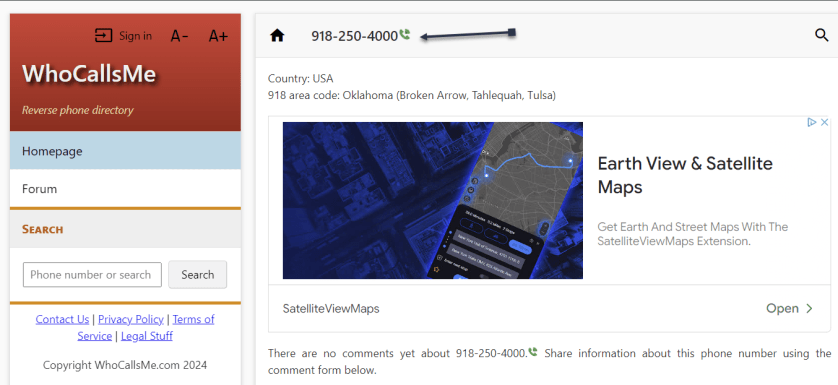
If you want to quickly know whether a caller is legit or a scammer, do a quick web search. As a rule of thumb, if the search results are primarily reverse phone lookup websites, it’s safe to say other people have received unwarranted calls from that same number and are reporting it to warn others. Refer to the below image:
Search the web
Reverse Phone Lookup
Speaking of reverse phone lookups, if you want to do some digging about a certain phone number, many websites can help you. You usually have to pay to get any worthwhile information, but there are a few tools that can help you for free. Even though they are free if you want additional information about the phone number, the sites charge for their service.
whocallsme
At WhoCallsMe, users can report their experiences with specific phone numbers. Enter a number and the website will tell you where the area code is from. You can then enter your own report or view what others say about it. See the below image:
WhoCallsMe main screen
spy dialer
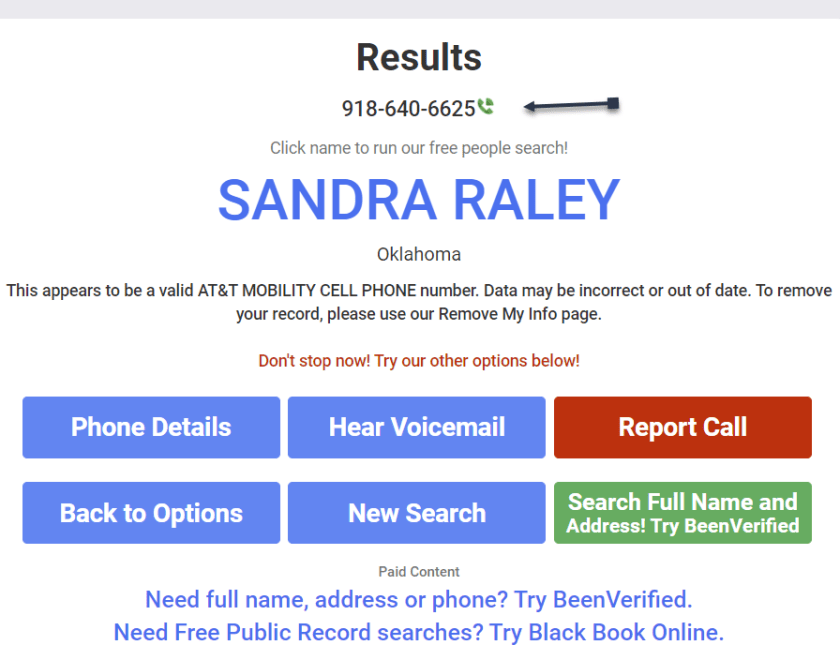
Spy Dialer allows you to search for phone numbers, names, addresses, and emails. Enter a phone number, then choose if you want to look up any linked names or photos, listen to the number’s outbound voicemail, or confirm if the number is spam or not. Spy Dialer can tell you with whom the number is registered, their general location, and whether or not the number has been reported as spam before.
For more information, click Phone Details to see how long the line has been in service and if the number is spoofed. Choose Hear Voicemail to get the caller’s outbound voicemail, if available. You can click Report Call to file a complaint with Spy Dialer.
We recommend this site over the others because it’s faster and offers more information. See the following image:
Spy Dialer main screen
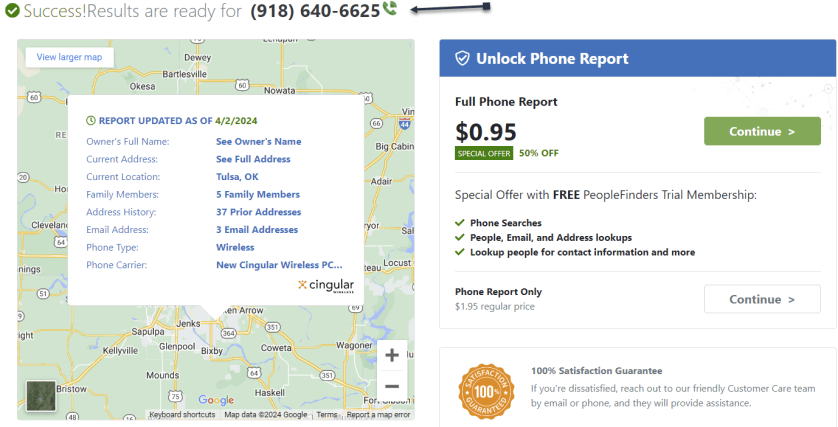
peoplefinders
PeopleFinders allows you to look up a phone number, name, address, or email. Enter a phone number into the search bar to get the caller’s general location, carrier, and phone type. More revealing information, such as the caller’s full name and address, is hidden requiring a fee. Refer to the below image:
PeopleFinders main screen
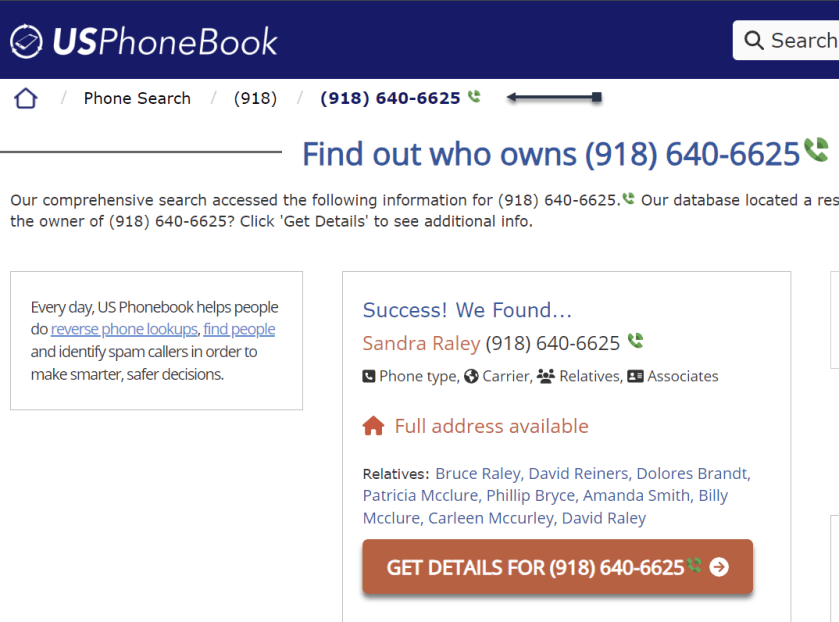
usphonebook
You can look up phone numbers, names, and addresses at USPhoneBook, though this works better for identifying individuals rather than businesses. Enter a number to find the person connected to it. The site will display a list of people who may be related to the person. You can then mark the number as safe or spam. Keep in mind that these listings can be outdated.
Click Get Details to view extra information about the person. This will include their age, current (and former) addresses, phone numbers associated with them, a list of relatives and associates, and even related email addresses. See the below image:
USPhoneBook main screen
What To Do Next
One option is to look at your mobile carrier’s anti-spam solutions for stopping spam calls and robo texts. Additionally, apps likeRoboKiller and Truecaller help keep the spam callers at bay. You can also report unwanted calls to the FTC and register your number with the National Do Not Call Registry, though those wishing to do you harm will undoubtedly ignore this. See the following image:
National Do Not Call Registry main screen
Disclaimer
Technology is always changing. Rarely is there static tech for smartphones and desktops. Thus, the contents of this post are only valid at the time of writing. Blog posts older than six months may have directions incompatible with your device or OS. Hopefully, older post content will continue to work as advertised. Thank you for reading TechSavvy.Life for Technology at Work For You.
Quote For the Day
. Motivation is what gets you started. Habit is what keeps you going.
Jim Rohn
Tweet Info
You are finished. Please feel free to share this post! One way to share is via Twitter.
Just click the Tweet icon below. This will launch Twitter where you click its icon to post the Tweet.
Checkout TechSavvy.Life for blog posts on smartphones, PCs, and Macs! You may email us at contact@techsavvy.life for comments or questions.
Was this post helpful? We would love to hear your comments. Do you have a computer or smart device tech question? I will do my best to answer your inquiry. Just send an email to contact@techsavvy.life. Please mention the device, app, and version you are using. To help us out, you can send screenshots of your data related to your question.
The post discusses methods for deleting Facebook Messenger chats on iPhone and desktop. It advises changing message retention settings on the iPhone and provides steps for deleting messages on both platforms. It also mentions using Chrome extensions for bulk deletion.
This is for the iPhone and desktop using Google. Screenshots are from iPhone 14 Pro running iOS 17.3 and Windows 10.
I was surprised at the number of Facebook Messenger chats on my iPhone. I started to delete them one at a time. But doing so was too time-consuming; there had to be a better way.
If you research this post, you will find articles that say bulk deletion of chats cannot be done. But with the help of Google Extensions, you can delete all your chats at once.
This blog post is one of my favorites, especially since I have thousands of chats that I want to delete. We had forgotten that the Forever option was selected, which as you may guess, saves your chats forever.
Where is a chat, a message, a conversation, or a thread used?
A chat is a term used in Messenger (owned by Facebook). A message is a term found on Facebook. In Facebook if there is more than one message with a person, group, or entity, that is labeled a conversation. For a thread, that is used in Reddit.
Check Your Settings
Why do you have hundreds or thousands of chats? On your iPhone head to:
Settings > Messages > Keep Messages
and tap the option. If the option is set to Forever you will have lots of chats. Refer to the below image:
Your Facebook Message time setting
We recommend you choose another option. When you do so, all older chats will be automatically deleted. We are selecting to delete messages older than one year. On the confirmation screen, tap Delete Older Messages. See the below image:
Selecting to delete messages older than one year
Your Keep Messages will now be set to the option you just chose. See the following image:
Your Keep Messages setting
Deleting Facebook messages does not have to be incredibly difficult. Whether you are deleting one or an entire history, there are options for you to do both with minimal effort.
Some users may find it easier to delete their entire Facebook account, although we do not recommend this. For now, let’s just clean up your messages/chats.
Using iPhone
Deleting messages on an iPhone or iPad one at a time:
Open the Facebook Messenger app.
Tap and hold the message that you no longer want, then swipe to the left.
When the menu appears, select Delete.
Confirm the selection by tapping Delete.
If you want to delete in bulk, it would be best to use a browser.
Using a Browser
Log into your Facebook account.
Click See all in Messenger.
Click on the 3-dot menu icon next to a conversation.
Click Delete Chat if you want to erase all the chats.
Confirm your deletion by clicking Delete Chat.
But what can you do about multiple messages and multiple conversations? For this, you have to install a third-party browser extension.
Using a Chrome Extension
Extensions become a part of your web browser and allow you to perform various functions on a website. To delete multiple or all of your Facebook message history, we need to install a web browser extension.
Whether it’s Chrome, Firefox, or Internet Explorer, we will begin by using Google to pull up the Web Store.
Note! You will find a lot of Chrome extensions for deletion of messages. We strongly recommend only using the following extensions from the Chrome web store, not from third-party web sites.
Extension: Delete Facebook Messages
You want to use Google Search to find the “Delete Facebook Messages” extension. Once you have found it, click Add to Chrome. Refer to the below image:
Adding Delete Facebook Messages Chrome extension
You will be prompted through various pop-ups until that extension is added. To view the added extension:
Click the 3-dot menu icon in the upper right-hand > Exenesions > Manage Extensions
See the below image:
Delete Facebook Messages Chrome extension
Now, let’s add the extension icon to the Chrome toolbar. Click the Details option. See the following image:
Selecting Details for the Chrome extension
Next, toggle the Pin to toolbar to ON. Refer to the below image:
Toggle Pin to toolbar to ON
Now, the Delete Facebook Messages icon will be in your toolbar. See the below image:
The Chrome extension icon
Next, click the Delete Facebook Messages icon and choose the Begin Deletion option. See the following image:
Launching the Chrome extension
Note! To use this extension more than once, there is a subscription fee.
Extension: Message Cleaner
To install the Chrome extension, search for Message Cleaner using Google Search, then select Add to Chrome. Refer to the below image:
Adding the Message Cleaner Chrome extension
Follow the directions above to add its icon to the toolbar.
The extension icon will be labeled Delete all Facebook Messages in your Chrome toolbar. When you click the extension icon you can Open Messages and Delete All Messages. For one-click deletion, press the F8 key. See the below image:
Launching the Message Cleaner Chrome extension
This extension works best if you scroll down to the bottom of the message list. Once you start the extension, it will recognize all the messages as being selected for removal. You can also then pick individual messages that you may want to save.
If you selected “all” before clicking “confirm,” the only way to get those messages back is to ask the person you sent them to for help or to use data recovery methods to retrieve backed-up information, assuming you have them backed up.
Disclaimer
Technology is always changing. Rarely is there static tech for smartphones and desktops. Thus, the contents of this post are only valid at the time of writing. Blog posts older than six months may have directions incompatible with your device or OS. Hopefully, older post content will continue to work as advertised. Thank you for reading TechSavvy.Life for Technology at Work For You.
Quote For the Day
Discipline is the bridge between goals and accomplishment.
Jim Rohn
Tweet Info
That’s it. Please feel free to share this post! One way to share is via Twitter.
Just click the Tweet icon below. This will launch Twitter where you click its icon to post the Tweet.
Checkout TechSavvy.Life for blog posts on smartphones, PCs, and Macs! You may email us at contact@techsavvy.life for comments or questions.
Please feel free to leave a comment. I would love to hear from you. Do you have a computer or smart device tech question? I will do my best to answer your inquiry. Just send an email to contact@techsavvy.life. Please mention the device, app, and version you are using. To help us out, you can send screenshots of your data related to your question.
Author’s E~Book
You can access the E-book from a Kindle device, or the Kindle App for a desktop or smartphone. The apps are free.
The author’s Vietnam eBook on the Battle for Tra Bong Vietnam: Events and Aftermath
You can start Google Chrome to open a specific page, a new tab, or continue where you left off from the On starup option. We will show you how to set this option to load your Google Apps. You can use the same procedure to load any website at startup or create a bookmark.
This is for the Desktop and iPhone. Screenshots are from Windows 10 and iPhone 14 Pro running iOS 17+
You can start Google Chrome to open a specific page, a new tab, or continue where you left off from the On startup option. We will show you how to set this option to load your Google Apps. You can use the same procedure to load any website at startup or create a bookmark.
Setup the On Startup Option
Your Google Apps can be displayed using the On startup option. First, to set this option, open Chrome and click the Menu (the 3 dots) in the upper right corner, then navigate to:
Settings > On startup
Next, under the Open a specific page or set of pages option, enter the following:
chrome://apps/
Refer to the below image:
Setting On startup option to your Google Apps
Now whenever you start Chrome, your Google Apps page will be displayed.
By doing the above, you can just click the Home button next to the address bar to display your Google Apps anytime. See the below image:
Accessing the Home button to view your Google Apps page
Clicking the Home button next to the address bar will display the page you have set as the On startup page.
Setup the Google Apps Bookmark on Desktop
If you do not have the On startup option set to Google Apps, why not create a bookmark for it. Following are the steps to do this.
First, open the Google Apps page you want to bookmark in Chrome. See the following image:
Setting your Google Apps page to bookmark
Next, click the Star icon in the address bar. Refer to the below image:
Adding your Google Apps page as a bookmark
Now, choose a name and location for your bookmark then hit Done. See the below image:
Editing your Google Apps bookmark
Next, head to your saved bookmark to see your Google Apps entry. See the following image:
Your saved Google Apps bookmark
Setup the Google Apps Bookmark on iPhone
First, open the Google Apps page you want to bookmark in Chrome then tap the Share button. Refer to the below image:
Setting your Google Apps page
Next, tap the Add to Bookmarks option. See the below image:
Adding your Google Apps bookmark
Edit the Google Apps Bookmark on iPhone
First, tap the Menu (the 3 dots) at the bottom right corner. See the following image:
Accessing the Menu option
Next, tap the Edit Bookmark option. Refer to the below image:
Choosing to edit your Google Apps bookmark
Now, change as necessary, then tap Done. See the below image:
Editing your Google Apps bookmark
Not only do bookmarks save you time as you do not need to type in a URL or search for your most frequently visited sites on Google every time you visit, but they are also great for keeping track of articles and videos you plan to head back to later. If you do not have Google Apps set as your startup page, creating a bookmark allows you to easily display the page.
Disclaimer
Technology is constantly changing; there is rarely static tech for smartphones and desktops. Thus, the contents of this post are only valid at the time of writing. Blog posts older than six months may have directions incompatible with your device or OS. Hopefully, older post content will continue to work as advertised. Thank you for reading TechSavvy.Life for Technology at Work For You.
Quote for the Day
“The best vision is insight.”
Malcolm Forbes
Tweet Info
That’s it. Please feel free to share this post! One way to share is via Twitter.
Just click the Tweet icon below. This will launch Twitter where you click its icon to post the Tweet.
Checkout TechSavvy.Life for blog posts on smartphones, PCs, and Macs! You may email us at contact@techsavvy.life for comments or questions.
Please feel free to leave a comment. I would love to hear from you. Do you have a computer or smart device tech question? I will do my best to answer your inquiry. Just send an email to contact@techsavvy.life. Please mention the device, app, and version you are using. To help us out, you can send screenshots of your data related to your question.
Author’s E-Book
You can access the e-book from a Kindle device, the Kindle App for the desktop or smartphone, which is a free app.
The author’s Vietnam eBook on the Battle for Tra Bong Vietnam: Events and Aftermath
You may have noticed that opening a link in Outlook behaves differently and not in your chosen browser. That’s because Microsoft wants to push their Edge browser, though they have some excuses for the change.
This is for devices running Microsoft Outlook. Screenshots are from Microsoft Outlook 365 in Windows 10
You may have noticed that opening a link in Outlook behaves differently and not in your chosen browser. That’s because Microsoft wants to push their Edge browser, though they have some excuses for the change.
When you click on a link in Outlook for Windows, it might open in the Edge browser, even though you have chosen a different default browser in Windows settings (like Chrome or Firefox).
And instead of just opening the web page, the email appears in a right side-pane alongside the link you clicked. Refer to the below image:
Side-by-Side View
According to Microsoft, this change means “No more disruptive switching—just your email and the web content you need to reference, in a single, side-by-side view.” They may have a point and it’s a change that suits some people.
It’s also a shameless attempt to push people to the Edge browser by overriding their browser choice with Microsoft’s preference.
This applies to Windows 10 or 11 only. Microsoft only says this is for ‘Outlook’ not which versions, but presumably Outlook 365 for Windows. For now, it only works on Microsoft-hosted emails including Outlook.com/Hotmail however it will be extended to Gmail later.
Change Browser via Windows
First, the default browser is chosen in Windows. To set up this browser, head to:
Settings | Apps | Default Apps
and choose your preferred browser. See the below image:
Setting Chrome as the web browser in Windows
Change the Search Engine and Default Browser
Next, for Chrome, ensure you have set the search engine. To find out, open Chrome and head to:
Menu (the 3 dots in the upper right) | Settings | Search engine
and, if necessary, set your search engine to Chrome. See the following image:
Setting Chrome as the search engine
Now, for Chrome, ensure you have set the default browser. To find out, open Chrome and head to:
Menu (the 3 dots in the upper right) | Settings | Default browser
Refer to the below image:
Your default browser
The reason why we are doing the above is to ensure we are using Google products. You can have Firefox as your browser and Chrome as your search engine.
Change Outlook Links Default Browser
Next, open Outlook and go to:
File | Options | Advanced | Link Handling
to change the browser to Default Browser. See the below image:
Setting Default Browser in Outlook
Side-by-Side View May Not Work
To be honest, you may not get this feature to work no matter what combination of Outlook, Windows, and Edge you try. We prefer to test for ourselves and not take Microsoft’s word. If your email links open in your browser with no side-by-side view, do not worry.
Disclaimer
Technology is always changing and rarely is there static tech for smartphones and desktops. Thus, the contents of this post are only valid at the time of writing. Blog posts older than six months may have directions incompatible with your device or OS. Hopefully, older post content will continue to work as advertised. Thank you for reading TechSavvy.Life for Technology at Work For You.
Quote For the Day
Ideas are easy. Implementation is hard.
Guy Kawasaki
Tweet Info
That’s it. Please feel free to share this post! One way to share is via Twitter.
Just click the Tweet icon below. This will launch Twitter where you click its icon to post the Tweet.
Checkout TechSavvy.Life for blog posts on smartphones, PCs, and Macs! You may email us at contact@techsavvy.life for comments or questions.
Please feel free to leave a comment. I would love to hear from you. Do you have a computer or smart device tech question? I will do my best to answer your inquiry. Just send an email to contact@techsavvy.life. Please mention the device, app, and version you are using. To help us out, you can send screenshots of your data related to your question.
Author’s E-Book
You can access the e-book from a Kindle device, the Kindle App for the desktop or smartphone, which is a free app.
The author’s Vietnam eBook on the Battle for Tra Bong Vietnam: Events and Aftermath
We are all constantly absorbing information online. Bionic Reading is an approach to reading that can help you read faster, retain more information, and boost your productivity in your favorite web browser, like Chrome.
This is for desktops using Chromeor other browsers. Screenshots are from Windows 10
We are all constantly absorbing information online. Bionic Reading is an approach to reading that can help you read faster, retain more information, and boost your productivity in your favorite web browser, like Chrome.
Bionic Reading Explained
Bionic reading is amethod of reading that combines traditional reading with technology-assistedtools. This helps readers increase their reading speed, improve their comprehension and retention, and ultimately become more productive in their reading activities.
Was the above paragraph easier and quicker to read? If you said yes, then you have just experienced some of the benefits of Bionic Reading. Now, imagine that but for a whole article, essay, or book.
Your brain does not always read every letter of every word. It only intakes enough information for you to understand a word, and then it moves on to the next one. The bolding of the first half of each word lets your mind fast-track through paragraphs.
The bolding aspect is the most notable factor in Bionic Reading, but there’s more as well. A lot of apps and extensions also remove colors from images and change white or black backgrounds to gray. These changes help your eyes focus on the text.
Why Use Bionic Reading
Using Bionic Reading in Chrome, or any other web browser, can offer several benefits.
It can help you read faster and more efficiently, which allows you to cover more material in less time.
Bionic Reading can also help you retain more information by training your brain to focus on the most important parts of any text.
As a result of the two above-mentioned benefits, it can improve your productivity by allowing you to process information more effectively. This can be particularly useful in academic or work-related settings.
Bionic Reading in any browser can be a valuable tool for anyone looking to optimize their online reading experience.
Think of Bionic Reading as akin to Speed Reading but they are different in their approach. Speed Reading is the process of rapidly recognizing and absorbing phrases or sentences on a page all at once, rather than identifying individual words.
How Bionic Reading Helps You
Bionic Reading helps you read faster and more efficiently with techniques including skimming, scanning, chunking, and altering images to be easier on the eye. Refer to the below image:
Bionic Reading example from Chrome Web Store
For example, when you skim a text, you quickly glance through it to get a general idea of the content without reading every word. Similarly, when you scan a text, you search for specific keywords or phrases that are relevant to your reading goals.
By using these techniques, you can save time and energy. Bionic Reading tools like web browser extensions or apps can help automate some of these techniques.
Bionic Reading Trains Your Brain to Retain Information
By using Bionic Reading, you can begin to retain more information by training your brain to focus on the most crucial parts of any text, such as key concepts, arguments, or evidence.
Through using techniques like skimming or scanning (as mentioned above), you can quickly identify the main points of the text and decide what information is relevant to your reading goals. In turn, this uses less mental energy.
By consistently applying these techniques, you can train your brain to become more efficient at processing and retaining information. Studying, researching, and editing your own work can become easier as a result.
Bionic Reading Improves Your Productivity
Before we go into how Bionic Reading increases your productivity, you need a frame of reference for how your productivity can suffer through everyday means.
Using your eyes takes up about 50% of your brain power. That’s more than any of your other senses. We, as humans, heavily rely on our vision for pretty much everything we do.
As your brain becomes able to retain more information, you will need to re-read the same text less often.
Reading faster and more efficiently drastically cuts down on the stress your eyes and brain suffer while researching, writing, and doing similar work, especially when you are mentally digesting new information.
To summarize, by improving your reading efficiency and training your brain to better retain information, your productivity should increase.
At the top of a Chrome window, click the Menu icon (the 3 dots) to open the Menu. Now, click More Tools > Extensions to view the extension. See the following image:
Bionic Reading Chrome extension
After installing it, you can manage the Bionic Reading extension through the Extensions menu at the top-right of your window (click the little jigsaw piece icon). Refer to the below image:
Activate Bionic Reading
You are now ready to begin using the Bionic Reading extension! When you want to activate it on any given webpage, all you need to do is click the jigsaw piece icon at the top-right of your window and then click the Bionic Reading icon. To turn Bionic Reading off, do the same thing again. See the below image:
Bionic Reading example
Everything is removed from the web page but the text. That’s all there is to it! Start saving your energy for tougher tasks by letting Bionic Reading do the heavy visual lifting.
Disclaimer
Technology is always changing and rarely is there static tech for smartphones and desktops. Thus, the contents of this post are only valid at the time of writing. Blog posts older than six months may have directions incompatible with your device or OS. Hopefully, older post content will continue to work as advertised. Thank you for reading TechSavvy.Life for Technology at Work For You.
Quote For the Day
I would like to die on Mars. Just not on impact.
Elon Musk
Tweet Info
That’s it. Please feel free to share this post! One way to share is via Twitter.
Just click the Tweet icon below. This will launch Twitter where you click its icon to post the Tweet.
Checkout TechSavvy.Life for blog posts on smartphones, PCs, and Macs! You may email us at contact@techsavvy.life for comments or questions.
Please feel free to leave a comment. I would love to hear from you. Do you have a computer or smart device tech question? I will do my best to answer your inquiry. Just send an email to contact@techsavvy.life. Please mention the device, app, and version you are using. To help us out, you can send screenshots of your data related to your question.
Author’s E-Book
You can access the e-book from a Kindle device, the Kindle App for the desktop or smartphone, which is a free app.
The author’s Vietnam eBook on the Battle for Tra Bong Vietnam: Events and Aftermath
Want to clear your browser history quickly? There’s a keyboard shortcut for that. It works in any browser, including Google Chrome, Apple Safari, Microsoft Edge, and Mozilla Firefox (on both Windows PCs and Macs.)
Want to clear your browser history quickly? There’s a keyboard shortcut for that. It works in any browser, including Google Chrome, Apple Safari, Microsoft Edge, and Mozilla Firefox (on both Windows PCs and Macs.)
Depending on your web browser of choice, you can speed things up in the future by activating the Clear button with a few keystrokes. You may have to tab through the interface to select the Clear button before hitting Enter.
Here’s how it works on a few popular browsers on a Windows 10 or Windows 11 PC:
Google Chrome: Press Ctrl+Shift+Delete and press Enter.
Mozilla Firefox: Press Ctrl+Shift+Delete and press Enter.
Microsoft Edge: Press Ctrl+Shift+Delete and press Enter.
You can now configure exactly what you want to delete. Your browser will remember the settings you pick here, so you will only have to set this up once.
You can pick a time range, or history from a time period like the last hour, last 24 hours, last week, or from all time. You can also pick the types of data: browsing history, download history, cookies, cached files, and more.
When you are done, click the Clear data or Clear now button. Refer to the below image for Chrome:
Selecting to Clear data in Chrome
Incognito Mode
In the future, you can eliminate the need to clear your browser history by browsing in a private-browsing mode, like Incognito Mode in Chrome. You will just have to close the private-browsing window, and your browser will immediately forget the history associated with your private browsing.
You can use keyboard shortcuts to open and close a private-browsing mode window, too.
Google Chrome: Press Ctrl+Shift+N
Mozilla Firefox: Press Ctrl+Shift+P
Safari or Chrome on a Mac: Press Command instead of Ctrl; for example, press Shift+Command+N.
When you are done, press Ctrl+W to close a single tab or Ctrl+Shift+W to close an entire window. (On a Mac, press Command instead of Ctrl.)
Just remember that Incognito Mode does not offer complete privacy online. It only prevents your web browser from storing your browsing history locally. You may want to combine it with a VPN to boost your online privacy.
Disclaimer
Technology is always changing and rarely is there static tech for smartphones and desktops. Thus, the contents of this post are only valid at the time of writing. Blog posts older than six months may have directions incompatible with your device or OS. Hopefully, older post content will continue to work as advertised. Thank you for reading TechSavvy.Life for Technology at Work For You.
Quote For the Day
Knowledge is of no value unless you put it into practice.
Anton Chekhov
Tweet Info
That was easy. Please feel free to share this post! One way to share is via Twitter.
Just click the Tweet icon below. This will launch Twitter where you click its icon to post the Tweet.
Checkout TechSavvy.Life for blog posts on smartphones, PCs, and Macs! You may email us at contact@techsavvy.life for comments or questions.
Please feel free to leave a comment. I would love to hear from you. Do you have a computer or smart device tech question? I will do my best to answer your inquiry. Just send an email to contact@techsavvy.life. Please mention the device, app, and version you are using. To help us out, you can send screenshots of your data related to your question.
Author’s E-Book
You can access the e-book from a Kindle device, the Kindle App for the desktop or smartphone, which is a free app.
The author’s Vietnam eBook on the Battle for Tra Bong Vietnam: Events and Aftermath