If you would like to share an Instagram photo or video outside the platform, you will have to get that item’s shareable link. Let’s explore how to get these links from your Instagram account, on either desktop or mobile.
Note! You can not get links to photos or videos that are in a private Instagram account. For these accounts, Instagram does not offer the option to get a link.
This is for devices running Instagram
Copyright Scott Adams, Inc./Distributed by Universal Uclick for UFS
The instructions to get a link to a photo or video on Instagram are the same for all Instagram-supported devices, including Windows, Mac, Linux, and Chromebook computers, as well as iPhones and Android smartphones.
First, open Instagram and find the photo or video for which you want to get a shareable link. At the top-right corner of that item, click or tap the three dots Menu. Refer to the below image:
Accessing the Menu
Next, choose Link on an iPhone or Copy Link on other devices. See the below image:
Accessing the Link icon
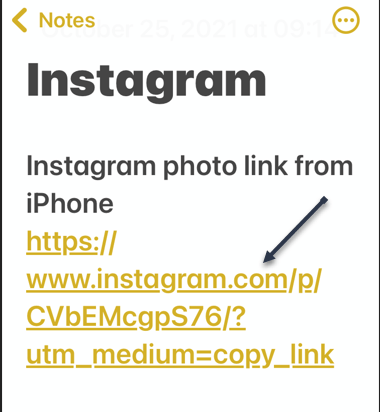
Now, the link to your selected photo or video on Instagram will be copied to your device’s clipboard. Use the Paste option in any text field on your device to view your link. In our example, we pasted the link to the iPhone Notes app.
Your shareable Instagram link should look something like the following image:
Your Instagram link
You may now send this link to your friends and family. They can click or tap it to access the photo or video on Instagram.
Quote For the Day
The system is that there is no system. That doesn’t mean we don’t have process. Apple is a very disciplined company, and we have great processes. But that’s not what it’s about. Process makes you more efficient.
Steve Jobs
That was easy. Please feel free to share this post! One way to share is via Twitter.
Just click the Tweet icon below. This will launch Twitter where you click its icon to post the Tweet.
Check out TechSavvy.Life for blog posts on smartphones, PCs, and Macs! You may email us at contact@techsavvy.life for comments or questions.
Please feel free to leave a comment. I would love hearing from you. Do you have a computer or smart device tech question? I will do my best to answer your inquiry. Just send an email to contact@techsavvy.life. Please mention the device, app, and version you are using. To help us out, you can send screenshots of your data related to your question.
The author’s Vietnam eBook on the Battle for Tra Bong Vietnam: Events and Aftermath
Not everyone you invite to a meeting may be a required guest. There might be someone that you want to give the choice to attend. Google Calendar provides the ability to make attendees optional, but it’s not obvious.
Not everyone you invite to a meeting may be a required guest. There might be someone that you want to give the choice to attend. Google Calendar provides the ability to make attendees optional, but it’s not obvious.
It could be your supervisor, a coworker who may not be available, or someone else with an interest in the meeting. By marking them optional, they can decide for themselves if they should or want to attend. And you can make guests optional at the time you create the Google Calendar event or afterward.
This is for devices using Google Calendar
Copyright Scott Adams, Inc./Distributed by Universal Uclick for UFS
When Creating the Event
First, launch Google Calendar and sign in if necessary. When you click to create a new event in Google Calendar, you see a small pop-up window to add all the details including your attendees. But you will not spot the optional feature for your guests immediately.
Next, hover your cursor over the attendee’s name or email address after you add it. To the right, you will see a gray contact (person) icon. Click that icon to mark your guest as optional. Refer to the below image:
Marking a guest as Optional
Now, the icon will appear white indicating the Optional status. You can click it again to make the guest required. See the below image:
Guest is Optional
After Creating the Event
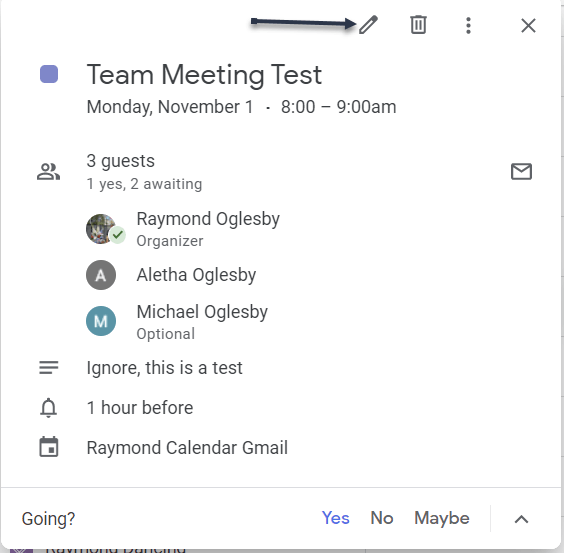
If you have already created the event, you can still make an attendee optional. Select the event on your Google Calendar to open the small detail window and then click the pencil icon to edit it. See the following image:
Selecting to Edit the event
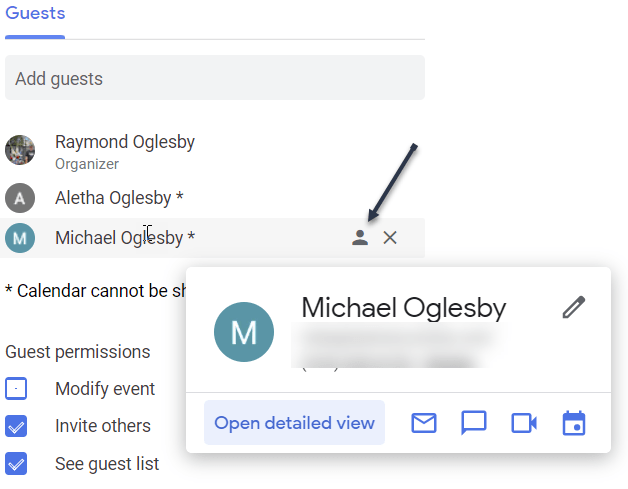
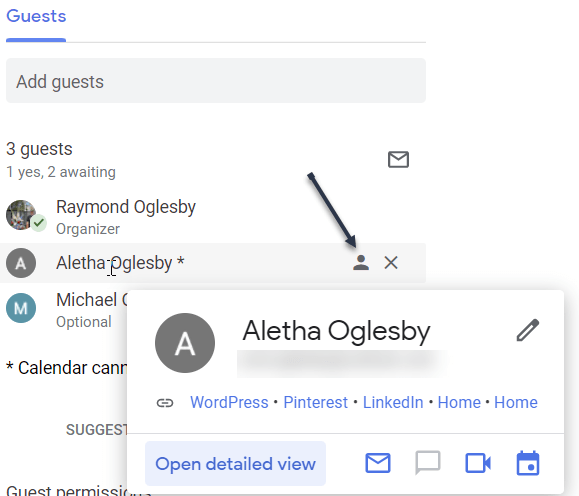
Next, on the event detail screen, hover your cursor over the attendee you want to make optional in the Guests section. To the right, click the gray contact icon. Refer to the below image:
Marking a guest as Optional
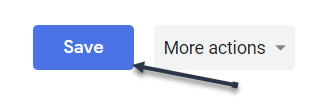
Now, click Save at the top to apply your change. See the below image:
Save your changes
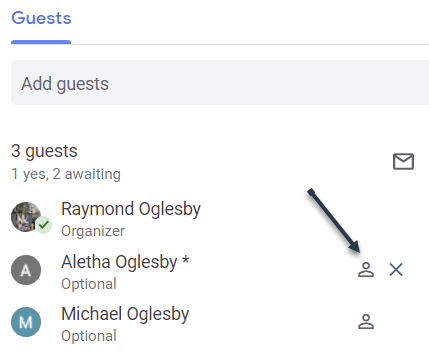
Next, the icon turns white and shows you the person is optional. If you want to make the attendee required again, just click that icon and hit Save. See the following image:
Guest is Optional
What Guest See
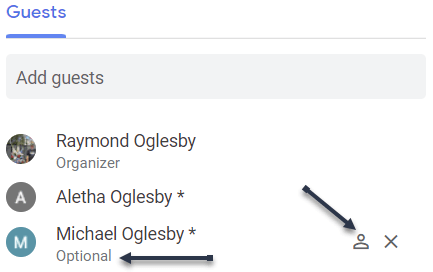
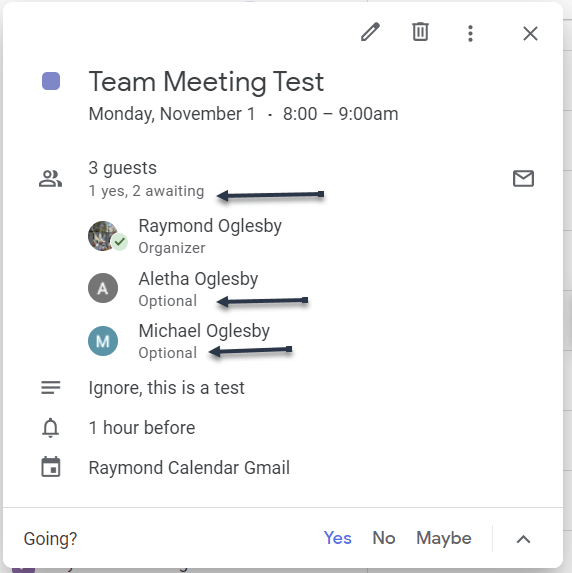
When you make an attendee optional for your event, the word Optional appears below their name. Anyone in the list of guests without the word Optional is required. Refer to the below image:
Viewing guests who are Optional
If you are setting up a meeting, conference call, or video call in Google Calendar and have certain guests that may want to attend but are not required to, you can easily use the Optional feature.
Quote For the Day
If we did all the things we are capable of, we would literally astound ourselves.
Thomas A Edison
That’s it. Now you know a seldom-used feature for making guests Optional in a Google Calendar event. Please feel free to share this post! One way to share is via Twitter.
Just click the Tweet icon below. This will launch Twitter where you click its icon to post the Tweet.
Check out TechSavvy.Life for blog posts on smartphones, PCs, and Macs! You may email us at contact@techsavvy.life for comments or questions.
Please feel free to leave a comment. I would love hearing from you. Do you have a computer or smart device tech question? I will do my best to answer your inquiry. Just send an email to contact@techsavvy.life. Please mention the device, app, and version you are using. To help us out, you can send screenshots of your data related to your question.
The author’s Vietnam eBook on the Battle for Tra Bong Vietnam: Events and Aftermath
You may be used to tapping the arrow keys to quickly scroll through images in Windows’ Photos app, but an even faster method is using the mouse wheel. Let’s explore how to make the mouse wheel scroll instead of zoom.
This is for devices running Windows 10
Copyright Scott Adams, Inc./Distributed by Universal Uclick for UFS
By default, when an image is open in Photos and you use your mouse wheel, your photo either zooms in or zooms out. By adjusting Photos’ settings, you can change this behavior so the mouse wheel opens the next or previous photo in your folder.
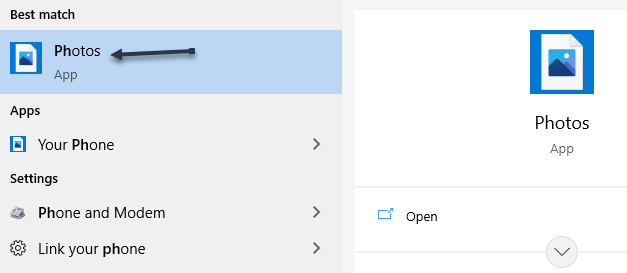
First, open the Photos app on your Windows 10 device by opening the Start menu, entering Photos in the Cortana search box, and clicking the app in the search results. Refer to the below image:
Selecting your Photos app
Next, in the top right-hand corner, click the three dots Menu. See the below image:
Selecting Photos Menu
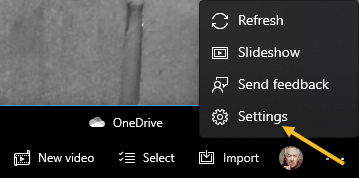
Now, select Settingsto open the Photos app’s Settings Menu. See the following image:
Selecting Photos Settings
Next, scroll down to the Viewing and Editing section. At the bottom of this section, in the Mouse Wheel subsection, enable the View next or previous item option. Refer to the below image:
Changing your mouse wheel option
And that’s it. In Photos, your mouse wheel will now navigate between the images in your folder.
Quote For the Day
Everything comes to him who hustles while he waits.
Thomas A Edison
You are finished. Please feel free to share this post! One way to share is via Twitter.
Just click the Tweet icon below. This will launch Twitter where you click its icon to post the Tweet.
Check out TechSavvy.Life for blog posts on smartphones, PCs, and Macs! You may email us at contact@techsavvy.life for comments or questions.
Please feel free to leave a comment. I would love hearing from you. Do you have a computer or smart device tech question? I will do my best to answer your inquiry. Just send an email to contact@techsavvy.life. Please mention the device, app, and version you are using. To help us out, you can send screenshots of your data related to your question.
The author’s Vietnam eBook on the Battle for Tra Bong Vietnam: Events and Aftermath
By default, when you search for something on Google, the site displays 10 results per page. If you would like to see more results, you can increase the results count from a Settings option on Google. (Note! As of this writing, this feature is only available for the desktop).
By default, when you search for something on Google, the site displays 10 results per page. If you would like to see more results, you can increase the results count from a Settings option on Google. (Note! As of this writing, this feature is only available for the desktop). In this blog post, we will show you how easily this is done.
This is for desktop devices using Google Search
Copyright Scott Adams, Inc./Distributed by Universal Uclick for UFS
To view more search results without having to click the next page number for your Windows, Mac, Linux, or Chromebook computer, first, open a web browser on your computer and access the Google site.
At the bottom right-hand corner of the Google site, click Settings. Refer to the below image:
Accessing Google Search Settings
Next, from the pop-up menu that opens, select Search settings. See the below image:
Accessing Search settings option
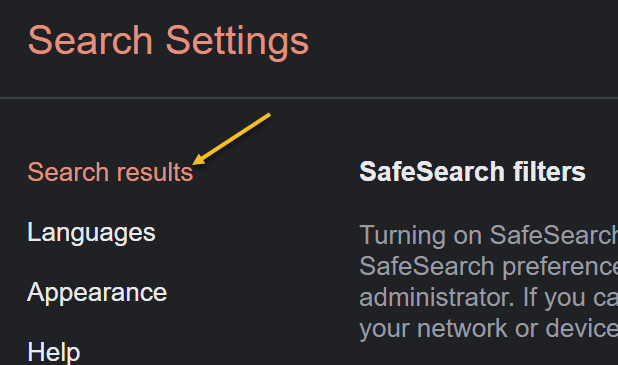
Now, on the Search Settings page, from the left sidebar, select Search results. See the following image:
Accessing Search results option
Next, on the right pane, you will see a Results per page slider. To increase the number of results per page, drag this slider to the right. Beneath the slider, you will see the number of search results you can enable on Google. Your options are 10, 20, 30, 40, 50, and 100. (Note! Your searches will be slower if you choose to display more results per page than the default). Refer to the below image:
Setting the slider for the number of search results per page
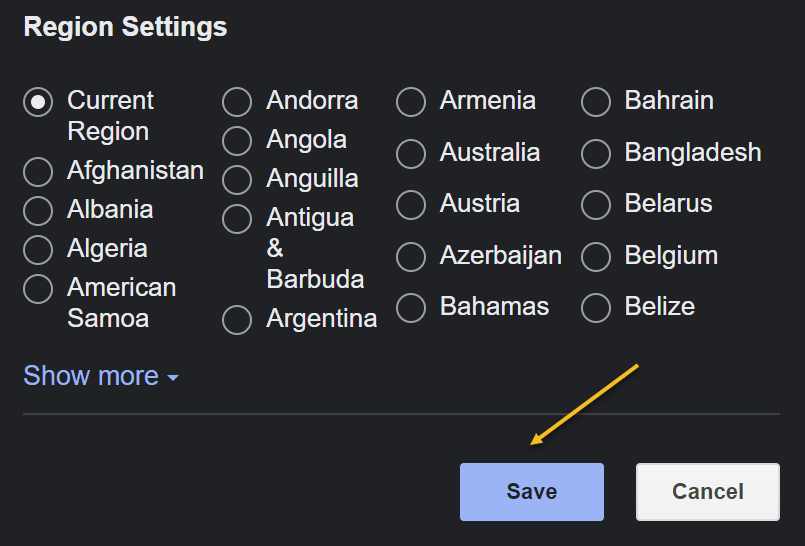
Now, to save your changes, scroll down to the bottom of the page, and click Save. See the below image:
Save your changes
Next, in the prompt, Your preferences have been saved, click OK. See the following image:
Confirming your changes
You will now see your selected number of search results per page on Google Search on your desktop. If you ever want to modify this option, you can head to the same menu and choose a new number.
Here is a helpful insight on using Google Search for you to consider. As of this writing, Chrome 95 has a bug in its Reading List option. To research, this or any other problem, start with the highest level then drill-down levels. For example, you would enter the following text for the search:
Google Chrome 95 Reading List option Add current tab is dimmed
The highest level is Google, next is Chrome 95, and so on. You will get better search results by following this guideline.
Quote For the Day
When you’re an engineer, you want to analyze things a lot. But if you believe that the most important data points are people, then you have to make conclusions in relatively short order. Because you want to push the people who are doing great. And you want to either develop the people who are not or, in a worst case, they need to be somewhere else.
Tim Cook
That’s it. Please feel free to share this post! One way to share is via Twitter.
Just click the Tweet icon below. This will launch Twitter where you click its icon to post the Tweet.
Check out TechSavvy.Life for blog posts on smartphones, PCs, and Macs! You may email us at contact@techsavvy.life for comments or questions.
Please feel free to leave a comment. I would love to hear from you. Do you have a computer or smart device tech question? I will do my best to answer your inquiry. Just send an email to contact@techsavvy.life. Please mention the device, app, and version you are using. To help us out, you can send screenshots of your data related to your question.
The author’s Vietnam eBook on the Battle for Tra Bong Vietnam: Events and Aftermath
Microsoft is leading the way for a passwordless future. You no longer are required passwords to login to your Microsoft account as you can now use the Microsoft Authenticator app, Windows Hello, a security key or a verification code sent via SMS or email.
Microsoft is leading the way for a passwordless future. You no longer are required passwords to login to your Microsoft account as you can now use the Microsoft Authenticator app, Windows Hello, a security key or a verification code sent via SMS or email. Let’s explore how to setup this feature.
The company has been preparing for a passwordless future for quite some time and its reason behind is the fact that passwords can be easily manipulated.
Vasu Jakkal, Corporate VP of Microsoft’s Security, Compliance and Identity, said “Weak passwords are the entry point for the majority of attacks across enterprise and consumer accounts. There are a whopping 579 password attacks every second—that’s 18 billion every year,” Jakkal added.
This is for devices using Microsoft Account. Screenshots are from iPhone XR.
Copyright Scott Adams, Inc./Distributed by Universal Uclick for UFS
First, install the Microsoft Authenticator app and link it to your Microsoft account. There are several authenticator apps, ensure you install the correct one from Microsoft. Refer to below image:
Download and install the Microsoft Authenticator app
Next, open your Microsoft account. See below image:
Your Microsoft account
Now, scroll down to Advanced security section and toggle on Passwordless account. See following image:
Setting Passwordless account option
Then follow the on-screen prompts and approve the notification from the Authenticator app.
Your Microsoft account is now passwordless. You can always go back to using a password for your account.
Quote For the Day
A lot of people in our industry haven’t had very diverse experiences. So they don’t have enough dots to connect, and they end up with very linear solutions without a broad perspective on the problem. The broader one’s understanding of the human experience, the better design we will have.
Steve Jobs
That’s it. Please feel free to share this post! One way to share is via Twitter.
Just click the Tweet icon below. This will launch Twitter where you click its icon to post the Tweet.
Check out TechSavvy.Life for blog posts on smartphones, PCs, and Macs! You may email us at contact@techsavvy.life for comments or questions.
Please feel free to leave a comment. I would love hearing from you. Do you have a computer or smart device tech question? I will do my best to answer your inquiry. Just send an email to contact@techsavvy.life. Please mention the device, app and version that you are using. To help us out, you can send screenshots of your data related to your question.
The author’s Vietnam eBook on the Battle for Tra Bong Vietnam: Events and Aftermath
With so many devices and so many social media accounts, it can be hard to remember where you are logged in to which accounts. To protect yourself from potential hacks, it’s a good idea to log out of social media sites, like Facebook, once you are done with your session, especially if you are using someone else’s device.
With so many devices and so many social media accounts, it can be hard to remember where you are logged in to which accounts. To protect yourself from potential hacks, it’s a good idea to log out of social media sites, like Facebook, once you are done with your session, especially if you are using someone else’s device.
But, if you forgot to log out, or suspect an unauthorized third-party login, you can still log out of all devices at once from your Facebook’s account settings. Let’s explore how this is done.
This is for devices running Facebook
Copyright Scott Adams, Inc./Distributed by Universal Uclick for UFS
Use Mobile App
If you use an iPhone, iPad, or Android phone, you can use the official Facebook app to sign out from Facebook on all your devices at once.
First, launch the Facebook app on your smartphone.
In the Facebook app, tap the three horizontal lines menu. On an iPhone or iPad, this menu is at the bottom of the screen. On an Android phone, you will find this menu at the top-right corner of the display. Refer to below image:
Accessing the Menu
Next, scroll down the Menu screen that opens, and tap Settings & Privacy. See below image:
Accessing Settings & Privacy option
Now, select Settings. See following image:
Accessing Settings option
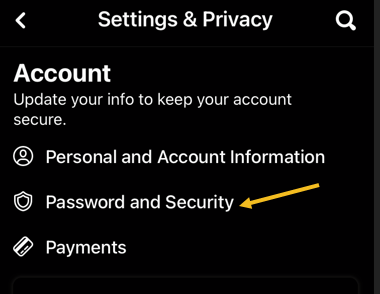
Next, scroll down to the Account section. Here, tap Password and Security. Refer to below image:
Accessing Password and Security option
Now, on the Where you’re logged In header, tap See All. (Note! My display text automatically changes size and the See All may be somewhat hidden depending on font size. See below image:
Accessing See All option
Facebook will display the list of devices where you use your account. At the bottom of this screen, tap Log Out of All Sessions. See following image:
Accessing Log Out Of All Sessions option
Next, select Log Out. Refer to below image:
Confirm your action by tapping Log Out
And Facebook will log you out from all your logged-in devices!
To use your Facebook account on those devices again, you will have to enter your Facebook username and password.
If you just want to log out of one session, tap the 3-dot icon to the right of a session, then tap Log Out and the session will be removed. See below image:
Log Out of one session
Use Facebook Site
If you are on a Windows, Mac, Linux, or Chromebook computer, use the Facebook site to sign yourself out from all your Facebook logged-in devices.
First, launch a web browser on your computer and open the Facebook site.
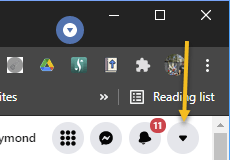
Next, at the top-right corner, click the down-arrow icon. See following image:
Accessing the Menu
Now, select Settings & Privacy. Refer to below image:
Accessing Settings & Privacy option
Next, choose Settings. See below image:
Accessing Settings option
Facebook will take you to your account’s settings page. Here, in the sidebar to the left, click Security and Login. See following image:
Accessing Security and Login option
Now, from the Where You’re Logged In section, click the See More option. Refer to below image:
Accessing See More option
Next, you will see a list of devices where you use your Facebook account. To sign out of all these devices, click Log Out Of All Sessions at the bottom-right corner of the Where You’re Logged In section. See below image:
Accessing Log Out Of All Sessions
Now, a Log Out of All Sessions prompt will appear. Next, click Log Out in the prompt to confirm your choice. See following image:
Confirm your action by tapping Log Out
And Facebook will log you out from all your logged-in devices!
To use your Facebook account on those devices again, you will have to enter your Facebook username and password.
If you just want to log out of one session, click the 3-dot icon to the right of the session, then click Log Out and the session will be removed. Refer to below image:
Log Out of one session
Quote For the Day
The thing that doesn’t fit is the thing that’s the most interesting: the part that doesn’t go according to what you expected.
Richard P Feynman
That’s it. Please feel free to share this post! One way to share is via Twitter.
Just click the Tweet icon below. This will launch Twitter where you click its icon to post the Tweet.
Check out TechSavvy.Life for blog posts on smartphones, PCs, and Macs! You may email us at contact@techsavvy.life for comments or questions.
Please feel free to leave a comment. I would love hearing from you. Do you have a computer or smart device tech question? I will do my best to answer your inquiry. Just send an email to contact@techsavvy.life. Please mention the device, app and version that you are using. To help us out, you can send screenshots of your data related to your question.
The author’s Vietnam eBook on the Battle for Tra Bong Vietnam: Events and Aftermath
Do you find yourself doing a lot of copy and paste of data in your spreadsheets? Did you know that you can use a special Excel’s paste feature to perform simple calculations? You can add, subtract, multiply, or divide in a few clicks with the paste special in Excel.
Do you find yourself doing a lot of copy and paste of data in your spreadsheets? Did you know that you can use a special Excel’s paste feature to perform simple calculations? You can add, subtract, multiply, or divide in a few clicks with the paste special in Excel. Let’s see how this is done.
This is for devices using Microsoft Excel. We are using Excel for Office 365.
Copyright Scott Adams, Inc./Distributed by Universal Uclick for UFS
Maybe you have prices that you want to increase or costs that you want to decrease by dollar amounts. Or, perhaps you have inventory that you want to increase or decrease by unit amounts. You can perform these types of calculations quickly on a large number of cells with Excel’s paste special operations.
Setup Paste Special
For each of your simple calculations, you will open the Paste Special dialog box. Next, you will start copying the data and then selecting the cell(s) that you are pasting to.
First, open Microsoft Excel. To copy, you can press Ctrl+C or right-click and select Copy. Refer to below image:
Selecting Copy option
Now, do one of the following to access Paste Special.
Click the Paste drop-down arrow in the ribbon on the Home tab, then select Paste Special.
Right-click cells that you are pasting to and select Paste Special in the shortcut menu.
See below image:
Selecting Paste Special option
Use Simple Calculations With Paste Special
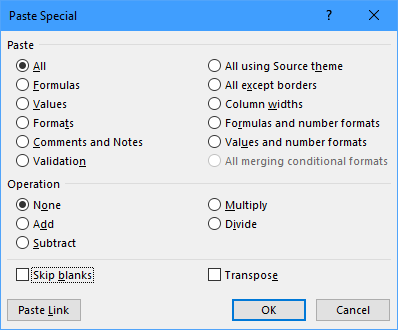
For basic numbers, decimals, and currency, you can choose from All, Values, or Values and Number Formats in the Paste section of the window. Use the best option for your data.
Next. you will use the section labeled Operation to add, subtract, multiply, or divide. See following image:
The Paste Special dialog box
Let’s look at a simple example of one operation to see how it all works.
Add With Paste Special
For this example, we want to add $50 to each of the amounts for our ski jacket prices to accommodate an increase.
We enter $50 into a cell outside of our data set and copy it. You might already have the data in your sheet or workbook that you need to copy. Refer to below image:
Selecting the amount for the increase
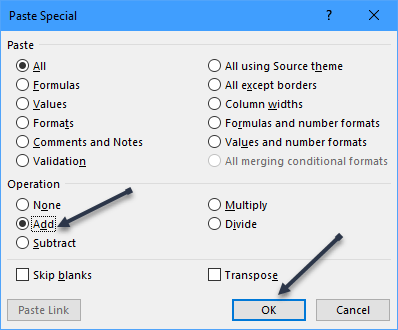
Now, we select the cells that we want to add $50 to and access Paste Special as described. Next, we choose Add in the Operation section and click OK. See below image:
Selecting to Add
And that’s it. All of the cells in your selection have increased by $50. See following image:
Your final result; all Ski Jackets are increased by $50
Subtract, multiply, or divide an amount works the same way. For multiply or divide, you would use units instead of currency.
Be sure to switch the operation back to None when you are finished.
The next time you need to add, subtract, multiply, or divide a large group of cells in Excel by the same amount, remember this trick using Paste Special.
Quote For the Day
I’m sorry, if you were right, I’d agree with you.
Robin Williams
That’s it. Please feel free to share this post! One way to share is via Twitter.
Just click the Tweet icon below. This will launch Twitter where you click its icon to post the Tweet.
Check out TechSavvy.Life for blog posts on smartphones, PCs, and Macs! You may email us at contact@techsavvy.life for comments or questions.
Please feel free to leave a comment. I would love hearing from you. Do you have a computer or smart device tech question? I will do my best to answer your inquiry. Just send an email to contact@techsavvy.life. Please mention the device, app and version that you are using. To help us out, you can send screenshots of your data related to your question.
The author’s Vietnam eBook on the Battle for Tra Bong Vietnam: Events and Aftermath
Features like Google account’s password and bookmark sync, extension support, cross-device migration, etc., make Chrome the number one choice over competitors. Chrome is the most installed web browser used today.
Features like Google account’s password and bookmark sync, extension support, cross-device migration, etc., make Chrome the number one choice over competitors. Chrome is the most installed web browser used today. Let’s explore how to set Chrome as your default browser.
This is for Windows 10 and iPhone/iPad running Chrome
Copyright Scott Adams, Inc./Distributed by Universal Uclick for UFS
Before we go any further, you need to have the Google Chrome browser installed on your computer or iPhone/iPad. You can download the Chrome app from the app or play store for your iPhone/iPad or from Google’s website if you are using a desktop or laptop.
Set Chrome as Default Browser on Windows 10
First, open System settings by pressing Windows key+I, and then click on Apps. Refer to below image:
Selecting Apps from Settings
Next, from the pane on the left side, click Default Apps. See below image:
Selecting Default Apps
Now, locate the Web Browser section, click on your current default browser, and then scroll through the list and select Google Chrome. See following image where Google Chrome is already my default browser:
Setting Chrome as default web browser
Next, close Settings. Chrome is now your default web browser.
Set Chrome as Default Browser on iPhone/iPad
If you are running iOS 14 and iPadOS 14 or higher, Apple made it possible to change the default web browser on iPhone/iPad.
First, locate your Settings app on your iPhone/iPad and tap it. Use Apple’s built-in Spotlight Search (your first screen) to quickly find the app if you can not locate it on your Home screen. Refer to below image:
Accessing Settings
Next, scroll down and select the Chromeapp. See below image:
Selecting Chrome
Now, select the Default Browser App from the menu. If the setting has not been changed before, it will list Safari as the default. See following image:
Selecting Default Browser app
Next, choose Chrome from the list of installed web browser apps. Refer to below image:
Setting Chrome as default web browser
Now, close Settings. The next time you click on a link in any app installed on your iPhone/iPad, it will automatically open Chrome.
Quote For the Day
I was born not knowing and have had only a little time to change that here and there.
Richard Feynman
And that’s it. Please feel free to share this post! One way to share is via Twitter.
Just click the Tweet icon below. This will launch Twitter where you click its icon to post the Tweet.
Checkout TechSavvy.Life for blog posts on smartphones, PCs, and Macs! You may email us at contact@techsavvy.life for comments or questions.
Please feel free to leave a comment. I would love hearing from you. Do you have a computer or smart device tech question? I will do my best to answer your inquiry. Just send an email to contact@techsavvy.life. Please mention the device, app and version that you are using. To help us out, you can send screenshots of your data related to your question.
The author’s Vietnam eBook on the Battle for Tra Bong Vietnam: Events and Aftermath
Apple’s iPhone and iPad takes photos in the HEIF image format by default. These photos have the HEIC file extension. Windows 10 can view HEIC files in just a few clicks; or you can convert them to standard JPEGs and view them anywhere.
Apple’s iPhone and iPad takes photos in the HEIF image format by default. These photos have the HEIC file extension. Windows 10 can view HEIC files in just a few clicks; or you can convert them to standard JPEGs and view them anywhere. Let’s explore how this is done.
This is for devices running Windows 10, iPhone, and iPad
Copyright Scott Adams, Inc./Distributed by Universal Uclick for UFS
What is HEIC
HEIC is the name that Apple gave to its container for the HEIF (High Efficiency Image File) image format and is based on the HEVC (High Efficiency Video Compression) video format.
What it means for you are high-quality images that take up less storage space thanks to a more modern compression method.
You can disable HEIC on the iPhone, but since its introduction in iOS 11, it has become Apple’s default photo storage format.
How to View HEIC Files
On modern versions of Windows 10, you can install support for HEIC image files.
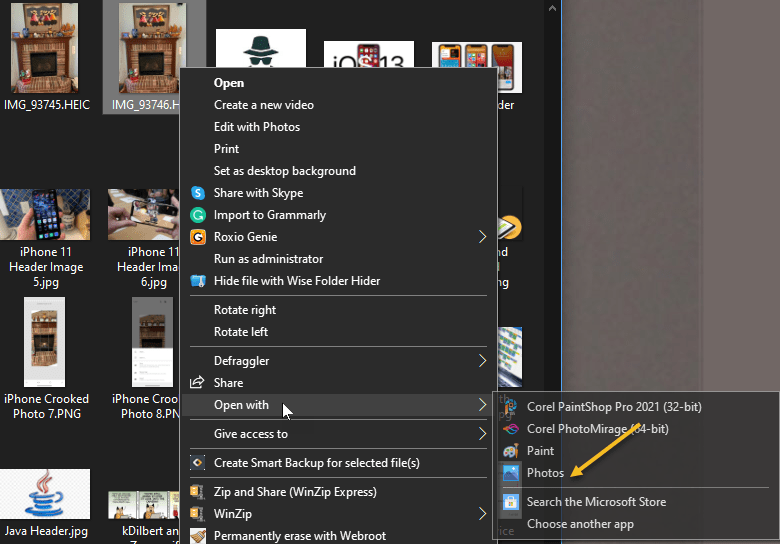
First, locate an HEIC file in File Explorer on your computer and double-click it. If you are asked which application you want to open it in, select Photos.
Note! If the HEIC file does not open in the Photos app, right-click the HEIC file and select
Open With > Photos
Refer to below image:
Selecting how to open HEIC photos
The Photos app will tell you that the HEIF Image Extension is required to display this file. Click the Download and install it now link to get it from the Microsoft Store. It’s a free download. If you do not see this requirement screen, do a Google search and install the extension. See below image:
Google search for HEIF extension
If Windows asks Did you mean to switch apps?, select Yes.
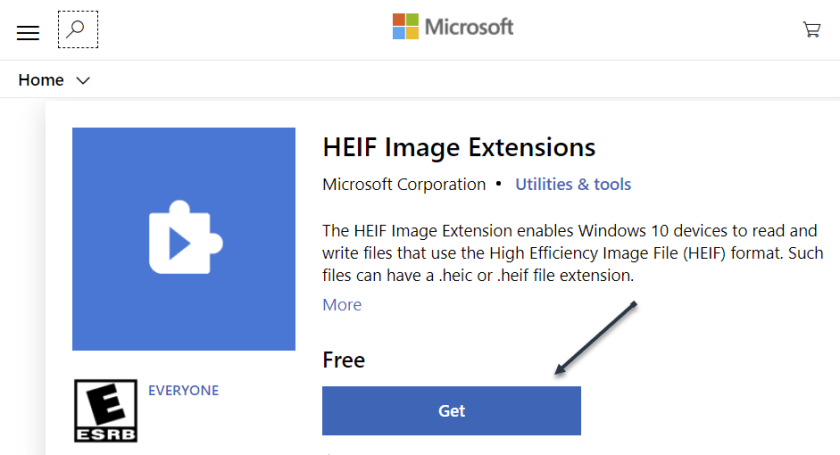
This will open the HEIF Image Extensions page in the Microsoft Store app. Click the Install or Get button to download support for HEIC image files (which use the HEIF format.) See following image:
Get or Install the HEIF extension
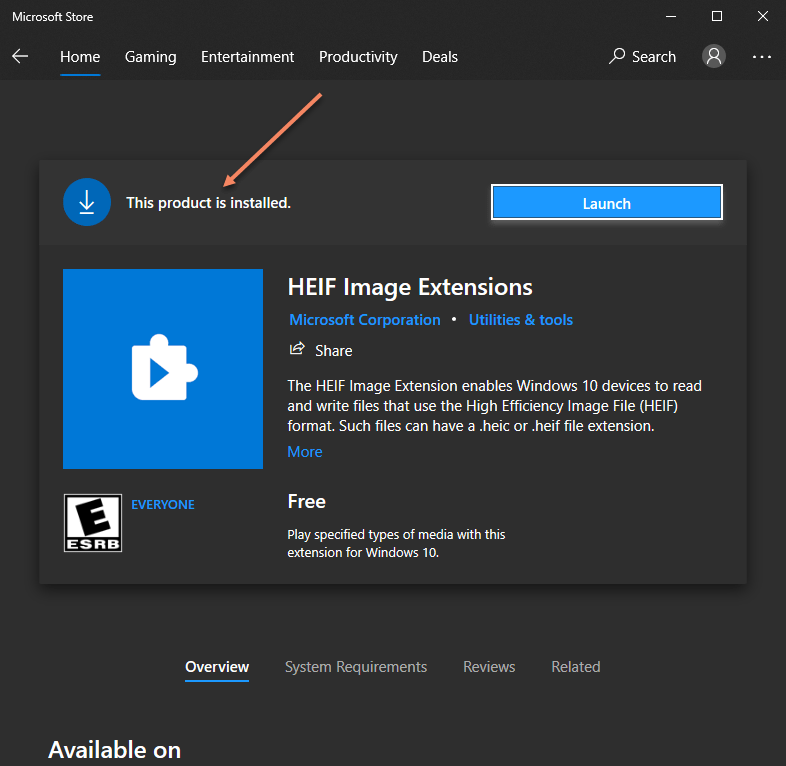
On the next screen, if the extension is already installed, you are set. If not, the Launch button will display Install instead. Just click to install the extension. Refer to below image:
Status of the extension
Now, when you open an HEIC image in the Photos app, you will be able to view it like you would any other image file, like a JPEG, PNG, GIF, or BMP. See below image:
HEIC photo
Windows 10’s File Explorer will automatically generate and display thumbnails for your HEIC image files, too. See following image:
Thumbnails of HEIC photos in File Explorer
Convert HEIC to JPEG
To quickly and easily convert HEIC files to standard JPEG images on Windows, we recommend you download and install CopyTrans HEIC for Windows.
This tool installs full support for HEIC images in Windows, so it’s particularly useful on Windows 7 and older versions of Windows 10 that do not have integrated support in the Photos app. It adds support for HEIC images to the classic Windows Photo Viewer.
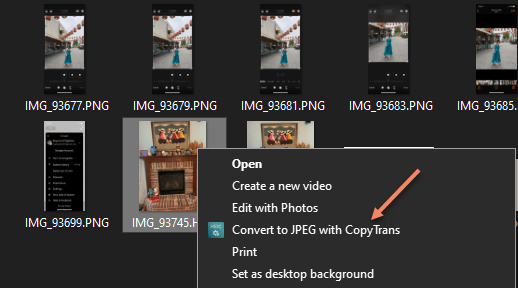
CopyTrans HEIC also allows you to right-click an HEIC file in File Explorer and select Convert to JPEG to easily convert it to a JPEG file. Select the option and you will get a JPEG version of the image automatically placed in the same folder as the original HEIC file.
JPEG files are more widely supported, so this will help you use the HEIC file in applications that support JPEG images but not HEIC files. Refer to below image:
Selecting to convert HEIC to JPEG
Change the Default
If you find dealing with HEIC files inconvenient, you can also configure your iPhone to always take photos in JPEG format.
Go to
Settings > Camera > Formats > (and checkmark) Most Compatible
instead of High Efficiency. See below image:
changing the default on iPhone
However, HEIC offers higher image quality in smaller file sizes. It’s a more modern image format, and we recommend sticking with it if the applications you use support it.
Quote For the Day
When you’re older you want to learn from other people.
Ray Bradbury
That’s it. Please feel free to share this post! One way to share is via Twitter.
Just click the Tweet icon below. This will launch Twitter where you click its icon to post the Tweet.
Checkout TechSavvy.Life for blog posts on smartphones, PCs, and Macs! You may email us at contact@techsavvy.life for comments or questions.
Please feel free to leave a comment. I would love hearing from you. Do you have a computer or smart device tech question? I will do my best to answer your inquiry. Just send an email to contact@techsavvy.life. Please mention the device, app and version that you are using. To help us out, you can send screenshots of your data related to your question.
The author’s Vietnam eBook on the Battle for Tra Bong Vietnam: Events and Aftermath
Adding your signature into a Microsoft Word document is a way to put your own stamp on it and make it look official and professional. Let’s explore how this is done.
This is for devices running Word. We are using Word for Microsoft 365 on Windows 10.
Copyright Scott Adams, Inc./Distributed by Universal Uclick for UFS
There are several ways to add your signature to a Word document. You can add a signature line for a post-print signature, or insert your own handwritten signature as a picture.
Add a Signature Line
A Signature Line provides you, or somebody else, with a location to sign a printed document. If you are planning on printing your Word document, adding a Signature Line is probably the easiest way.
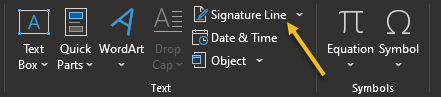
First, open a Word document. In the Text section, click
Insert > Signature Line
Refer to below image:
Selecting Signature Line option
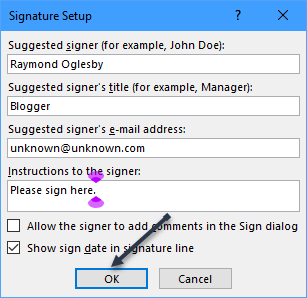
Next, in the Signature Setup box that appears, fill out your signature details. You can include the name, title, and email address of the signer. This can be you or somebody else.
You can also provide instructions for the signer. Once you are ready, click OK to insert your Signature Line. See below image:
Setting up Signature details
Now, once you have confirmed your signature options, a Signature Line is inserted with a cross and a line to signify where to sign. See following image:
Your Signature Line
You can now drag-and-drop this into an appropriate position within your Word document. The document can then be signed at this position after printing.
Add a Picture Signature
If you would prefer to use your handwritten signature, you can take a picture or scan a copy of it and upload it to your computer. You can then insert a picture of your signature into the Word document.
First, place your cursor where you want to locate the signature, preferably just below the Signature Line box.
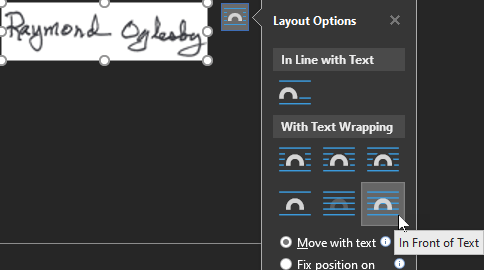
To insert the image into your document, click
Insert > Pictures > This Device
Your File Explorer will open for you to choose your signature image, then click Insert. Highlight your Signature Line box, and click the Layout Options icon. From here, choose the Layout Option, In Front of Text.
Selecting In Front of Text for Layout Option
Next, drag-and-drop your signature picture onto the Signature Line. See below image:
Your final result
Optionally, following the above steps, you could add a photo below or to the side of your Signature Line box.
Quote For the Day
People are always asking for the latest developments in the unification of this theory with that theory, and they don’t give us a chance to tell them anything about one of the theories that we know pretty well. They always want to know things that we don’t know.
Richard P Feynman
That’s it. You now know how to add a signature into a Word document. Please feel free to share this post! One way to share is via Twitter.
Just click the Tweet icon below. This will launch Twitter where you click its icon to post the Tweet.
Check out TechSavvy.Life for blog posts on smartphones, PCs, and Macs! You may email us at contact@techsavvy.life for comments or questions.
Please feel free to leave a comment. I would love hearing from you. Do you have a computer or smart device tech question? I will do my best to answer your inquiry. Just send an email to contact@techsavvy.life. Please mention the device, app and version that you are using. To help us out, you can send screenshots of your data related to your question.
The author’s Vietnam eBook on the Battle for Tra Bong Vietnam: Events and Aftermath