This is a summary of Zoom posts I have blogged about over the past few weeks. During the COVID-19 pandemic, many of us are working from home using Zoom for video/audio conferencing. If you take some time, you can make the video meeting a smooth experience for all participants. The host of the Zoom meeting has the responsiblity to setup and run the meeting. By exploring the following blog posts, you can achieve your goal of hosting a successful meeting, making it easy for the participants to join the video conference and keeping the Zoom troll attacks at a minimum.
This if for a PCs and Macs browsers and smartdevices that support Zoom
Copyright Scott Adams, Inc./Distributed by Universal Uclick for UFS
Following are my blog links for a Zoom video/audio meeting:
Please feel free to leave a comment. I would love hearing from you. Do you have a computer or smart device tech question? I will do my best to answer your inquiry. Please mention the device, app and version that you are using. To help us out, you can send screenshots of your data related to your question.
The author’s Vietnam eBook on the Battle for Tra Bong: Events and Aftermath
Internet trolls are crashing Zoom video conferences and flooding them with inappropriate content. Here are some ways to stablize your meetings and keep Zoom running smoothly.
This if for a PCs and Macs browsers and smartdevices that support Zoom
opyright Scott Adams, Inc./Distributed by Universal Uclick for UFS
1. Close All Running Apps
Before you start your video conference call or join the on-line meeting, save your work and close all running apps. Too many open apps will slow down your computer while you’re on a video call. This is because the call requires a lot of resources, especially if you’re on a lightweight laptop.
2. Check the Speed of Your Browser
Before your call, use a speed test tool, like Fast.com or Speedtest.net, to test your internet speed. If you’re not getting enough speed, move closer to your Wi-Fi router or try some other tips to boost your Wi-Fi signal. You can also use one of these tools to speed up your internet connection. Minimum bandwidth is 600 Kbps (up/down) and recommended is 1.5 Mbps (up/down). You may need to call your internet service provider and/or upgrade your equipment, which would be the best choice, if your equipment does not meet the minimum.
If you run both programs, you will notice a signifance difference in the speed test. This is due to the time of day you run the test, servers they are using and its location. Hopefully, your equipment exceeds the minimum speed for a Zoom meeting.
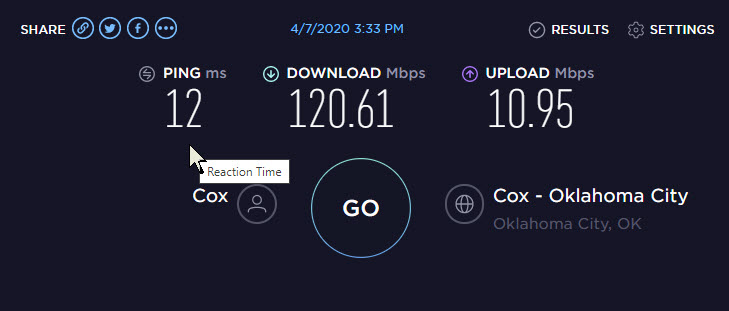
Below are my results in running Speedtest for Windows (Note that I greatly exceed the minimum):
Results in running SpeedTest on my browser
3. Test Your Audio and Video
You can also launch a test Zoom meeting anytime at zoom.us/test. This will launch a meeting where you are the only participant (you can invite others). This option lets you test your audio and video even if you don’t have the Zoom app installed.
See the article Joining A Test Meeting in the Zoom Help Center for more information about using the using the Zoom Test Meeting feature.
4. Mute Yourself When Not Speaking
When you’re in a video meeting with a lot of participants, it’s best to keep yourself muted. Only unmute yourself when you need to speak.
This eliminates any background noise on your end. Also, if anyone walks in the room and starts talking while you’re on a call, you won’t have to rush to find the mute button.
5. Never Use Your Personal Meeting ID
Each Zoom user has a personal meeting ID; think of it as your Zoom phone number. When creating a meeting, you can use your personal ID or generate a random one. You should always generate a random meeting ID.
If your personal meeting ID is leaked to the web, Zoom trolls are free to harass you with calls whenever they please.
6. Always Use a Meeting Password
For a video meeting other than a large classroom, town hall or lecture meeting, passwords should be turned on.
Make sure the password is kept safe. Zoom sends meeting passwords out to all invitees when invitations are sent. If you’re worried that someone unwanted may get the password, create the meeting without one set, update the meeting to add a password and send it out to invitees in a separate email or via another form of communication.
7. Set Join the Waiting Room Option
When you enable the waiting room for a Zoom meeting, each user who connects is put in a queue that the meeting host has to approve. If you don’t recognize someone in the waiting room, simply don’t let them in.
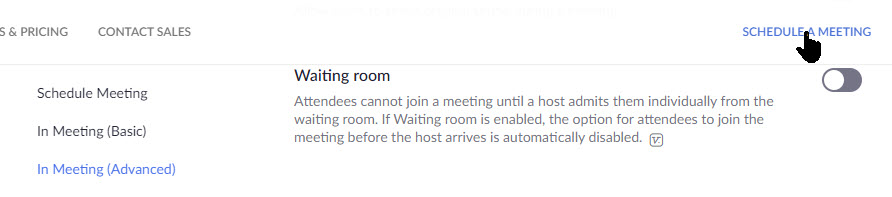
To enable this feature, navigate to Settings > In Meeting (Advanced), scroll down till you see the following option and toggle it to the On position. See below image:
Setting Join Waiting Room option
8. Set Meeting Options
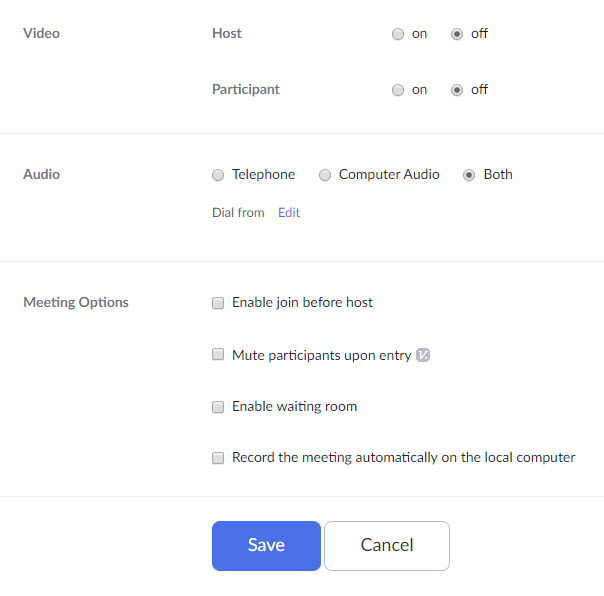
Under Meetings > Schedule a Meeting, set the following options:
Video > Host to On
Video > Participant to Off especially if your participates are using older equipment
Audio set to Both
Meeting Options set Emable waiting room to On. Set Record the meeting automatically on the local computer should only be set to On for the host. You don’t want each particpant to be recording and viewing at the same time. If a participate wants a recording, the host can send the video via email or some other form of communication.
Always Save you changes. Refer to following image:
Setting other options
9.Turn Off Screen Sharing
Zoom trolls need to be able to visually take over a meeting to be effective. Preventing anyone from sharing their screen aside from the meeting host stops them from being able to go on the attack.
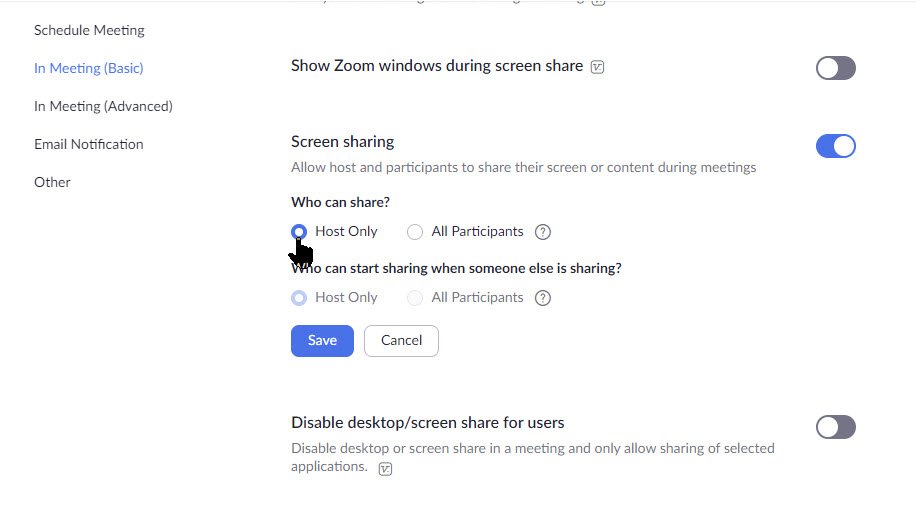
Under Settings > In Meeting (Basic), scroll down till you see the Show Zoom windows during screen share and set the following options:
Screen sharing, toggle to On
Who can share, toggle Host Only to On
Who can share when someone else is sharing, toggle Host Only to On
Always Save your changes. Refer to below image:
Setting screen share option
I Would Like to Hear from You
Please feel free to leave a comment. I would love hearing from you. Do you have a computer or smart device tech question? I will do my best to answer your inquiry. Please mention the device, app and version that you are using. To help us out, you can send screenshots of your data related to your question.
The author’s Vietnam eBook on the Battle for Tra Bong: Events and Aftermath
If you don’t want to see your own face during a Zoom video meeting, here’s how to hide, unhide and tweak your video settings.
A lot of us used to working in offices have found ourselves working at home due to the outbreak of theCoronavirus and that means a lot of virtual meetings. Users new to Zoom’s desktop app may find it a bit odd when their face appears while speaking. If you want to hide your own video, adjust it so you don’t take over the screen or bring it back once it’s hidden, then this post is for you.
There are several options for hiding and unhiding videos during a Zoom meeting, both for yourself and other. Lets get started.
This if for a PC, Macs, iPhone/iPad and Android devices that support Zoom
Copyright Scott Adams, Inc./Distributed by Universal Uclick for UFS
Accessing Zoom Settings
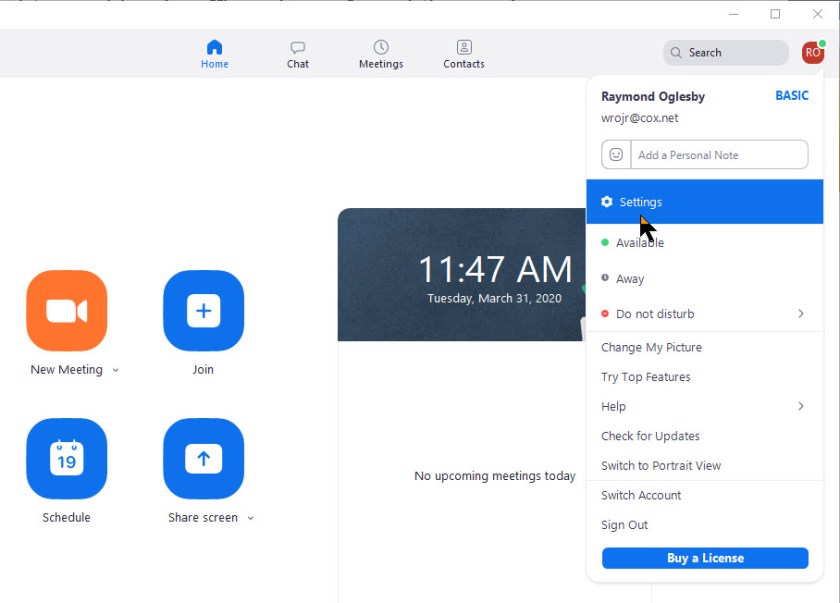
First, fire up Zoom and join an active meeting. Then click on your small profile photo in upper right-hand corner. This will open up the dialog options window. From here, click on the Settings option. See below image:
Accessomg the Settings option
The Video Settings
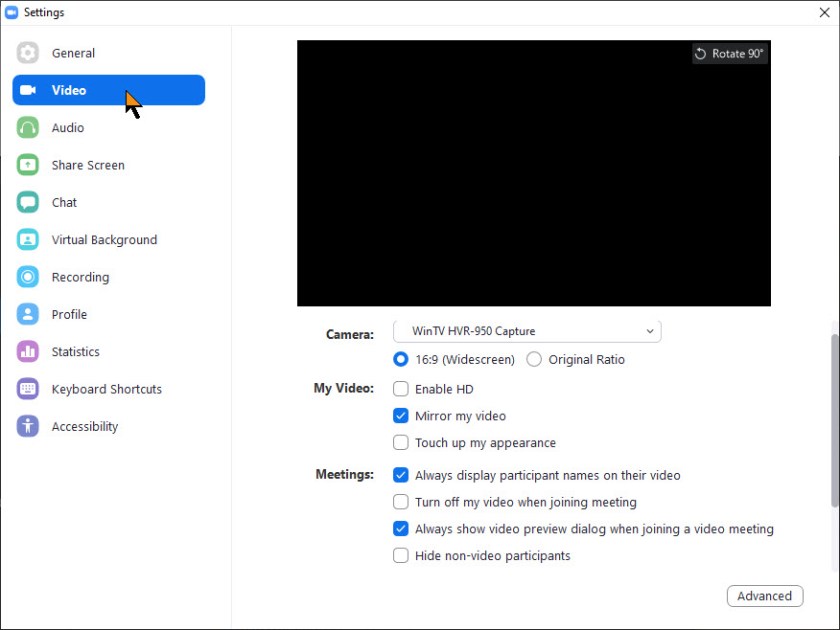
Once you click on the Settings option, the Settings dialog window will be revealed. Now, click on the Video tab. The below image only shows some of the settings.
Note!The black area on the below screens would show your online video image.
The Video tab part one
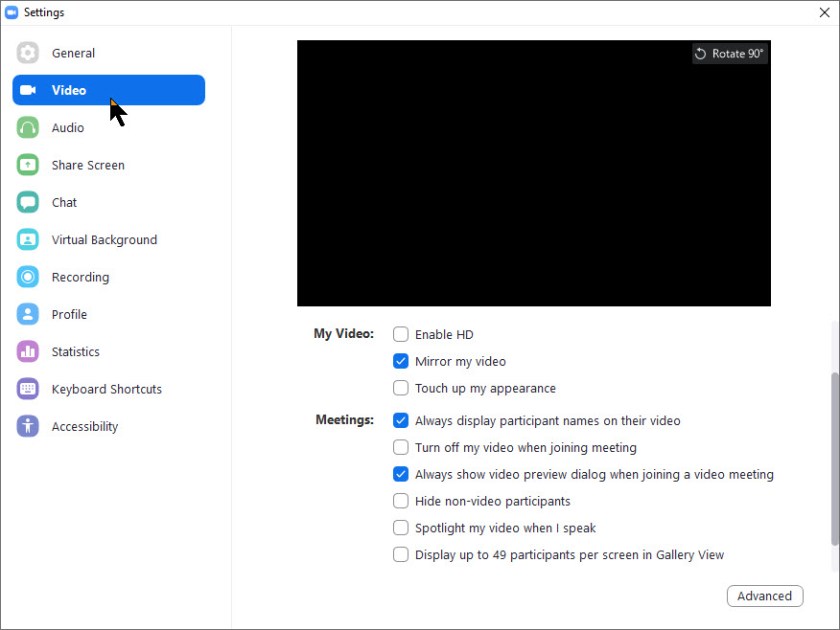
The Video tab has numerous options for configuring video in meetings that will change the way Zoom handles all videos in a meeting. The below image shows the rest of the settings.
The Video tab part two
Hide/Unhide a Video
During a meeting, if you wish to hide your video from your own screen to make room for other participants, just right-click on your video and choose Hide Myself. If you want to bring your own video back onto your screen, just right-click on any other user and select Show Myself.
Note! This won’t disable your video from showing up for other participants; only from from your screen.
To disable your own video completely, you can select the checkbox in the Video Settings screen shown above that says Turn off my video when joining a meeting to disable it, or click the Stop Video button in a meeting to temporary turn it off for the video session.
I Would Like to Hear from You
Please feel free to leave a comment. I would love hearing from you. Do you have a computer or smart device tech question? I will do my best to answer your inquiry. Please mention the device, app and version that you are using. To help us out, you can send screenshots of your data related to your question.
The author’s Vietnam eBook on the Battle for Tra Bong: Events and Aftermath
Facebook’s new website interface change is not well known. At some point, it will probably be the new standard. The interface is getting a visual overhaul that almost everyone can access. You can now update to this brand new, less cluttered design with the click of a button. If you don’t like the change, you can easily switch back to the classic interface.
This if for a desktop/laptop, Macs and smartphones supporting Facebook
Copyright Scott Adams, Inc./Distributed by Universal Uclick for UFS
Enabling the New Interface
Note! This post relates to a PC, other devices will be similar. If you don’t see the new Facebook option then Facebook has yet to rollout the change to your device.
Fire up your device and log in to your Facebook account.
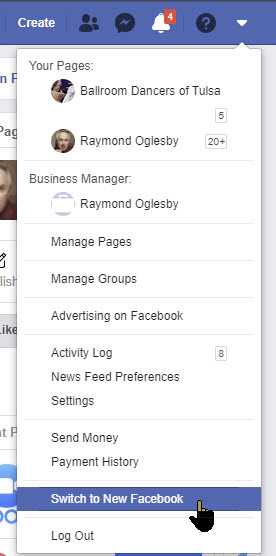
Next, click on the down arrow in the top-right corner of the interface. Select the Switch To New Facebook option. The page will refresh and the new interface design will load. Refer to below image:
Switch to the new Facebook option
A welcome message will appear the first time that you switch to the new Facebook design. Facebook claims that the redesign has faster loading time, cleaner look and bigger text. Additionally, Facebook now includes a dark mode that you can enable whenever you want.
Additionally, this update comes with a user-friendly redesign of the Groups tab and an overhaul of the News Feed. See below image:
The Welcome message for the new interface
Simply click the Next button. You will see the following image allowing you to select how yout interface will look.
Selecting your interface look
Just click the Get Started button. That’s it, you are all set with the new desktop interface. If you aren’t a fan of the Dark mode, you can switch back to Light whenever you like.
Switching Back to the Classic Interface
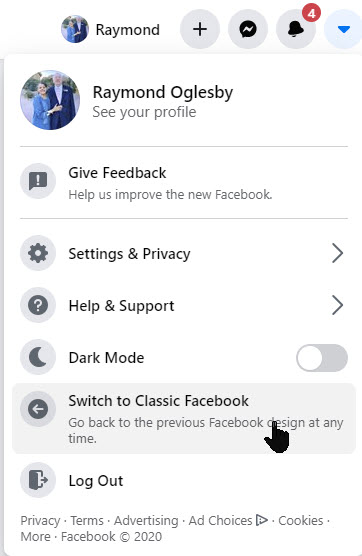
Once you’ve enabled the new interface, you can always revert the change from your Facebook account’s front page. Just click on the down arrow in the top-right and then select Switch To Classic Facebook. See following image:
Reverting back to the Classic interface
At some point in the future, Facebook may decide to roll out the new design permentally for all platforms. If so, reverting back to the classic interface will no longer be an option.
I Would Like to Hear from You
Please feel free to leave a comment. I would love hearing from you. Do you have a computer or smart device tech question? I will do my best to answer your inquiry. Please mention the device, app and version that you are using. To help us out, you can send screenshots of your data related to your question.
The author’s Vietnam eBook on the Battle for Tra Bong: Events and Aftermath
Why take notes during a Zoom meeting when you can refer back to a recording of the entire call? Here’s how to record a Zoom meeting, whether you’re the host or not.
Important meetings need good records, and anyone who has taken notes knows that some details can be missed. The best way to preserve a record of a meeting is to have a video recording.
That goes doubly for remote meetings, where distractions, tech issues and other problems can lead to you missing out on essential information.
If you are using an Enterprise account to host a meeting, you may not be able to record a Zoom meeting unless your IT team has given you permission. Be sure to check with your administrator before the meeting to grant you access if you don’t have it.
If using a PC or Mac, be sure your computer has a microphone and/or camera to use Zoom to its fullest. You may also use your smartphone to record the meeting.
This if for a PC, Macs, iPhone/iPad and Android devices that support Zoom
Copyright Scott Adams, Inc./Distributed by Universal Uclick for UFS
Accessing Zoom Settings
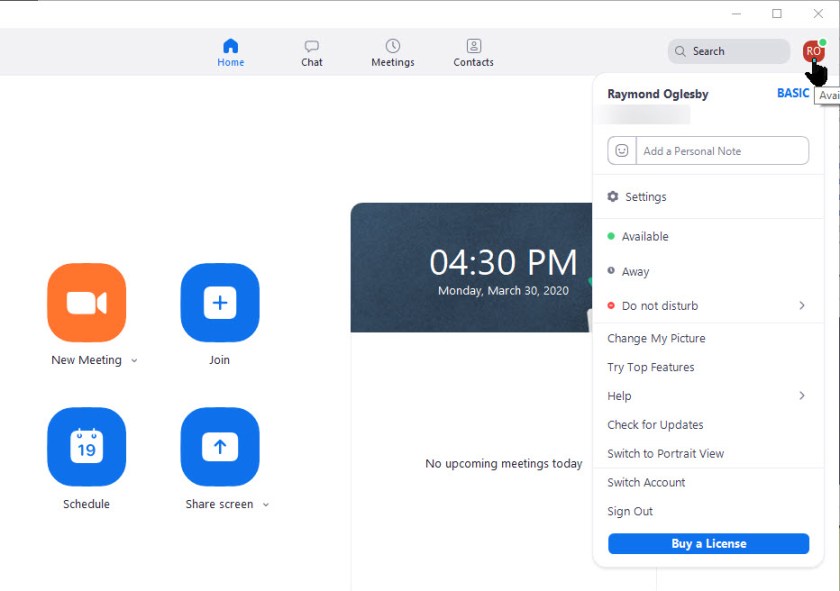
First, fire up Zoom and join an active meeting. Then click on your small profile photo in upper right-hand corner. This will open up the dialog options window. See below image:
Zoom dialog Options window
Recording a Zoom Meeting
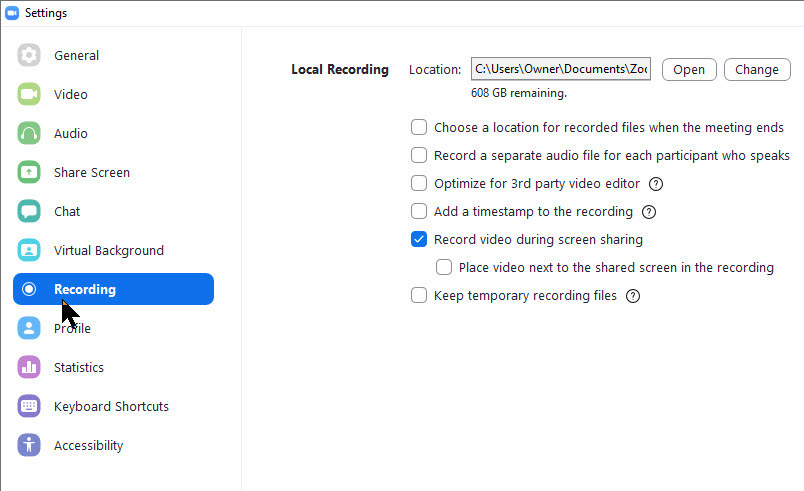
Next, click on the Settings option. The Settings options will be displayed. The Record video during screen sharing option should be checkmarked. Also, at the top of the screen is the location where your video will be stored upon completion. This folder was created when you installed Zoom. Refer to below image:
Settings options for recording a video
By default, only the meeting host can record the meeting, but it’s easy to grant other participants the ability to do so. The meeting host can do so by clicking on Participants while in a meeting, looking for the More button next to an individual’s name and selecting Allow Record.
Once in a meeting, those wanting to record only need to click the Record button to start capture, at which point the Record button will change into two buttons: One to Pause the recording and one to Stop recording.
When you’re done recording video, Zoom stores it temporarily in the location mentioned above. The video is encoded into MP4 format once the meeting has ended.
I Would Like to Hear from You
Please feel free to leave a comment. I would love hearing from you. Do you have a computer or smart device tech question? I will do my best to answer your inquiry. Please mention the device, app and version that you are using. To help us out, you can send screenshots of your data related to your question.
The author’s Vietnam eBook on the Battle for Tra Bong: Events and Aftermath
In this Coronavirus pandemic, many people are working from home. Our local TV news and weather people have live audio and video streaming from their homes for the daily news broadcast. Working from home has become the new norm.
This will continue after the crisis is over. Instead of going to an office or to a clients location, you will collaborate through an audio and video service.
I researched some web sites for the top call services. They have a similar mix of apps, just in a different order. Some of the web sites have organizations I never heard of. So, I like the ranking from Office Watch. Click here to read their review.
This is for modern web browsers and apps on Apple, Android and Microsoft platforms
Their top seven online call services are as follows:
FaceTime – handles up to 32 people
Skype – up to 50 people
WhatsApp – handles 4 people
Signal – one-on-one calls only
Zoom and Meetings – up to 100 people for the free version; 1000 for their enterprise paid version
Microsoft Teams and Live Events – can handle 4 participates, up to 10,000 for the paid version
Google Hangouts – up to 150 people
I recommend Facetime or Skype for a small busines; Zoom for a medium business; and Zoom Meetings for a large enterprise. Facetime and basic Zoom are free. Click here to read the review of their rankings.
I Would Like to Hear From You
Please feel free to leave a comment. I would love hearing from you. Do you have a computer or smart device tech question? I will do my best to answer your inquiry. Please mention the device, app and version that you are using. To help us out, you can send screenshots of your data related to your question.
The author’s Vietnam eBook on the Battle for Tra Bong: Events and Aftermath
Is your business using Zoom for collaboration during the Coronavirus outbreak? Zoom has become a key tool for working at home and a top choice for vittual meetings. Zoom is free for one-on-one calls that last as long as you like. For three or more people, your calls are limited to 40 minutes. Zoom also has a paid version for an enterprise; it can handle 1000 people.There’s also a plan for small and medium businesses that supports up to 300 participates per call..
Zoom Meeting’s free account is generous. You can host up to 100 people on a call for free and you can see as many as 49 people on an active call in a gallery-style view. There’s no limit on how many meetings you can host.
So, how do we setup our contacts with coworkers using Zoom? In this post we offer insight on how to do this.
This post is for Windows 7 or greater, iPhone or iPad with iOS 7 or later, Android 4 or greater, Web browsers, Macs and the Zoom app or program
Copyright Scott Adams, Inc./Distributed by Universal Uclick for UFS
Before you Begin
Of course, you have already setup the app. Linking to other people in Zoom is necessary before you can call them. A person has to be added to your Zoom contacts list and they have to add you before a call is made.
Zoom contacts are separate from Outlook and other contacts list.
Zoom links people by matching email addresses. Some people have multiple email addresses; for example, personal and work or different ones for different purposes or multiple old email addresses.
Which Email Address to Use?
Before adding a person to your contacts list it’s a good idea to check with them on which email address they use to login to Zoom.
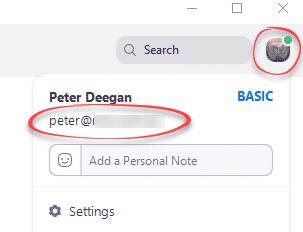
To check, they can click on their Zoom Profile in the top right where their name and address is displayed. Refer to below image:
Locate the correct email address
Invite a Contact
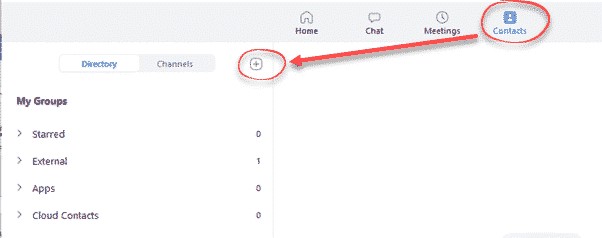
To link with someone, in the Zoom app, go to the Contacts section, then click the plus “+ “symbol. See following image:
Linking a Zoom contact
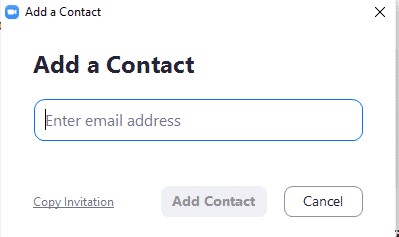
Enter the email address of the contact you want to add to Zoom. See below image:
Adding a Zoom contact
Then you have two options:
Add Contact – sends a contact request to that person’s Zoom account.
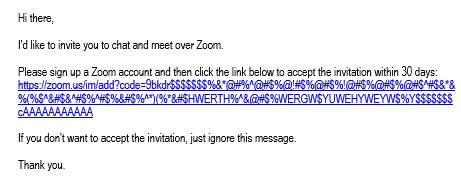
Copy Invitation – copies to your clipboard with web link. Paste that into an email or instant message.
Refer to below image:
Web address for the Zoom contact
There is no need to paste the entire text, change it to suit you. The web link is the important part to pass along. Make sure you include the whole web link; it’s a long link using multiple lines.
Accept a Contact Request
If a participate adds you to their Zoom contact list, you’ll see a pop-up alert. See following image:
Pop-up box for a contact request
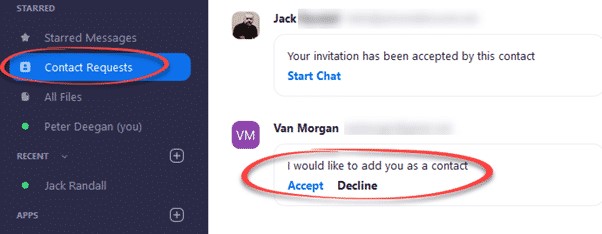
Or open your Zoom app/web page. Under Contacts look at Contact Requests. The request will be displayed with options to Accept or Decline. Refer to below image:
Accept or Decline a contact request
As you can see above, the Contact Requests you’ve made will also appear with their current status.
What to Do Next?
Now that you’ve linked with someone on Zoom, you can call them (voice, video, text, etc). If someone wants to invite you into a Zoom meeting, give them you Zoom linked email address.
That’s it on setting up your Zoom contacts. Try it out.
I Would Like to Hear from You
Please feel free to leave a comment. I would love hearing from you. Do you have a computer or smart device tech question? I will do my best to answer your inquiry. Please mention the device, app and version that you are using. To help me out, you can send screenshots of your data related to your question.
The author’s Vietnam eBook on the Battle for Tra Bong: Events and Aftermath