How to Use Different Time Zones in Google Calendar on Mobile Devices

You can change your time zone and create events with certain time zones. This helps if you will be traveling when the event happens, or if you are creating events for people in different time zones.

You can change your time zone and create events with certain time zones. This helps if you will be traveling when the event happens, or if you are creating events for people in different time zones.

Time might be constant, but your time zone does not have to be. You can set a one-off time zone to an event, or set primary and secondary (desktop version only) time zones for an entire calendar or account.

This is for Android, iPhone, and iPad running Google Calendar

Copyright Scott Adams, Inc./Distributed by Universal Uclick for UFS

How Your Calendar Uses Time Zones

According to Google:

  • For Events; When you create an event, you will see it in your local time zone. It will also show up in the local time zones for anyone you invite, even if they are in a different time zone.
  • For Reminders: Reminders always show up at the same hour regardless of time zone. For example, a daily 9 AM MT reminder becomes a 9 AM ET reminder if you travel from Denver to New York.
  • For Tasks: Tasks adapt to the new time zone if the Calendar’s time zone is changed after a task is created. For example, a 9 AM MT task changes to an 11 AM ET task if you travel from Denver to New York.

Confused, I am. Why not make all these options the same? I do not know why Google treats each option differently. Lets explore how to set a Google Calendar time zone.

Change Your Time Zone for One Event

You can change the time zone for a new or existing event in the Google Calendar app on Android, iPhone, and iPad.

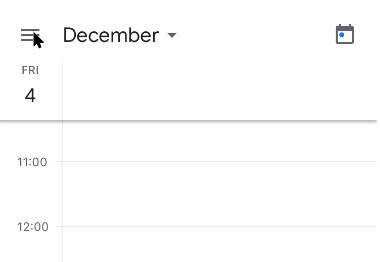
To create a new event, click the Add button in the bottom-right corner and select the type of event you wish to create. Refer to below image:

Calendar 1
Add an Event

To edit an existing event, tap on that event in your calendar view and then tap the Edit Event button. See below image:

Calendar 2
Edit an Event

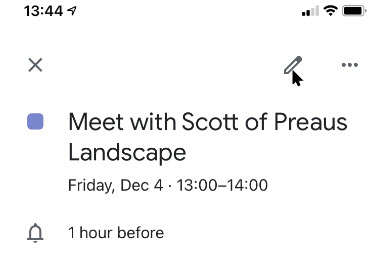
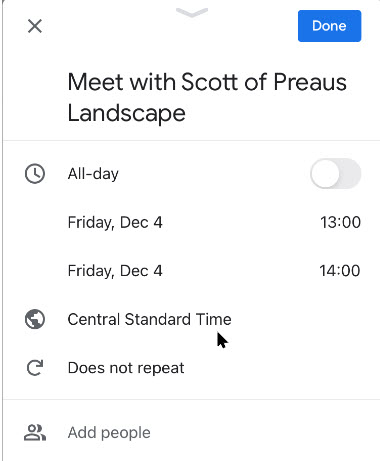
Next, in the event details menu, tap the current time zone. (Note!. You may have to tap More options to see the time zone). See following image:

Calendar 3
The current time zone for the Event

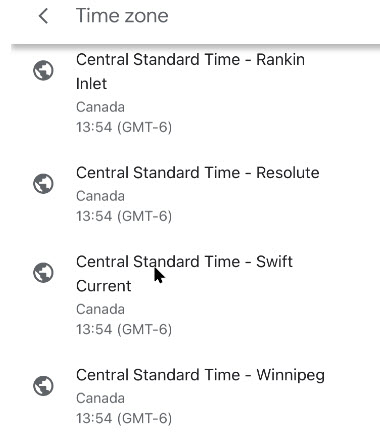
In the next menu, search for a country or specific time zone. Next, tap one of the results to select it as the new time zone. (Note! I kept the Event in CST). Refer to below image:

Calendar 4
Selecting a time zone for the Event

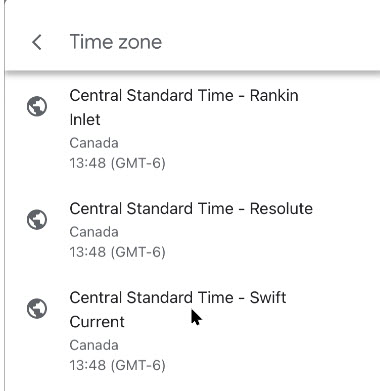
The time zone for the event will be added immediately after selecting it from the Search menu.

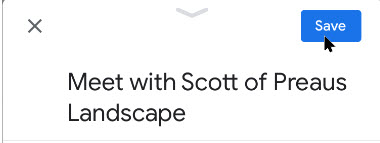
Confirm the rest of the event details are correct. Now, tap the Save button in the top-right corner to save the Event with the new time zone details. See below image:

Calendar 5
Save your changes

Change Your Time Zone Settings for All Events

When you travel to a different time zone, you can see your calendar in the local time. This can be confusing. The time zone is updated depending on if you are creating an event, reminder, or task. To keep your event times in your local time, I recommend not to create events, reminders, or tasks while in a different time zone, espicially if you are only going to be away from home a short while; wait till you get back to your local time zone to create them.

To change this setting:

Launch the Google Calendar app.

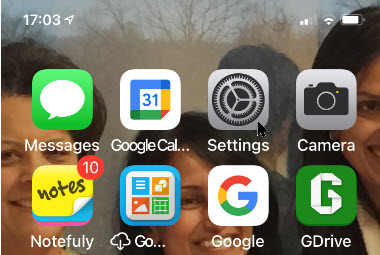
Next, tap the Menu hamburger icon in top left of your screen. See following image:

Calendar 6
Acccess the Menu

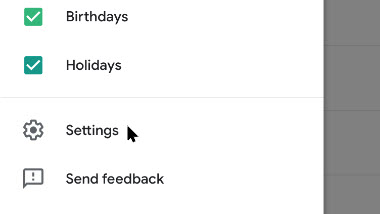
Now, swipe down and tap the Settings option. Refer to below image:

Calendar 7
Access Settings

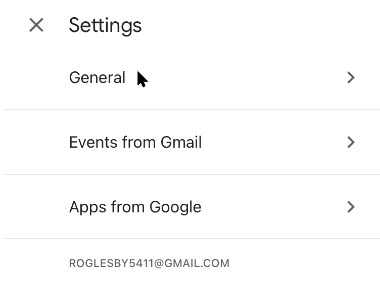
Next, tap the General option. See below image:

Calendar 8
Access the General option

Now, tap Use device time zone on or off. If On, your device will update automatically as you travel. See following image:

Calendar 9
Selecting Use device time zone toggle

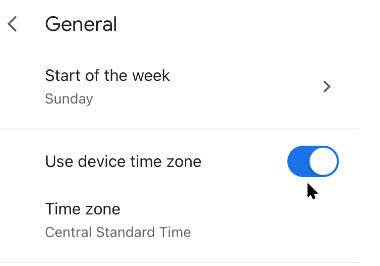
If Off, you can select a new time zone from the drop down menu. (Note! I kept the Events in CST). Refer to below image:

Calendarr 10
=Select a time zone for all Events

The new time zone for Google Calendar on your device will be applied automatically. Any entries in your Google Calendar will now be displayed in this new time zone on your mobile device. As I mentioned previously, this can be confusing, at least to me it is, so make sure what time zone you want to create events, teminders, or tasks. Now, tap back and exit Settings.

You are finished. Now you know how to see time zones in Google Calendar for events, remindars, or tasks. Please feel free to share this post! One way to share is via Twitter, as mentioned below.

Just click the Tweet icon below. This will launch Twitter where you click its icon to post the Tweet.

Check out TechSavvy.Life for blog posts on smartphones, PCs, and Macs! You may email us at contact@techsavvy.life for comments or questions.

I Would Like to Hear From You

Please feel free to leave a comment. I would love hearing from you. Do you have a computer or smart device tech question? I will do my best to answer your inquiry. Just send an email to contact@techsavvy.life. Please mention the device, app and version that you are using. To help us out, you can send screenshots of your data related to your question.

The author’s Vietnam eBook on the Battle for Tra Bong: Events and Aftermath

How to Identify Music on iPhone or iPad

Apple released a software update for iPhones and iPads in their operating system that includes a built-in music recognition icon that can help you quickly identify a song that is playing.

Apple released a software update for iPhones and iPads in their operating system that includes a built-in music recognition app that can help you quickly identify a song that is playing.

It is one way Apple is using Shazam, which it acquired in 2018. Since it is built-in, you don’t need to have the Shazam app installed for this to work. All you do is add a button to the Control Center menu and then, when you hear a song you like and want to know who the artist is, you just tap the button.

This is for iPhone and iPad

Dilbert and Diversity
Copyright Scott Adams, Inc./Distributed by Universal Uclick for UFS

Setting Up Music Recognition

We need to check your software updates, enable Siri, and download/install the Shamaz app.

First, let’s check your software updates. Head to

Settings > General > Software Update

for the iOS or iPadOS 14.2 update (or higher) and update if necessary.

Next, head to the Apple Store to download/install the Shazam app.

Here.is how the feature works. When you tell your iPhone to listen for a song, it uses its microphone to record the audio around you. That audio data is uploaded to a server and analyzed, matching it to a known song in a database.

Listen by Siri

Let’s examine another built-in feature that does not require the lastest software update; Siri. To enable Siri, go to

Settings > Siri & Search

and toggle on Listen for Hey Siri. You may also want to enable Press Side Button for Siri. Refer to below image:

Music 1
Enabling Siri

You can ask Siri what song is playing by saying something like “What’s that song?” or “What’s playing?”.

To activate Siri, long-press the Power button. Say “What’s that song?”. If you have Hey Siri set up, you can also say “Hey Siri, what’s that song?” without pressing any buttons.

Siri will pop up and say something like “Let me listen” or “Naming that tune.” Be sure your iPhone can hear the music properly. If you are in a noisy location or someone is talking loudly over the music, it might not hear the song well enough. If you have a problem, try moving your iPhone closer to the sound source playing the music, reducing noise in the area, or turning the volume up on the speaker playing the song. See below image where Siri is listening for a song:

Music A
Listening by Siri

If your device hears the song well enough, it will show you the song. If not, you will receive a message like “I can’t seem to recognize this song”.

Listen by Shazam in Control Center

As of the iOS and iPadOS 14.2 update, there is now a quick Control Center button you can use to start identifying a song. However, it is not enabled by default. Why; I do not know. Why does Apple want to hide this feature? But that is the reason for this post; to show you how to setup and use the Shazam built-in app.

First, head to Settings (the gear icon). See following image:

Music 2
Accessing Settings

Next, scroll down to Control Center. Refer to below image:

Music 3
Accessing Control Center option

Now, scroll down and tap the plus (+) sign to the left of the Music Recognition button to add the feature to the Control Center. If you do not see this option on the Settings screen, you have not updated your iPhone or iPad to 14.2 or higher yet. See below image:

Music 4
Enabling Music Recognition in Control Center

You can then drag it up or down in the list to rearrange the Control Center layout.

With the button added, you can now swipe down from the top-right corner of your device screen to open the Control Center. (On an older iPhone without a notch, you will have to swipe up from the bottom of the screen instead.)

Now, tap the button with the Shazam logo. The button will light up and pulse while it listens to the audio around you. Ensure your iPhone can hear the audio source properly. See following image:

Music 6
Listening by Shazam in Control Center

When the process is complete (it can take 10-15 seconds), you will see a “Music Recognition” notification banner showing you what song is playing. This notification appears along with all your other apps’ notifications in your notification center. If it can not identify a song in that period of time, you will see a notification saying a song was not detected.

Listen by the Shazam App

If you want more features, you will need a separate music recognition app on your device. The integrated music recognition features rely on Shazam, the music recognition app Apple purchased.

Shazam still has an app for your device that you can install, and it has more features. For example, the Shazam app supports Autp Shazam. In this mode, Shazma will stay in the background on your iPhone or iPad, listen to everything around you, and store a history of songs it’s heard. For example, let’s say you are at a party or ballroom dance competition and you love the playlist. You can enable Auto Shazma mode and your phone or tablet will automatically remember all the songs that was played. You can even keep using other apps on your device while Shazma listens.

To use this feature, install the Shazma app as mentioned in the beginning of this post. Now, launch it, and long-press the big Shazma button, to enable Auto Shazma mode. Refer to below image:

Music 7
Listening by Shazam app

Listen by Google

Although, not an Apple product, here is another music recognition method.

If a song you are trying to identify is trapped in your head and all you can remember is the song’s melody, there is still something you can do. With the Google app, you can hum or whistle a song’s tune to identify it.

  • Launch Google Search
  • Tap the microphone icon
  • Tap the Search A Song button

Now, start humming or whistling the song you are trying to identify. If Google can find similar matches, the results will appear labeled with match percentages. Tap More Results to see more possible matches. If Google does not find a match, you will receive a message saying so.

That’s it. Please feel free to share this post! One way to share is via Twitter, as mentioned below.

Just click the Tweet icon below to launch Twitter where you click its icon to post the Tweet.

Check out TechSavvy.Life for blog posts on smartphones, PCs, and Macs! You may email us at contact@techsavvy.life for comments or questions.

I Would Like to Hear From You

Please feel free to leave a comment. I would love hearing from you. Do you have a computer or smart device tech question? I will do my best to answer your inquiry. Just send an email to contact@techsavvy.life. Please mention the device, app and version that you are using. To help us out, you can send screenshots of your data related to your question.

The author’s Vietnam eBook on the Battle for Tra Bong: Events and Aftermath

How to Clear Your Google Chrome Browsing Data

Need to clear your Google Chrome browsing data? Your browsing data is stored in a “cache” and at times, may cause a problem with the actual data stored on a website. By clearing your browsing data, you are starting with a “fresh cache” to avoid inconsistencies.

Need to clear your Google Chrome browsing data? Your browsing data is stored in a “cache” and at times, may cause a problem with the actual data stored on a website. By clearing your browsing data, you are starting with a “fresh cache” to avoid inconsistencies.

This is for PCs, Macs, iPhone and iPad

Dilbert and Time
Copyright Scott Adams, Inc./Distributed by Universal Uclick for UFS

FIRST, before doing any of the following, launch your Google Chrome app. For the iPhone or iPad

  1. Open an article or your account and tap the the hamburger icon (the 3 dots) in lower right-hand corner.
  2. Tap History. (It may be labeled More History). Also, you can view more of your history at historygoogle.com
  3. At the bottom, tap Clear Browsing Data.
  4. Check Browsing history. It may be checked by default.
  5. Uncheck any other items you don’t want to delete.
  6. Tap Clear Browsing Data. Tap Clear Browsing Data again or Cancel if you do not want to proceed.
  7. At the top right, tap Done, then tap Done again.

Refer to below image:

Chrome 1
Clearing Chrome browsing data on an iPhone or iPad

For Windows, Mac, or Linux

  1. Press Cntl+Shift+Delete keys for Windows or Linux. Press Command+Shift+Backspace for a Mac. The backspace key is labeled “Delete”.
  2. Uncheck any items you don’t want to delete.
  3. Press Clear data button in lower right.
  4. Hit Enter or Return key.

See below image:

Chrome 2
Clearing Chrome browsing data for Windows, Mac, or Linux

IMPORTANT: Be sure and close/quit your browser and restart it after clearing your browsing data.

Your browsing history will be cleared to the level you have chosen. You may repeat the above process to clear any unchecked items.

That’s it. Please feel free to share this post! One way to share is via Twitter, as mentioned below.

I hope you have found this post helpful. If so, click the Tweet icon below. This will launch Twitter where you click its icon to post the Tweet.

Check out TechSavvy.Life for blog posts on smartphones, PCs, and Macs! You may email us at contact@techsavvy.life for comments or questions.

I Would Like to Hear From You

Please feel free to leave a comment. I would love hearing from you. Do you have a computer or smart device tech question? I will do my best to answer your inquiry. Just send an email to contact@techsavvy.life. Please mention the device, app and version that you are using. To help us out, you can send screenshots of your data related to your question.

The author’s Vietnam eBook on the Battle for Tra Bong: Events and Aftermath

How to View Notifications on iPhone and iPad

By now you familiar with notifications and how they can be overwhelming. It’s like having another Inbox to wade through. I have way too many notifications because of way too many apps on this iPhone. Luckily, Apple provides a single location where you can view and manage them called the Notification Center.

By now you familiar with notifications and how they can be overwhelming. It’s like having another Inbox to wade through. I have way too many notifications because of way too many apps on this iPhone. Luckily, Apple provides a single location where you can view and manage them called the Notification Center.

Ii is a centralized interface for reviewing notifications on your device that have been received from apps or the operating system itself.

This is for the iPhone and iPad

Dilbert and Writer
Copyright Scott Adams, Inc./Distributed by Universal Uclick for UFS

View From Unlocked Screen

To view the Notification Center while your iPhone or iPad is unlocked, swipe downward from the center of the upper edge of the screen. If you have iOS 14 or above you may also swipe down from upper left of your screen.

As a side note, swiping down from upper right will bring up the Control Center. Swiping down from the center will launch the Search screen.

View From Locked Screen

To view Notification Center on the Lock screen, swipe upward from the middle of the screen until it appears.

You can enable or disable Notification Center on the Lock screen by going to

Settings > Touch ID & Passcode or Face ID & Passcode

Then enter your Passcode and scroll down till you see the toggle for Notification Center.

Your Notifications

Once launched, you will see a special screen titled Notification Center that lists your recent notifications. If an app has sent more than one notification, the notifications may be stacked (there will be a number in the notification). Tap the stack to see all of the notifications expanded. Refer to below image where I have 19 stacked notifications :

Center 1
Your Notification Center

Now, you can swipe to the right on a particular notification to open it in the originating app. If you swipe quickly to the left, you can clear that notification away. Or if you want to clear all notifications at once, this is a two step process. First, tap the small “X” button beside the Notification Center heading. See below image:

Center 2
About to Clear all notifications

Second, tap the Clear text button (where the “X” was) to clear all notifications. See following image:

Center 3
Accessing to Clear all notifications

You can also turn off certain notifications from this screen by slowing swiping your finger to the left of a notification. Next, tap Manage in the options that appear. Refer to below image:

Center 4
Manage a notification

If notifications continue to get on your nerves, you can disable them on a per app basis in Settings. Head to

Settings > Notifications

then tap an app you would like to manage. There, you can select the type notifications you would like to receive or disable them completely. For your apps, enable or disable the Allow Notifications toggle as you wish. When finished, tap the Back text button and exit Settings. See below image:

Center 5
Toggle for Allow Notifications on per app basis

That’s it. Please feel free to share this post! One way to share is via Twitter, as mentioned below.

I hope you have found this post helpful. If so, click the Tweet icon below. This will launch Twitter where you click its icon to post the Tweet.

Check out TechSavvy.Life for blog posts on smartphones, PCs, and Macs! You may email us at contact@techsavvy.life for comments or questions.

I Would Like to Hear From You

Please feel free to leave a comment. I would love hearing from you. Do you have a computer or smart device tech question? I will do my best to answer your inquiry. Just send an email to contact@techsavvy.life. Please mention the device, app and version that you are using. To help us out, you can send screenshots of your data related to your question.

The author’s Vietnam eBook on the Battle for Tra Bong: Events and Aftermath

How to Make Chrome the Default Browser on iPhone and iPad

The iPhone has been out for over a decade, and for most of that time, Apple has only allowed one browser to be the default. Safari, the one they built; till iOS 14 and higher, has been the only supported browser.

The iPhone has been out for over a decade, and for most of that time, Apple has only allowed one browser to be the default. Safari, the one they built; till iOS 14 and higher, has been the only supported browser.

This means that Google Chrome fans can finally set the app as their default, and use it for all their browsing.

As long as your device is running the latest version of the operating system, this setting should be available to you.

You can change the default browser in the Settings app. First, though, make sure you have downloaded the latest version of Chrome from the App Store and opened it at least once.

This is for iPhone and iPad

Dilbert and Trap
Copyright Scott Adams, Inc./Distributed by Universal Uclick for UFS

First, launch your Settings app (the gear icon). Refer to below image:

Browser 1
Accessing Settings

Next, scroll way down to the Chrome section and tap on it. See below image:

Browser 2
Selecting Chrome app settings

Now, tap the Default Browser App option. See following image:

Browser 3
Selecting Default Browser App option

You will see a list of installed browsers. Tap the Chrome app to place a checkmark by it. Refer to below image:

Browser 4
Selecting Chrome as the default browser

To ensure your setting, tap the Back text button. You may now exit Settings.

That’s all you need to do! Chrome is now your default browser on your iPhone and/or iPad.

You may still see Safari if an app uses this browser by default. If this happens, you can simply tap the associated browser icon to reopen the page in Chrome.

If you want to revert back to Safari or choose another browser, navigate back to the Default Browser App section in the Chrome or Safari settings.

You are done. Please feel free to share this post! One way to share is via Twitter, as mentioned below.

I hope you have found this post helpful. If so, click the Tweet icon below. This will launch Twitter where you click its icon to post the Tweet.

Check out TechSavvy.Life for blog posts on smartphones, PCs, and Macs! You may email us at contact@techsavvy.life for comments or questions

I Would Like to Hear From You

Please feel free to leave a comment. I would love hearing from you. Do you have a computer or smart device tech question? I will do my best to answer your inquiry. Just send an email to contact@techsavvy.life. Please mention the device, app and version that you are using. To help us out, you can send screenshots of your data related to your question.

The author’s Vietnam eBook on the Battle for Tra Bong: Events and Aftermath

How to Automatically Change Dark Mode Wallpaper on iPhone or iPad

Changing the wallpaper or background on your iPhone and iPad is a great way to update the appearance of your device, especially with the Dark Mode Apple wallpaper options to choose from. You need to have your device updated to at least iOS 13 or iPadOS 13. It’s best to update to iOS 14 if you’re looking to stay up to date

Changing the wallpaper or background on your iPhone and iPad is a great way to update the appearance of your device, especially with the Dark Mode Apple wallpaper options to choose from. You need to have your device updated to at least iOS 13 or iPadOS 13. It’s best to update to iOS 14 or higher if you are looking to stay up to date.

By using special wallpapers provided by Apple, they will automatically operate in both light and dark modes.

Let’s get started finding and changing our device’s wallpaper to a Dark Mode option.

This is for the iPhone and iPad

Dilbert and Info
Copyright Scott Adams, Inc./Distributed by Universal Uclick for UFS

First, launch Settings (the gear icon). Refer to below image:

Wallpaper 1
Accessing Settings

Next, tap the Wallpaper option. See below image:

Wallpaper 2
Selecting Wallpaper option

Now, in its settings, tap the Choose a New Wallpaper option. See following image:

Wallpaper 3
Selecting the new Wallpaper option

On the Choose screen, tap the Stills category. Refer to below image:

Wallpaper 4
Selecting the Stills category

In the Stills category, select a wallpaper that includes the dark mode icon. This looks like several concentric circles with the center cut out of them. If you scroll down, you will notice stills without the icon; these will not work for our purposes. See below image:

Wallpaper 5
Choosing a Dark Mode Wallpaper

The wallpapers with the dark and light mode icon will change automatically between dark and light versions when dark or light mode is activated.

Once you have selected a still, tap the Set option. See following image:

Wallpaper 6
Selecting the Set option

Now, decide whether you want to see the wallpaper on your Lock screen, Home screen, or both; or Cancel your selection. Refer to below image:

Wallpaper 7
Choosing where to apply the new Wallpaper

Next, exit Settings and switch from light to dark mode (or vice versa) by opening Control Center, (swipe down from upper right-hand corner in iOS 14 or higher). Now, hold down the brightness slider, and tap the dark or light mode button to switch modes. After you switch, you will notice that the wallpaper you set changes automatically to match.

That’s it. Pretty neat trick. Please feel free to share this post! One way to share is via Twitter, as mentioned below.

I hope you have found this post helpful. If so, click the Tweet icon below. This will launch Twitter where you click its icon to post the Tweet.

Check out TechSavvy.Life for blog posts on smartphones, PCs, and Macs! You may email us at contact@techsavvy.life for comments or questions.

I Would Like to Hear From You

Please feel free to leave a comment. I would love hearing from you. Do you have a computer or smart device tech question? I will do my best to answer your inquiry. Just send an email to contact@techsavvy.life. Please mention the device, app and version that you are using. To help us out, you can send screenshots of your data related to your question..

The author’s Vietnam eBook on the Battle for Tra Bong: Events and Aftermath

How to Enable Full Screen Incoming Calls on iPhone or iPad in iOS or iPadOS 14

In iOS and iPad OS 14, Apple introduced persistent call banners instead of full-screen notifications. This means that when your device is unlocked, regular, FaceTime, and third-party VoIP incoming call banners take only a small space at the top.

In iOS and iPad OS 14, Apple introduced persistent call banners instead of full-screen notifications. This means that when your device is unlocked, regular, FaceTime, and third-party VoIP incoming call banners take only a small space at the top.

Call 1
Incoming Call banner mode

This compact UI feature is turned on by default. While you can swipe down on a banner to quickly expand the incoming call to the full-screen mode, it is not a permanent solution.

However, if you want a big contact picture in incoming calls, or do not like the new style, or it’s too easy to miss and you prefer the old way, here is how to activate this feature in iOS and iPadOS 14.

This is for iPhone or iPad running iOS or iPadOS 14

Dilbert and Tweet
Copyright Scott Adams, Inc./Distributed by Universal Uclick for UFS

Open the Settings app (the gear icon). Refer to below image:

Call 2
Accessing Settings

Next, scroll down to the Phone section. See below image:

Call 3
Accessing the Phone option

Now, choose Incoming Calls option. See following image:

Call 4
Accessing Incoming Calls option

Next, checkmark the Full Screen option. Refer to below image:

Call 5
Selecting Full Screen for incoming calls

The next time you receive a phone call (a cellular or a VoIP call), you will see a full-screen incoming call notification. See below image:

Call 6
Incoming Calls full screen mode

That’s it. Please feel free to share this post! One way to share is via Twitter.

Just click the Tweet icon below. This will launch Twitter where you click its icon to post the Tweet.

Check out TechSavvy.Life for blog posts on smartphones, PCs, and Macs! Feel free to email us at contact@techsavvy.life.

I Would Like to Hear From You

Please feel free to leave a comment. I would love hearing from you. Do you have a computer or smart device tech question? I will do my best to answer your inquiry. Just send an email to contact@techsavvy.life. Please mention the device, app and version that you are using. To help us out, you can send screenshots of your data related to your question.

The author’s Vietnam eBook on the Battle for Tra Bong: Events and Aftermath

How to Use the Magnifier Feature on iPhone or iPad in iOS 14

Your device can serve as a magnifier so you can better view the world around you. The built-in Magnifier tool uses the camera to zoom in like a magnifying glass. You can use the Magnifier to better see faraway objects or enlarge items that are closer to you, like text in a book or on a computer screen.

Your device can serve as a magnifier so you can better view the world around you. The built-in Magnifier tool uses the camera to zoom in like a magnifying glass. You can use the Magnifier to better see faraway objects or enlarge items that are closer to you, like text in a book or on a computer screen. Lets explorehow to use the Magnifier.

This is for the iPhone or iPad running iOS 14+

Dilbert and Friends
Copyright Scott Adams, Inc./Distributed by Universal Uclick for UFS

Setup Magnifier

To enable the feature, go to

Settings > Accessibility > Magnifier

and toggle On the switch for Magnifier. Refer to below image:

Magnify 1
Accessing the Magnifier

The Magnifier then appears on your Home Screen as an app. To launch the tool, just tap its icon. In my example, my first available Home Screen area is at the bottom right of the 6th page. See below image:

Magnify 2
Accessing the Magnifier app

The Magnifier Toolbar

Notice that the objects within the view of your camera are magnified in the viewfinder. Using the Magnifier panel at the bottom of your screen, drag the slider or pinch your fingers in and out to zoom in and out of the object. You can move the Magnifier panel around the screen by dragging any empty area of it with your finger. See following image:

Magnify 3
The Magnifier Toolbar

The Brightness Option

Tap the icon for Brightness and then drag the slider to increase or decrease the brightness. Tap the icon again to turn off the Brightness slider. Refer to below image:

Magnify 4
The Brighness option

The Filter Option

Tap the Filter icon to choose between different filters and find one that improves the clarity of the object. Tap the icon again to turn off the Filter gallery. Tap the Flashlight icon to turn on your device’s flashlight and throw more light onto the object. See below image:

Magnify 5
The Filter option

The Capture and View Options

To capture an image of the object you are viewing, press the Shutter button. You can then view any images you capture by tapping the View button. Swipe through the thumbnails of your captured images at the bottom left-hand corner and tap a specific picture to view it. See following image:

Magnify 6
Selecting a snapshot to view

The Share Option

From here, you can also tap the Share icon to share an image with someone else via an app or service. Refer to below image:

Magnify 7
Sharing your snapshot via Social Media

Close the Magnifier

Tap the End link at the upper left-hand corner to return to the Magnifier screen. See following image:

Magnify 8
Close the Magnifier

That’s it. Please feel free to share this post! One way to share is via Twitter.

Just click the Tweet icon below. This will launch Twitter where you click its icon to post the Tweet.

Check out TechSavvy.Life for blog posts on smartphones, PCs, and Macs! Feel free to email us at contact@techsavvy.life.

I Would Like to Hear From You

Please feel free to leave a comment. I would love hearing from you. Do you have a computer or smart device tech question? I will do my best to answer your inquiry. Just send an email to contact@techsavvy.life. Please mention the device, app and version that you are using. To help us out, you can send screenshots of your data related to your question.

The author’s Vietnam eBook on the Battle for Tra Bong: Events and Aftermath

How to View Privacy and Other Features in Safari for iPhone and iPad

Apple’s default web browser on iPhone or iPad is Safari, but have you ever taken the time to investigate its many hidden features and settings? We are going to concentrate on three features regarding security, privacy and the new start page. You may be amazed at what you find, at least we were.

Apple’s default web browser on iPhone or iPad is Safari, but have you ever taken the time to investigate its many hidden features and settings? We are going to concentrate on three features regarding security, privacy and the new start page. You may be amazed at what you find, at least we were.

With iOS or iPadOS 14 and higher, Safari has a few new tricks up its sleeve, including privacy reports, and password monitoring. Let’s explore three hidden features.

This is for the iPhone and iPad

Dilbert and Fedex
Copyright Scott Adams, Inc./Distributed by Universal Uclick for UFS

Your Privacy Report

Cross-site trackers monitor your web-based activities as you surf from one site to another, an activity that can certainly raise privacy concerns. Safari blocks such trackers from profiling you by default, and now allows you to see which sites and trackers are blocked.

First, to check your Privacy Report, tap the aA icon in upper left-hand corner of a website. Next, tap Privacy Report. Refer to below image:

Safari 8
Accessing the Privacy Report

Now, your report will open. See below image:

Safari 7
Your Privacy Report

In my Privacy Report, I have 164 trackers with 78% of visited websites with trackers.

Next, click the Show More link to learn more about the cross-site tracking and how Apple blocks them and to read about trackers. The window reveals how many trackers were prevented from profiling you and how many sites contacted such trackers. See following image:

Safari 9
Stats about your browsing

Let’s go back one screen and tap the Show Less link. Now, scroll down till you see two tabs. Websites and Trackers tabs. Refer to below image:

Safari 10
Verbage about trackers

Next, tap on a Website to see which trackers were blocked. See below image:

Safari 5
Selecting a website for tracking info

In my example, I selected Microsoft.com. Yes, even Microsoft has trackers. You may be alarmed at the number and percentage of trackers wanting to profile you, especially if you access Safari a lot. Your device is blocking them.

You may tap on the Trackers link to see a list of trackers. See following image:

Safari 7
The list of trackers for a website

My son works for a cyber security firm. He helps recover “hacked” devices. If a person wants to “hack” your device, with the proper tools, they can. The best you can do, is to “protect” your device. by using security features on your device and apps, having strong passwords, using multi factor authentication, and the like.

Your iCloud Passwords

On your iPhone or iPad, you can now see any passwords saved in the iCloud Keychain that has been leaked in a data breach, are being reused for multiple login credentials, or are considered weak.

First, launch Settings (the gear icon). Refer to below image:

Safari 1
Accessing Settings

Now, scroll down to the Passwords option and tap it. See below image:

Safari 2
Accessing the Passwords option

Next, tap the Security Recommendations option. See following image:

Safari 3
Accessing Security Recommendations option

Now, you can tap a specific entry to delete or change the password. You may be surprised by passwords you have forgotten. Apple has provided a link to access the website for updating these passwords. In my example, I have one High Priority password that I need to change; one that I had forgotten about. The password for PayPal website has been erased for privacy purposes. Refer to below image:

Safari 4
Your comprised passwords

Your New Start Page

Safari debuted a new Start page with the release of iOS/iPadOS 13. Open a new tab by taping the plus “+” button at the bottom of your screen. See below image:

Safari 11
Selecting a new tab

Now, you will see your bookmarks, frequently visited sites, and Siri suggested sites. Tap the Show More or Show Less link in the upper right to see more or fewer icons. See following image:

Safari 12
Your new Start page

Using SpeedTest

Althrough not a feature of privacy in Safari, you may want to know about the speed of your ISP for downloads and uploads. This tool is best used for a PC or Mac. Simply, head over to SpeedTest in your browser for your ISP speeds. Next, click the big round GO button. When it is finished, you will see your results like the image below:

Safari 13
Results of running SpeedTest

You can click the GO button again to rerun the test. Your results will differ depending on the time of day and Internet traffic. The firm, Ookla, has specific apps for your operating system that you can download and use.

That’s it. Please feel free to share this post! One way to share is via Twitter.

Just click the Tweet icon below. This will launch Twitter where you click its icon to post the Tweet.

Check out TechSavvy.Life for this post and similar blog posts on smartphones, PCs, and Macs!

I Would Like to Hear From You

Please feel free to leave a comment. I would love hearing from you. Do you have a computer or smart device tech question? I will do my best to answer your inquiry. Please mention the device, app and version that you are using. To help us out, you can send screenshots of your data related to your question.

The author’s Vietnam eBook on the Battle for Tra Bong: Events and Aftermath

How to Use the Zoom Feature on iPhone or iPad in iOS 14

Zoom is an accessibility feature that makes everything on your iPhone or iPad’s screen bigger and much easier to read.

Zoom is an accessibility feature that makes everything on your iPhone or iPad’s screen bigger and much easier to read.

It defaults to 5x magnification but can be set from 1x to 15x, depending on your preference and needs. You can pair it with Voice Over for further assistance to those with visual impairments.

Let us explore how to setup and use this feature.

This is for iPhone or iPad running iOS 14+

Dilbert and Software
Copyright Scott Adams, Inc./Distributed by Universal Uclick for UFS

Setup Zoom Settings

To enable the feature, go to

 Settings > Accessibility > Zoom

and toggle On the switch for Zoom. Refer to below image:

Zoom 1
Accessing the Zoom feature

A small window pops up that zooms in on the portion of the screen on which the window is resting. You can move the Zoom window by dragging the small bar that appears in the middle bottom of the window. You can also swipe up and down on the screen to change which section is zoomed in. (Note! We are unable to capture the screen while in Zoom.)

Turning on the Follow Focus button moves the Zoom window to the text you are typing and will follow along as you type. Turning on Smart Typing moves the Zoom window when a keyboard pops up so that the text is zoomed in but the keyboard is not. See below image:

Zoom 2
Two Zoom options

More Zoom Settings

On the Zoom settings, you can toggle Keyboard Shortcuts, Zoom Controller, Zoom Region, and Zoom Filter. Each switch has an associated menu of features to choose. At the bottom of the Zoom settings, you may adjust the Maximum Zoom Level (the default is 5x). See following image:

Zoom 3
More Zoom options

The Keyboard Shortcuts is a list of shortcuts to use on your keyboard for various Zoom features. Refer to below image:

Zoom 4
Zoom Keyboard Shortcuts

Setup Zoom Controller

Show Controller displays a round on-screen controller that you can use to move the Zoom window around the screen. Tap the controller to display a menu with options to zoom in/out, choose the region, resize the lens, choose a filter, or hide/show the controller. See below image:

Zoom 5
Zoom Controller options

You can zoom in or out with the first menu option. Choosing Region lets you choose a Full Screen Zoom or a Window Zoom.

Full-Screen Zoom makes the Zoom window disappear, while the entire screen is zoomed in instead. With Window Zoom, you use the Zoom window to zoom in on a small section of the screen as you move it around. See followimg image:

Zoiom 6
Zoom window options

Resize Lens feature allows you to resize the Zoom area you are viewing by grabbing and dragging on its handles. Refer to below image:

Zoom 7
Resize Lens option

The option to Choose Filter applies a specific color filter to the Zoom window in an attempt to make the text easier to read. See below image:

Zoom 8
Zoom filter options

iPhone/iPad Tapping Shortcuts

Once you have Zoom enabled, you can use it on the fly. Here’s how to use it:

  • Double-tap with three fingers anywhere on the screen to enable and disable zoom. You can do this from pretty much anywhere.
  • Drag three fingers around the screen to pan around and move to another area of the screen.
  • Use one or two fingers to scroll in the particular section that is on the display.
  • Tap and hold the anchor to drag the magnifying glass up and down the screen.

That’s it. I hope you have found this post helpful. If so, click the Tweet icon below. This will launch Twitter where you click its icon to post the Tweet.

I have found TechSavvy.Life blog posts extremely helpful. Check them out for posts on smart phone apps, Macs and PCs!

I Would Like to Hear From You

Please feel free to leave a comment. I would love hearing from you. Do you have a computer or smart device tech question? I will do my best to answer your inquiry. Please mention the device, app and version that you are using. To help us out, you can send screenshots of your data related to your question.

The author’s Vietnam eBook on the Battle for Tra Bong: Events and Aftermath