How to Crop Photos on iPhone and iPad

The stock Photos app for iOS and iPadOS comes with a built-in editing tool that can let you automatically resize a pic. Besides, you can also get rid of the unwanted parts manually to ensure there is no blemish. You do not need any photo editing apps to rotate, crop, or straighten your photos. 

RAYMOND OGLESBY @RaymondOglesby2
September 22, 2021

There could be all sorts of reasons why you would like to crop photos on your iPhone and iPad. Maybe you are not pleased with the actual size of the image or want to make it perfectly fit a frame.

The stock Photos app for iOS and iPadOS comes with a built-in editing tool that can let you automatically resize a photo. Besides, you can also get rid of the unwanted parts manually to ensure there is no blemish. You do not need any photo editing apps to rotate, crop, or straighten your photos.

However, the best part is that you can go back to the original size just in case the end result does not turn out as expected. Let’s see how this is done.

This is for the iPhone and iPad

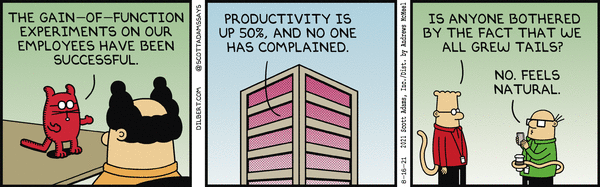
Dilbert and Genes
Copyright Scott Adams, Inc./Distributed by Universal Uclick for UFS

Crop Your Photo

First, open the Photos app on your iPhone or iPad and navigate to the photo that you want to crop. In the top right-hand corner, tap the Edit button. Refer to below image:

Crop 1
Selecting to Edit a photo

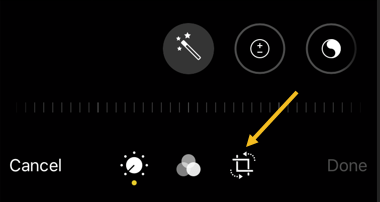
Now, in the photo editing view, you will see the bottom toolbar. Tap the Crop button which looks like a box with arrows around it. See below image:

Crop 2
Selecting the Crop button

Next, you will see the image surrounded by a white frame. Swipe in from any edge to crop the image. You can do this from all corners. Just, lift your finger to see the cropped image. See following image:

Crop 3
Cropping a photo

Now, you can also crop the image using a specific aspect ratio if you need the photo to be a perfect square. Tap the Aspect Ratio button in the top toolbar which looks like overlapping boxes. Refer to below image:

Crop 4
Selecting the Aspect Ratio button to crop a photo

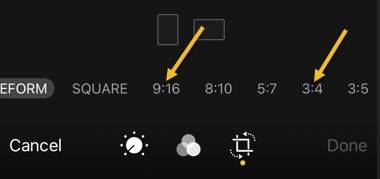
Next, you can choose the Aspect Ratio (such as “4:3” or “16:9”) or switch between the Portrait and Landscape formats.

Even after selecting the Aspect Ratio, you can continue to crop the image. The difference is that now, the Aspect Ratio will be locked. If you do not want to use the Aspect Ratio feature, choose the Original option. See below image:

Crop 5
Selecting an Aspect Ratio

Now, if you are satisfied with the crop dimensions, tap the Done button in the bottom toolbar on iPhone. See following image:

Crop 6
Selecting the Done button

Your photo will be cropped, and the result displayed on the screen. Refer to below image:

Crop 7
Original on left, cropped on right

Do not forget that you can share the photo with your friends using the Share button in the bottom toolbar which looks like a box with an arrow coming out of it. See below image:

Crop 8
Selecting the Share icon

Undo Your Crop

All edits in the Photos app are non-destructive. This means that you can revert any photo to its original state.

First, open the photo in the Photos app. Tap the Edit button in the top right-hand corner. See following image:

Crop 9
Selecting the Edit button

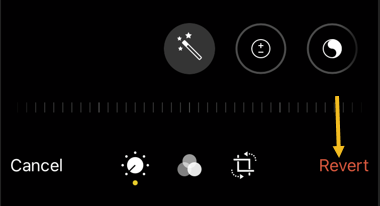
Now, in the bottom right-hand corner on iPhone, tap the Revert button. Refer to below image:

Crop 10
Selecting the Revert button

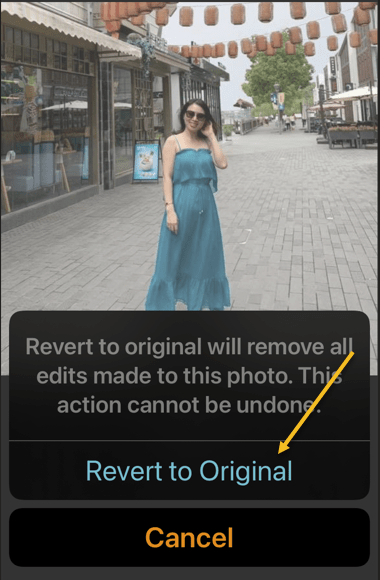
Next, in the pop-up, choose the Revert to Original option. See below image:

Crop 11
Revert your photo back to the original

Now, your photo will be back to its original form!

Quote For the Day

We are cups, constantly and quietly being filled. The trick is, knowing how to tip ourselves over and let the beautiful stuff out.

Ray Bradbury

And that’s it. Please feel free to share this post! One way to share is via Twitter.

\Just click the Tweet icon below. This will launch Twitter where you click its icon to post the Tweet.

Check out TechSavvy.Life for blog posts on smartphones, PCs, and Macs! You may email us at contact@techsavvy.life for comments or questions.

I Would Like to Hear From You

Please feel free to leave a comment. I would love hearing from you. Do you have a computer or smart device tech question? I will do my best to answer your inquiry. Just send an email to contact@techsavvy.life. Please mention the device, app and version that you are using. To help us out, you can send screenshots of your data related to your question.

The author’s Vietnam eBook on the Battle for Tra Bong Vietnam: Events and Aftermath

How to Check if Chrome 93 is Installed

Google Chrome 93 is officially here. There is plenty to be excited about. For example, with Chrome 93, progressive web apps (PWAs) feel a lot more like native desktop apps, as clicking on a link can open an associated web app. There’s also improved multi-screen support for web apps, making this an update web app users will love.

RAYMOND OGLESBY @RaymondOglesby2
JSeptember 21, 2021

Google Chrome 93 is officially here. There is plenty to be excited about. For example, with Chrome 93, progressive web apps (PWAs) feel a lot more like native desktop apps, as clicking on a link can open an associated web app. There’s also improved multi-screen support for web apps, making this an update web app users will love. Let’s explore how to install Chrome 93.

This is for Windows, Android, Mac, iPhone, and iPad

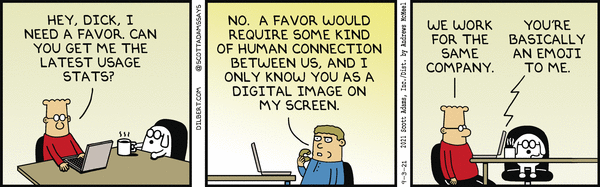
Dilbert and Stats
Copyright Scott Adams, Inc./Distributed by Universal Uclick for UFS

Some new features are related to recently closed tabs, a Material You theme for Android 12, a new Google Search UI on Android, the ability to sync Two-Factor OTP codes across devices (a true game-changer), the ability to use note-taking apps right from the browser, a new context menu on iPhone, and so much more.

Chrome 93 will now also show Google Drive documents on the New Tab page. The suggested documents will appear in a card underneath the Search Bar, allowing you to easily access recently edited Google Docs or Sheets.

First, you can check for an update by going to the three-dot menu hamburger icon on the top-right of Chrome. Next, click Help followed by About Google Chrome. Refer to below image:

Chrome 93 1
Selecting the About option

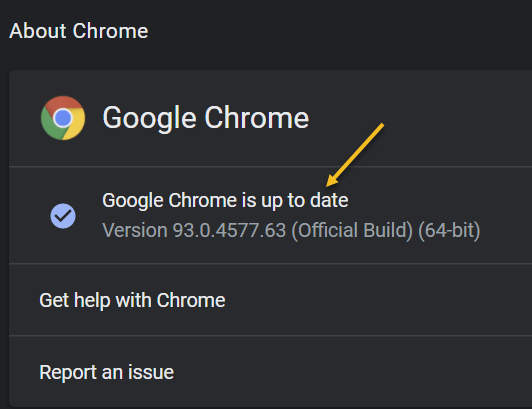
Now, the Chrome Settings window open. If Chrome is outdated, it will automatically download and install the latest version. See below image:

Chrome 93 2
Your Chrome version

Now, close Chrome and restart the app.

If you are on iPhone or Android, update the app as you would for any other application.

Quote For the Day

The most remarkable discovery in all of astronomy is that the stars are made of atoms of the same kind as those on the earth.

Richard P Feynman

You are finished. Please feel free to share this post! One way to share is via Twitter.

Just click the Tweet icon below. This will launch Twitter where you click its icon to post the Tweet.

Check out TechSavvy.Life for blog posts on smartphones, PCs, and Macs. You may email us at contact@techsavvy.life for comments or questions.

I Would Like to Hear From You

Please feel free to leave a comment. I would love hearing from you. Do you have a computer or smart device tech question? I will do my best to answer your inquiry. Just send an email to contact@techsavvy.life. Please mention the device, app and version that you are using. To help us out, you can send screenshots of your data related to your question.
The author’s Vietnam eBook on the Battle for Tra Bong Vietnam: Events and Aftermath

How to Add a Web Page to Chrome’s Reading List for iPhone and iPad

The Reading List is a similar concept to bookmarks but intended for reading material that you find online. At the time of this writing, it’s available in Chrome on the desktop (Windows, Mac, and Linux) and for iPhone and iPad. The feature is not available on Android.

RAYMOND OGLESBY @RaymondOglesby2
September 15, 2021

The Reading List is a similar concept to bookmarks but intended for reading material that you find online. At the time of this writing, it’s available in Chrome on the desktop (Windows, Mac, and Linux) and for iPhone and iPad. The feature is not available on Android. For this blog post, we will explore this feature for the iPhone and iPad.

This is for the iPhone and iPad using Google Chrome

Dilbert and Promotion
Copyright Scott Adams, Inc./Distributed by Universal Uclick for UFS

Chrome for iPhone and iPad has two different ways to add web pages to your Reading List. It can either be done from Chrome or from another app.

Method 1 – Within Chrome

First, find a page to save for later, and then tap the Share icon in the address bar. Refer to below image:

Reading 1
Accessing the Share icon

Next, select Read Later from the menu. See below image:

Reading 2
Selecting Read Later option

That’s it! The page is now in your Reading List.

Method 2 – Use an App

The second method allows you to add things to the list from outside of Chrome. Now, find a news article or story that you would like to read later in any app. In our example, we are using Apple News. Next, find the Share icon in the app and tap it. See following image:

Reading 3
Accessing the Share icon

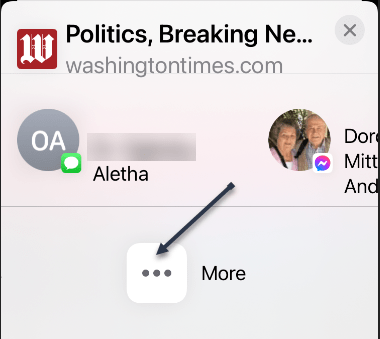
Now, find Chrome in the app row and select it. If you do not see Chrome, tap the three-dot More menu. Refer to below image:

Reading 4
Finding the Chrome app

Now, find Chrome from the app list and tap it. See below image:

Reading 5
Selecting Chrome app

Next, from the Chrome menu, tap Read Later. See following image:

Reading 6
Selecting Read Later option

To access the Reading List on your iPhone or iPad, first, open Chrome and tap the three-dot Menu icon at the bottom. Refer to below image:

Reading 7
Accessing the Menu icon

Next, select Reading List from the menu. You will notice a number that indicates unread pages. See below image:

Reading 8
Accessing Reading List option

Now, the Reading List will open with Unread pages at the top and Pages You’ve Read at the bottom. Pages marked with a green check are ready to read offline. See following image:

Reading 9
Your Reading List

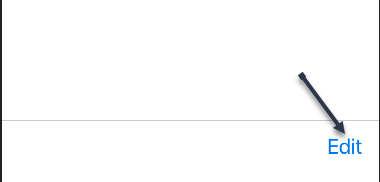
Next, tap Edit in the bottom corner to manage the list. Refer to below image:

Reading 10
Selecting to Edit your Reading List

From here, you can select pages and delete or mark them as read. See below image:

Reading 11
Selecting Delete or Mark as Read option

The Reading List is a nice, simple alternative to apps that provide similar services. It all happens right inside of Chrome without any additional software.

Quote For the Day

We’ve gotta reinvest in space travel. We should’ve never left the moon.

Ray Bradbury

That’s it. Please feel free to share this post! One way to share is via Twitter.

Just click the Tweet icon below. This will launch Twitter where you click its icon to post the Tweet.

Check out TechSavvy.Life for blog posts on smartphones, PCs, and Macs. You may email us at contact@techsavvy.life for comments or questions.

I Would Like to Hear From You

Please feel free to leave a comment. I would love hearing from you. Do you have a computer or smart device tech question? I will do my best to answer your inquiry. Just send an email to contact@techsavvy.life. Please mention the device, app and version that you are using. To help us out, you can send screenshots of your data related to your question.

The author’s Vietnam eBook on the Battle for Tra Bong Vietnam: Events and Aftermath

How to Add an iPhone Contact to Your Home Screen

iPhones are awesome communication devices. So it makes sense that you would want to put the people you talk to the front and center.

Surprisingly, Apple does not make it clear that it’s even possible to do this. The functionality is buried in the powerful Shortcuts app.

RAYMOND OGLESBY @RaymondOglesby2
September 8, 2021

iPhones are awesome communication devices. So it makes sense that you would want to put the people you talk to the front and center.

Surprisingly, Apple does not make it clear that it’s even possible to do this. The functionality is buried in the powerful Shortcuts app. Let’s explore how this is done.

This is for the iPhone and iPad

Dilbert and Talking
Copyright Scott Adams, Inc./Distributed by Universal Uclick for UFS

There are basically two different actions that can be associated with contact Shortcuts. You can have the Shortcut give you the option of how you want to contact the person; Message, Call, FaceTime; or it can jump straight into one of those. We will be covering the first option.

Create the Shortcut

First, open the Shortcuts app on your iPhone or iPad. Refer to below image:

Shortcuts 1
Accessing your Shortcuts app

Next, go to All Shortcuts See below image:

Shortcuts 2
Find All Shortcuts

Now, switch to the Gallery tab in the bottom bar. See following image:

Shortcuts 3
Open the Gallery of Shortcuts

Add the Contact

Next, do a search for Contact, and select the Contact on Home Screen shortcut. Refer to below image:

Shortcuts 4
Search for a contact

Now, tap the Add Shortcut button. See below image:

Shortcuts 5
Add contact Shortcut

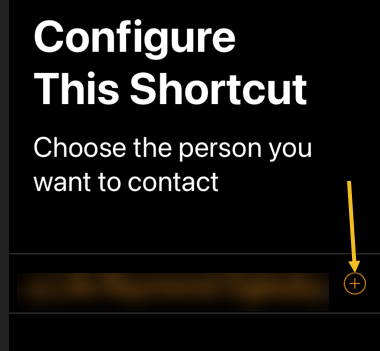
On the next screen is where you will select a person for the Shortcut. Tap the “+” button. See following image.

Shortcuts 6
Selecting to add a contact

Now, find the person you want to use for the Shortcut in your contacts list. Refer to below image:

Shortcuts 7
Locate a contact

Next, tap Done to finish. See below image:

Shortcuts 8
Finish the setup

View the Newly Added Shortcut

Now, go back to the My Shortcuts tab, and you will see the newly added Shortcut. Touch and hold to bring up some options. See following image:

Shortcuts 9
View your Shortcut

Next, select Details from the menu. Refer to below image:

Shortcuts 10
Accessing Details for the Shortcut

Add to Home Screen and Customize

Now, select Add to Home Screen. See below image:

Shortcuts 11
Add contact Shortcut to your Home screend

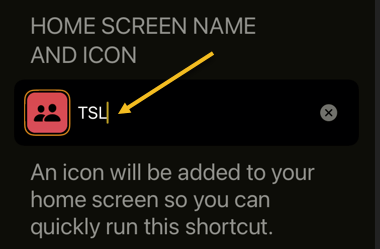
Next, tap the text to enter the name that you would see under the icon on the Home screen. See following image:

Shortcuts 12
Label the Shortcut icon

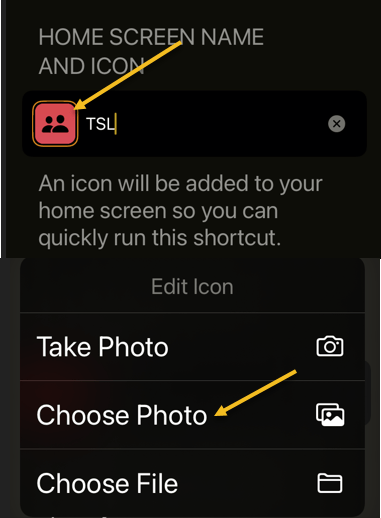
Now, select the icon to choose a photo for it or the other two options. Refer to below image:

Shortcuts 13
Select a photo for the contact

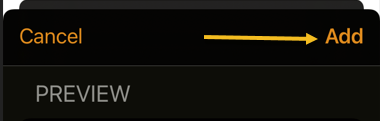
Next, once you are done customizing the icon, tap Add in the top right-hand corner. See below image:

Shortcuts 14
Finish customizing

Now, the icon will be added to your Home screen. When you tap it, a menu with communication choices will appear. Simply do this for all of your favorite people! See following image:

Shortcuts 15
Your Shortcut in action

Quote For the Day

It doesn’t matter how beautiful your theory is, it doesn’t matter how smart you are. If it doesn’t agree with experiment, it’s wrong.

Richard P Feynman

Pretty nifty feature. It’s like having a person on speed dial. Please feel free to share this post! One way to share is via Twitter.

Just click the Tweet icon below. This will launch Twitter where you click its icon to post the Tweet.

Check out TechSavvy.Life for blog posts on smartphones, PCs, and Macs! You may email us at contact@techsavvy.life for comments or questions.

I Would Like to Hear From You

Please feel free to leave a comment. I would love hearing from you. Do you have a computer or smart device tech question? I will do my best to answer your inquiry. Just send an email to contact@techsavvy.life. Please mention the device, app and version that you are using. To help us out, you can send screenshots of your data related to your question.
The author’s Vietnam eBook on the Battle for Tra Bong Vietnam: Events and Aftermath

How to Highlight Blank or Error Cells in Excel

Spotting things in a spreadsheet can be much quicker when you nightlight them. With conditional formatting in Microsoft Excel, you can make finding blank cells or formula errors easier.

RAYMOND OGLESBY @RaymondOglesby2
August 26, 2021

Spotting things in a spreadsheet can be much quicker when you highlight them. With conditional formatting in Microsoft Excel, you can make finding blank cells or formula errors easier. Let’s explore how this feature works.

This is for devices running Microsoft Excel

Dilbert and Yoga
Copyright Scott Adams, Inc./Distributed by Universal Uclick for UFS

Highlight Blank Cells

When you have a spreadsheet full of data that you expect to fill every cell, you can easily overlook cells that are left empty.

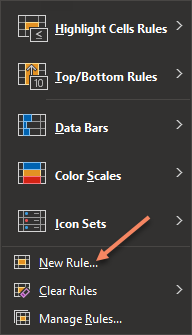
First, open the sheet and select the cells where you want to apply the formatting. Next, go to the Home tab and click Conditional Formatting in the Styles group of the Ribbon. Now, choose New Rule. Refer to below image:

Excel 1
Select New Rule option

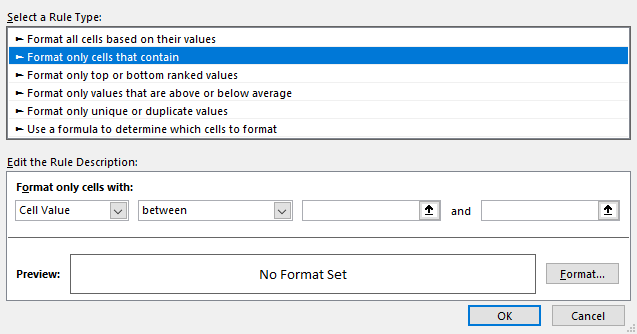
Next, in the New Formatting Rule window that appears, click Format only cells that contain under Select a Rule Type at the top. See below image:

Excel 2
Select a Rule Type option

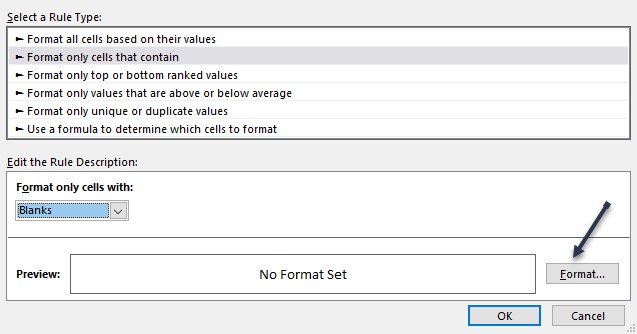
Now, at the bottom, pick Blanks in the Format only cells with drop-down box. Next, click Format to the lower right of the preview to select how to format the blank cells. See following image:

Excel 3
Select Format Cells with blanks

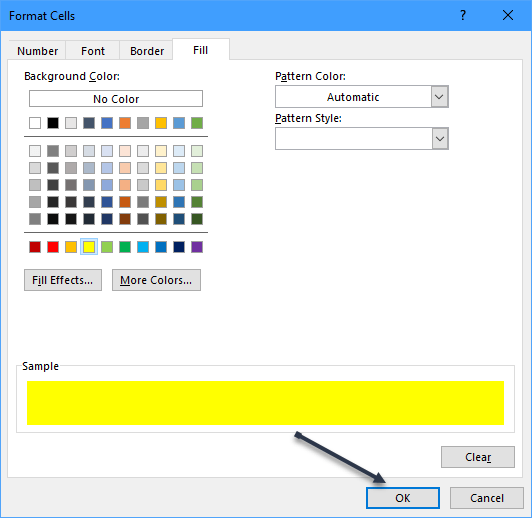
Now, in the Format Cells window, use the tabs at the top for Font, Border, and Fill to choose your formatting. Click OK. For our example, we are using Fill to color our blank cells bright yellow. Refer to below image:

Excel 4
Select choose a Fill color

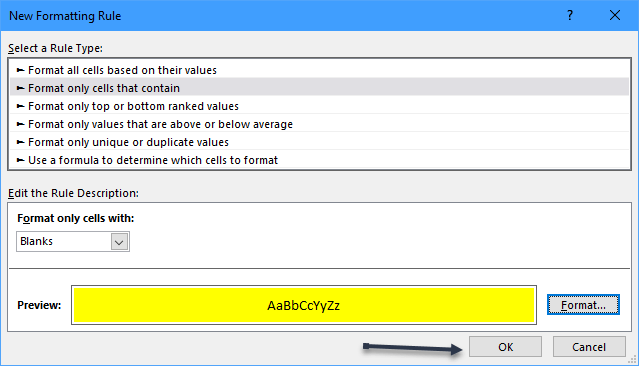
You will be back on the New Formatting Rule window, where you will see a preview of the formatting for blank cells. If you are happy with it, click OK to apply the conditional formatting. See below image:

Excel 5
Save your changes

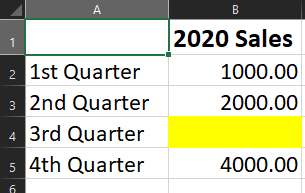
You should then see any empty cells in the range that you selected highlighted with the formatting that you picked. See following image:

Excel 6
Your final result

Highlight Error Cells

Even though Microsoft Excel does a decent job of of pointing errors out to you, they might not be noticeable if you have a large sheet to scroll through. To make sure that you see the errors quickly, conditional formatting is the way to go.

You will actually follow the same process that you used in the previous section to highlight blanks, but with one difference.

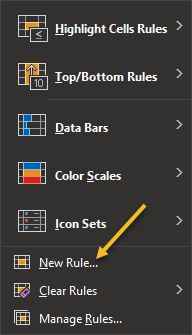
First, switch to the Home tab, click Conditional Formatting, and then choose New Rule. Refer to below image:

Excel 7
Select New Rule option

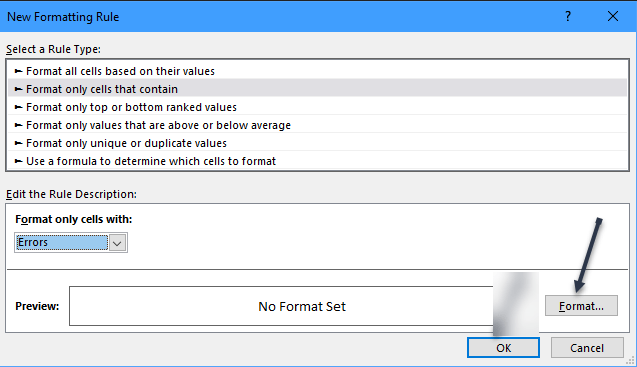
Next, in the New Formatting Rule window, pick Format only cells that contain at the top. But this time, pick Errors in the Format only cells with drop-down box at the bottom. Now, click Format to choose the formatting. See below image:

Excel 8
Select Format for errors

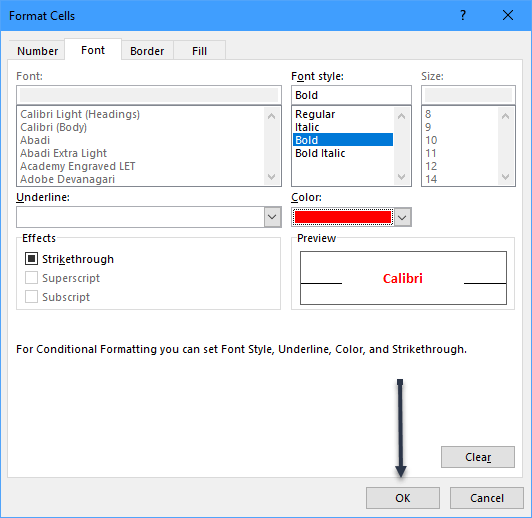
For this example, adjust the Font options to make the cells with errors bold and red. Click OK. After you pick the formatting, click OK again to apply the rule. See following image:

Excel 9
Select formatting for errors

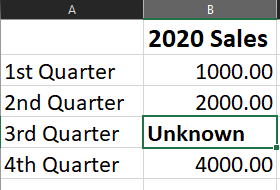
Now, those errors will be very visible! Refer to below image:

Excel 10
Your final result

Quote For the Day

The true delight is in the finding out rather than in the knowing

Isaac Asimov

You are finished. Please feel free to share this post! One way to share is via Twitter.

Just click the Tweet icon below. This will launch Twitter where you click its icon to post the Tweet.

Check out TechSavvy.Life for blog posts on smartphones, PCs, and Macs! You may email us at contact@techsavvy.life for comments or questions.

I Would Like to Hear From You

Please feel free to leave a comment. I would love hearing from you. Do you have a computer or smart device tech question? I will do my best to answer your inquiry. Just send an email to contact@techsavvy.life. Please mention the device, app and version that you are using. To help us out, you can send screenshots of your data related to your question.
The author’s Vietnam eBook on the Battle for Tra Bong: Events and Aftermath

How to Use Reminders on iPhone and iPad

The Reminders app has seen significant improvements with iOS 13 and iOS 14. Earlier it was a simple application with basic functionalities. Now, Reminders is laden with robust features that let you add subtasks, images, and more! iOS 14.5 even lets you print reminders and sort them accordingly.

RAYMOND OGLESBY @RaymondOglesby2
August 11, 2021

The Reminders app has seen significant improvements with iOS 13 and iOS 14. Earlier it was a simple application with basic functionalities. Now, Reminders is laden with robust features that let you add subtasks, images, and more! iOS 14.5 even lets you print reminders and sort them accordingly. Let’s explore some basic features.

This is for iPhone and iPad

Dilbert and Botox
Copyright Scott Adams, Inc./Distributed by Universal Uclick for UFS

Before You Begin: Make sure iCloud Reminders are set up so that everything syncs across all your Apple devices.

On iPhone and iPad: Open:

Settings app → your name from the top → iCloud

and make sure the switch for Reminders is turned ON.

Add a List

First, open your Reminders app or use Spotlight Search (your very first screen) to locate it and open. Next, tap the Add List blue link in lower right-hand corner. Refer to below image:

Reminders 5
Selecting Add List

Now, give the list a name and tap Done. See below image:

Reminders 6
Naming the Reminder

Add a Reminder

First, tap the New Reminder blue link at the bottom or tap a blank area on your screen and enter your reminder text. See following image:

Reminder 2
Selecting a New Reminder

Next, tap the Reminder, then tap the Info Circle icon to set your optional Details for the reminder. Refer to below image:

Reminder 8
Selecting more information for the Reminder

Now, after you have set your optional details like Date, Time, Location, and more, tap Done. See below image:

Reminder 7
Setting the Details options

Delete a Reminder

Tap the circle next to the reminder text and tap Done. A unique way to do this is just tap the circle, wait a moment, and your Reminder disappears. See following image:

Reminder 1
Delete a Reminder

View Your Reminders

Tap your Reminders icon, then tap your newly created list to view your Reminders. Refer to below image:

Reminder 4
Viewing your Reminders

Quote For the Day

There is a cult of ignorance in the United States, and there has always been. The strain of anti-intellectualism has been a constant thread winding its way through our political and cultural life, nurtured by the false notion that democracy means that my ignorance is just as good as your knowledge.

Isaac Asimov

You are finished. Please feel free to share this post! One way to share is via Twitter.

Just click the Tweet icon below. This will launch Twitter where you click its icon to post the Tweet.

Check out TechSavvy.Life for blog posts on smartphones, PCs, and Macs! You may email us at contact@techsavvy.life for comments or questions.

I Would Like to Hear From You

Please feel free to leave a comment. I would love hearing from you. Do you have a computer or smart device tech question? I will do my best to answer your inquiry. Just send an email to contact@techsavvy.life. Please mention the device, app and version that you are using. To help us out, you can send screenshots of your data related to your question.

The author’s Vietnam eBook on the Battle for Tra Bong: Events and Aftermath

How to Free Up Space in Google Drive

It’s easy to run out of space on Google Drive, since it stores data across much of your Google account. Fortunately, it’s also easy to delete data and free up some storage. As you will see, I am running out of space. Let’s explore how to do this.

RAYMOND OGLESBY @RaymondOglesby2
August 10, 2021

It’s easy to run out of space on Google Drive, since it stores data across much of your Google account. Fortunately, it’s also easy to delete data and free up some storage. As you will see, I am running out of space. Let’s explore how to do this.

This is for devices using Google Drive. Screenshots are from Drive on Windows 10 PC

Dilbert and Sane
Copyright Scott Adams, Inc./Distributed by Universal Uclick for UFS

If you use Google Drive to share large files, it’s quite easy to hit the 15GB free data limit on your Google account. While you can upgrade, for a price, it’s best to manually delete some data for more space first. After doing this, I upgraded to the 100GB plan, yet I am still out of space.

You will not need to spend hours combing through every nook and cranny in Google Drive. The website has a storage management feature that lists all your files, sorting them based on their file size.

First, open the Drive website in your browser.

You will see the Storage section at the bottom of the left sidebar. This will show you how much storage space you have left in your account. Now, click the Storage button. Refer to below image:

Drive 1
Your used Storage space

Next, you will see a list of all the large files in your account. Just click a file to select it. To select multiple files, hold the Command/Control key while selecting the file.

Now, to delete the file (or files), click the Remove button (the Trashcan icon) in the top toolbar. See below image:

Drive 2
Delete a file

Google Drive will remove the file and send it to the Trash.

If you want to find and open a folder where a particular file is saved (or find more files to delete), right-click and choose the Show File Location option. See following image:

Drive 3
Find more files

Next, you can select multiple files and use the Remove (Trashcan icon) in the toolbar to delete all the files at once. (You can use this method to delete entire folders as well.)

If you do not have a backup of the file that you are planning to delete, click the Download button in the right-click menu to download a copy of the file to your local storage. Refer to below image:

Drive 4
Download a file before deletion

Once you delete files like this, the files are no longer available in Google Drive, but you have not recovered any storage space yet. That’s because Google Drive does not actually delete the files for 30 days. So, if you change your mind, you have up to 30 days to recover the data.

If you want to reclaim the storage space, you will have to force Google Drive to permanently delete the data. To do this, go to the Trash or Bin section in the sidebar. See below image:

Drive 5
Accessing the Trash

Now, in the Trash, you will see a list of files that have yet to be deleted. To individually delete a file, right-click and choose the Delete Forever option. Or, click Empty Trash to delete all the files. See following image:

Drive 6
Delete your file(s)

Next, in the pop-up that appears, confirm using the Delete Forever button. Refer to below image:

Drive 7
Confirm to delete the file(s) forever

Now, all the files will be deleted. Once you reload the page, you will see that the storage space has been recovered.

Quote For the Day

I have noticed even people who claim everything is predestined, and that we can do nothing to change it, look before they cross the road.

Stephen Hawking

You now know how to clean up storage space on Google Drive. Please feel free to share this post! One way to share is via Twitter.

Just click the Tweet icon below. This will launch Twitter where you click its icon to post the Tweet.

Check out TechSavvy.Life for blog posts on smartphones, PCs, and Macs! You may email us at contact@techsavvy.life for comments or questions.

I Would Like to Hear From You

Please feel free to leave a comment. I would love hearing from you. Do you have a computer or smart device tech question? I will do my best to answer your inquiry. Just send an email to contact@techsavvy.life. Please mention the device, app and version that you are using. To help us out, you can send screenshots of your data related to your question.

The author’s Vietnam eBook on the Battle for Tra Bong: Events and Aftermath

Lossless Playback Now Available in Apple Music

In June 2021, Apple offered lossless audio for iPhone and iPad running iOS and iPadOS 14.6 or higher, and the Mac for all subscriptions at no extra cost

RAYMOND OGLESBY @RaymondOglesby2
August 4,2021

In June 2021, Apple offered lossless audio for iPhone and iPad running iOS and iPadOS 14.6 or higher, and the Mac for all subscriptions at no extra cost. Let’s explore this feature.

This is for iPhone and iPad running iOS and iPadOS 14.6 or higher, and Mac

Dilbert and Fired
Copyright Scott Adams, Inc./Distributed by Universal Uclick for UFS

You can stream most music in lossless format except for broadcast radio, live and on-demand content, and music videos.

What is Lossless Playback

Music is compressed to save on space, particularly when it comes to streaming. The bitrate of a particular file or stream determines the quality of the music, with more bits generally meaning better quality. When you choose a higher bitrate, you will also consume more bandwidth (streaming) or space on your device (downloading).

Until recently, Apple Music could only be streamed using “lossy” AAC (Advanced Audio Codec) compression. While Apple claims that “the difference between AAC and lossless audio is virtually indistinguishable,” the company now offers lossless compression that uses ALAC (Apple Lossless Audio Codec) instead.

ALAC is an open-source format that uses around 50% of the space of uncompressed audio. Support ranges from 16-bit/44.1 kHz CD quality to more modern 24-bit/192kHz recordings. Enabling lossless audio playback for Apple Music is easy and comes at no extra financial cost, but there’s more to lossless than simply flipping a switch.

Check Your OS

First, go to;

Settings > General > Software Update

There you will see your version number. If not 14.6 or higher, tap the blue link to download and install. After installation, go back to your Home Screen.

Enable Lossless Playback on iPhone and iPad

First, you must be a subscriber to Apple Music to enable Lossless audio. After subscribing (3 months free trial), then launch Settings and tap on Music. Next, tap on Audio Quality. Refer to below image:

Lossless 1
Selecting Audio Quality option

Now, under Audio Quality, toggle Lossless Audio to ON. See below image:

Lossless 2
Enabling Lossless Audio

Next, tap Wi-Fi Streaming. See following image:

Lossless 3
Accessing Wi-Fi Streaming

:Now, choose between a Lossless 48kHz sample rate or a High-Resolution Lossless 192kHz sample rate. Refer to below image

Lossless 4
Selecting High-Resolution Lossless option

If you choose High-Resolution Lossless and do not have a converter, you will receive a message. See below image:

Lossless 5
Message about using a DAC converter

Next, make a choice and exit Settings.

Enable Lossless Playback on a Mac

First, open your Apple Music app, and then click on

Music > Preferences

in the menu bar. Now, on the Playback tab, select Audio Quality. Next, toggle Lossless to ON. Next, choose between 48kHz and 192kHz sample rates. If you do not see the option, you may need to update your macOS.

Using AirPods

Wireless headphones and earphones use compression to stream music from your iPhone to your ears. This includes Apple’s AirPods, AirPods Pro, AirPods Max, and the Beats range of earphones and headphones. Since audio must be compressed for use with wireless Bluetooth audio, lossless audio offers no benefits.

To enjoy lossless audio, you will need to use a wired pair of headphones or speakers or the built-in speakers on your iPhone.

But wait, there is a catch. The iPhone cannot output the higher sample rate of 192kHz (Hi-Res Lossless) without an external digital-to-analog converter (DAC). The DAC in the iPhone is limited to 48kHz output.

Listening Difference

If you are frustrated that your expensive AirPods Max will not support lossless audio, consider for a minute that most people can not tell the difference. The best that you can do is to make sure that high-quality streaming is enabled under

Settings > Music

on your iPhone or iPad so that you are getting the best possible quality that’s available to you.

Quote For the Day

Imagination will often carry us to worlds that never were. But without it we go nowhere.

Carl Sagan

That’s it. Please feel free to share this post! One way to share is via Twitter

Just click the Tweet icon below. This will launch Twitter where you click its icon to post the Tweet.

Check out TechSavvy.Life for blog posts on smartphones, PCs, and Macs! You may email us at contact@techsavvy.life for comments or questions.

I Would Like to Hear From You

Please feel free to leave a comment. I would love hearing from you. Do you have a computer or smart device tech question? I will do my best to answer your inquiry. Just send an email to contact@techsavvy.life. Please mention the device, app and version that you are using. To help us out, you can send screenshots of your data related to your question.
The author’s Vietnam eBook on the Battle for Tra Bong: Events and Aftermath

How to Find and Install Third Party Shortcuts on iPhone and iPad

The Shortcuts app that comes pre-installed on iOS and iPadOS devices has proven to be incredibly useful especially with the release of iOS & iPadOS 14. There are so many things that you can do now with the Shortcuts app, Although you have access to a set of suggested shortcuts, you are not limited to using those alone. In fact, third-party shortcuts created by the community can be installed on your device too.

The Shortcuts app that comes pre-installed on iOS and iPadOS devices has proven to be incredibly useful especially with the release of iOS & iPadOS 14. There are so many things that you can do now with the Shortcuts app, Although you have access to a set of suggested shortcuts, you are not limited to using those alone. In fact, third-party shortcuts created by the community can be installed on your device too. Let’s explore how to do this.

This is for the iPhone and iPad

Dilbert and Zoom
Copyright Scott Adams, Inc./Distributed by Universal Uclick for UFS

There are several shortcuts websites to chose from. We will be focused on using the Shortcuts Gallery, one of the largest repositories of shortcuts. It includes proper descriptions, steps, and download links. Shortcuts are also sorted by category, so it’s easy to find what you want.

Enable Untrusted Shortcuts

Before you can start installing third-party shortcuts, you have to enable the feature. By default, shortcuts downloaded from the web are blocked because they have not been verified by Apple.

First, tap your Settings app on your iPhone or iPad. Refer to below image:

hortcuts 1
Accessing Settings

Next, scroll down and tap Shortcuts. See below image:

Shortcuts 2
Accessing Shortcuts

Now, toggle to On the Untrusted Shortcuts option. (Note! If you see a message saying you must first run a shortcut, then download a Shortcut from your Shortcut app and run it.) See following image:

Shortcuts 3
Enabling Untrusted Shortcuts

Next, in the pop-up message that appears, tap Allow. Refer to below image:

Shortcuts 4
Allow Untrusted Shortcuts

Next, enter your device’s passcode to verify that you own this iPhone or iPad. See below image:

Shortcuts 5
Entering your Passcode

You are ready to go to install third-party shortcuts.

Install Third-Party Shortcuts

 In our example, we will install the Clipboard shortcut from the Shortcuts Gallery website. Open the website in your browser on your iPhone or iPad. Now, tap the shortcut you want to download. See following image:

Shortcuts 6
Finding a Shortcut

Next, tap the Get Shortcut button. Refer to below image:

Shortcuts 7
Get the chosen Shortcut

Now, the shortcut in the Shortcuts app will open. Scroll to the bottom, and then tap Add Untrusted Shortcut. See below image:

Shortcuts 8
Adding the Untrusted Shortcut

Your new shortcut will be at the top of the list in your My Shortcuts. Just tap it to start using it. See following image:

Shortcuts 9
Your newly added Shortcut

After you have downloaded more shortcuts, you can organize them in folders. This will make it easier to launch them from an iPhone Home screen Widget.

Quote For the Day

We cannot solve our problems with the same thinking we used when we created them.

Albert Einstein

That’s it. Please feel free to share this post! One way to share is via Twitter.

Just click the Tweet icon below. This will launch Twitter where you click its icon to post the Tweet.

Check out TechSavvy.Life for blog posts on smartphones, PCs, and Macs! You may email us at contact@techsavvy.life for comments or questions.

I Would Like to Hear From You

Please feel free to leave a comment. I would love hearing from you. Do you have a computer or smart device tech question? I will do my best to answer your inquiry. Just send an email to contact@techsavvy.life. Please mention the device, app and version that you are using. To help us out, you can send screenshots of your data related to your question.

The author’s Vietnam eBook on the Battle for Tra Bong: Events and Aftermath

How to Delete Screenshots on iPhone and iPad

If your iPhone or iPad storage is full, or you just want to clean up, it’s easy to delete screenshots that you might not need on your device using the built-in Photos app. The latest iOS and iPadOS versions have a separate folder for just screenshots.

If your iPhone or iPad storage is full, or you just want to clean up, it’s easy to delete screenshots that you might not need on your device using the built-in Photos app. The latest iOS and iPadOS versions have a separate folder for just screenshots. Let’s explore how to delete screenshots.

This is for the iPhone and iPad

Dilbert and Wrong
Copyright Scott Adams, Inc./Distributed by Universal Uclick for UFS

Accessing Media Types

First, open the Photos app on your iPhone or iPad. If you can not find it, swipe downward with one finger from the middle of the home screen to open Spotlight search. Now, type “photos,” and then tap the Photos app icon. Refer to below image:

Screenshots 1
Accessing Photos

For the iPhone: Tap Albums at the bottom of the screen, and then select Screenshots from the Media Types list. See below image:

Screenshots 2
Accessing Screenshots for iPhone

For the iPad: In Photos, open the sidebar by tapping Photos in the upper-left corner of the screen. Now, select Screenshots from the Media Types section. See following image:

Screenshots 3
Accessing Screenshots for iPad

Delete a Screenshot

Your album of all the screenshots stored on your device will be displayed. To delete a single screenshot, tap its thumbnail to open it in a detailed view. Refer to below image:

Screenshots 4
Open a Screenshot

Next, when you have a screenshot open for closer viewing, delete it by tapping the Trashcan icon in the lower-left (iPhone) or upper-right (iPad) corner of the screen. See below image:

Screenshots 5
Delete a single Screenshot

Now, you will see a pop-up menu asking to confirm. Just select Delete Photo.

Delete Multiple Screenshots

To delete multiple screenshots, go back to the Screenshots album overview that shows thumbnails of all your screenshots. Next, tap the Select button in the upper-right corner of the screen. See following image:

Screenshots 6
Selecting multiple Screenshots

You are now in selection mode. You can select all the screenshots in the album by tapping Select All, or you can select multiple screenshots by tapping their thumbnails. When it’s selected, each photo’s thumbnail will have a small circle with a check mark in the lower-right corner. Refer to below image:

Screenshots 7
Your selected Screenshots

You can also quickly select a large number of screenshots by tapping a thumbnail with your finger and holding it down lightly while you drag it halfway down the screen. The screenshot thumbnail list will start scrolling while selecting images. To stop selecting, lift your finger.

When you have selected all the screenshots that you want to delete, tap the Trashcan icon in the corner of the screen. Next, when you are asked to confirm, tap Delete Photos. See below image:

Screenshots 8
Delete your selected Screenshots

By default, the screenshots that you just deleted will be permanently removed from your device in 30 days.

Delete All Screenshots

If you want to permanently remove the screenshots sooner, first, navigate to your Recently Deleted album in the Photos app.

  • For the iPhone: Navigate to Albums > Recently Deleted.
  • For the iPad: Open the sidebar and tap Recently Deleted under Utilities.

See following image:

Screenshots 9
Open Recently Deleted album

When you see the gallery of your recently deleted screenshot thumbnails, you can individually select and delete them with the Delete button. To delete all Recently Deleted images at once, tap Select in the corner of the screen, and then select Delete All. Refer to below image:

Screenshots 10
Delete All Screenshots

Now, when you are asked to confirm, tap Delete Photos. All of your screenshots will be permanently deleted.

Quote For the Day

Look up at the stars and not down at your feet. Try to make sense of what you see, and wonder about what makes the universe exist. Be curious.

Stephen Hawking

You are finished. Please feel free to share this post! One way to share is via Twitter.

Just click the Tweet icon below. This will launch Twitter where you click its icon to post the Tweet.

Check out TechSavvy.Life blog posts for smartphones, PCs, and Macs! You may email us at contact@techsavvy.life for comments or questions.

I Would Like to Hear From You

Please feel free to leave a comment. I would love hearing from you. Do you have a computer or smart device tech question? I will do my best to answer your inquiry. Just send an email to contact@techsavvy.life. Please mention the device, app and version that you are using. To help us out, you can send screenshots of your data related to your question.

The author’s Vietnam eBook on the Battle for Tra Bong: Events and Aftermath