Does your iPhone earpiece sound muffled or somewhat weird? The iPhone has a microphone next to the iSight camera for noise cancellation, allowing the user to block out ambient noise and get a more clearer sound in the earpiece. But at times, noise cancellation can be a hit or miss, resulting in muffled or fuzzy sound, making things tough to understand. If you’re facing such an issue, let’s turn off noise cancellation to fix things in a jiffy.
Does your iPhone earpiece sound muffled or somewhat weird? The iPhone has a microphone next to the iSight camera for noise cancellation, allowing the user to block out ambient noise and get a more clearer sound in the earpiece. But at times, noise cancellation can be a hit or miss, resulting in muffled or fuzzy sound, making things tough to understand. If you’re facing such an issue, let’s turn off noise cancellation to fix things in a jiffy.
This is for the iPhone running iOS 14
Copyright Scott Adams, Inc./Distributed by Universal Uclick for UFS
To Tweet about this post, click the Tweet icon below to launch Twitter, then click its Tweet icon to post.
Check out TechSavvy.Life for their blog posts on smartphone apps, PCs. and Macs!
Phone noise cancellation, first introduced in iOS 7, monitors levels of ambient background noise and produces an inverse audio signal to cancel that background noise, so you don’t hear it on a phone call. The technology works best with continuous low-level background noise, and it typically works very well. But sometimes it can produce an eerily quiet phone conversation or unsettling audio sounds, such as small crowd noises or low-level background music.
Also, some people find the noise-cancellation effect physically uncomfortable especially when using a headset. Fortunately, phone noise cancellation is easy to turn off on the iPhone. Let’s explore how to do this.
Disable Noise Cancellation
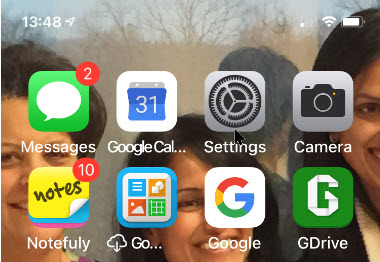
First, open Settings (the gear icon). Refer to below image:
Accessing Settings
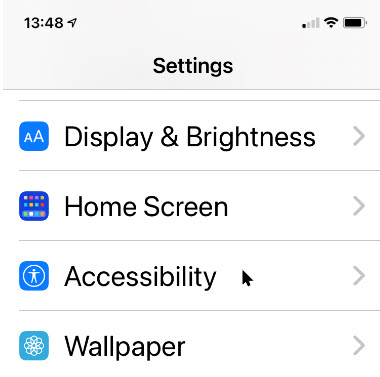
Now, scroll down and launch Accessibility. See below image:
Accessing Accessibility
Next, scroll down to the Hearing section and tap Audio/Visual. See following image:
Accessing Audio/Visual
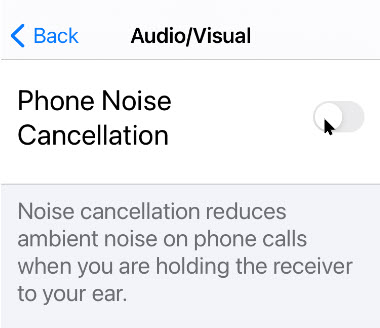
Now, tap the Phone Noise Cancellation toggle to turn it off (the default setting is On). Refer to below image:
Disabling Phone Noise Cancellation
Next, let’s go back one screen to make sure the change registers. You can now exit Settings. The next time you place or receive a phone call, noise cancellation will be disabled.
That’s it. You may enable the feature at any time by following the above steps.
I hope you have found this post helpful. If so, click the Tweet icon below. This will launch Twitter where you click its icon to post the Tweet.
I have found TechSavvy.Life blog posts extremely helpful. Check them out for posts on smart phone apps, Macs and PCs!
Please feel free to leave a comment. I would love hearing from you. Do you have a computer or smart device tech question? I will do my best to answer your inquiry. Please mention the device, app and version that you are using. To help us out, you can send screenshots of your data related to your question.
The author’s Vietnam eBook on the Battle for Tra Bong: Events and Aftermath
f you use a lot of terms, proper names, acronyms, or places, you may want to turn off Auto-Correct that is enabled by default.
If you use a lot of terms, proper names, acronyms, or places, you may want to turn off Auto-Correct that is enabled by default.
When your iPhone or iPad corrects a word automatically, it’s drawing on both a dictionary and a predictive text algorithm that learns from how you type. The dictionary may not include every proper name, acronym, or new term as it appears on the screen, so it can be frustrating when Auto-Correct changes what you know is correct. Also, if you misspell a certain word frequently enough, the predictive text algorithm will learn that typo, and it may begin “fixing” correct instances of a word or term when you do not want it to.
The easiest way to deal with Auto-Correct is to turn it off completely. (Note! IFfyou use an everyday language, it is recommended not to disable this feature to avoid typos). If you need to turn it off, here’s how to disable Auto-Correct.
This is for the iPhone or iPad running iOS 14
Copyright Scott Adams, Inc./Distributed by Universal Uclick for UFS
To Tweet about this post, click the Tweet icon below to launch Twitter, then click its Tweet icon to post.
Check out TechSavvy.Life for their blog posts on smartphone apps, PCs. and Macs!
Please feel free to leave a comment. I would love hearing from you. Do you have a computer or smart device tech question? I will do my best to answer your inquiry. Please mention the device, app and version that you are using. To help us out, you can send screenshots of your data related to your question.
The author’s Vietnam eBook on the Battle for Tra Bong: Events and Aftermath
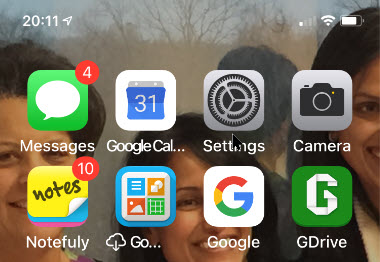
Starting with iOS 14, you can choose whether to place downloaded apps either on the Home Screen or in the App Library on your iPhone. The latter option can help you keep the Home Screen uncluttered.
Starting with iOS 14, you can choose whether to place downloaded apps either on the Home Screen or in the App Library on your iPhone. The latter option can help you keep the Home Screen uncluttered. Let’s explore how this is done.
This is for the iPhone running iOS 14
Copyright Scott Adams, Inc./Distributed by Universal Uclick for UFS
To Tweet about this post, click the Tweet icon below to launch Twitter, then click its Tweet icon to post.
Check out TechSavvy.Life for their blog posts on smartphone apps, PCs. and Macs!
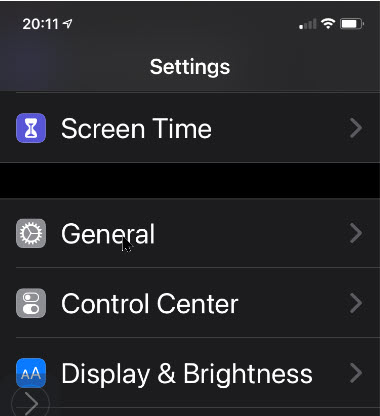
First, launch Settings (the gear icon). Refer to below image:
Accessing Settings
Now, scroll down to the Home Screen option and tap it. See below image;
Accessing the Home Screen option
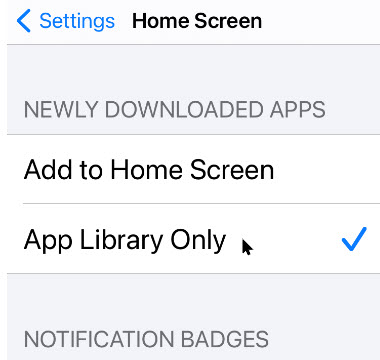
Locate the Newly Downloaded Apps section. There, you will find the two choices:
Add to Home Screen – If you want new apps you download to appear on the Home Screen (the default behavior prior to iOS 14). Apps will also appear in the App Library.
App Library Only – If you want new apps to appear only in the App Library. You can get to the App Library by swiping right through all of your Home Screen pages or swiping on the Dots Bar at bottom of your screen.
Regardless of what method you chose, your new app will appear in the App Library.
It appears that Apple is wanting to move away from the outdated Home Screen page(s) to the new App Library feature.
See following image:
Your Home Screen options
After you have made your selection, a checkmark will appear beside your choice.
Tap Settings and make sure your change has been saved. From now on, whenever you download a new app, it will appear in the location you have chosen.
If you have chosen App Library Only, you can find your new apps in the Recently Added section of the App Library. Refer to below image:
Recently Added app library
To move an app from the App Library to the Home Screen, simply hold and press down its icon, then tap Add to Home Screen in the menu that appears.
If you have chosen Add to Home Screen, newly downloaded apps will appear in the first blank spot on one of your Home Screen pages.
You can also move apps from the Home Screen to the App Library. To do so, just tap and hold a blank area of the Home Screen until the icons start to jiggle. Next, tap the app you want to move. Next, tap Remove App, then tap Move to App Library.
That’s it. I find the new App Library feature clunky and cumbersome to use. For now, you are unable to create new groupings or move apps between groupings. Apple has more work to do to make the App Library an easy to use feature.
I hope you have found this post helpful. If so, click the Tweet icon below. This will launch Twitter where you click its icon to post the Tweet.
I have found TechSavvy.Life blog posts extremely helpful. Check them out for posts on smart phone apps, Macs and PCs!
Please feel free to leave a comment. I would love hearing from you. Do you have a computer or smart device tech question? I will do my best to answer your inquiry. Please mention the device, app and version that you are using. To help us out, you can send screenshots of your data related to your question.
The author’s Vietnam eBook on the Battle for Tra Bong: Events and Aftermath
Do Mot Disturb is a helpful iPhone setting when you do not want to be interrupted, such as at meetings, formal events, driving, or at night.
Do Mot Disturb is a helpful iPhone setting when you do not want to be interrupted, such as at meetings, formal events, driving, or at night.
This option stops notifications, alerts, and calls from making any noise, vibration, or lighting up the iPhone when the screen is locked.
In this post, we are exploring how to send an “Auto-Reply” message when you receive a text message and who can receive that message once you have Do Not Disturb enabled.
This is for the iPhone
Copyright Scott Adams, Inc./Distributed by Universal Uclick for UFS
To Tweet about this post, click the Tweet icon below to launch Twitter, then click its Tweet icon to post.
Check out TechSavvy.Life for their blog posts on smartphone apps, PCs. and Macs!ds
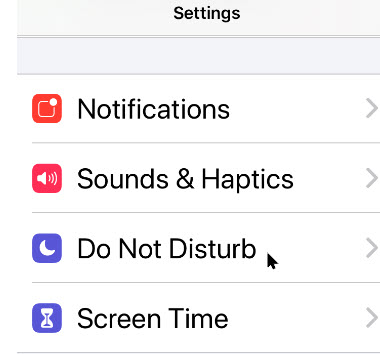
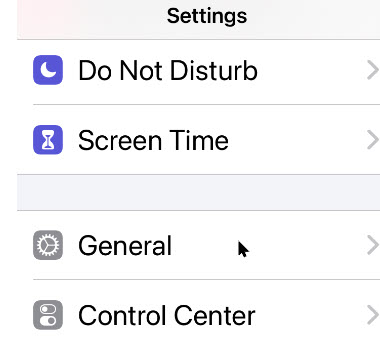
First, open Settings by tapping the gear icon. Refer to below image:
Accessing Settings
Setup for Do Not Disturb
Now, locate and tap the Do Not Disturb option. See below image:
Accessing Do Not Disturb option
Next, enable the Do Not Disturb option. See following image;
Enabling Do Not Disturb toggle
Setup for “Auto-Reply” Message
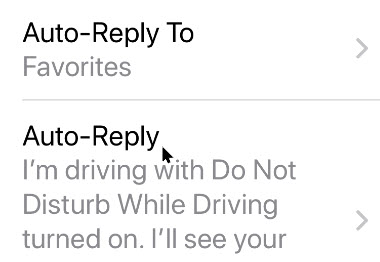
Now, scroll down until you see the “Auto-Reply” options. Tap Auto-Reply .Refer to below image:
Accessing “auto-reply” option
On the next screen, tap the text input area, and type any message you would like. Or, you can chose one of the canned messages. The message will be automatically texted to people you select that send you a message while your Do Not Disturb is enabled.
When you are done entering your message, or choosing one, tap the blue link Back button. See below image:
Choosing an “auto-reply” message
Setup Your Audience
Now, tap Auto-Reply To in the Do Not Disturb options.
You will see a list of options, including No One, which turns off “Auto-Reply”. Tap an option to select it. See following image:
Selecting your audience for the Do Not Disturb message
In my example, I am choosing the “I am driving…” canned message sent to my Contacts Favorities list.
When yo are done, tap the blue link Back button, then exit Settings.
That its. You have now set a Do Not Disturb “Auto-Reply” message.
I hope you have found this post helpful. If so, click the Tweet icon below. This will launch Twitter where you click its icon to post the Tweet.
I have found TechSavvy.Life blog posts extremely helpful. Check them out for posts on smart phone apps, Macs and PCs!
Please feel free to leave a comment. I would love hearing from you. Do you have a computer or smart device tech question? I will do my best to answer your inquiry. Please mention the device, app and version that you are using. To help us out, you can send screenshots of your data related to your question.
The author’s Vietnam eBook on the Battle for Tra Bong: Events and Aftermath
IOS 13 or higher allows you to automatically close tabs in Safari after a specified period of time, which helps to keep your iPhone running smoothly.
IOS 13 or higher allows you to automatically close tabs in Safari after a specified period of time, which helps to keep your iPhone running smoothly.
You can have up to 500 open tabs. This number of active browser tabs can quickly get out of hand. It gets to be kind of a pain to go swiping through all your open tabs every few weeks to clean out the ones you no longer use.
Fortunately, in the Safari settings on your iPhone or iPad, you can set how long your tabs stay open before they automatically close; after one day, after one week or after one month. Let’s explore how to set this feature.
This is for the iPhone and iPad
Copyright Scott Adams, Inc./Distributed by Universal Uclick for UFS
To Tweet about this post, click the Tweet icon below to launch Twitter, then click its Tweet icon to post.
Check out TechSavvy.Life for their blog posts on smartphone apps, PCs. and Macs!
One solution is using the Close All Tabs option revealed by a long press on Done. But it’ is no good if you have a handful of newer tabs that are still useful to have open. Refer to below image:
Close All Tabs option
The Settings Solution
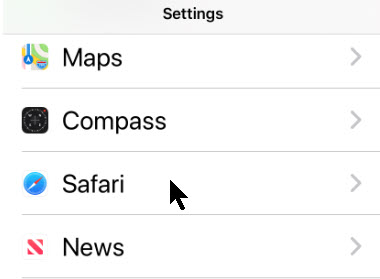
First, open Settings. Next, scroll down until you see the Safari option and tap it. See below image:
Safari option under Settings
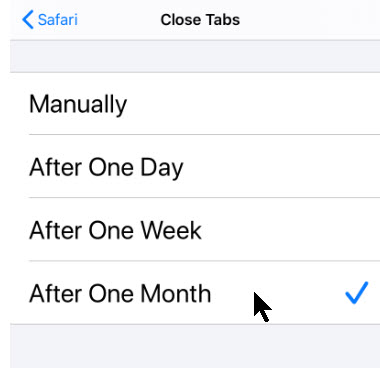
Now, swipe down to the Tabs section, then tap Close Tabs. See following image:
Close Tabs option under Safari
On this screen, you have the option to set the duration of open Safari browser tabs. When set, Safari will close tabs that have not been viewed within the period of time you set. The options are Manually, After One Day, After One Week or After One Month. This setting applies to Private tabs as well.
Checkmark an option that suits you. Refer to below image:
Select an option to automatically close Safari tabs
Now, you can exit Settings.
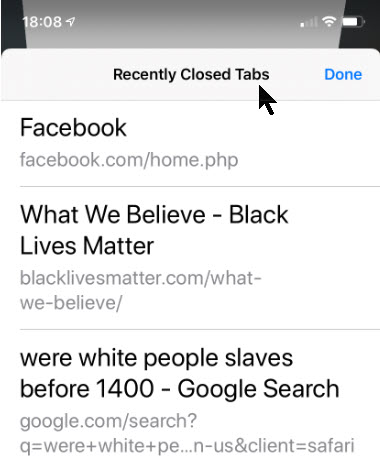
However, you can still find the automatically closed tabs as well as Private tabs in the Recently Closed Tabs menu by holding down the + (plus) button on the tab management screen in Safari. See below image:
Viewing Recently Closed Tabs
This is a potential downfall in using this feature. If you want to fully conceal recent browsing activity, it may be best to manually close the tabs.
I hope you have found this post helpful. If so, click the Tweet icon below. This will launch Twitter where you click its icon to post the Tweet.
I have found TechSavvy.Life blog posts extremely helpful. Check them out for posts on smart phone apps, Macs and PCs!
Please feel free to leave a comment. I would love hearing from you. Do you have a computer or smart device tech question? I will do my best to answer your inquiry. Please mention the device, app and version that you are using. To help us out, you can send screenshots of your data related to your question.
The author’s Vietnam eBook on the Battle for Tra Bong: Events and Aftermath
In addition to the App Library feature, another prominent change in iOS 14, is the addition of Widgets that can be added to any page.
In addition to the App Library feature, another prominent change in iOS 14, is the addition of Widgets that can be added to any page.
We have had Widgets on the Today View (the screen to the left of your first Home Screen) for years, but not a lot of people use that screen. And what’s the point of glanceable info if you have to swipe around to see it?
With iOS 14, Apple is replacing the old Widgets with all new ones that are more dynamic, can pull in more information, come in three sizes, and most importantly, can be placed anywhere on the Home Screen. Let’s explore how this is done.
This is for the iPhone running iOS 14
Copyright Scott Adams, Inc./Distributed by Universal Uclick for UFS
To Tweet about this post, click the Tweet icon below to launch Twitter, then click its Tweet icon to post.
Check out TechSavvy.Life for their blog posts on smartphone apps, PCs. and Macs!
Touch and hold an empty area on your screen until your apps jiggle and show minus (-) symbols. or tap Edit Home Screen. Refer to below image:
The Jiggle screen
Tap the plus /+) sign in the upper-left corner. See below image:
Selecting to add a Widget
You will bring up a menu of existing Widgets. See following image:
Existing Widgets to chose from
Tap on the Widget you want to add, or use the search bar to find one. Swipe left and right to choose the Widget’s size and shape.
Widgets can come in three sizes. Small Widgets are the same size as a 2 by 2 block of app icons. Medium Widgets are two icons high, but four icons wide (taking up the entire width of your Home Screen). Large Widgets are four icons wide and four icons tall.
Tap Add Widget. Refer to below image:
Adding a Widget
Once you have added the Widget, tap anywhere on the Home Screen to go out of edit (jiggle) mode.
Note! The first time you tap the new Widget, you may be asked to adjust its features (for example, to tell a weather Widget in what you want it to report).
You can even place multiple copies of the same Widget!
Move or Delete a Widget
To move the Widget around the screen or to another screen, just long-press it until it starts to shake and then move it where you want it.
If you want to get rid of the Widget, long-press to bring up a remove option or tap the little (-) button in the upper left corner of the Widget. See below image:
Remove a Widget
Create a Widget Stack
You can create a stack of Widgets if you want to save space or if there’s one Widget you will only want to use occasionally.
To create a stack:
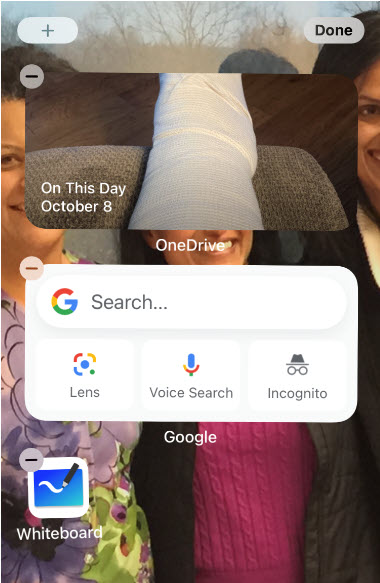
Select a Widget for your Home Screen as described above and place it where you want it. Select the next Widget you want to stack (you can stack as many as 10) and save it to your Home Screen. See following image:
Selecting Widgets to create a stack
Long press the Widget so that you can move it around the screen, and place it on top of the first. Note that the Widget must be the same size and shape; you can not, say, place a small Widget on a medium-sized one. Refer to below image:
Creating the stack
To see each Widget in your stack, swipe up or down on the top Widget and the next one will be revealed. In my example, I have stacked OneDrive on top of Google Search.
Tap Done when finished. See below image:
The finished stack consisting of OneDrive and Google Drive
Move or Delete a Widget Stack
If you want to change the position of or remove any of the apps in the stack:
Long press the stack and select Edit Stack. See following image:
Edit a stack
Press the three lines to the side of each app to change its position in the stack. Refer to below image:
Change an app position in the stack
In my example, I have stacked Google Drive on top, previously it was OneDrive. See below image :
Positioned Google Drive to be on top of OneDrive
To remove a Widget, swipe it to the left and tap Delete.
The Smart Rotateoption, if On, will automatically rotate the Widget you use the most to the top. If Off, the Widgets are fixed.
Use the Smart Stack
Apple has also created a feature it calls a Smart Stack, which will automatically choose which Widget should be on top depending on your location, what time it is, or what you most often look at. It takes into account your usual app use, the time of day, and your location, and does all of this locally on your iPhone so no data is sent to Apple or anyone else.
iOS 14 comes with a pre-built Smart Stack made up of a group of selected apps. You add that stack the same way you would add any widget:
Long press on your Home Screen and tap the plus (+) icon in the upper-left corner.
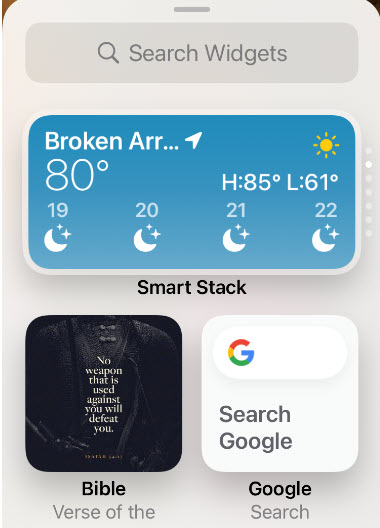
Scroll down until you see the Widget called Smart Stack. See following image:
The Smart Stack option
As with the other Widgets, scroll sideways to choose the size you want, and then tap Add Widget.
Note! There is no way to determine at a glance if apps are stacked. You have to swipe or chose Edit Stack.
Create a Smart Stack
You can make your own Smart Stack by simply dragging Widgets on top of each other.
Just place Widgets how you normally would. Drag any two Widgets of the same size on top of each other, and you have got a new stack! It works just like making a folder with app icons.
Move or DeleteSmart Stack
You can edit your stack the same way you do the Smart Stack. Turn Smart Rotate on or off, reorder the Widgets or remove the ones you no longer want.
Just long-press any stack you have created and select Edit Stack.
That’s it for the basics. There is much more on Widgets to explore, like third-party and the most popular ones.
I hope you have found this post helpful. If so, click the Tweet icon below. This will launch Twitter where you click its icon to post the Tweet.
I have found TechSavvy.Life blog posts extremely helpful. Check them out for posts on smart phone apps, Macs and PCs!
Please feel free to leave a comment. I would love hearing from you. Do you have a computer or smart device tech question? I will do my best to answer your inquiry. Please mention the device, app and version that you are using. To help us out, you can send screenshots of your data related to your question.
The author’s Vietnam eBook on the Battle for Tra Bong: Events and Aftermath
If you have a lot of apps, like me, you likely have a lot of Home Screen pages. With many pages, swiping them repetitively, over and over to find a specific page can feel very tedious. If this sounds like your iPhone experience, you should know their is a much faster way to get around your Home Screen pages, thanks to iOS 14 and iPadOS 14.
If you have a lot of apps, like me, you likely have a lot of Home Screen pages. With many pages, swiping them repetitively, over and over to find a specific page can feel very tedious. If this sounds like your iPhone experience, you should know their is a much faster way to get around your Home Screen pages, thanks to iOS 14 and iPadOS 14.
This if for the iPhone or iPad running iOS 14 or iPadOS 14
Copyright Scott Adams, Inc./Distributed by Universal Uclick for UFS
To Tweet about this post, click the Tweet icon below to launch Twitter, then click its Tweet icon to post.
Check out TechSavvy.Life for their blog posts on smartphone apps, PCs. and Macs!
There is the Dots Bar, that indicate which Home Screen page you are on. In portrait orientation, they are above the Home Screen Dock, while they are at the very bottom in landscape mode. They indicate which Home Screen page you are currently on. Refer to below image:
The Dots Bar
With one finger, tap and hold the dots, and an outline will appear around them. See below image:
The Dots Bar outlined
Without lifting your finger, slide your finger to the left or right. The Home Screen page will change. The faster you move your finger, the faster you will scroll through the pages. Lift your finger to stop scrolling and land on a page. Note! If you land on your last dot (a Home Screen page), you have to swipe left one more time to view your App Library page.To exit the App Library, swipe up.
This technique can come in very handy if you have many pages of apps. But both the new App Library and the new Home Screen Widgets (blog post coming) may make you rethink how your apps are organized.
That’s it. Your scrolling is now much faster.
I hope you have found this post helpful. If so, click the Tweet icon below. This will launch Twitter where you click its icon to post the Tweet.
I have found TechSavvy.Life blog posts extremely helpful. Check them out for posts on smart phone apps, Macs and PCs!
Please feel free to leave a comment. I would love hearing from you. Do you have a computer or smart device tech question? I will do my best to answer your inquiry. Please mention the device, app and version that you are using. To help us out, you can send screenshots of your data related to your question.
The author’s Vietnam eBook on the Battle for Tra Bong: Events and Aftermath
iPhones with iOS 14 or later, now support Picture -In-Picture (PIP) mode like their cousin, the iPad. By default, when you switch from playing a full-screen video in a supported media app, it will continue playing in the corner of the screen. If you find this annoying, like me, you can easily turn it off.
iPhones with iOS 14 or later, now support Picture -In-Picture (PIP) mode like their cousin, the iPad. By default, when you switch from playing a full-screen video in a supported media app, it will continue playing in the corner of the screen. If you find this annoying, like me, you can easily turn it off. Here’s how to do this.
This is for the iPhone running iOS 14
Copyright Scott Adams, Inc./Distributed by Universal Uclick for UFS
To Tweet about this post, click the Tweet icon below to launch Twitter, then click its Tweet icon to post.
Check out TechSavvy.Life for their blog posts on smartphone apps, PCs. and Macs!
First, launch Settings (the gear icon). Refer to below image:
Accessing Settings
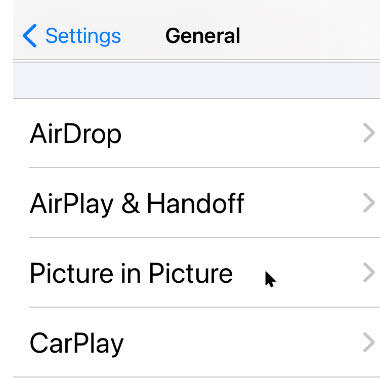
Now, scroll down and tap on the General option. See below image:
Accessing the General option
Next, tap on the Picture in Picture option. See following image:
Accessing the PIP option
Tap on it to open the Picture in Picture settings. Now, toggle off (disable) the Start PIP Automatically option. Refer to below image:
Disabling the PIP option
Now, the next time you return to the Home Screen while playing a video, the Picture-in-Picture will not pop-up automatically. To manually open Picture-in–Picture, just tap the Picture-in-Picture button (if the app you are using supports it.)
That’s it. You just disabled a possible annoying feature of iOS 14.
I hope you have found this post helpful. If so, click the Tweet icon below. This will launch Twitter where you click its icon to post the Tweet.
I have found TechSavvy.Life blog posts extremely helpful. Check them out for posts on smart phone apps, Macs and PCs!>
Please feel free to leave a comment. I would love hearing from you. Do you have a computer or smart device tech question? I will do my best to answer your inquiry. Please mention the device, app and version that you are using. To help us out, you can send screenshots of your data related to your question.
The author’s Vietnam eBook on the Battle for Tra Bong: Events and Aftermath
In recent months, the USA has had numerous forest, refinery, and chemical fires, to name a few If you are worried about local air quality from these fires, pollen, or other environmental pollution, you can check the current Air Quality Index (AQI) using your iPhone or iPad. Currently, Apple only supports checking the AQI in certain countries that includes the USA, United Kingdom, India, and Germany. Apple plans to roll out the AQI in more regions in the future.
In recent months, the USA has had numerous forest, refinery, and chemical fires, to name a few If you are worried about local air quality from these fires, pollen, or other environmental pollution, you can check the current Air Quality Index (AQI) using your iPhone or iPad. Currently, Apple only supports checking the AQI in certain countries that includes the USA, United Kingdom, India, and Germany. Apple plans to roll out the AQI in more regions in the future.
This is for the iPhone and iPad
Copyright Scott Adams, Inc./Distributed by Universal Uclick for UFS
To Tweet about this post, click the Tweet icon below to launch Twitter, then click its Tweet icon to post.
Check out TechSavvy.Life for their blog posts on smartphone apps, PCs. and Macs!
The Air Quality Index (AQI) is a numerical indicator of regional outdoor air quality in your area. Each country has its own way of determining air quality. For example, in the USA, the AQI iss defined by the Environmental Protextion Agengy (EPA) as a composite scale from 0 to 500 that incorporates inormation about five different pollutants (ground-level ozone, particle pollution, carbon monoxide, sulfur dioxide, and nitrogen dioxide) into one index.
The USA. AQI is divided into six categories, each with its own color. An AQI above 100 means the air quality is dangerous to sensitive groups. As the AQI rises, the number of people impacted by the poor air quality increases. Refer to below image:
Air Quality Index chart
Other countries use their own custom AQI methodology, but the color codes are similar to the USA. Regardless of country, the goal of every AQI is to stand the crummy air and avoid getting sick . It is wise to know what the air is like so you can make the best decisions for your health.
Check AQI using Apple Maps
One of the fastest ways to check AQI for your area is by using Apple Maps on your iPhone or iPad running iOS or iPadOS 12.2 or later.
First, launch Settings. See below image:
Accessing Settings
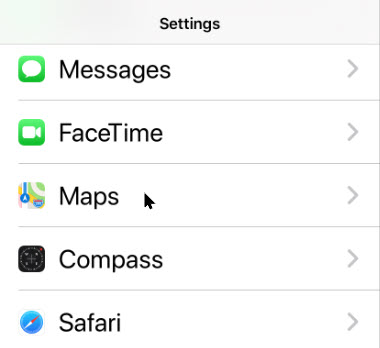
Next, scroll down till you see Maps and tap it. See followingimage:
Accessing Maps
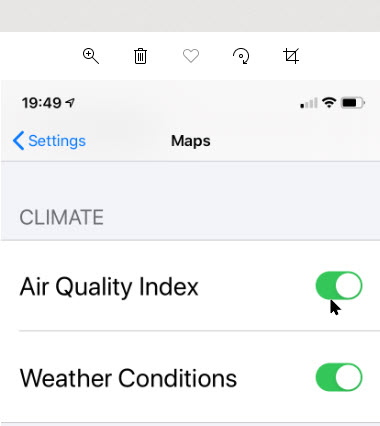
Now, scroll down to the CLIMATE section and enable Air Quality Index. Refer to below image:
Accessing Air Quality Index
Next, open the Apple Maps app and then tap the navigation arrow to center the map on your current location. (It is assumed you have enabled Location Services). See below image:
Accessing your current location
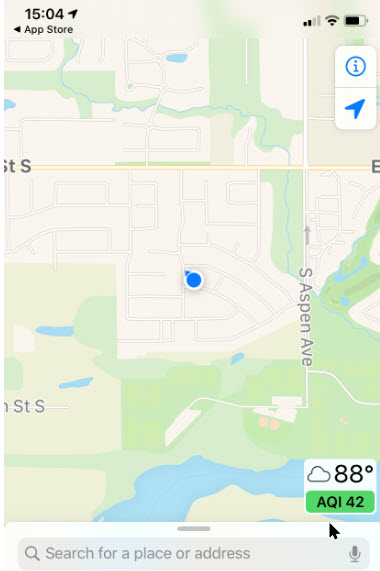
Once the map is correctly positioned, look for a small rectangular box in the bottom-right corner of your screen. If your country is supported, you will see a local temperature and an AQI number along with a category color code. See following image:
Positioning your current location
If you don’t see an AQI number in the corner, it might not be available in your country via Apple Maps. If the feature is supported, reposition the map, zoom in enough, wait a moment, and that area’s AQI will appear in the corner of your screen. Refer to below image:
Your local AQI from the Maps app
Check AQI using Apple Weather
You can also check the AQI using the Apple Weather pre-installed app. Open the the Weather app and then scroll down to the bottom of your local forecast page. There you will see the Air Qualtiy Index and Air Quality indication. Pretty neat! See below image:
Your local AQI from the Weather app
Third Party App
For a more global view of AQI, you may want to check out the Air Matters app, available on the Apple App store for the iPhone or iPad. Click here to preview and/or download. The free version comes with ads, but you can remove the ads with their paid version.
I hope you have found this post helpful. If so, click the Tweet icon below. This will launch Twitter where you click its icon to post the Tweet.
I have found TechSavvy.Life blog posts extremely helpful. Check them out for posts on smart phone apps, Macs and PCs!
Please feel free to leave a comment. I would love hearing from you. Do you have a computer or smart device tech question? I will do my best to answer your inquiry. Please mention the device, app and version that you are using. To help us out, you can send screenshots of your data related to your question.
The author’s Vietnam eBook on the Battle for Tra Bong: Events and Aftermath
If you have ever taken a Live Photo on your iPhone,it has basically created a short video clip attached to an image. If you do not like the resulting photo (or want to use a different one), it is possible to extract a different photo from the video clip that you can save or share
If you have ever taken a Live Photo on your iPhone it has basically created a short video clip attached to an image. If you do not like the resulting photo (or want to use a different one), it is possible to extract a different photo from the video clip that you can save or share. Let us explore how to do this.
This is for the iPhone
Copyright Scott Adams, Inc./Distributed by Universal Uclick for UFS
To Tweet about this post, click the Tweet icon below to launch Twitter, then click its Tweet icon to post.
Check out TechSavvy.Life for their blog posts on smartphone apps, PCs. and Macs!
First, open the Photos app. Browse your photos until you find the Live Photo you would like to work on. Tap it to view it in detail. Now, tap the Edit button in the upper-right corner of your screen. Refer to below image:
Accessing the Edit icon
Next, on the Edit screen, tap the Live Photo icon near the bottom of the screen; the one that looks like three concentric circles. See below image:
Accessing the Live Photo icon
Extract an Image
A filmstrip will appear just below the photo. Drag your finger along the filmstrip until you find the image that you would like to extract. You will be making this the Key Photo, or the one you want to visually represent the Live Photo when viewed in the Photos app.
Now, lift your finger from the film strip, then tap the Make Key Photo pop-up. See following image:
Accessing Make Key Photo option
The Key Photo will be set. Next, tap Done to leave the Edit screen. Refer to below image:
Save your changes
When you return to the photo detail screen, notice that the image has changed to the one you selected.
Duplicate the Live Photo
To extract the image while leaving the original Live Photo intact, we are going to duplicate it.
First, tap the Share button which looks like a square with an arrow pointing upward out of it at the bottom left hand corne of your screen. See below image:
Accessing the Share button
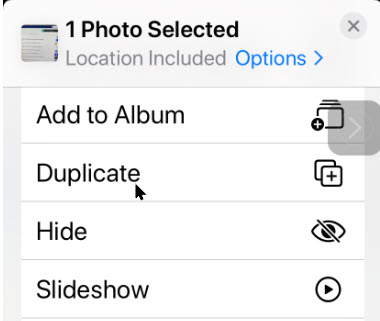
Next, in the Share menu, swipe down and tap Duplicate. See following image:
Accessing the Duplicate option
Next, from the pop-up, tap Duplicate as Still Photo. Refer to below image:
Selecting make a Duplicate as Still Photo
Revert Back to Original
After that, a new duplicate photo of the key frame you picked will appear in your Photos library just beside the original Live Photo.
If you would like, you can also return to your original Live Photo. On the photo, tap Edit again, then tap Revert to restore the Live Photo to its original settings.
The resolution of the extracted photo may not match that of a typical still photo on the iPhone. That’s because you have just extracted a still frame from a video, and Apple devices record video frames at a lower resolution than still photos.
I hope you have found this post helpful. If so, click the Tweet icon below. This will launch Twitter where you click its icon to post the Tweet.
I have found TechSavvy.Life blog posts extremely helpful. Check them out for posts on smart phone apps, Macs and PCs!
Please feel free to leave a comment. I would love hearing from you. Do you have a computer or smart device tech question? I will do my best to answer your inquiry. Please mention the device, app and version that you are using. To help us out, you can send screenshots of your data related to your question.
The author’s Vietnam eBook on the Battle for Tra Bong: Events and Aftermath